Installation Instructions for C & R Heat Exchanger Removal of Factory Unit
|
|
|
- Alexandrina Nelson
- 6 years ago
- Views:
Transcription
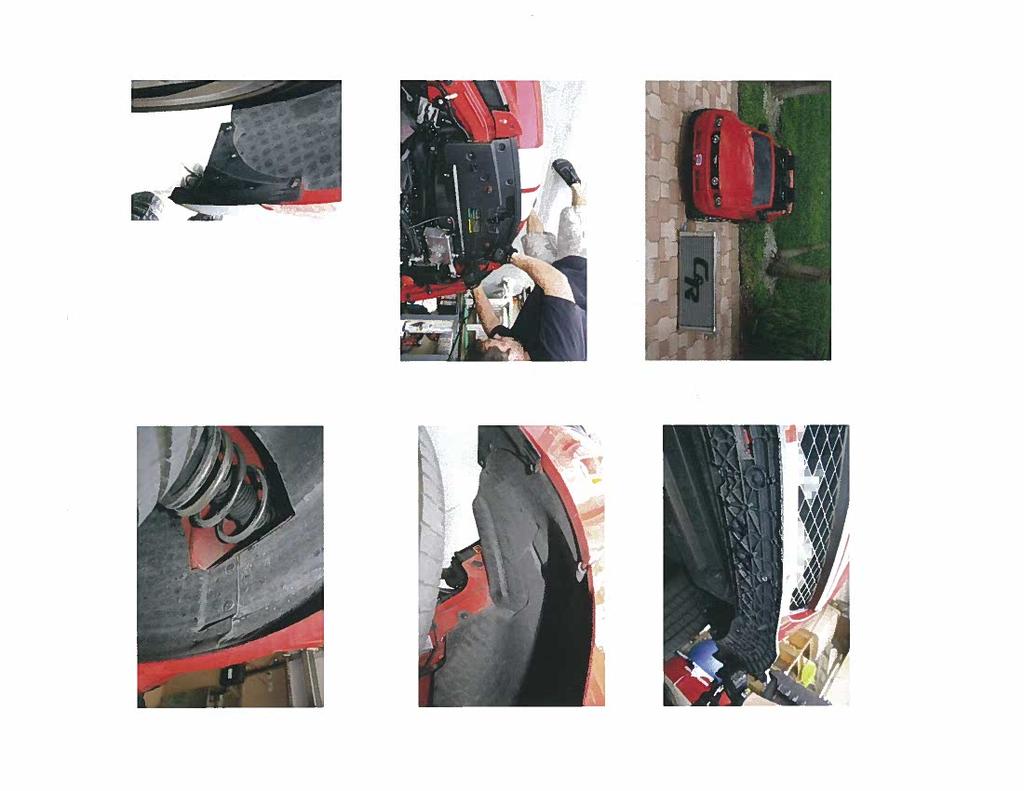
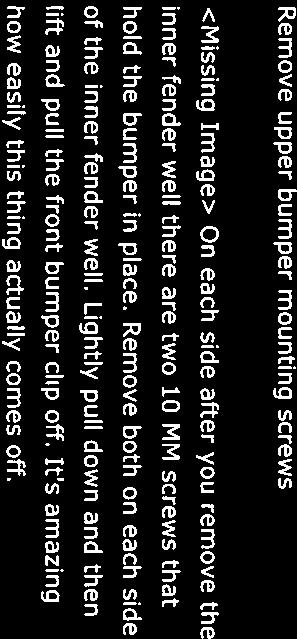
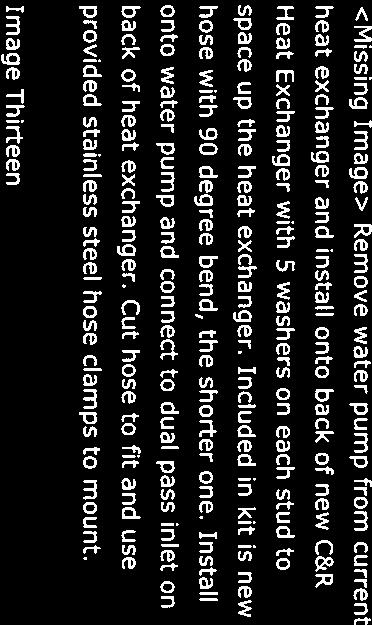
1 Installation Instructions for C & R Heat Exchanger Removal of Factory Unit Remove the 8 clips that retain the upper radiator shroud. Remove the shroud. Remove the coolant tank cap from the heat exchanger coolant tank. Front Bumper Cover Removal Remove the two front wheels and set aside. Remove the 7 screws from the lower splash guard using a 5.5mm socket and remove the splash guard. Remove the 10 bolts from the lower lip air dam using a 10mm socket. Remove the air dam. Remove the 10 screws and clips from the fender well splash guards. Pull the splash guards back from the front bumper and remove completely. Remove the two nuts that retain the front bumper to the front fender on each side. These nuts are located at the very back corners of the bumper and are accessible from inside the fender wells. Unclip the three electrical connectors on each side that attach to the fog lights, turn signals, and parking lamp. Remove two bolts retaining the top of the bumper to the core support. Lift the top ears of the bumper up and over the tabs. Then, slide the whole bumper cover forward and off of the vehicle. Grab the foam bumper core and pull straight out to free the 4 plastic clips. Be careful not to damage the clips or the foam core. Heat Exchanger Removal Drain the coolant from the heat exchanger by removing the lower hose on the passenger side of the stock unit. Remove the 4 nuts that secure the heat exchanger mount to the vehicle s frame. From above, unclip the electrical connector at the factory pump attached to the heat exchanger. Unclamp and remove the hose connecting the pump to the surge tank. Remove the 4 plastic clips attaching the plastic shroud to the heat exchanger. It is recommended at this point that the horns be removed from the vehicle to allow ease of removal of the heat exchanger without damage to the AC condenser. Using a 13mm deep well socket, remove the two bolts closest to center on each side that attach the front bumper to the frame. At this point, the factory heat exchanger and bracket can be lifted up and out of the vehicle. Remove the pump from the factory bracket and remove any hoses connected to it. Installation of C & R Unit C & R Heat Exchanger Installation Install the four supplied 8mm x 50mm long bolts and washers in place of the bolts removed in step 19. Screw them in until they protrude about 3/4 from the opposite side. Using a 1/2 wrench, attach the stock pump in the same orientation as stock to the C&R heat exchanger using the supplied nuts. Connect the supplied 90 o rubber hose between the pump outlet (facing down) and the heat exchanger inlet (90 o tube). Trimming of the hose may be required. Clamp both ends with the supplied hose clamps. Snap the four supplied mounting grommets, washer side toward rear of vehicle, into the mounting holes on the heat exchanger brackets.
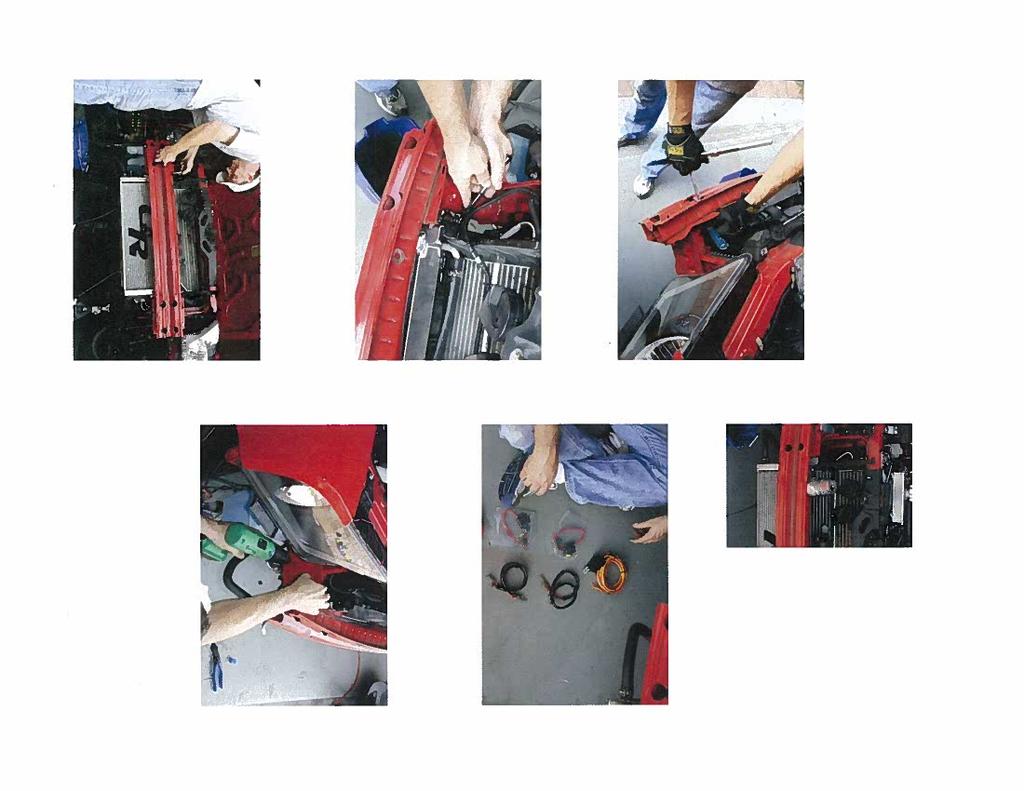
2 Installation Instructions for C & R Heat Exchanger Installation of C & R Unit cont. Slide the heat exchanger up from the bottom and place on the mounting studs. If the pump outlet or hose is too close to the AC condenser, rotate the pump in its rubber hanger until sufficient clearance is obtained. Lubrication of the rubber piece may be required in order to rotate the pump. Finish threading the bolts installed in step 22 completely into the bumper and tighten. Make sure that the washers do not get caught on the lip inside of the bumper and that they are resting flat. Secure the heat exchanger using the four supplied Nylock nuts. The blue grommets should crush approximately 1/16. Do not over tighten the nuts. Install the plastic shroud on the outside of the C & R brackets using the four factory clips. Re-attach the factory hoses to the lower heat exchanger outlet and the pump inlet using the factory clamps. Re-connect the electrical connector to the pump. Secure the wire-loom to the upper hose on the heat exchanger using the supplied wire ties. Verify all bolts, nuts, and hose connections. Fill the system and surge tank using the recommended OEM coolant. Reconnect the negative battery cable, start the vehicle, and allow the car to idle until warm. The heat exchanger pump will not turn on until the air charge is warm. Once the pump turns on, the level in the surge tank will drop rapidly. Continue adding coolant until at the recommended level. This system will hold approximately 1.5 gallons of coolant. Continue to run the vehicle for 5 minutes to verify all air is purged from the system. Check system for leaks while waiting. Once system is checked, install the bumper, splash guards, air dam, and wheels in the reverse of removal. Included in the Installation Kit: 1 - Hose 90* DRVRT 1 - Hose 90* DRVRT-Long 4 - Clamp, Norma thin band (20 x 32mm 9mm band) 4 - Hex Head, M8 x 50 x 1.25 full thread 4 - Nut, Nyloc M8 x 1.25 full hgth. 4 - Washer, M8 id. x 24 mm od. 2 - Hex Head, 5/16-18 x Nut, Nyloc 5/16-18 full hgth. 2 - AN washer, 5/16 thk 4 - Grommet 1 - Ty Rap, 0.091w x 8.00 long 2 - Fan Harness with Relay (use for dual fan install)

3


4


5


6


7

8
SHELBY GT500
 2007-2009 SHELBY GT500 Removal of Factory Unit WARNING: 1. Radiator fluid must be handled properly. Please observe local ordinances with regards to handling and disposal. 2. Allow vehicle and components
IE MK5/MK6 2.0T FSI & TSI FDS INTERCOOLER INSTALL GUIDE PART NUMBER: IETPCB1
 IE MK5/MK6 2.0T FSI & TSI FDS INTERCOOLER INSTALL GUIDE PART NUMBER: IETPCB1 Thank you for purchasing another high quality Integrated Engineering product! This instruction sheet is used for installation
Fitting Instructions. Revo MQB Golf/GTi/Octavia/Leon Intercooler. Recommended Tools. Contents RV581M Dealer installation advised.
 RV581M100100 Recommended Tools Contents No. Description Tools Size Intercooler Torx Bit T25, T30 Bracket Kit llen Key 4, 5 mm Silicone Hoses Socket 7, 10, 16, 19 mm Hose Clamps Flat Head Screwdriver Small,
DewEze Clutch Pump Kit Ford 6.2L Gas, A Pump, Side Port, 2011+
 DewEze Clutch Pump Kit 700512 Ford 6.2L Gas, A Pump, Side Port, 2011+ INSTALLATION INSTRUCTIONS 1. The installation of this kit requires trained decisionmaking concerning clearances, tying components together,
DewEze Clutch Pump Kit Ford 6.2L Gas, A Pump, Side Port, INSTALLATION INSTRUCTIONS 1. The installation of this kit requires trained decis
 DewEze Clutch Pump Kit 700564 Ford 6.2L Gas, A Pump, Side Port, 2014+ INSTALLATION INSTRUCTIONS 1. The installation of this kit requires trained decisionmaking concerning clearances, tying components together,
Part number SP1305. Maintaining your Cold air intake system: Tools required:
 Part number SP1305 2000-03 Honda S2000 4 cyl. 2.0L 2004-06 Honda S2000 4 cyl. 2.2L 1-2 piece cold air intake 1-3 Injen filter (#1014) 1-2 3/4 x 3 silicone step hose (#3040) 1-3 straight hose (#3044) 1-
FRONT MOUNT INTERCOOLER GOLF / JETTA IV 1.8T PART # & P INSTALATION INSTRUCTIONS
 FRONT MOUNT INTERCOOLER GOLF / JETTA IV 1.8T PART # 48.10.90 & 48.10.90P INSTALATION INSTRUCTIONS PART LIST: 1 INTERCOOLER CORE 1 U-BENT TUBE 1 L-SHAPED TUBE 1 INTERCOOLER INLET TUBE 4 M6 NYLOC NUT 3 M6
Application List L Cummins
 1 Discharging & Recharging of the A/C System is required for this install. INTERCOOLER INSTALLATION FOR 2010+ DODGE 6.7L CUMMINS Application List 2010+ 6.7L Cummins 1042530 PLEASE READ ALL INSTRUCTIONS
2015+ SUBARU STI FRONT-MOUNT INTERCOOLER PARTS LIST AND INSTALLATION GUIDE INSTALL DIFFICULTY DISCLAIMER CAUTION INSTALL PROCEDURE TOOLS NEEDED
 PARTS LIST AND PARTS INCLUDED 1PC ALUMINUM INTAKE PIPE 1PC BAR-AND-PLATE INTERCOOLER 1PC STEEL CRASH BAR W/ MOUNTING HARDWARE 2PC HOT-SIDE INTERCOOLER PIPES 2PC COLD-SIDE INTERCOOLER PIPES 1PC BPV FLANGE
TOYOTA TUNDRA 3 BODY LIFT INSTALLATION INSTRUCTIONS 2014 KIT# 5643
 3651 N Highway 89 Chino Valley, AZ 86323 (928) 636-7080 www.p-a-g.net TOYOTA TUNDRA 3 BODY LIFT INSTALLATION INSTRUCTIONS 2014 KIT# 5643 Installation of a Performance Automotive Group body lift kit will
Installation Manual. Model Chassis Code Engine Code Year
 INTERCOOLER KIT NISSAN GT-R R35 (VR38 38DETT) SPEC-R HG TYPE29 Full KIT Installation Manual Please read the Installation Manual before installing. Keep this manual for future reference. Model Chassis Code
APS F-Body Twin Pump Fuel Supply System - APSGMF-FSS/01
 APS F-Body Twin Pump Fuel Supply System - APSGMF-FSS/01 1 Remove the fuel tank from the vehicle in accordance with the factory service manual. 2 Remove the stock fuel pump assembly from the fuel tank in
M-9603-FST FOCUS ST COLD AIR INTAKE KIT INSTALLATION INSTRUCTIONS
 M-9603-FST Please visit www.fordracingparts.com for the most current instruction information.!!! PLEASE READ ALL OF THE FOLLOWING INSTRUCTIONS CAREFULLY PRIOR TO INSTALLATION. AT ANY TIME YOU DO NOT UNDERSTAND
OIL COOLER KIT CHEVY CAMARO 2.0T PARTS LIST AND INSTALLATION GUIDE INSTALL DIFFICULTY DISCLAIMER CAUTION TOOLS NEEDED NOTE INSTALL PROCEDURE
 PARTS LIST AND PARTS INCLUDED 3PC APPLICATION-SPECIFIC MOUNTING BRACKETS 1PC HORN RELOCATION MOUNTING BRACKET 1PC 25-ROW OIL COOLER (SLEEK SILVER OR STEALTH BLACK) 1PC 4'4" STAINLESS STEEL BRAIDED HOSE
PARTS LIST INSTALLATION INSTRUCTIONS PARTS LIST AND INSTALLATION GUIDE INSTALL TIME: 2 HOURS INSTALL DIFFICULTY: 3/5
 PARTS LIST AND PARTS LIST 1PC MISHIMOTO INTERCOOLER 1PC M6 X 1.0 X 20MM FLANGE BOLT 1PC M4 X 0.7 X 12MM BUTTON-HEAD BOLT 1PC M4 LOCK WASHER 1PC MAP SENSOR O-RING 2. Remove the eight pop clips that hold
ADM Performance 6079 Mapleshade Lane Dallas, Texas (214)
") 1) Disconnect Battery Ground 2) Raise front end of Vehicle FAN INSTALL INSTRUCTIONS 3) Remove lower Radiator hose and drain coolant into a pan. (you will reuse coolant later) 4) Remove Air Intake piping
1) Disconnect Battery Ground 2) Raise front end of Vehicle FAN INSTALL INSTRUCTIONS 3) Remove lower Radiator hose and drain coolant into a pan. (you will reuse coolant later) 4) Remove Air Intake piping
Instant Chat off the main page of Or simply call our tech team at
 FRONT MOUNT INTERCOOLER 2015+ WRX 2017-07-07 Thank you for purchasing this PERRIN product for your car! Installation of this product should only be performed by persons experienced with installation of
Installation Manual. Model Chassis Code Engine Code Year
 INTERCOOLER KIT NISSAN GT-R R35 (VR38 38DETT) SPEC-R HG TYPE29 Full KIT Installation Manual Please read the Installation Manual before installing. Keep this manual for future reference. Model Chassis Code
Part number SP Honda Element 2.4L, 4 cyl.
 Part number SP1727 07-08 Honda Element 2.4L, 4 cyl. 1-2 piece cold air intake 1-3 Injen filter (#1017) 1-2.75 straight hose (#3043) 1-3 straight hose (#3044) 1-12 8mm vacuum hose (#3091) 2- Power Bands.312.040
SAFETY THIS PRODUCT IS FOR OFFROAD USE ONLY. ALL LIABILITY FOR INSTALLATION AND USE RESTS WITH THE OWNER.
 SAFETY Your safety and the safety of others is very important. In order to help you make informed decisions about safety, we have provided installation instructions and other information. These instructions
2015+ WRX/STI RADIATOR SHROUD
 2015+ WRX/STI RADIATOR SHROUD Thank you for purchasing this PERRIN product for your car! Installation of this product should only be performed by persons experienced with installation of aftermarket performance
SLP Camaro ZL1 STAGE 2 (625 HP)
") SLP - 2012 Camaro ZL1 STAGE 2 (625 HP) PART #26001 PACKING LIST Before installation, use this check list to make sure all necessary parts have been included. ITEM QTY CHECK PART NUMBER DESCRIPTION 1. 1
SLP - 2012 Camaro ZL1 STAGE 2 (625 HP) PART #26001 PACKING LIST Before installation, use this check list to make sure all necessary parts have been included. ITEM QTY CHECK PART NUMBER DESCRIPTION 1. 1
Procharger Stage II Intercooled Supercharger System (11-14 GT)
") Procharger Stage II Intercooled Supercharger System (11-14 GT) Installation Time: Approximately one day. Installed on 2012 Mustang GT 5.0/Manual Required Tools 3/8 Socket Set (Standard and Metric) 1/2
Procharger Stage II Intercooled Supercharger System (11-14 GT) Installation Time: Approximately one day. Installed on 2012 Mustang GT 5.0/Manual Required Tools 3/8 Socket Set (Standard and Metric) 1/2
PART NUMBER: MAZDA MX-5 L4-2.0L C.A.R.B. E.O. # D MAZDA MX-5 Miata L4-2.0L C.A.R.B. E.O. # D-670-6
 Equipped with AEM Dryflow Filter No Oil Required! INSTALLATION INSTRUCTIONS PART NUMBER:21-640 2006-2008 MAZDA MX-5 L4-2.0L C.A.R.B. E.O. # D-670-6 2006-2009 MAZDA MX-5 Miata L4-2.0L C.A.R.B. E.O. # D-670-6
COLD AIR SYSTEM. Installation Instructions for: Part Number Civic CX/DX/LX
 COLD AIR SYSTEM Installation Instructions for: Part Number 21-413 1996-2000 Civic CX/DX/LX ADVANCED ENGINE MANAGEMENT INC. 2205 126 TH Street, Unit A Hawthorne, CA. 90250 Phone: (310) 484-2322 Fax: (310)
OIL COOLER KIT INSTALLATION INSTRUCTIONS PART NUMBER D
 OIL COOLER KIT INSTALLATION INSTRUCTIONS PART NUMBER D570-0904 APPLICATION: 2011-2012 E90 335i/xi (N55 engine) with BMW standard bumper and with stock oil cooler Congratulations for being selective enough
IMPORTANT: PLEASE RETAIN THIS INSTRUCTION MANUAL FOR FUTURE REFERENCE
 IMPORTANT: PLEASE RETAIN THIS INSTRUCTION MANUAL FOR FUTURE REFERENCE 2009 Toyota RAV-4 Stainless Steel Mesh Grilles L 30 G8P Fine Mesh Part #30-002-09 Quantity Description Part No. Upper Mesh Grille (includes):
Installation instruction do88 Intercooler for SAAB 9-3SS/SC 4-cyl Turbo
 Installation instruction do88 Intercooler for SAAB 9-3SS/SC 4-cyl Turbo This instruction shows how to replace the OEM intercooler with this performance intercooler. 1. 4. 5. At this type of installation
SAFETY THIS PRODUCT IS FOR OFFROAD USE ONLY. ALL LIABILITY FOR INSTALLATION AND USE RESTS WITH THE OWNER.
 SAFETY Your safety and the safety of others is very important. In order to help you make informed decisions about safety, we have provided installation instructions and other information. These instructions
APIKOL Ur-S4/S6 Gen. II Front Mount Intercooler INSTALLATION INSTRUCTIONS
 APIKOL Ur-S4/S6 Gen. II Front Mount Intercooler INSTALLATION INSTRUCTIONS Only work underneath your vehicle after properly supporting it with adequate jack stands on a flat surface. NEVER work under a
Mazda 3 & Mazdaspeed 3 Oil Cooler Installation Instructions
 Page1 2007-2009 Mazda 3 & Mazdaspeed 3 Oil Cooler Installation Instructions Tooling: Jack and jack stands or a lift Socket wrench and torque wrench 10mm and 14mm sockets 3/16 Allen wrench 10mm wrench Pliers
READ AND UNDERSTAND ALL INSTRUCTIONS AND WARNINGS PRIOR TO INSTALLATION OF SYSTEM AND OPERATION OF VEHICLE.
 #9378 Installation Instructions 3 Body Lift Kit 1998-2000 Ranger READ AND UNDERSTAND ALL INSTRUCTIONS AND WARNINGS PRIOR TO INSTALLATION OF SYSTEM AND OPERATION OF VEHICLE. SAFETY WARNING BDS Suspension
INSTALLATION INSTRUCTIONS CATCH CAN KIT
 INSTALLATION INSTRUCTIONS CATCH CAN KIT FORD FOCUS Document: 19-0150 Support: info@radiumauto.com STEPS 1 TO 19 COVER THE PCV SIDE CATCH CAN KIT (P/N: 20-0315) STEPS 20-32 COVER THE CRANKCASE CATCH CAN
Installation instruction do88 Intercooler for Volvo S60 V70 XC70 S80 Turbo 00-09
 Installation instruction do88 Intercooler for Volvo S60 V70 XC70 S80 Turbo 00-09 1. This instruction shows how to replace the OEM intercooler with our performance intercooler. At this type of installation
SDHQ F-150 Winch Mount System Installation
 SDHQ 2015+ F-150 Winch Mount System Installation Recommended Tools: Door panel removal tool Needle Nose Pliers 10mm Socket or Wrench 13 mm or ½ Socket (⅜ Drive) 14 mm or 9/16 Socket (⅜ Drive) 21 mm or
Installation Instructions MX-5 Dual Air Horns
 440 Rutherford St. P.O. Box 847 Goleta, CA 93117 1-800-667-7872 FAX 805-692-2525 www.mossmotors.com Tools required: Phillips screwdriver, 8mm, 10mm and 21mm sockets, 8mm and 10mm combination wrenches,
P3066 INSTALLATION MANUAL
 P3066 INSTALLATION MANUAL Parts List 1 Grille guard 1 Driver / left frame bracket Level of Difficulty Moderate Scan for helpful install tips 1 Passenger / right frame bracket 1 Driver / left top bracket
3.4L V6 SUPERCHARGER 7 TH INJECTOR KIT
 Part Number: 00602-17620-260 00602-17620-261 00602-17620-263 00602-17620-264 00602-17620-274 00602-17620-275 00602-17620-276 Section I Installation Preparation Kit Contents Item # Quantity Reqd. Description
Part number RD1306. Maintaining your Cold air intake system: Tools required:
 Part number RD1306 06-07 Honda S2000 4 cyl. 2.2L 1-2 piece cold air intake 1-3 Injen filter (#1014) 1-2 3/4 x 3 silicone step hose (#3040) 1-3 straight hose (#3044) 4- Power-bands.362.048 (#4004) 1-1525
SAFETY THIS PRODUCT IS FOR OFFROAD USE ONLY. ALL LIABILITY FOR INSTALLATION AND USE RESTS WITH THE OWNER.
 SAFETY Your safety and the safety of others is very important. In order to help you make informed decisions about safety, we have provided installation instructions and other information. These instructions
Part Number: H451SAL000 Description: Fog Light Kit, Legacy
 Kit Contents A Part Number: H451SAL000 B C D Fog Lights, Driver: 1 Passenger: 1 Cover, Passenger: 1 Cover, Driver: 1 Relay: 1 E F G H Switch: 1 Tools Required Clip: 2 J-Nut: 2 Bolt: 2 10mm, 12mm Nylon
OIL COOLER KIT INSTALLATION INSTRUCTIONS PART NUMBER D E92 335i/xi (N55 engine) with BMW Standard bumper and with stock oil cooler
 with BMW Standard bumper and with stock oil cooler") OIL COOLER KIT INSTALLATION INSTRUCTIONS PART NUMBER D570-0924 APPLICATION: 2011-12 E92 335i/xi (N55 engine) with BMW Standard bumper and with stock oil cooler Congratulations for being selective enough
OIL COOLER KIT INSTALLATION INSTRUCTIONS PART NUMBER D570-0924 APPLICATION: 2011-12 E92 335i/xi (N55 engine) with BMW Standard bumper and with stock oil cooler Congratulations for being selective enough
Fig A. Addictive Desert Designs. Preparation: Removal:
 Preparation: Disconnect the negative battery terminal. Park the vehicle on level ground and set the emergency brake. We recommend reading through the installation instructions in whole before performing
INFINITI Q50/Q60 Red Alpha Heat Exchanger
 INFINITI Q50/Q60 Red Alpha Heat Exchanger Whether you live in a hot climate region, enjoy racing, or long high speed pulls the INFINITI Q60/Q50 Red Alpha Heat Exchanger will help keep your intake temps
INSTALLATION INSTRUCTIONS PART NUMBER:
 Equipped with AEM Dryflow Filter No Oil Required! INSTALLATION INSTRUCTIONS PART NUMBER: 21-450B (Blue Finish) 21-450C (Gun Metal Grey Finish) 21-450P (Vacuum Metalized Chrome-VMC) 21-450R (Red Finish)
Equipped with AEM Dryflow Filter No Oil Required! INSTALLATION INSTRUCTIONS PART NUMBER C (GUN METAL GRAY FINISH) NISSAN SENTRA 1.
 NISSAN SENTRA 1.") Equipped with AEM Dryflow Filter No Oil Required! INSTALLATION INSTRUCTIONS PART NUMBER 21-799C (GUN METAL GRAY FINISH) 2014-16 NISSAN SENTRA 1.8L 1 ITEM NO. PART NUMBER DESCRIPTION QTY. 1 21-2157D AIR
Equipped with AEM Dryflow Filter No Oil Required! INSTALLATION INSTRUCTIONS PART NUMBER 21-799C (GUN METAL GRAY FINISH) 2014-16 NISSAN SENTRA 1.8L 1 ITEM NO. PART NUMBER DESCRIPTION QTY. 1 21-2157D AIR
INSTALLATION INSTRUCTIONS
 INSTALLATION INSTRUCTIONS Accessory Application Publications No. AIR CONDITIONER CIVIC 2- AND 4-DOOR AII 24158 Issue Date SEP 2002 What s New The installation instructions for the 2003 Civic A/C are the
BD TrackMaster S D o d g e H P C R Installation Instructions
 7 July 2016 PN#1045701, 1045702, 1045704 Dodge 6.7L TMS400 (I-00361) 1 BD TrackMaster S400 2008-2012 D o d g e H P C R Installation Instructions 1045701 2008-2009 Dodge 6.7L TMS400 1045702 2010-2012 Dodge
Installation Manual Volvo C30 T5 Front Mount Intercooler System
 Installation Manual Volvo C30 T5 Front Mount System Volvo C30 T5 System / Installation Manual i C Contents Important Information i Parts List i Required Tools and Materials 1 1.0 - Vehicle Preparation
HAVING INSTALLATION QUESTIONS? CALL TECHNICAL SUPPORT AT
 9/23/2009 1 of 6 ITEM 1 QTY 8 Parts List PART NUMBER DESCRIPTION 3/8" CONICAL TOOTHED WASHER TOOLS REQUIRED #2 PHILLIPS SCREWDRIVER #2 STUBBY SCREWDRIVER 8mm SOCKET 13mm SOCKET RATCHET 12" EXTENSION TORQUE
ITEM QTY CHECK PART NUMBER DESCRIPTION
 PART #21128 2010 Camaro Cold Air Induction Stage II PACKING LIST Before installation, use this check list to make sure all necessary parts have been included. ITEM QTY CHECK PART NUMBER DESCRIPTION 1.
OIL COOLER KIT INSTALLATION INSTRUCTIONS PART NUMBER D
 OIL COOLER KIT INSTALLATION INSTRUCTIONS PART NUMBER D570-0907 APPLICATION: 2011-12 E90 335i/xi (N55 engine) with BMW M-Technic bumper and without stock oil cooler Congratulations for being selective enough
OIL COOLER KIT INSTALLATION INSTRUCTIONS PART NUMBER D E92 335is (N54 engine) with BMW M-Technic bumper and with stock oil cooler
 with BMW M-Technic bumper and with stock oil cooler") OIL COOLER KIT INSTALLATION INSTRUCTIONS PART NUMBER D570-0923 APPLICATION: 2011 E92 335is (N54 engine) with BMW M-Technic bumper and with stock oil cooler Congratulations for being selective enough to
OIL COOLER KIT INSTALLATION INSTRUCTIONS PART NUMBER D570-0923 APPLICATION: 2011 E92 335is (N54 engine) with BMW M-Technic bumper and with stock oil cooler Congratulations for being selective enough to
MAZDASPEED3 Intercooler Instructions
 MAZDASPEED3 Intercooler Instructions Congratulations on your purchase of the COBB Tuning Front Mount Intercooler System for your 2007-2009 Mazdaspeed3. The following instructions should assist you through
Depress each tab as you pull the bezel off. The bezels are tight. L.H. shown.
 2013-2014 Ford Mustang V6 & Boss 302 Lower Valance Fog Light Kit Parts List: Quantity: Tool List: Fog light & bulb with bracket 2 Flat head & Phillips screwdriver Black bezels 2 Ratchet & Socket set OR
Installation Instructions for Chevrolet Colorado, GMC Canyon, LT, Z71, With Factory Fog Lights
 Installation Instructions for 2015-2018 Chevrolet Colorado, GMC Canyon, LT, Z71, With Factory Fog Lights This kit is designed to allow use of your factory fog light operation along with an addition auxiliary
Equipped with AEM Dryflow Filter No Oil Required! INSTALLATION INSTRUCTIONS PART NUMBER DS (GUN METAL GRAY FINISH)
") Equipped with AEM Dryflow Filter No Oil Required! INSTALLATION INSTRUCTIONS PART NUMBER 21-823DS (GUN METAL GRAY FINISH) 1 ITEM NO. PART NUMBER DESCRIPTION QTY. 1 21-202DOSK AIR FILTER; OFFSET 2.75" X
Equipped with AEM Dryflow Filter No Oil Required! INSTALLATION INSTRUCTIONS PART NUMBER 21-823DS (GUN METAL GRAY FINISH) 1 ITEM NO. PART NUMBER DESCRIPTION QTY. 1 21-202DOSK AIR FILTER; OFFSET 2.75" X
Fig A ADDICTIVE DESERT DESIGNS. Preparation: Removal:
 Preparation: Disconnect the negative battery terminal. Park the vehicle on level ground and set the emergency brake. We recommend reading through the installation instructions in whole before performing
96-04 tt. Hellion Power Systems Mustang Twin Turbo Kit Instructions
 96-04 tt Hellion Power Systems 1996-2004 Mustang Twin Turbo Kit Instructions 1. Disconnect battery and elevate front end of car on either Jack stands or a lift if available 2.Lock steering wheel and remove
INSTALLATION INSTRUCTIONS ELEVATION FRONT BUMPER DODGE RAM
 INSTALLATION INSTRUCTIONS PARTS LIST: 1 Elevation Bumper Assembly 24 12mm x 37mm OD x 3mm Flat Washers 2 Frame Mounting Brackets 12 12mm Nylon Lock Nuts 8 12-1.75mm x 50mm Hex Bolts 2 License Plate Mounting
4 December 2017 PN# , , Dodge 6.7L Rumble B SXE (I-00400) 1. BD Rumble B SXE. D o d g e 6. 7 L H P C R Installation Instructions
 1. BD Rumble B SXE. D o d g e 6. 7 L H P C R Installation Instructions") 4 December 2017 PN#1045705, 1045706, 1045708 Dodge 6.7L Rumble B SXE (I-00400) 1 DOWNLOAD ENHANCED INSTALL MANUALS AT dieselperformance.com BD Rumble B SXE D o d g e 6. 7 L H P C R Installation Instructions
4 December 2017 PN#1045705, 1045706, 1045708 Dodge 6.7L Rumble B SXE (I-00400) 1 DOWNLOAD ENHANCED INSTALL MANUALS AT dieselperformance.com BD Rumble B SXE D o d g e 6. 7 L H P C R Installation Instructions
Equipped with AEM Dryflow Filter No Oil Required! INSTALLATION INSTRUCTIONS
 Equipped with AEM Dryflow Filter No Oil Required! INSTALLATION INSTRUCTIONS PART NUMBER: 21-8030 2009-2010 CADILLAC Escalade V8-6.2L SEE * NOTE 2009-2010 CHEVROLET Avalanche V8-5.3L SEE * NOTE 2009 CHEVROLET
INSTALLATION INSTRUCTIONS PART NUMBER:21-729
 Equipped with AEM Dryflow Filter No Oil Required! INSTALLATION INSTRUCTIONS PART NUMBER:21-729 2010-2013 MAZDA MX-5 MIATA 2.0L I-4 PARTS LIST Description Qty. Part Number A Tube, Lower Intake, 2006-13
2016+ FORD FOCUS RS PERFORMANCE AIR INTAKE PARTS LIST AND INSTALLATION GUIDE PARTS INCLUDED INSTALL PROCEDURE TOOLS NEEDED
 PARTS LIST AND PARTS INCLUDED 1PC ALUMINUM INTAKE PIPE W/ CNC-MACHINED MAP SECTION 1PC AIRBOX W/ PROTECTIVE EDGING 1PC HIGH-FLOW OILED FILTER 1PC SILICONE TURBO INLET HOSE 2PC WORM-GEAR CLAMPS MOUNTING
INSTALLATION INSTRUCTIONS CATCH CAN KIT
 INSTALLATION INSTRUCTIONS CATCH CAN KIT FORD FOCUS Document: 19-0150 Support: info@radiumauto.com STEPS 1 TO 19 COVER THE PCV CATCH CAN KIT (P/N: 20-0315) STEPS 20-32 COVER THE CRANKCASE CATCH CAN KIT
IAG Street Series Air / Oil Separator (AOS) For 2017 WRX
 For 2017 WRX") P IAG Street Series Air / Oil Separator (AOS) For 2017 WRX Part# IAG-ENG-7152 Tools Required: Ratchet, torque wrench, extensions, needle nose pliers, hose cutter, snips/scissors, flathead screwdriver,
P IAG Street Series Air / Oil Separator (AOS) For 2017 WRX Part# IAG-ENG-7152 Tools Required: Ratchet, torque wrench, extensions, needle nose pliers, hose cutter, snips/scissors, flathead screwdriver,
BLACKBIRD INSTALLATION SUPPLEMENT
 BLACKBIRD INSTALLATION SUPPLEMENT FOR 2003-7 FORD 6.0 LITER DIESEL F-SERIES DUAL ALTERNATOR VERSION 10/07 Blackbird Installation Supplement for Ford 6.0. Liter Dual Alternator Parts included in the 6.0
SAFETY SENSORS FIELD OF VIEW WILL BE ALTERED WITH USE OF THE REPLACEMENT BUMPER. Injury hazard
 SAFETY Your safety and the safety of others is very important. In order to help you make informed decisions about safety, we have provided installation instructions and other information. These instructions
INSTALLATION INSTRUCTIONS FORD F-150 2WD & 4WD RETAINS FACTORY TOW HOOKS PART #P3063
 INSTALLATION INSTRUCTIONS FORD F-150 2WD & 4WD RETAINS FACTORY TOW HOOKS PART #P3063 PARTS LIST: 1 Grille Guard 2 10-1.5mm Nylon Lock Nuts 1 Driver/Left Frame Mounting Bracket 4 12mm Plastic Washers 1
Installation Instructions for Lingenfelter GM 2500 Suburban & Yukon XL Auxiliary Fan System (with ECM controlled fan output)
") Installation Instructions for Lingenfelter 2007-2013 GM 2500 Suburban & Yukon XL Auxiliary Fan System (with ECM controlled fan output) PN L300090607 Revision - 1.1 Lingenfelter Performance Engineering
Installation Instructions for Lingenfelter 2007-2013 GM 2500 Suburban & Yukon XL Auxiliary Fan System (with ECM controlled fan output) PN L300090607 Revision - 1.1 Lingenfelter Performance Engineering
Equipped with AEM Dryflow Filter No Oil Required! INSTALLATION INSTRUCTIONS PART NUMBER: DS (Plastic Intake Tube)
") Equipped with AEM Dryflow Filter No Oil Required! INSTALLATION INSTRUCTIONS PART NUMBER:21-8126DS (Plastic Intake Tube) 2011-2014 Ford F150 V6 3.5L ECOBOOST C.A.R.B. E.O. D-670-19 AEM Induction Systems
Equipped with AEM Dryflow Filter No Oil Required! INSTALLATION INSTRUCTIONS PART NUMBER:21-8126DS (Plastic Intake Tube) 2011-2014 Ford F150 V6 3.5L ECOBOOST C.A.R.B. E.O. D-670-19 AEM Induction Systems
Owner smanual. Banks Techni-Cooler System Dodge 6.7L Cummins (24-valve) ISB Pickup Trucks (2500/3500) USE WITH SYSTEM P/N 25987
 ISB Pickup Trucks (2500/3500) USE WITH SYSTEM P/N 25987") Owner smanual with Installation Instructions Banks Techni-Cooler System 2013-16 Dodge 6.7L Cummins (24-valve) ISB Pickup Trucks (2500/3500) USE WITH SYSTEM P/N 25987 Gale Banks Engineering 546 Duggan Avenue
Owner smanual with Installation Instructions Banks Techni-Cooler System 2013-16 Dodge 6.7L Cummins (24-valve) ISB Pickup Trucks (2500/3500) USE WITH SYSTEM P/N 25987 Gale Banks Engineering 546 Duggan Avenue
2016 Camaro Header Installation
 TEXAS-SPEED.COM 2016 Camaro Header Installation Tools 8mm Socket 11mm Socket 5/8 Spark Plug Socket T15, T35 Torx Bit 5mm Allen Bit 10mm Socket and Wrench 11mm Socket and Wrench 3/8 Drive Ratchet, Torque
2014+ FORD FIESTA ST DIRECT-FIT OIL COOLER KIT PARTS LIST AND INSTALLATION GUIDE CAUTION PARTS INCLUDED NOTE TOOLS NEEDED INSTALL PROCEDURE
 PARTS LIST AND PARTS INCLUDED 3PC APPLICATION-SPECIFIC MOUNTING BRACKETS & SPACER 1PC 19-ROW OIL COOLER 1PC 4 ', X 1'' BRAIDED HOSE W/90-10AN FITTINGS 1PC 3'' X 2.5 '' BRAIDED HOSE W/45 AND 90-10AN FITTINGS
PowerMax Diesel Upgrade For Cummins Engines
 PowerMax Diesel Upgrade For Cummins Engines 00.5-007.5 Dodge Ram With Cummins 5.9L Item 3 4 5 6 7 8 9 0 3 4 5 6 7 8 Parts List Description Turbocharger Ancillary kit 773069- (includes) Installation Instructions
SS41HF Mitsubishi Pajero NS & NT V8/V9 Series 3.2 Litre Turbo Diesel (4M41 Engine) 3.8 Litre V6 Petrol (6G76 Engine)
 3.8 Litre V6 Petrol (6G76 Engine)") SS41HF Mitsubishi Pajero NS & NT V8/V9 Series 3.2 Litre Turbo Diesel (4M41 Engine) 3.8 Litre V6 Petrol (6G76 Engine) 21/7/2010 Parts List ITEM PART NO DESCRIPTION QTY 1 570-133-200 BODY - SNORKEL (SS41HF)
SS41HF Mitsubishi Pajero NS & NT V8/V9 Series 3.2 Litre Turbo Diesel (4M41 Engine) 3.8 Litre V6 Petrol (6G76 Engine) 21/7/2010 Parts List ITEM PART NO DESCRIPTION QTY 1 570-133-200 BODY - SNORKEL (SS41HF)
OIL COOLER KIT INSTALLATION INSTRUCTIONS PART NUMBER D E92 335i/xi (N55 engine) with M-Technic bumper and without stock oil cooler
 with M-Technic bumper and without stock oil cooler") OIL COOLER KIT INSTALLATION INSTRUCTIONS PART NUMBER D570-0925 APPLICATION 2011-12 E92 335i/xi (N55 engine) with M-Technic bumper and without stock oil cooler Congratulations for being selective enough
OIL COOLER KIT INSTALLATION INSTRUCTIONS PART NUMBER D570-0925 APPLICATION 2011-12 E92 335i/xi (N55 engine) with M-Technic bumper and without stock oil cooler Congratulations for being selective enough
BHW Engine Coolant Temperature Replacement
 BHW Engine Coolant Temperature Replacement NEVER perform this procedure on a hot engine. Parts: 059 919 501 A dual temperature sensor 032 121 142 retaining spring N 903 168 02 sensor round seal N 905 216
INSTALLATION INSTRUCTIONS 97 FORD EXPEDITION
 INSTALLATION INSTRUCTIONS 97 FORD EXPEDITION 1. Read the instructions completely and carefully before you begin. Check the kit for proper contents (refer to the part s list and the picture diagrams). Before
MINI COOPER HAVING INSTALLATION QUESTIONS? CALL TECHNICAL SUPPORT AT DESIGNED FOR USE WITH BALL MOUNT # D-19 / 45519
 10/8/2012 PAGE 1 of 6 ITEM 1 QTY 8 Parts List PART NUMBER DESCRIPTION 3/8" CONICAL TOOTHED WASHER TOOLS REQUIRED RATCHET TORQUE WRENCH 12" EXTENSION 12mm SOCKET 8mm SOCKET OFFSET SCREWDRIVER FLAT BLADE
INSTALLATION INSTRUCTIONS PART NUMBER:
 Equipped with AEM Dryflow Filter No Oil Required! INSTALLATION INSTRUCTIONS PART NUMBER: 21-518B (Blue Finish) 21-518C (Gun Metal Grey Finish) 21-518P (Vacuum Metalized Chrome-VMC) 21-518R (Red Finish)
* PLEASE READ INSTRUCTIONS PRIOR TO INSTALLATION *
 XDP Duramax LBZ EGR Race Track Kit Item Number: XD165 PACKING LIST: 1 LBZ EGR Plate for Up Pipe 5 M8x1.25-20mm Bolt 2 M10x1.5 Flange Hex Nut 1 LBZ EGR Plate for Intake 1 M8x1.25-45mm Bolt 1 M8x1.25 Flange
INSTALLATION INSTRUCTIONS
 INSTALLATION INSTRUCTIONS 2011 Dodge Charger Road Defender 5000 Series Push Bumper Part Number 5076 Do not attempt to install this product on any vehicle other than the one it is designed for and listed
INSTALLATION INSTRUCTIONS CATCH CAN KIT
 INSTALLATION INSTRUCTIONS CATCH CAN KIT FORD FOCUS Document: 19-0150 Support: info@radiumauto.com STEPS 1-19 COVER THE PCV SIDE CATCH CAN KIT (P/N: 20-0315) STEPS 20-32 COVER THE CRANKCASE CATCH CAN KIT
Installation instruction do88 Intercooler for SAAB 9-3 1,9 TTiD
 Installation instruction do88 Intercooler for SAAB 9-3 1,9 TTiD This instruction shows how to replace the OEM intercooler with this performance intercooler. At this type of installation we always recommend
1997 Volvo 850 GLT. Fig. 2: Removing Drive Shaft, Engine Mount Bolt & Torque Arm (5-Cylinder) Courtesy of VOLVO CARS OF NORTH AMERICA.
 Courtesy of VOLVO CARS OF NORTH AMERICA.") Fig. 2: Removing Drive Shaft, Engine Mount Bolt & Torque Arm (5-Cylinder) 4. Remove front exhaust pipe nuts and springs. Remove front exhaust pipe bolts. Disconnect speedometer. Remove engine mounting
Fig. 2: Removing Drive Shaft, Engine Mount Bolt & Torque Arm (5-Cylinder) 4. Remove front exhaust pipe nuts and springs. Remove front exhaust pipe bolts. Disconnect speedometer. Remove engine mounting
This information covers the proper procedure for replacing the Volvo D16F engine in a VT or VNL chassis.
 Volvo Trucks North America Greensboro, NC USA Engine, Replacement DService Bulletin Trucks Date Group No. Page 10.2007 210 139 1(47) Engine, Replacement Volvo D16F VNL, VT W2005773 This information covers
Muncie Power Products
 Muncie Power Products CMKF08-6400-P8-AC 2008-2010 Ford F-250-550 6.4L Diesel W-WO/AC, WO/Dual Alt. WO/Vacuum Pump INSTALLATION NOTES 1. Using a 8mm socket or wrench, disconnect the negative battery cables
Vortech Charge Air Cooler
 NOT ALL BOOST I S C R E AT E D E Q U A L Vortech Charge Air Cooler Installation Instructions 2013-2014 Ford Focus ST* P/N: 8N310-020 * Legal in California only for racing vehicles which may never be used
2017+ L5P Duramax 3 ½ Down Pipe & EGR Fix Kit
 2017+ L5P Duramax 3 ½ Down Pipe & EGR Fix Kit Covers installation of PN s: WCF100630, WCF100829 Note: This Kit is for off road competition use only! Off Road Competition Use Tuning & Exhaust System is
»Product» Safety Warning
 Read and understand all instructions and warnings prior to installation of product and operation of vehicle. 1. Zone Offroad Products recommends this system be installed by a professional technician. In
Owner smanual. Banks Techni-Cooler Intercooler System L I-6 Jeep Wrangler. with Installation Instructions
 Owner smanual with Installation Instructions Banks Techni-Cooler Intercooler System 1999-2006 4.0L I-6 Jeep Wrangler THIS MANUAL IS FOR USE WITH SYSTEMS: 1999-2004 WRANGLER - SYSTEM 25400, 2005-2006 WRANGLER
Part number SP Hyundai genesis 2.0L turbo 4 cyl.
 Part number SP1386 2010 Hyundai genesis 2.0L turbo 4 cyl. 1-1 piece Cold air intake system 1-3 1/2 Injen/AMSOIL Ea nano-fiber Performance Dry Filter (#1021) 1-1 1/8 x 3 long str. hose (#3109) 1-7 -10mm
Integrated Engineering MK7/MQB TSI GEN 3 FDS Intercooler Install. Part Number IETPCI1
 Integrated Engineering MK7/MQB TSI GEN 3 FDS Intercooler Install Part Number IETPCI1 Thank you for purchasing another high quality Integrated Engineering product! This instruction guide is used for installation
09-12 Dodge 4WD /4 Body Lift
 92RC80000 09-12 Dodge 4WD 1500 1 1/4 Body Lift Thank you for choosing Rough Country for all your suspension needs. Rough Country recommends a certified technician install this kit. Attempts to install
Intake Installation Instructions P/N 9046 (red filter) - P/N 9046B (blue filter) P/N 9046K (black filter)
 - P/N 9046B (blue filter) P/N 9046K (black filter)") Intake Installation Instructions P/N 9046 (red filter) - P/N 9046B (blue filter) P/N 9046K (black filter) Year/Make/Model/Engine 2012-17 Ford Focus 2.0L Parts List 1- Intake tube 1- Heat shield, Side 1-
Intake Installation Instructions P/N 9046 (red filter) - P/N 9046B (blue filter) P/N 9046K (black filter) Year/Make/Model/Engine 2012-17 Ford Focus 2.0L Parts List 1- Intake tube 1- Heat shield, Side 1-
Read and understand all instructions and warnings prior to installation of product and operation of vehicle.
 #F9378 Installation Instructions 1998-2000 Ford Ranger 3" Body Lift Kit Read and understand all instructions and warnings prior to installation of product and operation of vehicle. Zone Offroad Products
CHEVY COLORADO GMC CANYON BODY LIFT INSTALLATION INSTRUCTIONS KIT # 10153
 CHEVY COLORADO GMC CANYON BODY LIFT INSTALLATION INSTRUCTIONS 2004-2005 3 KIT # 10153 Installation of a Performance Automotive Group body lift kit will change the vehicle s center of gravity and handling
Front Bumper Installation Instructions
 Front Bumper Installation Instructions 1) Remove the factory bumper, air dam, and frame cover (optional). A) Remove the air dam by pulling on the plastic clips holding it in place with a set of pliers.
TyrolSport UGSMIC Install Instructions for Audi A4.
 TyrolSport UGSMIC Install Instructions for Audi A4. Tools Necessary: Torx T25, T45. 10mm socket and ratchet. 6mm hex wrench. Flat blade screwdriver. Hacksaw blade or die grinder or dremel tool. Drill (not