Fitting Instructions. Revo MQB Golf/GTi/Octavia/Leon Intercooler. Recommended Tools. Contents RV581M Dealer installation advised.
|
|
|
- Bertram Murphy
- 5 years ago
- Views:
Transcription

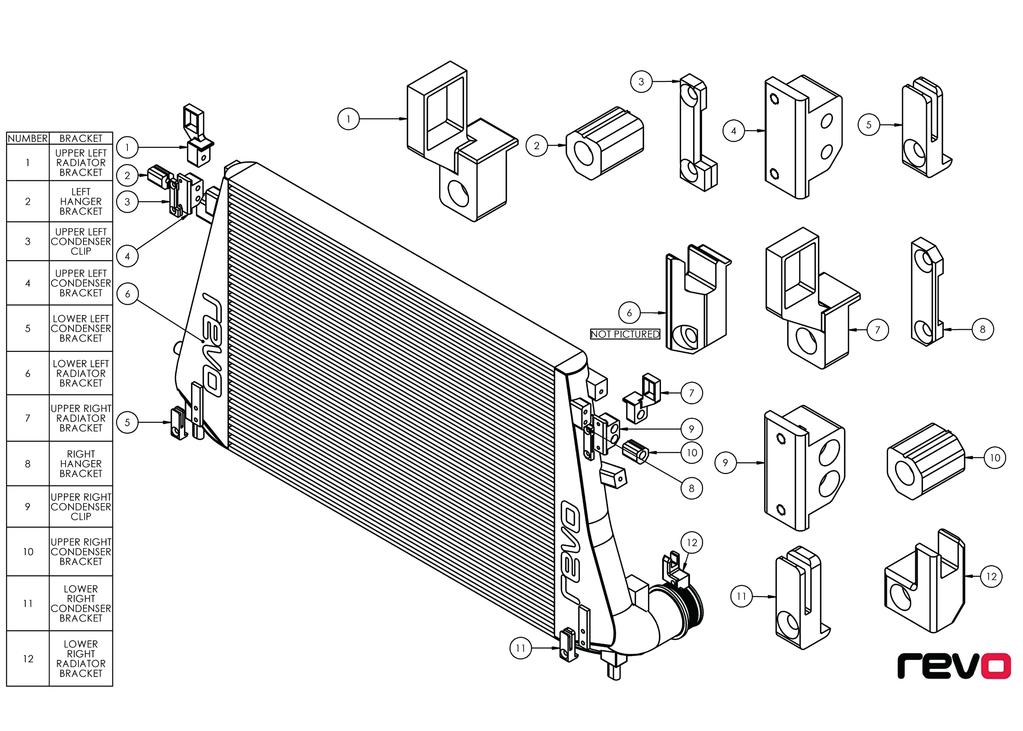
1 RV581M Recommended Tools Contents No. Description Tools Size Intercooler Torx Bit T25, T30 Bracket Kit llen Key 4, 5 mm Silicone Hoses Socket 7, 10, 16, 19 mm Hose Clamps Flat Head Screwdriver Small, Medium Ball Peen End Hammer VG Lug Bolt Cap Removal Tool Hydraulic Jack / Jack Stand Vehicle Lift / x4 Jack Stands Before starting, please ensure that the battery is disconnected and you have ensured the engine is cool. Engine temperatures can remain high for a substantial amount of time after use.

. Free the housing from the headlight bracket and set the bracket aside.")


2 1 Open hood and remove x2 T25 Torx screws from grille shroud () Remove front intake section and airbox. Remove the x3 T30 Torx bolts from the black headlight brackets on both sides of the vehicle. On the washer fluid filler neck up, depress the white tab and lift the neck up to remove it from the headlight bracket. 5 Flip the headlight bracket over and use plyers to carefully depress the hood latch housing clips (). Free the housing from the headlight bracket and set the bracket aside. 5 6 pply pressure to the top and bottom housing shells to disengage the slotted coupling and allow top black cover to be opened (). Remove the black latch sheathing and ballend from the housing and separate the hood latch connection. 7 Securely raise the vehicle on a lift on jack stands to allow access to the underside of the vehicle. 8 9 Remove the front wheels and the x8 T25 Torx screws that secure the splash pan to the plastic wheel well surrounds and bottom of the bumper. R models only: Unplug the headlight washer feed at the bottom of the washer reservoir. Note this will drain all of the washer fluid in the reservoir. Free the corrugated washer fluid hose from the metal routing clips to allow the hose end to move with the bumper cover. Underneath the vehicle, remove the x2 (x4 total) T25 Torx screws that secure the bottom of the wheel well liner to the bumper on each side Remove the x6 T25 Torx screws () that secure the bottom half of the wheel well liner to the chassis/bumper. lso remove the x1 T25 Torx screw (B) that secures the top of the bumper to the fender. Repeat this process on the opposite wheel well of the vehicle. If applicable, unplug the fog light () on each side of the vehicle. Remove both OE boost hoses Locate the radiator fan plug on the right frame rail within the engine bay. Carefully remove the plug assembly and tuck both connectors out of the workspace. 14 Using a 10mm deepwell socket, remove the x2 plastic nuts (metal on R models) from inside the top corner of each bumper cover (x4 total). 15 Using a 10mm deepwell socket, remove the x2 plastic nuts (metal on R models) from inside the top corner of each bumper cover (x4 total) and pull the top of each corner until separated from the fender clips. Remove the bumper. R models only: Unplug the main parking sensor harness in the right hand side of the bumper.


3 16 17 Unplug the headlight harness on both headlights (B). lso remove the x1 harness routing clip () on headlight wiring harness. Unplug the coolant temperature sensor located on the plastic sensor provision on the radiator outlet. This sensor is located on the same side as the hood latch sensor Unplug the yellow crash sensor on the same side. B 19 Unplug the horn connections on both sides of the vehicle. 20 Unplug the ambient sensor () located underneath of the metal crash bar. Unclip the ambient sensor harness at the routing points to free the heat exchanger support shroud from the harness Remove the x3 T30 Torx screws that affix the plastic bumper cover holder to the heat exchanger support shroud. Carefully remove the x2 air ducts from the plastic bumper cover holder. 22 Remove the plastic bumper cover holder from the vehicle. 23 Remove the plastic bumper cover holder from the vehicle Remove the x1 T30 Torx from the front of each headlight assembly. Loosen the x1 T30 Torx screw () at the bottom rear of each headlight assembly and carefully remove each headlight assembly. Do not completely remove the screws Unplug the yellow crash sensor on the right side of the heat exchanger support shroud. The black crash sensor does not need to be removed. 27 Remove the x2 nuts from the crash bar studs below the hood latch. R models only: Disconnect the coolant line brackets from the heat exchanger support shroud by removing the x2 T30 Torx screws from the interior of the shroud Using a hydraulic jack or jack stand, support the underside of the radiator/intercooler/condenser/support shroud assembly to allow the crash bar to be removed. Be sure to use foam or cardboard as an insulator between the assembly and the jack pad/jack stand so as not to damage the underside of any of the heat exchangers. 29 Remove the x2 T30 Torx screws () on each side (x4 total) that hold the composite heat exchanger support shroud to the metal crash bar. 30 Carefully remove the crash bar from the vehicle. 31 Remove the x2 T25 Torx screws () that affix the composite intake tray to the heat exchanger support shroud. Carefully lean the heat exchanger shroud forward and remove the intake tray. Set it aside, out of the work area.


4 Carefully remove the air conditioning condenser from the heat exchanger support shroud and set it to the left side of the vehicle. Note the aluminum and flexible refrigerant lines to make sure they do not rub excessively on the frame rail face or become kinked. Free the yellow composite support housings from the composite heat exchanger support shroud. Repeat on the opposite side of the vehicle until the heat exchanger assembly is freed from the heat exchanger support shroud. Remove the yellow composite support housings from the OE intercooler (x1 on each side) and set them aside, out of the work area. Remove the intercooler/radiator assembly along with the heat exchanger support shroud. Depress the composite tabs that affix the top of the radiator to the OE intercooler. Depress the composite tabs that affix the top of the radiator to the OE intercooler. Lift the OE radiator upward to free the radiator tabs from the seats on the OE intercooler. Gently set the radiator on the lower support, ensuring it is not resting on the OE intercooler. Reinstall the x1 T30 Torx screw () loosely at the upper left of the heat exchanger support housing to secure it for OE intercooler removal. With a 4mm and 5mm allen key/ socket, assemble all brackets onto the Revo intercooler loosely except for the left/right upper condenser clips. The left/right hanger brackets can be installed and fully tightened to 5.75 ftlb (69 in.lbs). Ensure these are oriented like the OE intercooler hanger dowels. Follow the assembly pictures for bracket and hardware placement. Tighten all brackets with locating edges onto the Revo intercooler enough so that they cannot spin 360 degrees. Place the OE yellow support housings onto the Revo hanger brackets ensuring that they are facing in the correct direction. The T channel on the housings should face upward. With a 5mm allen key/socket, tighten the upper left/right condenser brackets to 5.75 ftlb (69 in.lbs). Do not install the condenser clips at this time. Place the Revo intercooler with brackets onto the lower stand that currently supports the OE radiator. Lift the radiator up and sit it into the lower radiator brackets on the Revo intercooler, ensuring the composite radiator tabs are sitting inside the Revo lower radiator bracket provisions, not on top of the bracket ()
5 43 Lean the OE radiator toward the Revo intercooler and rotate the upper radiator brackets onto the OE radiator, ensuring the upper composite locking tabs on the OE radiator engage with the Revo brackets. With a 5mm allen key/ socket, tighten the upper and lower radiator brackets to 5.75 ftlb (69 in.lbs). Ensure the lower radiator tabs are fully seated in the Revo lower radiator brackets (i.e. the composite radiator tabs touch the bottom of the bracket bore) Lift the newly installed heat exchanger assembly up and have another person slip the bottom of the heat exchanger support shroud underneath the assembly. Lower the heat exchanger assembly into the shroud and seat the bottom locating dowels on the Revo intercooler into the OE rubber grommets at the bottom of the shroud. Before engaging the OE yellow housing clips into the shroud, reinstall the condenser by placing it in front of the Revo intercooler, sliding the lower condenser ears into the lower Revo condenser brackets and installing the upper left/right condenser clips onto the base brackets. With and 4mm and 5mm allen key/socket, tighten the lower condenser brackets and upper condenser clips to 5.75 ftlb (69 in.lbs). Lean the heat exchanger assembly forward and engage the yellow support housings to the shroud. Ensure that all yellow support clips are fully engaged to the shroud. Reinstall all OE parts. Reinstallation is the reverse of removal. Follow all factory torque specifications during reinstallation of OE parts When reinstalling the crash bar, note the location of the crash sensor harnesses before the installation. The harnesses naturally sit in front of the frame rail mounting face and can easily become pinched and cut during reinstallation of the crash bar. When installing the Revo silicone boost hoses and clamps via a 10mm socket/wrench, note the location of the clamp studs to ensure they will not contact any surrounding parts during vehicle operation.
6
7
INSTALLATION INSTRUCTIONS Unitronic Intercooler Upgrade Kit for 2.0 TFSI (EA113) UH007-ICA
 UH007-ICA") Unitronic recommends that you read through the entire installation instructions prior to beginning the installation to familiarize yourself with the included components, tools required, and procedures
Unitronic recommends that you read through the entire installation instructions prior to beginning the installation to familiarize yourself with the included components, tools required, and procedures
Integrated Engineering MK7/MQB TSI GEN 3 FDS Intercooler Install. Part Number IETPCI1
 Integrated Engineering MK7/MQB TSI GEN 3 FDS Intercooler Install Part Number IETPCI1 Thank you for purchasing another high quality Integrated Engineering product! This instruction guide is used for installation
IE MK5/MK6 2.0T FSI & TSI FDS INTERCOOLER INSTALL GUIDE PART NUMBER: IETPCB1
 IE MK5/MK6 2.0T FSI & TSI FDS INTERCOOLER INSTALL GUIDE PART NUMBER: IETPCB1 Thank you for purchasing another high quality Integrated Engineering product! This instruction sheet is used for installation
PARTS LIST INSTALLATION INSTRUCTIONS PARTS LIST AND INSTALLATION GUIDE INSTALL TIME: 2 HOURS INSTALL DIFFICULTY: 3/5
 PARTS LIST AND PARTS LIST 1PC MISHIMOTO INTERCOOLER 1PC M6 X 1.0 X 20MM FLANGE BOLT 1PC M4 X 0.7 X 12MM BUTTON-HEAD BOLT 1PC M4 LOCK WASHER 1PC MAP SENSOR O-RING 2. Remove the eight pop clips that hold
Mazda 3 & Mazdaspeed 3 Oil Cooler Installation Instructions
 Page1 2007-2009 Mazda 3 & Mazdaspeed 3 Oil Cooler Installation Instructions Tooling: Jack and jack stands or a lift Socket wrench and torque wrench 10mm and 14mm sockets 3/16 Allen wrench 10mm wrench Pliers
IE Audi B9 S4, S5, A4, A5, Allroad FDS Intercooler Install Guide IETPCK1
 IE Audi B9 S4, S5, A4, A5, Allroad FDS Intercooler Install Guide IETPCK1 Thank you for purchasing the best performing intercooler on the market! This instruction guide is used for installation of IE s
SHELBY GT500
 2007-2009 SHELBY GT500 Removal of Factory Unit WARNING: 1. Radiator fluid must be handled properly. Please observe local ordinances with regards to handling and disposal. 2. Allow vehicle and components
2015+ SUBARU STI FRONT-MOUNT INTERCOOLER PARTS LIST AND INSTALLATION GUIDE INSTALL DIFFICULTY DISCLAIMER CAUTION INSTALL PROCEDURE TOOLS NEEDED
 PARTS LIST AND PARTS INCLUDED 1PC ALUMINUM INTAKE PIPE 1PC BAR-AND-PLATE INTERCOOLER 1PC STEEL CRASH BAR W/ MOUNTING HARDWARE 2PC HOT-SIDE INTERCOOLER PIPES 2PC COLD-SIDE INTERCOOLER PIPES 1PC BPV FLANGE
Audi S4 SMIC Installation. B5 Audi S4 Side Mount Intercooler installation
 Audi S4 SMIC Installation B5 Audi S4 Side Mount Intercooler installation Disclaimer: These installation instructions are to be used as a guide only. It is at the reader and/or installer s discretion to
2016+ NISSAN TITAN XD
 PARTS LIST AND PARTS INCLUDED 1PC MISHIMOTO INTERCOOLER 2PC SILICONE BOOTS WITH DURACORE TECHNOLOGY 4PC CONSTANT-TENSION T-BOLT CLAMPS 2PC ALUMINUM SPACERS MOUNTING HARDWARE CAUTION Never work on the cooling
2014+ FORD FIESTA ST DIRECT-FIT OIL COOLER KIT PARTS LIST AND INSTALLATION GUIDE CAUTION PARTS INCLUDED NOTE TOOLS NEEDED INSTALL PROCEDURE
 PARTS LIST AND PARTS INCLUDED 3PC APPLICATION-SPECIFIC MOUNTING BRACKETS & SPACER 1PC 19-ROW OIL COOLER 1PC 4 ', X 1'' BRAIDED HOSE W/90-10AN FITTINGS 1PC 3'' X 2.5 '' BRAIDED HOSE W/45 AND 90-10AN FITTINGS
INTERCOOLER PIPE KIT CHEVY CAMARO 2.0T PARTS LIST AND INSTALLATION GUIDE PARTS INCLUDED CAUTION INSTALL PROCEDURE TOOLS NEEDED
 PARTS LIST AND PARTS INCLUDED 2PC ALUMINUM PIPES W/ CNC-MACHINED QUICK-DISCONNECTS 1PC ALUMINUM PIPE W/ CNC-MACHINED 2-BOLT FLANGE 2PC QUICK-DISCONNECT SPRING CLIPS 1PC 2.75" 90 SILICONE COUPLER 1PC 2.25"
OIL COOLER KIT CHEVY CAMARO 2.0T PARTS LIST AND INSTALLATION GUIDE INSTALL DIFFICULTY DISCLAIMER CAUTION TOOLS NEEDED NOTE INSTALL PROCEDURE
 PARTS LIST AND PARTS INCLUDED 3PC APPLICATION-SPECIFIC MOUNTING BRACKETS 1PC HORN RELOCATION MOUNTING BRACKET 1PC 25-ROW OIL COOLER (SLEEK SILVER OR STEALTH BLACK) 1PC 4'4" STAINLESS STEEL BRAIDED HOSE
M-9603-FST FOCUS ST COLD AIR INTAKE KIT INSTALLATION INSTRUCTIONS
 M-9603-FST Please visit www.fordracingparts.com for the most current instruction information.!!! PLEASE READ ALL OF THE FOLLOWING INSTRUCTIONS CAREFULLY PRIOR TO INSTALLATION. AT ANY TIME YOU DO NOT UNDERSTAND
Subaru Front Mount Intercooler Kit STI Subaru Front Mount Intercooler Kit STI
 Subaru Front Mount Intercooler Kit STI 2008-2014 715500 Subaru Front Mount Intercooler Kit STI 2008-2014 Congratulations on your purchase of the Subaru Front Mount Intercooler Kit STI 2008-2014. The following
3/8 Universal Joint Phillips Head Screwdriver
 Magnetic retrieval tool Pliers 1/4 Ratchet Drive T-35 Torx Socket 3/8 Ratchet Drive 5mm Allen Head Socket Torque Wrench 7-3/8 Drive Extension Flat Head Screwdriver 10mm Socket 8mm Socket 3/8 Universal
EXPANSION TANK PARTS LIST AND INSTALLATION GUIDE
 PARTS LIST AND INSTALLATION GUIDE PARTS LIST 1 PC MISHIMOTO RADIATOR 2 PC CAST THERMOSTAT HOUSINGS 1 PC MAGNETIC DRAIN PLUG W/ DOWTY OIL SEAL 4 PC RUBBER BUSHINGS AND METAL COLLARS 3 PC HARDWARE PACKETS
INSTALLATION GUIDE Front Bumper. KL Cherokee (Trailhawk)
") INSTALLATION GUIDE Front Bumper KL Cherokee (Trailhawk) Included Hardware: Sample Sample Sample Skill Level: 5/5 stars (Professional install recommended) Disclaimer Expedition One is not responsible for
INSTALLATION GUIDE Front Bumper KL Cherokee (Trailhawk) Included Hardware: Sample Sample Sample Skill Level: 5/5 stars (Professional install recommended) Disclaimer Expedition One is not responsible for
Fig A ADDICTIVE DESERT DESIGNS. Preparation: Removal:
 Preparation: Disconnect the negative battery terminal. Park the vehicle on level ground and set the emergency brake. We recommend reading through the installation instructions in whole before performing
Installation Instructions for C & R Heat Exchanger Removal of Factory Unit
 Installation Instructions for C & R Heat Exchanger Removal of Factory Unit Remove the 8 clips that retain the upper radiator shroud. Remove the shroud. Remove the coolant tank cap from the heat exchanger
2016+ FORD FOCUS RS PERFORMANCE AIR INTAKE PARTS LIST AND INSTALLATION GUIDE PARTS INCLUDED INSTALL PROCEDURE TOOLS NEEDED
 PARTS LIST AND PARTS INCLUDED 1PC ALUMINUM INTAKE PIPE W/ CNC-MACHINED MAP SECTION 1PC AIRBOX W/ PROTECTIVE EDGING 1PC HIGH-FLOW OILED FILTER 1PC SILICONE TURBO INLET HOSE 2PC WORM-GEAR CLAMPS MOUNTING
Installation Instructions
 Installation Instructions Transverse K04 Tools Required Jack and jack stands Drain pan for coolant and oil 3" and 6" extensions Channel locks 7mm, 8mm, 10mm, 11mm, 12mm, 13mm, and 16mm sockets Oxygen sensor
JBR MAZDASPEED
 Page1 james Barone Racing Aftermarket Parts and Accessories JBR 2007 2009 MAZDASPEED 3 Front Mount Intercooler Piping Kit Installation Instructions for TR8 Intercooler Tooling: o Jack, Jack Stands, Ramps
Procharger Stage II Intercooled Supercharger System (11-14 GT)
") Procharger Stage II Intercooled Supercharger System (11-14 GT) Installation Time: Approximately one day. Installed on 2012 Mustang GT 5.0/Manual Required Tools 3/8 Socket Set (Standard and Metric) 1/2
Procharger Stage II Intercooled Supercharger System (11-14 GT) Installation Time: Approximately one day. Installed on 2012 Mustang GT 5.0/Manual Required Tools 3/8 Socket Set (Standard and Metric) 1/2
Installation instruction do88 Performance Radiator for Volvo S60 V70 XC70 S
 Installation instruction do88 Performance Radiator for Volvo S60 V70 XC70 S80 00-09 1. This instruction shows how to replace the OEM radiator with do88 performance radiator. At this type of installation
RFB MK6 Jetta Fog Light Kit Wiles Rd.Coral Springs, FL
 What s Included: Tools Required: (2) Fog Lights (2) Front Grills Wire Harness Headlight Switch Hardware Kit T25 Torx Wire Cutters 10mm Socket and Rachet Headlight Switch Composite Wedge Tool 01 1. Remove
54531/ FORD FUSION
 54531/51531 54531/51531 13-15 FORD FUSION 13-15 FORD FUSION FORD FUSION Upper Class Grille w/ Bars TOOLS REQUIRED: Socket Set Flat/Phillips Screw Drivers Torx Bits Plastic Pry Bar 3/16 Drill Bit and Drill
2016+ Mazda Miata Front & Rear Sway Bar Installation Instructions
 Page1 James Barone Racing Aftermarket Parts and Accessories 2016+ Mazda Miata Front & Rear Sway Bar Installation Instructions Tools Required: Jack Lift or ramps Ratchet wrench Torque Wrench 6 and 12 Extension
INSTALLATION INSTRUCTIONS. Upgrade Front Intercooler 2001 Early 2006 Chevrolet / GMC Duramax P/N 2-486
 INSTALLATION INSTRUCTIONS Upgrade Front Intercooler 2001 Early 2006 Chevrolet / GMC Duramax P/N 2-486 Turbonetics, Inc. * 2255 Agate Court * Simi Valley, CA * 805-581-0333 * TurboneticsInc.com READ THIS
Installation instruction do88 Intercooler for SAAB 9-3 1,9 TTiD
 Installation instruction do88 Intercooler for SAAB 9-3 1,9 TTiD This instruction shows how to replace the OEM intercooler with this performance intercooler. At this type of installation we always recommend
97-02 JEEP TJ BODY LIFT KIT INSTRUCTIONS
 92RC60500 97-02 JEEP TJ BODY LIFT KIT INSTRUCTIONS Congratulations on your purchase of a new Rough Country 2 /3 Body Lift. We are committed to providing you with the best product available for the best
TyrolSport UGSMIC Install Instructions for Audi A4.
 TyrolSport UGSMIC Install Instructions for Audi A4. Tools Necessary: Torx T25, T45. 10mm socket and ratchet. 6mm hex wrench. Flat blade screwdriver. Hacksaw blade or die grinder or dremel tool. Drill (not
Installation Instructions :BMW E39 M5 : Page 1
 Installation Instructions :BMW E39 M5 : Page 1 1. We will start by removing the front bumper. Remove the 3 x 8mm hex head bolts in the wheel arch liners on both sides. Turn the wheels to gain access. 2.
INSTALLATION INSTRUCTIONS Unitronic DV Relocation Kit for 2.0 TSI Gen2 UH003-ICA
 Unitronic recommends that you read through the entire installation instructions prior to beginning the installation to familiarize yourself with the included components, tools required, and procedures
05-08 GT. Hellion Power Systems Mustang Kit Instructions
 Hellion Power Systems 05-08 Mustang Kit Instructions 1. Disconnect Battery 2. Drain Radiator, keep fluid for re-installation. 3. Remove air box and inlethoses. 6. Next, underneath, punch oil pan for turbo
Installation instruction do88 Intercooler for SAAB 9-3SS/SC 2,8 V6 Turbo
 Installation instruction do88 Intercooler for SAAB 9-3SS/SC 2,8 V6 Turbo This instruction shows how to replace the OEM intercooler with this performance intercooler. At this type of installation we always
SCION tc FOG LIGHT. Part Number: STC-312 / STC-812
 SCION tc 2011-2013 FOG LIGHT Part Number: STC-312 / STC-812 Kit Contents Item # Quantity Reqd. Description 1 2 Fog Lamps 2 2 Fog Light bezels 3 1 Switch Assembly 4 1 Fog Light Operation guide 5 1 Harness
Installation instruction do88 Intercooler for SAAB 9-3SS/SC 4-cyl Turbo
 Installation instruction do88 Intercooler for SAAB 9-3SS/SC 4-cyl Turbo This instruction shows how to replace the OEM intercooler with this performance intercooler. 1. 4. 5. At this type of installation
---Optional Items---
 1 2 3 4 5 6 ---Optional Items--- 10 9 11 7 8 12 This package should contain: 1. One (1) CorkSport Crashbar Weldment 2. Eight (8) M8x1.25x20 mm Bolts 3. Eight (8) M8x1.25mm Nyloc Nuts 4. Sixteen (16) M8
CBEA/CJAA Timing belt procedure. Written by: greengeeker Photos by: DanG144, Kriesel, coalminer16. Required tools:
 CBEA/CJAA Timing belt procedure Written by: greengeeker Photos by: DanG144, Kriesel, coalminer16 Required tools: 1. Securing pin 3359 (you need two of them!) 2. Crankshaft stop T10050 3. Counter-hold tool
Huron Speed Products Twin Turbo Install Gen 2 CTS-V (09-15)
") Huron Speed Products Twin Turbo Install Gen 2 CTS-V (09-15) 1 2 Remove two bolts in trunk cover with 8mm socket. Pull up on cover to remove. Unscrew net tie down on side cover where battery is located
Huron Speed Products Twin Turbo Install Gen 2 CTS-V (09-15) 1 2 Remove two bolts in trunk cover with 8mm socket. Pull up on cover to remove. Unscrew net tie down on side cover where battery is located
EXPANSION TANK MUSTANG GT FORD FIESTA ST PARTS LIST AND INSTALLATION GUIDE PARTS LIST AND INSTALLATION GUIDE
 PARTS LIST MMHOSE-MUS8-15L: 4 PC SILICONE HOSES 8 PC CLAMPS 1 PC STAINLESS STEEL ADAPTER MMHOSE-MUS8-15U: 1 PC SILICONE HOSE 1 PC QUICK-DISCONNECT FITTING 1 PC CLAMP MMHOSE-MUS8-15ANC: INSTALLATION INSTRUCTIONS
54531/ FORD FUSION
 2014-2015 FORD Upper Class Grille w/ Bars TOOLS REQUIRED: Socket Set Flat/Phillips Screw Drivers Torx Bits Plastic Pry Bar 3/16 Drill Bit and Drill Motor PARTS LIST: (4) #8 u-nuts (2) seal brackets (driver
Application List L Cummins
 1 Discharging & Recharging of the A/C System is required for this install. INTERCOOLER INSTALLATION FOR 2010+ DODGE 6.7L CUMMINS Application List 2010+ 6.7L Cummins 1042530 PLEASE READ ALL INSTRUCTIONS
MAZDASPEED3 Intercooler Instructions
 MAZDASPEED3 Intercooler Instructions Congratulations on your purchase of the COBB Tuning Front Mount Intercooler System for your 2007-2009 Mazdaspeed3. The following instructions should assist you through
INSTRUCTIONS. INTERCOOLER UPGRADE BMW E82 135i 2008-
 INSTRUCTIONS INTERCOOLER UPGRADE BMW E82 135i 2008- Parts Included: - Intercooler - Left and right side pipes with hoses - 3 Silicone Hoses ( 2.5 x 3 ) - 1 Silicone Hose 90degree 2.5 elbow - 8 Hoseclamps
2017+ L5P Duramax 3 ½ Down Pipe & EGR Fix Kit
 2017+ L5P Duramax 3 ½ Down Pipe & EGR Fix Kit Covers installation of PN s: WCF100630, WCF100829 Note: This Kit is for off road competition use only! Off Road Competition Use Tuning & Exhaust System is
SAFETY SENSORS FIELD OF VIEW WILL BE ALTERED WITH USE OF THE REPLACEMENT BUMPER. Injury hazard
 SAFETY Your safety and the safety of others is very important. In order to help you make informed decisions about safety, we have provided installation instructions and other information. These instructions
INSTALLATION INSTRUCTIONS
 HIGH FLOW AIRFLOW METER INSTALLATION INSTRUCTIONS PART NUMBER D763-1600A APPLICATION: 2001-06 E46 M3 Parts List: Hose clamp 64Z (7) Plastic Rivets Air Filter Temp Sensor & Harness (2) Button Head Screws
R8 Exhaust Installation Guidelines
 STāSIS Engineering R8 Exhaust Installation Guidelines Exhaust Muffler support bracket bolt to muffler Muffler support bracket to chassis Muffler heat shield screws Heat shield bolt to chassis beneath anti
Audi C6 A6 RS-style Grille Installation Tutorial
 Audi C6 A6 RS-style Grille Installation Tutorial Proper service and repair procedures are vital to the safe, reliable operation of all motor vehicles as well as the personal safety of those performing
SAFETY THIS PRODUCT IS FOR OFFROAD USE ONLY. ALL LIABILITY FOR INSTALLATION AND USE RESTS WITH THE OWNER.
 SAFETY Your safety and the safety of others is very important. In order to help you make informed decisions about safety, we have provided installation instructions and other information. These instructions
2015 COLORADO 1 /2 LEVELING KITS
 92921000 2015 COLORADO 1 /2 LEVELING KITS Thank you for choosing Rough Country for all your suspension needs. Rough Country recommends a certified technician install this system. In addition to these instructions,
APIKOL Ur-S4/S6 Gen. II Front Mount Intercooler INSTALLATION INSTRUCTIONS
 APIKOL Ur-S4/S6 Gen. II Front Mount Intercooler INSTALLATION INSTRUCTIONS Only work underneath your vehicle after properly supporting it with adequate jack stands on a flat surface. NEVER work under a
CBEA/CJAA Timing belt procedure. Written by: greengeeker Photos by: DanG144, Kriesel, coalminer16. Required tools:
 CBEA/CJAA Timing belt procedure Written by: greengeeker Photos by: DanG144, Kriesel, coalminer16 Required tools: Securing pin 3359 (need two of them!) Crankshaft stop T10050 Counter-hold tool T10172 Special
Equipped with AEM Dryflow Filter No Oil Required! INSTALLATION INSTRUCTIONS PART NUMBER C (GUN METAL GRAY FINISH) NISSAN SENTRA 1.
 NISSAN SENTRA 1.") Equipped with AEM Dryflow Filter No Oil Required! INSTALLATION INSTRUCTIONS PART NUMBER 21-799C (GUN METAL GRAY FINISH) 2014-16 NISSAN SENTRA 1.8L 1 ITEM NO. PART NUMBER DESCRIPTION QTY. 1 21-2157D AIR
Equipped with AEM Dryflow Filter No Oil Required! INSTALLATION INSTRUCTIONS PART NUMBER 21-799C (GUN METAL GRAY FINISH) 2014-16 NISSAN SENTRA 1.8L 1 ITEM NO. PART NUMBER DESCRIPTION QTY. 1 21-2157D AIR
Depress each tab as you pull the bezel off. The bezels are tight. L.H. shown.
 2013-2014 Ford Mustang V6 & Boss 302 Lower Valance Fog Light Kit Parts List: Quantity: Tool List: Fog light & bulb with bracket 2 Flat head & Phillips screwdriver Black bezels 2 Ratchet & Socket set OR
Locate the 4 screws on each side of the vehicle, on the inner fender well liner. Remove them with a Torx T25 bit:
 Installation Instructions for TyrolSport UG SM IC. The first step in installing the UG SMIC is removing the front bumper. Locate the 4 screws on each side of the vehicle, on the inner fender well liner.
Nissan Titan / / Front Bumper Installation Instructions. Removal. Hardware. 12mm/1.
 2004-2014 Nissan Titan 20-915-04 / 22-915-04 / 24-915-04 Front Bumper Installation Instructions Hardware 6 ½ Hex Bolts 10 ½ Lock Washers 16 ½ Flat washers 6 ½ Hex Nuts 4 12mm/1.25 x 35mm Removal 1. First,
REVi RX-8 Intake. RX-8 REVi Intake System I PN Installation Instructions. Tools Required:
 RX-8 REVi Intake System PN 18299 Installation Instructions I-18299 Tools Required: Small/Stubby Phillips head screwdriver Small flat head screwdriver Medium Phillips head screwdriver 10mm socket and ratchet
INSTALLATION INSTRUCTIONS PART NUMBER AEM C (GUN METAL GRAY FINISH)
") Equipped with AEM Dryflow Filter No Oil Required! INSTALLATION INSTRUCTIONS PART NUMBER AEM-21-805C (GUN METAL GRAY FINISH) 2016.5-17 CHEVROLET CRUZE 1.4T ITEM NO. PART NUMBER DESCRIPTION QTY. 1 21-2038DK
Equipped with AEM Dryflow Filter No Oil Required! INSTALLATION INSTRUCTIONS PART NUMBER AEM-21-805C (GUN METAL GRAY FINISH) 2016.5-17 CHEVROLET CRUZE 1.4T ITEM NO. PART NUMBER DESCRIPTION QTY. 1 21-2038DK
2015 Corvette Supercharger System Instructions
 2015 Corvette Supercharger System Instructions These instructions are meant to serve as a guide to the installation of the ECS 2015 Corvette Supercharging system. Please be sure to use all safety equipment
Front Bumper Fascia Replacement
 Page 1 of 10 2008 Pontiac G8 G8 Service Manual Body Repair Bumpers and Fascias Repair Instructions Document ID: 2044380 Front Bumper Fascia Replacement Removal Procedure Caution: Refer to Safety Glasses
Audi S1 Intake kit. Qty. Description
 Audi S1 Intake kit Description Qty Silicone Intake pipe 1 Vacuum hose 1 Heatshield 1 Bracket 1 Machined inlet 1 Vacuum connector 1 Filter 1 M6x16 cap head bolt 1 Tools Ratchet Extension Torx socket Sockets
MAZDA 3 MPS FRONT MOUNTING INTERCOOLER INSTALLATION
 MAZDA 3 MPS FRONT MOUNTING INTERCOOLER INSTALLATION Tools needed: 7mm Hose clamp driver 10mm,12mm sockets and suitable ratchet with extensions Flat bladed screwdriver Pliers Phillips screwdriver KIT CONTENTS
OIL COOLER KIT INSTALLATION INSTRUCTIONS PART NUMBER D E92 335i/xi without stock oil cooler
 OIL COOLER KIT INSTALLATION INSTRUCTIONS PART NUMBER D570-0921 APPLICATION 2007-08 E92 335i/xi without stock oil cooler Congratulations for being selective enough to use a Dinan Engineering Oil Cooler
Installation Manual Volvo C30 T5 Front Mount Intercooler System
 Installation Manual Volvo C30 T5 Front Mount System Volvo C30 T5 System / Installation Manual i C Contents Important Information i Parts List i Required Tools and Materials 1 1.0 - Vehicle Preparation
INFINITI Q50/Q60 Red Alpha Heat Exchanger
 INFINITI Q50/Q60 Red Alpha Heat Exchanger Whether you live in a hot climate region, enjoy racing, or long high speed pulls the INFINITI Q60/Q50 Red Alpha Heat Exchanger will help keep your intake temps
INSTALLATION INSTRUCTIONS ELEVATION FRONT BUMPER DODGE RAM
 INSTALLATION INSTRUCTIONS PARTS LIST: 1 Elevation Bumper Assembly 24 12mm x 37mm OD x 3mm Flat Washers 2 Frame Mounting Brackets 12 12mm Nylon Lock Nuts 8 12-1.75mm x 50mm Hex Bolts 2 License Plate Mounting
GMC Yukon
 Torch Series LED Grille TOOLS REQUIRED: Flat Head Screwdriver Long Flat Head Screwdriver Phillips Screwdriver 7mm Socket 10mm Socket Ratchet & Extensions 3/16 Drill Bit Power Drill Cutting Wheel or Saw
99-04 GT. Hellion Power Systems Mustang GT Kit Instructions
 Hellion Power Systems 99-04 Mustang GT Kit Instructions Part 1 Hellion recommends that the front suspension system be installed either by trained professionals or by 5.Remove rack bolts K-Member Installation
FRONT MOUNT INTERCOOLER GOLF / JETTA IV 1.8T PART # & P INSTALATION INSTRUCTIONS
 FRONT MOUNT INTERCOOLER GOLF / JETTA IV 1.8T PART # 48.10.90 & 48.10.90P INSTALATION INSTRUCTIONS PART LIST: 1 INTERCOOLER CORE 1 U-BENT TUBE 1 L-SHAPED TUBE 1 INTERCOOLER INLET TUBE 4 M6 NYLOC NUT 3 M6
EXPANSION TANK PARTS LIST AND INSTALLATION GUIDE
 PARTS LIST AND INSTALLATION GUIDE PARTS LIST 2 PC APPLICATION-SPECIFIC MOUNTING BRACKETS 2 PC BLACK, ANODIZED 6061 ALUMINUM CATCH CANS 4 PC SILICONE HOSES 4 PC PLASTIC BARBED FITTINGS 4 PC WORM-GEAR CLAMPS
Current Range Rover Sport STRUT Collection Installation Manual
 2014 - Current Range Rover Sport STRUT Collection Installation Manual 1 1. Removing Main Grille and Lower Fascia 1.1 Run a line of low tack masking tape across the front of the bumper below the grille
mk3 SEAT Ibiza Cupra Front Mount Intercooler.
 mk3 SEAT Ibiza Cupra Front Mount Intercooler. Warning be sure not to let any foreign body enter the inlet track of the vehicle whilst the following work is being carried out. Serious engine damage may
INSTALLATION GUIDE PREMIUM FRONT BUMPER FOR RAM AEV30304AA Last Updated: 09/18/17
 AEV30304AA Last Updated: 09/18/17 PREMIUM FRONT BUMPER FOR RAM 1500 INSTALLATION GUIDE PLEASE READ BEFORE YOU START To guarantee a quality installation, we recommend reading these instructions thoroughly
Jeep Wrangler TJ 4.0 LITER Installation instructions
 www.jeepair.com 2002-2004 Jeep Wrangler TJ 4.0 LITER Installation instructions Kit Information These directions are for 2002-2006 model Jeep Wranglers. After 1994 every vehicle was designed for R134a refrigerant.
Installation Instructions
 Description Contents Revo Test Pipe or Optional Catalytic Converter Pipe Revo Mid Pipe Revo FWD Reducer Pipe Recommended Tools Quantity Tool Size 1 Hex Key / Socket 6 1 Sockets 13 (deep well) 1 Ratchet
Installation Manual TWM Performance Short Shifter Cobalt SS/SC, SS/TC, HHR SS, Ion Redline and Saab 9-3
 Page 1 Installation Manual TWM Performance Short Shifter Cobalt SS/SC, SS/TC, HHR SS, Ion Redline and Saab 9-3 Please Note: It is preferable to park on a flat surface, as you will have to engage and disengage
Instant Chat off the main page of Or simply call our tech team at
 FRONT MOUNT INTERCOOLER 2015+ WRX 2017-07-07 Thank you for purchasing this PERRIN product for your car! Installation of this product should only be performed by persons experienced with installation of
 Special Tools Needed: DrVanos.com Stage I Installation Instructions Camshaft locking tool TDC Crank pin Sprocket turning tool Tool rental is available with the purchase of a vanos kit *See website for
B5 A4 1.8t Front Mount Intercooler Install Instructions
 B5 A4 1.8t Front Mount Intercooler Install Instructions Only work underneath your vehicle after properly supporting it with adequate jack stands on a flat surface. NEVER work under a vehicle only supported
Vortech Charge Air Cooler
 Vortech Charge Air Cooler Installation Instructions 2015 Ford Mustang 2.3L EcoBoost P/N: 8N310-040 ENGINEERING, INC. 1650 Pacific Avenue, Channel Islands, CA 93033-9901 Phone 805 247-0226 Fax: 805 247-0669
READ AND UNDERSTAND ALL INSTRUCTIONS AND WARNINGS PRIOR TO INSTALLATION OF SYSTEM AND OPERATION OF VEHICLE.
 #9378 Installation Instructions 3 Body Lift Kit 1998-2000 Ranger READ AND UNDERSTAND ALL INSTRUCTIONS AND WARNINGS PRIOR TO INSTALLATION OF SYSTEM AND OPERATION OF VEHICLE. SAFETY WARNING BDS Suspension
2015+ EcoBoost F150 & Raptor Intercooler Install
 2015+ EcoBoost F150 & 2017+ Raptor Intercooler Install Note: This entire job can be performed with the truck on the ground - No need to raise the vehicle. The most difficult part is removing the grille
Z1 Motorsports 350Z / G35 Oil Cooler Kit Installation Manual
 Z1 Motorsports 2877 Carrollton Villa Rica Hwy Carrollton GA 30116 770.838.7777 Z1 Motorsports 350Z / G35 Oil Cooler Kit Installation Manual For 19, 25 and 34 Row Oil Cooler Kits Parts Included: 1 Aluminum
03-04 Mach 1. Hellion Power Systems Mach 1 Kit Instructions
 Hellion Power Systems 03-04 Mach 1 Kit Instructions Part 1 Hellion recommends that the front suspension system be installed either by trained professionals or by 5.Remove rack bolts K-Member Installation
IE Audi 3.0T Crank Pulley Upgrade Install Guide IEBAVJ3
 IE Audi 3.0T Crank Pulley Upgrade Install Guide IEBAVJ3 Thank you for purchasing your IE 3.0T crankshaft pulley upgrade! This instruction guide is used for installation of IE s lower overdrive pulley for
INSTALLATION INSTRUCTIONS
 COLD AIR INTAKE INSTALLATION INSTRUCTIONS PART NUMBER D760-0390C APPLICATION: 1999-2003 E39 M5 PARTS LIST 1 Left Aluminum Intake Tube 1 Air Pump Bracket (A) 1 Right Aluminum Intake Tube 1 Air Pump Bracket
Performance Inlet Manifold
 Performance Inlet Manifold Tools needed (some tools not required on some models): 13mm Combination Wrench Flat Blade Screwdriver T30 Torx Driver T25 Torx Driver 10mm Combination Wrench and/or Socket with
Installation Instructions MX-5 Dual Air Horns
 440 Rutherford St. P.O. Box 847 Goleta, CA 93117 1-800-667-7872 FAX 805-692-2525 www.mossmotors.com Tools required: Phillips screwdriver, 8mm, 10mm and 21mm sockets, 8mm and 10mm combination wrenches,
Page 1 of 6
 WWW.ATPTURBO.COM Page 1 of 6 Procedure: Installation for the ATP direct replacement high flow/high density front mounted intercooler assembly on the 2007 and newer Volvo C30 / S40 T5 Model Purpose of this
Huron Speed Products Twin Turbo Install Gen 2 CTS-V (09-15)
") Huron Speed Products Twin Turbo Install Gen 2 CTS-V (09-15) The following install guide is simply that, a guide to help you with installation. It is by no means the exact method to perform installation,
Huron Speed Products Twin Turbo Install Gen 2 CTS-V (09-15) The following install guide is simply that, a guide to help you with installation. It is by no means the exact method to perform installation,
COLD AIR SYSTEM. Installation Instructions for: Part Number Volkswagen Golf/GTI 1.8L Turbo Volkswagen Jetta 1.
 COLD AIR SYSTEM Installation Instructions for: Part Number 21-493 1999.5-2004 Volkswagen Golf/GTI 1.8L Turbo 1999.5-2004 Volkswagen Jetta 1.8L Turbo ADVANCED ENGINE MANAGEMENT INC. 2205 126 TH Street,
Jeep Wrangler TJ. Complete Air Conditioning System. Slide Control Head. Installation instructions
 WWW.JEEPAIR.COM 1996-1998 Jeep Wrangler TJ Complete Air Conditioning System Slide Control Head Installation instructions Kit Information After 1994 every vehicle was designed for R134a refrigerant. The
COLD AIR INTAKE INSTALLATION INSTRUCTIONS
 COLD AIR INTAKE INSTALLATION INSTRUCTIONS # D760-0029 Fits: 2009-10 335i/xi (E90; with N54 engine) Congratulations for being selective enough to use a Dinan Engineering Cold Air Intake. We have spent many
Integrated Engineering VW Jetta & GLI MK6 ( ) 2.0T/1,8T Gen 3 Cold Air Intake Install
 2.0T/1,8T Gen 3 Cold Air Intake Install") Integrated Engineering VW Jetta & GLI MK6 (2013.5+) 2.0T/1,8T Gen 3 Cold Air Intake Install Thank you for purchasing another high quality Integrated Engineering product! This instruction guide is used
Integrated Engineering VW Jetta & GLI MK6 (2013.5+) 2.0T/1,8T Gen 3 Cold Air Intake Install Thank you for purchasing another high quality Integrated Engineering product! This instruction guide is used
Read and understand all instructions and warnings prior to installation of product and operation of vehicle.
 #F9378 Installation Instructions 1998-2000 Ford Ranger 3" Body Lift Kit Read and understand all instructions and warnings prior to installation of product and operation of vehicle. Zone Offroad Products
Hybrid Racing Racing Performance Air Intake System Acura RSX Type S
 Hybrid Racing Racing Performance Air Intake System 02-06 Acura RSX Type S This is a step by step guide on how to install the Hybrid Racing Performance Air Intake System on the 02-06 Acura RSX Type S. Written
Edelbrock E-Force Supercharger Part #1538: Dodge 1500 Truck 5.7L V8 HEMI
 Edelbrock E-Force Supercharger Part #1538: 2009-2014 Dodge 1500 Truck 5.7L V8 HEMI 2009-14 Dodge 5.7L Hemi 1500 Truck INTRODUCTION Thank you for purchasing the Edelbrock Supercharger System for the 2009-15