Apologies for the absence of pictures during the removal. I was just getting on with it and completely forgot about taking pictures.
|
|
|
- Lindsay Harmon
- 5 years ago
- Views:
Transcription

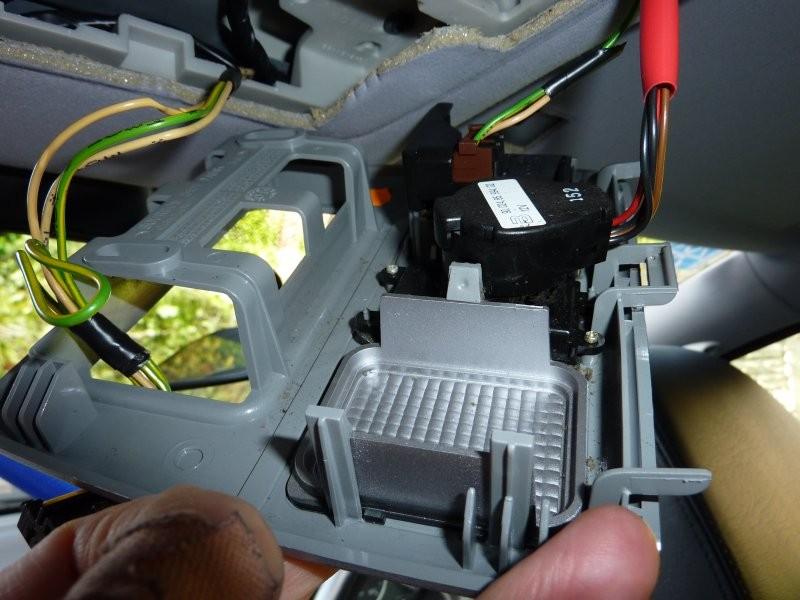
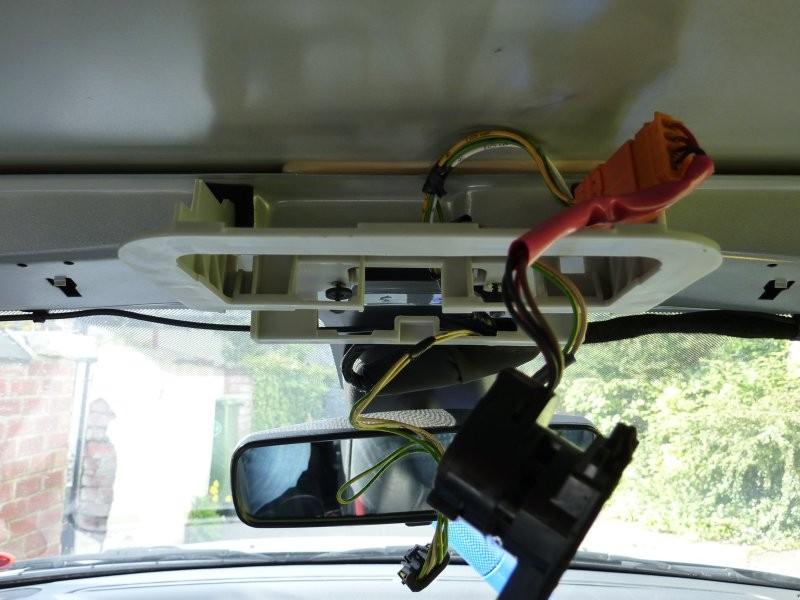
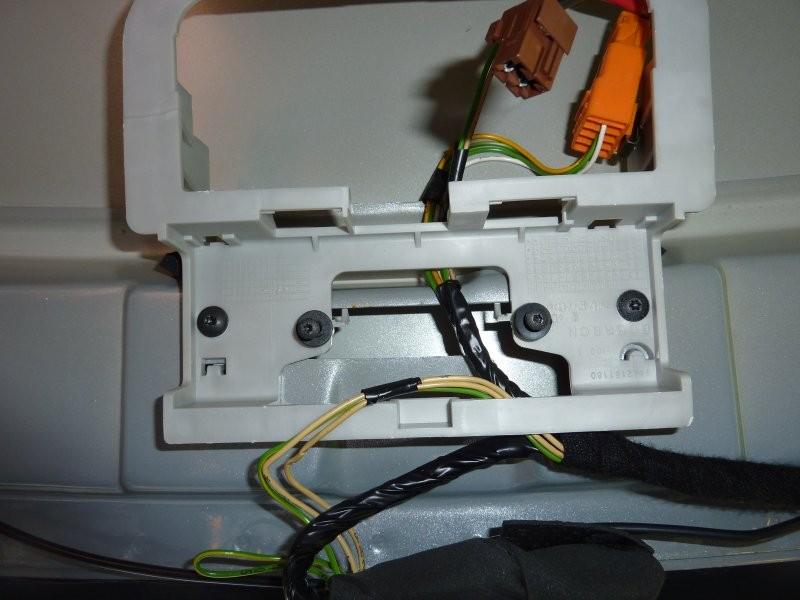
1 Please note that this is exclusive to a non-sunroof vehicle. Those with sunroofs will have additional fittings/fixings to deal with, of which I have no knowledge of. Apologies for the absence of pictures during the removal. I was just getting on with it and completely forgot about taking pictures. What you will need: A suitable DAB & AM/FM Aerial & Cables Torx Bits 15, 20 & 30 Socket 17mm 22mm Spanner Torque Wrench Black Silicone Sealant An assistant Time I reckon you could complete this in a day if you have everything to hand and start early enough. I did mine over a couple of days as I was interupted/taking it slowly/went for a pint and I have the luxury of not needing to use it and it being parked round the back out of the way. Firstly you will need to remove the fixings from the headlining area. Both Sun Visors (T15 & T20), Grab Handle (T30) and the Coat Hangers (T20). The rear roof console is removed by simply using a thin plastic blade to prise out the light from the lining, I found the Tesco Clubcard on my keyring to be ideal for this task. Unclip the electrical connection. Remove the surround. The front roof console is removed in a similar way. Once the light is removed you will then have access to the 2 screws (T15). The console will then come away and you can unclip the electrical connections.
2
3
4

5 The A pillar covers come away by pulling the top away and I used an old credit card to get some leverage to then pull the trim away as though it was hinged at the windscreen. Gently work your way down until it comes away, taking care with the alarm sensor and unclipping it from the rear of the cover.
 that holds the seatbelt in. The pillar trim can then be removed by pulling at the top and then working down and lifting up and away.")
6 The B pillar ones are tackled by removing the triangular plastic cover and then removing the screw (T15). Once that is removed undo the bolt (17mm) - (Retighten to 3.5 ± 0.21 da.nm.) that holds the seatbelt in. The pillar trim can then be removed by pulling at the top and then working down and lifting up and away. You might want to put the seatbelt bolt back in and put the shroud back on on both sides. This is to A) enable you to nip out if need be and B) stop you from potentially glancing your head against the exposed metal shaft (OUCH!/FFS!/...Yes, can I have an Ambulance please).

7 The rear covers do not need to be completely removed, just pulled away starting at the top and working down.

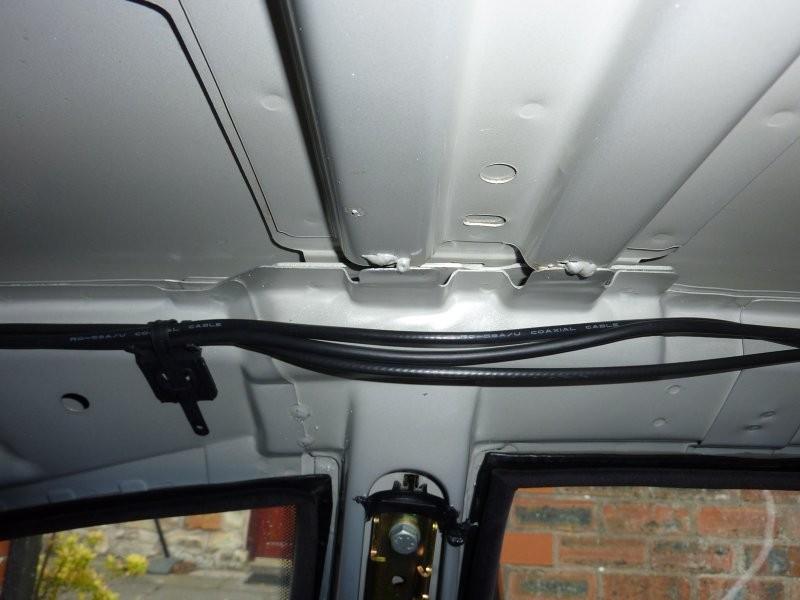
8 The roof lining has 2 fixings at the rear, one above each of the rear headrests. After those are pulled away, it just magic that is holding the lining up...just kidding. You will just need to lift the lining up out of the felt like material at the top of the window areas. There is also a 'Stickle Brick' type device that is fixed to the roof between the B pillars to hold the lining, see pic. You can now call on your assistant to help you support the lining while it is removed through the passenger side. Reclining the front seats helps.

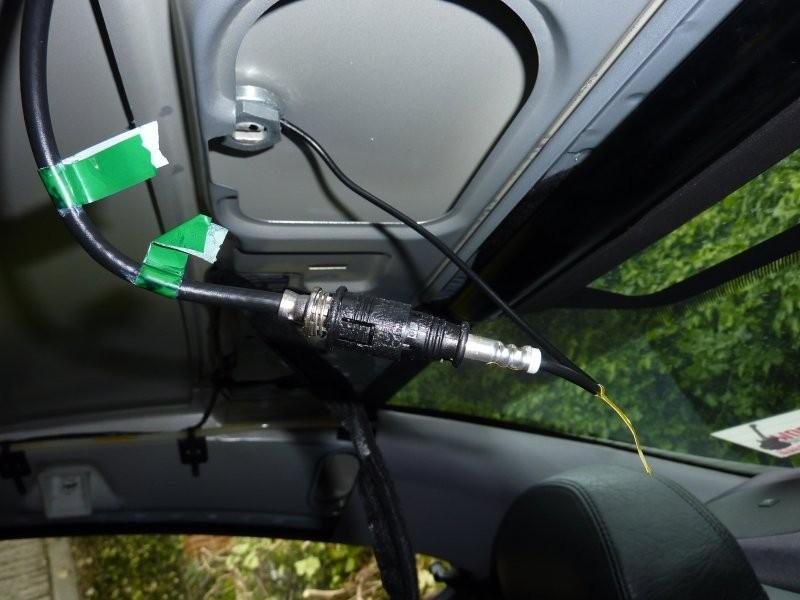
9 The route of the factory cable is now in full view along the passenger side of the roof and front and rear pillars. I decided to leave the original cable in as the new cables would fit alongside, plus I could not be bothered removing it. It does mean I can return it to factory spec if needed. The first thing I did was to route the cables alongside the existing ones. Follow where the existing cable goes down at the side of the dash and one by one feed the new cables down until they appear just underneath the glove box. Pull enough through to reach behind the centre console and meet the rear of your Head Unit. The cable can be tucked up behind the glove box. The aerial I bought (Kinetic DRA-1001) has a wire to power the aerial so that will need routing to the same spot too. If I remember correctly I had to extend this wire to reach the front. This was so that I could patch it into the same live feed as the radio. So I knew that if the radio was on, the aerial would also have power. The cable tidies can be undone and your new cables added working back to the rear. Undo the connections to the existing aerial and using the 22mm spanner remove the nut at the aerial base. Exit the car and pull the base and wires clear from the car. This is a good time to give that area quick clean.
10
11

12 On the new aerial base, put a ring of silicone sealant around the underside and using the correct washer place the aerial base in place. I guess you could get assistance at this point to hold the base down whilst you fasten the nut on the inside. I managed without help. Your call. Now you can connect your new aerial to your newly installed cables. You can now refit your headlining in the reversal of the removal procedure. NOTE: One tip for refitting is to be aware of the fitting around the third brake light. I must have missed this, as from the outside the lining seems to float about 5-10mm from the glass. This was not spotted until all the trim covers and fixings were replaced. I could not be bothered undoing everything to investigate. All that is required now is to connect the other ends of the cable to the rear of your chosen head unit. That 'delightful' task is covered in detail elsewhere.
Raxiom Factory GPS Rear Back-up Camera Kit (07-17 Wrangler)
") Raxiom Factory GPS Rear Back-up Camera Kit (07-17 Wrangler) Installation Time: 2.5-3Hrs Tools Required: 7mm Socket & Driver 10mm Socket 10mm Open end wrench Knife / Razor blade Zip-ties Wire Cutters Needle
Raxiom Factory GPS Rear Back-up Camera Kit (07-17 Wrangler) Installation Time: 2.5-3Hrs Tools Required: 7mm Socket & Driver 10mm Socket 10mm Open end wrench Knife / Razor blade Zip-ties Wire Cutters Needle
Here I Will Explain How To Install Recon Cab Lights In A 3rd Gen Dodge Ram.
 1 P age Here I Will Explain How To Install Recon Cab Lights In A 3rd Gen Dodge Ram. *Now, There Are Many Ways of Installing Them, Including Wiring Methods, Wiring Connectors, And Other Variables - In This
Audi A4 B8 Concert Stereo Removal
 Audi A4 B8 Concert Stereo Removal I decided to put these pages together to show how to remove the Concert / Symphony stereo units from B8 model A4's as there is little information available on the internet
FITTING OF (WESTFALIA) REMOVABLE TOWBAR ON SKODA OCTAVIA WITHOUT TOWBAR PREPARATION (04/11/16 CJ v1.0)
 REMOVABLE TOWBAR ON SKODA OCTAVIA WITHOUT TOWBAR PREPARATION (04/11/16 CJ v1.0)") FITTING OF (WESTFALIA) REMOVABLE TOWBAR ON SKODA OCTAVIA 2013+ WITHOUT TOWBAR PREPARATION (04/11/16 CJ v1.0) A. INTRO ALL STEPS COMPLETED AT YOUR OWN RISK! I AM NOT LIABLE FOR ANY LOSS OR DAMAGE! These
FITTING OF (WESTFALIA) REMOVABLE TOWBAR ON SKODA OCTAVIA 2013+ WITHOUT TOWBAR PREPARATION (04/11/16 CJ v1.0) A. INTRO ALL STEPS COMPLETED AT YOUR OWN RISK! I AM NOT LIABLE FOR ANY LOSS OR DAMAGE! These
Please use this How to in conjunction with the workshop manual pdf on the same subject.
 Please use this How to in conjunction with the workshop manual pdf on the same subject. The workshop manual is a decent guide but fails to mention a few things which would hinder progress and probably
STEPS FOR REMOVING REAR ASHTRAY & CUP HOLDER, CENTER ARMREST, E- BRAKE CONSOLE, FRONT ASHTRAY, LOWER CENTER CONSOLE AND GLOVE BOX
 Please give credit where credit is due! This DIY was completed ENTIRELY by the hardest working VW Vortex moderator on the site!! Gary Thompson, Ph.D. - vortex ID VGRT6, email address vgrt6@yahoo.com. Please
Roll Cage Installation Notes
 Roll Cage Installation Notes Introduction The regulations state that you have to fit one of 3 versions of Safety Devices 6 point bolt-in cage. The items you need are shown below: Option 1 Part Number RBC052
BMW 3 SeriesE90 - E93 Factory Alarm Install
 Instructions on a BMW 3 Series Factory Alarm Install. Written By: Danielle 2017 guides.drivediy.com Page 1 of 9 INTRODUCTION Tips on how to install a BMW 3 Series Factory alarm. Credit: CC 330i[E90Post.com
Curt Mfg. Trailer Hitch and Hoppy Wiring Kit Installation Instructions
 Curt Mfg. Trailer Hitch and Hoppy Wiring Kit Installation Instructions The Curt trailer hitch replaces the stock rear cross member in the Touareg. It attaches with 8 bolts just like the factory VW hitch.
Removing and installing moulded headliner
 Page 1 of 13 Removing and installing moulded headliner Special tools and workshop equipment required Removal lever -80-200- Front-end hook -3370- Removal wedge -3409- Removing Remove driver's seat: Audi
How to change Swirl Flaps, on Diesel BMW
 How to change Swirl Flaps, on Diesel BMW I am now going to show you how i did it on my car. May'sedition of Total BMW (still in WHSmiths) did a cover on how to change and modify Swirl flaps on a 330d engine,
 Page 1 of 15 1Search ANTENNA 2010 MINI Cooper 1.6L Eng Base 6520 AERIAL ANTENNA 6520090 Removing And Installing/Replacing Aerial Amplifier (FM) Necessary Preliminary Tasks Remove RIGHT REAR LIGHT Unlock
Rear Speaker replacement.
 Rear Speaker replacement. First off you need the right rear speakers. The easy bit is 6x9 and better than a 15W paper cone, the difficult bit is getting a mounting depth under 74mm. Or to be more precise,
2007 Crown Victoria Police Interceptor (P71) Blend Door Actuator Replacement (If I did it, you can too.)
 Blend Door Actuator Replacement (If I did it, you can too.)") 2007 Crown Victoria Police Interceptor (P71) Blend Door Actuator Replacement (If I did it, you can too.) I'm not saying this is the only way, or even the right way, but it worked for me. First time I've
2007 Crown Victoria Police Interceptor (P71) Blend Door Actuator Replacement (If I did it, you can too.) I'm not saying this is the only way, or even the right way, but it worked for me. First time I've
Connecting the rear fog light on the A4 Jetta, while keeping the 5 Light Mod
 Connecting the rear fog light on the A4 Jetta, while keeping the 5 Light Mod DISCLAIMER: I'm human and make mistakes. If you spot one in this how to, tell me and I'll fix it This was done on my 99.5 Jetta.
INSTALLATION INSTRUCTIONS
 INSTALLATION INSTRUCTIONS Accessory Application Publications No. XM SATELLITE RADIO SYSTEM (EX) 2008 PILOT All 37110 Issue Date JUN 2007 PARTS LIST XM Radio Attachment (sold separately) P/N 08B15-S9V-100A
FITTING FRONT SEAT BELTS TO THE MG Y TYPE SALOON
 FITTING FRONT SEAT BELTS TO THE MG Y TYPE SALOON Background After much thought I decided to fit front seatbelts to my Y type during the body off restoration. There is an ongoing debate as to whether the
C4 Sound Deadening & Insulation Kit Interior Removal & Installation Instructions
 C4 Sound Deadening & Insulation Kit Interior Removal & Installation Instructions Ok, let's start with taking the radio bezel dash area off first. Here is what the OEM radio looks like, and the points you
4RE Tahoe Bracket Installation Manual
 4RE 2007 2014 Tahoe Bracket Installation Manual Parts included with Bracket: 1 WGAP01459-001- Bracket 4RE, Display, Chevy Tahoe, 2007+ Screw Kit (WGP01459-HDW): (2) 10x3/4 Hex (5/16 head) Self Drilling
Door panel removal F07 5 GT
 Things needed Decent plastic trim removal tools Torx 30 Spare door clips 07147145753 I got away with a set of 5 but if I did it again I d be cautious and get 10. From prior experience if they are damaged
PRELIMINARY INSTALLATION INSTRUCTIONS. PARTS LIST Attachment Kit(sold separately): P/N 08B23-S9V-100B. Display bracket.
: P/N 08B23-S9V-100B. Display bracket.") INSTALLATION INSTRUCTIONS Accessory Application Publications No. in- ENTERTAINMENT SYSTEM 2006 PILOT All 30502 Issue Date SEP 2005 PARTS LIST Attachment Kit(sold separately): P/N 08B23-S9V-100B Display
INSTALLATION INSTRUCTIONS Accessory Application Publications No. in- ENTERTAINMENT SYSTEM 2006 PILOT All 30502 Issue Date SEP 2005 PARTS LIST Attachment Kit(sold separately): P/N 08B23-S9V-100B Display
ECS Tuning 3095 Cleveland-Massillon Rd. Norton, Ohio Phone Fax Web
 B7 A4 Gauge Pod Installation Instructions Safety first:. When working with your vehicles electrical system; always disconnect the battery! Avoid shorting any circuits, or probing around wires. Failure
2015 Copyright Maxspeed-Motorsports.com
 1 Porsche PCM 3.1 Backup Camera Installation Instructions. Thank you for purchasing your product at www.maxspeedmotorsports.com Before you start please understand that these installation instructions are
HOW TO FIT A KEYLESS ENTRY SYSTEM
 HOW TO FIT A KEYLESS ENTRY SYSTEM THE KITS ARE WIDELY AVAILABLE TO BUY FROM THE INTERNET AND OTHER GOOD STOCKISTS HERE IS AN IDEA OF WHAT YOU SHOULD RECIEVE IN YOUR KIT. PLUS WIRING DIAGRAM PLUS WIRING
Saab 9-3 4D/5D M page 3 Saab 9-5 M page 17
 SCdefault 900 Monteringsanvisning SITdefault MONTERINGSNVISNING INSTLLTION INSTRUCTIONS MONTGENLEITUNG INSTRUCTIONS DE MONTGE Saab 9-3 4D/5D M03-............................... page 3...................................
BODY-24, Late Model 944 ( and Newer) Dash Replacement
 Dash Replacement") BODY-24, Late Model 944 (1985.5 and Newer) Dash Replacement Introduction Replacing the dash in a late model 944 is not overly difficult. However, it is very tedious and a lot of patience is required. It's
BODY-24, Late Model 944 (1985.5 and Newer) Dash Replacement Introduction Replacing the dash in a late model 944 is not overly difficult. However, it is very tedious and a lot of patience is required. It's
Mercedes W123 Front Seat Replacement
 Mercedes W123 Front Seat Replacement If your fronts seats are saggy, ripped, springy, stuck, or otherwise in bad shape one easy option is to replace them with a good used seat. This guide will show you
Genuine Corvette Accessories Carbon Fiber Radio Surround Installation Instructions for Corvettes.
 Genuine Corvette Accessories Carbon Fiber Radio Surround Installation Instructions for 2005-2007 Corvettes. Difficulty: 3 out of 5. Time: Plan on about 1 hour. The tools used are: A small flashlight A
BMW 7 Series (E38) Installation Guide StealthOne Version 1.6
 Installation Guide StealthOne Version 1.6") BMW 7 Series (E38) Installation Guide StealthOne Version 1.6 Copyright Fontana Enterprises, 2008 All rights reserved. Product Information Copyright Copyright Fontana Enterprises 2008 All rights reserved.
BMW 7 Series (E38) Installation Guide StealthOne Version 1.6 Copyright Fontana Enterprises, 2008 All rights reserved. Product Information Copyright Copyright Fontana Enterprises 2008 All rights reserved.
How To: Replace Brembo front discs & pads
 How To: Replace Brembo front discs & pads Necessary Tools required Good quality socket set. T55 Torx/spline bit of very good quality. T30 Torx/spline bit. T27 Torx /spline bit WD40 Mallet. Punch. Brake
Disco 3 Clock Spring / Rotary Coupler replacement
 Disco 3 Clock Spring / Rotary Coupler replacement I recently had to change my Clock spring and thought some folks may find it helpful to see what it entailed. I did lots of reading around but couldn t
Gentex Homelink Installation Instructions
 Gentex Homelink Installation Instructions Kit Contents: Item Qty Part Description 1 Number GENK-41 NVS Homelink Mirror GENK-42 NVS Homelink w/mood lights 1 of the GENK-45 NVS Homelink w/compass following
How To: Thermostat change - D8 V6 194bhp
 How To: Thermostat change - D8 V6 194bhp Firstly, take off the Air Filter hoses and connectors and lift off. This leaves you with this workable space... I started with taking the two bolts out of the cable
INSTALLATION INSTRUCTIONS
 Rear Vision System Mirror Display Dodge Ram Kit Contents: Instruction Sheets Template Chassis Harness Endgate Handle with Camera Wire Ties (Qty: 17) Bottle of ZTech Plug for Non-Locking Endgates (Optional)
 Page 1 of 33 Welcome, goldeneye006 Notifications My Profile Settings Log Out Forum What's New? Home Classifieds Vendors Vendor Specials Store New Rules Posts Private Advertising Messages FAQ Calendar Community
Stand Alone Fog Lights Installation Instructions
 Tools Required: 1. Trim Removal tool or protected flat screwdriver 2. #2 Phillips Screwdriver 3. 10mm socket 4. 10mm wrench 5. 8mm or 5/16 socket 6. Adjustable Pliers 7. Electrical Tape WARNING!!! Disconnect
Prius XM Radio Installation Instructions. Eddie Bell
 2004-2005 Prius XM Radio Installation Instructions By Eddie Bell www.metrotpn.com 1 Let me begin by saying this is an easy but time consuming job. Set aside a few hours of your time for the install. If
INSTALLATION INSTRUCTIONS
 INSTALLATION INSTRUCTIONS Document# 19-0038 2004+ Lotus Elise (Series 2) Rear Clamshell Removal Kit Safely support the vehicle. This is a two-person job. Allow 1 to 2 hours for initial disassembly. Have
SECTION 1A3 - INSTRUMENT PANEL AND CONSOLE
 SECTION 1A3 - INSTRUMENT PANEL AND CONSOLE Click on the button for more information. CAUTION: This vehicle will be equipped with a Supplemental Restraint System (SRS). A SRS will consist of either seat
At Mark's suggestion I thought I'd write this up so future Coupe lovers can have as much fun* as I did with this job.
 At Mark's suggestion I thought I'd write this up so future Coupe lovers can have as much fun* as I did with this job. My enormous thanks to forum members, particularly glorfindel, for their advice when
Installation JETTA manual: Parrot MKi + Parrot CK3100 range JETTA
 Installation JETTA manual: Parrot MKi + Parrot CK3100 range JETTA This The VOLKSWAGEN sheet is designed JETTA to marque help you and with VOLKSWAGEN the installation logo are of a the Parrot property product
BMW 3Series (E46) Installation Guide StealthOne Version 1.6
 Installation Guide StealthOne Version 1.6") BMW 3Series (E46) Installation Guide StealthOne Version 1.6 Copyright Fontana Enterprises, 2008 All rights reserved. Product Information Copyright Copyright Fontana Enterprises, 2008 All rights reserved.
BMW 3Series (E46) Installation Guide StealthOne Version 1.6 Copyright Fontana Enterprises, 2008 All rights reserved. Product Information Copyright Copyright Fontana Enterprises, 2008 All rights reserved.
Down South Vettes Leather Sun visor Installation Instructions.
 Down South Vettes Leather Sun visor Installation Instructions. Difficulty: 3 out of 5. Time: Plan on about 30 minutes. The tools used are:? A medium blade screw driver? A small flashlight may help get
BMW E61 Hydraulic Pump replacement instructions
 BMW E61 Hydraulic Pump replacement instructions This DIY will guide you through the tasks needed to successfully replace your defective tailgate hydraulic pump Difficulty 3 of 10. The most difficult part
DVD REAR SEAT VIDEO SYSTEM
 Read entire instructions thoroughly before starting. TOOLS REQUIRED: DVD REAR SEAT VIDEO SYSTEM MINIVANS WITH ROOF RAILS INSTALLATION INSTRUCTIONS Non-metal trim stick Phillips screwdriver T15, T20, T25
SADDLEBAG AUDIO WIRE HARNESS KIT P/N
 SADDLEBAG AUDIO WIRE HARNESS KIT P/N 2880986 APPLICATION ALL INDIAN MOTORCYCLES WITH BOTH TRUNK AND SADDLEBAG AUDIO INSTALLED BEFORE YOU BEGIN Read these instructions and check to be sure all parts and
Fitting Instructions For The TDV6 EGR Blanking Kit To A 2006 Model Discovery 3 TDV6 GHSE
 Part Number DA1112 Fitting Instructions For The TDV6 EGR Blanking Kit To A 2006 Model Discovery 3 TDV6 GHSE You do this modification at your own risk. Britpart won t be held responsible for what is written
There is hence three things you can do - add oil, adjust the temp that the clutch begins to engage, or do both.
 As most of you may be aware, I have been doing a lot of research lately on our cooling system in the 80's including the fact that we have a dead spot on the OEM temp gauge which prompted me to not rely
(2) #10 Washers (6) 5/16 Narrow Washers (2) Locknuts (2) 5/16 Locknuts
 #10 Washers (6) 5/16 Narrow Washers (2) Locknuts (2) 5/16 Locknuts") INSTALLATION INSTRUCTIONS TJ Speaker / Storage Security Console #066 Please read and fill out the enclosed warranty registration card to activate your warranty. SHIPMENT CONTENTS Console Front Shift Lever
INSTALLATION INSTRUCTIONS TJ Speaker / Storage Security Console #066 Please read and fill out the enclosed warranty registration card to activate your warranty. SHIPMENT CONTENTS Console Front Shift Lever
INSTALLATION INSTRUCTIONS
 INSTALLATION INSTRUCTIONS Accessory Application Publications No. XM RADIO SYSTEM (EXCEPT LX) 2006 ODYSSEY All 30392 Issue Date AUG 2005 PARTS LIST XM Radio Attachment (sold separately): P/N 08B15-SHJ-100
Mini R53 Top Mount Intercooler Fitting Instructions
 Parts Pro Alloy Intercooler 2 x M6 x 12 Hex head bolt 2 x M6 Washer 1 x 30-45mm Hose Clip Tools Required T30 Torx Bit 12mm Spanner 11mm Spanner Deep 10mm Socket 11mm Socket 8mm Socket Extension bar Ratchet
Fitting the Bell Auto Services (B-A-S) TDV6 EGR Blanking Kit to a 2006 model Discovery 3 TDV6 HSE
 TDV6 EGR Blanking Kit to a 2006 model Discovery 3 TDV6 HSE") Fitting the Bell Auto Services (B-A-S) TDV6 EGR Blanking Kit to a 2006 model Discovery 3 TDV6 HSE Before I describe how I did this, I must first thank other members of the Disco3.co.uk forum (namely J,moore
Fitting the Bell Auto Services (B-A-S) TDV6 EGR Blanking Kit to a 2006 model Discovery 3 TDV6 HSE Before I describe how I did this, I must first thank other members of the Disco3.co.uk forum (namely J,moore
INSTALLATION INSTRUCTIONS
 INSTALLATION INSTRUCTIONS Accessory NIGHT Application CR-V Publications No. AII 32951 Issue Date SEP 2006 PARTS LIST Automatic Day/Night Mirror Attachment Kit P/N 08V03-SWA-100 Harness cover set Automatic
INSTALLATION INSTRUCTIONS
 INSTALLATION INSTRUCTIONS Accessory Application Publications No. in- ENTERTAINMENT SYSTEM 2004 TSX BII 24811 Issue Date APRIL 2003 PARTS LIST Attachment Kit P/N 08B23-SDA-101A Monitor bracket harness FM
Peugeot 406 Coupe: Delocking your boot V.1 April 2005
 This is a first stab at a DIY guide to de-locking your 406 Coupe. It isn t a hard modification to do yourself, but you do need to be confident working on your cars electrics and removing and refitting
Aamir_bt The legend..
 Aamir_bt The legend.. How to do timing on a 4XE1-W (DOHC) engine. well i decided to to a write up for DOHC timing since there was only the SOHC written up, and i had to do a timing belt on my stylus anyways,
Exhaust Alert Installation & Operating Instructions THE SCIENCE OF SILENCE. Exhaust Alert Operating & Fitting Instructions 1
 Exhaust Alert Installation & Operating Instructions THE SCIENCE OF SILENCE Exhaust Alert Operating & Fitting Instructions 1 Contents Exhaust Alert Fitting Instructions Section Page 1 Introduction 2 1.1
Anglefire s Guide to Radiator Replacement
 Land Rover Discovery 3 Anglefire s Guide to Radiator Replacement Mark Colston WWW.DISCO3CLUB.CO.UK August 2011 Version 1.0 Copyright Mark Colston Change Record. DATE Revision Update Notes Made By August
Mobile Video Installation Guide
 000MVGUIDE Revision 04/29/04 Mobile Video Installation Guide This installation guide offers examples of mobile video system types and suggested layouts. The installation of your system will depend upon
5 Mechanisms and accessories
 5 Mechanisms and accessories 51A SIDE OPENING ELEMENT MECHANISMS 52A NON-SIDE OPENING ELEMENT MECHANISMS 54A WINDOWS 55A EXTERIOR PROTECTION 56A EXTERIOR EQUIPMENT 57A INTERIOR EQUIPMENT 59A SAFETY ACCESSORIES
This is a guide to assist you adjust the valve clearance on a 2l V6 MIVEC engine found in a Mitsubishi FTO GPX
 Adjusting the valve clearance on a 2L V6 FTO engine This is a guide to assist you adjust the valve clearance on a 2l V6 MIVEC engine found in a Mitsubishi FTO GPX Disclaimer: This guide is to assist you
MAZDA 3 MPS FRONT MOUNTING INTERCOOLER INSTALLATION
 MAZDA 3 MPS FRONT MOUNTING INTERCOOLER INSTALLATION Tools needed: 7mm Hose clamp driver 10mm,12mm sockets and suitable ratchet with extensions Flat bladed screwdriver Pliers Phillips screwdriver KIT CONTENTS
Installation manual: CK3100 range C3 PICASSO
 Installation manual: Parrot C3 PICASSO MKi + Parrot CK3100 range C3 PICASSO This The brand sheet name is designed CITROËN to help C3 PICASSO you with and the the installation CITROËN logo of a are Parrot
PDC RETROFIT INSTALLATION By Kevin
 1 PDC RETROFIT INSTALLATION By Kevin Kshek369@hotmail.com 1 These instructions are intended to help those who chose to do this retrofit by showing you what you are in store for and to give you some instructions
BMW N54 TWIN TURBO THROTTLE BODY HARD PIPE INSTALLATION INSTRUCTIONS
 BMW N54 TWIN TURBO THROTTLE BODY HARD PIPE INSTALLATION INSTRUCTIONS Tools needed: Short flat blade screwdriver T20, T25 Torxs 14mm spanner Needle nosed pliers 7mm hose clamp driver Safety eyewear, footwear,
 Page 1 of 14 This install requires work on your supplemental restraint system and could cause injury or damage to your car. If you are not comfortable performing the steps detailed here then do not attempt
Remove the 3-11mm nuts holding mirror on. Don t drop the nuts!
 2005-2012 Ford Mustang Puddle Lamp Kit Parts List: Quantity: Tool List: LED Lamps 2 Flat head screwdriver Seals 2 Ratchet & Socket set OR Nuts 2 Adjustable Wrench Wiring harness 1 Drill & 11/16 th bit
BEN-HUR Bentley head unit replacement kit (INSTALLATION MANUAL)
") JH (rev 1.4) 31-03-17 BEN-HUR Bentley head unit replacement kit (INSTALLATION MANUAL) DO NOT ATTEMPT TO FIT THE BEN-HUR UNTIL YOU HAVE READ THE INSTALL MANUAL Overview The BEN-HUR allows you to install
JH (rev 1.4) 31-03-17 BEN-HUR Bentley head unit replacement kit (INSTALLATION MANUAL) DO NOT ATTEMPT TO FIT THE BEN-HUR UNTIL YOU HAVE READ THE INSTALL MANUAL Overview The BEN-HUR allows you to install
2010 Toyota Prius Fog Light Retrofit
 2010 Toyota Prius Fog Light Retrofit A DIY prospective Last updated: Friday, December 25, 2009 *** Disclaimer Use this document and its contents at your own risk! *** Forward: This document was compiled
PLEASE READ THROUGH THE WHOLE WRITE UP BEFORE ACTUALLY USING IT!!!!
 JDM power folding mirror switch install into stock USDM harness. By: Greg L., Zeke21 on twinturbo.net PLEASE READ THROUGH THE WHOLE WRITE UP BEFORE ACTUALLY USING IT!!!! This is how I was able to get the
Mustang CDC Lightbar (94-04) - Installation Instructions
 - Installation Instructions") Mustang CDC Lightbar (94-04) - Installation Instructions The below installation instructions work for the following products: Classic Design Concepts Mustang Convertible Lightbar (94-04 Carbon Fiber) Classic
Mustang CDC Lightbar (94-04) - Installation Instructions The below installation instructions work for the following products: Classic Design Concepts Mustang Convertible Lightbar (94-04 Carbon Fiber) Classic
SS1066HF Jeep JK Wrangler Left Hand Drive CRDI4 2.8Litre-I4 Diesel Engine and EGHV6 3.8Litre V6 Gasoline Engine
 SS1066HF Jeep JK Wrangler Left Hand Drive CRDI4 2.8Litre-I4 Diesel Engine and EGHV6 3.8Litre V6 Gasoline Engine Installation Guide Safari SS1066HF Page - 1 of 12 6/10/2009 ITEM PART NO DESCRIPTION QTY
Moddit. How to Install an OS Giken Differential into a
 Moddit How to Install an OS Giken Differential into a Subaru BRZ This guide goes over the steps necessary to remove and install the OS Giken Limited Slip Differential into a Subaru BRZ. This guide may
7 Trim and upholstery
 7 Trim and upholstery 71A BODY INTERNAL TRIM 72A SIDE OPENING ELEMENT TRIM 73A NON-SIDE OPENING ELEMENTS TRIM 75A FRONT SEAT FRAMES AND MECHANISMS X79 NOVEMBER 2009 EDITION ANGLAISE "The repair procedures
FITTING OIL TEMP AND PRESSURE GUAGES
 FITTING OIL TEMP AND PRESSURE GUAGES this guide is of reference to fitting an oil temp and pressure sender/ sensor into a sandwich plate- not the sump plug temp sensor (although it wouldn't be much different
INSTALLATION INSTRUCTIONS JEEP 2011-UP JK SECURITY FULL CONSOLE #274
 INSTALLATION INSTRUCTIONS JEEP 2011-UP JK SECURITY FULL CONSOLE #274 PARTS CHECKLIST Tuffy Console #9 Left Front Mounting Bracket #10 Right Front Mounting Bracket #11 Electronics mounting bracket #12 Divider
Soumatrix speakers installation guide
 speakers installation guide Preface coaxial speakers combine bass and treble loudspeaker in one unit. Just replace the car original bass loudspeaker in each of the front and rear doors. Please disconnect
 Page 1 of 14 Welcome, goldeneye006 Notifications My Profile Settings Log Out Forum What's New? Home Classifieds Vendors Vendor Specials Store New Rules Posts Private Advertising Messages FAQ Calendar Community
It should be used in conjunction with the full Vortex thread entitled
 Phaeton Upgrade How to fit a rear AC Controller to 5 Seat Phaetons Summary This document provides resources, guidance, hints and tips to achieve the change shown in the above two photographs. I cannot
Sunroof Repair. Sunroof Repair TSB. The sunroof repair kit available for the J30 is part number Y20. See images at bottom of document.
 Sunroof Repair This document is the text/images from the TSB (technical service bulletin) issued by Infiniti concerning the repair procedure for sunroof issues. Be advised that this is a LARGE, TIME-CONSUMING
VTCM Installation Manual Table of Contents
 VTCM Installation Manual Table of Contents 1. Introduction:... 2 2. Disclaimer:... 2 3. Software / Drivers:... 2 a. Plugging in the controller:... 2 b. Install 4.0.NET Frame work:... 3 c. Install COM port
INSTALLATION INSTRUCTIONS
 INSTALLATION INSTRUCTIONS FUEL SURGE TANK INSTALLATION KIT 1999-2006 BMW E46 COUPE Document# 19-0056 Support: info@radiumauto.com Note: This kit was designed for a standard single pump Radium Engineering
TOYOTA AVALON EC REARVIEW MIRROR
 Section I - Installation Preparation Part Number: PT732-07000 Section I - Installation Preparation Kit Contents Item # Quantity Reqd. Description 1 1 Full Mirror Assembly, Compass 2 1 Hardware Bag 3 1
Gentex Autodim Homelink Compass Temperature Mirror Installation in 2014 Tacoma Purchased from Bob s Automotive Mirrors & More LLC (Robert Prim)
") Gentex Autodim Homelink Compass Temperature Mirror Installation in 2014 Tacoma Purchased from Bob s Automotive Mirrors & More LLC (Robert Prim) This is my 50-GENK51A Gentex mirror kit and instructions.
Gentex Autodim Homelink Compass Temperature Mirror Installation in 2014 Tacoma Purchased from Bob s Automotive Mirrors & More LLC (Robert Prim) This is my 50-GENK51A Gentex mirror kit and instructions.
Lethal Performance Dual FPDM Harness Kit Installation
 Lethal Performance Dual FPDM Harness Kit Installation The Lethal Performance Dual FPDM Harness Kit is a plug-and-play modification. Depending on whether you are using the Lethal Performance wire upgrade
INSTALLATION INSTRUCTIONS
 INSTALLATION INSTRUCTIONS FUEL SURGE TANK INSTALL KIT Honda S2000 Document# 19-0063 Support: info@radiumauto.com WARNING: DO NOT SMOKE WHILE WORKING ON FUEL SYSTEMS. KEEP SPARKS AND OPEN FLAMES AWAY FROM
 Page 1 of 33 SPECIFICATIONS 2013 Ford Edge 3.5L Eng Limited Print Date: TORQUE SPECIFICATIONS Description Nm lb-ft lb-in Assist handle bolts 9-80 B-pillar upper trim panel screw 9-80 C-pillar trim panel
DDMWorks Windshield Mount DDM-16-31
 DDMWorks Windshield Mount DDM-16-31 The DDMWorks windshield mount is designed to work with the Polaris Slingshot and offer some more mounting options than the stock windshield mount along with a way to
Installation instruction do88 performance Intercooler for Volvo S60/V60 T6 MY10-
 Installation instruction do88 performance Intercooler for Volvo S60/V60 T6 MY10-1. This instruction shows how to replace the OEM intercoolers with do88 performance intercoolers. At this type of installation
Lotus Elise Series 1 DASH2 PRO Installation.
 Lotus Elise Series 1 DASH2 PRO Installation. Step 1 Remove the shroud from around the steering column. Step 2, Using a 10mm socket remove the 2 screws underneath the existing dashboard 1 on each side of
JRSC + BBK Install on SVTF. Neil A. Shah medicnas on focaljet September 2006
 JRSC + BBK Install on SVTF Neil A. Shah medicnas on focaljet September 2006 ECU up here. When removing make sure the smaller bundles of wires don t get wrapped around the bottom edge and break - this almost
Essentials. Simple and Easy to Follow Installation Manual % Free Call! Expert Advice.
 Essentials Simple and Easy to Follow Installation Manual % Free Call! %800-745-5337 Expert Advice DVD Headrest JK Wrangler Installation Instructions Note: Be sure to read this entire instruction sheet
SCION xb AUTO-DIMMING MIRROR Preparation
 Preparation Part Number: PT374-02090 Kit Contents Item # Quantity Reqd. Description 1 1 AD Mirror Assembly w/ PRNDL 2 1 Hardware bag Hardware Bag Contents Item # Quantity Reqd. Description 1 2 T-tap Connectors,
2001 V70 T5 ETM Removal and Cleaning Directions
 2001 V70 T5 ETM Removal and Cleaning Directions Howard Cheng howardc64@gmail.com 10/24/05 Version 1.4 Read this before you start I performed this ETM cleaning because I had gotten 2 reduced performance
Interior Judge. Interior. Manual Transmission. Automatic Transmission. JCNA Series 3 E-Type Judge s Guide Page 23
 Interior Manual Transmission Automatic Transmission JCNA Series 3 E-Type Judge s Guide Page 23 Woodwork, Vinyl & Leather (Except Seats) Woodwork The Series 3 E-Type does not have any factory-installed
Soumatrix speakers installation guide
 Soumatrix speakers installation guide Preface Soumatrix coaxial speakers combine bass and treble loudspeaker in one unit. Just replace the car original bass loudspeaker in each of the front and rear doors.
Evo X Walbro 450 Pump System
 Evo X Walbro 450 Pump System Installation Guide Please contact us at sales@wtftuned.com with any additional questions Tools required: 8 mm socket and wrench, needle-nose pliers, razor, drill w/ 5/64 bit,
INSTALLATION MANUAL FORD PI SEDAN PRISONER TRANSPORT SEAT WITH OS-BELT SEATBELTS (PI02) Required Tools:
 Required Tools:") INSTALLATION MANUAL FORD PI SEDAN PRISONER TRANSPORT SEAT WITH OS-BELT SEATBELTS (PI02) Required Tools: Drill Bits: 9/16 (.5625 ) Power Drill Socket Wrench Set Square #2 Driver Rubber Mallet Utility Knife
INSTALLATION MANUAL FORD PI SEDAN PRISONER TRANSPORT SEAT WITH OS-BELT SEATBELTS (PI02) Required Tools: Drill Bits: 9/16 (.5625 ) Power Drill Socket Wrench Set Square #2 Driver Rubber Mallet Utility Knife
2006 MINI Cooper ACCESSORIES & EQUIPMENT Audio, Navigation & Anti-Theft Systems - Repair Instructions - Cooper (1.6L) R50/W10 & Cooper S
 R50/W10 & Cooper S") Fig. 1: Locating Radio Receiver Retaining Screws 2006 MINI Cooper 2002-05 ACCESSORIES & EQUIPMENT Audio, Navigation & Anti-Theft Systems - Repair Instructions - Cooper (1.6L) R50/W10 & Cooper S MONO RADIO
Fig. 1: Locating Radio Receiver Retaining Screws 2006 MINI Cooper 2002-05 ACCESSORIES & EQUIPMENT Audio, Navigation & Anti-Theft Systems - Repair Instructions - Cooper (1.6L) R50/W10 & Cooper S MONO RADIO
NISSAN FIGARO NIGGLES PART 4 I CAN T SEEM TO FIND NEW TYRES FOR MY FIGARO
 NISSAN FIGARO NIGGLES PART 4 I CAN T SEEM TO FIND NEW TYRES FOR MY FIGARO There were two sizes of tyres fitted to the Figaro originally: 155SR12 or 165 70 12. Don t mix these sizes on the car all four