*** FOR COMPETITION USE ONLY per US EPA regulations *** Factory Pipe Bill Of Materials Yamaha GP1200R
|
|
|
- Prosper Jordan
- 6 years ago
- Views:
Transcription
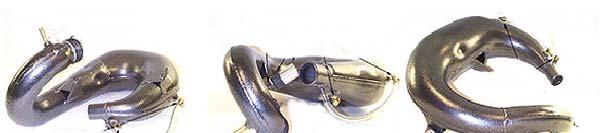
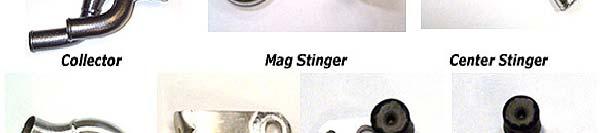
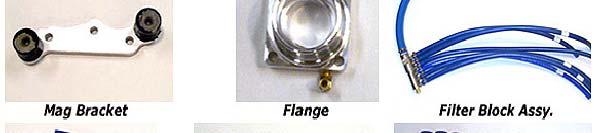
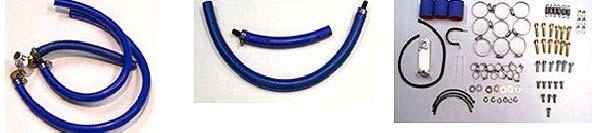
1 *** FOR COMPETITION USE ONLY per US EPA regulations *** Factory Pipe Bill Of Materials Yamaha GP1200R Item Qty Part Number Part Description 1 3 COMASM0690 GP1200R Flange assembly 2 1 COMASM0840 GP1200R Collector assembly 3 1 COMASM0821 GP1200R Mag chamber assembly 4 1 COMASM0822 GP1200R Ctr chamber assembly 5 1 COMASM0823 GP1200R PTO chamber assembly 6 1 COMST12002 GP1200R Mag stinger 7 1 COMST12003 GP1200R Ctr stinger 8 1 COMST12001 GP1200R PTO stinger 9 1 COMASM0825 GP1200R Mag bracket assembly 10 1 COMASM0826 GP1200R PTO upper bracket assy 11 1 COMASM0827 GP1200R PTO lower bracket assy 12 1 COMASM0828 GP1200R Filter block hose assy 13 1 COMASM0829 GP1200R Exit water manifold 14 1 COMASM0844 GP1200R Cyl head water exit 15 1 COMASM0843 GP1200R Hardware kit (includes items 16-35) 16 6 COMASM0790 Spring w/ clear hose cover COMFAS mm x 1.25 x 40mm Flanged head cap 18 6 COMFAS Hole spring hook S.S. (10mm) 19 9 COMCLP0020 #32 SS Hose clamp (2") 20 3 COMHOS /4" Silicone coupler (2-1/2") COMCLP0010 #06 SS Hose clamp (3/8") 23 6 COMFAS0086 3/8" Flat washer w/1" OD S.S COMFAS mm x 1.25 x 30mm Flange head cap 25 1 COMFAS0280 3/8"-16 x 1" S.S. Hex head cap screw 26 5 COMFAS0100 3/8"-16 x 3/4" Hex head bolt S.S COMFAS mm Lock washer (.691" OD) S.S COMBRK0214 GP1200R Mag case bracket 29 3 COMGAS /4" Graphite/kevlar sealing ring 32 2 COMCLP0085 S.S. AP@ Clamp 33 1 COMFAS0012 #10 x 2" SS Pan head screw 34 2 COMFAS0210 4" Plastic zip tie 35 1 COMTUB0006 1/4" Flex guard 24" long Required Parts Not Included in Kit: Aftermarket Rev Limiter/Ignition Module, Aftermarket Flame arrestors and Aftermarket Top Loader Intake Pump Grate and Ride Plate. < CHECK CONTENTS AGAINST BILL OF MATERIALS. REPORT ANY SHORTAGES WHERE YOU PURCHASED YOUR FACTORY PIPE. < READ ALL INSTRUCTIONS CAREFULLY BEFORE STARTING INSTALLATION. < DO NOT USE THE STOCK IGNITION MODULE, ENGINE DAMAGE WILL OCCUR IF THE STOCK IGNITION TIMING CURVE IS USED. < AN AFTERMARKET INTAKE GRATE AND/OR RIDE PLATE MUST BE USED WITH THIS EXHAUST SYSTEM. INCREASED SPEEDS WILL RESULT IN DANGEROUS HANDLING WITHOUT THESE CHANGES. Page 1


2 Page 2
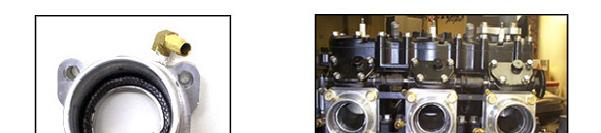
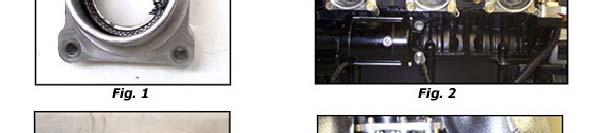
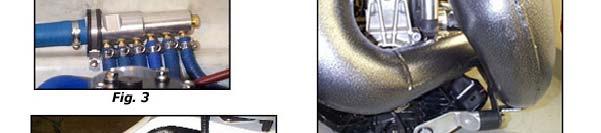
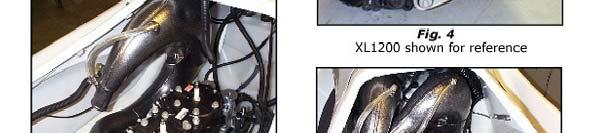
3 Factory Pipe Instructions Yamaha GP1200R Disconnect the battery and remove the power valve servo and cables with the bracket. Completely remove the stock exhaust/catalytic converter system from the cylinder to the water box and leave the stock 3/8" waterlines attached to the side squirters. Remove the two studs on the center cylinder. Retain the stock waterbox rubber coupler and clamp, stock front engine case bracket, and stock exhaust manifold gasket. Remove the stock front air silencer and carburetor flame arrestors. Retain one of the rubber mounts and bolt. Remove the rear motor mount on the exhaust side of the boat. Slide trim cable, stator wires, starter cable, and ground cable under motor. Remove lower cable guide from hull to allow clearance for exhaust. Install an aftermarket top loader intake grate and ignition system (or rev limiter/cdi module) per the manufacturer=s instructions. Install the three graphite/kevlar sealing rings (item #29) into the flanges (item #1) (Figure 1). Note: Kevlar seals should be 7-1/4" in length. Check length before installing. Install the three flanges on the cylinder using the retained stock manifold gasket, 10mm x 40mm bolts (item #17), and spring hooks (item #18). The barbed hose fittings should point toward the front of the boat and the spring hooks should be turned outward at a 45 degree angle (Figure 2). Torque all flange bolts to 30 ft.-lb. Lay the filter block assembly (item #12) in the left side of the hull in the upper groove centered on the engine. Connect the front three non-filtered waterlines on the filter block assembly to the fittings on the exhaust flanges. Secure with #6 hose clamps (item #22). Note: Waterline lengths are left long to accommodate different setups. Cut to suit your application. Secure the filter assembly to the hull using one of the AP@ clamps (item #32), and the #10 x 2" screw (item #33). Use a 1/8" drill bit to pre-drill the hole for the screw (Figure 3). Remove the stock black 5/8" x 4" piece of waterline from the stock AY@. Connect the 5/8" waterline from the filter assembly to the AY@ and secure with the supplied clamp. Remove the air box silencer rubber mount from the left side of the mag cover. Install the mag case bracket (item #28) using the retained rubber mount and 8mm bolt and washer, making sure that the steel collar is on the mag side of the bracket. (Figure 4). Put the center chamber (item #4) in the boat and secure the rubber Lord mount on chamber to the mag case bracket using a 3/8"-16 x 3/4" bolt and washer (item #26,23). Do not insert chamber into flange at this time (Figure 5). Page 3
4 Install the mag chamber (item #3) starting with the pipe vertical and rotating it down and through the center chamber. Now, insert both the mag and center chambers into the flanges and secure with the exhaust springs (item #16)(Figure 6). Note: 1. After installation of mag chamber, remove the throttle cable from carb bracket and route through center of chamber to avoid stretching cable. 2. A small amount of grease on the o-rings will allow them to slide in easily. Install the mag bracket (item #9) on the stock front bracket using two 10mm x 30mm bolts (item #24), and two 10mm lock washers (item #27). Torque bolts to 30 ft.-lb. Attach mag chamber to bracket using the 3/8" x 1" bolt (item #25), and 3/8" flat washer (item #23) on the exhaust side mount, and a 3/8" x 3/4" bolt (item #26), and flat washer (item #23) on the carburetor side mount. Note: Install the 3/8" x 1" bolt first. Install a 3/8" x 3/4" bolt (item #26), and flat washer (item #23), on the upper mount of the center chamber into the Lord mount and tighten. Attach the front two filtered waterlines (the larger diameter of the filter block is the filtered end) to the fittings on the mag and center chambers below the flanges using a #6 hose clamp (item #13). Install the collector assembly (item #2) into the waterbox coupler and rotate it so the bottom tube is 2" above hull. Do not tighten clamp at this time. Note: 1. Do not use grease or oil on silicone couplers. Use only glass cleaner or water with dish soap if required. 2. You may want to leave all the hose clamps slightly loose on the stinger/collector/chamber connections until all three are installed and aligned. Slip a #32 hose clamp (item #19) over each coupler tube on the collector and leave loose. Install the mag stinger tailpipe (item #6) into the lower coupler on the collector. Then install a 1-3/4" x 2 2"silicone coupler (item #20) between the mag chamber and mag stinger and lightly secure with #32 hose clamps (item #19). Install the center stinger tailpipe (item #7) into the upper coupler on the collector. Install a 1-3/4"x 2-1/2"silicone coupler (item #20) between the center chamber and tailpipe. Lightly secure with #32 hose clamps (item #19) and lightly secure clamps on the rear collector (Figure 7). Install the PTO lower bracket (item #11) using two 10mm x 30mm bolts (item #24), and two 10mm lock washers (item #27) onto the left rear engine case and torque to 30 ft.-lbs.. Remove the four nuts holding the battery tray and move it just slightly to make it easier to install the PTO chamber. Install the PTO chamber (item #5) into the flange and secure with exhaust springs (item #16). Install a 3/8" x 3/4" bolt and washer (item #26,23) through the PTO chamber into the lower mount bracket. Install the PTO upper bracket (item #10) on the cylinder head using the remaining 10 x 30mm bolts (item #24), and 10mm lock washers (item #27) and torque to 30 ft.-lb. Install a 3/8" x 3/4" bolt and washer (item #26,23) through the PTO chamber, into Page 4
5 the upper mount bracket. Install the PTO stinger tailpipe (item #8) into the remaining coupler on the collector. Attach the 1-3/4"x 2-1/2" silicone coupler (item #20) between the chamber and tailpipe and secure with #32 hose clamps (item #19). Attach the remaining waterline from the filter block assembly to the fitting on the PTO chamber, secure with a #6 hose clamp (item #22). Connect the stock 2@ outlet hose to the 2" fitting on the water exit manifold (item #13). Secure with the retained stock clamp. Attach the three 3/8@ waterlines to the outlet fitting on the end of each of the chambers and secure with #6 hose clamps (item #22). Note: You can also use three individual side squirters to bypass the exit water from the chambers. Install remaining AP@ clamp (item #32) over 3/8" waterlines going to the center and mag chambers. Attach to the left upper 6mm bolt hole on the PTO power valve assembly. Attach the cylinder head exit waterlines (item #14) to the water outlet fittings on the cylinder head. Attach the 3/8" barbed ends to the two retained stock waterlines from the side squirters at the front of the boat. Secure all hoses with #6 hose clamps (item #22). IMPORTANT NOTES 1. You must run fuel with a minimum octane rating of 92 (premium pump fuel). Running a lower octane fuel can cause detonation and serious engine damage. 2. Always warm up the engine prior to full throttle/high speed operation. CARBURETOR ADJUSTMENTS Because of the number of variables involved with the triple pipes on this application, Factory Pipe makes no carburetor recommendations. Carburetor adjustments will vary depending on engine modifications, fuel, altitude, and other variables. PLEASE CONSULT A QUALIFIED TECHNICIAN IF YOU ARE NOT FAMILIAR WITH TUNING YOUR CARBURETOR(S). Page 5


6 Page 6
7 GP1200R August 22, 2000 instruction addendum As of this writing the only ignition systems available for the Yamaha GP1200R are: 1. MSD total loss ignition with a RAD flywheel. Currently MSD is out of flywheels which they generally buy from RAD. The downside is that this system retails for about $1,100 retail and requires recharging the battery after every race/ride. The upside is that, well, they are available and they are easily programmed with your desired ignition curve (we recommend a specific curve which is attached) and if installed correctly they are reliable. We strongly recommend you double check the timing with a strobe light. 2. ProTec. ProTec will modify your OEM ignition to raise the rev limiter to about 8,100 RPM for $ This does not change the stock ignition curve which is less than perfect and does not address issues with the exhaust valve. To address the issues with the OEM exhaust valve controller ProTec offers an inline unit which allows you to adjust the valve opening and closing for $ Also not addressed is the temp sensor. The temp sensor may be installed into the outlet water manifold by taping it to 8mm. 3. Riva Yamaha. Riva is currently working on an ignition system which, when it is ready, is to properly control the exhaust valves and have several ignitions curves available. Exhaust valves. You can run an 800 (66e) power valve controller instead of the stock GP1200R unit because the GP1200R controller will close the valve if the RPM goes past the normal rev limiter. Dan Racer=s Edge makes these great pressure operated exhaust valves, ala Sea-Doo7/Rotax7 RAVE7 valves. These valves are available through Riva Yamaha. The down side is that they are about $450 and some people say that you should pull the cylinders off to match the valves to your cylinder and pull the shaft out. The upside is that, well, they are available, and they are reported to operate faster than the OEM Yamaha electronic valves and are easily adjusted by changing springs. Vendor Vendor Phone number Item $Retail MSD (915) Total loss ignition.$ RAD (562) MSD/RAD flywheel # $ Riva Yamaha (954) Ignitions (eventually) Exhaust valves Handling components Ride Plate, Intake Grates, Sponsons R and D (562) Handling components, Ride Plate, Intake Grates, Sponsons Racer=s Edge (951) Exhaust Valves.$ PRO-TEC (951) Rev Limiter Modification Power Valve Controller $ Page 7
*** FOR COMPETITION USE ONLY per US EPA regulations *** Factory Pipe Bill of Materials 701 SuperJet Type 9
 *** FOR COMPETITION USE ONLY per US EPA regulations *** Factory Pipe Bill of Materials 701 SuperJet Type 9 Item Qty Part Number Part Description 1 1 COMASM0964 701 SuperJet Type 9 chamber assy. (includes
***FOR COMPETITION USE ONLY as per US EPA regulations *** Factory Pipe Bill of Materials Kawasaki Ultra 150 Triple Pipe
 ***FOR COMPETITION USE ONLY as per US EPA regulations *** Factory Pipe Bill of Materials Kawasaki Ultra 150 Triple Pipe Item Qty Part Number Part Description 1 1 COMASM0947 Ultra 150 PTO Chamber assembly
*** FOR COMPETITION USE ONLY per US EPA regulations *** Factory Pipe Bill of Materials Kawasaki STX-R Triple Pipe
 *** FOR COMPETITION USE ONLY per US EPA regulations *** Factory Pipe Bill of Materials Kawasaki STX-R Triple Pipe Item Qty Part Number Part Description 1 1 COMASM0935 STX-R PTO Chamber assembly 2 1 COMASM0936
*** FOR COMPETITION USE ONLY as per US EPA regulations *** Factory Pipe Bill of Materials SeaDoo 951XP Twin
 *** FOR COMPETITION USE ONLY as per US EPA regulations *** Factory Pipe Bill of Materials SeaDoo 951XP Twin Item Qty Part Number Part Description 1 1 COMASM0851 951XP MAG Chamber assembly 2 1 COMASM0850
*** FOR COMPETITION USE ONLY per US EPA regulations *** Factory Pipe Bill of Materials Sea-Doo 785XP Spec I 1997
 *** FOR COMPETITION USE ONLY per US EPA regulations *** Factory Pipe Bill of Materials Sea-Doo 785XP Spec I 1997 Item# Qty Part # Part Description - 1 COMASM0200 785 Spec I hardware kit, 97 (includes items
***FOR COMPETITION USE ONLY per US EPA regulations*** Factory Pipe Bill of Materials Sea-Doo 720 XP 1995 / 650 XP 1994
 ***FOR COMPETITION USE ONLY per US EPA regulations*** Factory Pipe Bill of Materials Sea-Doo 720 XP 1995 / 650 XP 1994 Item# Qty Part Number Part Description - 1 COMASM0300 Sea-Doo XP HX Hardware kit (Includes
* * * FOR COMPETITION USE ONLY per US EPA regulations* * * Factory Pipe Bill of Materials 1996-Up 701 SuperJet Limited
 * * * FOR COMPETITION USE ONLY per US EPA regulations* * * Factory Pipe Bill of Materials 1996-Up 701 SuperJet Limited Item# Qty. Part Number Part Description 1 1 COMCST0040 B Headpipe - 701 Yamaha all/xir
Factory Pipe Bill of Materials 650 Super Jet
 Factory Pipe Bill of Materials 650 Super Jet Item# Qty. Part Description 1 1 Factory Pipe tunable cast aluminum headpipe 2 1 Factory Pipe aluminum chamber 3 1 Factory Pipe tuned exhaust manifold 4 2 100-120mm
***FOR COMPETITION USE ONLY per US EPA regulations*** Factory Pipe Bill of Materials 650 SX/X2 Limited & Mod
 ***FOR COMPETITION USE ONLY per US EPA regulations*** Factory Pipe Bill of Materials 650 SX/X2 Limited & Mod Item# Qty. Part Number Part Description 1 1 COMCST0010 Reg headpipe-750 SX/650 SX-X2/650 SJ
INSTALLATION INSTRUCTIONS
 APPLICATIONS: 2000-`02 GPR1200R; 1999-`00 XL1200Ltd.; 2001-`03 XLT1200 PARTS LISTING PART# QTY DESCRIPTION N/A 1 Stinger 3 Billet Flange N/A 1 Stinger 3 Head Pipe N/A 1 Stinger 2/3 Tail Pipe N/A 6 8MM
INSTALLATION INSTRUCTIONS
 APPLICATIONS: 2000-`02 GP1200R; 1999-`00 XL1200Ltd.; 2001-`03 XLT1200 equipped with Riva Stinger2. NOTE: Stinger3 Upgrade Kit is compatible with Riva Stinger2 Exhaust System only. Do not attempt to install
POLARIS MARINE 1200 Model #W000099D Polaris Sales Inc. PARTS MANUAL PN and MICROFICHE PN /00
 POLARIS MARINE 00 Model #W000099D 000 Polaris Sales Inc. PARTS MANUAL PN 9968 and MICROFICHE PN 9969 /00 TABLE OF CONTENTS POLARIS MARINE 00 W000099D Parts Manual A AIR VENT...........................
PARTS MANUAL PN and MICROFICHE PN /03. OCTANE Model #W045402DA. E 2003 Polaris Sales Inc.
 PARTS MANUAL PN 0 and MICROFICHE PN 00 /0 OCTANE Model #W00DA E 00 Polaris Sales Inc. This page left blank intentionally. TABLE OF CONTENTS OCTANE W00DA Parts Manual BATTERY BOX... BILGE PUMP... CARBURETOR...
GEN-3 Power Cooler Kit
 GEN-3 Power Cooler Kit PART# RS1752-PC APPLICATION(S): 215hp Sea Doo RXP / RXT / GTX-Supercharged We strongly recommend the use of a service manual to familiarize yourself with the various components and
DAYTONA 700 (97DTA-1997) Page 1 of 60 BILGE PUMP ASSEMBLY
 Page 1 of 60 BILGE PUMP ASSEMBLY") 1997 DAYTONA 700 (97DTA-1997) Page 1 of 60 BILGE PUMP ASSEMBLY 1997 DAYTONA 700 (97DTA-1997) Page 2 of 60 BILGE PUMP ASSEMBLY Ref # Part Number Qty S/P/F Description 1 0673-377 1 Fitting, Outlet - Bilge
1997 DAYTONA 700 (97DTA-1997) Page 1 of 60 BILGE PUMP ASSEMBLY 1997 DAYTONA 700 (97DTA-1997) Page 2 of 60 BILGE PUMP ASSEMBLY Ref # Part Number Qty S/P/F Description 1 0673-377 1 Fitting, Outlet - Bilge
RIVA YAMAHA GPR MECHANICAL TRIM-TAB SYSTEM PART # (RY2820) APPLICATIONS: GP1200R GP800R NOTICE :
 APPLICATIONS: GP1200R GP800R NOTICE :") RIVA YAMAHA GPR MECHANICAL TRIM-TAB SYSTEM PART # (RY80) APPLICATIONS: 000-00 GP00R 00-00 GP800R NOTICE : This system has been upgraded with a new heavy-duty pivot rod that features welded on push rod
RIVA YAMAHA GPR MECHANICAL TRIM-TAB SYSTEM PART # (RY80) APPLICATIONS: 000-00 GP00R 00-00 GP800R NOTICE : This system has been upgraded with a new heavy-duty pivot rod that features welded on push rod
GP1800, VXR/VXS Rear Exhaust Kit PART# RY15061
 GP1800, VXR/VXS Rear Exhaust Kit PART# RY15061 We strongly recommend the use of a service manual to familiarize yourself with the various components and procedures involved with this installation. Please
Please read the following completely prior to beginning installation.
 APPLICATION: `04~07 Kawasaki STX-15F Kawasaki STX-15F Supercharger Kit PART# RK1785 Please read the following completely prior to beginning installation. Although every effort has been made to simplify
BA /02/03/04/06/07/08/13/13B/15 BIG AIR KIT (BAK) - Yamaha Road Star (99-07)
 - Yamaha Road Star (99-07)") BA-2020-00/02/03/04/06/07/08/13/13B/15 BIG AIR KIT (BAK) - Yamaha Road Star (99-07) Page: 1 Revision: 6.2-02/23/2011 Install Time: 1.5 Hours We recommend a qualified Yamaha technician install this kit
BA-2020-00/02/03/04/06/07/08/13/13B/15 BIG AIR KIT (BAK) - Yamaha Road Star (99-07) Page: 1 Revision: 6.2-02/23/2011 Install Time: 1.5 Hours We recommend a qualified Yamaha technician install this kit
XLT SPECIAL TRIPLE PIPE SET P.N Installation Instructions
 1995-97 XLT SPECIAL TRIPLE PIPE SET P.N. 09-598 Installation Instructions Revised 8/20/02 Read instructions carefully before installation 1 - Remove stock exhaust, Y-Pipe, front and rear muffler support.
MONTEGO DELUXE (95MTB-W-1995) Page 1 of 50 BILGE PUMP ASSEMBLY
 Page 1 of 50 BILGE PUMP ASSEMBLY") 1995 MONTEGO DELUXE (95MTB-W-1995) Page 1 of 50 BILGE PUMP ASSEMBLY 1995 MONTEGO DELUXE (95MTB-W-1995) Page 2 of 50 BILGE PUMP ASSEMBLY Ref # Part Number Qty S/P/F Description 1 0673-377 2 Fitting, Outlet
1995 MONTEGO DELUXE (95MTB-W-1995) Page 1 of 50 BILGE PUMP ASSEMBLY 1995 MONTEGO DELUXE (95MTB-W-1995) Page 2 of 50 BILGE PUMP ASSEMBLY Ref # Part Number Qty S/P/F Description 1 0673-377 2 Fitting, Outlet
Revised 10/23/2015 Page 2 of 10
 1.Remove the gauge, side panels, hood and headlight. Remove the air box from the throttle bodies then remove the seat and gas tank. 2.Carefully remove temp sensor from air box using a small pick or screw
XCR 600/ XLT TRIPLE PIPE SET P.N Installation Instructions
 1994-97 XCR 600/1993-97 XLT TRIPLE PIPE SET P.N. 09-5970 Installation Instructions Read instructions carefully before installation 1-Remove stock exhaust, Y-pipe, and rear muffler support. 2-Install three
Engine Removal / Installation Sea-Doo 800 RFI
 Step 1 Battery and Seat Brace Removal Step 2 Intake Removal 2.1 (Below) Disconnect the head temp sensor wire, head cooling lines, and the lines to the rave valves. 2.4 (Below)Remove the four bolts securing
CHALLENGER TWIN TURBO SYSTEM INSTALLATION INSTRUCTIONS
 CHALLENGER TWIN TURBO SYSTEM INSTALLATION INSTRUCTIONS 1 Verify contents of kits with supplied packing list 1) Unhook the battery. 2) Remove wheel wells & front fascia of vehicle. 3) Remove the catalytic
TURBO KIT INSTRUCTIONS
 Revision 12/20/10 TURBO KIT INSTRUCTIONS This turbo kit consists of the necessary parts to upgrade or add a turbo to your 22R/RE/RET. This kit may require some fabrication to address your particular application
POLARIS XLT-SPECIAL TRIPLE PIPE SET P.N
 1998-99 POLARIS XLT-SPECIAL TRIPLE PIPE SET P.N. 09-596 Important: Read instructions carefully before installation. 1-Remove stock exhaust, Y-pipe, and rear muffler support. 2-Install three exhaust flanges,
Edelbrock E-Force RPM Carburetor Supercharger Chevrolet LS Engines
 Carburetors and air cleaner sold separately. Edelbrock E-Force RPM Carburetor Supercharger Chevrolet LS Engines Rectangular Port Heads: 1511, 15111, 15113 Cathedral Port Heads: 1512, 15121, 15123 Page
Fizzle Intercooler Kit Installation Instructions
 Fizzle Intercooler Kit Installation Instructions Note: The minimum exhaust modification required for the installation of this intercooler is the removal of the OEM black plastic resonator box. It can easily
TiAL R770 & S605. Installation notes. TIAL Sport!! TiALsport.com!! Revision 2
 TiAL R770 & S605 Installation notes TIAL Sport!! TiALsport.com!! Revision 2 Caution! The components in this package may require additional parts to be sourced or fabricated for the installation. Due to
SLP PIPE INSTALLATION INSTRUCTIONS #09-9 & # & NEWER POLARIS INDY 650 & RXL PIPE SET EFFECTIVE 6-92
 Page 1 of 5 SLP PIPE INSTALLATION INSTRUCTIONS #09-9 & #09-10 1988 & NEWER POLARIS INDY 650 & RXL PIPE SET EFFECTIVE 6-92 READ INSTRUCTIONS CAREFULLY BEFORE ATTEMPTING TO INSTALL PIPE SET #09-9 (For stock
Block & Side Cover 4-5. Crank, Piston & Rod 6-7. Cylinder Head 8-9. Cam & Valve train Carburetor / Manifold Flywheel & Ignition 14-15
 Table of Contents 2-1-2005 Title Page Block & Side Cover 4-5 Crank, Piston & Rod 6-7 Cylinder Head 8-9 Cam & Valve train 10-11 Carburetor / Manifold 12-13 Flywheel & Ignition 14-15 Assembly & 6 Packs 16
CAUTION: READ INSTRUCTIONS CAREFULLY BEFORE STARTING INSTALLATION
 V-Twin MFG. VT No. 32-9500 V-TECH 1 IGNITION KIT, SINGLE FIRE FITS EV SHOVEL, XL THRU 1997 VT No. 32-9503 V-TECH 1 IGNITION KIT, SINGLE FIRE FITS EV, SHOVEL, XL, WITH COIL AND WIRES This is a custom application
YAMAHA RHINO 660 INSTALLATION INSTRUCTIONS
 YAMAHA RHINO 660 INSTALLATION INSTRUCTIONS PLEASE READ THE ENTIRE INSTRUCTIONS BEFORE STARTING THE INSTALLATION. THIS KIT INCLUDES ALL NECESSARY PARTS WHICH INCLUDES A GIBSON PERFORMANCE MUFFLER AND A
POLARIS 700/800 PRO X SINGLE PIPE P.N
 2003-04 POLARIS 700/800 PRO X SINGLE PIPE P.N. 09-839 Important: Read instructions carefully before installation. Note: Do not remove banding placed on the mid section of the pipe. It has been placed there
Page1. ISF Stainless Steel Headers // Part# HDR-004
 Congratulations on the purchase of your ISF Stainless Steel Headers and thank you for choosing Sikky Manufacturing. This installation manual is intended to guide you through the removal of the factory
Pro Series SVHO Engine Cooling Upgrade Kit
 Pro Series SVHO Engine Cooling Upgrade Kit PART# - RY10080-ECUK-PC-1 APPLICATION(S): Yamaha FZ & FX SVHO using RIVA Power Cooler Kit (part # RY17080-PC) We strongly recommend the use of a service manual
Installation Instructions for: TOYOTA 3.4L SUPERCHARGER SYSTEM
 Installation Instructions for: TOYOTA 3.4L SUPERCHARGER SYSTEM 1996-2002 4Runner 1997-1998 T100 1997-2004 Tacoma 2000-2003 Tundra * PREMIUM FUEL REQUIRED * Magnuson Products LLC 1990 Knoll Drive, Bldg
FACTORY PIPE COUPLER, CLAMP, AND MOUNT APPLICATION CHART
 EXHAUST DRIVE LINE ELECTRICAL WATERLINE BODY ACCESSORIES SERVICE TOOLS FACTORY PIPE GENUINE REPLACEMENT PARTS ID LENGTH 1-3/4 5 2 2-1/2 2-1/2 2-3/4 3-1/2 2-1/16 3 2-1/2 2-1/4 2 3-1/2 2-3/16 2-1/2 2-1/2
K9-C23 INSTALLATION INSTRUCTIONS K9 Kit for CHEVY TAHOE PPV (9C1)
") K9-C23 INSTALLATION INSTRUCTIONS K9 Kit for 2015-2018 CHEVY TAHOE PPV (9C1) TOOLS Needed: Phillips Screw Driver Trim panel removal tool Caulk Gun Standard Socket set Wire Cutters /Crimpers Drill & Drill
K9-C23 INSTALLATION INSTRUCTIONS K9 Kit for 2015-2018 CHEVY TAHOE PPV (9C1) TOOLS Needed: Phillips Screw Driver Trim panel removal tool Caulk Gun Standard Socket set Wire Cutters /Crimpers Drill & Drill
Pump Gas Instructions for Polaris And 800 Models. Important Information before Installing This System:
 Pump Gas Instructions for Polaris 600 700 And 800 Models Important Information before Installing This System: Before you begin your turbo install, read through these instructions to determine if you are
1996+ Yamaha G16 / G22 Yamaha G29/YDRA Drive
 Vegas Carts & Performance 2995 Coleman St North Las Vegas, NV 89032 702-530-7753 VegasCarts.com 625cc Big Block Installation Instructions 1996+ Yamaha G16 / G22 Yamaha G29/YDRA Drive Revised 8/6/2018 1
SHORT RAM SYSTEM. Installation Instructions for: Part Number Mazda Miata
 SHORT RAM SYSTEM Installation Instructions for: Part Number 22-482 2000-2003 Mazda Miata ADVANCED ENGINE MANAGEMENT INC. 2205 126 TH Street, Unit A Hawthorne, CA. 90250 Phone: (310) 484-2322 Fax: (310)
Prerequisites: Shop Manual (recommended) pages 3-9 through 3-13.
 pages 3-9 through 3-13.") Prerequisites: Order your gaskets average about $25.00 bucks X 2 so $50.00 4NK-11193-00-00 Obtain a shim kit (Should have several 265 and 270s) (Some dealers will exchange) Obtain a Valve Bucket Tool YM-33961
Prerequisites: Order your gaskets average about $25.00 bucks X 2 so $50.00 4NK-11193-00-00 Obtain a shim kit (Should have several 265 and 270s) (Some dealers will exchange) Obtain a Valve Bucket Tool YM-33961
Engine Removal / Installation Sea-Doo 951DI
 Step 1 Battery Removal Step 2 Intake Removal 2.1 (Below) Loosen the two 10mm bolts and slide the intakes out of the brace on the exhaust manifold. Slide the intakes up and out of the hull. 2.3 (Below)
9/7/2014 F9.9MSHV 1997 / CYLINDER CRANKCASE Yamaha Motor Corporation, U.S.A. All rights reserved.
 F9.9MSHV 997 Page of 45 9/7/04 F9.9MSHV 997 / CYLINDER CRANKCASE 04 Yamaha Motor Corporation, U.S.A. All rights reserved. F9.9MSHV 997 Page of 45 9/7/04 Part List F9.9MSHV 997 / CYLINDER CRANKCASE REF
SLP PART # ATTENTION DEALER
 SLP PART #09-872 ATTENTION DEALER PLEASE PROVIDE YOUR CUSTOMER WITH THE INSTALLATION AND INSTRUCTION DATA THAT IS SUPPLIED IN THIS PACKET FOR THIS PRODUCT. Before you begin, please read the following:
Sinlge Pipe for /800 Pro-X/Pro-X2/Pro-XR P.N
 Sinlge Pipe for 2003-04 700/800 Pro-X/Pro-X2/Pro-XR P.N. 09-9 Important: Read instructions carefully before installation. Note: Do not remove banding placed on the mid section of the pipe. It has been
Counter-clockwise, view to output shaft Mixture 1:50, 2-stroke-oil, fuel min. 95 octane (RON)
") HIRTH 2703 Carburated - 55 hp The 2703 V is an air cooled, piston controlled 2-cylinder-inline-2-stroke engine with one or two carburetors and Nikasil coated cylinders. It has one of the highest power
HIRTH 2703 Carburated - 55 hp The 2703 V is an air cooled, piston controlled 2-cylinder-inline-2-stroke engine with one or two carburetors and Nikasil coated cylinders. It has one of the highest power
Backwater Performance Systems Large Vanguard Mikuni Twin Carburetor Kit
 Backwater Performance Systems Large Vanguard Mikuni Twin Carburetor Kit 1. Throttle Cable Twin (CKC-41) 2. Carburetor VM30mm (CKC-40) 3. Loctite 242.5mL (A-210) 4. Air Cleaner Filter 6000 (EC-86) 5. Rev
60-90 EXTRA 260/300 DLE 20 INSTALLATION GUIDE
 60-90 EXTRA 260/300 DLE 20 INSTALLATION GUIDE This engine installation addendum will outline the installation of the new DLE 20cc in the 60-90 Extra 260 and Extra 300. The Extra 300 is shown however the
POLARIS XLT 580/600 INSTALLATION INSTRUCTIONS PART # READ INSTRUCTIONS CAREFULLY BEFORE ATTEMPTING TO INSTALL PIPE SET
 Page 1 of 6 POLARIS 1993-97 XLT 580/600 INSTALLATION INSTRUCTIONS PART #09-595 READ INSTRUCTIONS CAREFULLY BEFORE ATTEMPTING TO INSTALL PIPE SET 1. Remove stock exhaust, y-pipe, front and rear muffler
BEFORE BEGINNING INSTALLATION
 EDELBROCK E-FORCE SUPERCHARGER KITS Part #1551, 15511, 1552, 15521, 1553, 15531, 1554, 15541, 15611, 15621, 15631, 15641 INSTALLATION INSTRUCTIONS PLEASE study these instructions carefully before beginning
Kit Part Number:
 Equipped with AEM DRYFLOW Filter No oil required! Kit Part Number: 21-573 2006-2008 Toyota Yaris 1.5L *Legal in California only for racing vehicles which may never be used upon a highway. 2008, Advanced
Official Powerdyne Model BD Supercharger and Kit Limited Warranty
 Official Powerdyne Model BD Supercharger and Kit Limited Warranty Powerdyne Automotive Products Inc. warrants your new Powerdyne model BD Supercharger and installation kit to be free of defects in workmanship
Rear Exhaust Kit PART# - RS
 Rear Exhaust Kit PART# - RS15110-1 APPLICATION(S): Sea Doo RXP-X 260 & GTR 215 We strongly recommend the use of a service manual to familiarize yourself with the various components and procedures involved
Brute Force Intake System. Installation Instructions for: Part Number Toyota 4Runner 3.4L V Toyota Tacoma 3.
 Brute Force Intake System Installation Instructions for: Part Number 21-8402 1999-2002 Toyota 4Runner 3.4L V6 1999-2004 Toyota Tacoma 3.4L V6 ADVANCED ENGINE MANAGEMENT INC. 2205 126 TH Street, Unit A
4. Remove (4) 10mm and (1) 7mm bolt that holds fascia at front corners, on each side
 10mm and (1) 7mm bolt that holds fascia at front corners, on each side") 2010 Camaro LS3 1. Disconnect battery ground 2. Remove front wheels 3. Remove (5) push pins and (5) #20 torx screws on inner front wheel well liners and remove liners on each side 4. Remove (4) 10mm and
2010 Camaro LS3 1. Disconnect battery ground 2. Remove front wheels 3. Remove (5) push pins and (5) #20 torx screws on inner front wheel well liners and remove liners on each side 4. Remove (4) 10mm and
INSTALLATION INSTRUCTIONS
 Equipped with AEM Dryflow Filter No Oil Required! INSTALLATION INSTRUCTIONS PART NUMBER:22-489 2004 MAZDA Miata Mazdaspeed L4-1.8L C.A.R.B. E.O. # D-670 PARTS LIST Description Qty. Part Number Element
All cores due 30 days after invoice date - no credit after 60 days.
 NO WARRANTY STATEMENT High performance parts & products no warranty policy: The purchaser understands and recognizes that high performance diesel products and services sold by INDUSTRIAL INJECTION SERVICE.
Instructions For Trick Flow Track Heat 4.6L 2V SOHC Ford Intake Manifold System TFS-518B0002, TFS , TFS
 MADE IN U.S.A. Instructions For Trick Flow Track Heat 4.6L 2V SOHC Ford Intake Manifold System TFS-518B0002, TFS-51800002, TFS-51811002 1999-2004 FORD MUSTANG GT INSTALLATION INSTRUCTIONS 1 LIMITED WARRANTY
POLARIS 700 XC/SKS/RMK SLP TWIN PIPE SET P.N
 POLARIS 700 XC/SKS/RMK SLP TWIN PIPE SET P.N. 09-710 IMPORTANT: Read instruction carefully before installation. For engines with stock porting use either 09-700 glass pack pipe set or 09-710 canister pipe
Counter-clockwise, view to output shaft Mixture 1:50, 2-stroke-oil, fuel min. 95 octane (RON)
") HIRTH 2703 Carburated - 55 hp The 2703 V is an air cooled, piston controlled 2-cylinder-inline-2-stroke engine with one or two carburetors and Nikasil coated cylinders. It has one of the highest power
HIRTH 2703 Carburated - 55 hp The 2703 V is an air cooled, piston controlled 2-cylinder-inline-2-stroke engine with one or two carburetors and Nikasil coated cylinders. It has one of the highest power
Fuel Pressure Regulator Kit PART# - RY12040-RRFPR-6S5
 APPLICATION(S): Yamaha FX-SHO, FZR & FZS Fuel Pressure Regulator Kit PART# - RY12040-RRFPR-6S5 We strongly recommend the use of a service manual to familiarize yourself with the various components and
Instant Chat off the main page of Or simply call our tech team at
 Subaru WRX/STI Air Oil Separator for Front Mounted Intercooler Setups 2013-02- 22 Thank you for purchasing this PERRIN product for your car! Installation of this product should only be performed by persons
GENESIS Model #B INT L GENESIS Model #I Rev. 01
 GENESIS Model #B0 INT L GENESIS Model #I0 Rev. 0 PARTS MANUAL PN and MICROFICHE PN / TABLE OF CONTENTS Parts Manual A AIR VENT........................... B BATTERY BOX....................... C BILGE PUMP.........................
9/7/2014 T9.9ELRZ 2001 / TOP COWLING Yamaha Motor Corporation, U.S.A. All rights reserved.
 T9.9ELRZ 00 Page of 56 9/7/0 T9.9ELRZ 00 / TOP COWLING 0 Yamaha Motor Corporation, U.S.A. All rights reserved. T9.9ELRZ 00 Page of 56 9/7/0 Part List T9.9ELRZ 00 / TOP COWLING REF - NO PART NUMBER PART
COLD AIR INTAKE INSTALLATION INSTRUCTIONS. # D Fits: i (4.8L)
") COLD AIR INTAKE INSTALLATION INSTRUCTIONS # D760-0013 Fits: 2006-10 650i (4.8L) PARTS LIST Air Box Assembly Left tube Center tube Right tube Support bracket AFM housing AFM/TB tube Hardware Kit Congratulations
COLD AIR INTAKE INSTALLATION INSTRUCTIONS # D760-0013 Fits: 2006-10 650i (4.8L) PARTS LIST Air Box Assembly Left tube Center tube Right tube Support bracket AFM housing AFM/TB tube Hardware Kit Congratulations
SLX Model #W004699D INT L SLX Model #W004699I
 SLX Model #W00D INT L SLX Model #W00I PARTS MANUAL PN and MICROFICHE PN / A AIR VENT............................. B B BATTERY BOX........................ B BILGE PUMP.......................... B C CARBURETOR........................
SLP Twin Pipes for 2004 Arctic Cat 900 Mountain Cat Twin P.N (CP)
") Setting the World s Performance Standards Twin Pipes for 2004 Arctic Cat 900 Mountain Cat Twin P.N. 09-907(CP) Contents of Pipe Set 1 - Plastic Zip tie 3 - Large Head Rivets 4 - Short s 1 - Red Silicone
Setting the World s Performance Standards Twin Pipes for 2004 Arctic Cat 900 Mountain Cat Twin P.N. 09-907(CP) Contents of Pipe Set 1 - Plastic Zip tie 3 - Large Head Rivets 4 - Short s 1 - Red Silicone
DISPLACEMENT: The maximum displacement that may be achieved in the Ski Superstock Class is 1500 cc.
 SKSS.1 SUPERSTOCK CLASS COMPETITION Competitors in this class are allowed modifications to gain maximum machine and engine performance while restricting the build costs by prohibiting aftermarket hulls
Procharger Stage II Intercooled Supercharger System (11-14 GT)
") Procharger Stage II Intercooled Supercharger System (11-14 GT) Installation Time: Approximately one day. Installed on 2012 Mustang GT 5.0/Manual Required Tools 3/8 Socket Set (Standard and Metric) 1/2
Procharger Stage II Intercooled Supercharger System (11-14 GT) Installation Time: Approximately one day. Installed on 2012 Mustang GT 5.0/Manual Required Tools 3/8 Socket Set (Standard and Metric) 1/2
3 October 2016 PN# V Dodge Twin Turbo Kit (I-00274) ½ D o d g e 2 4 v I S B
 ½ D o d g e 2 4 v I S B") 3 October 2016 PN#1045320 24V Dodge Twin Turbo Kit (I-00274) 1 DOWNLOAD ENHANCED INSTALL MANUALS AT dieselperformance.com BD Twin Turbo Kit 1998½- 2 0 0 2 D o d g e 2 4 v I S B Part# 1045320 PLEASE READ
3 October 2016 PN#1045320 24V Dodge Twin Turbo Kit (I-00274) 1 DOWNLOAD ENHANCED INSTALL MANUALS AT dieselperformance.com BD Twin Turbo Kit 1998½- 2 0 0 2 D o d g e 2 4 v I S B Part# 1045320 PLEASE READ
Edelbrock E-Force RPM Carburetor Supercharger C.I.D. Small-Block Chevy
 Edelbrock E-Force RPM Carburetor Supercharger 302-400 C.I.D. Small-Block Chevy 1986 and Earlier Style Heads: 1513, 1514, 15131, 15133, 15141, 15143 E-Tec and Vortec Style Heads: 1515, 1516, 15151, 15153,
Installation Instructions Dual Perimeter Plate Nitrous System (#82185)
") Installation Instructions Dual Perimeter Plate Nitrous System (#82185) Thank you for choosing ZEX. If at any time you have questions regarding this or any of our products, please call our ZEXTEK support
Installation Instructions Dual Perimeter Plate Nitrous System (#82185) Thank you for choosing ZEX. If at any time you have questions regarding this or any of our products, please call our ZEXTEK support
Assembly Instructions for A, A, A, & A
 Update Instructions Yield-Pro 1225/1625 Planter Used with: Yield-Pro 1225 Planter Yield-Pro 1625 Planter General Information! When you see this symbol, the subsequent instructions and warnings are serious
MAZDASPEED3 Intercooler Instructions
 MAZDASPEED3 Intercooler Instructions Congratulations on your purchase of the COBB Tuning Front Mount Intercooler System for your 2007-2009 Mazdaspeed3. The following instructions should assist you through
SLP PART # ATTENTION DEALER
 SLP PART #09-883 ATTENTION DEALER PLEASE PROVIDE YOUR CUSTOMER WITH THE INSTALLATION AND INSTRUCTION DATA THAT IS SUPPLIED IN THIS PACKET FOR THIS PRODUCT. Before you begin, please read the following:
Instant Chat off the main page of Or simply call our tech team at
 02-07 WRX/STI Air Oil Separator for Top Mounted Intercooler Setups 2013-02- 27 Thank you for purchasing this PERRIN product for your car! Installation of this product should only be performed by persons
TS-L 1000 (98MCC-1998) Page 1 of 69 BILGE PUMP ASSEMBLY
 Page 1 of 69 BILGE PUMP ASSEMBLY") 1998 TS-L 1000 (98MCC-1998) Page 1 of 69 BILGE PUMP ASSEMBLY 1998 TS-L 1000 (98MCC-1998) Page 2 of 69 BILGE PUMP ASSEMBLY 1 0673-377 1 Fitting, Outlet - Bilge 2 0612-456 2 Seal, Fitting 3 0623-753 2 /P
1998 TS-L 1000 (98MCC-1998) Page 1 of 69 BILGE PUMP ASSEMBLY 1998 TS-L 1000 (98MCC-1998) Page 2 of 69 BILGE PUMP ASSEMBLY 1 0673-377 1 Fitting, Outlet - Bilge 2 0612-456 2 Seal, Fitting 3 0623-753 2 /P
INSTALLATION INSTRUCTIONS
 Equipped with AEM Dryflow Filter No Oil Required! INSTALLATION INSTRUCTIONS PART NUMBER:21-8402 1999-2004 TOYOTA Tacoma V6-3.4L C.A.R.B. E.O. # D-670 1999-2002 TOYOTA 4Runner V6-3.4L C.A.R.B. E.O. # D-670
(C6) Chevrolet Corvette Crank Scraper and Oil Pan Baffle Kit
 Chevrolet Corvette Crank Scraper and Oil Pan Baffle Kit") 2005-2013 (C6) Chevrolet Corvette Crank Scraper and Oil Pan Baffle Kit Part No. EGM-21X Made in USA Important: Read these instructions in their entirety prior to installation. Rev 160614 Applications 2005-2013
2005-2013 (C6) Chevrolet Corvette Crank Scraper and Oil Pan Baffle Kit Part No. EGM-21X Made in USA Important: Read these instructions in their entirety prior to installation. Rev 160614 Applications 2005-2013
INSTALLATION MANUAL BULLET PROOF OIL COOLER KIT F-SERIES
 INSTALLATION MANUAL BULLET PROOF OIL COOLER KIT 2003-2007 F-SERIES NEAL TECHNOLOGIES, INC. U.S. PATENT 8,375,917; 8,505,512 and OTHER PATENTS PENDING UPDATED 1/8/2018 2014 BULLET PROOF DIESEL BEFORE You
HIRTH 2703 Carburated - 55 hp
 HIRTH 2703 Carburated - 55 hp The 2703 V is an air cooled, piston controlled 2-cylinder-inline-2-stroke engine with one or two carburetors and Nikasil coated cylinders. It has one of the highest power
COLD AIR INTAKE INSTALLATION INSTRUCTIONS. # D Fits: i (4.8L)
") COLD AIR INTAKE INSTALLATION INSTRUCTIONS # D760-0012 Fits: 2006-10 550i (4.8L) PARTS LIST Air Box Assembly Left tube Center tube Right tube Outer Tube AFM housing AFM/TB tube Hardware Kit Congratulations
COLD AIR INTAKE INSTALLATION INSTRUCTIONS # D760-0012 Fits: 2006-10 550i (4.8L) PARTS LIST Air Box Assembly Left tube Center tube Right tube Outer Tube AFM housing AFM/TB tube Hardware Kit Congratulations
Mfg. No: ,700 Watt Briggs & Stratton Inverter
 Parts Manual Mfg. No: 030651-00 1,700 Watt Briggs & Stratton Inverter Copyright Briggs and Stratton. All Rights reserved 13-Nov-2017 Model Components Table Of Contents Page Alternator & Control Panel
SLP Single Pipe for Polaris 600 H.O. Fusion/RMK/Switchback/Shift (Carb Models)
") SLP Single Pipe for 2006-09 Polaris 600 H.O. Fusion/RMK/Switchback/Shift (Carb Models) Part # 09-634 Kit Contents: 2-7 Insulated Heat Tape 1-1/8 Pipe Adjustment Washer 4-30 Reflective Heat Tape 1 - Wire
SLP Single Pipe for 2006-09 Polaris 600 H.O. Fusion/RMK/Switchback/Shift (Carb Models) Part # 09-634 Kit Contents: 2-7 Insulated Heat Tape 1-1/8 Pipe Adjustment Washer 4-30 Reflective Heat Tape 1 - Wire
Equipped with AEM Dryflow Filter No Oil Required! INSTALLATION INSTRUCTIONS PART NUMBER: DS (Plastic Intake Tube)
") Equipped with AEM Dryflow Filter No Oil Required! INSTALLATION INSTRUCTIONS PART NUMBER:21-8126DS (Plastic Intake Tube) 2011-2014 Ford F150 V6 3.5L ECOBOOST C.A.R.B. E.O. D-670-19 AEM Induction Systems
Equipped with AEM Dryflow Filter No Oil Required! INSTALLATION INSTRUCTIONS PART NUMBER:21-8126DS (Plastic Intake Tube) 2011-2014 Ford F150 V6 3.5L ECOBOOST C.A.R.B. E.O. D-670-19 AEM Induction Systems
2010+ Audi B8 S4/S5 3.0T S-FLO Intake Kit INSTALLATION GUIDE FOR RACING USE ONLY
 INSTALLATION GUIDE 2010+ Audi B8 S4/S5 3.0T S-FLO Intake Kit FOR RACING USE ONLY Congratulations on your purchase of the AWE Tuning S-FLO Intake for the 2010+ Audi B8 S4 and B8 S5 3.0T. Exquisite build
Calibration Procedures:
 Calibration Procedures: Setting the Ignition Timing Correction Selecting an Advance Curve Setting Rev Limit RPM These Instructions are for Tempest II Ignitions Only Rev. C // Severe engine damage is possible
GP1-R FULL EXHAUST SUZUKI GSX-R600 / GSX-R
 THIS EXHAUST SYSTEM IS DESIGNED FOR USE IN CLOSED COURSE RACING ONLY, AND IS NOT INTENDED FOR PUBLIC HIGHWAY USE. IN THE STATE OF CALIFORNIA, IT IS ILLEGAL TO MODIFY THE EMISSION CONTROL SYSTEM ON ANY
INSTALLATION INSTRUCTIONS
 Equipped with AEM Dryflow Filter No Oil Required! INSTALLATION INSTRUCTIONS PART NUMBER:21-8011 1996-1999 Chevrolet C1500 V8-5.0L C.A.R.B. E.O. # D-392-19 1996-1999 Chevrolet C1500 V8-5.7L C.A.R.B. E.O.
952004S STAINLESS POWER EXHAUST SYSTEM CHEVY 454 CLASS A MOTORHOME SINGLE AIR PUMP
 952004S STAINLESS POWER EXHAUST SYSTEM 75-86 CHEVY 454 CLASS A MOTORHOME SINGLE AIR PUMP Thank you very much for purchasing our Gibson Exhaust System for your vehicle. If you need further assistance, please
INSTALLATION INSTRUCTIONS
 INSTALLATION INSTRUCTIONS Part# 22-7810 Add On Kit for Your ADS System Contents: Complete Install Kit for Your ARB CKMTA12V Compressor For the most up-to-date instructions please visit www.updownair.com
INSTALLATION INSTRUCTIONS
 INSTALLATION INSTRUCTIONS Part# 22-7810 Jeep JK/JKU ARB Mounting Kit 2007-2018.5 For the most up to date instructions please visit www.updownair.com www.updownair.com 833 226 4863 IMPORTANT INFORMATION
TRACKER /6/2013 COPYRIGHT 6/10/10 ALL RIGHTS RESERVED
 TRACKER 3000 PAGE 1 TRACKER 3000 DECK SUB ASSY 35 3 33 3 22 23 38 2 50 9 1 21 36 53 39 1 32 58 56 7 9 19 26 31 10 8 57 11 9 50 5 37 27 300173 MOUNTING PLATE TWIN ASSEMBLY PARTS BREAK DOWN 12 13 1 15 18
RAS.1.3 Sound level shall not exceed 86 db(a) at 22.86m (75 ft.). See Section 19.5 (pg. 78).
 at 22.86m (75 ft.). See Section 19.5 (pg. 78).") RAS.1 RUNABOUT STOCK CLASS COMPETITION Intended to promote interest in stock personal watercraft competition and to enable individuals to become active competitors with low investment and maintenance costs.
RAS.1 RUNABOUT STOCK CLASS COMPETITION Intended to promote interest in stock personal watercraft competition and to enable individuals to become active competitors with low investment and maintenance costs.
Trackspeed Engineering, LLC 1289 Reamwood Ave #A, Sunnyvale, CA
 Trackspeed Engineering, LLC 1289 Reamwood Ave #A, Sunnyvale, CA 94089 650-701-7223 info@trackspeedengineering.com Trackspeed DIY Turbocharger System Installation Instructions v1.00 (10/12/16) Thanks for
HSR Carburetor. Total Kits. Installation Instructions. # Evo Big Twin # present Twin Cam
 HSR Carburetor Total Kits Installation Instructions HSR42 Kits: HSR45 Kits: #42-8 84-99 Evo Big Twin #42-19 99 - present Twin Cam #45-2 84-99 Evo Big Twin #45-3 84-99 Evo Big Twin #45-4 99 - present Twin
INSTALLATION INSTRUCTIONS AOS-R (Air Oil Separator-Return) Turbo Subaru and STi Document# Support:
 Turbo Subaru and STi Document# Support:") INSTALLATION INSTRUCTIONS AOS-R (Air Oil Separator-Return) 02-14 Turbo Subaru and 2015+ STi Document# 19-0102 Support: info@radiumauto.com These instructions are based on a vehicle with an OEM turbocharger
INSTALLATION INSTRUCTIONS AOS-R (Air Oil Separator-Return) 02-14 Turbo Subaru and 2015+ STi Document# 19-0102 Support: info@radiumauto.com These instructions are based on a vehicle with an OEM turbocharger