INSTALLATION INSTRUCTIONS
|
|
|
- Brook Howard
- 5 years ago
- Views:
Transcription

1 APPLICATIONS: 2000-`02 GP1200R; 1999-`00 XL1200Ltd.; 2001-`03 XLT1200 equipped with Riva Stinger2. NOTE: Stinger3 Upgrade Kit is compatible with Riva Stinger2 Exhaust System only. Do not attempt to install if you have a Riva Stinger1 Exhaust System. This kit is compiled of the parts required for installation of Stinger3 billet flange only. No modifications are necessary for this installation. If you have any questions please contact our technical representative directly at (954) or via e- mail at tech_support@rivayam aha.com. PARTS LISTING PART# QTY DESCRIPTION N/A 1 Stinger 3 Billet Flange N/A 1 Stinger 3 Head Pipe RY15-04/ "ID x 3-1/8"L Silicone Coupler RY-AWAB-CLAMP-#64 4 #64-4-1/2" AWAB Hose Clamp N/A 2 1/2" Barbed x 1/4" NPT 45* Brass Fitting /2" Barbed x 1/4" NPT 90* Brass Fitting /8" Barbed x 1/8" NPT 90* Brass Fitting HBT1-664B 1 3/8" Barbed x 1/4" NPT x 3/8" Barbed "T" Fitting N/A 1 1/2" Barbed "T" Fitting RY /8" Waterline, Synflex, Black RY /2" Waterline, Synflex, Black COMCLP #12-1/2" Hose Clamp COMCLP #06-3/8" Hose Clamp RY804B 1 1/2" Water Bypass, Black JW-WR01 1 Inline Water Restrictor INSTALLATION INSTRUCTIONS *WARNING! DISCONNECT BATTERY AND TURN FUEL VALVE OFF BEFORE PERFORMING WORK!* Removing Stinger2 Parts 1. Remove wrist lanyard; disconnect battery cables, spark plug wires and turn fuel valve to off position. 2. Loosen the two OE hose clamps that retain the large black exhaust boot/cooling coupler to billet flange and slide boot/coupler forward over OE exhaust head pipe. (Refer to illustration #2) 3. Loosen hose clamp on 3-1/2"ID X 1-5/8"L silicone coupler that retains the Stinger2 billet flange to OE head pipe. 4. Loosen hose clamps on 4"ID x 3-1/8"L silicone coupler that retain head pipe section of Stinger2 and slide coupler down onto tail pipe section. 5. Remove the 3/8 16 flange nut and 3/8 washer securing head pipe section of Stinger2 to upper lord mount on cylinder head. 6. Disconnect 1/2" and 3/8 ID waterlines attached to Stinger2 billet flange. 7. Remove Stinger2 head pipe and billet flange section. Word doc. RY1522-UK H1 8/26/02 1
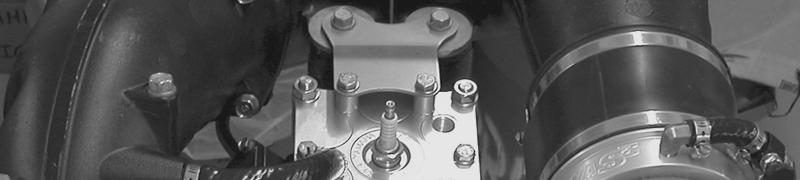
2 Prepping for installation of Stinger3 8. Install the included 1/2" barbed x 1/4" NPT 90 degree brass fitting, 3/8" barbed x 1/8" NPT 90 degree brass fitting and 3/8" barbed x 1/4" NPT x 3/8" barbed brass T fitting into Stinger3 billet flange. (Refer to illustration #1) Note: Use pipe thread sealant on threads. Do not over tighten. 9. Install included Inline Water Restrictor on Stinger3 billet flange between the 3/8" barbed x 1/8"NPT 90 degree brass fitting and the 3/8" barbed x 1/4"NPT x 3/8" barbed brass T fitting using two 2 long pieces of included 3/8 ID waterline. (Refer to illustration #1) Secure using included 3/8 hose clamps. Do not over tighten clamps. WARNING: Do not remove washer between jam nut and valve. Overheat damage could occur if washer is removed and valve is closed completely. (See Recommendations & Tips on page 3 for tuning using Inline Water Restrictor.) 10. Install included 1/2 water bypass. Note: We recommend installing bypass under grab handle at rear of craft as water exiting bypass is hot. Be sure to use silicone sealant when installing. Secure one end of included 1/2 ID waterline to bypass using included 1/2 hose clamp. Do not over tighten clamp. Run waterline forward along left side of craft past bulkhead. 11. For OEM Cylinder Head Applications: Splice the longer OE 1/2" waterline from exhaust head pipe to cylinder head. Install included 1/2" barbed T Fitting and secure using supplied 1/2" hose clamps. Attach 1/2" waterline for previously installed 1/2" bypass to T fitting and secure using included 1/2" hose clamp. (Refer to illustration #5.) Do not over tighten clamps. For Riva Performance & Pro-Series Cylinder Head Applications: Install one each of included 1/2" barbed X 1/4" NPT 45 degree brass fittings into front and center cylinder heads. Install included 1/2" barbed X 1/4" NPT 90 degree brass fitting into rear cylinder head. Replace OE 1/2" waterline from exhaust head pipe to cylinder head with included 1/2" waterline and secure using OE 1/2" hose clamps. Attach 1/2" waterline from previously installed 1/2" bypass to 1/2" barbed X 1/4" NPT 90 degree brass fitting on rear cylinder head and secure using included 1/2" hose clamp. (Refer to illustration #6.) NOTE: Use pipe thread sealant on threads. Do not over tighten brass fittings or hose clamps. Installing Stinger3 ** DENOTES: Prior to installing we strongly recommend you thoroughly clean all couplers and mating surfaces with a non-residual cleaner such as PJ-1 Super Cleaner. (This is available through Riva Yamaha s parts department [part# ] and at most motorcycle dealerships.) Only use window cleaner to ease installation. DO NOT use any type of lubricant or solvent! 12. Insert Stinger3 billet flange into 3-1/2"ID X 1-5/8"L silicone coupler on OE head pipe completely (The inner venturi sits inside OE exhaust head pipe.) and secure**. (Refer to illustration #2) Do not over tighten clamps. 13. Attach 1/2" waterline to 1/2" barbed x 1/4" NPT 90 degree brass fitting on Stinger 3 billet flange and secure using one of the included 1/2" hose clamps. Attach 3/8 cooling line to 3/8" barbed x 1/4"NPT x 3/8" barbed brass T fitting on Stinger3 billet flange using one of the included 3/8 hose clamps. Do not over tighten clamps. 14. Install included 4"ID x 3-1/8"L silicone coupler onto Stinger 3 billet flange and secure using one of the included #64 hose clamps**. Loosely place second included #64 hose clamp over silicone coupler. (Refer to illustration #2) 15. Insert straight end of Stinger3 head pipe into 4"ID x 3-1/8"L silicone coupler on Stinger3 billet flange and onto upper Lord Mount on cylinder head **. Install 3/8-16 flange nut and 3/8 lock washer onto Lord Mount. Loosely tighten flange nut and clamp at Stinger3 billet flange. 16. Slide silicone coupler on tail section up onto end of Stinger3 head pipe section splitting the distance between the two sections. Secure clamps at flat area of exhaust tube before bead roll. 17. Inspect all joints to ensure they are even, there is no binding and exhaust tubes aren t rubbing anywhere. Once you are certain everything lines up, tighten each hose clamp evenly. Do not over tighten clamps. Then tighten 3/8-16 flange nut on upper lord mount. Note: It may be necessary to loosen the OE exhaust bracket located on rear of engine to allow Stinger3 to line up evenly. If so, remove the two OE M10 X 50mm bolts completely, add Loc-Tite 271 and reinstall. Torque to 30Nm (3.9m/kgf 28ft/lbs). 18. Slide large black exhaust boot/cooling coupler Stinger3 billet flange and secure**. (Refer to illustration #2) Do not over tighten clamps. 19. Check bilge area for tools, loose lines and/or fittings. Reattach battery cables and turn fuel valve to on position. 20. Upon completing installation, run engine on flush kit and check for leaks. Go over all hose clamps to make sure they are seated properly. After your first test-ride we recommend you go over all hose clamps again to ensure they are tight and seated properly. Word doc. RY1522-UK H1 8/26/02 2
3 Single Pipe Stinger3 Upgrade Kit INSTALLATION RECOMMENDATIONS & TIPS Carburetor mixture screws may need to be adjusted. Settings will vary due to altitude, climate and level of modification to craft. Tamper caps will need to be removed in order to make adjustments. We recommend the following at sea-level: Stock: Stock settings Stage I to Stage II: Stock low speed; 1-1/4 +/- high speed. Stock pop-off and needle & seat. Add.020 clearance between accelerator arm and cam. (These are starting points only. Always tune using an aftermarket tachometer and check spark plugs.) Single Pipe Big Bore: Contact our technical department by phone; (954) or ; tech_support@rivayamaha.com. Prior to installing any couplers we strongly recommend you thoroughly clean all couplers and mating surfaces with a non-residual cleaner such as PJ-1 Super Cleaner. This is available through Riva Yamaha s parts department (part# ) and at most motorcycle dealerships. Only use window cleaner to ease installation. DO NOT use any type of lubricant or solvent! If you aren t using an aftermarket ignition such as the Riva Digital CDI (part# RY11820) we recommend installing a Riva Cat Temp Sensor Chip (part# RY115-20). This will mimic the signal sent to the OE CDI by the catalytic converter s temperature probe preventing CDI flutters, warning devices and engine shut downs due removal of catalytic converter and sensor. To ensure hose clamps remain tight add Red Loc-Tite on the worm drive after tightening. This is available through Riva Yamaha s parts department (part# ) and at most motorcycle dealerships. For those hard to reach clamps, add Loc-Tite to clamp prior to installing. For added assurance we recommend using Squeeze-on Stainless Steel Clamps (aka Oetiker Clamps) when installing waterlines. These stepless clamps won t loosen or damage waterline like conventional hose clamps. This is available through Riva Yamaha s parts department in both 3/8 and 1/2" ID clamps as well as the tool required for installing. (Stepless clamps are not reusable.) 3/8 ID Clamps Part# C QTY Available in pre-packs of 50 or /2 ID Clamps Part# C QTY Available in pre-packs of 50 or 100. Oetiker Pliers Part# C Sold 1 each. Inline Water Restrictor can be adjusted to dry out exhaust system by restricting water flow at billet flange. Restrictor comes preset in fully open position. For increased mid-range and top-end speed, close restrictor 1/2-turn at a time. WARNING: Do not remove washer between jam nut and valve. Overheat damage could occur if washer is removed and valve is closed completely. For extended periods of use such as long distance riding or racing we advise against closing valve completely. Always tune using an aftermarket tachometer. IMPORTANT: Technical Support For answers to questions regarding installation or trouble shooting contact: Riva Yamaha Tech (954) or online at tech_support@rivayamaha.com or you re local Riva Dealer. Riva Yamaha Limited 1-Year Warranty Riva Yamaha Exhaust Systems carry a one-year limited warranty to the original purchaser. They are warranted to be free of defects in materials and workmanship under normal use and service. Customer modified components will be void of warranty. This warranty is limited to defects in the primary aluminum components only. Anodized/painted finish, wear marks in or on aluminum parts, lord mounts, brass fittings and hardware are not covered under this warranty. Riva Yamaha s liability is expressly limited to the repair or replacement of the primary aluminum components contained within or associated with this exhaust system. Riva Yamaha agrees to repair or at Riva Yamaha s option, replace any defective unit without charge, if product is returned to Riva Yamaha freight prepaid and accompanied by a copy of the original invoice within the warranty period. Any equipment returned which, in Riva Yamaha s opinion, has been subjected to misuse, abuse, overheating, accident or modification shall not be covered by this warranty. Riva Yamaha shall have no liability for special, incidental or consequential damages or injury to persons or property from any cause arising from the sale, installation or use of this product. No other warranty, express or implied, including, but not limited to the implied warranties of merchantability and fitness for a particular purpose, applies. Various states do not allow for the limitation of incidental or consequential damages and therefore the above exclusion or limitation may not apply to you. Warranty does not include the expenses related to freight or transportation of parts or compensation for any inconvenience or loss of use while being repaired. A copy of the original invoice must accompany all warranty claims. Warranted replacement parts will be returned freight collect. Word doc. RY1522-UK H1 8/26/02 3


4 INSTALLATION ILLUSTRATIONS RIVA S3 LOGO 3/8 Barbed X 1/8 NPT Fitting Inline Water Restrictor Exhaust Boot/ Cooling Coupler 3-1/2" Silicone Coupler RIVA S3 LOGO 1/2" Barbed X 1/4 NPT Fitting 3/8 Barbed X 1/4" NPT X 3/8 Barbed T Fitting 4" Silicone Couplers ILLUSTRATION #1 ILLUSTRATION #2 COMPLETED INSTALLTION OF STINGER3! ILLUSTRATION #3 Word doc. RY1522-UK H1 8/26/02 4


5 INSTALLATION ILLUSTRATIONS ILLUSTRATION #4 ILLUSTRATION #5 Word doc. RY1522-UK H1 8/26/02 5
INSTALLATION INSTRUCTIONS
 APPLICATIONS: 2000-`02 GPR1200R; 1999-`00 XL1200Ltd.; 2001-`03 XLT1200 PARTS LISTING PART# QTY DESCRIPTION N/A 1 Stinger 3 Billet Flange N/A 1 Stinger 3 Head Pipe N/A 1 Stinger 2/3 Tail Pipe N/A 6 8MM
This booklet is for 215hp RXP, RXT, & GTX-SC applications.
 Rear Exhaust Kit PART# RS15050-1 We strongly recommend the use of a Sea Doo service manual to familiarize yourself with the various components and procedures involved with this installation. Please note
GP1800, VXR/VXS Rear Exhaust Kit PART# RY15061
 GP1800, VXR/VXS Rear Exhaust Kit PART# RY15061 We strongly recommend the use of a service manual to familiarize yourself with the various components and procedures involved with this installation. Please
- INSTALLATION INSTRUCTIONS -
 Sea-Doo 255hp OEM Intercooler Upgrade Kit PART# - RS17080-ICUK We strongly recommend the use of a Sea Doo service manual to familiarize yourself with the various engine components and procedures involved
Pro Series SVHO Engine Cooling Upgrade Kit
 Pro Series SVHO Engine Cooling Upgrade Kit PART# - RY10080-ECUK-PC-1 APPLICATION(S): Yamaha FZ & FX SVHO using RIVA Power Cooler Kit (part # RY17080-PC) We strongly recommend the use of a service manual
- INSTALLATION INSTRUCTIONS -
 APPLICATION(S): Sea-Doo & (255hp) Free Flow Kit PART# - RS16080 Required tools ( ONLY) Part# VTS Socket Tool 295000133 *** NOTE: Allow craft s engine to cool thoroughly before performing installation.
Rear Exhaust Kit PART# - RS
 Rear Exhaust Kit PART# - RS15110-1 APPLICATION(S): Sea Doo RXP-X 260 & GTR 215 We strongly recommend the use of a service manual to familiarize yourself with the various components and procedures involved
GEN-3 Super-duty Supercharger Shaft Kit PART# - RY17040-UK-6S5-3
 GEN-3 Super-duty Supercharger Shaft Kit PART# - RY17040-UK-6S5-3 We strongly recommend the use of a service manual to familiarize yourself with the various components and procedures involved with this
Fuel Pressure Regulator Kit PART# - RY12040-RRFPR-6S5
 APPLICATION(S): Yamaha FX-SHO, FZR & FZS Fuel Pressure Regulator Kit PART# - RY12040-RRFPR-6S5 We strongly recommend the use of a service manual to familiarize yourself with the various components and
- INSTALLATION INSTRUCTIONS -
 APPLICATION(S): RXT-X, RXT & GTX-SC Sea-Doo Pro-Series O.P.A.S. Block-off Kit PART# - RS29985 Required tools Part# 8mm shallow socket 10mm shallow socket 13mm shallow socket Ratchet 10mm combination wrench
GEN-3 Power Cooler Kit
 GEN-3 Power Cooler Kit PART# RS1752-PC APPLICATION(S): 215hp Sea Doo RXP / RXT / GTX-Supercharged We strongly recommend the use of a service manual to familiarize yourself with the various components and
INSTALLATION INSTRUCTIONS
 APPLICATION(S): Kawasaki Ultra 250X Pro-Series Power Filter Kit PART# - RK13096 We strongly recommend the use of a service manual to familiarize yourself with the various components and procedures involved
RIVA YAMAHA GPR MECHANICAL TRIM-TAB SYSTEM PART # (RY2820) APPLICATIONS: GP1200R GP800R NOTICE :
 APPLICATIONS: GP1200R GP800R NOTICE :") RIVA YAMAHA GPR MECHANICAL TRIM-TAB SYSTEM PART # (RY80) APPLICATIONS: 000-00 GP00R 00-00 GP800R NOTICE : This system has been upgraded with a new heavy-duty pivot rod that features welded on push rod
RIVA YAMAHA GPR MECHANICAL TRIM-TAB SYSTEM PART # (RY80) APPLICATIONS: 000-00 GP00R 00-00 GP800R NOTICE : This system has been upgraded with a new heavy-duty pivot rod that features welded on push rod
RIVA Sea-Doo S3/T3 Rear Exhaust Outlet Kit
 RIVA Sea-Doo S3/T3 Rear Exhaust Outlet Kit PART# - RS15090-ET APPLICATION(S): Sea-Doo RXT/GTX S3 (Suspended & Fixed Deck) & RXP-X T3 icontrol Models This billet outlet kit is intended to complement our
RS12140-IMUK Intake Manifold Upgrade Kit COMPONENT LIST QUANTITY PART NUMBER DESCRIPTION A 1 Ame O-ring, Viton B K371 O-ring, Buna-N, (
 Intake Manifold Upgrade Kit PART# - RS12140-IMUK Applications: Sea Doo 300 Engines Approximate Installation Time: 2hrs. Recommended Specialty Tools: Part # Fuel Disconnect Tool 529036037 Required Materials:
- INSTALLATION INSTRUCTIONS -
 RIVA/ViPEC Engine Control Unit PART# - RY11840-01-C In order to achieve optimal performance gains you will need to install the following RIVA Performance Products: Product RIVA Performance Power Filter
- INSTALLATION INSTRUCTIONS -
 APPLICATION(S): RXT-X / RXT / GTX-SC Pump Extension Kit (+50mm) PART# - RS33085-PEK-50 Required tools Part# Drive Shaft Holder Tool 529 035 986 PTO Seal Support Tool 529 035 842 Floating Ring Tool 529
Power Filter Kit PART# - RS
 Power Filter Kit PART# - RS13100-1 We strongly recommend the use of a service manual to familiarize yourself with the various components and procedures involved with this installation. Please note that
Dash Logger Extension Cable PART# - RS11850-MD60-EC-11. APPLICATION(S): RIVA/Athena Dash Logger with 2011 & Newer Sea Doo 4-TEC Models
: RIVA/Athena Dash Logger with 2011 & Newer Sea Doo 4-TEC Models") Dash Logger Extension Cable PART# - RS11850-MD60-EC-11 APPLICATION(S): RIVA/Athena Dash Logger with 2011 & Newer Sea Doo 4-TEC Models This document is broken up into two sections. Proceed to applicable
Dash Logger Extension Cable PART# - RS11850-MD60-EC-11 APPLICATION(S): RIVA/Athena Dash Logger with 2011 & Newer Sea Doo 4-TEC Models This document is broken up into two sections. Proceed to applicable
Sea-Doo Speed Control Override Modules
 Sea-Doo Speed Control Override Modules BEFORE YOU INSTALL: Read below items 1 & 2 completely. It will save you a lot of time!!! 1. If any of the below listed Sea-Doo Modules have been installed on your
Sea-Doo Speed Control Override Modules
 Sea-Doo Speed Control Override Modules BEFORE YOU INSTALL: Read below items 1 & 2 completely. It will save you a lot of time!!! 1. If any of the below listed Sea-Doo Modules have been installed on your
Sea-Doo RXP-X/RXT-X/GTX Steering Kit PART# - RS20150 Applications: RXP-X 260/300 RXT-X 260/300 GTX 260/300 Approximate Installation Time: 1 Hr. Recomm
 Sea-Doo RXP-X/RXT-X/GTX Steering Kit PART# - RS20150 Applications: RXP-X 260/300 RXT-X 260/300 GTX 260/300 Approximate Installation Time: 1 Hr. Recommended Specialty Tools: Part # icontrol removal tool
Please read the following completely prior to beginning installation.
 APPLICATION: `04~07 Kawasaki STX-15F Kawasaki STX-15F Supercharger Kit PART# RK1785 Please read the following completely prior to beginning installation. Although every effort has been made to simplify
INSTALLATION INSTRUCTIONS. PART NUMBER C (Gun Metal Gray Finish) 2016 HYUNDAI TUCSON 1.6 Turbo
 2016 HYUNDAI TUCSON 1.6 Turbo") INSTALLATION INSTRUCTIONS PART NUMBER 26-3002C (Gun Metal Gray Finish) 2016 HYUNDAI TUCSON 1.6 Turbo 1 ITEM NO. PART NUMBER DESCRIPTION QTY. 1 08483K HOSE CLAMP #28, BLACK ZINC PLATED 2 2 5-1070 COUPLER;1.75-2.50X3.25"
INSTALLATION INSTRUCTIONS PART NUMBER 26-3002C (Gun Metal Gray Finish) 2016 HYUNDAI TUCSON 1.6 Turbo 1 ITEM NO. PART NUMBER DESCRIPTION QTY. 1 08483K HOSE CLAMP #28, BLACK ZINC PLATED 2 2 5-1070 COUPLER;1.75-2.50X3.25"
INSTALLATION INSTRUCTIONS
 MINIMUM REQUIRED TOOLS: INSTALLATION INSTRUCTIONS PRO DUALS TOURING FLAT HEAD SCREWDRIVER 1/2, 9/16, 14mm, 7/8 or 22mm WRENCHES 5/16, 1/2, 9/16 SOCKETS AND RATCHET SNAP RING PILERS 3/16, 1/4, 5/16 ALLEN
Installation Instructions and Warranty Information
 Installation Instructions and Warranty Information For JBA Headers 1997-2004 Chevrolet Corvette and z06 LS-1 / LS-6 V-8 Part# Application 1817 97-99 with 1-5/8 tube 1817-1 01-04 with 1-5/8 tube 1817-2
½ DODGE CUMMINS OEM BYPASS LIFT PUMP KIT Installation Instructions Part #
 29 July 2005 2003-04.5 Dodge Cummins OEM Bypass Lift Pump Kit # 1050227-1 - 2003-04½ DODGE CUMMINS OEM BYPASS LIFT PUMP KIT Installation Instructions Part # 1050227 PLEASE READ ALL INSTRUCTIONS CAREFULLY
INSTALLATION INSTRUCTIONS
 Equipped with AEM Dryflow Filter No Oil Required! INSTALLATION INSTRUCTIONS PART NUMBER 21-823DS (GUN METAL GRAY FINISH) 2014-17 INFINITI Q70 3.7L 1 ITEM NO. PART NUMBER DESCRIPTION QTY. 1 21-202DOSK AIR
PART NUMBER: MINI Cooper S L4-1.6L SEE * NOTE
 Equipped with AEM Dryflow Filter No Oil Required! INSTALLATION INSTRUCTIONS PART NUMBER: 21-699 2007-2010 MINI Cooper S L4-1.6L SEE * NOTE * NOTE: Legal in California only for racing vehicles which may
***FOR COMPETITION USE ONLY as per US EPA regulations *** Factory Pipe Bill of Materials Kawasaki Ultra 150 Triple Pipe
 ***FOR COMPETITION USE ONLY as per US EPA regulations *** Factory Pipe Bill of Materials Kawasaki Ultra 150 Triple Pipe Item Qty Part Number Part Description 1 1 COMASM0947 Ultra 150 PTO Chamber assembly
*** FOR COMPETITION USE ONLY per US EPA regulations *** Factory Pipe Bill of Materials Kawasaki STX-R Triple Pipe
 *** FOR COMPETITION USE ONLY per US EPA regulations *** Factory Pipe Bill of Materials Kawasaki STX-R Triple Pipe Item Qty Part Number Part Description 1 1 COMASM0935 STX-R PTO Chamber assembly 2 1 COMASM0936
INSTALLATION INSTRUCTIONS
 INSTALLATION INSTRUCTIONS PRO DUALS TOURING MINIMUM REQUIRED TOOLS: FLAT HEAD SCREWDRIVER 1/2, 9/16, 14mm, 7/8 or 22mm WRENCHES 5/16, 1/2, 9/16 SOCKETS AND RATCHET SNAP RING PILERS 3/16, 1/4, 5/16 ALLEN
BD SUPER B SPECIAL Dodge 5.9L Cummins 24v ISB
 1 This turbo is intended for high performance applications and is not to be used for towing applications BD SUPER B SPECIAL 1994-2002 Dodge 5.9L Cummins 24v ISB Part# 1045120 PLEASE READ ALL INSTRUCTIONS
Installation Instructions and Warranty Information
 Installation Instructions and Warranty Information 1999 2003 Ford SuperDuty Truck and Excursion Part# 1669S, 1669S-1, 1669S-2 Read all instructions carefully before attempting installation. Rev. 10/05
INSTALLATION INSTRUCTIONS
 INSTALLATION INSTRUCTIONS RIOT DYNA MINIMUM REQUIRED TOOLS: FLAT HEAD SCREWDRIVER 1/2, 9/16, 14mm, 7/8 or 22mm WRENCHES 5/16, 1/2, 9/16 SOCKETS AND RATCHET SNAP RING PILERS 3/16, 1/4, 5/16 ALLEN WRENCH
INSTALLATION INSTRUCTIONS
 Equipped with AEM Dryflow Filter No Oil Required! INSTALLATION INSTRUCTIONS PART NUMBER AEM-21-805C (GUN METAL GRAY FINISH) 2016.5-19 CHEVROLET CRUZE 1.4T 1 ITEM NO. PART NUMBER DESCRIPTION QTY. 1 21-2038DK
*** FOR COMPETITION USE ONLY per US EPA regulations *** Factory Pipe Bill Of Materials Yamaha GP1200R
 *** FOR COMPETITION USE ONLY per US EPA regulations *** Factory Pipe Bill Of Materials Yamaha GP1200R Item Qty Part Number Part Description 1 3 COMASM0690 GP1200R Flange assembly 2 1 COMASM0840 GP1200R
Equipped with AEM Dryflow Filter No Oil Required! INSTALLATION INSTRUCTIONS PART NUMBER DS BMW 335i 3.0L
 Equipped with AEM Dryflow Filter No Oil Required! INSTALLATION INSTRUCTIONS PART NUMBER 21-754DS 2012-2015 BMW 335i 3.0L 1 ITEM NO. PART NUMBER DESCRIPTION QTY. 1 21-2057DK AIR FILTER 1 2 9-0442 TUBE;
*** FOR COMPETITION USE ONLY per US EPA regulations *** Factory Pipe Bill of Materials 701 SuperJet Type 9
 *** FOR COMPETITION USE ONLY per US EPA regulations *** Factory Pipe Bill of Materials 701 SuperJet Type 9 Item Qty Part Number Part Description 1 1 COMASM0964 701 SuperJet Type 9 chamber assy. (includes
INSTALLATION INSTRUCTIONS PART NUMBER C (Gun Metal Gray Finish)
") Equipped with AEM Dryflow Filter No Oil Required! INSTALLATION INSTRUCTIONS PART NUMBER 21-764C (Gun Metal Gray Finish) YEAR MAKE MODEL ENGINE SIZE 2014-2015 VW JETTA 1.8 TSI 2014-2015 VW JETTA GLI 2.0
Equipped with AEM Dryflow Filter No Oil Required! INSTALLATION INSTRUCTIONS PART NUMBER 21-764C (Gun Metal Gray Finish) YEAR MAKE MODEL ENGINE SIZE 2014-2015 VW JETTA 1.8 TSI 2014-2015 VW JETTA GLI 2.0
DODGE CUMMINS 24V ISB OEM BYPASS LIFT PUMP KIT Installation Instructions Part #
 2/15/2006 2000-2002 Dodge Cummins OEM Bypass Lift Pump Kit # 1050229-1 - 2000-02 DODGE CUMMINS 24V ISB OEM BYPASS LIFT PUMP KIT Installation Instructions Part # 1050229 PLEASE READ ALL INSTRUCTIONS CAREFULLY
INSTALLATION INSTRUCTIONS
 INSTALLATION INSTRUCTIONS ROCKSTAR SOFTAIL MINIMUM REQUIRED TOOLS: FLAT HEAD SCREWDRIVER 1/2, 9/16, 14mm, 7/8 or 22mm WRENCHES 5/16, 1/2, 9/16 SOCKETS AND RATCHET SNAP RING PILERS 3/16, 1/4, 5/16 ALLEN
INSTALLATION INSTRUCTIONS
 MINIMUM REQUIRED TOOLS: INSTALLATION INSTRUCTIONS ROCKSTAR TOURING FLAT HEAD SCREWDRIVER 1/2, 9/16, 14mm, 7/8 or 22mm WRENCHES 5/16, 1/2, 9/16 SOCKETS AND RATCHET SNAP RING PILERS 3/16, 1/4, 5/16 ALLEN
INSTALLATION INSTRUCTIONS
 Equipped with AEM Dryflow Filter No Oil Required! INSTALLATION INSTRUCTIONS PART NUMBER 22-687C (Gun Metal Gray Finish) 2015-17 Ford Mustang GT 5.0L V8 1 ITEM NO. PART NUMBER DESCRIPTION QTY. 1 2-1525C
INSTALLATION INSTRUCTIONS
 Equipped with AEM Dryflow Filter No Oil Required! INSTALLATION INSTRUCTIONS PART NUMBER AEM-21-796C (GUN METAL GRAY FINISH) 2015-2016 HYUNDAI GENESIS SEDAN 3.8L V6 C.A.R.B. E.O # D-670-24 1 ITEM NO. PART
Equipped with AEM Dryflow Filter No Oil Required! INSTALLATION INSTRUCTIONS PART NUMBER:
 Equipped with AEM Dryflow Filter No Oil Required! INSTALLATION INSTRUCTIONS PART NUMBER:21-8125 2011-2012 Ford F150 V8 5.0L * NOTE: Legal in California only for racing vehicles which may never be used
advanced FLOW engineering Instruction Manual P/N: / / /
 advanced FLOW engineering Instruction Manual P/N: 55-12550 / 55-12551 / 55-12540 /55-12541 Make: Toyota Model: Tundra Year: 2007-2017 Engine: V8-4.6L/5.7L Please read the entire instruction manual before
Installation Instructions and Warranty Information
 Installation Instructions and Warranty Information 1625S 96-98 Mustang 4.6L 2v 1-1/2 1625S-8 96-98 Mustang 4.6L 2v 1-5/8 1625S-1 99-04 Mustang 4.6L 2v 1-1/2 1625S-9 99-04 Mustang 4.6L 2v 1-5/8 1625S-5JT
INSTALLATION INSTRUCTIONS
 INSTALLATION INSTRUCTIONS RIOT DYNA MINIMUM REQUIRED TOOLS: FLAT HEAD SCREWDRIVER 1/2, 9/16, 14mm, 7/8 or 22mm WRENCHES 5/16, 1/2, 9/16 SOCKETS AND RATCHET SNAP RING PILERS 3/16, 1/4, 5/16 ALLEN WRENCH
INSTALLATION INSTRUCTIONS
 MINIMUM REQUIRED TOOLS: INSTALLATION INSTRUCTIONS BANDIT SPORTSTER FLAT HEAD SCREWDRIVER 1/2, 9/16, 14mm, 7/8 or 22mm WRENCHES 5/16, 1/2, 9/16 SOCKETS AND RATCHET SNAP RING PILERS 3/16, 1/4, 5/16 ALLEN
INSTALLATION INSTRUCTIONS
 Equipped with AEM Dryflow Filter No Oil Required! INSTALLATION INSTRUCTIONS PART NUMBER 21-783C (Gun Metal Gray Finish) 2016 HYUNDAI TUCSON 1.6L TURBO C.A.R.B. E.O# D-670-24 2017 HYUNDAI TUCSON 1.6L TURBO
Equipped with AEM Dryflow Filter No Oil Required! INSTALLATION INSTRUCTIONS PART NUMBER:
 Equipped with AEM Dryflow Filter No Oil Required! INSTALLATION INSTRUCTIONS PART NUMBER: 21-490B (Blue Finish) 21-490C (Gun Metal Grey Finish) 21-490P (Vacuum Metalized Chrome-VMC) 21-490R (Red Finish)
INSTALLATION INSTRUCTIONS
 Equipped with AEM Dryflow Filter No Oil Required! INSTALLATION INSTRUCTIONS PART NUMBER:21-8402 1999-2004 TOYOTA Tacoma V6-3.4L C.A.R.B. E.O. # D-670 1999-2002 TOYOTA 4Runner V6-3.4L C.A.R.B. E.O. # D-670
INSTALLATION INSTRUCTIONS PART NUMBER WR (Wrinkle Red Finish)
") Equipped with AEM Dryflow Filter No Oil Required! INSTALLATION INSTRUCTIONS PART NUMBER 21-746WR (Wrinkle Red Finish) 2015-17 VOLKSWAGEN GOLF 1.8/2.0L 2015-17 VOLKSWAGEN GTI 2.0L 2015-16 VOLKSWAGEN GOLF
Equipped with AEM Dryflow Filter No Oil Required! INSTALLATION INSTRUCTIONS PART NUMBER 21-746WR (Wrinkle Red Finish) 2015-17 VOLKSWAGEN GOLF 1.8/2.0L 2015-17 VOLKSWAGEN GTI 2.0L 2015-16 VOLKSWAGEN GOLF
INSTALLATION INSTRUCTIONS
 Equipped with AEM Dryflow Filter No Oil Required! INSTALLATION INSTRUCTIONS PART NUMBER 21-818C (GUN METAL GRAY FINISH) 2017 Nissan Sentra SR Turbo 1.6T 1 ITEM NO. PART NUMBER DESCRIPTION QTY. 1 21-2157DK
advanced FLOW engineering Instruction Manual P/N: / / Make: Jeep Model: Wrangler (JK) Year: Engine: V6-3.
 Year: Engine: V6-3.") advanced FLOW engineering Instruction Manual P/N: 51-76204 / 54-76204 / 75-76204 Make: Jeep Model: Wrangler (JK) Year: 2012-2015 Engine: V6-3.6L Please read the entire instruction manual before proceeding.
advanced FLOW engineering Instruction Manual P/N: 51-76204 / 54-76204 / 75-76204 Make: Jeep Model: Wrangler (JK) Year: 2012-2015 Engine: V6-3.6L Please read the entire instruction manual before proceeding.
Equipped with AEM Dryflow Filter No Oil Required! INSTALLATION INSTRUCTIONS PART NUMBER: DS (Plastic Intake Tube)
") Equipped with AEM Dryflow Filter No Oil Required! INSTALLATION INSTRUCTIONS PART NUMBER:21-8126DS (Plastic Intake Tube) 2011-2014 Ford F150 V6 3.5L ECOBOOST C.A.R.B. E.O. D-670-19 AEM Induction Systems
Equipped with AEM Dryflow Filter No Oil Required! INSTALLATION INSTRUCTIONS PART NUMBER:21-8126DS (Plastic Intake Tube) 2011-2014 Ford F150 V6 3.5L ECOBOOST C.A.R.B. E.O. D-670-19 AEM Induction Systems
INSTALLATION INSTRUCTIONS
 MINIMUM REQUIRED TOOLS: F-BOMB SOFTAIL INSTALLATION INSTRUCTIONS FLAT HEAD SCREWDRIVER 1/2, 9/16, 14mm, 7/8 or 22mm WRENCHES INCLUDED HARDWARE: 1. (2) 02 ADAPTER 2. (3) 02 PLUG SOCKET 3. (1) NUT PLATE
INSTALLATION INSTRUCTIONS
 PERFORMER 2 INTO 1 TOURING MINIMUM REQUIRED TOOLS: INSTALLATION INSTRUCTIONS FLAT HEAD SCREWDRIVER 1/2, 9/16, 14mm, 7/8 or 22mm WRENCHES 5/16, 1/2, 9/16 SOCKETS AND RATCHET SNAP RING PILERS 3/16, 1/4,
INSTALLATION INSTRUCTIONS
 MINIMUM REQUIRED TOOLS: INSTALLATION INSTRUCTIONS LOWDOWN SOFTAIL FLAT HEAD SCREWDRIVER 1/2, 9/16, 14mm, 7/8 or 22mm WRENCHES 5/16, 1/2, 9/16 SOCKETS AND RATCHET SNAP RING PILERS 3/16, 1/4, 5/16 ALLEN
Equipped with AEM Dryflow Filter No Oil Required! INSTALLATION INSTRUCTIONS
 Equipped with AEM Dryflow Filter No Oil Required! INSTALLATION INSTRUCTIONS PART NUMBER: 21-9021 2004.5 CHEVROLET Silverado 3500 V8-6.6L DSL LB7 C.A.R.B. E.O. # D-670 2004.5 CHEVROLET Silverado 2500 HD
AEM bypass valves are not compatible with this intake system (part number ) DO NOT attempt to install an AEM bypass valve on this intake system!
 DO NOT attempt to install an AEM bypass valve on this intake system!") Equipped with AEM Dryflow Filter No Oil Required! INSTALLATION INSTRUCTIONS PART NUMBER: 21-452 2005 FORD Focus L4-2.0L SEE * NOTE 2004 FORD Focus L4-2.3L SEE * NOTE AEM bypass valves are not compatible
Equipped with AEM Dryflow Filter No Oil Required! INSTALLATION INSTRUCTIONS PART NUMBER: 21-452 2005 FORD Focus L4-2.0L SEE * NOTE 2004 FORD Focus L4-2.3L SEE * NOTE AEM bypass valves are not compatible
INSTALLATION INSTRUCTIONS
 MINIMUM REQUIRED TOOLS: INSTALLATION INSTRUCTIONS LOWDOWN SPORTSTER FLAT HEAD SCREWDRIVER 1/2, 9/16, 14mm, 7/8 or 22mm WRENCHES 5/16, 1/2, 9/16 SOCKETS AND RATCHET SNAP RING PILERS 3/16, 1/4, 5/16 ALLEN
INSTALLATION INSTRUCTIONS PART NUMBER DS
 INSTALLATION INSTRUCTIONS PART NUMBER 21-781DS 2014-2016 Mercedes Benz CLA250 2.0T C.A.R.B E.O # D-670-24 1 ITEM NO. PART NUMBER DESCRIPTION QTY. 1 21-1015DK ELEMENT; 6-3/8 OD B, 5-3/16 OD T; 8-7/8H 1
INSTALLATION INSTRUCTIONS PART NUMBER:
 Equipped with AEM Dryflow Filter No Oil Required! INSTALLATION INSTRUCTIONS PART NUMBER: 41-1406 2006-2013 LEXUS IS250 V6-2.5L LEGAL IN CALIFORNIA ONLY FOR RACING VEHICLES WHICH MAY NEVER BE USED, REGISTERED
INSTALLATION INSTRUCTION PART NUMBER:
 Equipped with AEM Dryflow Filter No Oil Required! INSTALLATION INSTRUCTION PART NUMBER: 24-6003 1994-2001 ACURA Integra L4-1.8L Manual Trans. C.A.R.B. E.O. # D-670 Non VTEC models ONLY AEM bypass valves
INSTALLATION INSTRUCTIONS PART NUMBER: DC
 Equipped with AEM Dryflow Filter No Oil Required! INSTALLATION INSTRUCTIONS PART NUMBER: 21-8033DC 2014-16 Chevrolet Silverado 1500 5.3L/6.2L C.A.R.B. E.O. # D-670-23 2014-16 GMC Sierra 1500 5.3L/6.2L
INSTALLATION INSTRUCTIONS
 Equipped with AEM Dryflow Filter No Oil Required! INSTALLATION INSTRUCTIONS PART NUMBER: 21-703C (Gun Metal Grey Finish) 21-703P (Vacuum Metalized Chrome - VMC) 2011-2013 FORD Fiesta L4-1.6L C.A.R.B. E.O.
Endlinks Installation Guide v1.0 (Feb 2015) Part No s: EC ; EC ; EC
 Part No s: EC ; EC ; EC") Endlinks Installation Guide v1.0 (Feb 2015) Part No s: EC0202-0306; EC0202-0305; EC0202-0304 Application VW Mk7 Golf, GTI, Golf R Audi 8V A3, S3 List of Parts Included List of Required Tools A. Front End
Endlinks Installation Guide v1.0 (Feb 2015) Part No s: EC0202-0306; EC0202-0305; EC0202-0304 Application VW Mk7 Golf, GTI, Golf R Audi 8V A3, S3 List of Parts Included List of Required Tools A. Front End
Installation Instructions and Warranty Information For Ford F-250 & F-350 Trucks with 7.5L V8 Auto. Transmission Only
 Installation Instructions and Warranty Information For 1988-1998 Ford F-250 & F-350 Trucks with 7.5L V8 Auto. Transmission Only Part# 1629SJT, 1629-1SJT, Requires part# 1629YJT, 1629Y-1JT, 1629Y-2JT, or
INSTALLATION INSTRUCTIONS: HARLEY-DAVIDSON STREET ROD SLIP-ON PART# 47943
 INSTALLATION INSTRUCTIONS: HARLEY-DAVIDSON STREET ROD SLIP-ON PART# 47943 Congratulations, you have purchased the finest exhaust system available for your motorcycle. Your Vance & Hines exhaust is designed
Sport Sway Bar Kit (22425) Scion tc
 Scion tc") Sport Sway Bar Kit (22425) Scion tc Thank you for your purchase from our new line of Scion tc parts. Please call us at (877) 4NO - ROLL if you have any questions regarding the service or installation of
Sport Sway Bar Kit (22425) Scion tc Thank you for your purchase from our new line of Scion tc parts. Please call us at (877) 4NO - ROLL if you have any questions regarding the service or installation of
Equipped with AEM Dryflow Filter No Oil Required! INSTALLATION INSTRUCTIONS
 Equipped with AEM Dryflow Filter No Oil Required! INSTALLATION INSTRUCTIONS PART NUMBER: 21-9022 2005 CHEVROLET Silverado 2500 HD V8-6.6L DSL C.A.R.B. E.O. # D-670 2005 CHEVROLET Silverado 3500 V8-6.6L
INSTALLATION INSTRUCTIONS PART NUMBER:
 Equipped with AEM Dryflow Filter No Oil Required! INSTALLATION INSTRUCTIONS PART NUMBER: 21-521 2003-2007 HYUNDAI Tiburon V6-2.7L C.A.R.B. E.O. # D-670-2 The installation of this AEM intake system requires
Equipped with AEM Dryflow Filter No Oil Required! INSTALLATION INSTRUCTIONS PART NUMBER: DS
 Equipped with AEM Dryflow Filter No Oil Required! INSTALLATION INSTRUCTIONS PART NUMBER:21-8126DS 2011-2013 Ford F150 V6 3.5L ECOBOOST * NOTE: Legal in California only for racing vehicles which may never
Installation Instructions. Application List Dodge 24V PLEASE READ ALL INSTRUCTIONS BEFORE INSTALLATION
 1 BD DODGE CUMMINS 03-055 C O O L - I T I N T E R C O O L E R Installation Instructions Application List 2003-2006 Dodge 24V 1042510 PLEASE READ ALL INSTRUCTIONS BEFORE INSTALLATION KIT CONTENTS: Please
INSTALLATION INSTRUCTIONS PART NUMBER:
 Equipped with AEM Dryflow Filter No Oil Required! INSTALLATION INSTRUCTIONS PART NUMBER: 24-6110 2003-2006 HONDA Accord V6-3.0L C.A.R.B. E.O. # D-670 Excludes 2006 MY LEV II SULEV 6HNXV03.0WMC model year
22421 SPORT SWAY BAR SET TOYOTA COROLLA
 22421 SPORT SWAY BAR SET 98-01 TOYOTA COROLLA Thank you for your purchase from our line of Corolla parts. Please call us at (877) 4NO-ROLL if you have any questions regarding the service or installation
INSTALLATION INSTRUCTIONS
 Equipped with AEM Dryflow Filter No Oil Required! INSTALLATION INSTRUCTIONS PART NUMBER: 21-9210 1994-2002 DODGE Ram 2500 Pickup L6-5.9L DSL C.A.R.B. E.O. # D-670 1994-2002 DODGE Ram 3500 Pickup L6-5.9L
advanced FLOW engineering Instruction Manual P/N: / / Make: Jeep Model: Wrangler (JK) Year: Engine: V6-3.
 Year: Engine: V6-3.") advanced FLOW engineering Instruction Manual P/N: 51-76204 / 54-76204 / 75-76204 Make: Jeep Model: Wrangler (JK) Year: 2012-2017 Engine: V6-3.6L Please read the entire instruction manual before proceeding.
advanced FLOW engineering Instruction Manual P/N: 51-76204 / 54-76204 / 75-76204 Make: Jeep Model: Wrangler (JK) Year: 2012-2017 Engine: V6-3.6L Please read the entire instruction manual before proceeding.
INSTALLATION INSTRUCTIONS PART NUMBER C (Gun Metal Grey Finish)
") Equipped with AEM Dryflow Filter No Oil Required! INSTALLATION INSTRUCTIONS PART NUMBER 21-763C (Gun Metal Grey Finish) 2011-2014 VOLKSWAGEN JETTA 2.0L DSL 1 ITEM NO. PART NUMBER DESCRIPTION QTY. 1 2-1542C
Equipped with AEM Dryflow Filter No Oil Required! INSTALLATION INSTRUCTIONS PART NUMBER 21-763C (Gun Metal Grey Finish) 2011-2014 VOLKSWAGEN JETTA 2.0L DSL 1 ITEM NO. PART NUMBER DESCRIPTION QTY. 1 2-1542C
INSTALLATION INSTRUCTIONS PART NUMBER:
 Equipped with AEM Dryflow Filter No Oil Required! INSTALLATION INSTRUCTIONS PART NUMBER: 22-417 1999-2000 HONDA Civic Si L4-1.6L C.A.R.B. E.O. # D-670 * NOTE: Legal in California only for racing vehicles
INSTALLATION INSTRUCTIONS
 INSTALLATION INSTRUCTIONS LEGACY CLASSIC SPORTSTER MINIMUM REQUIRED TOOLS: FLAT HEAD SCREWDRIVER 1/2, 9/1, 14mm, 7/8 or 22mm WRENCHES 5/1, 1/2, 9/1 SOCKETS AND RATCHET INCLUDED HARDWARE: SNAP RING PILERS
Equipped with AEM Dryflow Filter No Oil Required! INSTALLATION INSTRUCTIONS PART NUMBER:
 Equipped with AEM Dryflow Filter No Oil Required! INSTALLATION INSTRUCTIONS PART NUMBER: 21-9032 Year Make Model Engine Info CARB E.O. # 2012 Chevrolet Silverado 2500HD/3500 HD V8-6.6L DSL D-670-13 2012
Installation instructions
 Installation instructions Akrapovič Exhaust System: Slip-On for the Yamaha XJR 1300 *503789* www.akrapovic.com www.akrapovic.com Congratulations on purchasing an Akrapovič exhaust system. Please read the
INSTALLATION INSTRUCTIONS PART NUMBER:
 Equipped with AEM Dryflow Filter No Oil Required! INSTALLATION INSTRUCTIONS PART NUMBER: 24-6004 1994-2001 ACURA Integra GSR L4-1.8L C.A.R.B. E.O. # D-670 AEM bypass valves are not compatible with this
INSTALLATION INSTRUCTIONS PART NUMBER:
 Equipped with AEM Dryflow Filter No Oil Required! INSTALLATION INSTRUCTIONS PART NUMBER: 21-641 2006 MAZDA Mazdaspeed 6 L4-2.3L C.A.R.B. E.O. # D-670-2 * NOTE: Legal in California only for racing vehicles
21-413B (Blue Finish) C (Gun Metal Grey Finish) P (Vacuum Metalized Chrome-VMC) R (Red Finish)
 C (Gun Metal Grey Finish) P (Vacuum Metalized Chrome-VMC) R (Red Finish)") Equipped with AEM Dryflow Filter No Oil Required! INSTALLATION INSTRUCTIONS PART NUMBER: 21-413B (Blue Finish) 21-413C (Gun Metal Grey Finish) 21-413P (Vacuum Metalized Chrome-VMC) 21-413R (Red Finish)
Equipped with AEM Dryflow Filter No Oil Required! INSTALLATION INSTRUCTIONS PART NUMBER: 21-413B (Blue Finish) 21-413C (Gun Metal Grey Finish) 21-413P (Vacuum Metalized Chrome-VMC) 21-413R (Red Finish)
Tubular Lower A-Arms GM A-Body Tubular Lower A-Arms GM F-Body
 1104 - Tubular Lower A-Arms 64-72 GM A-Body 1108 - Tubular Lower A-Arms 70-81 GM F-Body Tubular Lower A-Arms: Thank you for your purchase from our new line of A-Body parts. Please call us at (877) 4NO
Factory Pipe Bill of Materials 650 Super Jet
 Factory Pipe Bill of Materials 650 Super Jet Item# Qty. Part Description 1 1 Factory Pipe tunable cast aluminum headpipe 2 1 Factory Pipe aluminum chamber 3 1 Factory Pipe tuned exhaust manifold 4 2 100-120mm
INSTALLATION INSTRUCTIONS PART NUMBER:
 Equipped with AEM Dryflow Filter No Oil Required! INSTALLATION INSTRUCTIONS PART NUMBER: 21-447 1998-2001 CHEVROLET Cavalier L4-2.2L Manual trans. requires 20-455 C.A.R.B. E.O. # D-670 2000-2002 PONTIAC
Equipped with AEM Dryflow Filter No Oil Required! INSTALLATION INSTRUCTIONS PART NUMBER C (GUN METAL GRAY FINISH) NISSAN SENTRA 1.
 NISSAN SENTRA 1.") Equipped with AEM Dryflow Filter No Oil Required! INSTALLATION INSTRUCTIONS PART NUMBER 21-799C (GUN METAL GRAY FINISH) 2014-16 NISSAN SENTRA 1.8L 1 ITEM NO. PART NUMBER DESCRIPTION QTY. 1 21-2157D AIR
Equipped with AEM Dryflow Filter No Oil Required! INSTALLATION INSTRUCTIONS PART NUMBER 21-799C (GUN METAL GRAY FINISH) 2014-16 NISSAN SENTRA 1.8L 1 ITEM NO. PART NUMBER DESCRIPTION QTY. 1 21-2157D AIR
INSTALLATION INSTRUCTIONS PART NUMBER:
 Equipped with AEM Dryflow Filter No Oil Required! INSTALLATION INSTRUCTIONS PART NUMBER: 21-488 2006-2008 MAZDA 3 L4 2.3L SEE * NOTE 2004-2008 MAZDA 3 L4 2.0L SEE * NOTE 2004-2005 MAZDA 3 L4 2.3L C.A.R.B.
INSTALLATION INSTRUCTIONS
 Equipped with AEM Dryflow Filter No Oil Required! INSTALLATION INSTRUCTIONS PART NUMBER:22-489 2004 MAZDA Miata Mazdaspeed L4-1.8L C.A.R.B. E.O. # D-670 PARTS LIST Description Qty. Part Number Element
Installation instructions
 Installation instructions Akrapovič Exhaust Systems: Racing and Evolution for the YAMAHA YZ250F FOR CLOSED COURSE COMPETITION USE ONLY. NOT INTENDED FOR STREET USE. *503670* www.akrapovic.com www.akrapovic.com
Equipped with AEM Dryflow Filter No Oil Required! INSTALLATION INSTRUCTIONS PART NUMBER: DS (Plastic tube)
") Equipped with AEM Dryflow Filter No Oil Required! INSTALLATION INSTRUCTIONS PART NUMBER: 21-8316DS (Plastic tube) 2012-2016 Jeep Wrangler V6 3.6L C.A.R.B E.O. # D-670-24 Not legal for sale or use on any
Equipped with AEM Dryflow Filter No Oil Required! INSTALLATION INSTRUCTIONS PART NUMBER: 21-8316DS (Plastic tube) 2012-2016 Jeep Wrangler V6 3.6L C.A.R.B E.O. # D-670-24 Not legal for sale or use on any
INSTALLATION INSTRUCTIONS
 Equipped with AEM Dryflow Filter No Oil Required! INSTALLATION INSTRUCTIONS PART NUMBER: 22-408 1994-1997 HONDA Accord L4-2.2L C.A.R.B. E.O. # D-670 1994-1995 HONDA Accord EX L4-2.2L C.A.R.B. E.O. # D-670
1109 Tubular Lower A-Arms Camaro/Firebird
 1109 Tubular Lower A-Arms 67-69 Camaro/Firebird Tubular Lower A-Arms: Thank you for your purchase from our new line of F-Body parts. Please call us at (877) 4NO - ROLL if you have any questions regarding
SCION xb L4-2.4L
 Equipped with AEM Dryflow Filter No Oil Required! INSTALLATION INSTRUCTIONS PART NUMBER: 21-577 2008-2012 SCION xb L4-2.4L AEM Induction Systems 1 (800) 992-3000 WWW: http://www.aemintakes.com PARTS LIST
advanced FLOW engineering Instruction Manual P/N: B / B Make: Ford Model: F-150 Year: Engine: V6-3.
 advanced FLOW engineering Instruction Manual P/N: 51-12972-B / 54-12972-B Make: Ford Model: F-150 Year: 2017-2018 Engine: V6-3.5L (tt) EcoBoost Please read the entire instruction manual before proceeding.