SLP Single Pipe for Polaris 600 H.O. Fusion/RMK/Switchback/Shift (Carb Models)
|
|
|
- Olivia Neal
- 6 years ago
- Views:
Transcription
 Part # 09-634 Kit Contents: 2-7 Insulated Heat Tape 1-1/8 Pipe Adjustment Washer 4-30 Reflective Heat Tape 1 - Wire Loom Supports (Fusion only) 1 - Medium")
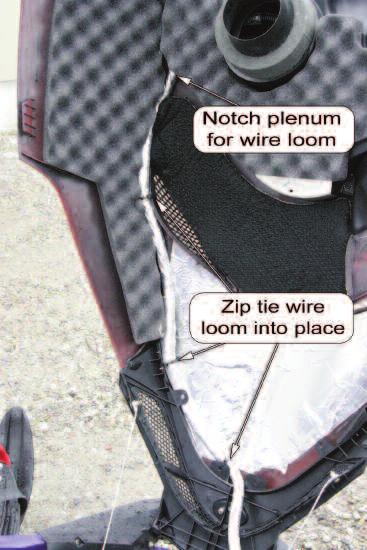
1 SLP Single Pipe for Polaris 600 H.O. Fusion/RMK/Switchback/Shift (Carb Models) Part # Kit Contents: 2-7 Insulated Heat Tape 1-1/8 Pipe Adjustment Washer 4-30 Reflective Heat Tape 1 - Wire Loom Supports (Fusion only) 1 - Medium SLP Spring 3 - Zip Tie Important: Read instructions carefully before installation. Note: Do not remove banding placed on the mid section of each pipe. It has been placed there to reduce noise emissions, improve performance and reliability. RMK MODELS 1. Remove stock exhaust pipe and silencer (retain OEM springs and gaskets for pipe installation). 2. Install SLP silencer onto the stock silencer support bracket and spring into place using 2 stock short springs. 3. Set SLP single pipe into place. Mark the area closest to the bellypan below the head pipe. Remove the pipe and install 2 strips of insulated heat tape then cover with reflective heat tape (see illustration #1). Remove the insulation from the front center of the hood. On the right hand underside of the hood apply reflective heat tape (see illustration #2). 4. Apply reflective heat tape to the wire loom that runs close to the pipe support bracket and zip tie it to the coolant hose to prevent it from bouncing up and contacting the pipe. Apply reflective heat tape to the wires that run the exhaust valve servo. 5. Remove air plenum under the hood headlight by removing the 5 screws that hold it into place. Cut the zip ties that hold the wire loom to the hood. 6. Run the wire loom up the left side of the hood to the inside of the hood foam. Remove the upper plastic rivet on the hood vent. Using the three zip ties provided, fasten wire loom to the hood. Use the hole in the hood vent rivet hole for one of the zip ties (see Illustration #3). 7. Using a razor knife notch out a 3/4 slot in the air plenum for the wire loom. Then reinstall plenum using the 5 stock screws 1

2 8. Install the SLP single pipe and spring into place using 3 stock springs on the head pipe and 2 stock springs on the stinger. Use a silicone sealer suck as Loctite 598 Ultra Black on the pipe to silencer joint and from the silencer to bellypan for a good seal. Spring the pipe to the stock pipe support bracket on the out side of the pipe and 1 medium spring provided on the inside (see illustration #4). If the pipe needs to be adjusted for belly pan or hood clearance (1/8 ) washer can be added or removed from the stock rubber mushroom. NOTE: Check for pipe clearance on right hand hood vent trim for 1/8 clearance if needed. SLP recommends the use of, SLP High Flow Air Horn kit part # and Radiator Removal kit #10-9 (on RMK models only). Spring Tension Adjustment: Spring loop adjustment is suggested for proper spring tension to prevent leakage and wear (low tension), allow adequate flex (proper tension) and prevent spring breakage (excessive tension). When system is installed the spring can be judged for proper tension. The winding spacing at the center of the spring will indicate tension. When proper the two center windings will have.040" to.050" clearance between them. This is easily tested with a feeler gage. If tension is incorrect, the loop on the pipe or silencer can be bent in the direction needed to increase or decrease tension. Attach a vise grip firmly to the loop and bend. ILLUSTRATION #1 2

3 ILLUSTRATION #2 ILLUSTRATION #3 3

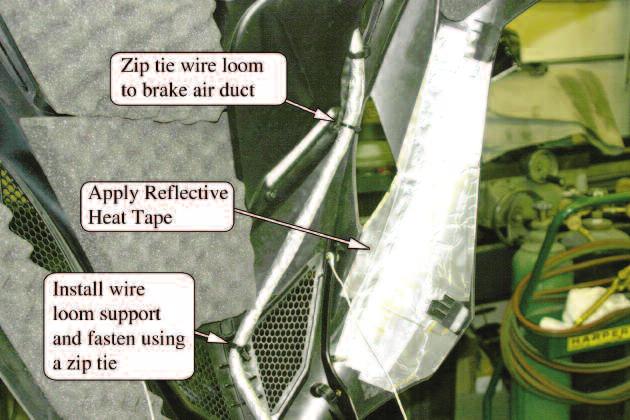
4 ILLUSTRATION #3 FUSION MODELS 1. Remove stock exhaust pipe and silencer (retain OEM springs and gaskets for pipe installation). 2. Install SLP silencer onto the stock silencer support bracket and spring into place using 2 stock short springs. 3. Pull all of the slack out of the wire loom that runs up the center of the hood. In the center of the hood screen measure down 2 1/4 and mark. Using a 1/4 drill bit, drill a hole through the hood screen (use caution not to drill through the hood) and install a wire loop support into the hole (see illustration #1). Place wire loom into loom support close wire support and secure using a zip tie (provided). From the second screw up on the brake air duct measure towards the outside of the sled 1/2 and mark. Drill using a 1/4 drill bit. Zip tie wire loom to brake air duct by slipping a zip tie (provided) through the drilled hole and under the air duct edge. Apply reflective heat tape to the wire loom closest to the pipe support bracket. Using a ziptie provided tie the wire loom to the coolant hose to prevent it from bouncing up and contacting the pipe. 4. Apply reflective heat tape to both sides of the belly pan, radiator cover and right hand underside of the hood. Apply reflective heat tape to the wires that run the exhaust valve servo (see illustration #2). 5. Install the SLP single pipe and spring into place using 3 stock springs on the head pipe and 2 stock springs on the stinger. Use a silicone sealer such as Loctite 598 Ultra Black on the pipe to silencer joint and from the silencer to bellypan for a good seal. Spring the pipe to the stock pipe support bracket on the out side of the pipe and 1 medium spring provided on the inside (see illustration #3). If the pipe needs to be adjusted for belly pan or hood clearance (1/8 ) washers can be added or removed from the stock rubber mushroom. SLP recommends the use of SLP High Flow Air Horn kit part #

5 ILLUSTRATION #1 ILLUSTRATION #2 5
6 ILLUSTRATION #3 Polaris 600 Jetting Chart Pilot Jet - 50 Sarter Jet Jet Needle - 9DGN6-57 Pilot Air Jet -.6 Needle Jet - P-8 Altitude Ambient Temperature meters Below -25 F -25 F to -10 F -10 F to +5 F +5 F to +20 F +20 F to +35 F +35 F to +50 F +50 F to +65 F +65 F and Above (feet) Below -35 C -35 C to -23 C -23 C to -15 C -15 C to -7 C -7 C to +2 C +2 C to +10 C +10 C to +18 C +18 C and Above (0-2000) #3 #3 #3 #2 #2 #2 #2 # ( ) #3 #3 #2 #2 #2 #2 #1 # ( ) #3 #2 #2 #2 #2 #1 #1 # ( ) #3 #2 #2 #2 #1 #1 #1 # ( ) #2 #2 #2 #1 #1 #1 #1 # ( #2` #2 #1 #1 #1 #1 #1 # ) Important! Fuels containing ethanol or alcohol based fuel compounds will require larger main jets, usually 2 sizes larger than the SLP jetting chart. Needle needs must be richened one E clip position. Jetting specifications are with 2 Flow-Rites (P.N ) installed in the hood and an SLP Air Horn kit installed. 6
7 Polaris 600 Clutching Chart Altitude Driven Clutch (P-85) Driven Clutch (TEAM) meters Shift Weight Clutch Clutch Driven Gearing (feet) SLP MTX Spring Spring Helix g SLP Red/Black 64/ :39-76 (0-2000) P.N Black/Pink (Stock) (Stock) (Stock) 3 g rivet in outer hole g SLP Red/Black 64/ :39-76 ( ) P.N Blue/Pink (Stock) (Stock) (Stock) 1 g rivet in inner hole g SLP Red/Black 56/ :41-76 ( ) P.N Blue/Pink (Stock) (Stock) (Stock) 2 g rivet in inner hole g SLP Red/Black 56/ :41-76 ( ) P.N Blue / Pink (Stock) (Stock) (Stock) 1 g rivet in outer hole g SLP Red/Black 56/ :41-76 ( ) P.N Blue / Pink (Stock) (Stock) (Stock) no rivets Running RPM specifications based on HO Fusion specifications based on HO RMK Caring for your ceramic coated pipes and/or silencer: Ceramic Coating is an aluminum matrix applied to your exhaust system to provide a thermal barrier for more consistent performance. It is a coating which requires little maintenance to keep your pipes and/or silencer looking like new. Upon completion of new installation, wipe the ceramic coated parts of the exhaust system down with brake cleaner. This will prevent oils and grease (usually in the form of fingerprints) from burning on and staining the exhaust during first initial startup. To maintain your ceramic coated system, wash it with soap and water periodically (especially necessary after trailering it to and from your riding area on roads that have been treated with salt and other ice removing chemicals). Salt and other ice removing chemicals will attack and eat away at the ceramic coating. This will result in rust coming through the coating. Typically you will notice this rusting after your snowmobile has set for a period of time without the exhaust system being brought up to running temperature. Periodically polish your ceramic coated pipes and/or silencer after each washing with an aluminum polish such as Mothers, Maas or Blue Magic aluminum polish that can be found at any automotive parts store. Do not use any acidic cleaners! For stubborn stains use fine 000 steel wool, then use a soft cloth with polish. Failure to maintain your ceramic coated pipes or silencer can result in damage to the ceramic coating for which there is no warranty coverage. A little care will insure that your pipes and/or silencer will continue looking like new for many years. Note: In areas of the ceramic coated system where skin temperatures exceed 1300 degrees F, it is normal for the coating to turn dull gray. These areas should also be washed and polished periodically. 7
POLARIS 700/800 PRO X SINGLE PIPE P.N
 2003-04 POLARIS 700/800 PRO X SINGLE PIPE P.N. 09-839 Important: Read instructions carefully before installation. Note: Do not remove banding placed on the mid section of the pipe. It has been placed there
1-Remove stock exhaust, Y-Pipe, and silencer (Retain OEM springs and exhaust gaskets for pipe installation).
.") Single Pipe Set for use with Performance Edition Kit for 2003-04 POLARIS 800 Pro X P.N. 09-848 Important: Read instructions carefully before installation. Note: Do not remove banding placed on the mid
Single Pipe Set for use with Performance Edition Kit for 2003-04 POLARIS 800 Pro X P.N. 09-848 Important: Read instructions carefully before installation. Note: Do not remove banding placed on the mid
Sinlge Pipe for /800 Pro-X/Pro-X2/Pro-XR P.N
 Sinlge Pipe for 2003-04 700/800 Pro-X/Pro-X2/Pro-XR P.N. 09-9 Important: Read instructions carefully before installation. Note: Do not remove banding placed on the mid section of the pipe. It has been
SLP Single Pipe Set for 2007 Arctic Cat M1000
 Single Pipe Set for 2007 Arctic Cat M1000 P.N. 09-876 Kit Contents: 1 - Silencer 1 - Spring Tab 1 - Large Head Rivet 1 - Short Spring 1 - Zip Tie 1-30 Reflective Heat Tape 1 - Y-Pipe 1 - Single Pipe Read
SLP Twin Pipes for 2003 Arctic Cat 900 Twin
 Setting the World s Performance Standards SLP Twin Pipes for 2003 Arctic Cat 900 Twin P.N. 09-902(CP) and 09-903(CP) IMPORTANT: Read instructions carefully before installation. 1. Remove stock exhaust,
SLP PART # ATTENTION DEALER
 SLP PART #09-872 ATTENTION DEALER PLEASE PROVIDE YOUR CUSTOMER WITH THE INSTALLATION AND INSTRUCTION DATA THAT IS SUPPLIED IN THIS PACKET FOR THIS PRODUCT. Before you begin, please read the following:
Stock rubber isolator must remain in this location
 *015-09319* Setting the World s Performance Standards 743 East Iona Road, Idaho Falls, ID 83401, (208) 529-0244 Fax (208) 529-9000 Lightweight Silencer for Polaris: 2015-18 800 Axys Models & 2016-18 600
Setting the World s Performance Standards
 Setting the World s Performance Standards 743 East Iona Road, Idaho Falls, ID 83401, (208) 529-0244 Fax (208) 529-9000 Lightweight Silencer for Polaris: 2016-17 800 Axys Models & 2017 600 Pro-RMK P/N 09-322
Part # SLP Silencer for G4 Ski Doo 850
 Part # 09-867 SLP Silencer for 2017-18 G4 Ski Doo 850 Parts List: 7-7 Insulated Heat Tape (Part #090-29) 5-30 Reflective Heat Tape (Part #090-31) 1 - Inner Aluminum Heat Shield (Part #091-6057) 3-3/16
SLP PART # ATTENTION DEALER
 PART #09-8000 ATTENTION DEALER PLEASE PROVIDE YOUR CUSTOMER WITH THE INSTALLATION AND INSTRUCTION DATA THAT IS SUPPLIED IN THIS PACKET FOR THIS PRODUCT. Before you begin, please read the following: The
SLP Twin Pipes for 2004 Arctic Cat 900 Mountain Cat Twin P.N (CP)
") Setting the World s Performance Standards Twin Pipes for 2004 Arctic Cat 900 Mountain Cat Twin P.N. 09-907(CP) Contents of Pipe Set 1 - Plastic Zip tie 3 - Large Head Rivets 4 - Short s 1 - Red Silicone
Setting the World s Performance Standards Twin Pipes for 2004 Arctic Cat 900 Mountain Cat Twin P.N. 09-907(CP) Contents of Pipe Set 1 - Plastic Zip tie 3 - Large Head Rivets 4 - Short s 1 - Red Silicone
Single Pipe for Ski-Doo REV H.O. (For use with ported engines only) #09-870
 #09-870") the World s Performance Standards Single Pipe for 200-2006 Ski-Doo REV H.O. (For use with ported engines only) #09-870 Important: Read instructions carefully before installation. 1. Remove stock pipe and
the World s Performance Standards Single Pipe for 200-2006 Ski-Doo REV H.O. (For use with ported engines only) #09-870 Important: Read instructions carefully before installation. 1. Remove stock pipe and
Part # SLP Single Pipe Set for G4 Ski Doo 850
 Setting the World s Performance Standards 743 East Iona Road, Idaho Falls, ID 83401, (208) 529-0244 Fax (208) 529-9000 Part # 09-867 SLP Single Pipe Set for 2017-18 G4 Ski Doo 850 Parts List: 7-7 Insulated
3- Remove stock silencer bracket from the bulkhead located above brake assembly (this bracket will not be used in installation).
.") SLP Single Pipe Set for 2004 ZR 900 P.N. 09-904CP Kit Contents: 2 1/4 Flat Washer 2 Large Head Rivets 2 1/4 Nylock Nuts 2 Rivet Washers 1 Stem Vibro Support 1 Medium Sping 1 pc 30 Reflective Heat Tape
SLP Single Pipe Set for 2004 ZR 900 P.N. 09-904CP Kit Contents: 2 1/4 Flat Washer 2 Large Head Rivets 2 1/4 Nylock Nuts 2 Rivet Washers 1 Stem Vibro Support 1 Medium Sping 1 pc 30 Reflective Heat Tape
SLP PART# ATTENTION DEALER
 *015-09866* Setting the World s Performance Standards 743 East Iona Road, Idaho Falls, ID 83401, (208) 529-0244 Fax (208) 529-9000 PART# 09-866 ATTENTION DEALER PLEASE PROVIDE YOUR CUSTOMER WITH THE INSTALLATION
Single Pipe Set with OEM Silencer for /800 RMK/XC, /800 SKS, /800 Switchback and Switchback
 Single Pipe Set with OEM Silencer for 2002-05 700/800 RMK/XC, 2003 700/800 SKS, 2004 700/800 Switchback and 2005 800 Switchback P.N. 09-836 Important: Read instructions carefully before installation. Note:
SLP Single Pipe Set for Arctic Cat 900 Mountain Cat Carb and EFI with Transfer Outlet Tube P.N CP/09-914CP
 Setting the Wld s Perfmance Standards SLP Single Pipe Set f 2004-05 Arctic Cat 900 Mountain Cat Carb and EFI with Transfer Outlet Tube P.N. 09-908CP/09-914CP Read instructions carefully and completely
SLP PART # ATTENTION DEALER
 SLP PART #09-883 ATTENTION DEALER PLEASE PROVIDE YOUR CUSTOMER WITH THE INSTALLATION AND INSTRUCTION DATA THAT IS SUPPLIED IN THIS PACKET FOR THIS PRODUCT. Before you begin, please read the following:
POLARIS XLT-SPECIAL TRIPLE PIPE SET P.N
 1998-99 POLARIS XLT-SPECIAL TRIPLE PIPE SET P.N. 09-596 Important: Read instructions carefully before installation. 1-Remove stock exhaust, Y-pipe, and rear muffler support. 2-Install three exhaust flanges,
Single Pipe Set for Big Block: /700 XC/SKS/RMK and /700 RMK/SKS For use with Stock Silencer P.N
 Single Pipe Set for Big Block: 2000 600/700 XC/SKS/RMK and 2001 600/700 RMK/SKS For use with Stock Silencer P.N. 09-732 Important: Read instruction carefully before installation. Note: Removal of pipe
POLARIS 700 XC/SKS/RMK SLP TWIN PIPE SET P.N
 POLARIS 700 XC/SKS/RMK SLP TWIN PIPE SET P.N. 09-710 IMPORTANT: Read instruction carefully before installation. For engines with stock porting use either 09-700 glass pack pipe set or 09-710 canister pipe
XLT SPECIAL TRIPLE PIPE SET P.N Installation Instructions
 1995-97 XLT SPECIAL TRIPLE PIPE SET P.N. 09-598 Installation Instructions Revised 8/20/02 Read instructions carefully before installation 1 - Remove stock exhaust, Y-Pipe, front and rear muffler support.
XCR 600/ XLT TRIPLE PIPE SET P.N Installation Instructions
 1994-97 XCR 600/1993-97 XLT TRIPLE PIPE SET P.N. 09-5970 Installation Instructions Read instructions carefully before installation 1-Remove stock exhaust, Y-pipe, and rear muffler support. 2-Install three
POLARIS XLT 580/600 INSTALLATION INSTRUCTIONS PART # READ INSTRUCTIONS CAREFULLY BEFORE ATTEMPTING TO INSTALL PIPE SET
 Page 1 of 6 POLARIS 1993-97 XLT 580/600 INSTALLATION INSTRUCTIONS PART #09-595 READ INSTRUCTIONS CAREFULLY BEFORE ATTEMPTING TO INSTALL PIPE SET 1. Remove stock exhaust, y-pipe, front and rear muffler
POLARIS Twin 600/700 SINGLE PIPE SET P.N
 1997-1998 POLARIS Twin 600/700 SINGLE PIPE SET P.N. 09-718 Important: Read instruction carefully before installation. Note: Do not remove banding placed on the mid section of the pipe. It has been placed
SLP PIPE INSTALLATION INSTRUCTIONS POLARIS ULTRA 680 SP SKS & RMK P.N (Read instructions carefully before installation.
 SLP PIPE INSTALLATION INSTRUCTIONS POLARIS 1996-97 ULTRA 680 SP SKS & RMK P.N. 09-6802 (Read instructions carefully before installation.) NOTE: The Ultra has proven to exhibit distinct personalities from
SLP PIPE INSTALLATION INSTRUCTIONS POLARIS ULTRA 680 SP SKS & RMK P.N (Read instructions carefully before installation.
 SLP PIPE INSTALLATION INSTRUCTIONS POLARIS 1996-97 ULTRA 680 SP SKS & RMK P.N. 09-6801 (Read instructions carefully before installation.) NOTE: The Ultra has proven to exhibit distinct personalities from
SLP PIPE INSTALLATION INSTRUCTIONS #09-9 & # & NEWER POLARIS INDY 650 & RXL PIPE SET EFFECTIVE 6-92
 Page 1 of 5 SLP PIPE INSTALLATION INSTRUCTIONS #09-9 & #09-10 1988 & NEWER POLARIS INDY 650 & RXL PIPE SET EFFECTIVE 6-92 READ INSTRUCTIONS CAREFULLY BEFORE ATTEMPTING TO INSTALL PIPE SET #09-9 (For stock
SLP Stage 2 Performance Kit for Polaris 800 Axys
 Setting the World s Performance Standards 743 E. Iona Road, Idaho Falls, ID 83401, (208) 529-0244 Fax (208) 529-9000 Stage 2 Performance Kit for 2015-17 Polaris 800 Axys The following tuning specification
Lexus ES Fine Mesh and Adaptive Cruise Control Fine Mesh Grilles Upper and Lower Replacements
 IMPORTANT: PLEASE KEEP THIS INSTRUCTION MANUAL FOR FUTURE REFERENCE! 2013-15 Lexus ES Fine Mesh and Adaptive Cruise Control Fine Mesh Grilles Upper and Lower Replacements Part #1372-0102-13 / Black Ice
Performance Edition Kit (SLP Stage 4)
") Performance Edition Kit ( Stage 4) for 2011-15 Polaris 800 RMK, Pro-RMK, Switchback Assault, RMK Assault & Indy 2011-14 800 Rush & Switchback Congratulations! You have just purchased one of the best modifications
Performance Edition Kit ( Stage 4) for 2011-15 Polaris 800 RMK, Pro-RMK, Switchback Assault, RMK Assault & Indy 2011-14 800 Rush & Switchback Congratulations! You have just purchased one of the best modifications
Equipped with AEM Dryflow Filter No Oil Required! INSTALLATION INSTRUCTIONS PART NUMBER: C
 Equipped with AEM Dryflow Filter No Oil Required! INSTALLATION INSTRUCTIONS PART NUMBER: 21-721C 2011-2013 MINI Cooper S L4-1.6L SEE NOTE* 2011-2013 MINI Clubman S L4-1.6L SEE NOTE* 2011-2013 MINI Cooper
Arctic Cat 800 F/XF/M SPI Single Pipe Polished Ceramic Operating RPM 8300
 2012-14 Arctic Cat 800 F/XF/M SPI Single Pipe 131-153 Polished Ceramic Operating RPM 8300 The 131-153 Arctic Cat Single Pipe Looses 3.2 lbs of weight! Straightline also offers a lightweight muffler that
WOC-364 Installation Instructions Ranger XP Heater System
 WOC-364 Installation Instructions Ranger 2011-12 XP Heater System Order of installation for a Complete Enclosure Always install the Heater System first if possible NOTE: If installing the Heater System
ELECTRIC START KIT P/N APPLICATION BEFORE YOU BEGIN KIT CONTENTS. Instr Rev Page 1 of 6. All Polaris Pro-Ride Snowmobiles
 ELECTRIC START KIT P/N 2879330 APPLICATION All Polaris Pro-Ride Snowmobiles BEFORE YOU BEGIN Read these instructions and check to be sure all parts and tools are accounted for. Please retain these installation
RACE X INTERCOOLER INSTALLATION INSTRUCTIONS
 RACE X INTERCOOLER INSTALLATION INSTRUCTIONS The goal of AMS Performance is to provide the highest quality, best performing products available. By utilizing research and development, and rigorous testing
BLACKBIRD INSTALLATION SUPPLEMENT
 BLACKBIRD INSTALLATION SUPPLEMENT FOR 2008-105 FORD 6.4 LITER DIESEL F-SERIES VERSION 3/10 Parts Blackbird Wiring Manual Installation Supplement 6.4 liter Diesel Owner s Manual Includes Warrantee Registration
ELECTRIC START KIT KIT P/N
 ELECTRIC START KIT KIT P/N 2879330 Application All Polaris Pro-Ride Snowmobiles Before you begin, read these instructions and check to be sure all parts and tools are accounted for. Please retain these
Revised 10/22/2014 Page 2 of?
 1.Remove side panels, hood, seat, fuel tank, and 2.Remove stock air box, remove fuel line muffler. Save exhaust springs and rubber muffler mounts for turbo bracket. Sand back surface flat for mounting.
BLACKBIRD INSTALLATION SUPPLEMENT
 BLACKBIRD INSTALLATION SUPPLEMENT FOR 2003-7 FORD 6.0 LITER DIESEL F-SERIES DUAL ALTERNATOR VERSION 10/07 Blackbird Installation Supplement for Ford 6.0. Liter Dual Alternator Parts included in the 6.0
Industrial Injections Compound Turbo Installation For 6.7L Scorpion
 Industrial Injections Compound Turbo Installation For 6.7L Scorpion Step 1: Whenever you are doing an installation the first thing you should do is unhook the batteries to avoid arcing. You will need an
Backwater Performance Systems Large Vanguard Mikuni Twin Carburetor Kit
 Backwater Performance Systems Large Vanguard Mikuni Twin Carburetor Kit 1. Throttle Cable Twin (CKC-41) 2. Carburetor VM30mm (CKC-40) 3. Loctite 242.5mL (A-210) 4. Air Cleaner Filter 6000 (EC-86) 5. Rev
Current Range Rover Sport STRUT Collection Installation Manual
 2014 - Current Range Rover Sport STRUT Collection Installation Manual 1 1. Removing Main Grille and Lower Fascia 1.1 Run a line of low tack masking tape across the front of the bumper below the grille
AUXILIARY BATTERY BOX INSTALLATION INSTRUCTIONS
 AUXILIARY BATTERY BOX INSTALLATION INSTRUCTIONS The original TOMMY GATE hydraulic lift Assembling the Auxiliary Battery Box 1. Remove the cover from the auxiliary battery box by removing the two nuts and
Lexus NX Fine Mesh and Dynamic Radar Cruise Control Fine Mesh Grilles
 IMPORTANT: PLEASE KEEP THIS INSTRUCTION MANUAL FOR FUTURE REFERENCE! 2015-16 Lexus NX Fine Mesh and Dynamic Radar Cruise Control Fine Mesh Grilles Upper Insert - factory chrome surround and emblem reused
2011 Honda Accord Coupe Fine Mesh Grille
 IMPORTANT: PLEASE KEEP THIS INSTRUCTION MANUAL FOR FUTURE REFERENCE! TOOLS REQUIRED 2011 Honda Accord Coupe Fine Mesh Grille Replacement Upper / Lower Overlay Part #: Complete #1124-0102-11 / Black Ice
IMPORTANT: PLEASE KEEP THIS INSTRUCTION MANUAL FOR FUTURE REFERENCE! 2015 Nissan Murano. Upper and Lower Overlay Mesh Grilles
 IMPORTANT: PLEASE KEEP THIS INSTRUCTION MANUAL FOR FUTURE REFERENCE! 2015 Nissan Murano Upper and Lower Overlay Mesh Grilles Upper Chrome Mesh Part #1318-010U-15 / Lower Chrome Mesh Part #1318-010L-15
SHELBY GT500
 2007-2009 SHELBY GT500 Removal of Factory Unit WARNING: 1. Radiator fluid must be handled properly. Please observe local ordinances with regards to handling and disposal. 2. Allow vehicle and components
INSTALLATION INSTRUCTIONS 97 FORD EXPEDITION
 INSTALLATION INSTRUCTIONS 97 FORD EXPEDITION 1. Read the instructions completely and carefully before you begin. Check the kit for proper contents (refer to the part s list and the picture diagrams). Before
INSTALLATION INSTRUCTIONS
 INSTALLATION INSTRUCTIONS Trans4mer Grille Guard/Winch Mount For 2007 Toyota Tundra Kit 76380 (Black) and 76381 (Stainless) Your safety, and the safety of others, is very important. To help you make informed
SS1066HF Jeep JK Wrangler Left Hand Drive CRDI4 2.8Litre-I4 Diesel Engine and EGHV6 3.8Litre V6 Gasoline Engine
 SS1066HF Jeep JK Wrangler Left Hand Drive CRDI4 2.8Litre-I4 Diesel Engine and EGHV6 3.8Litre V6 Gasoline Engine Installation Guide Safari SS1066HF Page - 1 of 12 6/10/2009 ITEM PART NO DESCRIPTION QTY
Exhaust Heat Shield Instructions ND
 Exhaust Heat Shield Instructions ND 2016 + Thank you for purchasing the Track Dog Racing Exhaust Heat Shield for the 2016 to Present Mazda MX-5. Our TDR Heat Shield is designed to help maintain lower temperatures
BA /02/03/04/06/07/08/13/13B/15 BIG AIR KIT (BAK) - Yamaha Road Star (99-07)
 - Yamaha Road Star (99-07)") BA-2020-00/02/03/04/06/07/08/13/13B/15 BIG AIR KIT (BAK) - Yamaha Road Star (99-07) Page: 1 Revision: 6.2-02/23/2011 Install Time: 1.5 Hours We recommend a qualified Yamaha technician install this kit
BA-2020-00/02/03/04/06/07/08/13/13B/15 BIG AIR KIT (BAK) - Yamaha Road Star (99-07) Page: 1 Revision: 6.2-02/23/2011 Install Time: 1.5 Hours We recommend a qualified Yamaha technician install this kit
INSTALLATION INSTRUCTIONS
 INSTALLATION INSTRUCTIONS Accessory Application Publications No. AII 25852 PILOT Issue Date AUG 2003 PARTS LIST INSTALLATION NOTE: Door visor (Front left) These instructions show the left door visors being
Standard Duty Oil Filter Relocation Kit (OC-8)
") 3430 Sacramento Dr., Unit D San Luis Obispo, CA 93401 Telephone: 805/544-8748 Fax: 805/544-8645 www.maximummotorsports.com Standard Duty Oil Filter Relocation Kit (OC-8) Filter Mount Installation 4. Remove
3430 Sacramento Dr., Unit D San Luis Obispo, CA 93401 Telephone: 805/544-8748 Fax: 805/544-8645 www.maximummotorsports.com Standard Duty Oil Filter Relocation Kit (OC-8) Filter Mount Installation 4. Remove
2010 Mustang V6 Shaker CDC #
 - - Incomplete 2010 Mustang V6 Shaker CDC # 1011-7002-01 Component Check List: Quantity/Description Part # Engine Cover Assembly 1011-6000-01 1 Engine Cover w/ Upper Air Tube 0511-2100-01 1 Aluminum Shaker
GrilleGuy.com, LLC. Installation Instructions and Care guide : Scion tc : Honda S2000 : Honda Civic
 Installation Instructions and Care guide : 2005 2009 Scion tc : 2000 2003 Honda S2000 : 2004 2005 Honda Civic Thanks again for purchasing your custom grille insert from the GrilleGuy. The following are
Exhaust Heat Shield Instructions NC 06-15
 Exhaust Heat Shield Instructions NC 06-15 Thank you for purchasing the Track Dog Racing Exhaust Heat Shield for the 2006-2015 Mazda MX-5. Our TDR Heat Shield is designed to help maintain lower temperatures
Parts List Continues on Next Page
 Assembly Instructions and Owner s Manual Description: Quantum Hardcoated Polycarbonate UTV Windshield, Wash n Wipe Full Size Model: Part Number: N30202 Installation Time: 60 min Polaris RZR 800, Round
1) Remove side panels. Remove clutch cover. Remove windshield by pulling up on the three posts secured into
 Remove side panels. Remove clutch cover. Remove windshield by pulling up on the three posts secured into") UNDER HOOD HEAT ELIMINATOR A.K.A. THE BLOW HOLE by Mountain Tek Application 2013 Model Year SKIDOO XM Kit Contents 1) (1) Fan Tube Assembly 2) (1) Accessory Connect Harness 3) (1) Fan Vent Cover Plate
UNDER HOOD HEAT ELIMINATOR A.K.A. THE BLOW HOLE by Mountain Tek Application 2013 Model Year SKIDOO XM Kit Contents 1) (1) Fan Tube Assembly 2) (1) Accessory Connect Harness 3) (1) Fan Vent Cover Plate
OIL COOLER KIT INSTALLATION INSTRUCTIONS PART NUMBER D
 OIL COOLER KIT INSTALLATION INSTRUCTIONS PART NUMBER D570-0907 APPLICATION: 2011-12 E90 335i/xi (N55 engine) with BMW M-Technic bumper and without stock oil cooler Congratulations for being selective enough
INSTALLATION INSTRUCTIONS
 HIGH FLOW AIRFLOW METER INSTALLATION INSTRUCTIONS PART NUMBER D763-1600A APPLICATION: 2001-06 E46 M3 Parts List: Hose clamp 64Z (7) Plastic Rivets Air Filter Temp Sensor & Harness (2) Button Head Screws
INSTALLATION INSTRUCTIONS
 Equipped with AEM Dryflow Filter No Oil Required! INSTALLATION INSTRUCTIONS PART NUMBER: 21-696 2009-2010 DODGE Challenger V6-3.5L SEE * NOTE * NOTE: Legal in California only for racing vehicles which
OIL COOLER KIT INSTALLATION INSTRUCTIONS PART NUMBER D
 OIL COOLER KIT INSTALLATION INSTRUCTIONS PART NUMBER D570-0904 APPLICATION: 2011-2012 E90 335i/xi (N55 engine) with BMW standard bumper and with stock oil cooler Congratulations for being selective enough
INSTALLATION INSTRUCTIONS SEMI Hidden Kit Part Number: Application: Toyota Tacoma
 INSTALLATION INSTRUCTIONS SEMI Hidden Kit Part Number: 100044 Application: 2016+ Toyota Tacoma GENERAL SAFETY PRECAUTIONS Your safety, and the safety of others, is very important. To help you make informed
Mercedes E63/CLS AMG Carbon Turbo Intake System Instructions
 Mercedes E63/CLS AMG Carbon Turbo Intake System Instructions The goal of Alpha Performance is to provide the highest quality, best performing products available. By utilizing research and development,
SS41HF Mitsubishi Pajero NS & NT V8/V9 Series 3.2 Litre Turbo Diesel (4M41 Engine) 3.8 Litre V6 Petrol (6G76 Engine)
 3.8 Litre V6 Petrol (6G76 Engine)") SS41HF Mitsubishi Pajero NS & NT V8/V9 Series 3.2 Litre Turbo Diesel (4M41 Engine) 3.8 Litre V6 Petrol (6G76 Engine) 21/7/2010 Parts List ITEM PART NO DESCRIPTION QTY 1 570-133-200 BODY - SNORKEL (SS41HF)
SS41HF Mitsubishi Pajero NS & NT V8/V9 Series 3.2 Litre Turbo Diesel (4M41 Engine) 3.8 Litre V6 Petrol (6G76 Engine) 21/7/2010 Parts List ITEM PART NO DESCRIPTION QTY 1 570-133-200 BODY - SNORKEL (SS41HF)
Header P/N: TTi HEADER INSTALLATION. Parts List
 Header P/N: TTi 440-178 HEADER INSTALLATION Page 1 of 3 Parts List (1) Driver side header (1) Passenger side header (2) Header gaskets (12) 3/8"-16x1 Header bolts (2) Header reducer adapters w/ 3" 3-bolt
Installation instruction do88 Intercooler for SAAB 9-3SS/SC 4-cyl Turbo
 Installation instruction do88 Intercooler for SAAB 9-3SS/SC 4-cyl Turbo This instruction shows how to replace the OEM intercooler with this performance intercooler. 1. 4. 5. At this type of installation
AC 120 MODEL NUMBER S2008ACAAAUSG MODEL NUMBER S2008ACAAAUSP
 2008 AC 120 Illustrated Parts Manual MODEL NUMBER S2008ACAAAUSG MODEL NUMBER S2008ACAAAUSP TABLE OF CONTENTS (Model No. S2008ACAAAUSG) (Model No. S2008ACAAAUSP) SKI AND SPINDLE ASSEMBLY... 1 A-ARM ASSEMBLY...
Integrated Engineering MK7/MQB TSI GEN 3 FDS Intercooler Install. Part Number IETPCI1
 Integrated Engineering MK7/MQB TSI GEN 3 FDS Intercooler Install Part Number IETPCI1 Thank you for purchasing another high quality Integrated Engineering product! This instruction guide is used for installation
Please read BOTH these Installation Instructions and the General Instructions prior to installing or operating this equipment.
 2011-14 BMW Mini Cooper Countryman (Includes S) Attachment Tab Height: 14 Serial Number Attachment Tab Width: 20 Please read BOTH these and the General Instructions prior to installing or operating this
 INSTALLATION INSTRUCTIONS Accessory S P/N 08R04-SWA-100 Application 2010 CR-V Publications No. AII 42599 Issue Date AUG 2009 NOTE: Visors may not be legal in all states. Please check the laws of your state
Please read BOTH these Installation Instructions and the General Instructions prior to installing or operating this equipment.
 2011-15 BMW Mini Cooper Countryman (Includes S) Attachment Tab Height: 14 Serial Number Attachment Tab Width: 20 Please read BOTH these and the General Instructions prior to installing or operating this
JBR MAZDASPEED
 Page1 james Barone Racing Aftermarket Parts and Accessories JBR 2007 2009 MAZDASPEED 3 Front Mount Intercooler Piping Kit Installation Instructions for TR8 Intercooler Tooling: o Jack, Jack Stands, Ramps
Installation instruction do88 Intercooler for SAAB 9-3SS/SC 2,8 V6 Turbo
 Installation instruction do88 Intercooler for SAAB 9-3SS/SC 2,8 V6 Turbo This instruction shows how to replace the OEM intercooler with this performance intercooler. At this type of installation we always
RAM BOX INSTALLATION SHEET
 RAM BOX INSTALLATION SHEET Any damaged or missing parts? Parts will be shipped to you directly. Call 844-779-8986 Mon - Fri 8:30 am - 7 pm EST or email support@bakindustries.com 6.5 bed Front (cab) 5.5
1963 GEN IV SUREFIT VINTAGE AIR CONDITIONING INSTALLATION
 by Randy Irwin 1963 GEN IV SUREFIT VINTAGE AIR CONDITIONING INSTALLATION Randy Irwin - Technical Writer Randy has been involved in the Chevy parts business for over 30 years. He is a wizard at creating,
INSTALLATION INSTRUCTIONS
 COLD AIR INTAKE INSTALLATION INSTRUCTIONS PART NUMBER D760-0390C APPLICATION: 1999-2003 E39 M5 PARTS LIST 1 Left Aluminum Intake Tube 1 Air Pump Bracket (A) 1 Right Aluminum Intake Tube 1 Air Pump Bracket
ELECTRIC START KIT KIT P/N
 ELECTRIC START KIT KIT P/N 2873876 Application 2002 Polaris EDGE Models with 500-600 Domestic Engines Before you begin, read these instructions and check to be sure all parts and tools are accounted for.
INSTRUCTIONS. High Boost Upgrade Polaris PRO-RMK Polaris SKS 850 (155) 2019 Polaris ASSAULT 850. Page Number: 1 INSTRUCTIONS MODEL:
 2019 Polaris ASSAULT 850. Page Number: 1 INSTRUCTIONS MODEL:") INSTRUCTIONS MODEL: FITS: High Boost Upgrade 2019 Polaris PRO-RMK 850 2019 Polaris SKS 850 (155) 2019 Polaris ASSAULT 850 Page Number: 1 INSTRUCTIONS Table of Contents Contents INSTRUCTIONS...1 Contents
INSTRUCTIONS MODEL: FITS: High Boost Upgrade 2019 Polaris PRO-RMK 850 2019 Polaris SKS 850 (155) 2019 Polaris ASSAULT 850 Page Number: 1 INSTRUCTIONS Table of Contents Contents INSTRUCTIONS...1 Contents
4. Remove (4) 10mm and (1) 7mm bolt that holds fascia at front corners, on each side
 10mm and (1) 7mm bolt that holds fascia at front corners, on each side") 2010 Camaro LS3 1. Disconnect battery ground 2. Remove front wheels 3. Remove (5) push pins and (5) #20 torx screws on inner front wheel well liners and remove liners on each side 4. Remove (4) 10mm and
2010 Camaro LS3 1. Disconnect battery ground 2. Remove front wheels 3. Remove (5) push pins and (5) #20 torx screws on inner front wheel well liners and remove liners on each side 4. Remove (4) 10mm and
OIL COOLER KIT INSTALLATION INSTRUCTIONS PART NUMBER D E92 335i/xi (N55 engine) with BMW Standard bumper and with stock oil cooler
 with BMW Standard bumper and with stock oil cooler") OIL COOLER KIT INSTALLATION INSTRUCTIONS PART NUMBER D570-0924 APPLICATION: 2011-12 E92 335i/xi (N55 engine) with BMW Standard bumper and with stock oil cooler Congratulations for being selective enough
OIL COOLER KIT INSTALLATION INSTRUCTIONS PART NUMBER D570-0924 APPLICATION: 2011-12 E92 335i/xi (N55 engine) with BMW Standard bumper and with stock oil cooler Congratulations for being selective enough
BLACKBIRD INSTALLATION SUPPLEMENT
 BLACKBIRD INSTALLATION SUPPLEMENT FOR 2003-7 FORD 6.0 LITER DIESEL SINGLE ALTERNATOR F-350, F-450, F-550, EXCURSION VERSION 7-07 Parts Description Blackbird Wiring Manual Installation Supplement 6.0 Liter
GENUINE PARTS INSTALLATION INSTRUCTIONS
 GENUINE PARTS INSTALLATION INSTRUCTIONS DESCRIPTION: APPLICATION: PART NUMBER: KIT CONTENTS: Item Qty. A B C D E F G H 1 Bedliner Under Rail Bedliner Titan Crew Cab/King Cab/Single Cab 999T1 W3700, 999T1
Installation Instructions. Original Bar Grille
 Installation Instructions Part Number 84137 I-sheet Rev. A5 Contents Original Bar Grille For proper installation and best possible fit, please read all instructions BEFORE you begin. For technical assistance
GENUINE PARTS INSTALLATION INSTRUCTIONS
 GENUINE PARTS INSTALLATION INSTRUCTIONS DESCRIPTION: APPLICATION: PART NUMBER: Hood Bug Deflector Pathfinder T99D5 9PJ0A KIT CONTENTS: Item Qty. A 2 Inner Clip A B 2 Outer Clip B C 2 Wing Clip C D 1 Hood
HARNESS KIT 3 PORT ISOLATION MODULE LIGHT SYSTEM
 January 1, 2016 Lit. No. 92935, Rev. 01 52101 HARNESS KIT 3 PORT ISOLATION MODULE LIGHT SYSTEM Parts List and Installation Instructions Read this document before installing the snowplow. See your sales
READ AND UNDERSTAND ALL INSTRUCTIONS AND WARNINGS PRIOR TO INSTALLATION OF SYSTEM AND OPERATION OF VEHICLE.
 #9378 Installation Instructions 3 Body Lift Kit 1998-2000 Ranger READ AND UNDERSTAND ALL INSTRUCTIONS AND WARNINGS PRIOR TO INSTALLATION OF SYSTEM AND OPERATION OF VEHICLE. SAFETY WARNING BDS Suspension
Factory Pipe Bill of Materials 650 Super Jet
 Factory Pipe Bill of Materials 650 Super Jet Item# Qty. Part Description 1 1 Factory Pipe tunable cast aluminum headpipe 2 1 Factory Pipe aluminum chamber 3 1 Factory Pipe tuned exhaust manifold 4 2 100-120mm
Arctic Cat ProClimb Sidekick Installation Instructions
 2013-2017 Arctic Cat ProClimb Sidekick Installation Instructions 1.Remove side panels, front bumper, and hood 2. Remove pipe, muffler, heat shield and ECU 3. Remove cross brace. Unplug the servo motor
99-04 GT. Hellion Power Systems Mustang GT Kit Instructions
 Hellion Power Systems 99-04 Mustang GT Kit Instructions Part 1 Hellion recommends that the front suspension system be installed either by trained professionals or by 5.Remove rack bolts K-Member Installation
IMPORTANT: PLEASE RETAIN THIS INSTRUCTION MANUAL FOR FUTURE REFERENCE
 IMPORTANT: PLEASE RETAIN THIS INSTRUCTION MANUAL FOR FUTURE REFERENCE 2009 Toyota RAV-4 Stainless Steel Mesh Grilles L 30 G8P Fine Mesh Part #30-002-09 Quantity Description Part No. Upper Mesh Grille (includes):
YAMAHA VIPER SX SRX SXR V-MAX XTC CUSTOM LONG TRACK INSTALLATION
 YAMAHA VIPER SX SRX SXR V-MAX XTC CUSTOM LONG TRACK INSTALLATION REMOVAL OF OLD TUNNEL EXTENSION AND COOLER 1. Remove plastic bumper covers. 2. Drain coolant by removing left or right rear cooler hose.
Kit Part Number:
 Equipped with AEM DRYFLOW Filter No oil required! Kit Part Number: 21-573 2006-2008 Toyota Yaris 1.5L *Legal in California only for racing vehicles which may never be used upon a highway. 2008, Advanced
Installation Manual. Model Chassis Code Engine Code Year
 INTERCOOLER KIT NISSAN GT-R R35 (VR38 38DETT) SPEC-R HG TYPE29 Full KIT Installation Manual Please read the Installation Manual before installing. Keep this manual for future reference. Model Chassis Code
INSTALLATION INSTRUCTIONS FOR THE MOTOR TRIKE CROSS COUNTRY / CROSS ROADS / HARD BALL RAKE KIT
 INSTALLATION INSTRUCTIONS FOR THE MOTOR TRIKE CROSS COUNTRY / CROSS ROADS / HARD BALL RAKE KIT Thank you for choosing the Motor Trike Cross Country / Cross Roads / Hard Ball rake kit. We ask that you read
Header P/N: TTi 636A HEADER INSTALLATION. Parts List
 Phone (951) 371-4878 www.ttiexhaust.com Header P/N: TTi 636A HEADER INSTALLATION Page 1 of 3 Parts List (1) Driver side header (1) Passenger side header (2) Header gaskets (12) 5/16"-18x1 Header bolts
Instant Chat off the main page of Or simply call our tech team at
 FRONT MOUNT INTERCOOLER 2008-13 STI 2014-04- 08 Thank you for purchasing this PERRIN product for your car! Installation of this product should only be performed by persons experienced with installation
Ford F-150 Supercrew A (2004 Heritage) Ford F-150 Super Cab A
 Ford F-150 Super Cab A") INSTALLATION GUIDE APPLICATION LENGTH MODEL YR PART # Ford F-150 Supercrew 79 1999-2004 75111-01A (2004 Heritage) Ford F-150 Super Cab 72 1999-2003 75111-01A INSTALLATION TIME 3:00 hrs SKILL LEVEL 1 2
INSTALLATION GUIDE APPLICATION LENGTH MODEL YR PART # Ford F-150 Supercrew 79 1999-2004 75111-01A (2004 Heritage) Ford F-150 Super Cab 72 1999-2003 75111-01A INSTALLATION TIME 3:00 hrs SKILL LEVEL 1 2