1) Remove side panels. Remove clutch cover. Remove windshield by pulling up on the three posts secured into
|
|
|
- Leslie Rice
- 5 years ago
- Views:
Transcription

1 UNDER HOOD HEAT ELIMINATOR A.K.A. THE BLOW HOLE by Mountain Tek Application 2013 Model Year SKIDOO XM Kit Contents 1) (1) Fan Tube Assembly 2) (1) Accessory Connect Harness 3) (1) Fan Vent Cover Plate 4) (20 ) Hook and Loop Fastener 5) (4) 1/8 Steel Rivets 6) (4) 3/16 Aluminum Expansion Rivets 7) MTNTK Performance Decal 8) (1) Plastic Quick Tie 1 Of 18 Tools Recommended 1) Rivet Tool with Mandrels for 1/8 and 3/16 Rivets 2) 3/16, and 1/8 Drill Bits and Drill 3) #20 Torx Bit 4) Air Reciprocating Saw to cut plastic or Equivalent 5) Rotary tool for smoothing plastic 6) De-Burring Tool or Utility Knife 7) Silver pencil, Marker or something to transfer lines to plastic panel 8) Isopropyl alcohol and cleaning rags INSTALLATION INSTRUCTIONS 1) Remove side panels. Remove clutch cover. Remove windshield by pulling up on the three posts secured into the rubber grommets. Remove the hood by first disconnecting the air temp sensor. Disconnect the air intake tube by


2 2 Of 18 lifting the retainer tab and rotating the connection to release. Remove 8 Torx head screws noting the placement of 4 longer screws. Raise up gauge console assembly and carefully disconnect harness from gauges and hood headlight harness. Lift off hood and place in safe location.


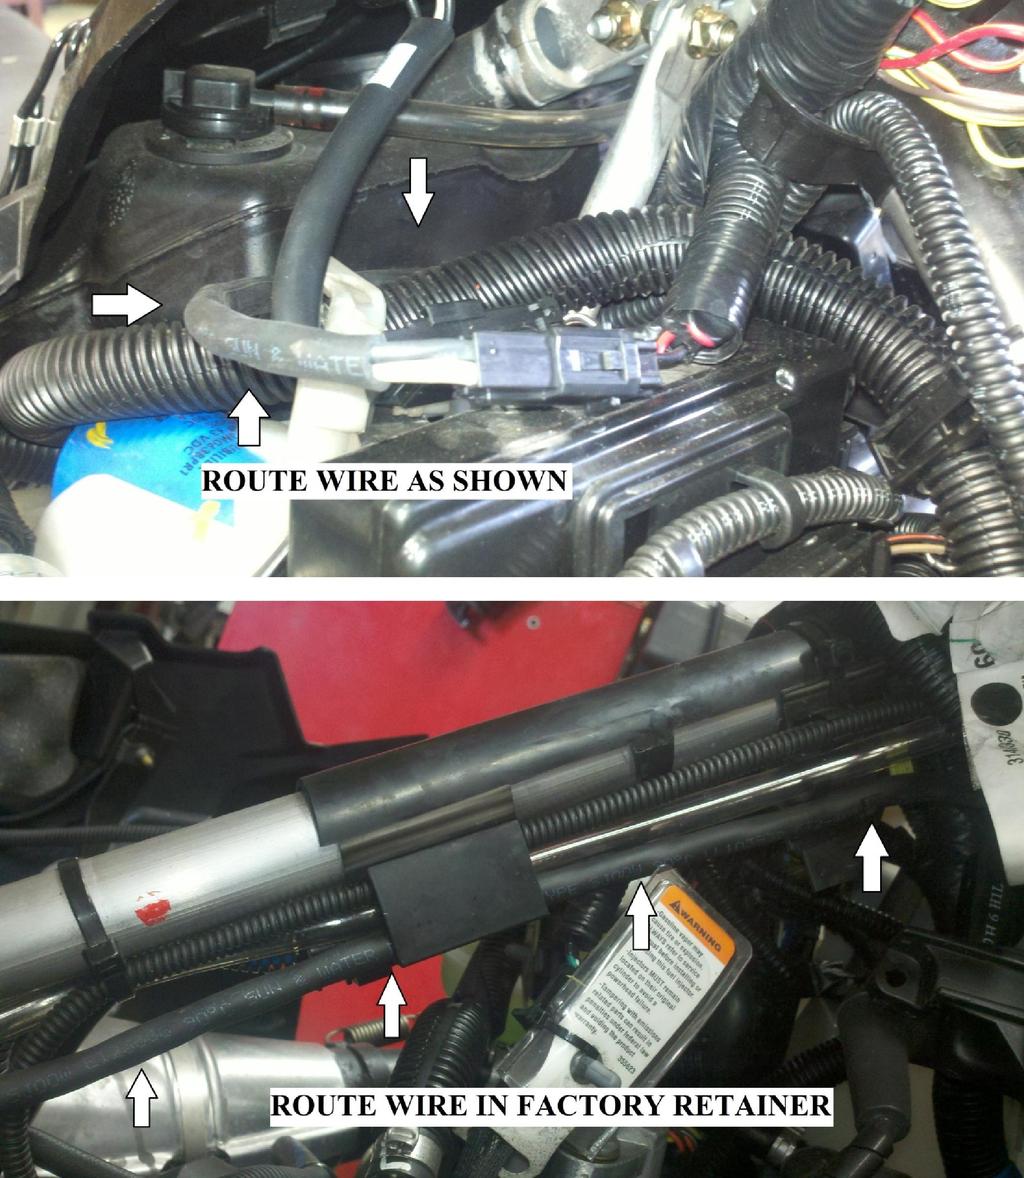
3 3 Of 18 2) Locate accessory 3 amp plug located on the right side near the steering post above the ECU. Plug in the accessory connect harness and route as shown.
4 4 Of 18

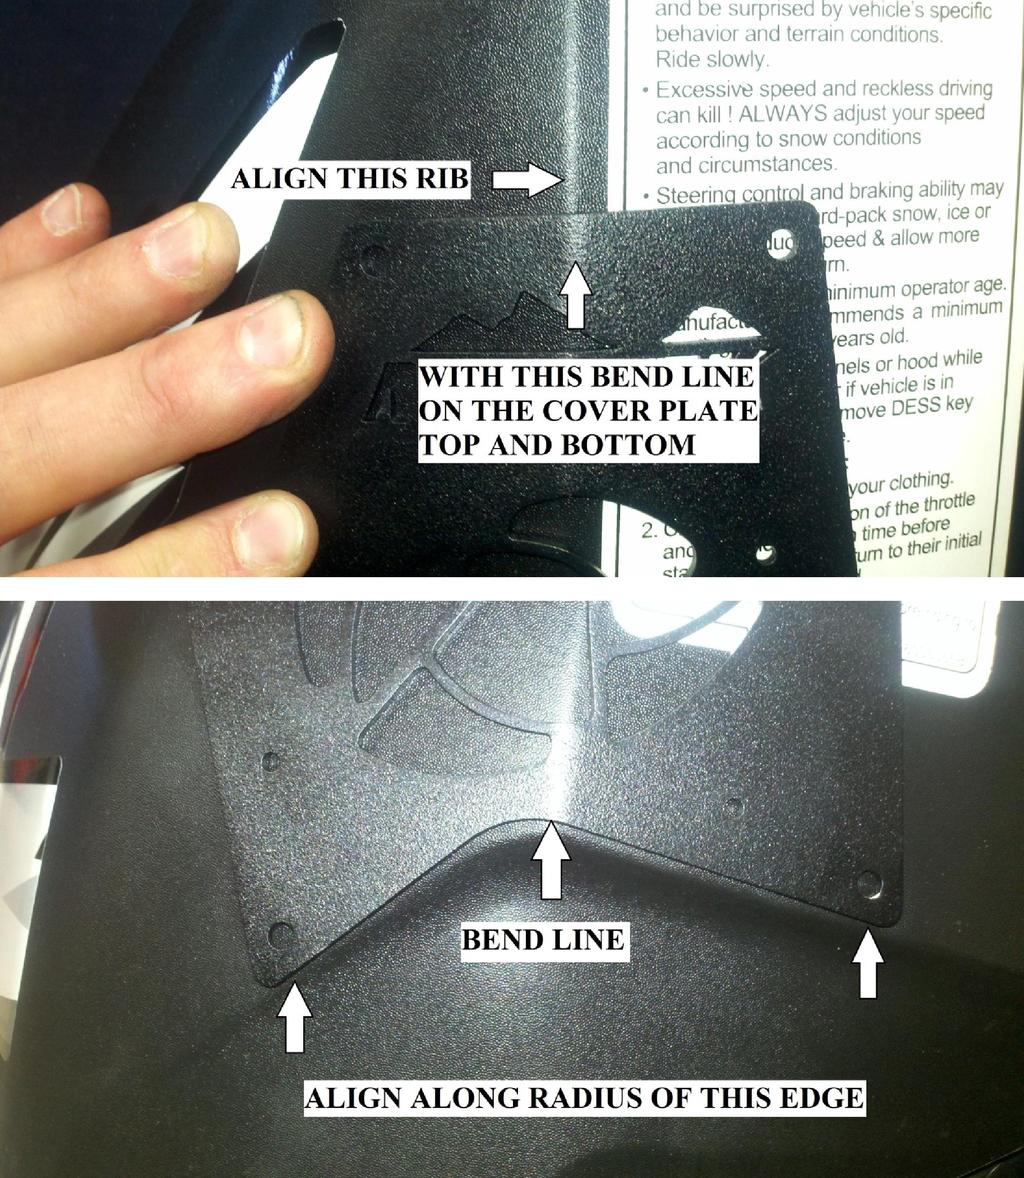
5 5 Of 18 3) Place plastic wire tie approximately 1.25 from frame weld as shown. 4) You can now replace the hood, gauge console, retaining bolts and screws. Don t forget to connect the connectors together on the headlight harness, gauge console, air temp sensor and the tube connector on the air intake. 5) Hold the face plate up to the side panel, aligning the edges at the bottom with the rib in the panel simultaneously aligning the center bend with the ridge in the panel as shown.
6 6 Of 18


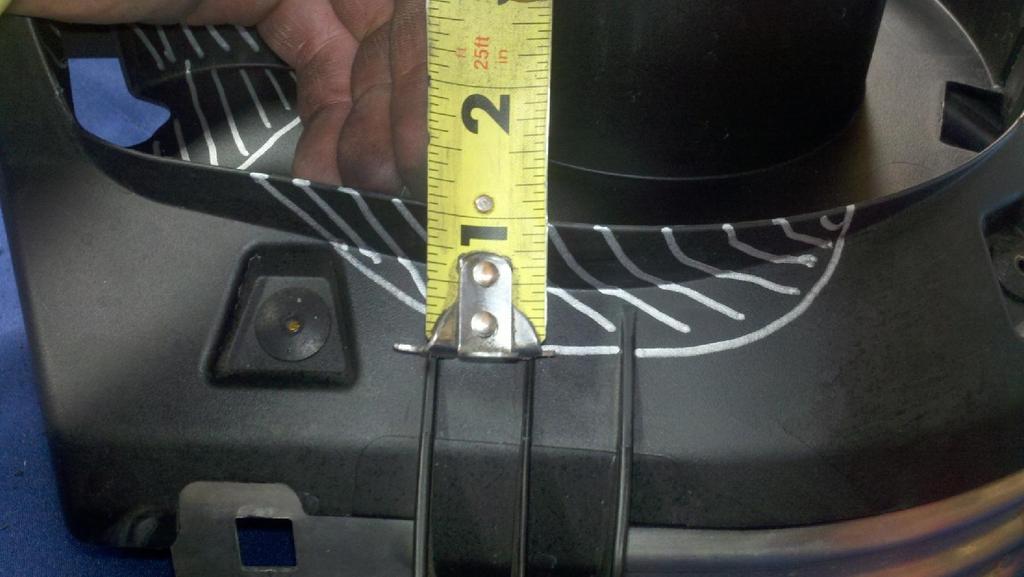
7 7 Of 18 6) Drill (4) 3/16 holes in the outer (4) holes of the face plate through the panel. Start with one hole and place a rivet in the hole temporarily to hold it while moving to the next hole. 7) Using a silver pencil, scratch awl, or marker, mark the location of the center hole.

 Cut the foam and")
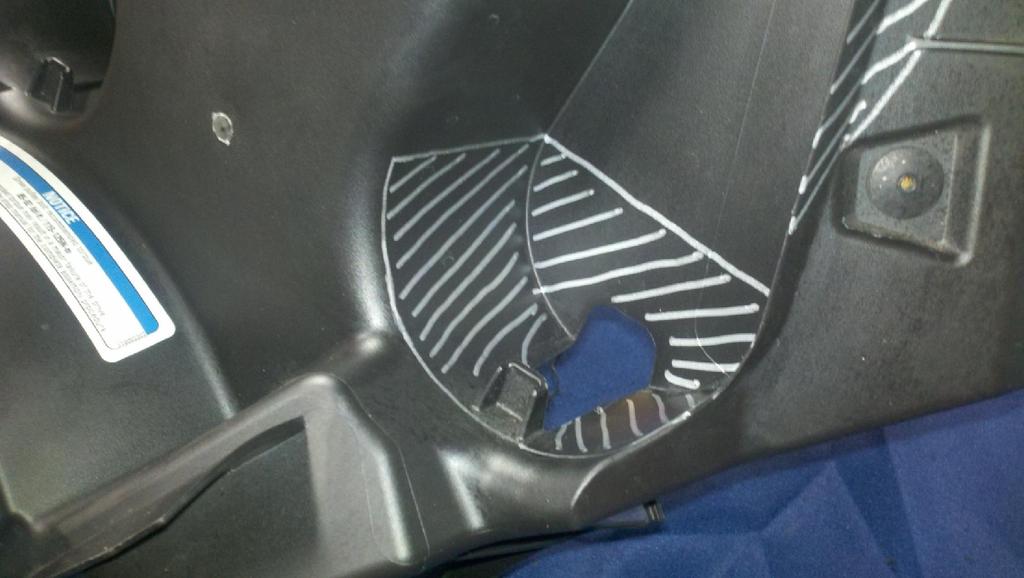
8 8 Of 18 8) Remove face plate and fill in the unmarked spaces. 9) Cut the foam and remove one section.


9 10) Drill a start hole and cut out the marked hole. 9 Of 18


10 10 Of 18 11) Clean up the hole using a rotary tool and or a de-burring tool. Read your warning sticker completely and commit to memory. Remove warning stickers and clean panel of glue residue. If you cannot remember what the warning sticker said then be responsible and order new warning decal to install on your sled because it will remind you to not be stupid. Rivet face plate onto side panel using the 3/16 expanding rivets.

 Ensure rivets will go through the holes and if")
11 11 Of 18 12) Using a 1/8 or #30 drill bit, drill through the side panel using the remaining 4 small holes as a guide. 13) Ensure rivets will go through the holes and if needed drill out to the proper size with the 1/8 or #30 bit
 places.")

12 12 Of 18 14) Placing the fan motor assembly on the inside rivet the fan motor, side panel and faceplate together using the 1/8 rivets in (4) places. Push them all together to ensure a tight fit before pulling rivet. It should look like this. 15) Using the picture as a guide cut the hook and loop tape so it will fit as shown.

 Remove spare belt from clutch cover and mark as shown.")
13 13 Of 18 16) Clean the area where the tape is about to be affixed thoroughly with isopropyl alcohol. Clean it 2 or more times to ensure that the surface is clean. Let it dry completely, and then apply the tape. Make sure that the tape is close to the foam near the top edge to allow clearance for the wire when the panel is reinstalled. Route the wire inside the hook and loop as shown. 17) Remove spare belt from clutch cover and mark as shown. Take care to reference from the picture to ensure you know what to cut. Lined area is to be removed.

14 14 Of 18


15 15 Of 18 18) Using the saw remove the pieces carefully and deliberately. The plastic has a gummy consistency when cut and using a small amount of an aerosol lubricant will help. Hold the saw horizontal and cut through both faces of the cover at the same time. Remember you can always cut more off if it doesn t fit right!


16 19) You will also have to remove some of the reinforcing webbing from the underside of the cover. 16 Of 18


17 17 Of 18 20) Reinstall the clutch cover. Ensure the wires are placed as shown connected and the side panel is installed properly. Check the fit of the panel when closed. It should require a small amount of pressure to snap the cover over the upper side panel hook. 21) If you purchased the optional belt retaining clip then insert the belt into the clip and test the fit of the belt until it looks as shown in the picture. It should fit tight down at the bottom and clear the rib reinforcement.
 Be sure to clean any shavings from the clutch area and check for proper fit of all components. With parking brake on start engine and ensure no abnormal noises or rubbing.")
18 18 Of 18 22) Mark the location of the clip, remove belt, drill 3/16 holes and rivet on with expanding rivets. 23) Be sure to clean any shavings from the clutch area and check for proper fit of all components. With parking brake on start engine and ensure no abnormal noises or rubbing. 24) Clean a conspicuous spot with isopropyl alcohol and apply the MTNTK Performance decal to ensure your friends now know you are better than them. Start your sled, warm it up, remove parking brake and then go enjoy your BLOW HOLE! Disclaimer: Never attempt to adjust or run engine with side panel removed. Do not stick your fingers into the fan housing as it will cut or dismember. Mountain Tek Performance is not responsible for damages incurred by using this product or improper installation.
OIL COOLER KIT INSTALLATION INSTRUCTIONS PART NUMBER D
 OIL COOLER KIT INSTALLATION INSTRUCTIONS PART NUMBER D570-0904 APPLICATION: 2011-2012 E90 335i/xi (N55 engine) with BMW standard bumper and with stock oil cooler Congratulations for being selective enough
Polaris Axys Sidekick Installation Instructions
 2016-2017 Polaris Axys Sidekick Installation Instructions 1. Remove hood and side panels. 2. Remove fasteners and slide console back. 3. Remove belt and driven clutch. 4. Remove clutch cover/ oil-tank
Revised 10/23/2015 Page 2 of 10
 1.Remove the gauge, side panels, hood and headlight. Remove the air box from the throttle bodies then remove the seat and gas tank. 2.Carefully remove temp sensor from air box using a small pick or screw
Jeep Wrangler 4.0 Liter TJ Jeep Wrangler 2.5 Liter TJ Installation instructions
 TM www.jeepair.com 1999 Jeep Wrangler 4.0 Liter TJ 1999-2001 Jeep Wrangler 2.5 Liter TJ Installation instructions Kit Information After 1994 every vehicle was designed for R134a refrigerant. The Jeep kit
Jeep Wrangler TJ. Complete Air Conditioning System. Slide Control Head. Installation instructions
 WWW.JEEPAIR.COM 1996-1998 Jeep Wrangler TJ Complete Air Conditioning System Slide Control Head Installation instructions Kit Information After 1994 every vehicle was designed for R134a refrigerant. The
2010 Mustang V6 Shaker CDC #
 - - Incomplete 2010 Mustang V6 Shaker CDC # 1011-7002-01 Component Check List: Quantity/Description Part # Engine Cover Assembly 1011-6000-01 1 Engine Cover w/ Upper Air Tube 0511-2100-01 1 Aluminum Shaker
OIL COOLER KIT INSTALLATION INSTRUCTIONS PART NUMBER D
 OIL COOLER KIT INSTALLATION INSTRUCTIONS PART NUMBER D570-0907 APPLICATION: 2011-12 E90 335i/xi (N55 engine) with BMW M-Technic bumper and without stock oil cooler Congratulations for being selective enough
4 th Gen 4 Runner Front Bumper - Installation Instructions:
 www.shrockworks.com info@shrockworks.com 877-474-7625 4 th Gen 4 Runner Front Bumper - Installation Instructions: Thank you for purchasing a ShrockWorks product. We are confident you will enjoy it for
OIL COOLER KIT INSTALLATION INSTRUCTIONS PART NUMBER D E92 335is (N54 engine) with BMW M-Technic bumper and with stock oil cooler
 with BMW M-Technic bumper and with stock oil cooler") OIL COOLER KIT INSTALLATION INSTRUCTIONS PART NUMBER D570-0923 APPLICATION: 2011 E92 335is (N54 engine) with BMW M-Technic bumper and with stock oil cooler Congratulations for being selective enough to
OIL COOLER KIT INSTALLATION INSTRUCTIONS PART NUMBER D570-0923 APPLICATION: 2011 E92 335is (N54 engine) with BMW M-Technic bumper and with stock oil cooler Congratulations for being selective enough to
OIL COOLER KIT INSTALLATION INSTRUCTIONS PART NUMBER D E92 335i/xi (N55 engine) with BMW Standard bumper and with stock oil cooler
 with BMW Standard bumper and with stock oil cooler") OIL COOLER KIT INSTALLATION INSTRUCTIONS PART NUMBER D570-0924 APPLICATION: 2011-12 E92 335i/xi (N55 engine) with BMW Standard bumper and with stock oil cooler Congratulations for being selective enough
OIL COOLER KIT INSTALLATION INSTRUCTIONS PART NUMBER D570-0924 APPLICATION: 2011-12 E92 335i/xi (N55 engine) with BMW Standard bumper and with stock oil cooler Congratulations for being selective enough
HANDLEBAR BAG WITH PHONE CHARGER KIT
 HANDLEBAR BAG WITH PHONE CHARGER KIT P/N 2883687; 2883786 APPLICATION Verify accessory fitment at Polaris.com. BEFORE YOU BEGIN Read these instructions and check to be sure all parts and tools are accounted
Jeep Wrangler TJ 4.0 LITER Installation instructions
 www.jeepair.com 2000-2001 Jeep Wrangler TJ 4.0 LITER Installation instructions Important information about your system, and warranty DO NOT ADD ANY OIL TO ANY PART OF THE SYSTEM. DO NOT USE THE SIGHT GLASS
Mustang Shaker
 2005-2009 Mustang Shaker CDC #110050 ( 05/ 06) or 0711-7000-01 ( 07/ 09) Component Check List: Quantity/Description Part # CDC Installer 1 - Engine Cover Assembly 114050 1 - Aluminum Shaker Scoop 183020
Wiring Harness Relocation by Flopster Mar 2012
 Wiring Harness Relocation by Flopster843 21 Mar 2012 On my 2008 Ram, there is a gigantic blob of electrical wiring that Dodge decided to put between the engine and the brake master cylinder, just behind
GrilleGuy.com, LLC. Installation Instructions and Care guide : Scion tc : Honda S2000 : Honda Civic
 Installation Instructions and Care guide : 2005 2009 Scion tc : 2000 2003 Honda S2000 : 2004 2005 Honda Civic Thanks again for purchasing your custom grille insert from the GrilleGuy. The following are
ITEM QTY CHECK PART NUMBER DESCRIPTION
 PART #21128 2010 Camaro Cold Air Induction Stage II PACKING LIST Before installation, use this check list to make sure all necessary parts have been included. ITEM QTY CHECK PART NUMBER DESCRIPTION 1.
INSTALLATION INSTRUCTIONS
 COLD AIR INTAKE INSTALLATION INSTRUCTIONS PART NUMBER D760-0620 & D760-0621 PARTS LIST APPLICATION: 9/98-2003 E39 540i 4.4L 4" Intake Tube Air Filter w/ clamp Silicone Hose 80-100mm Hose Clamp 90-110mm
GT Mustang Shaker
 CD4II3CU CDC Mustang 5.0 Shaker 2011-2014 2011-2014 5.0 GT Mustang Shaker Part #1111-7000-01 Component Check List: Shaker Assembly: Part # 1 - Aluminum Shaker Scoop 183020 1 Upper Air Box 1111-3301-01
RCA PLUG KIT P/N APPLICATION BEFORE YOU BEGIN KIT CONTENTS. Verify accessory fitment at Polaris.com.
 RCA PLUG KIT P/N 2883824 APPLICATION Verify accessory fitment at Polaris.com. BEFORE YOU BEGIN Read these instructions and check to be sure all parts and tools are accounted for. Please retain these installation
INSTALLATION INSTRUCTIONS
 HIGH FLOW AIRFLOW METER INSTALLATION INSTRUCTIONS PART NUMBER D763-1600A APPLICATION: 2001-06 E46 M3 Parts List: Hose clamp 64Z (7) Plastic Rivets Air Filter Temp Sensor & Harness (2) Button Head Screws
Revised 10/22/2014 Page 2 of?
 1.Remove side panels, hood, seat, fuel tank, and 2.Remove stock air box, remove fuel line muffler. Save exhaust springs and rubber muffler mounts for turbo bracket. Sand back surface flat for mounting.
 INSTALLATION INSTRUCTIONS Accessory ACCESSORY HANDSFREELINK (WITH MOON) Application 2009 PILOT Publications No. AII 39492 Issue Date MAY 2008 PARTS LIST HFL Attachment Kit 2 Washer screws, 4 x 12 mm HFL
Parts List Continues on Next Page
 Assembly Instructions and Owner s Manual Description: Quantum Hardcoated Polycarbonate UTV Windshield, Wash n Wipe Full Size Model: Part Number: N30202 Installation Time: 60 min Polaris RZR 800, Round
INSTALLATION INSTRUCTIONS
 INSTALLATION INSTRUCTIONS Accessory Application Publications No. AUTOMATIC PILOT AII 23597 Issue Date MAY 2002 PARTS LIST Automatic Day/Night Mirror Attachment Kit P/N 08V03-S9V-100A Day/night mirror Upper
OIL COOLER KIT INSTALLATION INSTRUCTIONS PART NUMBER D E92 335i/xi (N55 engine) with M-Technic bumper and without stock oil cooler
 with M-Technic bumper and without stock oil cooler") OIL COOLER KIT INSTALLATION INSTRUCTIONS PART NUMBER D570-0925 APPLICATION 2011-12 E92 335i/xi (N55 engine) with M-Technic bumper and without stock oil cooler Congratulations for being selective enough
OIL COOLER KIT INSTALLATION INSTRUCTIONS PART NUMBER D570-0925 APPLICATION 2011-12 E92 335i/xi (N55 engine) with M-Technic bumper and without stock oil cooler Congratulations for being selective enough
INSTALLATION INSTRUCTIONS
 INSTALLATION INSTRUCTIONS Accessory Application Publications No. S 1998 CIVIC 2/3/4-DOOR All 18767 Issue Date SEP 1997 PARTS LIST Fog Light Kit: P/N 08V31-S01-100 Right fog light (marked R ) Fuse label
INSTALLATION INSTRUCTIONS
 INSTALLATION INSTRUCTIONS Accessory Application Publications No. SYSTEM S2000 AII 26324 Issue Date OCT 2004 PARTS LIST Headrest Speaker System P/N 08A54-S2A-100 3 Small wire ties 2 Headrest speakers 9
INSTALLATION INSTRUCTIONS
 INSTALLATION INSTRUCTIONS Accessory S P/N 08V67-SJC-101 Application 2012 RIDGELINE Publications No. AII 12006 Issue Date NOV 2011 PARTS LIST Back-up sensor harness 3 Wire ties with small clips (2 Not used)
CHEVROLET TAHOE/DENALI/AVALANCHE/YUKON/ SILVERADO/SIERRA 2007+
 CHEVROLET TAHOE/DENALI/AVALANCHE/YUKON/ SILVERADO/SIERRA 2007+ INSTALLATION INTRODUCTION 1. REMOVING THE FENDER AND DOORS FROM THE A-PILLAR AND DISCONNECTING THE WIRE HARNESS @ THE DOOR JAM 2. REMOVING
Weistec M156/M159 ENGINE
 Weistec M156/M159 ENGINE Oil / Air Separator System Installation Guide 2007-2011 S63 AMG 2007-2011 ML63 AMG 2007 R63 AMG 2007-2008 CLK63 AMG 2008 CLK63 Black Series 2007-2011 CLS63 AMG 2008-Present C63
INSTALLATION INSTRUCTIONS
 COLD AIR INTAKE INSTALLATION INSTRUCTIONS PART NUMBER D760-0390C APPLICATION: 1999-2003 E39 M5 PARTS LIST 1 Left Aluminum Intake Tube 1 Air Pump Bracket (A) 1 Right Aluminum Intake Tube 1 Air Pump Bracket
INSTALLATION INSTRUCTIONS
 INSTALLATION INSTRUCTIONS Accessory Application Publications No. CD CHANGER ATTACHMENT KIT 2005 CIVIC SI AII 27936 Issue Date AUG 2004 PARTS LIST CD Changer Attachment Kit (sold separately): P/N 08B26-S5T-100
INSTALLATION INSTRUCTIONS
 INSTALLATION INSTRUCTIONS Accessory S P/N 08V67-SJC-101 Application 2010 RIDGELINE Publications No. AII 42117 Issue Date AUG 2009 PARTS LIST Back-up sensor harness 3 Wire ties with small clip (2 Not used)
Prepare the cargo area for storage of under-hood parts, removed as interference. (Put down blankets.)
") PCU Replacement Procedure John Mayer Hawthorne Auto Clinic 1-28-2014 updated 1-20-2016 Overall notes: It is preferable to perform the PCU replacement procedure on a lift, or to have access to under the
PCU Replacement Procedure John Mayer Hawthorne Auto Clinic 1-28-2014 updated 1-20-2016 Overall notes: It is preferable to perform the PCU replacement procedure on a lift, or to have access to under the
INSTRUCTIONS. INTERCOOLER UPGRADE BMW E82 135i 2008-
 INSTRUCTIONS INTERCOOLER UPGRADE BMW E82 135i 2008- Parts Included: - Intercooler - Left and right side pipes with hoses - 3 Silicone Hoses ( 2.5 x 3 ) - 1 Silicone Hose 90degree 2.5 elbow - 8 Hoseclamps
INSTALLATION INSTRUCTIONS
 INSTALLATION INSTRUCTIONS Accessory Application Publications No. AII 30518 KIT 2006 PILOT Issue Date NOV 2005 NOTE: Accessory ATF and power steering coolers are required when installing the trailer hitch.
GrilleGuy.com, LLC. Installation Instructions and Care Guide : Toyota Tacoma Grille UPPER GRILLE
 Installation Instructions and Care Guide : 2001 2004 Toyota Tacoma Grille Thanks again for purchasing your custom grille insert from GrilleGuy.com. The following are some general guidelines that will simplify
Z06 Corvette Lingenfelter High Flow Air Intake
 2006-2007 Z06 Corvette Lingenfelter High Flow Air Intake LN4233 1557 Winchester Road Decatur, Indiana 46733 260 724 2552 phone 260 724 8761 fax www.lingenfelter.com Parts List # Part number Description
PART NUMBER: MINI Cooper S L4-1.6L SEE * NOTE
 Equipped with AEM Dryflow Filter No Oil Required! INSTALLATION INSTRUCTIONS PART NUMBER: 21-699 2007-2010 MINI Cooper S L4-1.6L SEE * NOTE * NOTE: Legal in California only for racing vehicles which may
PRODUCT: Install Instructions, MV-1 C/O Std, With Aux Fan RELEASE DATE: 2/28/14 REVISION DATE: 9/30/2014 PART NUMBER: Rev C
 Parts List (1) 01 000 027 Switch, 4 Position Blower (1) 04 000 007 Hose, 1/2 ID Drain, 6 (1) 01 000 087 Harn, Resistor (1) 04 000 078 Tube, Convo 1/2 x 24 (2) 01 000 136 Relay, 40 Amp (1) 04 000 015 Hose,
Part# JL AIR IT UP 4 Tire On Board Air Delivery System. (Requires External Air Source)
") Part# 18-1819 JL AIR IT UP 4 Tire On Board Air Delivery System (Requires External Air Source) The most up-to-date instructions always visit www.updownair.com www.updownair.com 833-226-4863 I M P O R T
Part# 18-1819 JL AIR IT UP 4 Tire On Board Air Delivery System (Requires External Air Source) The most up-to-date instructions always visit www.updownair.com www.updownair.com 833-226-4863 I M P O R T
INSTALLATION INSTRUCTIONS
 INSTALLATION INSTRUCTIONS Accessory Application Publications No. AII 33373 ATTACHMENT KIT (TRUNK MOUNT) 2007 S2000 Issue Date AUG 2006 PARTS LIST Plain washer CD Changer Attachment Kit: P/N 08B26-S2A-100A
Jeep Wrangler TJ 4.0 LITER Installation instructions
 www.jeepair.com 2002-2004 Jeep Wrangler TJ 4.0 LITER Installation instructions Kit Information These directions are for 2002-2006 model Jeep Wranglers. After 1994 every vehicle was designed for R134a refrigerant.
INSTALLATION INSTRUCTIONS
 INSTALLATION INSTRUCTIONS Accessory S P/N 08E10-TK6-100 Application 2013 FIT Publications No. AII 13198 Issue Date JULY 2012 PARTS LIST Ambient light kit 2 Ambient lights 6 Wire ties Fuse label 2 Grommets
WK2 SNORKEL. Installation Instructions PLEASE READ AND UNDERSTAND ALL INSTRUCTIONS BEFORE YOU START
 WK2 SNORKEL Installation Instructions PLEASE READ AND UNDERSTAND ALL INSTRUCTIONS BEFORE YOU START Please note: This kit is specifically for diesel models only. WK2 Snorkel Installation Instructions Rev.
INSTALLATION INSTRUCTIONS
 INSTALLATION INSTRUCTIONS Accessory Application Publications No. AII 40454 XM SATELLITE RADIO 2009 S2000 Issue Date AUG 2008 PARTS LIST Template XM Radio Unit Kit (sold separately): P/N 08A53-S2A-101 XM
Lexus ES Fine Mesh and Adaptive Cruise Control Fine Mesh Grilles Upper and Lower Replacements
 IMPORTANT: PLEASE KEEP THIS INSTRUCTION MANUAL FOR FUTURE REFERENCE! 2013-15 Lexus ES Fine Mesh and Adaptive Cruise Control Fine Mesh Grilles Upper and Lower Replacements Part #1372-0102-13 / Black Ice
INSTALLATION INSTRUCTIONS
 INSTALLATION INSTRUCTIONS Accessory Application Publications No. AII 25876 2004 PILOT (LX only) Issue Date AUG 2003 The subwoofer cannot be installed on a vehicle equipped with a navigation unit. Subwoofer
GENUINE PARTS INSTALLATION INSTRUCTIONS
 GENUINE PARTS INSTALLATION INSTRUCTIONS 1. 2. 3. 4. DESCRIPTION: Accent light Kit APPLICATION: R42H (2011) PART NUMBER: 999F3 AW000 - Universal Accent Lighting Kit. KIT CONTENTS: Item QTY Description Service
850 TETHER SWITCH KIT
 850 TETHER SWITCH KIT P/N 2883823 APPLICATION Verify accessory fitment at Polaris.com. BEFORE YOU BEGIN Read these instructions and check to be sure all parts and tools are accounted for. Please retain
460 HORIZON DR. SUITE 400 SUWANEE, GA PHONE: FAX: JK Hood Vent
 460 HORIZON DR. UITE 400 UWANEE, GA 30024 PHONE: 770-614-6101 FAX: 770-614-6069 info@omix-ada.com Components: 1. Hood Vent (1) 2. utton Head olt (16) 3. Nylon Lock Nut (16) 4. Washer (30) 5. utton Head
GENUINE PARTS INSTALLATION INSTRUCTIONS
 GENUINE PARTS INSTALLATION INSTRUCTIONS 1. 2. 3. DESCRIPTION: APPLICATION: PART NUMBER: Accent light Kit Cube (MY2013+) 999F3 AW000 - Universal Accent Lighting Kit. 4. KIT CONTENTS: Item QTY Description
INSTALLATION INSTRUCTIONS
 INSTALLATION INSTRUCTIONS Accessory Application Publications No. ELEMENT AII 24282 Issue Date DEC 2002 PARTS LIST 2 Screw-grommets CD Changer Attachment Kit: P/N 08B26-SCV-100 CD changer plate 2 Self-tapping
Air Conditioner for M915 A0/A1 Truck
 RD-2-4530-0 Air Conditioner for M915 A0/A1 Truck INSTALLATION INSTRUCTIONS Install refrigerant compressor per instructions provided with compressor mount kit. CAUTION: Edges of sheet metal can be sharp!
BODY INSTALLATION AND ADJUSTMENT...
 Subsection 01 (TABLE OF CONTENTS) TABLE OF CONTENTS 0 BODY... 09-02-1 INSTALLATION AND ADJUSTMENT... 09-02-1 HEADLAMP BEAM AIMING... 09-02-1 BULB REPLACEMENT... 09-02-1 DECAL... 09-02-2 WINDSHIELD INSTALLATION...
---Optional Items---
 1 2 3 4 5 6 ---Optional Items--- 10 9 11 7 8 12 This package should contain: 1. One (1) CorkSport Crashbar Weldment 2. Eight (8) M8x1.25x20 mm Bolts 3. Eight (8) M8x1.25mm Nyloc Nuts 4. Sixteen (16) M8
Installation Instructions BR20 Rear Bumper Replacement Part # 28178T Toyo ta Tundra 2/4WD
 Installation Instructions BR20 Rear Bumper Replacement Part # 28178T 2014-2016 Toyo ta Tundra 2/4WD Excludes Models with B lind Spot Monitoring & Cross Traffic Alert Parts List Item Qty. Part # Description
INSTALLATION INSTRUCTIONS
 INSTALLATION INSTRUCTIONS Part# 69-0717 AIR IT UP 4 Tire On Board Installed Air Delivery System with Rear Mounted Controller (Requires External Air Source) For the most up-to-date instructions please visit
INSTALLATION INSTRUCTIONS
 INSTALLATION INSTRUCTIONS Accessory USB ADAPTER Application 2014 INSIGHT Publications No. AII 50655 Issue Date OCT 2013 PARTS LIST USB Adapter Attachment Kit P/N 08B28-TM8-100A 6 mm Flange nut Control
Removal of bumper & intercooler:
 R56 Front Mount Intercooler 090107 Thank you for purchasing the ALTA Performance R56 Front Mount Intercooler kit. Persons experienced in the proper operation of MINI engines should only perform this installation.
INSTALLATION INSTRUCTIONS
 INSTALLATION INSTRUCTIONS Accessory Application Publications No. AII 31716 HONDA (For ipod ) FIT Issue Date MAR 2006 PARTS LIST Attachment Kit P/N 08A28-1H1-800 4 Cushion tapes Honda Music Link Kit P/N
BODY INSTALLATION AND ADJUSTMENT...
 Subsection 0 (TABLE OF CONTENTS) TABLE OF CONTENTS 0 BODY... 09-0- INSTALLATION AND ADJUSTMENT... 09-0- HEADLAMP BEAM AIMING... 09-0- BULB REPLACEMENT... 09-0- DECAL... 09-0- WINDSHIELD INSTALLATION...
Installation Instructions
 Installation Instructions Page 1 of 15 November 2007 Equipment Parts, Trailer Hitch Version 3.0 Accessory Development These Installation Instructions supersede all previous versions. SUBJECT MODEL TRAILER
INSTALLATION INSTRUCTIONS
 INSTALLATION INSTRUCTIONS Accessory Application Publications No. AII 24307 SYSTEM 2003 ELEMENT Issue Date DEC 2002 NOTE: An optional keyless entry system (sold seperately) must be installed before you
Installation Instructions for Chevrolet Corvette Lingenfelter High Flow Air Intake System (6.0L LS2 V8 engine)
") Installation Instructions for 2005-2007 Chevrolet Corvette Lingenfelter High Flow Air Intake System (6.0L LS2 V8 engine) PN: L650070105 1557 Winchester Road Decatur, Indiana 46733 260 724 2552 phone 260
Installation Instructions for 2005-2007 Chevrolet Corvette Lingenfelter High Flow Air Intake System (6.0L LS2 V8 engine) PN: L650070105 1557 Winchester Road Decatur, Indiana 46733 260 724 2552 phone 260
BLACKBIRD INSTALLATION SUPPLEMENT
 BLACKBIRD INSTALLATION SUPPLEMENT FOR 2003-7 FORD 6.0 LITER DIESEL F-SERIES DUAL ALTERNATOR VERSION 10/07 Blackbird Installation Supplement for Ford 6.0. Liter Dual Alternator Parts included in the 6.0
INSTALLATION INSTRUCTIONS
 INSTALLATION INSTRUCTIONS Accessory S Application 2011 PILOT Publications No. AII 43298 Issue Date MARCH 2010 PARTS LIST Back-up Sensor Attachment Kit P/N 08V67-SZA-100A Back-up sensor harness Fuse label
INSTALLATION INSTRUCTIONS
 INSTALLATION INSTRUCTIONS Accessory Application Publications No. 2003 ELEMENT AII 24318 Issue Date DEC 2002 PARTS LIST Trailer Hitch Kit P/N 08L92-SCV-100 4 Bolts, 12 x 35 mm Trailer hitch U-bolt 2 Nuts,
INSTALLATION GUIDE PREMIUM FRONT BUMPER FOR RAM AEV30304AA Last Updated: 09/18/17
 AEV30304AA Last Updated: 09/18/17 PREMIUM FRONT BUMPER FOR RAM 1500 INSTALLATION GUIDE PLEASE READ BEFORE YOU START To guarantee a quality installation, we recommend reading these instructions thoroughly
Installation Instructions
 Installation Instructions Page 1 of 13 October 2006 Equipment Parts, Trailer Hitch Ver 4.0 Accessory Development These Installation Instructions supersede all previous versions. SUBJECT MODEL TRAILER HITCH
Factory Five Racing, Inc. 818 Kit Assembly manual revision 1i update
 Factory Five Racing, Inc. 818 Kit Assembly manual revision 1i update Pedal box...1 Cable Accelerator Pedal (2002-2005)...2 OEM seats...7 Windshield... 13 Center console... 19 Pedal box Attach the pedal
Tools Required. Metric Wrench Set Screwdriver Set Metric Socket Set Pliers Heavy duty hydraulic Jack and Car Stands Box knife or similar Hacksaw WD40
 Subaru 2004+ Legacy GT & Outback XT For JDM 2.0 twinscroll turbo and USDM 2.5 turbo models Front Mount Intercooler Fitting Instructions PN# LEG-1348-000 You are now the proud owner of a highly tested and
Pump Gas Instructions for Polaris And 800 Models. Important Information before Installing This System:
 Pump Gas Instructions for Polaris 600 700 And 800 Models Important Information before Installing This System: Before you begin your turbo install, read through these instructions to determine if you are
MTNTKperformance.com. '16-Current Polaris AXYS 800 Intercooled Turbo Kit Install Instructions
 1 '16-Current Polaris AXYS 800 Intercooled Turbo Kit Install Instructions '16-Current Polaris AXYS 800 Intercooled Turbo Kit Install Instructions 1. Remove: side panel, hood, seat, fuel tank, muffler,
Subaru Front Mount Intercooler Kit STI Subaru Front Mount Intercooler Kit STI
 Subaru Front Mount Intercooler Kit STI 2008-2014 715500 Subaru Front Mount Intercooler Kit STI 2008-2014 Congratulations on your purchase of the Subaru Front Mount Intercooler Kit STI 2008-2014. The following
SHELBY GT500
 2007-2009 SHELBY GT500 Removal of Factory Unit WARNING: 1. Radiator fluid must be handled properly. Please observe local ordinances with regards to handling and disposal. 2. Allow vehicle and components
Table of Contents. Tail Wheel Assembly Installation.. page 01. Stabilizer Installation.. page 02. Fin Installation.. page 03
 Table of Contents Tail Wheel Assembly Installation.. page 01 Stabilizer Installation.. page 02 Fin Installation.. page 03 Elevator and Rudder Hinge Installation.. page 04 Rudder Controls.. page 05 Elevator
AIR INDUCTION SYSTEM
 Page 1 PART NUMBER: APPLICATION: 203.51.2500 HONKER C5 1997 2000 CORVETTE AIR INDUCTION SYSTEM (without supercharger) INSTRUCTION SHEET NUMBER: 903.51.9850G PACKAGE CONTENTS: Air Box Cover Air Box Base
INSTALLATION INSTRUCTIONS
 INSTALLATION INSTRUCTIONS Accessory Accessory Hands Free Link Application 2008 ACCORD 2 AND 4-DOOR Publications No. AII 38281 Issue Date NOV 2007 PARTS LIST Attachment Kit P/N 08E02-TA0-100 trim retainer
INSTALLATION INSTRUCTIONS
 INSTALLATION INSTRUCTIONS Accessory Application Publications No. AII 25877 PILOT Issue Date AUG 2003 Optional ATF and power steering coolers are required when installing the trailer hitch. 2 Spacers PARTS
Baby Grands Water Cooling Installation Instructions
 Baby Grands Water Cooling Installation Instructions These instructions are designed to help an average racer install a water cooled engine in their Baby Grand racecar. This assumes that the engine is already
Installation Instructions for Lingenfelter GM 2500 Suburban & Yukon XL Auxiliary Fan System (with AC clutch controlled fan output)
") Installation Instructions for Lingenfelter 2007-2013 GM 2500 Suburban & Yukon XL Auxiliary Fan System (with AC clutch controlled fan output) PN L300080607 Revision - 1.1 Lingenfelter Performance Engineering
Installation Instructions for Lingenfelter 2007-2013 GM 2500 Suburban & Yukon XL Auxiliary Fan System (with AC clutch controlled fan output) PN L300080607 Revision - 1.1 Lingenfelter Performance Engineering
 INSTALLATION INSTRUCTIONS Accessory Application Publications No. AII 38143-40201 S 2008 ODYSSEY Issue Date AUG 2008 PARTS LIST Backup Sensor Attachment Kit P/N 08V67-SHJ-100B Backup sensor control unit
SolarSheat Wall Installation Manual
 SolarSheat Wall Installation Manual Version 3.2 December 15, 2015 Copyright 2015 Your Solar Home, All Rights Reserved SolarSheat products must be installed in accordance to all local building, plumbing,
INSTALLATION INSTRUCTIONS
 INSTALLATION INSTRUCTIONS Accessory Application Publications No. AII 26320 ATTACHMENT KIT 2004 S2000 Issue Date OCT 2003 PARTS LIST CD Changer Attachment Kit: P/N 08B26-S2A-100A Plain washer Template CD
INSTALLATION INSTRUCTIONS
 INSTALLATION INSTRUCTIONS Part# 22-7810 Add On Kit for Your ADS System Contents: Complete Install Kit for Your ARB CKMTA12V Compressor For the most up-to-date instructions please visit www.updownair.com
INSTALLATION INSTRUCTIONS
 INSTALLATION INSTRUCTIONS Accessory Application Publications No. AII 26042-26353 XM INTERFACE ODYSSEY EXCEPT EX-L WITH NAVI/RES Issue Date FEB 2004 PARTS LIST 8 Wire ties XM Radio Attachment P/N 08B15-S0X-100
Line Lock Package, Mustang GT/GT500, 2007 PACKING LIST
 PART #M25002 Line Lock Package, Mustang GT/GT500, 2007 PACKING LIST Before installation, use this check list to make sure all necessary parts have been included. ITEM QTY CHECK PART NUMBER DESCRIPTION
Installation instruction do88 performance Turbo intake hoses Porsche 911 TT (997.2)
") Installation instruction do88 performance Turbo intake hoses Porsche 911 TT (997.2) 2010-2012 3. 2. 4. 6. 7. 5. 1. This instruction shows how to replace the OEM turbo intake pipes for do88 performance
Installation instruction do88 performance Turbo intake hoses Porsche 911 TT (997.2) 2010-2012 3. 2. 4. 6. 7. 5. 1. This instruction shows how to replace the OEM turbo intake pipes for do88 performance
ECS Tuning 3095 Cleveland-Massillon Rd. Norton, Ohio Phone Fax Web
 B7 A4 Gauge Pod Installation Instructions Safety first:. When working with your vehicles electrical system; always disconnect the battery! Avoid shorting any circuits, or probing around wires. Failure
INSTALLATION INSTRUCTIONS
 INSTALLATION INSTRUCTIONS [1] Description: Tow Hitch Wire Harness Kit [2] Application: Nissan Rogue Note: Tow Harness application is limited to specific vehicle option packages that include tow harness
Rzr Heater System Part #
 Rzr Heater System Part # 2878135 NOTE: This heater unit installs below the center of the dash. If you have a radio mount kit (Polaris Part # 2876897) you may need to cut the top front corner off the mount
Mustang Radiator Conversion DIY. By GearHeadPeter. January 27, 2011
 1964-1966 Mustang Radiator Conversion DIY By GearHeadPeter January 27, 2011 We all know that the radiators in our cars are not the best, especially if you have done any customization to the engine, which
SS1066HF Jeep JK Wrangler Left Hand Drive CRDI4 2.8Litre-I4 Diesel Engine and EGHV6 3.8Litre V6 Gasoline Engine
 SS1066HF Jeep JK Wrangler Left Hand Drive CRDI4 2.8Litre-I4 Diesel Engine and EGHV6 3.8Litre V6 Gasoline Engine Installation Guide Safari SS1066HF Page - 1 of 12 6/10/2009 ITEM PART NO DESCRIPTION QTY
Wiring Harness 1. Remove left hand footwell trim panel from driver s footwell. Typically secured by several Philips head screws.
 Installation There are four segments to the installation; wiring harness, EDIS and Megajolt, coil pack, and Timing wheel and VR sensor. If the car needs to be driven, install everything except the coil
YAMAHA VIPER SX SRX SXR V-MAX XTC CUSTOM LONG TRACK INSTALLATION
 YAMAHA VIPER SX SRX SXR V-MAX XTC CUSTOM LONG TRACK INSTALLATION REMOVAL OF OLD TUNNEL EXTENSION AND COOLER 1. Remove plastic bumper covers. 2. Drain coolant by removing left or right rear cooler hose.
INSTALLATION INSTRUCTIONS
 INSTALLATION INSTRUCTIONS Accessory Application 2015 CR-Z Publications No. VERSION 1 Issue Date SEP 2014 PARTS LIST Armrest console Armrest bracket 2 Collars 4 Washer-bolts 2 Caps TOOLS AND SUPPLIES REQUIRED
INSTALLATION INSTRUCTIONS
 INSTALLATION INSTRUCTIONS Accessory Application Publications No. BII 31129 REARVIEW CAMERA 2006 RL Issue Date OCT 2005 PARTS LIST Attachment Kit P/N: 08B21-SJA-B00 Template Rear camera trim 6-Pin connector
LGT-306L / LB Club Car Precedent LED Light Bar Bumper Kit Installation Instructions
 LGT-306L / LB Club Car Precedent LED Light Bar Bumper Kit Installation Instructions Caution: Please read through the instructions carefully. Before starting this project, remove the system s positive and
07-11 GM 4WD 1500 P/U 1 1/4 Body Lift
 92RC70100 07-11 GM 4WD 1500 P/U 1 1/4 Body Lift Thank you for choosing Rough Country for all your suspension needs. Rough Country recommends a certified technician install this kit. Attempts to install