Rzr Heater System Part #
|
|
|
- Janis Boone
- 5 years ago
- Views:
Transcription

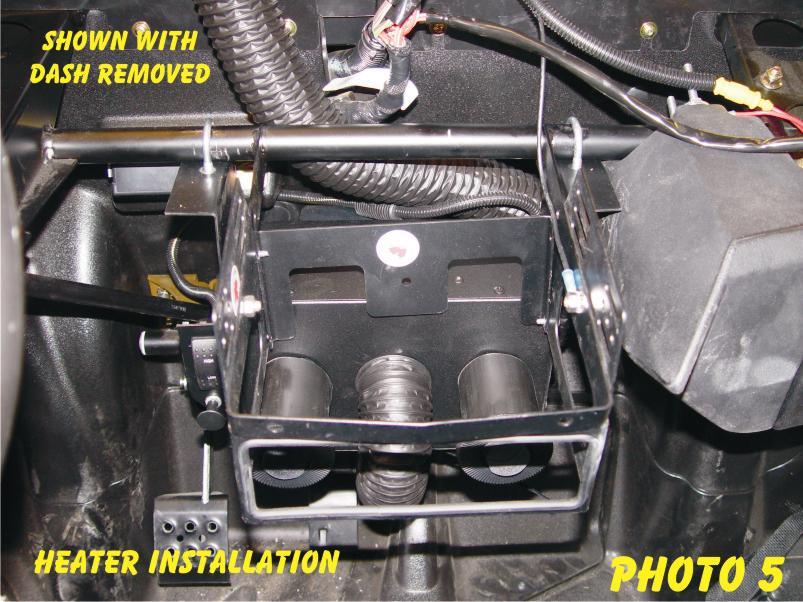
1 Rzr Heater System Part #
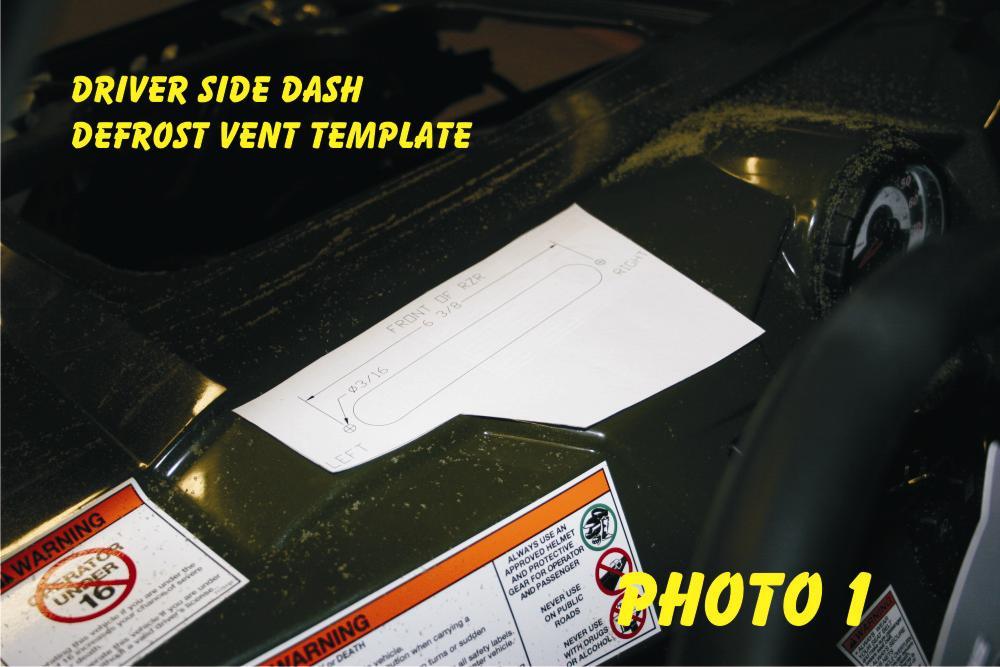
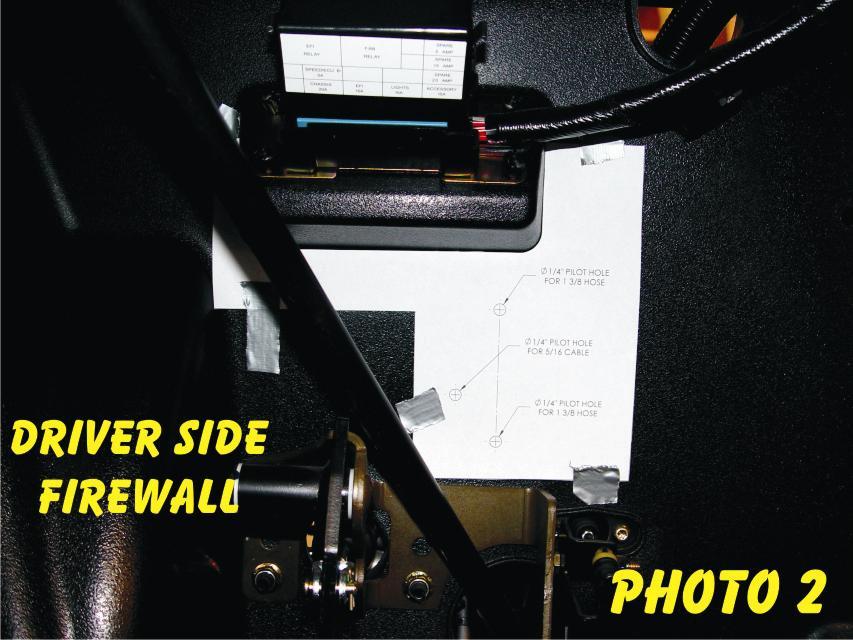
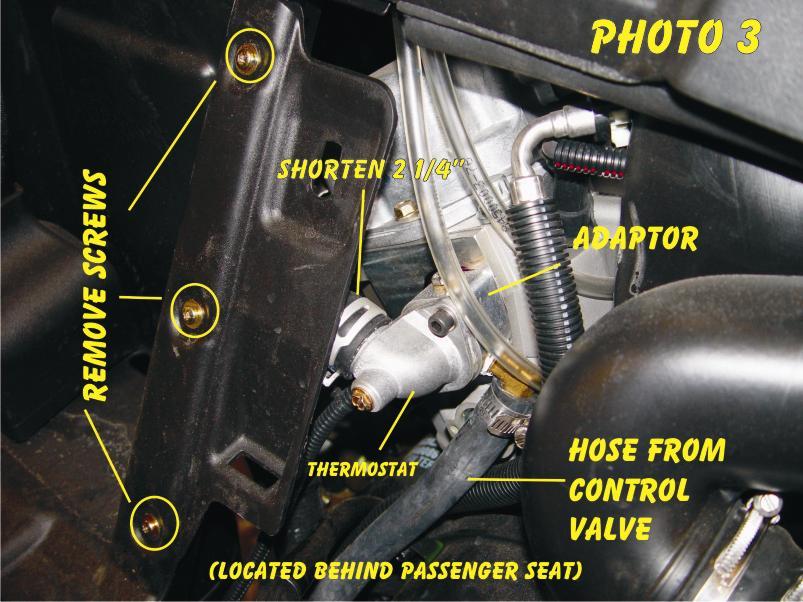
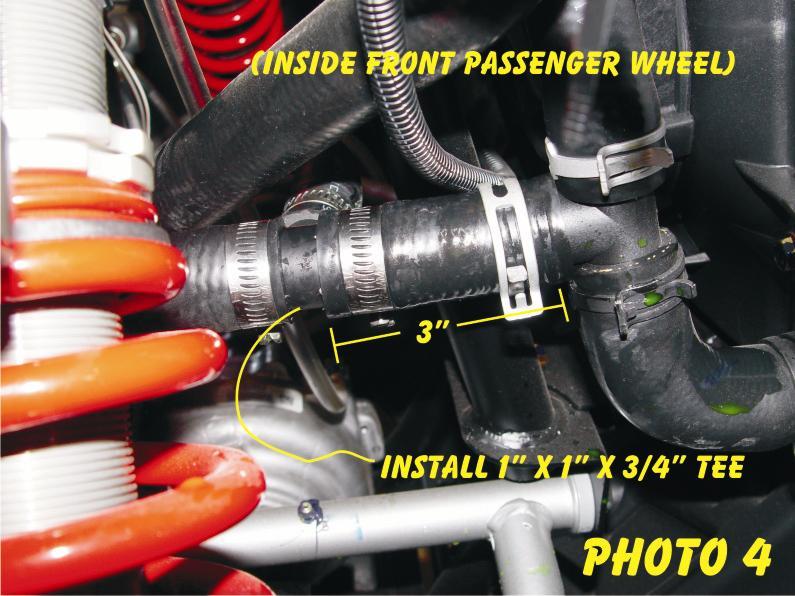
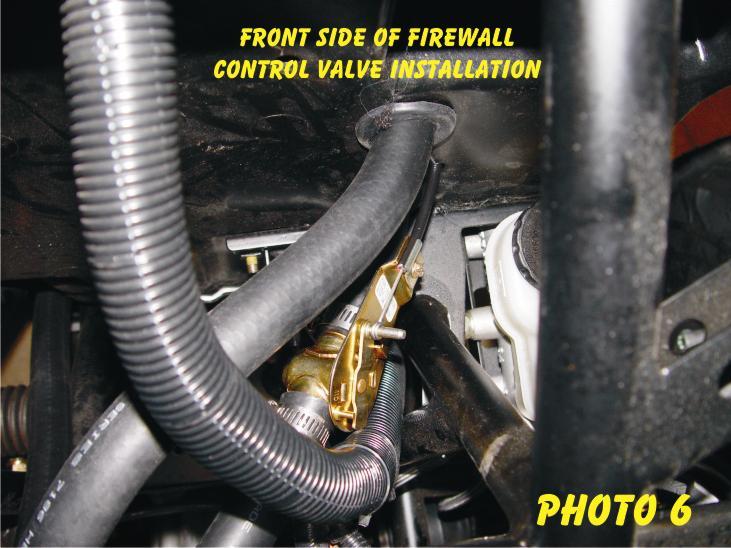
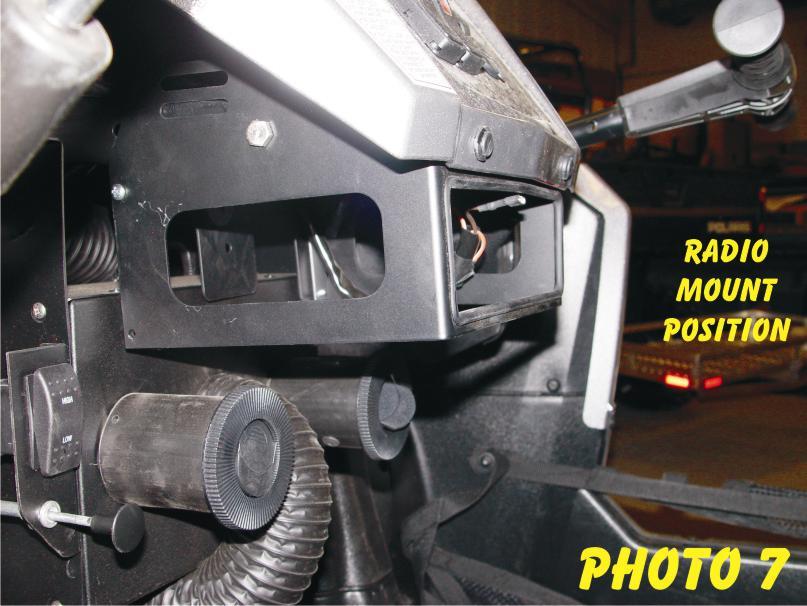
2 NOTE: This heater unit installs below the center of the dash. If you have a radio mount kit (Polaris Part # ) you may need to cut the top front corner off the mount and locate it flush with the dash (Photo 7) NOTE: Check engine coolant level often until all the air is removed from the system. 1. Remove the hood, front storage basket, seats, center console and rear panel behind the seat. 2. Drain the coolant system by removing the lower radiator hose. 3. (Photo 1) Use the template to drill and cut out the dash for the defrost vent. Check for clearance under the dash before drilling or cutting. Mount the defrost vent using the hardware provided. 4. (Photo 2) Cut out and locate the firewall template in the space between the pedal bracket and fuse panel. Drill the pilot holes ¼. Drill the cable hole to 5/16 and the hose outlets to 1 3/8. Install the grommets in the hose outlets. ( Lube the grommets to make the hose installation easier) 5. (Photo 3) ((Retain all parts for reinstallation)) Remove the 3 torx screws securing the plastic panel behind the passenger seat. Remove the thermostat housing from the engine. Remove the coolant hose from the housing and cut 2 ¼ off the hose. 6. (Photo 3), & Diagram A Install the adaptor, gaskets, thermostat and housing as shown in Diagram A using the longer bolts supplied. Reconnect the coolant hose to the housing with the tabs on the clamps pointing down. Use a hose clamp to connect a 84 piece of ¾ hose to the outlet on the thermostat adaptor. Route the hose forward following the drive shaft to the area in front of the firewall. Replace the 3 torx screws removed earlier. Install the center rear plastic panel (make sure the hose does not pinch on the passenger side). Use wire ties to secure the hose to the factory coolant lines and frame as necessary to keep clear of the drive shaft. 7. (Photo 4) Locate the Tee in the lower radiator hose (locate from passenger front wheel area). Cut the hose 3 behind the Tee and install the 1 x 1 x ¾ Tee as shown. Connect a 24 piece of ¾ hose and route thru the top Grommet in the firewall. Allow 5 to extend thru the firewall and loosely place a hose clamp on the hose. 8. (Photo 5) Position the heater below the center of the dash as shown. Extend the control cable and lower hose from the heater thru the firewall. Slide the top hose (with clamp) on to the upper heater core outlet. Secure the heater to the round dash support tube using the u-bolts and flange nuts. Tighten the hose clamps. 9. (Photo 6) Install the control valve (face up 45 degrees toward the driver side) in the lower hose coming from the heater (flow arrow points toward the heater). With the valve in the off position and the control knob pushed in loop the control cable end over the valve pin and secure the cable clamp. Connect the hose coming from the engine to the valve. Tighten all hose clamps.
3 10. Route the duct hose from the defrost vent to the center outlet on the heater and secure with wire ties. Place the (2) directional vents on the outside outlets on the heater. 11. Bolt the ground wire to the dash brace using a ¼ x ¾ bolt and nut. Hook the red wire with the bullet terminal to the accessory bullet terminal located in the wire bundle leading to the accessory outlet in the dash. Secure wiring with wire ties as needed. Operate the switch to check the blower (Key On). 12. Check and tighten all hose clamps. Check hose routing and secure away from moving parts. 13. Remove the radiator cap and push the heater control knob to the on position. Fill the radiator with coolant. Start and run the engine while filling the radiator as air bleeds out (3 minutes) Replace the cap, check for leaks and run the engine for several minutes. Check the heater function by turning the blower on and feeling for warm air. Turn engine off and allow to cool. Refill radiator as necessary. 14. Replace storage basket, center console, hood and seats. 15. Replace the WARNING decal with the new one provided. Place the decal forward of the defrost vent. (Between Defrost Vent & Windshield.
4
5
6
7
8 GASKET MATERIAL ENGINE ADAPTOR GASKET THERMOSTAT THERMOSTAT HOUSING
9 09 HEATER HOSE ROUTING SCHEMATIC FIREWALL 1"X1"X3/4"
10 1/4" PILOT HOLE FOR 5/16 CABLE 1/4" PILOT HOLE FOR 1 3/8 HOLE 7/8" CLEARANCE FROM CENTER OF HOLE TO PEDAL BRACKET FUSE PANEL FIREWALL TEMPLATE 1/4" PILOT HOLE FOR 1 3/8 HOLE
11 Defrost Cut Out
WOC-364 Installation Instructions Ranger XP Heater System
 WOC-364 Installation Instructions Ranger 2011-12 XP Heater System Order of installation for a Complete Enclosure Always install the Heater System first if possible NOTE: If installing the Heater System
WPS-104 Heater Installation Instructions For 500EFI, 700 XP, & Crew Applications
 WPS-104 Heater Installation Instructions For 500EFI, 700 XP, & Crew Applications ORDER OF INSTALLATION FOR A COMPLETE ENCLOSURE OF A RANGERWARE WPS (Weather Protection System) IS AS FOLLOWS: 1. Heater
1. Disconnect the battery. This is important! This will prevent air bag deployment.
 PARTS PACKING LIST Evaporator assembly Drain tube Plastic air plug Hardware package 11040 3601 W. Clarendon Phoenix, Arizona 85019 (602) 233-0090 800-648-4475 www.ackits.com 2003-4 Jeep Wrangler EVAPORATOR
PERFECT FIT SERIES IN-DASH HEAT/ COOL/ DEFROST MUSTANG
 specializing in AIR CONDITIONING, PARTS AND SYSTEMS for your classic vehicle PERFECT FIT SERIES IN-DASH HEAT/ COOL/ DEFROST 1969-70 MUSTANG CONTROL & OPERATING INSTRUCTIONS The controls on your new Perfect
PERFECT FIT IN-DASH HEAT/ COOL/ DEFROST FORD FAIRLANE & CROWN VICTORIA
 PERFECT FIT IN-DASH HEAT/ COOL/ DEFROST 1955-56 FORD FAIRLANE & CROWN VICTORIA CONTROL & OPERATING INSTRUCTIONS The controls on your new Perfect Fit system, offer complete comfort capabilities in virtually
WPS-104 Heater. Installation Instructions
 WPS-104 Heater Installation Instructions For 2007 vehicles see page 15 WPS 104 HEATER SYSTEM INSTALLATION INSTRUCTIONS If this is a complete installation of top, windshield and heater system, for ease
Installation Instructions
 2011-2013 LML DURAMAX COMPOUND-ADD 2011-2015 LML A Duramax TURBO KIT Add INSTALL A Turbo INSTRUCTIONS Compound Kit Installation Instructions 1-800-955-0476 - www.industrialinjection.com - info@industrialinjection.com
& 76 CHEVROLET NOVA HEATER ONLY
 specializing in AIR CONDITIONING, PARTS AND SYSTEMS for your classic hi l PERFECT FIT IN-DASH HEAT/ COOL/ DEFROST 1969-74 & 76 CHEVROLET NOVA HEATER ONLY CONTROL & OPERATING INSTRUCTIONS The controls on
Installation Instructions
 Installation Instructions Dual Wiper System Part # 2878138 For Tip Out Windshield go to page 4 You Will need the Windshield off of Vehicle for the Installation process. Order of installation for Rangerware
BMW X-5 Evaporator Removal
 BMW X-5 Evaporator Removal Intro: The following instructions will help you in replacing the Air Conditioning Evaporator in a BMW X-5. Following these instructions is at your own risk and the author assumes
Jeep Wrangler TJ. Complete Air Conditioning System. Slide Control Head. Installation instructions
 WWW.JEEPAIR.COM 1996-1998 Jeep Wrangler TJ Complete Air Conditioning System Slide Control Head Installation instructions Kit Information After 1994 every vehicle was designed for R134a refrigerant. The
CHEVROLET CORVETTE
 Suggested Installation Instructions for: 658-133 and 658-134 1968-1976 Air Conditioning Retro-Fit System 1968-76 CHEVROLET CORVETTE CONTROL & OPERATING INSTRUCTIONS The controls on your new Perfect Fit
PERFECT FIT SERIES IN-DASH HEAT/ COOL/ DEFROST 1969 CHEVROLET CAMARO/ FIREBIRD NOTE: INSTRUCTIONS DEPICT CAMARO
 specializing in AIR CONDITIONING, PARTS AND SYSTEMS for your classic vehicle PERFECT FIT SERIES IN-DASH HEAT/ COOL/ DEFROST 1969 CHEVROLET CAMARO/ FIREBIRD NOTE: INSTRUCTIONS DEPICT CAMARO CONTROL & OPERATING
INSTALLATION & OWNER S MANUAL
 INSTALLATION & OWNER S MANUAL CAB INSTALLATION INSTRUCTIONS JOHN DEERE 3000 SERIES (4200/4300/4400) (4210/4310/4410) & (3120/3320/3520/3720) HARD SIDED CAB ENCLOSURE (p/n 1JD3520AS) SOFT SIDED CAB ENCLOSURE
Turn Signal / Horn Kit PN 7101 by All years Polaris RZR 1000 and RZR 900, 900-4, 900 trail, 900S and 900XC STOP - THIS KIT IS DESIGNED
 All years Polaris RZR 1000 and 1000-4 2015 RZR 900, 900-4, 900 trail, 900S and 900XC STOP - THIS KIT IS DESIGNED SPECIFICALLY FOR ALL YEAR AND MODEL POLARIS RZR 1000 AND 1000-4. ALSO THE 2015 POLARIS RZR
Jeep Wrangler TJ 4.0 LITER Installation instructions
 www.jeepair.com 2002-2004 Jeep Wrangler TJ 4.0 LITER Installation instructions Kit Information These directions are for 2002-2006 model Jeep Wranglers. After 1994 every vehicle was designed for R134a refrigerant.
Installation Manual PERFECT FIT Mustang Factory Air SERIES. Elite DOCUMENT #1-2026FA ClassicAutoAir / 6.11vs1
 PERFECT FIT SERIES Elite Installation Manual 1967-1968 Mustang Factory Air DOCUMENT #1-2026FA 2011 ClassicAutoAir / 6.11vs1 Congratulations... You have just purchased the highest quality, best performing
Step 6: Remove and save the MAP sensor for later use. Step 7: Remove the passenger side intercooler pipe and the EGR intake manifold.
 LBZ Twin kit Install Step 1: Disconnect both batteries. Step 2: Drain coolant and oil also remove passenger side inner fender. Step 3: Remove intake box and piping. (Remove and save the MAF sensor in the
INSTALLATION INSTRUCTIONS 97 FORD EXPEDITION
 INSTALLATION INSTRUCTIONS 97 FORD EXPEDITION 1. Read the instructions completely and carefully before you begin. Check the kit for proper contents (refer to the part s list and the picture diagrams). Before
CHAPTER 21 ENVIRONMENT CONTROL. Section Title Page
 CHAPTER 21 ENVIRONMENT CONTROL Section Title Page 21-00 Description........................................ 21.1 21-10 Ventilation........................................ 21.3 21-11 Nose Vent................................
FACTORY AIR CONVERSION HEAT/ COOL/ DEFROST CHEVROLET CHEVELLE
 specializing in AIR CONDITIONING, PARTS AND SYSTEMS for your classic vehicle FACTORY AIR CONVERSION HEAT/ COOL/ DEFROST 1970-72 CHEVROLET CHEVELLE CONTROL & OPERATING INSTRUCTIONS The controls on your
INSTALLATION & OWNER S MANUAL
 INDUSTRIES, LLC. INSTALLATION & OWNER S MANUAL CAB INSTALLATION INSTRUCTIONS KUBOTA GRAND L 40 SERIES HARD SIDED CAB ENCLOSURE (p/n 1KGL4AS) This Curtis Cab is designed and manufactured for use only as
JODALE PERRY. Parts List & Mounting Instructions. Jacobsen HR9016 JDP BUILT FOR LIFE
 JODALE PERRY Parts List & Mounting Instructions Jacobsen HR9016 JDP BUILT FOR LIFE Jacobsen HR9016 Mounting Instructions Standard Parts 1 - LH Rear Mounting Bracket 1 - RH Rear Mounting Bracket 1 - Front
INSTALLATION & OWNER S MANUAL
 INSTALLATION & OWNER S MANUAL CAB INSTALLATION INSTRUCTIONS MASSEY FERGUSON TGX SERIES SOFT SIDED CAB ENCLOSURE (p/n MFTGXSS) This Curtis Cab is designed and manufactured for use only as reasonable weather
HIGH PERFORMANCE HEAT EXCHANGER INSTALLATION INSTRUCTIONS PART NUMBER D A APPLICATION: F80 M F82/F83 M4
 HIGH PERFORMANCE HEAT EXCHANGER INSTALLATION INSTRUCTIONS PART NUMBER D780-0001A APPLICATION: 2015-17 F80 M3 2015-17 F82/F83 M4 Congratulations for being selective enough to use a Dinan High Performance
Jeep Wrangler TJ 4.0 LITER Installation instructions
 www.jeepair.com 2000-2001 Jeep Wrangler TJ 4.0 LITER Installation instructions Important information about your system, and warranty DO NOT ADD ANY OIL TO ANY PART OF THE SYSTEM. DO NOT USE THE SIGHT GLASS
Jeep Wrangler 4.0 Liter TJ Jeep Wrangler 2.5 Liter TJ Installation instructions
 TM www.jeepair.com 1999 Jeep Wrangler 4.0 Liter TJ 1999-2001 Jeep Wrangler 2.5 Liter TJ Installation instructions Kit Information After 1994 every vehicle was designed for R134a refrigerant. The Jeep kit
4. Remove (4) 10mm and (1) 7mm bolt that holds fascia at front corners, on each side
 10mm and (1) 7mm bolt that holds fascia at front corners, on each side") 2010 Camaro LS3 1. Disconnect battery ground 2. Remove front wheels 3. Remove (5) push pins and (5) #20 torx screws on inner front wheel well liners and remove liners on each side 4. Remove (4) 10mm and
2010 Camaro LS3 1. Disconnect battery ground 2. Remove front wheels 3. Remove (5) push pins and (5) #20 torx screws on inner front wheel well liners and remove liners on each side 4. Remove (4) 10mm and
OIL COOLER KIT INSTALLATION INSTRUCTIONS PART NUMBER D
 OIL COOLER KIT INSTALLATION INSTRUCTIONS PART NUMBER D570-0907 APPLICATION: 2011-12 E90 335i/xi (N55 engine) with BMW M-Technic bumper and without stock oil cooler Congratulations for being selective enough
Important information about your new a/c system. Please read the following directions prior to installing this a/c system.
 PAGE 1 Important information about your new a/c system. Please read the following directions prior to installing this a/c system. PN s: CK-7586258, CK-758642, CK-7586304, CK7586SBC, CK-7486NC Jeep CJ Series
RAINGEAR 1955/ 1956 Chevrolet
 RAINGEAR 1955/ 1956 Chevrolet GETTING STARTED: SOME RECOMMENDATIONS PLEASE TRY OUR WAY FIRST! Note: This system is designed with built in adjustments to fit in your car. If, as you are installing it, you
Ford F-100 Evaporator Kit (751153)
") an ISO 9001:2015 Registered Company 1968-72 Ford F-100 Evaporator Kit (751153) 18865 Goll St. San Antonio, TX 78266 Phone: 800-862-6658 Sales: sales@vintageair.com Tech Support: tech@vintageair.com www.vintageair.com
an ISO 9001:2015 Registered Company 1968-72 Ford F-100 Evaporator Kit (751153) 18865 Goll St. San Antonio, TX 78266 Phone: 800-862-6658 Sales: sales@vintageair.com Tech Support: tech@vintageair.com www.vintageair.com
OIL COOLER KIT INSTALLATION INSTRUCTIONS D Application: , E89 Z4 sdrive 35i without stock oil cooler* PARTS LIST
 OIL COOLER KIT INSTALLATION INSTRUCTIONS D570-0891 Application: 2009-11, E89 Z4 sdrive 35i without stock oil cooler* PARTS LIST Qty Part No. Description 1 D573-0050 Oil Cooler + Frame Assy 1 D573-0044
INSTALLATION & OWNER S MANUAL
 INSTALLATION & OWNER S MANUAL CAB INSTALLATION INSTRUCTIONS JOHN DEERE 4000 SERIES (4500/4600/4700) (4510/4610/4710) (4120/4320/4520/4720) HARD SIDED CAB ENCLOSURE (p/n 1JD4120AS) SOFT SIDED CAB ENCLOSURE
1963 GEN IV SUREFIT VINTAGE AIR CONDITIONING INSTALLATION
 by Randy Irwin 1963 GEN IV SUREFIT VINTAGE AIR CONDITIONING INSTALLATION Randy Irwin - Technical Writer Randy has been involved in the Chevy parts business for over 30 years. He is a wizard at creating,
OIL COOLER KIT INSTALLATION INSTRUCTIONS PART NUMBER D
 OIL COOLER KIT INSTALLATION INSTRUCTIONS PART NUMBER D570-0904 APPLICATION: 2011-2012 E90 335i/xi (N55 engine) with BMW standard bumper and with stock oil cooler Congratulations for being selective enough
COLD AIR INTAKE INSTALLATION INSTRUCTIONS. # D Fits: i (4.8L)
") COLD AIR INTAKE INSTALLATION INSTRUCTIONS # D760-0012 Fits: 2006-10 550i (4.8L) PARTS LIST Air Box Assembly Left tube Center tube Right tube Outer Tube AFM housing AFM/TB tube Hardware Kit Congratulations
COLD AIR INTAKE INSTALLATION INSTRUCTIONS # D760-0012 Fits: 2006-10 550i (4.8L) PARTS LIST Air Box Assembly Left tube Center tube Right tube Outer Tube AFM housing AFM/TB tube Hardware Kit Congratulations
RZR WINCH KIT KIT P/N
 RZR WINCH KIT KIT P/N 2878787; 2879334 Application All RZR Models except RZR XP Before you begin, read these instructions twice and check to be sure all parts and tools are accounted for. Please retain
U L T I M A T E R A D A R / L A S E R D E F E N S E S Y S T E M
 S m a r t e r Q u i e t e r M o r e A c c u r a t e U L T I M A T E R A D A R / L A S E R D E F E N S E S Y S T E M Installation Manual PASSPORT 9500ci Comes Complete Front Radar Receiver Miniature weatherproof
Installation Instructions - ECS Tuning Vent Pod Vacuum/Boost Gauge Kit
 Installation Instructions - ECS Tuning Vent Pod Vacuum/Boost Gauge Kit This tutorial is provided as a courtesy by ECS Tuning. Part Number for (2005-2008) Proper service and repair procedures are vital
RangerWare RZR Fiberglass Top and Rear Installation Instructions. Page 1 of 10
 Page 1 of 10 RangerWare RZR Fiberglass Top and Rear Installation Instructions FIBERGLASS ROOF & REAR PANELS KIT P/N: 2878051, 2878056 Application: Polaris RZR MY 2010 Before you begin, read these instructions
COLD AIR INTAKE INSTALLATION INSTRUCTIONS. # D Fits: i (4.8L)
") COLD AIR INTAKE INSTALLATION INSTRUCTIONS # D760-0013 Fits: 2006-10 650i (4.8L) PARTS LIST Air Box Assembly Left tube Center tube Right tube Support bracket AFM housing AFM/TB tube Hardware Kit Congratulations
COLD AIR INTAKE INSTALLATION INSTRUCTIONS # D760-0013 Fits: 2006-10 650i (4.8L) PARTS LIST Air Box Assembly Left tube Center tube Right tube Support bracket AFM housing AFM/TB tube Hardware Kit Congratulations
Chevrolet Truck Install Instructions. This kit is designed for the Chevrolet or GMC trucks without factory air conditioning.
 1967-1972 Chevrolet Truck Install Instructions This kit is designed for the 1967-1972 Chevrolet or GMC trucks without factory air conditioning. Glove box Heater box Heater box firewall cover Controls and
Installation Manual Mustang
 Installation Manual 1967-1968 Mustang DOCUMENT #1-2026 2013 ClassicAutoAir / 7.13vs4 3 You have just purchased the highest quality, best performing A/C system ever designed for your Mustang. To obtain
Installation Manual Mustang Factory Air DOCUMENT #1-2026FA ClassicAutoAir / vs2.12
 Installation Manual 1967-1968 Mustang Factory Air DOCUMENT #1-2026FA 2012 ClassicAutoAir / vs2.12 Congratulations... You have just purchased the highest quality, best performing A/C system ever designed
Part # Description Qty Inspected By Rack & Pinion Pump Kit Remote Reservoir Line Kit Shaft Kit
 58-62 Corvette Power Rack & Pinion Kit Instructions # 8011530 Unisteer offers a limited warranty against all manufacturer defects of their kits and supplied parts. Unisteer will not honor any warranty
Installation instructions for Camaro/Firebird and Nova* Windshield Wiper Systems
 Installation instructions for 1967-69 Camaro/Firebird and 1968-74 Nova* Windshield Wiper Systems The Raingear 1967-69 Camaro/Firebird and 1964-74 Nova wiper system is designed for ease of installation
OIL COOLER KIT INSTALLATION INSTRUCTIONS PART NUMBER D E92 335i/xi (N55 engine) with BMW Standard bumper and with stock oil cooler
 with BMW Standard bumper and with stock oil cooler") OIL COOLER KIT INSTALLATION INSTRUCTIONS PART NUMBER D570-0924 APPLICATION: 2011-12 E92 335i/xi (N55 engine) with BMW Standard bumper and with stock oil cooler Congratulations for being selective enough
OIL COOLER KIT INSTALLATION INSTRUCTIONS PART NUMBER D570-0924 APPLICATION: 2011-12 E92 335i/xi (N55 engine) with BMW Standard bumper and with stock oil cooler Congratulations for being selective enough
INSTALLATION INSTRUCTIONS
 2007-Current Jeep Wrangler 360º System for Aftermarket display (Kit # AVMS-3700v2) Please read thoroughly before starting installation and check that kit contents are complete. Items Included in the Kit:
Page 6 of 6 OUTLAW DIESEL EGR COOLER DELETE KIT W/INTAKE ELBOW L FORD POWERSTROKE
 What s in the box 1 Exhaust Block-Off Plate 1 Exhaust Gasket 2 Coolant Line Plugs 1 Brass Barbed Hose Connector 1 Stand-off Spacer 4 M10-1.25 x 40 Hex Head Bolts (Exhaust Manifold) 2 M10-1.25 x 20 Hex
MKVI Jetta Fog Light Kit
 MKVI Jetta Fog Light Kit Part Number VW Jetta Fog Light Installation This tutorial is provided as a courtesy by ECS Tuning. Proper service and repair procedures are vital to the safe, reliable operation
COLD AIR INTAKE INSTALLATION INSTRUCTIONS. # D Fits: F10 M5 # D Fits: F06/F12/F13 M6 PARTS LIST
 COLD AIR INTAKE INSTALLATION INSTRUCTIONS # D760-0035 Fits: 2013-15 F10 M5 # D760-0037 Fits: 2012-15 F06/F12/F13 M6 PARTS LIST (1) Left Carbon Airbox Lid (1) Right Carbon Airbox Lid (1) Left Carbon Snorkel
PRXB EXHAUST BRAKE MAXIMUM EXHAUST FLOW DESIGN
 MAXIMUM EXHAUST FLOW DESIGN PRXB EXHAUST BRAKE C44072/C44073/C44074/C44075/C44076 APPLICATION: 994-2002 DODGE RAM TRUCKS W/5.9L CUMMINS DIESEL ENGINES WITH MANUAL & AUTOMATIC TRANSMISSIONS STOCK DODGE
INSTALLATION INSTRUCTIONS
 2007-Current Jeep Wrangler 360º System for Factory Display Radios (Kit # AVMS-3701) Please read thoroughly before starting installation and check that kit contents are complete. Items Included in the Kit:
INSTALLATION INSTRUCTIONS
 2007-Current Jeep Wrangler 360º System for Factory Display Radios (Kit # AVMS-3701v2) Please read thoroughly before starting installation and check that kit contents are complete. Items Included in the
Heater/Defroster Installation Instructions
 1301 39 th Street NW, Suite 2 * Fargo, ND 58102 * Toll Free 866.764.0616 * Fax 701.446.0103 * www.gemcar.com Service Instructions Heater/Defroster Installation Instructions Models: All 2005 - Current Part
OIL COOLER KIT INSTALLATION INSTRUCTIONS PART NUMBER D E92 335is (N54 engine) with BMW M-Technic bumper and with stock oil cooler
 with BMW M-Technic bumper and with stock oil cooler") OIL COOLER KIT INSTALLATION INSTRUCTIONS PART NUMBER D570-0923 APPLICATION: 2011 E92 335is (N54 engine) with BMW M-Technic bumper and with stock oil cooler Congratulations for being selective enough to
OIL COOLER KIT INSTALLATION INSTRUCTIONS PART NUMBER D570-0923 APPLICATION: 2011 E92 335is (N54 engine) with BMW M-Technic bumper and with stock oil cooler Congratulations for being selective enough to
OIL COOLER KIT INSTALLATION INSTRUCTIONS PART NUMBER D E92 335i/xi (N55 engine) with M-Technic bumper and without stock oil cooler
 with M-Technic bumper and without stock oil cooler") OIL COOLER KIT INSTALLATION INSTRUCTIONS PART NUMBER D570-0925 APPLICATION 2011-12 E92 335i/xi (N55 engine) with M-Technic bumper and without stock oil cooler Congratulations for being selective enough
OIL COOLER KIT INSTALLATION INSTRUCTIONS PART NUMBER D570-0925 APPLICATION 2011-12 E92 335i/xi (N55 engine) with M-Technic bumper and without stock oil cooler Congratulations for being selective enough
DURAMAX LML EGR DELETE
 2011-2012 DURAMAX LML EGR DELETE Sinister Diesel EGR Delete Kit A B C D E F G H PACKING LIST: QTY. A B C D E F G H QTY. 1 4 1 1 1 3 1 4 Description Blue Coolant Hose M8 x 25 Hex Head Bolts Exhaust Block
HEAT/ COOL/ DEFROST CHEVROLET PICKUP CONTROL & OPERATING INSTRUCTIONS
 specializing in AIR CONDITIONING, PARTS AND SYSTEMS for your classic vehicle PERFECT FIT FACTORY AIR CONVERSION HEAT/ COOL/ DEFROST 1967-72 CHEVROLET PICKUP CONTROL & OPERATING INSTRUCTIONS The controls
Installation Instructions - ECS Tuning Vent Pod Vacuum/Boost Gauge Kit
 Installation Instructions - ECS Tuning Vent Pod Vacuum/Boost Gauge Kit This tutorial is provided as a courtesy by ECS Tuning. Part Number for Audi B6 A4 (2002-2004) Proper service and repair procedures
Installation Instructions and Suggestions For Jeep YJ Fiberglass Replacement Bodies
 Installation Instructions and Suggestions For Jeep YJ Fiberglass Replacement Bodies Getting started with the removal of your existing Jeep body. Trust nothing to memory; take photos of everything at different
HAND THROTTLE KIT For Workman 3000 Series
 FORM NO. 7 6 MODEL NO. 0746 INSTALLATION INSTRUCTIONS HAND THROTTLE KIT For Workman 000 Series. Position vehicle on a clean, level surface, stop engine, engage parking brake and remove key from ignition
Retrofit Steering Column
 Retrofit Steering Column INSTALLATION INSTRUCTIONS for 1970-75 Camaro FOR PART NUMBER S: 1620860010, 1620860020, 1620860051, 1626860010, 1626860020, 1626860051 S INCE 1986 www.ididitinc.com 610 S. Maumee
Installation Instructions for TJ Jeep s Fiberglass Replacement Bodies and Parts
 Installation Instructions for 1997-2006 TJ Jeep s Fiberglass Replacement Bodies and Parts Getting started: We recommend that you take pictures as you dismantle your Jeep. These pictures will help you when
Installation Instructions
 Installation Instructions Automatic Retracting Running Board Vehicle Application Ford F150 Supercrew 2001-2003 (2004 Heritage) Part Number: 75111-01 www.bestop.com - We re here to help! Visit our web site
Thermo-Bob 1 Installation Manual: Kawasaki Concours
 Thermo-Bob 1 Installation Manual: 1986-2006 Kawasaki Concours This is a basic guide for installing the Thermo-Bob 1 on a Kawasaki ZG-1000 Concours. The bike used in the following photos was a 1995 year
Kubota B2910, B7800 Boxer
 Kubota B2910, B7800 Boxer Parts List & Mounting Instructions Jodale Perry Printed: 2004/12 Standard Parts List Qty Description Photo L&R Rear Brackets L&R Front Brackets 2 Front Bracket Spacers (No-Loader)
Installation Instructions for: TOYOTA 3.4L SUPERCHARGER SYSTEM
 Installation Instructions for: TOYOTA 3.4L SUPERCHARGER SYSTEM 1996-2002 4Runner 1997-1998 T100 1997-2004 Tacoma 2000-2003 Tundra * PREMIUM FUEL REQUIRED * Magnuson Products LLC 1990 Knoll Drive, Bldg
INSTALLATION INSTRUCTIONS FOR COZY CAB A-1 AIR CONDITIONING KIT
 INSTALLATION INSTRUCTIONS FOR COZY CAB A-1 AIR CONDITIONING KIT 05-11 INSTALLATION INSTRUCTIONS A-12235 Air Conditioner Kit Cab set up instructions; This air conditioning kit is designed to be used with
pg 2 Disassembly, Wire and Amplifier Plate Installation pg 9 Glovebox Subwoofer Installation pg 13 Kick Panel Speakers Installation
 RZ3-5KRC RZR XP1000 & 2015+ RZR900 with Ride Command SSV Works 5 Speaker Audio Kit pg 2 Disassembly, Wire and Amplifier Plate Installation pg 9 Glovebox Subwoofer Installation pg 13 Kick Panel Speakers
Jeep JK 6 Switch Panel
 921709590 2007-17 Jeep JK 6 Switch Panel Thank you for choosing Rough Country for all your lighting needs. Please read instructions before beginning installation. Check the kit hardware against the kit
Jacobsen 600 Series Ransomes 700 Series
 Jacobsen 600 Series Ransomes 700 Series Parts List & Mounting Instructions Jodale Perry Printed: 2004/01 Standard Parts List Qty Description Photo L&R Rear Mounting Brackets L&R Front Mounting Brackets
IAG Street Series Air / Oil Separator (AOS) For WRX
 For WRX") P IAG Street Series Air / Oil Separator (AOS) For 2015-16 WRX Part# IAG-ENG-7152 Tools Required: Ratchet, torque wrench, extensions, needle nose pliers, hose cutter, snips/scissors, flat head screw driver,
P IAG Street Series Air / Oil Separator (AOS) For 2015-16 WRX Part# IAG-ENG-7152 Tools Required: Ratchet, torque wrench, extensions, needle nose pliers, hose cutter, snips/scissors, flat head screw driver,
Line Lock Package, Mustang GT/GT500, 2007 PACKING LIST
 PART #M25002 Line Lock Package, Mustang GT/GT500, 2007 PACKING LIST Before installation, use this check list to make sure all necessary parts have been included. ITEM QTY CHECK PART NUMBER DESCRIPTION
Duramax LMM EGR Delete With Intake Tube
 Duramax LMM EGR Delete With Intake Tube PACKING LIST: QTY. 4 2 2 2 Description Intake Charge Pipe w/ O-Ring M8 Flange Nut M8x25 Flange Hex Bolt M0x20 Hex Head Bolts M8x25 Socket Head Bolts M8x20 Hex Head
INSTALLATION INSTRUCTIONS
 INSTALLATION INSTRUCTIONS Accessory Application Publications No. AII 26031 2004 ODYSSEY Issue Date AUG 2003 NOTE: You cannot install the subwoofer in a vehicle equipped with both an under seat Navigation
M-6642-MB Boss Oil Cooler INSTALLATION INSTRUCTIONS
 !!! PLEASE READ THE FOLLOWING INSTRUCTIONS CAREFULLY PRIOR TO INSTALLATION!!! Caution: If you are not confident that you can complete the installation safely, have it completed by a certified technician!
INSTALLATION INSTRUCTIONS
 INSTALLATION INSTRUCTIONS Accessory REMOTE ENGINE STARTER SYSTEM Application 2010 CIVIC 4-DOOR Publications No. AII 42460 Issue Date AUG 2009 PARTS LIST Remote Engine Starter Unit Kit P/N 08E91-E22-100B
Procharger Stage II Intercooled Supercharger System (11-14 GT)
") Procharger Stage II Intercooled Supercharger System (11-14 GT) Installation Time: Approximately one day. Installed on 2012 Mustang GT 5.0/Manual Required Tools 3/8 Socket Set (Standard and Metric) 1/2
Procharger Stage II Intercooled Supercharger System (11-14 GT) Installation Time: Approximately one day. Installed on 2012 Mustang GT 5.0/Manual Required Tools 3/8 Socket Set (Standard and Metric) 1/2
PRELIMINARY INSTALLATION INSTRUCTIONS. Remote Engine Starter Attachment Kit P/N 08E92-SNA-100B
 INSTALLATION INSTRUCTIONS Accessory Application Publications No. REMOTE ENGINE STARTER SYSTEM 2008 CIVIC 2-DOOR AII 38215 Issue Date OCT 2007 PARTS LIST Remote Engine Starter Unit Kit P/N 08E91-E22-100B
97-02 JEEP TJ BODY LIFT KIT INSTRUCTIONS
 92RC60500 97-02 JEEP TJ BODY LIFT KIT INSTRUCTIONS Congratulations on your purchase of a new Rough Country 2 /3 Body Lift. We are committed to providing you with the best product available for the best
Prepare the cargo area for storage of under-hood parts, removed as interference. (Put down blankets.)
") PCU Replacement Procedure John Mayer Hawthorne Auto Clinic 1-28-2014 updated 1-20-2016 Overall notes: It is preferable to perform the PCU replacement procedure on a lift, or to have access to under the
PCU Replacement Procedure John Mayer Hawthorne Auto Clinic 1-28-2014 updated 1-20-2016 Overall notes: It is preferable to perform the PCU replacement procedure on a lift, or to have access to under the
Retrofit Steering Column
 Retrofit Steering Column Installation Instructions for 1970-75 Camaro For Part # s: 1620860010, 1620860020, 1620860051, 1620869910, 1620869920, 1620869951, 1625860010, 1625860020, 1625860051, 1625869910,
IAG Competition Series Air / Oil Separator (AOS) For WRX
 For WRX") P IAG Competition Series Air / Oil Separator (AOS) For 2015-16 WRX Part# IAG-ENG-7252 Tools Required: Ratchet, torque wrench, extensions, needle nose pliers, hose cutter, snips/scissors, flat head screw
P IAG Competition Series Air / Oil Separator (AOS) For 2015-16 WRX Part# IAG-ENG-7252 Tools Required: Ratchet, torque wrench, extensions, needle nose pliers, hose cutter, snips/scissors, flat head screw
WOC & WOC Top & Back Installation Instructions
 Shown with optional Sun Roof WOC-900500-2 & WOC-900501-2 Top & Back Installation Instructions Install Order! Heater Door System Wiper on to Windshield Windshield Rear Panel Top Panel Tools needed: 5/16
INSTALLATION INSTRUCTIONS
 INSTALLATION INSTRUCTIONS Accessory REMOTE CONTROL Application 2008 CR-V Publications No. AII 35843-38422 Issue Date DEC 2007 PARTS LIST Caution label Remote Engine Starter Kit P/N 08E91-E22-100B Transmitter
COLD AIR INTAKE INSTALLATION INSTRUCTIONS
 COLD AIR INTAKE INSTALLATION INSTRUCTIONS # D760-0033 Fits: 2013-15 F01 B7, 750i & xdrive (N63TU engine) 2013-15 F02 B7L, 750Li & xdrive (N63TU engine) PARTS LIST Left and right carbon fiber air box lids
GN-3A Polaris General SSV Works 3 Speaker Audio Kit
 GN-3A Polaris General SSV Works 3 Speaker Audio Kit pg 2 Disassembly, Wire and Amplifier Plate Installation pg 9 Glovebox Subwoofer Installation pg 17 Kick Panel Speakers Installation pg 21 MRB3 and Dash
2017+ L5P Duramax 3 ½ Down Pipe & EGR Fix Kit
 2017+ L5P Duramax 3 ½ Down Pipe & EGR Fix Kit Covers installation of PN s: WCF100630, WCF100829 Note: This Kit is for off road competition use only! Off Road Competition Use Tuning & Exhaust System is
Part Number: SFR-713. Hardware Bag Contents. General Applicability All models. Conflicts - Fog Lights. Date: SCION FRS LED DRL
 Date: 01.30.2014 SCION FRS 2013-2015 LED DRL Part Number: SFR-713 Kit Contents Item # Quantity Reqd. Description 1 2 DRL s bezels w/led DRL 2 1 Driver Box 3 1 Harness bag 4 1 User s card 5 1 Switch Hardware
Installation Instructions - ECS Tuning Vent Pod Vacuum/Boost Gauge Kit
 Installation Instructions - ECS Tuning Vent Pod Vacuum/Boost Gauge Kit This tutorial is provided as a courtesy by ECS Tuning. Part Number (also available as steering wheel mounted kit ES2593248) for VW
ADM Performance 6079 Mapleshade Lane Dallas, Texas (214)
") 1) Disconnect Battery Ground 2) Raise front end of Vehicle FAN INSTALL INSTRUCTIONS 3) Remove lower Radiator hose and drain coolant into a pan. (you will reuse coolant later) 4) Remove Air Intake piping
1) Disconnect Battery Ground 2) Raise front end of Vehicle FAN INSTALL INSTRUCTIONS 3) Remove lower Radiator hose and drain coolant into a pan. (you will reuse coolant later) 4) Remove Air Intake piping
2013 Mustang Workshop Manual
 32. Attach the wiring harness retainers to the LH side of the oil pan and the front oil pan stud bolts and install the 2 nuts. Tighten to 8 Nm (71 lb-in). 33. Position the underbody shield and install
ELECTRIC START KIT KIT P/N
 ELECTRIC START KIT KIT P/N 2873876 Application 2002 Polaris EDGE Models with 500-600 Domestic Engines Before you begin, read these instructions and check to be sure all parts and tools are accounted for.
INSTALLATION INSTRUCTIONS
 INSTALLATION INSTRUCTIONS Accessory Application Publications No. P/N 08E49-S2A-100 2004 S2000 AII 26325 Issue Date OCT 2003 PARTS LIST Hood switch harness TOOLS AND SUPPLIES REQUIRED #2 Phillips screwdriver
ITEM QTY CHECK PART NUMBER DESCRIPTION. NOTE: This package does not include any accessories for gauge installation
 PART #90540A Gauge Pod Only Package, SLP, 2005-2013 Corvette PACKING LIST Before installation, use this check list to make sure all necessary parts have been included. ITEM QTY CHECK PART NUMBER DESCRIPTION
Includes: 1. Silicone Hose 2. EGR Block Off Plates 1. Exhaust Block Off Plate 2. Hose Clamps 1. Spacer/Washer 8. Bolts 2. Nuts
 Includes: 1. Silicone Hose 2. EGR Block Off Plates 1. Exhaust Block Off Plate 2. Hose Clamps 1. Spacer/Washer 8. Bolts 2. Nuts WARNING: This product is not legal for sale or use on pollution controlled
LML 3 Y-Bridge Kit or High Flow Intake Bundle Package
 2011-2016 LML 3 Y-Bridge Kit or High Flow Intake Bundle Package Covers installation of PN s: WCF100607, WCF100691, WCF100716, & WCF100353 Note: This Kit is for off road competition use only! Overview-