Arctic Cat ProClimb Sidekick Installation Instructions
|
|
|
- Britton Cook
- 5 years ago
- Views:
Transcription


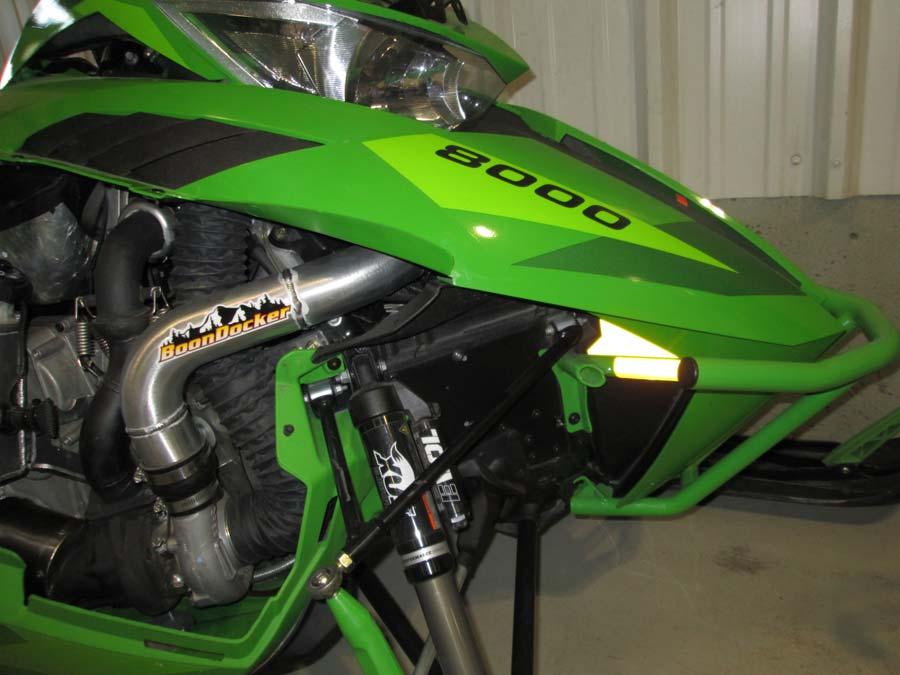
1 Arctic Cat ProClimb Sidekick Installation Instructions


2 1.Remove side panels, front bumper, and hood 2. Remove pipe, muffler, heat shield and ECU 3. Remove cross brace. Unplug the servo motor and carefully move out of the way so air box can be removed. Loosen the clamps on the air box and slide forward to remove throttle bodies 5. Unclip oil pump linkage rod, loosen clamps and slide throttle bodies out of boots. Remove coolant lines from throttle bodies, clamp or plug lines (re-routed in Step 15). 6. Move throttle bodies out of the way and remove the air box. NOTE; IF INSTALLING MTA OILLESS TURBO PROCEED TO STEP 1 Revised 1/3/2017 Page 2 of 11


3 7. Plug exhaust and intake to prevent debris from getting into the engine.. Tip Sled onto its side, (clutch side works best) 8. Drill and remove the two access plates from the bottom of the bulk head 9. Drill and remove the exhaust outlet plate and rubber from the belly pan 10. Locates the crank oil feed line on crank case, unbolt the fitting remove the bolt and 2 washers, one on each side of fitting. Carefully remove the fitting from oil hose.. DO NOT CUT! 11.Remove the stock oil lines from the throttle body boots and oil pump, keep clamps for installation of new lines 12. Install the pre assembled Boondocker oil lines, Follow diagram for proper installation and routing, Revised 1/3/2017 Page 3 of 11


 thru the opening between bulk head and")


4 13. Wrap the hose leading to the crank case using the stock protective sleeve. 1. Remove the oil from pump, using a syringe fill system with oil. 15. Route both water lines from throttle body (from Step 5) thru the opening between bulk head and recoil housing. A little WD-0 will help slide hose thru clamp on bulk head. 16. Rotate Banjo fitting. 17. Install throttle body and tighten. Make sure to attach OIL LINKAGE ROD. Verify linkage operation and oil line routing, zip tie to prevent kinking and rubbing, 18. Install Boondocker Timing module. Revised 1/3/2017 Page of 11


5 19. Drain oil into a clean container and remove the stock oil tank. Remove oil level sensor and rubber insert as well as the oil fill neck. 20. Install two layers of heat shielding tape onto sensor wiring that exits from bottom of chain case. After muffler installation, ensure wiring is routed away from muffler. 21. Install oil level sensor float facing down, install filler neck onto the new oil tank (apply thread sealant to threads of bolts). Re-connect oil-level sensor wiring after mounting. 22. Mount the oil tank using stock screws in the upper rear/lower front holes and use provided M6x1.0 hex head screw in upper front hole. Use provided 5/16 nuts as spacers between chaincase cover and bracket. 23. Fill the oil tank and lines, connect tank line to the stock oil pump feed line, make sure lines are full before assembly to eliminate air bubbles 2. Install the charge box, make sure the o-rings are lightly lubed for ease of installation Revised 1/3/2017 Page 5 of 11


6 25. Secure air box by removing the fuel rail screws, using the aluminum keepers. Slide keepers into the grooves on air box, fasten using the stock fuel rail screws 26. Install cross brace and plug in the servo motor. 27. Install Exhaust heat deflector, using the two predrilled holes on cross brace. then drill remaining holes and rivet in place. 28. Install ECU mounting bracket, bolt on the ECU using the factory bolts 29. High temp Silicon the exhaust donuts and install the pipe using the supplied high tension exhaust springs (long side of hook towards the engine). 30. Rivet spring tap to the chassis for turbo hold down Revised 1/3/2017 Page 6 of 11


7 31. Remove the stock rubber mounting hardware from the stock muffler and install onto the turbo bracket. 32. Hold turbo in place, rout short water line to inside fitting on turbo, route long hose and cut the hose and tubing to length Save extra tubing for the other water line. 33. Route long hose and cut the hose and tubing to length Save extra tubing for the other water line. 3. Mount turbo on cross brace, spring into place using long exhaust spring 35. Install turbo inlet onto the turbo, align the turbo to the pipe and spring the pipe to the turbo inlet. 36. Fill the turbo oil feed line using a syringe, leave a 1 air pocket to ensure oil is pumping when machine is running, air pocket will disappear when pumping correctly. Revised 1/3/2017 Page 7 of 11


8 37. Connect the turbo oil feed line to the oil pump hose located on the bottom of the engine, Using a small zip tie secure the oil pump hose to the turbo feed union fitting 38. Routing is crucial, zip tie and secure to prevent rubbing kinking or melting 39. Install banjo fitting into crank case oil feed line, bolt to crank case (1 washer on each side of fitting) 0. Using the supplied template mark and drill a 2 1/ hole in the tunnel, de-burr and verify fit, file to fit if needed 1. Using the supplied template cut and modify the foot rest kick plate 2. Using the spring tab removed earlier, bolt onto chain case cover using factory bolt, spring muffler into place Revised 1/3/2017 Page 8 of 11


9 3. Install the muffler and spring into place.. Install the kick plate and muffler heat shield using factory bolts, Adjust heat shield to prevent vibration rattling and rivet into place on the tunnel 5. Zip tie oil line to the foot well upright post. Check and secure electrical/oil lines as necessary so all wires are routed away from exhaust components and have ample clearance. 6. Install the exhaust outlet block off plate 7. Install the Boondocker control box.. NOTE: mount in lower left hand corner for hood clearance. 8. Plug in the Boost line, temp sensor and the boost control solenoid Revised 1/3/2017 Page 9 of 11


 starting from")
10 9. Install the charge tube, route the pressure hose from the charge tube to the solenoid fasten hose using small zip ties 50. Remove the windshield, gauge, air intake and headlight 51. Remove the factory air intake plenum 52. Attach the Boondocker cold air intake plenum, using stock holes and supplied hardware. 53. Re-assemble hood, be sure that the air intake rubbers are installed properly in the hood. 5. Load adjustable weights (if not pre-loaded) starting from heel to toe Install clutch components (optimal RPM range ) Revised 1/3/2017 Page 10 of 11


11 55. MUST pre-mix first tank of fuel 50:1 and verify that the sled is using oil properly to prevent damage. Discontinue pre mix after oil consumption is verified 56. Set the hood in place and plug in, verify the machine starts, check that oil pump is pumping oil to the turbo and throttle bodies, run long enough to verify and check coolant level!! 57. Install the hood, and front bumper. Hook up cold air from the turbo to the hood 58. Tip the sled back on its side and re-install the bulk head access plates Revised 1/3/2017 Page 11 of 11
12 ITEM NO. PART NUMBER DESCRIPTION QTY. 1 FIT-B022 Fitting, Tee, 1/8", Brass 3 2 FIT-PL13 Fitting, Valve, Check, 1/8" 3 3 TUB-0001 Fitting, Cup Plug 1 TUB-0023 Hose, Oil, 1/8" ID /" TO THROTTLE BODY PTO SIDE 2 1 SCALE: 1: SIZE: B D C B A D FROM PUMP BANJO ON PTO SIDE 7 1/8" 2 1/2" 1 2 5/8" 1 2 1/8" C FROM PUMP BANJO ON MAG SIDE 2 3/8" 2 3/8" 1 2 ORIFICE 3 2 1/2" B 2 2 A 1 1/2" 5 1/8" TO THROTTLE BODY MAG SIDE TO BANJO CRANKCASE THE INFORMATION CONTAINED IN THIS DRAWING IS THE SOLE PROPERTY OF BOONDOCKER, LLC. ANY REPRODUCTION IN PART OR AS A WHOLE WITHOUT THE WRITTEN PERMISSION OF BOONDOCKER IS PROHIBITED. NOTE: This assembly requires 31" of Item, TUB-0023 DRWN CHKD APPR NAME A.Case DATE UNLESS OTHERWISE SPECIFIED: DIMENSIONS ARE INCHES FRACTIONAL: 1/16" ANGULAR: 0.50 X:.030" XX:.010" XXX:.005" UNLESS NOTED OTHERWISE TITLE: 2017 Arctic Cat Sidekick Motor/Crank Oil System MATERIAL: Varies SHEET 1 OF 1 NAME: KBT-A05 SHEET: SCALE:
13 NOTE: This assembly requires 18.5" of Item, TUB-0023 and 16" of Item 5, SLE SCALE: 1: SIZE: B D C B A D ITEM NO. PART NUMBER DESCRIPTION QTY. 1 FIT-T00 Fitting, Union, 1/", AN x Brk 1 2 FIT-H01 Fitting, 5, 1/" NPT x Barb 1 3 FIT-B002 Fitting, Union, NPT x Barb 1 TUB-0023 Hose, Oil, 1/8" ID 1 5 SLE-0012 Shield, Insutherm, 3/8 1 6 FIT-B050 Fitting, Union, 1/8", Brass 1 TURBO C #10-32 TAP ITEM 2 GREEN LOCTITE 18 1/2" 6 1 STOCK OIL LINE FROM PUMP TO CRANKCASE BANJO " B REMOVE FROM CRANKCASE BANJO A DRWN CHKD APPR NAME A.Case DATE TITLE: 2017 Arctic Cat Sidekick Turbo Feed Oil System THE INFORMATION CONTAINED IN THIS DRAWING IS THE SOLE PROPERTY OF BOONDOCKER, LLC. ANY REPRODUCTION IN PART OR AS A WHOLE WITHOUT THE WRITTEN PERMISSION OF BOONDOCKER IS PROHIBITED. UNLESS OTHERWISE SPECIFIED: DIMENSIONS ARE INCHES FRACTIONAL: 1/16" ANGULAR: 0.50 X:.030" XX:.010" XXX:.005" UNLESS NOTED OTHERWISE MATERIAL: Varies SHEET 1 OF 1 NAME: TCH-IA33 SHEET: SCALE:
14 THIS PAGE LEFT BLANK
15 mark center point cut out
16 THIS PAGE LEFT BLANK
17 notch place this face on running board side of stirrup plate align holes and slots for best fit and mark out notch
Polaris Axys Sidekick Installation Instructions
 2016-2017 Polaris Axys Sidekick Installation Instructions 1. Remove hood and side panels. 2. Remove fasteners and slide console back. 3. Remove belt and driven clutch. 4. Remove clutch cover/ oil-tank
Revised 10/22/2014 Page 2 of?
 1.Remove side panels, hood, seat, fuel tank, and 2.Remove stock air box, remove fuel line muffler. Save exhaust springs and rubber muffler mounts for turbo bracket. Sand back surface flat for mounting.
Revised 10/23/2015 Page 2 of 10
 1.Remove the gauge, side panels, hood and headlight. Remove the air box from the throttle bodies then remove the seat and gas tank. 2.Carefully remove temp sensor from air box using a small pick or screw
Skidoo XM Etec Installation Instructions
 Thank you for purchasing your Silber Turbo kit. This product was designed to give you endless amounts of power and satisfaction. During the installation feel free to call us with any question or concerns
INSTRUCTIONS. High Boost Upgrade Polaris PRO-RMK Polaris SKS 850 (155) 2019 Polaris ASSAULT 850. Page Number: 1 INSTRUCTIONS MODEL:
 2019 Polaris ASSAULT 850. Page Number: 1 INSTRUCTIONS MODEL:") INSTRUCTIONS MODEL: FITS: High Boost Upgrade 2019 Polaris PRO-RMK 850 2019 Polaris SKS 850 (155) 2019 Polaris ASSAULT 850 Page Number: 1 INSTRUCTIONS Table of Contents Contents INSTRUCTIONS...1 Contents
INSTRUCTIONS MODEL: FITS: High Boost Upgrade 2019 Polaris PRO-RMK 850 2019 Polaris SKS 850 (155) 2019 Polaris ASSAULT 850 Page Number: 1 INSTRUCTIONS Table of Contents Contents INSTRUCTIONS...1 Contents
XF 800 Sno Pro SHARE OUR PASSION.
 2012Snowmobile Illustrated Parts Manual XF 800 Sno Pro Model Number S2012XFHSPUSG Model Number S2012XFHSPUSO Model Nubmer S2012XFHSPOSG - International Model Number S2012XFHSPOSO - International TM SHARE
INSTALLATION INSTRUCTIONS 97 FORD EXPEDITION
 INSTALLATION INSTRUCTIONS 97 FORD EXPEDITION 1. Read the instructions completely and carefully before you begin. Check the kit for proper contents (refer to the part s list and the picture diagrams). Before
Pump Gas Instructions for Polaris And 800 Models. Important Information before Installing This System:
 Pump Gas Instructions for Polaris 600 700 And 800 Models Important Information before Installing This System: Before you begin your turbo install, read through these instructions to determine if you are
03-04 Mach 1. Hellion Power Systems Mach 1 Kit Instructions
 Hellion Power Systems 03-04 Mach 1 Kit Instructions Part 1 Hellion recommends that the front suspension system be installed either by trained professionals or by 5.Remove rack bolts K-Member Installation
MOROSO PERFORMANCE PRODUCTS, INC. (203) , 80 CARTER DRIVE GUILFORD, CT
 , 80 CARTER DRIVE GUILFORD, CT") Parts List (2) Air Oil separator (2) Billet Clamp (1) Stainless Mounting Bracket (2) Ball Valve (2) 90 Degree drain (2) ¼-20X1 SHCS (4) ¼-20x5/8 SHCS (2) ¼-20X1 HHCS (2) ¼-20 Nylock Nuts (2) ½ x 90 Barbed
Parts List (2) Air Oil separator (2) Billet Clamp (1) Stainless Mounting Bracket (2) Ball Valve (2) 90 Degree drain (2) ¼-20X1 SHCS (4) ¼-20x5/8 SHCS (2) ¼-20X1 HHCS (2) ¼-20 Nylock Nuts (2) ½ x 90 Barbed
Step 6: Remove and save the MAP sensor for later use. Step 7: Remove the passenger side intercooler pipe and the EGR intake manifold.
 LBZ Twin kit Install Step 1: Disconnect both batteries. Step 2: Drain coolant and oil also remove passenger side inner fender. Step 3: Remove intake box and piping. (Remove and save the MAF sensor in the
Instant Chat off the main page of Or simply call our tech team at
 FRONT MOUNT INTERCOOLER 2008-13 STI 2014-04- 08 Thank you for purchasing this PERRIN product for your car! Installation of this product should only be performed by persons experienced with installation
3.4L V6 SUPERCHARGER 7 TH INJECTOR KIT
 Part Number: 00602-17620-260 00602-17620-261 00602-17620-263 00602-17620-264 00602-17620-274 00602-17620-275 00602-17620-276 Section I Installation Preparation Kit Contents Item # Quantity Reqd. Description
4. Remove (4) 10mm and (1) 7mm bolt that holds fascia at front corners, on each side
 10mm and (1) 7mm bolt that holds fascia at front corners, on each side") 2010 Camaro LS3 1. Disconnect battery ground 2. Remove front wheels 3. Remove (5) push pins and (5) #20 torx screws on inner front wheel well liners and remove liners on each side 4. Remove (4) 10mm and
2010 Camaro LS3 1. Disconnect battery ground 2. Remove front wheels 3. Remove (5) push pins and (5) #20 torx screws on inner front wheel well liners and remove liners on each side 4. Remove (4) 10mm and
WPS-104 Heater Installation Instructions For 500EFI, 700 XP, & Crew Applications
 WPS-104 Heater Installation Instructions For 500EFI, 700 XP, & Crew Applications ORDER OF INSTALLATION FOR A COMPLETE ENCLOSURE OF A RANGERWARE WPS (Weather Protection System) IS AS FOLLOWS: 1. Heater
IAG Street Series Air / Oil Separator (AOS) For 2017 WRX
 For 2017 WRX") P IAG Street Series Air / Oil Separator (AOS) For 2017 WRX Part# IAG-ENG-7152 Tools Required: Ratchet, torque wrench, extensions, needle nose pliers, hose cutter, snips/scissors, flathead screwdriver,
P IAG Street Series Air / Oil Separator (AOS) For 2017 WRX Part# IAG-ENG-7152 Tools Required: Ratchet, torque wrench, extensions, needle nose pliers, hose cutter, snips/scissors, flathead screwdriver,
WOC-364 Installation Instructions Ranger XP Heater System
 WOC-364 Installation Instructions Ranger 2011-12 XP Heater System Order of installation for a Complete Enclosure Always install the Heater System first if possible NOTE: If installing the Heater System
Scion FR-S ZN6. GTX2867R Gen2 (Internal Wastegate) Installation Instructions GPP P/N #
 Installation Instructions GPP P/N #") TURBO KIT Scion FR-S ZN6 Subaru BRZ ZC6 GTX2867R Gen2 (Internal Wastegate) Installation Instructions GPP P/N # 11518000 Vehicle Type Chassis Code Engine Code Transmission Model Year Scion FR-S DBA-ZN6
TURBO KIT Scion FR-S ZN6 Subaru BRZ ZC6 GTX2867R Gen2 (Internal Wastegate) Installation Instructions GPP P/N # 11518000 Vehicle Type Chassis Code Engine Code Transmission Model Year Scion FR-S DBA-ZN6
IAG Competition Series Air / Oil Separator (AOS) For WRX
 For WRX") P IAG Competition Series Air / Oil Separator (AOS) For 2015-16 WRX Part# IAG-ENG-7252 Tools Required: Ratchet, torque wrench, extensions, needle nose pliers, hose cutter, snips/scissors, flat head screw
P IAG Competition Series Air / Oil Separator (AOS) For 2015-16 WRX Part# IAG-ENG-7252 Tools Required: Ratchet, torque wrench, extensions, needle nose pliers, hose cutter, snips/scissors, flat head screw
MTNTKperformance.com. '16-Current Polaris AXYS 800 Intercooled Turbo Kit Install Instructions
 1 '16-Current Polaris AXYS 800 Intercooled Turbo Kit Install Instructions '16-Current Polaris AXYS 800 Intercooled Turbo Kit Install Instructions 1. Remove: side panel, hood, seat, fuel tank, muffler,
Installation Instructions
 2011-2013 LML DURAMAX COMPOUND-ADD 2011-2015 LML A Duramax TURBO KIT Add INSTALL A Turbo INSTRUCTIONS Compound Kit Installation Instructions 1-800-955-0476 - www.industrialinjection.com - info@industrialinjection.com
Kit Part Number:
 Equipped with AEM DRYFLOW Filter No oil required! Kit Part Number: 21-573 2006-2008 Toyota Yaris 1.5L *Legal in California only for racing vehicles which may never be used upon a highway. 2008, Advanced
99-04 GT. Hellion Power Systems Mustang GT Kit Instructions
 Hellion Power Systems 99-04 Mustang GT Kit Instructions Part 1 Hellion recommends that the front suspension system be installed either by trained professionals or by 5.Remove rack bolts K-Member Installation
3 October 2016 PN# V Dodge Twin Turbo Kit (I-00274) ½ D o d g e 2 4 v I S B
 ½ D o d g e 2 4 v I S B") 3 October 2016 PN#1045320 24V Dodge Twin Turbo Kit (I-00274) 1 DOWNLOAD ENHANCED INSTALL MANUALS AT dieselperformance.com BD Twin Turbo Kit 1998½- 2 0 0 2 D o d g e 2 4 v I S B Part# 1045320 PLEASE READ
3 October 2016 PN#1045320 24V Dodge Twin Turbo Kit (I-00274) 1 DOWNLOAD ENHANCED INSTALL MANUALS AT dieselperformance.com BD Twin Turbo Kit 1998½- 2 0 0 2 D o d g e 2 4 v I S B Part# 1045320 PLEASE READ
IAG Street Series Air / Oil Separator (AOS) For WRX
 For WRX") P IAG Street Series Air / Oil Separator (AOS) For 2015-16 WRX Part# IAG-ENG-7152 Tools Required: Ratchet, torque wrench, extensions, needle nose pliers, hose cutter, snips/scissors, flat head screw driver,
P IAG Street Series Air / Oil Separator (AOS) For 2015-16 WRX Part# IAG-ENG-7152 Tools Required: Ratchet, torque wrench, extensions, needle nose pliers, hose cutter, snips/scissors, flat head screw driver,
IAG Air / Oil Separator (AOS) For STi
 For STi") IAG Air / Oil Separator (AOS) For 2008-14 STi Part# IAG-ENG-7000 Tools Required: Ratchet, torque wrench, extensions, needle nose pliers, hose cutter, snips/scissors Sockets: 10mm, 12mm 13mm Wrenches: 10mm,
IAG Air / Oil Separator (AOS) For 2008-14 STi Part# IAG-ENG-7000 Tools Required: Ratchet, torque wrench, extensions, needle nose pliers, hose cutter, snips/scissors Sockets: 10mm, 12mm 13mm Wrenches: 10mm,
WARNINGs! Read all instructions before starting installation of this product! Installing the improper FASS Pump can cause severe engine damage.
 WARNINGs! Read all instructions before starting installation of this product! Installing the improper FASS Pump can cause severe engine damage. FASS Recommended Application T F17 150G Powerstroke (6.7L)
INSTALLATION INSTRUCTIONS
 Equipped with AEM Dryflow Filter No Oil Required! INSTALLATION INSTRUCTIONS PART NUMBER: 21-507B (Blue Finish) 21-507C (Gun Metal Grey Finish) 21-507R (Red Finish) 2002-2006 ACURA RSX L4-2.0L Auto Trans.
Procharger Stage II Intercooled Supercharger System (11-14 GT)
") Procharger Stage II Intercooled Supercharger System (11-14 GT) Installation Time: Approximately one day. Installed on 2012 Mustang GT 5.0/Manual Required Tools 3/8 Socket Set (Standard and Metric) 1/2
Procharger Stage II Intercooled Supercharger System (11-14 GT) Installation Time: Approximately one day. Installed on 2012 Mustang GT 5.0/Manual Required Tools 3/8 Socket Set (Standard and Metric) 1/2
2006 Honda Civic SI Supercharger Kit Installation Instruction Kit #
 2006 Honda Civic SI Supercharger Kit Installation Instruction Kit #350-091 3239 MONIER CIRCLE, STE.5 RANCHO CORDOVA, CA 95742 916.635.4550 FAX 916.635.4632 www.ct-engineering.com INS-157 VERSION: 3.25.2009
JODALE PERRY. Parts List & Mounting Instructions. Jacobsen HR9016 JDP BUILT FOR LIFE
 JODALE PERRY Parts List & Mounting Instructions Jacobsen HR9016 JDP BUILT FOR LIFE Jacobsen HR9016 Mounting Instructions Standard Parts 1 - LH Rear Mounting Bracket 1 - RH Rear Mounting Bracket 1 - Front
03-04 Cobra. Hellion Power Systems Mustang Cobra Kit Instructions
 Hellion Power Systems 03-04 Mustang Cobra Kit Instructions NECESSARY PARTS REQUIRED FOR INSTALLATION Necessary: 03-04 Cobra hellion Kit ONLY 99-01 Alternator #YR3210346AA Alternator Bracket #XR3Z-10153-AB
Always wear safety glasses when working on your vehicle.
 90-93 MAZDA MIATA SUPERCHARGER KIT The KraftWerks 90-93 Mazda Miata Supercharger Kit was designed for easy installation. Competent mechanics with the appropriate tools will find the process to be relatively
Illustrated Parts Manual
 2010 Illustrated Parts Manual 120 Sno Pro Model Number S2010ACAAAUSG SHARE OUR PASSION ṬM TABLE OF CONTENTS 2010 120 Sno Pro (Model No. S2010ACAAAUSG) SKI AND SPINDLE ASSEMBLY... 1 A-ARM ASSEMBLY... 2
Sno Pro 120. Model Number S2012ACAAAUSG SHARE OUR PASSION.
 2012Snowmobile Illustrated Parts Manual Sno Pro 120 Model Number S2012ACAAAUSG TM SHARE OUR PASSION. TABLE OF CONTENTS 2012 Sno Pro 120 (Model No. S2012ACAAAUSG) SKI AND SPINDLE ASSEMBLY... 1 A-ARM ASSEMBLY...
ARCTIC CAT. Illustrated Parts Manual. F8 EFI Sno Pro SHARE OUR PASSION.
 ARCTIC CAT SHARE OUR PASSION. TM Illustrated Parts Manual F8 EFI Sno Pro Model Number S2007F8HEPUSG Model Number S2007F8HEPUSB Model Number S2007F8HEPUSO Model Number S2007F8HTSUSO (Tony Stewart Edition)
AC 120 MODEL NUMBER S2008ACAAAUSG MODEL NUMBER S2008ACAAAUSP
 2008 AC 120 Illustrated Parts Manual MODEL NUMBER S2008ACAAAUSG MODEL NUMBER S2008ACAAAUSP TABLE OF CONTENTS (Model No. S2008ACAAAUSG) (Model No. S2008ACAAAUSP) SKI AND SPINDLE ASSEMBLY... 1 A-ARM ASSEMBLY...
XLT SPECIAL TRIPLE PIPE SET P.N Installation Instructions
 1995-97 XLT SPECIAL TRIPLE PIPE SET P.N. 09-598 Installation Instructions Revised 8/20/02 Read instructions carefully before installation 1 - Remove stock exhaust, Y-Pipe, front and rear muffler support.
Fuel Tank Fitment Instructions Tusk/Rally Raid Products/Seat Concepts kit Husqvarna 701 Enduro
 Fuel Tank Fitment Instructions Tusk/Rally Raid Products/Seat Concepts kit Husqvarna 701 Enduro Part #1849120001, 1849120002, 1849110001, 1849110002 Thank you for purchasing the Tusk/Rally Raid Products
Part # SLP Silencer for G4 Ski Doo 850
 Part # 09-867 SLP Silencer for 2017-18 G4 Ski Doo 850 Parts List: 7-7 Insulated Heat Tape (Part #090-29) 5-30 Reflective Heat Tape (Part #090-31) 1 - Inner Aluminum Heat Shield (Part #091-6057) 3-3/16
Equipped with AEM Dryflow Filter No Oil Required! INSTALLATION INSTRUCTIONS PART NUMBER:
 Equipped with AEM Dryflow Filter No Oil Required! INSTALLATION INSTRUCTIONS PART NUMBER:21-8125 2011-2012 Ford F150 V8 5.0L * NOTE: Legal in California only for racing vehicles which may never be used
ZR 120 Model NumberS2003ZRAAAUSG
 ARCTIC CAT ZR 120 Model NumberS2003ZRAAAUSG TABLE OF CONTENTS 2003 ZR 120 - Revised (Model No. S2003ZRAAAUSG) SKI AND SPINDLE ASSEMBLY................................................. 1 A-ARM ASSEMBLY..........................................................
IAG Competition Series Air / Oil Separator (AOS) For 2017 STI
 For 2017 STI") P IAG Competition Series Air / Oil Separator (AOS) For 2017 STI Part# IAG-ENG-7251 Tools Required: Ratchet, torque wrench, extensions, needle nose pliers, hose cutter, snips/scissors, flat head screw driver,
P IAG Competition Series Air / Oil Separator (AOS) For 2017 STI Part# IAG-ENG-7251 Tools Required: Ratchet, torque wrench, extensions, needle nose pliers, hose cutter, snips/scissors, flat head screw driver,
Installation Instructions for: TOYOTA 3.4L SUPERCHARGER SYSTEM
 Installation Instructions for: TOYOTA 3.4L SUPERCHARGER SYSTEM 1996-2002 4Runner 1997-1998 T100 1997-2004 Tacoma 2000-2003 Tundra * PREMIUM FUEL REQUIRED * Magnuson Products LLC 1990 Knoll Drive, Bldg
SLP Twin Pipes for 2004 Arctic Cat 900 Mountain Cat Twin P.N (CP)
") Setting the World s Performance Standards Twin Pipes for 2004 Arctic Cat 900 Mountain Cat Twin P.N. 09-907(CP) Contents of Pipe Set 1 - Plastic Zip tie 3 - Large Head Rivets 4 - Short s 1 - Red Silicone
Setting the World s Performance Standards Twin Pipes for 2004 Arctic Cat 900 Mountain Cat Twin P.N. 09-907(CP) Contents of Pipe Set 1 - Plastic Zip tie 3 - Large Head Rivets 4 - Short s 1 - Red Silicone
READ AND UNDERSTAND ALL INSTRUCTIONS AND WARNINGS PRIOR TO INSTALLATION OF SYSTEM AND OPERATION OF VEHICLE.
 #9378 Installation Instructions 3 Body Lift Kit 1998-2000 Ranger READ AND UNDERSTAND ALL INSTRUCTIONS AND WARNINGS PRIOR TO INSTALLATION OF SYSTEM AND OPERATION OF VEHICLE. SAFETY WARNING BDS Suspension
C3 Syncro Drive Proclimb 1100 Installation Instructions
 Revision 4 Nov 8-2013 201A Old Town Road, Sicamous, BC. V0E 2V4 Ph 250-833 3538 Fax 888-716 5903 www.c3powersports.com Thank you for purchasing a ProClimb M, ProCross F & XF SyncroDrive Note: This modification
DODGE CUMMINS 24V ISB
 19 November 2009 1998-1999 Dodge Cummins OEM Bypass Lift Pump Kit # 1050230-1 - 1998-99 DODGE CUMMINS 24V ISB OEM BYPASS LIFT PUMP KIT I n s t a l l a t i o n I n s t r u c t i o n s Part# 1050230 PLEASE
Model No. S2002ZRAAAUSG ILLUSTRATED PARTS MANUAL
 A RC TI C C A T 2002 ZR 120 Model No. S2002ZRAAAUSG ILLUSTRATED PARTS MANUAL TABLE OF CONTENTS 2002 ZR 120 (Model No. S2002ZRAAAUSG) SKI AND SPINDLE ASSEMBLY.................................................
Equipped with AEM Dryflow Filter No Oil Required! INSTALLATION INSTRUCTIONS PART NUMBER: DS (Plastic Intake Tube)
") Equipped with AEM Dryflow Filter No Oil Required! INSTALLATION INSTRUCTIONS PART NUMBER:21-8126DS (Plastic Intake Tube) 2011-2014 Ford F150 V6 3.5L ECOBOOST C.A.R.B. E.O. D-670-19 AEM Induction Systems
Equipped with AEM Dryflow Filter No Oil Required! INSTALLATION INSTRUCTIONS PART NUMBER:21-8126DS (Plastic Intake Tube) 2011-2014 Ford F150 V6 3.5L ECOBOOST C.A.R.B. E.O. D-670-19 AEM Induction Systems
ITEM QTY CHECK PART NUMBER DESCRIPTION
 PART #21128 2010 Camaro Cold Air Induction Stage II PACKING LIST Before installation, use this check list to make sure all necessary parts have been included. ITEM QTY CHECK PART NUMBER DESCRIPTION 1.
96-04 tt. Hellion Power Systems Mustang Twin Turbo Kit Instructions
 96-04 tt Hellion Power Systems 1996-2004 Mustang Twin Turbo Kit Instructions 1. Disconnect battery and elevate front end of car on either Jack stands or a lift if available 2.Lock steering wheel and remove
FRONT MOUNT INTERCOOLER GOLF / JETTA IV 1.8T PART # & P INSTALATION INSTRUCTIONS
 FRONT MOUNT INTERCOOLER GOLF / JETTA IV 1.8T PART # 48.10.90 & 48.10.90P INSTALATION INSTRUCTIONS PART LIST: 1 INTERCOOLER CORE 1 U-BENT TUBE 1 L-SHAPED TUBE 1 INTERCOOLER INLET TUBE 4 M6 NYLOC NUT 3 M6
COLD AIR INTAKE INSTALLATION INSTRUCTIONS. # D Fits: i (4.8L)
") COLD AIR INTAKE INSTALLATION INSTRUCTIONS # D760-0013 Fits: 2006-10 650i (4.8L) PARTS LIST Air Box Assembly Left tube Center tube Right tube Support bracket AFM housing AFM/TB tube Hardware Kit Congratulations
COLD AIR INTAKE INSTALLATION INSTRUCTIONS # D760-0013 Fits: 2006-10 650i (4.8L) PARTS LIST Air Box Assembly Left tube Center tube Right tube Support bracket AFM housing AFM/TB tube Hardware Kit Congratulations
Illustrated Parts Manual. ZR 120 Model Number S2005ZRAAAUSG Model Number S2005ZRAAAUSR
 Illustrated Parts Manual ZR 120 Model Number S2005ZRAAAUSG Model Number S2005ZRAAAUSR 2 00 5 TABLE OF CONTENTS 2005 ZR 120 (Model No. S2005ZRAAAUSG) (Model No. S2005ZRAAAUSR) SKI AND SPINDLE ASSEMBLY.................................................
***FOR COMPETITION USE ONLY as per US EPA regulations *** Factory Pipe Bill of Materials Kawasaki Ultra 150 Triple Pipe
 ***FOR COMPETITION USE ONLY as per US EPA regulations *** Factory Pipe Bill of Materials Kawasaki Ultra 150 Triple Pipe Item Qty Part Number Part Description 1 1 COMASM0947 Ultra 150 PTO Chamber assembly
PFadvantage Metalfor Araus 1360
 Metalfor Araus 1360 Note: Indented items indicate parts included in an assembly listed above Part Name/Description Part Number Quantity Instruction Kit Metalfor Araus 2005300-14 1 Display Bracket 4000134
8 Zip Tie Zip Tie 1 Union Fitting 1 ½ ½ Union Reducer Fitting Union 1 5/8 ½ (For Plastic Intake Manifold Vehicles)
") P IAG Street Series Air / Oil Separator (AOS) For 2017 STI Part# IAG-ENG-7151 Tools Required: Ratchet, torque wrench, extensions, needle nose pliers, hose cutter, snips/scissors, flat head screw driver,
P IAG Street Series Air / Oil Separator (AOS) For 2017 STI Part# IAG-ENG-7151 Tools Required: Ratchet, torque wrench, extensions, needle nose pliers, hose cutter, snips/scissors, flat head screw driver,
Subaru Front Mount Intercooler Kit STI Subaru Front Mount Intercooler Kit STI
 Subaru Front Mount Intercooler Kit STI 2008-2014 715500 Subaru Front Mount Intercooler Kit STI 2008-2014 Congratulations on your purchase of the Subaru Front Mount Intercooler Kit STI 2008-2014. The following
Factory Five Racing, Inc. Roadster Complete Kit Assembly manual revision 3p update
 Factory Five Racing, Inc. Roadster Complete Kit Assembly manual revision 3p update Kit Parts Prep...3 Body Removal...3 Aluminum Removal...5 Front upper control arm...7 Adjusting the upper control Arm...10
SALEEN SPEEDLAB BOOST AND WATER TEMPERATURE GAUGE POD KIT
 = SALEEN SPEEDLAB BOOST AND WATER TEMPERATURE GAUGE POD KIT INSTALLATION MANUAL: 2005-09 Mustang 4.6L 3V P/N: 10-8002-C12000B KIT P/N: 10-2903-B11511* Saleen Performance, Inc. 1225 East Maple Rd. Troy,
INSTALL MANUAL D o d g e 1 2 v 6 B T A PLEASE READ ALL INSTRUCTIONS BEFORE INSTALLATION.
 PN#1045310 12V Dodge Twin Turbo Kit (I-00273) 1 INSTALL MANUAL BD Twin Turbo Kit 1994-1 9 9 8 D o d g e 1 2 v 6 B T A Part# 1045310 PLEASE READ ALL INSTRUCTIONS BEFORE INSTALLATION. * Picture as shown
Part # Description Qty Inspected By Rack & Pinion Pump Kit Remote Reservoir Line Kit Shaft Kit
 58-62 Corvette Power Rack & Pinion Kit Instructions # 8011530 Unisteer offers a limited warranty against all manufacturer defects of their kits and supplied parts. Unisteer will not honor any warranty
IAG Street Series Air / Oil Separator (AOS) For WRX
 For WRX") IAG Street Series Air / Oil Separator (AOS) For 2008-14 WRX Part# IAG-ENG-7100 Tools Required: Ratchet, extensions, needle nose pliers, hose cutter, snips/scissors, flat head screw driver, hose clamping
IAG Street Series Air / Oil Separator (AOS) For 2008-14 WRX Part# IAG-ENG-7100 Tools Required: Ratchet, extensions, needle nose pliers, hose cutter, snips/scissors, flat head screw driver, hose clamping
05-08 GT. Hellion Power Systems Mustang Kit Instructions
 Hellion Power Systems 05-08 Mustang Kit Instructions 1. Disconnect Battery 2. Drain Radiator, keep fluid for re-installation. 3. Remove air box and inlethoses. 6. Next, underneath, punch oil pan for turbo
Edelbrock E-Force Supercharger Part #1538: Dodge 1500 Truck 5.7L V8 HEMI
 Edelbrock E-Force Supercharger Part #1538: 2009-2014 Dodge 1500 Truck 5.7L V8 HEMI 2009-14 Dodge 5.7L Hemi 1500 Truck INTRODUCTION Thank you for purchasing the Edelbrock Supercharger System for the 2009-15
INSTALLATION INSTRUCTIONS
 Equipped with AEM Dryflow Filter No Oil Required! INSTALLATION INSTRUCTIONS PART NUMBER:22-489 2004 MAZDA Miata Mazdaspeed L4-1.8L C.A.R.B. E.O. # D-670 PARTS LIST Description Qty. Part Number Element
Part # SLP Single Pipe Set for G4 Ski Doo 850
 Setting the World s Performance Standards 743 East Iona Road, Idaho Falls, ID 83401, (208) 529-0244 Fax (208) 529-9000 Part # 09-867 SLP Single Pipe Set for 2017-18 G4 Ski Doo 850 Parts List: 7-7 Insulated
58-62 Corvette Manual Rack & Pinion Kit Instructions #
 58-62 Corvette Manual Rack & Pinion Kit Instructions # 8001550 Unisteer offers a limited warranty against all manufacturer defects of their kits and supplied parts. Unisteer will not honor any warranty
Part number SP Mitsubishi Lancer 4 cyl. 2.0L non-turbo. 1- Three piece cold air intake
 Part number SP1835 08-09 Mitsubishi Lancer 4 cyl. 2.0L non-turbo 1- Three piece cold air intake 1- Formed silicone hose (#3158) 1-2 1/2 Injen filter (#1012) 1-2 3/4 straight hose (#3043) 4- Power-Bands.312.040
Thermo-Bob 1 Installation Manual: Kawasaki Concours
 Thermo-Bob 1 Installation Manual: 1986-2006 Kawasaki Concours This is a basic guide for installing the Thermo-Bob 1 on a Kawasaki ZG-1000 Concours. The bike used in the following photos was a 1995 year
Illustrated Parts Manual
 ARCTIC CAT SHARE OUR PASSION. TM Illustrated Parts Manual AC 120 Model Number S2007ACAAAUSG Model Number S2007ACAAAUSO 2007 TABLE OF CONTENTS 2007 AC 120 (Model No. S2007ACAAAUSG) (Model No. S2007ACAAAUSO)
Installation Instructions Models 2858, 2858A-1, 2858GL February 2009
 Installation Instructions Models 2858, 2858A-1, 2858GL February 2009 www.donovan-ent.com Donovan Enterprises 3353 SE Gran Park Way Stuart, FL 34997 800-327-8287 Step 1 Head Assembly Installation Instructions
Bearcat Z1 XT GS. Model Number S2012BCNWGUSO Model Number S2012BCNWGOSO - International SHARE OUR PASSION.
 2012Snowmobile Illustrated Parts Manual Bearcat Z1 XT GS Model Number S2012BCNWGUSO Model Number S2012BCNWGOSO - International TM SHARE OUR PASSION. TABLE OF CONTENTS 2012 Bearcat Z1 XT GS (Model No. S2012BCNWGUSO)
Installation Instructions February 2009
 Installation Instructions February 2009 www.donovan-ent.com Donovan Enterprises 3353 SE Gran Park Way Stuart, FL 34997 800-327-8287 The Hammer Head Assembly Installation Instructions (Rollerbar & Direct
R O A D S M I T H TRIKE CONVERSIONS BY THE TRIKE SHOP
 R O A D S M I T H TRIKE CONVERSIONS BY THE TRIKE SHOP Please thoroughly review the instructions before and during installation. Keep in mind that this product was designed to be installed by trained dealer
Trike Conversion Kit ROADLINER, STRATOLINER, & STRATOLINER DELUXE
 by Trike Conversion Kit ROADLINER, STRATOLINER, & STRATOLINER DELUXE Installation Instructions Revised 1-2015 California Sidecar Parts & Technical Support 434.263.8866 Table of Contents: 1. Warnings and
BD Cobra Compound Turbo
 3 July 2018 1045780-98 Dodge Cobra Turbo Kit (I-00377) 1 DOWNLOAD COLOR INSTALL MANUALS AT www.dieselperformance.com BD Cobra Compound Turbo 2003-2018 Dodge Cummins Cobra 76 Cobra 80 Cobra 86 Cobra 88
Installation of Auto Meter Cobalt Boost/Vacuum Gauge:
 Installation of Auto Meter Cobalt Boost/Vacuum Gauge: Fitment: All 79-14 models. This installation was completed on a 2004 Mustang GT, and should be identical for all 1999-2004 model Mustangs. Time needed:
ELECTRIC START KIT KIT P/N
 ELECTRIC START KIT KIT P/N 2873876 Application 2002 Polaris EDGE Models with 500-600 Domestic Engines Before you begin, read these instructions and check to be sure all parts and tools are accounted for.
R35 GTR ALPHA X TURBO KIT INSTALLATION INSTRUCTIONS
 R35 GTR ALPHA X TURBO KIT INSTALLATION INSTRUCTIONS 04 06 09 10 14 21 30 31 34 Turbo Kit Packaging Information Engine Mount Installation Exhaust Manifold Installation Heat Shield Exhaust Manifold Shield
Installation Instructions Z-Gate Shifter
 Installation Instructions Z-Gate Shifter Part Number 80681 1998, 2001 by B&M Racing and Performance Products The B&M Z-Gate shifter can be used in vehicles equipped with most popular three speed automatic
2008 Arctic Cat 600 Sno Pro. Race School November 8, 2007 General Chassis Information Presented by Brian Dick
 2008 Arctic Cat 600 Sno Pro Race School November 8, 2007 General Chassis Information Presented by Brian Dick Chassis Self Pierce Riveted (SPR) tunnel assembly Engine/Lower Arm Frame assembly Upper Spar
BLACKBIRD INSTALLATION SUPPLEMENT
 BLACKBIRD INSTALLATION SUPPLEMENT FOR 2003-7 FORD 6.0 LITER DIESEL SINGLE ALTERNATOR F-350, F-450, F-550, EXCURSION VERSION 7-07 Parts Description Blackbird Wiring Manual Installation Supplement 6.0 Liter
Rzr Heater System Part #
 Rzr Heater System Part # 2878135 NOTE: This heater unit installs below the center of the dash. If you have a radio mount kit (Polaris Part # 2876897) you may need to cut the top front corner off the mount
PART NUMBER: MINI Cooper S L4-1.6L SEE * NOTE
 Equipped with AEM Dryflow Filter No Oil Required! INSTALLATION INSTRUCTIONS PART NUMBER: 21-699 2007-2010 MINI Cooper S L4-1.6L SEE * NOTE * NOTE: Legal in California only for racing vehicles which may
CALIFORNIA Proposition 65 Warning:
 PARTS MANUAL P1064 For Models: L1064D, L1064A, M1064D, M1064T1, M1064T2, M1064A, M1064H, NL1064D, NL1064T1, NL1064T2, NL1064H1, NL1064H2, M40C2, M55C2, & M65C2 CALIFORNIA Proposition 65 Warning: Diesel
Illustrated Parts Manual
 1 10 Illustrated Parts Manual 2 425 CR EFT Model Number A2011IRK4CETR (Red) S H A R E O U R PA S S IO N. TM TABLE OF CONTENTS 2011 ATV 425 CR EFT Red (A2011IRK4CETR) FRONT RACK, BODY PANEL, AND HEADLIGHT
Page 1. File: Motolight caliper one-piece Harley Date: 8/15/2006
 Page 1 Harley-Davidson FL Caliper Mount Installation One-piece mounting brackets You should allow about two to three hours for installation. We suggest you use a well-lighted space for installation. PLEASE
XCR 600/ XLT TRIPLE PIPE SET P.N Installation Instructions
 1994-97 XCR 600/1993-97 XLT TRIPLE PIPE SET P.N. 09-5970 Installation Instructions Read instructions carefully before installation 1-Remove stock exhaust, Y-pipe, and rear muffler support. 2-Install three
SLP Camaro ZL1 STAGE 3 (650 HP)
") SLP - 2012 Camaro ZL1 STAGE 3 (650 HP) PART #26002 PACKING LIST Before installation, use this check list to make sure all necessary parts have been included. ITEM QTY CHECK PART NUMBER DESCRIPTION 1. 1
SLP - 2012 Camaro ZL1 STAGE 3 (650 HP) PART #26002 PACKING LIST Before installation, use this check list to make sure all necessary parts have been included. ITEM QTY CHECK PART NUMBER DESCRIPTION 1. 1
COLD AIR INTAKE INSTALLATION INSTRUCTIONS
 COLD AIR INTAKE INSTALLATION INSTRUCTIONS # D760-0033 Fits: 2013-15 F01 B7, 750i & xdrive (N63TU engine) 2013-15 F02 B7L, 750Li & xdrive (N63TU engine) PARTS LIST Left and right carbon fiber air box lids
ILLUSTRATED PARTS MANUAL
 ILLUSTRATED PARTS MANUAL Wildcat Trail Model Number U2014W5T2PUSG Model Number U2014W5T2PUSR Model Number U2014W5T2PUSZ Model Number U2014W5T2POSG - International Model Number U2014W5T2POSR - International
ARCTIC CAT. Illustrated Parts Manual. F1000 EFI Sno Pro SHARE OUR PASSION.
 ARCTIC CAT SHARE OUR PASSION. TM Illustrated Parts Manual F1000 EFI Sno Pro Model Number S2007F1LEPUSG Model Number S2007F1LEPUSB Model Number S2007F1LEPUSO Model Number S2007F1LEPOSB (International) 2007
6.7L Cummins EGR Delete
 6.7L Cummins EGR Delete H I A B E C D F J K G L PACKING LIST: Part# A B C D E F G H I J K L QTY. 4 Description Coolant Hose Coolant Hose Connector M0 Flange Nut 5/6 Bolts, Nuts, and Flat Washers /4-0 Bolt,
Factory Five Racing, Inc. 818 Kit Assembly manual revision 1J update
 Factory Five Racing, Inc. 818 Kit Assembly manual revision 1J update Turbo coolant overflow tank...1 Shifter handle...4 Install...4 Door skin...7 Door Liner... 10 Side mirrors... 14 Door handles and pulls...
Read and understand all instructions and warnings prior to installation of product and operation of vehicle.
 #F9378 Installation Instructions 1998-2000 Ford Ranger 3" Body Lift Kit Read and understand all instructions and warnings prior to installation of product and operation of vehicle. Zone Offroad Products
G2 INSTALLATION MANUAL
 PERFORMANCE ENGINEERED SYSTEMS G2 INSTALLATION MANUAL FOR RACING OR OFF ROAD USE 1 INTRODUCTION PLEASE PURCHASE AUDI- ONLY POWER STEERING FLUID (PENTOSIN CHF 11S) Please note this an older version, and
POLARIS XLT-SPECIAL TRIPLE PIPE SET P.N
 1998-99 POLARIS XLT-SPECIAL TRIPLE PIPE SET P.N. 09-596 Important: Read instructions carefully before installation. 1-Remove stock exhaust, Y-pipe, and rear muffler support. 2-Install three exhaust flanges,
Instant Chat off the main page of Or simply call our tech team at
 FRONT MOUNT INTERCOOLER 2015+ WRX 2017-07-07 Thank you for purchasing this PERRIN product for your car! Installation of this product should only be performed by persons experienced with installation of