INSTALL INSTRUCTIONS C-VS-1400-EQX-1 14 VEHICLE SPECIFIC CONSOLE for 2014 Chevy Equinox with OEM Center console
|
|
|
- Christopher Hopkins
- 5 years ago
- Views:
Transcription
1 INSTALL INSTRUCTIONS C-VS-1400-EQX-1 14 VEHICLE SPECIFIC CONSOLE for 2014 Chevy Equinox with OEM Center console TOOLS NEEDED: Phillips Screw Driver Standard Socket set Metric Socket set Thin Tape T-20 Torx Bit Hack saw Wire Crimping tool Small Air saw Wire Cutters File Marker Drill and drill bits QTY DESCRIPTION PART # 1 Main Console Housing 1 Front floor mount U bracket CM Rear mount spacer plate CM Hardware Kit includes the following 1 4 Filler panel C-FP-4 2 1/4" Nylock nut GSM /4 serrated nut GSM /4 Flat washer GSM /4 Fender washer GSM /4 x 1/2 Carriage bolt GSM /4 x 5/8 Truss head bolt GSM34401
2 C-VS-1400-EQX-1 (Main Housing Assembly) Note: The console housing is 18 inches long. However the 4 inch section in the rear is not usable because of the OEM floor mount bracket. (See photos below) C-FP-4 Filler Panel CM Rear mount spacer plate (Not shown) Main Console Housing CM Front mount U bracket Front of Vehicle NOTE! Read all instructions before installing any Havis, Inc. products Use hardware provided with install kit.


3 View of O.E.M. console prior to removal. Remove Seats and Disconnect vehicle battery. Carefully unclip and remove rear console panel. Unplug all wire connectors. Remove armrest and save hardware to be reused later. Using side panel trim seam, use tape to create a temporary line across top of console. This will be the cut line. Carefully unclip and remove console forward side panels. Carefully unclip and remove console rear side panels. This photo shows material to be cut / removed. The bottom cut is just above trim panel clip mount hole. Do not cut away clip mount hole. Notice wiring inside console. There is not access to unplug all connectors at this time. Be careful not to cut wires when modifying OEM console


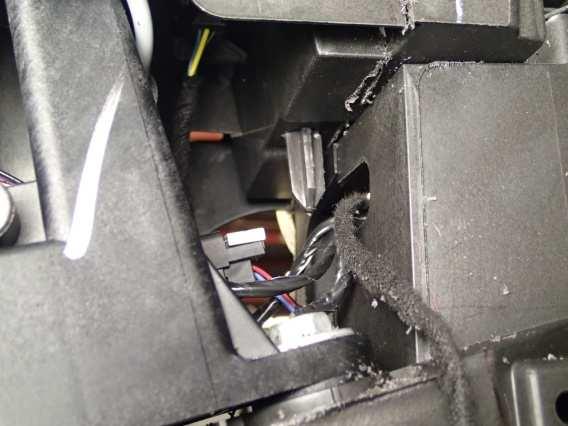
4 Driver side view of existing wires and area to be cut. Carefully cut top of OEM console. A combination of a hack saw and air saw may be needed. Carefully cut top of OEM console. A combination of a hack saw and air saw may be needed Carefully cut top of OEM console. A combination of a hack saw and air saw may be needed Cut down far enough to detach storage pocket top trip Detach storage pocket top trip Unplug and remove 120 volt socket and USB connector. Unplug storage pocket interior light. Cut down to this open area. Notice wiring inside console. There is not access to unplug all connectors at this time. Be careful not to cut wires when modifying OEM console


5 Mark and cut bottom line is just above trim panel clip mount hole. Do not cut away clip mount hole. Cut all the way through including storage pocket. Mark and cut rear line is forward of metal bracket. Upper trim panel clip hole can be cut away. Cut all the way through including storage pocket. Cut across above metal bracket. Carefully cut front of storage pocket from inside. Follow same cutting process on driver side. This view shows blade cutting all the way through. Remove console section that was cut. It may be necessary to break away plastic above wire harness. View of OEM console with cut off section removed. Cut as needed if more depth in center is needed for longer radios. Do not cut away lower trim panel mount holes. Clean up cut plastic edges. Remove small section that was above wire harness View of remaining OEM forward console


 Drill bracket mount holes")


6 spacer Attach the front CM bracket to new console end panel with 1/4 x 1/2 Carriage bolt flat washers and serrated nuts. Notched side of bracket goes on passenger side. Place console assembly onto OEM console housing. Front bracket will straddle OEM console as shown in the following photos. Attach rear of new console to the OEM rear bracket with the previously removed OEM armrest hardware. The upper set of holes requires the CM spacer. With side trim panels removed, locate front bracket between trim panel mount holes. (passenger side shown) With side trim panels removed, locate front bracket forward of trim panel mount hole. (driver side shown) Drill bracket mount holes in OEM plastic housing with 9/32 drill bit Attach front bracket to OEM plastic housing with 1/4 x 5/8 Truss head bolts, fender washers and nylon stop nuts. Temporarily remove console from front and rear brackets View of console housing removed.


 OEM 12 volt socket will be")
7 Measure and cut OEM rear side trim panels. Note: Cut should be just above side panel clips as shown. Attach rear side trim panels before the front side trim panels. Cut panel as needed if more depth in center is needed for longer radios. Do not cut away lower trim panel mount clips. Top Attach front trim panels. Install console housing back into position with previously removed hardware. Measure and cut OEM rear trim panel. (Approximately 6 to 7 inches from top) OEM 12 volt socket will be reused Plug in 12 volt socket and attach rear trim panel. Install Control heads
INSTALLATION INSTRUCTIONS C-VS-2000-DUR-1 20 VEHICLE SPECIFIC CONSOLE for 2018 Dodge Durango with Standard Shifter
 INSTALLATION INSTRUCTIONS C-VS-2000-DUR-1 20 VEHICLE SPECIFIC CONSOLE for 2018 Dodge Durango with Standard Shifter TOOLS REQUIRED: Phillips Screw Driver T-20 Torx bit Standard Socket set 9/64 Allen wrench
INSTALL INSTRUCTIONS C-VS-1500-DUR-1 15 VEHICLE SPECIFIC CONSOLE for Dodge Durango with OEM Center Shifter
 INSTALL INSTRUCTIONS C-VS-1500-DUR-1 15 VEHICLE SPECIFIC CONSOLE for 2011-2013 Dodge Durango with OEM Center Shifter TOOLS NEEDED: Phillips Screw Driver Standard Socket set Metric Socket set 90 Phillips
INSTALL INSTRUCTIONS C-VS-2000-TAH Chevy Tahoe (Special Service) Vehicle Specific Console 20 inches of Equipment mounting space
 Vehicle Specific Console 20 inches of Equipment mounting space") INSTALL INSTRUCTIONS C-VS-2000-TAH-1 2007-2014 Chevy Tahoe (Special Service) Vehicle Specific Console 20 inches of Equipment mounting space Tools Required: Phillips Screw Driver Standard Socket set T-20
INSTALL INSTRUCTIONS C-VS-2000-TAH-1 2007-2014 Chevy Tahoe (Special Service) Vehicle Specific Console 20 inches of Equipment mounting space Tools Required: Phillips Screw Driver Standard Socket set T-20
INSTALL INSTRUCTIONS C-VS-0812-TAH-1
 INSTALL INSTRUCTIONS C-VS-0812-TAH-1 2015-2018 Chevy Tahoe Police Pursuit Vehicle (PPV) Vehicle Specific Console with 20 inches of Equipment mounting space Tools Required: Phillips Screw Driver Standard
INSTALL INSTRUCTIONS C-VS-2000-TAH-2
 INSTALL INSTRUCTIONS C-VS-2000-TAH-2 2015-2019 Chevy Tahoe Police Pursuit Vehicle (PPV) Vehicle Specific Console (12.5 inches wide) 20 inches of Equipment mounting space Tools Required: Phillips Screw
Tools Required: Phillips Screw Driver Standard Socket set T-20 Torx Bit Metric Socket set Wire Cutters Wire Crimping tool
 INSTALL INSTRUCTIONS C-VS-1013-TAH-1 2015-2018 Chevy Tahoe Police Pursuit Vehicle (PPV) Vehicle Specific Console (9 inches wide) 23 inches of Equipment mounting space Tools Required: Phillips Screw Driver
Tools Required: Phillips Screw Driver Standard Socket set T-20 Torx Bit Metric Socket set Wire Cutters Wire Crimping tool
 INSTALL INSTRUCTIONS C-VS-1500-TAH-1 2015-2018 Chevy Tahoe Police Pursuit Vehicle (PPV) Vehicle Specific Console (9 inches wide) 15 inches of Equipment mounting space Note: 2 inches of mounting space is
TOOLS REQUIRED: Phillips Screw Driver Standard Socket set T-20 Torx Bit Metric Socket set Wire Cutters Wire Crimping tool
 INSTALL INSTRUCTIONS C-VS-1200-INUT 2013-2018 FORD INTERCEPTOR UTILITY Fits Standard Interior and Optional Interior Upgrade (Code 65U) Vehicle Specific Console 12 inches of Equipment mounting space TOOLS
MOUNT BRACKET PARTS and HARDWARE: Installation parts with * come loose in hardware kit bag. Other parts are preassembled
 INSTALL INSTRUCTIONS C-DMM-2006 Dash Monitor Mount 2017-2019 F-250, 350, 450 Pickup, F-450 and 550 Cab Chassis, 2015-2019 Ford F-150 and 2018-2019 Expedition Notes: 1. The C-DMM-2000 series Dash Monitor
K9-C23 INSTALLATION INSTRUCTIONS K9 Kit for CHEVY TAHOE PPV (9C1)
") K9-C23 INSTALLATION INSTRUCTIONS K9 Kit for 2015-2018 CHEVY TAHOE PPV (9C1) TOOLS Needed: Phillips Screw Driver Trim panel removal tool Caulk Gun Standard Socket set Wire Cutters /Crimpers Drill & Drill
K9-C23 INSTALLATION INSTRUCTIONS K9 Kit for 2015-2018 CHEVY TAHOE PPV (9C1) TOOLS Needed: Phillips Screw Driver Trim panel removal tool Caulk Gun Standard Socket set Wire Cutters /Crimpers Drill & Drill
KK-K9-F16-K INSTALLATION INSTRUCTIONS K9 Kit for FORD EXPLORER (Retail Model Vehicle with OEM Center Shifter Console)
") KK-K9-F16-K INSTALLATION INSTRUCTIONS K9 Kit for 2011-2016 FORD EXPLORER (Retail Model Vehicle with OEM Center Shifter Console) TOOLS Needed: Phillips Screw Driver Power Drill with Drill Bits Trim panel
KK-K9-F16-K INSTALLATION INSTRUCTIONS K9 Kit for 2011-2016 FORD EXPLORER (Retail Model Vehicle with OEM Center Shifter Console) TOOLS Needed: Phillips Screw Driver Power Drill with Drill Bits Trim panel
K9-F17 INSTALLATION INSTRUCTIONS K9 Kit for FORD INTERCEPTOR SEDAN
 K9-F17 INSTALLATION INSTRUCTIONS K9 Kit for 2013-2018 FORD INTERCEPTOR SEDAN TOOLS Needed: Phillips Screw Driver Trim panel removal tools Caulk Gun Standard Socket set Metric Socket set Wire Cutters /Crimpers
INSTALLATION INSTRUCTIONS C-DMM FORD INTERCEPTOR UTILITY SWING-OUT DASH MONITOR MOUNT
 INSTALLATION INSTRUCTIONS C-DMM-123 2013-2018 FORD INTERCEPTOR UTILITY SWING-OUT DASH MONITOR MOUNT The Dash Monitor Mount bracket system requires two or three main parts that are sold separately. See
INSTALLATION INSTRUCTIONS C DMM Nissan Frontier SWING OUT DASH MONITOR MOUNT
 INSTALLATION INSTRUCTIONS C DMM 134 2011 2018 Nissan Frontier SWING OUT DASH MONITOR MOUNT The Dash Monitor Mount bracket system may require two or three main parts that are Sold Separately. See web site
INSTALLATION INSTRUCTIONS FRONT PARTITION W/FILLER PANEL MOUNTING KIT
 INSTALLATION INSTRUCTIONS FRONT PARTITION W/FILLER PANEL MOUNTING KIT P FRONT 1 with MFK 4 for 2008 2019 CHEVROLET PASSENGER VANS W/DUAL SIDE SWING OUT DOORS P FRONT 2 with MFK 8 for 2008 2019 CHEVROLET
2 Rubber Bumper GSM MM nut GSM30201 K9-F18-PT_INST_4-16
 K9-F18-PT INSTALLATION INSTRUCTIONS K9 Kit for 2013-2019 FORD INTERCEPTOR UTILITY Vehicle Notes: 1. For K9 applications, it is recommended to order the Interceptor Utility with the OEM optional Aux Rear
Ford F-150 Billet Grilles Upper Replacement
 2015-16 Ford F-150 Billet Grilles Upper Replacement Upper Black Billet Part #1045-019U-15B Upper Polished Billet Part #1045-019U-15 TOOLS REQUIRED Automotive grade masking tape, plastic clip removal tool,
IMPORTANT: PLEASE KEEP THIS INSTRUCTION MANUAL FOR FUTURE REFERENCE! TOOLS REQUIRED
 IMPORTANT: PLEASE KEEP THIS INSTRUCTION MANUAL FOR FUTURE REFERENCE! 2014-15 Toyota Tundra Mesh Grille Upper Insert - Fits ALL model Tundras with chrome or painted factory grille surround Black Mesh Part
JEEP JK WRANGLER UNLIMITED 4-DOOR Pro-Series Front Replacement Fenders
 PSFF001 2007-2016 JEEP JK WRANGLER UNLIMITED 4-DOOR Pro-Series Front Replacement Fenders HARDWARE INCLUDED 4 6mm x 25mm Hex Bolts 16 10mm x 20mm Button Head Bolts 8 6mm x 12mm x 1.6mm Flat Washers 16 10mm
Wildcat System Instructions
 Wildcat System Instructions NOTE: Most steps contained in these instructions will need to be repeated on the other side of the vehicle. Prior to assembly of windshield it is necessary to establish what
Thank you for your purchase! Please read all instructions carefully prior to beginning installation of your Rock Hard 4x4 product.
 ROCK HARD 4X4 JEEP WRANGLER JK 2/4-DOOR 2007-2017 FRONT BUMPER (ALL) PART #: RH-5001-B / 5002 / 5003 / 5004 / 5005 / 5006 / 5007 / 5008 / 5009 / 5041 / 5042 / 5045 / 5046 Installation Manual PACKING LIST:
INSTALLATION INSTRUCTIONS JEEP 2011-UP JK SECURITY FULL CONSOLE #274
 INSTALLATION INSTRUCTIONS JEEP 2011-UP JK SECURITY FULL CONSOLE #274 PARTS CHECKLIST Tuffy Console #9 Left Front Mounting Bracket #10 Right Front Mounting Bracket #11 Electronics mounting bracket #12 Divider
Deuce/Ace Installation Instructions
 HARDWARE KIT: Upper Mounting Plate: 2-7/16" (11mm) X 3.5" bolts 2-7/16" flange nuts 2-2" spacers 2-7/16" trim cap mounting washers 2 - plastic trim caps TOOLS NEEDED: safety glasses wrenches 16mm or 5/8"
INSTALLATION INSTRUCTIONS
 INSTALLATION INSTRUCTIONS Accessory P/N 08U89-TK6-111 Application 2012 FIT Publications No. AII 45981 Issue Date AUG 2011 PARTS LIST Armrest console Armrest cover Bolt cover Floor bracket Washer bolt,
WARNING. BX Fiat 500 Abarth/Turbo 2014 Fiat 500c Abarth Installation Instructions
 Attachment Tab Height: 13 Attachment Tab Width: 22 Please read BOTH these and the General Instructions prior to installing or operating this equipment. 1. Blue Ox towing products and accessories are intended
* * Inside Ram. Tools Required 1500, 2500, 3500 IMPORTANT
 Revision 10/07/14 IMPORTANT Before starting, compare items on your invoice with items received. Carefully check through packaging material. If any item is missing, please call Crutchfield Technical Support
INSTALLATION INSTRUCTIONS
 INSTALLATION INSTRUCTIONS Accessory USB ADAPTER Application 2014 INSIGHT Publications No. AII 50655 Issue Date OCT 2013 PARTS LIST USB Adapter Attachment Kit P/N 08B28-TM8-100A 6 mm Flange nut Control
Chevy Equinox / GMC Terrain 2013-up (with color display) G
 G") INSTALLATION INSTRUCTIONS FOR PART 99-3308G Chevy Equinox / GMC Terrain 2013-up (with color display) 99-3308G KIT FEATURES ISO DIN radio provision with pocket ISO DDIN radio provision Painted gray to match
INSTALLATION INSTRUCTIONS FOR PART 99-3308G Chevy Equinox / GMC Terrain 2013-up (with color display) 99-3308G KIT FEATURES ISO DIN radio provision with pocket ISO DDIN radio provision Painted gray to match
FRONT MOUNT INTERCOOLER GOLF / JETTA IV 1.8T PART # & P INSTALATION INSTRUCTIONS
 FRONT MOUNT INTERCOOLER GOLF / JETTA IV 1.8T PART # 48.10.90 & 48.10.90P INSTALATION INSTRUCTIONS PART LIST: 1 INTERCOOLER CORE 1 U-BENT TUBE 1 L-SHAPED TUBE 1 INTERCOOLER INLET TUBE 4 M6 NYLOC NUT 3 M6
Factory Five Racing, Inc. 818 Kit Assembly manual revision 1i update
 Factory Five Racing, Inc. 818 Kit Assembly manual revision 1i update Pedal box...1 Cable Accelerator Pedal (2002-2005)...2 OEM seats...7 Windshield... 13 Center console... 19 Pedal box Attach the pedal
Installation Instructions
 Equipment Required: Installation Instructions Fastener Kit: F Wrenches: 8mm, 13mm, 3/4, 15/16 Drill Bits: 1/4 Other Tools: Drill, Reciprocating Saw, File WARNING: Under no circumstances do we recommend
Installation Instructions
 Equipment Required: Fastener Kit: F Wrenches: ¾, 7/8, 15/16 Drill Bits: 1/8, 9/16, 5/8 1-1/8 HOLE SAW Other Tools: Center Punch, Measuring Tape Installation Instructions 5 WARNING: Under no circumstances
GMC Mesh Grille
 921701560 GMC 2016-18 1500 Mesh Grille Thank you for choosing Rough Country for all your lighting needs. Please read instructions before beginning installation. Check the kit hardware against the kit contents
VELAR HITCH INSTALLATION INSTRUCTIONS TOW RANGE ROVER MODEL/ TRIM YEARS: WEIGHT CAPACITY to Present PARTS & SUPPLIES: TOOLS REQUIRES:
 HITCH INSTALLATION INSTRUCTIONS MAKE: RANGE ROVER YEARS: 2018 to Present MODEL/ TRIM VELAR PACKAGE: TOW WEIGHT CAPACITY TRAILER TONGUE 5300 LBS. 300 LBS. INSTALLATION TIME: 2 HOURS NO YES YES PARTS & SUPPLIES:
Acura TSX 2009-up CH
 INSTALLATION INSTRUCTIONS FOR PART KIT FEATURES ISO Double DIN radio provision Painted charcoal gray APPLICATIONS Acura TSX 2009-up Table of Contents Acura TSX 2009-up...2-5 Kit Assembly ISO Double DIN
Holden Commodore. (2011 Production Onwards) ALLOY NUDGE BAR INSTALLATION INSTRUCTION
 ALLOY NUDGE BAR INSTALLATION INSTRUCTION") Holden Commodore (20 Production Onwards) ALLOY NUDGE BAR INSTALLATION INSTRUCTION Accessory Part No. NBAR0026 Installation Time: 90min Approx Nudge Bar Weight: KG! Important: Please read each step of these
Holden Commodore (20 Production Onwards) ALLOY NUDGE BAR INSTALLATION INSTRUCTION Accessory Part No. NBAR0026 Installation Time: 90min Approx Nudge Bar Weight: KG! Important: Please read each step of these
Owner smanual. Banks Ram-Air Super-Scoop Chevy/GMC Pickups. with Installation Instructions
 Owner smanual with Installation Instructions Banks Ram-Air Super-Scoop 2007-2013 Chevy/GMC Pickups THIS MANUAL IS FOR USE WITH SYSTEM 42235, 42236 & 42237 Gale Banks Engineering 546 Duggan Avenue Azusa,
SCION XB SUBWOOFER ENCLOSURE Preparation
 Preparation Part Number: Kit Contents Item # Quantity Reqd. Description 1 1 Subwoofer enclosure 2 1 Wire Harness 3 1 Paper Template 4 1 Plastic Drill Template 5 1 Hardware Bag Hardware Bag Contents 1 Item
Installation Instructions
 Installation Instructions DODGE RAM (1/2 TON AND 3/4 TON) 2002 2008 1500 PICK UP TRUCK 2003 2012 2500 PICK UP TRUCK (Except Megacab) Part Numbers: 50040 Parts List Qty A 1 B 1 C 2 D 2 E 2 F 2 Description
SUBARU/VOLVO VOLKSWAGEN INSTALLATION INSTRUCTIONS (pgs. 1-6) (pgs. 7-10)
 (pgs. 7-10)") 3b 4 5 C A B D Fig. C Fig. D 00 SERIES (LOWER DASH), 00 SERIES: For -Shaft head units, slide the aftermarket head unit into the Radio Housing and secure with shaft nuts. (see ). For DIN head units, cut
3b 4 5 C A B D Fig. C Fig. D 00 SERIES (LOWER DASH), 00 SERIES: For -Shaft head units, slide the aftermarket head unit into the Radio Housing and secure with shaft nuts. (see ). For DIN head units, cut
APPROXIMATE ASSEMBLY TIME (R&R): 45 minutes -1-
: 45 minutes -1-") PLOW ANGLE CONTROL KIT P/N 2879224 Application For use with the Glacier Pro Plow System P/N 2879103 on the below listed models MY09 and newer full size Ranger 500, 700 & 800 models MY13 and newer Ranger
PLOW ANGLE CONTROL KIT P/N 2879224 Application For use with the Glacier Pro Plow System P/N 2879103 on the below listed models MY09 and newer full size Ranger 500, 700 & 800 models MY13 and newer Ranger
Rear bumper cannot be used for towing after installation of the rear bumper relocation brackets.
 921RC7030 GM 88-98 4WD 1500 P/U 3 Body Lift Thank you for choosing Rough Country for all your suspension needs. *RC703BAG2* RC703BAG2 Rough Country recommends a certified technician install this kit. Attempts
QTY 3D PART NO. FORD SERVICE PN DESCRIPTION VAA6Z A FIESTA 5 DOOR (4) PC. KIT
 PC. KIT") Rev. 08-4 - 2010 QTY 3D PART NO. FORD SERVICE PN DESCRIPTION 1 691620 VAA6Z-5820049-A 2011- FIESTA 5 DOOR (4) PC. KIT HARDWARE SUPPLIED 12 #8 X ¾ SELF DRILLING SCREWS 220 / 18.5 3M VHB DOUBLE FACE TAPE
Rev. 08-4 - 2010 QTY 3D PART NO. FORD SERVICE PN DESCRIPTION 1 691620 VAA6Z-5820049-A 2011- FIESTA 5 DOOR (4) PC. KIT HARDWARE SUPPLIED 12 #8 X ¾ SELF DRILLING SCREWS 220 / 18.5 3M VHB DOUBLE FACE TAPE
Conflicts None. TOYOTA TUNDRA 2017 Black Laser Cut Grille. Part Number: Accessory Code: BG3000. General Applicability
 TOYOTA TUNDRA 2017 Black Laser Cut Grille Part Number: 00016-34173 Accessory Code: BG3000 Conflicts None Kit Contents Item # Quantity Reqd. Description 1 1 Laser Cut Grille 2 1 Complete hardware kit General
M GT 2005 up Mustang ENGINE START Push-Button INSTRUCTION SHEET
 Please contact the Ford Racing Techline for the most current instruction information @ (800) FORD-788!!! PLEASE READ THE FOLLOWING INSTRUCTIONS CAREFULLY PRIOR TO INSTALLATION!!! OVERVIEW: The following
P/N Rev 01 04/14-1- NOTE: If you are ordering hinges for your rear doors, order and/or
 REAR CANVAS DOOR KIT 900 XP RANGER CREW P/N 2879899 Application RANGER 900 XP CREW Before you begin, read these instructions twice and check to be sure all parts and tools are accounted for. Please retain
Amp & Speaker Upgrade Install Instructions for Victory Cross Country
 Amp & Speaker Upgrade Install Instructions for Victory Cross Country Tools Needed: 13mm Socket 4mm Ball Head Allen Socket 5mm Allen Wrench 10mm Wrench Wire Cutters Wire Strippers Phillips Screwdriver Pocket
Amp & Speaker Upgrade Install Instructions for Road Glide
 Amp & Speaker Upgrade Install Instructions for Road Glide Tools Needed: 1/2 inch Socket Wire Cutters 7/16 inch Socket Wire Strippers 10 mm Socket Phillips Screwdriver 1/2 inch Ratchet Wrench T25 Torx driver
DODGE Ram 2500/3500 Mesh Grille
 921701510 DODGE 2013-18 Ram 2500/3500 Mesh Grille Thank you for choosing Rough Country for all your lighting needs. Please read instructions before beginning installation. Check the kit hardware against
PRE-INSTALLATION. INSTALLATION INSTRUCTIONS Front Dodge Ram WD 6" Suspension Lift Kit
 2012-2015 Dodge Ram 1500 4WD 6" Suspension Lift Kit PRE-INSTALLATION 35015 2 - Knuckle (Driv/Pass) 2 - Crossmember (Front/Rear) 2 - Differential Bracket (Driv/Pass) 1 - Diff. Brace Bracket (Pass) 2 - Front
INSTALLATION GUIDE P1000 PRO-CELL CURRENT FORD POLICE UTILITY INTERCEPTOR. pro-gard.com STRONG RELIABLE SECURE
 INSTALLATION GUIDE P1000 PRO-CELL 2013 - CURRENT FORD POLICE UTILITY INTERCEPTOR STRONG RELIABLE SECURE THESE COMPONENTS ARE REQUIRED TO INSTALL THE PRO-GARD PARTITION SYSTEM WB4711-01D WB4711-01P 4K47UINTPRO
INSTALLATION INSTRUCTIONS
 INSTALLATION INSTRUCTIONS Accessory P/N 08E10-TA0-110A Application 2012 ACCORD 2- AND 4-DOOR Publications No. AII 46501 Issue Date AUG 2011 PARTS LIST Ambient Light Kit Fuse label 2 Ambient lights Washer
INSTALLATION MANUAL
 INSTALLATION MANUAL 2563000 Parts List 1 Carrier weldment 2 Support arm assembly 1 Third brake light assembly 1 Light extension bracket 1 Spare tire adjustment plate 1 Spare tire mount plate 1 Female spade
3500 WINCH KIT P/N APPLICATION BEFORE YOU BEGIN KIT CONTENTS. P/N Rev 01 06/15 Page 1 of 11
 3500 WINCH KIT P/N 2881671 APPLICATION RZR XP 1000 ALL MODEL YEARS, 900 MY15 AND NEWER BEFORE YOU BEGIN Before you begin, read these instructions twice and check to be sure all parts and tools are accounted
13171 INSTALLATION INSTRUCTIONS
 7 INSTALLATION INSTRUCTIONS Safety glasses should be worn at all times while installing this product. YEARS: 0-PRESENT MAKE: JEEP MODEL: CHEROKEE STYLE: ALL (INCLUDES TRAILHAWK) WARNING: NEVER EXCEED YOUR
INSTALLATION INSTRUCTIONS DRAWERS #240
 INSTALLATION INSTRUCTIONS DRAWERS #240 Please read and fill out the enclosed warranty registration card to activate your warranty. SHIPMENT CONTENTS #1 Lid #2 Rear #3 Left side panel #4 Right side panel
INSTALLATION INSTRUCTIONS
 INSTALLATION INSTRUCTIONS Accessory S P/N 08E10-TK6-100 Application 2013 FIT Publications No. AII 13198 Issue Date JULY 2012 PARTS LIST Ambient light kit 2 Ambient lights 6 Wire ties Fuse label 2 Grommets
 INSTALLATION INSTRUCTIONS Accessory ACCESSORY HANDSFREELINK (WITH MOON) Application 2009 PILOT Publications No. AII 39492 Issue Date MAY 2008 PARTS LIST HFL Attachment Kit 2 Washer screws, 4 x 12 mm HFL
11403 INSTALLATION INSTRUCTIONS
 0 INSTALLATION INSTRUCTIONS Safety glasses should be worn at all times while installing this product. YEARS: 0 MAKE: CHRYSLER MODEL: 00 STYLE: SEDAN WARNING: NEVER EXCEED YOUR VEHICLE MANUFACTURER'S RECOMMENDED
Installation Instructions
 Equipment Required: Fastener Kit: F Wrenches: 3/4, 15/16 Drill Bits: 1/4 Other Tools: Drill Installation Instructions Short & Long Bed All Megacabs 9464/9474 HIDE-A-GOOSE HITCH INSTALLATION WARNING: Under
POLY TIP-DOWN WINDSHIELD KIT
 POLY TIP-DOWN WINDSHIELD KIT P/N 2883261 APPLICATION Verify accessory fitment at Polaris.com. BEFORE YOU BEGIN Read these instructions and check to be sure all parts and tools are accounted for. Please
Chevrolet Cobalt Short Shifter Installation Manual
 Chevrolet Cobalt Short Shifter Installation Manual Pull shift boot down on the shifter shaft. Pull up on the shift knob to remove it. It requires some force. Remove the ebrake console, shifter console
XX, TOYOTA, TACOMA FRONT BUMPER INSTALLATION INSTRUCTIONS THIS BUMPER SHOULD ONLY BE INSTALLED BY A PROFESSIONAL. SAFETY
 FRONT BUMPER INSTALLATION INSTRUCTIONS THIS BUMPER SHOULD ONLY BE INSTALLED BY A PROFESSIONAL. SAFETY Know safety, no injury. Know injury, no safety. ~Author Unknown If there are any questions, call 1-855-HHTOUGH
Cargo Socket Kit. Securely connect connectors and terminals. Failure to do so can result in poor connections.
 00 Cargo Socket Kit Fitting Model OUTBACK October 2014 and later Installation Instructions PART No. H6710AL100 J: To those installing this product Important 1. We recommend that you ask the SUBARU dealer
Here I Will Explain How To Install Recon Cab Lights In A 3rd Gen Dodge Ram.
 1 P age Here I Will Explain How To Install Recon Cab Lights In A 3rd Gen Dodge Ram. *Now, There Are Many Ways of Installing Them, Including Wiring Methods, Wiring Connectors, And Other Variables - In This
09-12 Dodge 4WD /4 Body Lift
 92RC80000 09-12 Dodge 4WD 1500 1 1/4 Body Lift Thank you for choosing Rough Country for all your suspension needs. Rough Country recommends a certified technician install this kit. Attempts to install
Push Start Ignition (05-10 All) Installation
 Installation") Tools Required: Phillips head screwdriver Flat head screwdriver Ratchet 7mm Socket Torx T20 bit Wire strippers/cutters Hand file Needle nose pliers Installation Instructions: Push Start Ignition (05-10
Tools Required: Phillips head screwdriver Flat head screwdriver Ratchet 7mm Socket Torx T20 bit Wire strippers/cutters Hand file Needle nose pliers Installation Instructions: Push Start Ignition (05-10
OIL COOLER KIT INSTALLATION INSTRUCTIONS PART NUMBER D
 OIL COOLER KIT INSTALLATION INSTRUCTIONS PART NUMBER D570-0907 APPLICATION: 2011-12 E90 335i/xi (N55 engine) with BMW M-Technic bumper and without stock oil cooler Congratulations for being selective enough
NOTICE TO DEALER AND VEHICLE OWNER
 921332300 *1332BAG1* 1332BAG1 2012-18 DODGE 1500 6 LIFT KIT Thank you for choosing Rough Country for all your suspension needs. Rough Country recommends a certified technician install this system. In addition
Important: Please read these instructions carefully and completely before starting the installation. TITAN Fuel Tanks INSTALLATION GUIDE
 TITAN pt. no.: 03 0000 0128 Important: Please read these instructions carefully and completely before starting the installation. TITAN Fuel Tanks INSTALLATION GUIDE 30 Gallon* Spare Tire Auxiliary Fuel
INSTALLATION INSTRUCTIONS
 INSTALLATION INSTRUCTIONS Accessory P/N 08E10-TA0-100 Application 2008 ACCORD 2-AND 4-DOOR Publications No. AII 35358 Issue Date AUG 2007 PARTS LIST Ambient Light Kit 2 Ambient lights Fuse label Washer
INSTALLATION & OWNER S MANUAL
 INSTALLATION & OWNER S MANUAL CAB INSTALLATION INSTRUCTIONS KUBOTA GRAND L 30 SERIES HARD SIDED CAB ENCLOSURE (p/n 1KU3AS) SOFT SIDED CAB ENCLOSURE (p/n 1KU3SS) This Curtis Cab is designed and manufactured
BLACKBIRD INSTALLATION SUPPLEMENT
 BLACKBIRD INSTALLATION SUPPLEMENT FOR 2003-7 FORD 6.0 LITER DIESEL F-SERIES DUAL ALTERNATOR VERSION 10/07 Blackbird Installation Supplement for Ford 6.0. Liter Dual Alternator Parts included in the 6.0
*70200BAG1* 70200BAG FORD F150 GRILLE LIGHT MOUNT
 927020000 *70200BAG1* 70200BAG1 2015-2018 FORD F150 GRILLE LIGHT MOUNT PRIOR TO INSTALLATION Make sure the kit is complete and you have read these instructions thoroughly before beginning installation.
700 Pine Ridge Road Golden CO Tel (303) (888) 4X4 SLEE Fax (303)
 (888) 4X4 SLEE Fax (303)") 700 Pine Ridge Road Golden CO 80403 Tel (303) 278 8287 1(888) 4X4 SLEE Fax (303) 278 7182 Slee Off-Road 1998-07 Land Cruiser / LX470 (* Requires AHC Removal) - Second Instructions Qty Parts Included Suggested
700 Pine Ridge Road Golden CO 80403 Tel (303) 278 8287 1(888) 4X4 SLEE Fax (303) 278 7182 Slee Off-Road 1998-07 Land Cruiser / LX470 (* Requires AHC Removal) - Second Instructions Qty Parts Included Suggested
INSTALLATION INSTRUCTIONS
 INSTALLATION INSTRUCTIONS Accessory Application Publications No. AII 38137-38714 Accessory HandsFreeLink 2008 ODYSSEY Issue Date JAN 2008 PARTS LIST Attachment Kit P/N 08E02-SHJ-100B trim Fuse label Fuse
GMC Yukon
 Torch Series LED Grille TOOLS REQUIRED: Flat Head Screwdriver Long Flat Head Screwdriver Phillips Screwdriver 7mm Socket 10mm Socket Ratchet & Extensions 3/16 Drill Bit Power Drill Cutting Wheel or Saw
INSTALLATION INSTRUCTIONS
 INSTALLATION INSTRUCTIONS Accessory Application 2015 CR-Z Publications No. VERSION 1 Issue Date SEP 2014 PARTS LIST Armrest console Armrest bracket 2 Collars 4 Washer-bolts 2 Caps TOOLS AND SUPPLIES REQUIRED
LGT-312L E-Z-Go TXT Light Bar Bumper Kit Installation Instructions
 LGT-312L E-Z-Go TXT 2014+ Light Bar Bumper Kit Installation Instructions Caution: Please read through the instructions carefully. Before starting this project, remove the system s positive and negative
Lexus NX Fine Mesh and Dynamic Radar Cruise Control Fine Mesh Grilles
 IMPORTANT: PLEASE KEEP THIS INSTRUCTION MANUAL FOR FUTURE REFERENCE! 2015-16 Lexus NX Fine Mesh and Dynamic Radar Cruise Control Fine Mesh Grilles Upper Insert - factory chrome surround and emblem reused
Chevrolet Impala 2014-up* *Visit MetraOnline.com for up-to-date vehicle specific applications. KIT FEATURES
 99-3024B INSTALLATION INSTRUCTIONS KIT FEATURES ISO DIN radio provision with pocket ISO DDIN radio provision Painted matte black to match the factory finish KIT COMPONENTS A) Radio trim panel B) Radio
06-15 ECU, Battery and Washer Bottle Relocation
 06-15 ECU, Battery and Washer Bottle Relocation On the 2006-2015 MX-5, there is a very narrow middle section between the battery box and the air filter box to remove heat. For the most part, this design
2017 Current Ford SuperDuty Adaptive Cruise Control Relocation Bracket Installation Instructions
 2017 Current Ford SuperDuty Adaptive Cruise Control Relocation Bracket Installation Instructions PREPARATION 1. Disconnect the negative terminal on the battery. Park the vehicle on level ground and set
Rear bumper cannot be used for towing after installation of the rear bumper relocation brackets.
 921RC7020 *RC702BAG2* RC702BAG2 GM 07-13 4WD 1500 P/U 3 Body Lift Thank you for choosing Rough Country for all your suspension needs. Rough Country recommends a certified technician install this kit. Attempts
INSTALLATION INSTRUCTIONS
 INSTALLATION INSTRUCTIONS Accessory Application Publications No. AII 25876 2004 PILOT (LX only) Issue Date AUG 2003 The subwoofer cannot be installed on a vehicle equipped with a navigation unit. Subwoofer
Chevrolet Camaro 2010-up S-LC
 INSTALLATION INSTRUCTIONS FOR PART 99-10S-LC APPLICATIONS Chevrolet Camaro 2010-up 99-10S-LC KIT FEATURES DIN and DDIN head unit provision Painted silver to match factory dash AXXESS Interface included
WARNING. BX Fiat 500L Trekking/Easy/Pop/Lounge Installation Instructions
 2014-16 Fiat 500L Trekking/Easy/Pop/Lounge Attachment Tab Height: 15 Attachment Tab Width: 23 Please read BOTH these and the General Information sheet prior to installing or operating this equipment. 1.
Installation Instructions: (Part # SB614802) Dodge Ram 1500/2500/3500 M1 Rear Bumper Kit
 Dodge Ram 1500/2500/3500 M1 Rear Bumper Kit") NOTE: Carefully read entire instructions thoroughly before attempting to install this part. Parts Included Qty Rear M1 1 93-9344 Sensor Mounting Plate 4 93-9345 Sensor Hole Cover Plate 4 93-9347 Trailer
NOTE: Carefully read entire instructions thoroughly before attempting to install this part. Parts Included Qty Rear M1 1 93-9344 Sensor Mounting Plate 4 93-9345 Sensor Hole Cover Plate 4 93-9347 Trailer
INSTALLATION GUIDE P1000 PRO-CELL CURRENT FORD POLICE UTILITY INTERCEPTOR. pro-gard.com STRONG RELIABLE SECURE
 INSTALLATION GUIDE P1000 PRO-CELL 2013 - CURRENT FORD POLICE UTILITY INTERCEPTOR STRONG RELIABLE SECURE THESE COMPONENTS ARE REQUIRED TO INSTALL THE PRO-GARD PARTITION SYSTEM WB4711-01D WB4711-01P 4K47UINTPRO
(1) License Plate Light (2) License Plate Plugs
 License Plate Light (2) License Plate Plugs") PARTS LIST: 1 HD Replacement Bumper 4 12mm x 40mm Hex Bolts 1 Driver/Left Bracket 4 12mm Nylon Lock Nuts 1 Passenger/Right Bracket 8 12mm x 37mm x 3mm Oversize Flat Washers 2 Thin Side Spacers 4 Rubber
PARTS LIST: 1 HD Replacement Bumper 4 12mm x 40mm Hex Bolts 1 Driver/Left Bracket 4 12mm Nylon Lock Nuts 1 Passenger/Right Bracket 8 12mm x 37mm x 3mm Oversize Flat Washers 2 Thin Side Spacers 4 Rubber
INSTALLATION INSTRUCTIONS
 Accessory Application Publications No. INSTALLATION INSTRUCTIONS S (DX, HX, VP) 2005 CIVIC 2- AND 4- DOOR AII 27865-30866 Issue Date SEP 2005 NOTE: Fog Lights cannot be installed if the vehicle is equipped
COMBAR G/BAR CHEROKEE KJ SRS NFO
 Part Number: 3450170 F/KIT: 6173661 & 6173668 Product Description: Suited to vehicle/s: Optional Fitting Kit: WARNING REGARDING VEHICLES EQUIPPED WITH SRS AIRBAG; When installed in accordance with these
Lexus ES Fine Mesh and Adaptive Cruise Control Fine Mesh Grilles Upper and Lower Replacements
 IMPORTANT: PLEASE KEEP THIS INSTRUCTION MANUAL FOR FUTURE REFERENCE! 2013-15 Lexus ES Fine Mesh and Adaptive Cruise Control Fine Mesh Grilles Upper and Lower Replacements Part #1372-0102-13 / Black Ice
INSTALLATION INSTRUCTIONS
 INSTALLATION INSTRUCTIONS Accessory TRAILER HITCH Application 2011 ODYSSEY Publications No. AII 43937 Issue Date SEP 2010 PARTS LIST Trailer Hitch Kit P/N 08L92-TK8-100 Trailer Hitch Harness Kit P/N 08L91-TK8-100
INSTALLATION INSTRUCTIONS
 Rear Vision System Tailgate Handle Camera Mirror Display 2004-2014 Ford F-150 and 2008-2015 Ford Super Duty (Kit part numbers 9002-9521) Kit Contents: Mirror Tailgate Handle with camera and harness Interior
This harness kit includes: Civic harness (2003 to 2005) Installing the Hybrid ReVolt Universal grid charger in a First Gen Civic ( )
 Installing the Hybrid ReVolt Universal grid charger in a First Gen Civic ( )") Installing the Hybrid ReVolt Universal grid charger in a First Gen Civic (2003-2005) This harness kit includes: Civic harness (2003 to 2005) (a) 1 HV warning label (c) 1 charger connector cover (e) 4 #6
Installing the Hybrid ReVolt Universal grid charger in a First Gen Civic (2003-2005) This harness kit includes: Civic harness (2003 to 2005) (a) 1 HV warning label (c) 1 charger connector cover (e) 4 #6
Installation Instructions QUICKSILVER CONSOLE SHIFTER Fits: Chevelle / El Camino
 WORK SAFELY! For maximum safety, perform this installation on a clean, level surface and with the engine turned off. Place blocks or wedges in front of and behind both rear wheels to prevent movement in
2017 Current Ford Raptor Stealth Fighter Rear Bumper Installation Instructions
 2017 Current Ford Raptor Stealth Fighter Rear Bumper Installation Instructions PREPARATION 1. Disconnect the negative terminal on the battery. Park the vehicle on level ground and set the emergency brake.
ECS Tuning 3095 Cleveland-Massillon Rd. Norton, Ohio Phone Fax Web
 B7 A4 Gauge Pod Installation Instructions Safety first:. When working with your vehicles electrical system; always disconnect the battery! Avoid shorting any circuits, or probing around wires. Failure
Owner smanual. Banks Ram-Air Super-Scoop Chevy/GMC 6.6L Duramax Turbo-Diesel Pickups. with Installation Instructions
 with Installation Instructions Owner smanual Banks Ram-Air Super-Scoop 2003-07 Chevy/GMC 6.6L Duramax Turbo-Diesel Pickups THIS MANUAL IS FOR USE WITH KITS 42168 and 42169 Gale Banks Engineering 546 Duggan