Anatomy of a Build Series - 1
|
|
|
- Robert Foster
- 6 years ago
- Views:
Transcription

, Hauler - Steyr 2000A Pritsche (HLX 48224), Hauler - Steyr 1500 Detail Set (HLX 48214), Verlinden - 2cm Flak38A AA Gun (2232) and plenty of scratch-building with Evergreen")


.")
, or long frame shassis (Leadwarrior kit Lw35024).")


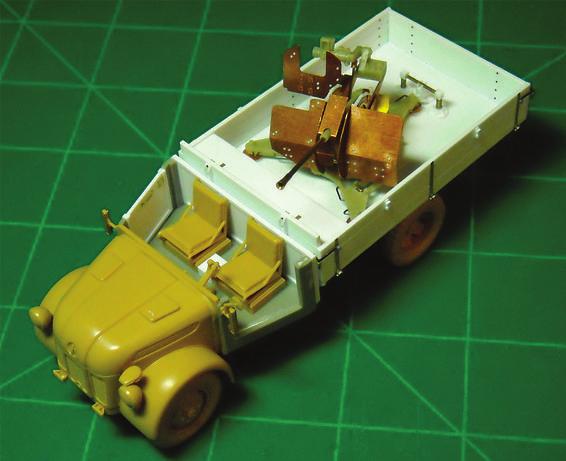
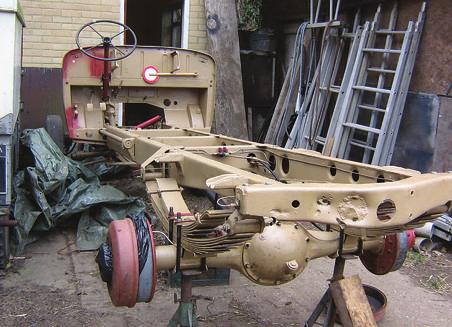
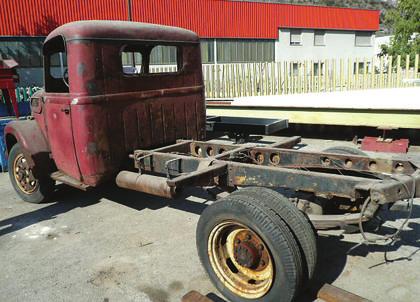
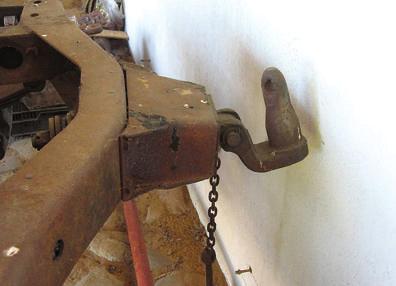
1 HISTORICAL MINIATURE Ebay: LEADWARRIOR Anatomy of a Build Series - 1 1/48 th Steyr Type 2000A 2cm Flak.38 AA Gun Carrier Conversion Back in late 2008, I decided to build a particular variant of a Steyr truck with a Flak38 on the back. Parts came from a variety of sources including: Tamiya - Steyr Type 1500A/01 (#32549), CMK - Steyr 1500 Cargo Truck (No. 8032), Hauler - Steyr 2000A Pritsche (HLX 48224), Hauler - Steyr 1500 Detail Set (HLX 48214), Verlinden - 2cm Flak38A AA Gun (2232) and plenty of scratch-building with Evergreen styrene. Additional information came from Wings and Wheels Publication Steyr 1500A in Detail. I wanted to closely follow LeadWarrior s 1/35 th scale LW Steyr Type 2000A 2cm. LEADWARRIOR Flak.38 AA Gun Carrier as STEYR Type 2000A shown in one of the photos. There is precedence for this CONVERSION KIT for TAMIYA Steyr Type 1500A ( kit #35225 ) And Dragon / Italeri / Tristar / Tamiya Flak.38 AA Gun particular type of mating. As you can see in the only two surviving pictures, the bed of the truck looks like the Hauler Austria s all wheel drive Steyr 1500A was one of the many personnel/transport vehicles which was variant, but the gun is designed to meet Whermacht requirement for standard army 1,5 ton truck. Presented in 1941, the Steyr was used as troop transport in all the war panzers theaters. A total of more than 20,000 were built, in a definitely a 3cm variant known wide range of variants Tamiya presents basic and command versions. The chassis of Steyr 1500A and it s reinforced variant Steyr vehicles and guns. 2000A were also used for Fire trucks, Omnibus as a MK 103 gun. Since this (Leadwarrior kit Lw35026), Ambulance (Leadwarrior kit Lw35025), universal Funk-Koffer, and different types of cargo carriers. The initial variant of cargo truck on Steyr 1500A variant exists, I am taking a chassis had opened driver s compartment combined with wooden trunk (Leadwarrior kit Lw35023). Later Steyr 2000A cargo trucks with full-metal cabin supply purposes. and reinforced rear springs were introduced, utilising leap of faith that the standard frame shassis (Leadwarrior kit Lw35027), or long frame shassis (Leadwarrior kit Lw35024). That later variant had standard wheels base, but additional frame section was added to support longer flatbed LeadWarrior, and thus my cargo platform. LW INFO@LEADWARRIOR.COM COPYRIGHT 2007 variant, may have existed. As my friend Bruce Culver says, Never underestimate a German Engineer with a blow torch and some metal! The first stage of this conversion was to scratchbuild the lower frame. The one supplied with the Tamiya kit is very minimal at best and being metal, is not very easily improved upon. This wouldn t matter so much with the kit made OOB, but since I am opening up the sides by putting a bed with a wooden box on the back, all the bottom features will be seen. Here begins my quest for the ultimate frame! 2cm. Flak.38 AA Gun Carrier 49 RESIN PARTS In second half of WWII, due to superiority of Allies in the air, Germany faced an urgent need in Self-Propelled Anti-Aircraft vehicles. Beside many official developments, utilizing and halftraks chassis (see Leadwarrior kits Lw35014, Lw35022), there was a wide range of troop improvisations made by infantry units using all sort of This kit presents the conversion of Steyr 2000A long-frame cargo truck chassis to carry 2cm. Flak.38 AA Gun. The complete gun including the field carriage was mounted. This way the gun could be used in the static position, while the vehicle could be used for (Later the official variant of this vehicle was introduced. It utilized the same Steyr 2000A chassis, but instead of 2cm. Flak.38 the 3cm. Flak.108/38 mounted on pedestal was used.) 1 To start with, measurements had to be made of the existing Tamiya frame, including all the relevant attachment points to the plastic body.


 save on weight (an all Proposed Total Length of Frame = 4.2663 inches.")


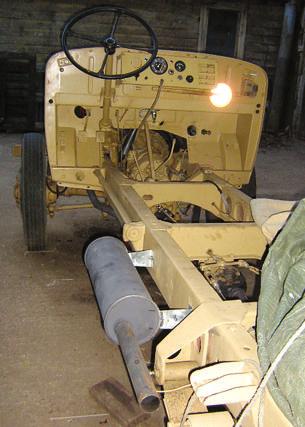
2 BENDS IN FRAME SIDES = Tamyia attachment points =.020 x.156 Styrene = Cross members =.040 x.156 Styrene = Lightening holes = New rear frame =.08 =.0359 = DRIVE TRAIN SLOT CENTER OF MIDDLE X-MEMBER From there, actual pictures and schematics were combed through to provide the necessary lightening hole arrangement for the hollow box frame. These holes were used on the real truck as a weight-saving measure, and, since these will be seen in this open frame model, they must be correctly portrayed. The accompanying illustrations show the measurements I made with all pertinent features CENTER OF SPRING It should be noted that I took some time to puzzle out how I would make the frame appear to be made out of a box-like set up. In reality, the frame sides were hollow to 1) save on weight (an all Proposed Total Length of Frame = inches. metal frame would be too heavy), and 2) to allow for the various plumbing of wires and tubing to be secured. Since I had no desire to actually build side boxes, I opted for a different approach. I built each side from two pieces of styrene. The first and inside part contained the lightening holes with a bit of reaming to simulate the openness of the hollow sides. The second and outer piece finished the side so the holes would only be seen from the inside. The reamed side was placed face in to the outer piece. Once both sections were created, they were joined together with the appropriate cross-members to create a solid frame to build upon The next step in the process was to finish the rear end by scratch-building the last two cross-members. According to plans, the outer member was just a copy of the inner one. Patience and a great deal of trialand-error were the keys to my success. At this point, I was a bit perplexed as to how to make the two sets of double springs needed for the rear suspension. I searched for similar arrangements in many kits so as to save myself from creating them, but in the end, I did just that out of styrene with a brass top plate. The brass was used to create the necessary bend in the larger bottom sections that the styrene strips would follow up on. This was important to me so that the proper look of sprung springs would be achieved. With that done, I then had to scratch the pockets that the lower springs would sit in, as well as the bumper stops for the upper springs. Each pocket was created from five separate pieces of styrene. The bumper stops were made from channel with a separate strip of styrene down the middle. 2


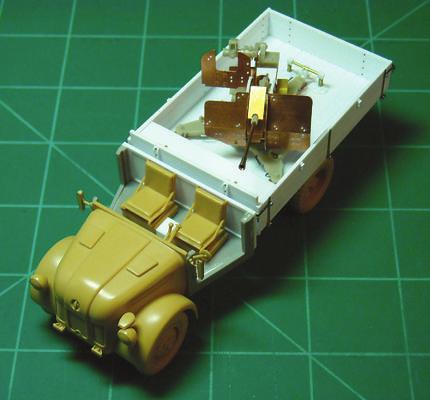
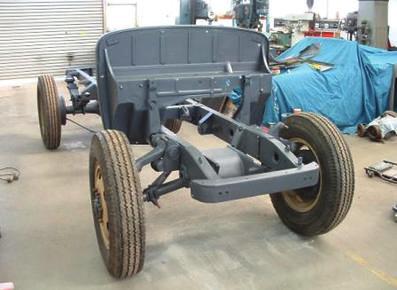
3 Other improvements made because of the openness of this variant included filling in sections of the differential housing and adding a large nut to the back of it to simulate the fluid drain hole. Test fitting was done all along the way so as to ensure that the Tamiya drive train would mate up to the scratch-built frame without any sloppiness. I was very happy with my results and you can see in the pictures that everything did indeed come together very nicely! Chalk one up for careful measurements. Now came the cab and interior portions. Please note that the tan pieces are from the base Tamiya kit, the gray ones are from the Hauler kit, and, unfortunately, the CMK kit could not be used except as a template because of some warpage that occurred. In the end, the CMK kit provided the necessary patterns for the bed and some of the photoetch used along the sides. The Hauler kit provided the necessary extra set of rear wheels, the cabin floor (to replace the Tamiya one differing configuration) and the side doors. These kit side doors closely follow the MK 103 Steyr set-up, but I wanted square doors as in the LeadWarrior kit so some extra modification needed to be done. The cabin was pieced together using dimensions taken from the Tamiya kit for proper placement of the seats and center console box. As you can see, I made my own plastic jig for this. The sides were cut down to create the square look for the doors and the doors themselves created from styrene with additional side bracing. It was around this point that the Hauler photoetch set for the Steyr came into play as the dashboard was swapped out for the brass version and the foot pedals were used as well. Just as a side note, I had used some wiring for the back of the gauges, but in the end, it would not be seen; c est la vie! The final piece was the back of the cab which I created in styrene as well. Once the cab area was addressed I mated it to the chassis with the addition of the two rear wheels from the Hauler kit. With this done, the side exhaust system was fixed in place by the addition of a couple of scratchbuilt attachment points. Also, the two brass side support rails (I believe 3


 that 14 Evergreen.04 x.125 (#142) boards with an Evergreen.")


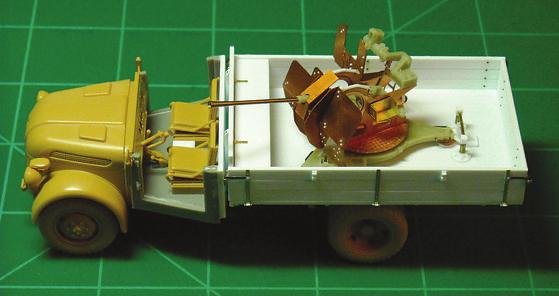
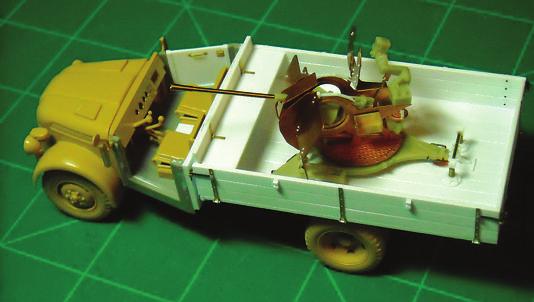
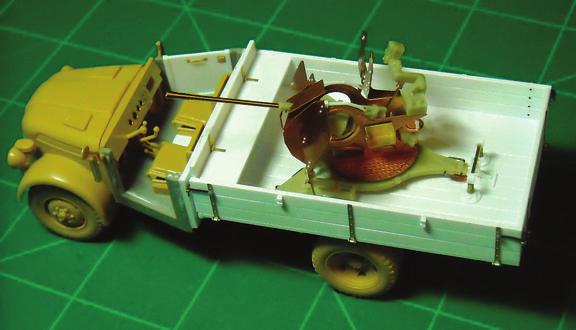
4 they were used for the up/down movement of the front suspension) were fixed in place towards the front end. I wasn t sure if I needed these, but a side view of the chassis and cab showed a lack of detail in this area would be seen by the casual viewer. My attention was now firmly fixed on the bed and the Verlinden Flak38 that would be going into it. As stated before, the CMK resin bed was slightly warped and unusable by me except as a template. It shows 13 boards across, but I decided with the current dimensions (1.670 wide x long) that 14 Evergreen.04 x.125 (#142) boards with an Evergreen.04 x.04 (#142) border would better suit my needs. Building on the floor, the sides and back were created from 3 planks each of the same.04 x.125 (#142). With the back bed completed, it needed to be mated to the chassis. The LeadWarrior instruction sheet gave me the proper template guides for the bed risers and cross stabilizing pieces, with two of the stabilizers being the shorter versions (to lock into the bed risers) and the other two the higher ones located closer to the cab portion. I also drew inspiration from the LeadWarrior instructions to create the bench seat in an upright position next to the cab portion. The side locking photoetch pieces along with some brass channel completed the final touches on the back bed/box. 4


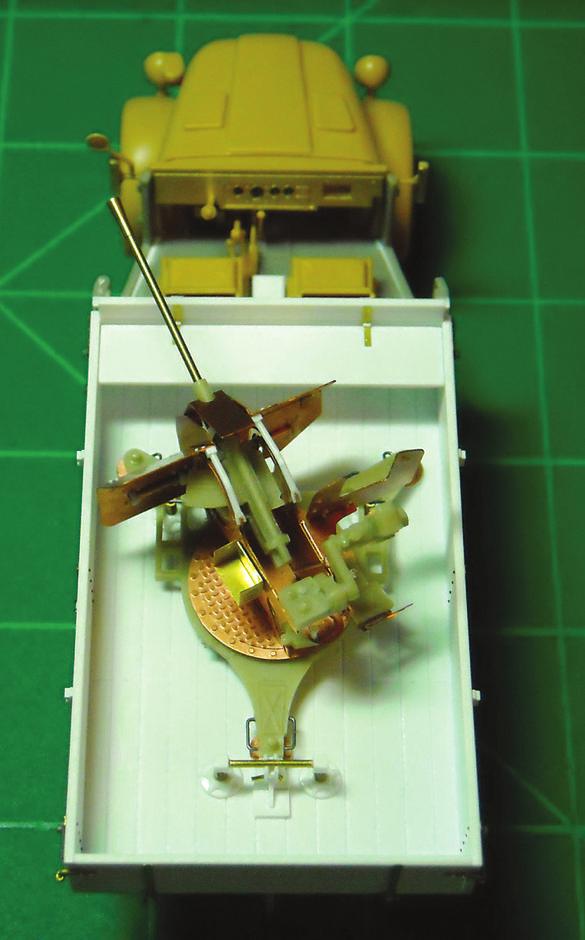
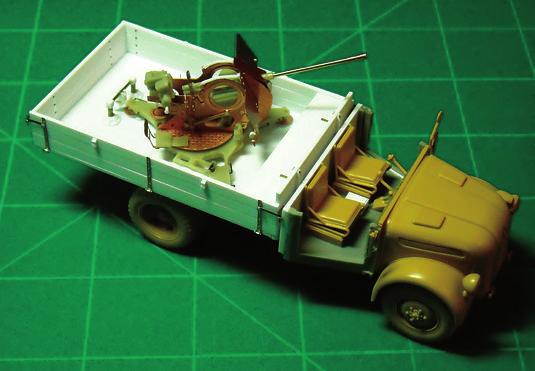
5 The Verlinden Flak38 was a bit of a disappointment for me. Being the only game in town at the time, I had no choice but to use it. I found the kit sorely lacking in details such as the rivets in the front shield, side grab handles, the top braces used to hold the shields, the spade at the back end, and thin diameter barrel. The seat may still need to be replaced as even in 1/48 th scale it is unbelievably small. Also, there are two internal rods on either side of the gun platform that are used to hold the whole thing on supports affixed to the bed. These need to be replaced with brass rod. I found a brass barrel for the gun, so the resin part was cut off. One other item I changed out was the side shelf used for spare magazines. I used a brass photoetch.50 caliber box as the basis for it instead of the resin version supplied. Apart from all that, the gun went together following the instructions. 5


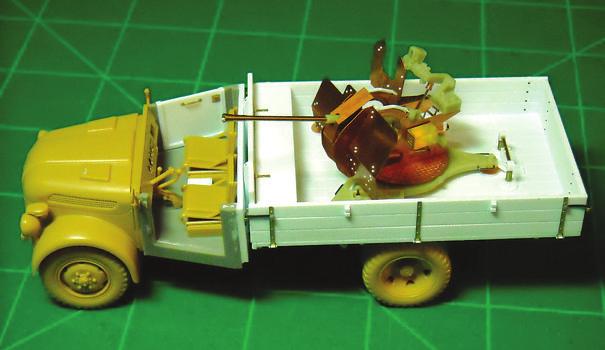
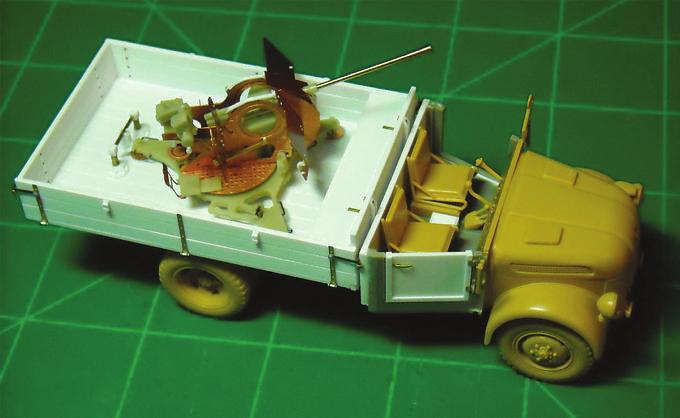
6 The supports that go in the bed for the Flak38 were comprised of three different parts 2 of styrene and one of brass rod. The template for the star-shaped ring is shown. This was glued to a round base and the edges were chamfered. The brass rod came as a delightful surprise to me. I was trying to figure out what was the best way to create the grooves that run around the shaft when by shear chance, it sorted itself out. My tube cutter started to apply a thread to the outside and when I noticed it, I had enough threaded to do the job! Four supports are needed; one on either side towards the cab, and two joined together for the back. The completion of the supports came after I filed a groove for the guns internal rods to sit in. Using the LeadWarrior instruction sheet as a template again, I created a spare 2cm barrel case. After all, I need something to go in the back for that lived in look! Finishing touches included adding the additional photoetch details (such as door handles), the seat backs, and spare wheel holder under the bed. I have, to date, finished about 95% of this build. Aside from priming and painting, I have the driver s side door to place and do not yet know if I will have it closed or open, with the driver out of the vehicle. Also, the spare wheel is not fixed in place yet and once painted will be set in and the second bracket added. I hope you enjoy the pictures! - Ken Kolenovsky 6
7 7
8 8
The 234/5 (?) Is this the missing link of German armored cars? Model by Tom Kondziolka Photos by Bill Tanguay & Tom Kondziolka
 Is this the missing link of German armored cars? Model by Tom Kondziolka Photos by Bill Tanguay & Tom Kondziolka") The 234/5 (?) Is this the missing link of German armored cars? Model by Tom Kondziolka Photos by Bill Tanguay & Tom Kondziolka THE HISTORY I have always been fascinated by unusual vehicles designed by
The 234/5 (?) Is this the missing link of German armored cars? Model by Tom Kondziolka Photos by Bill Tanguay & Tom Kondziolka THE HISTORY I have always been fascinated by unusual vehicles designed by
22 SCALED SPINE BOOSTER BUILDERS GUIDE THIS EPISODE:
 22 SCALED SPINE BOOSTER BUILDERS GUIDE THIS EPISODE: This is not a kit. It is intended as a guide to help those interested in creating their own build. SPACE:1999 is Carlton Media. No infringement is intended
Armor How-To KITBASHING DRAGON S T-34/85M
 Armor How-To KITBASHING DRAGON S T-34/85M 58 FineScale Modeler December 2002 1/35 Scale Story and photos by Peter Rasmussen A scratchbuilt turret turns a T-34 into a modern-era tank killer Combining ICM
Scratchbuilding PRR Class FL Flat Cars By David J. Vinci
 Scratchbuilding PRR Class FL Flat Cars By David J. Vinci If you have been following the scratchbuilding freight car series I have been doing, you probably have noticed that most of the time
Scratchbuilding an F25 Well Flat Car
 Scratchbuilding an F25 Well Flat Car By David J. Vinci (Flat Figure 1) Well flats are a pretty rare car type generally, but the Pennsy seems to have had the lion s share of variety. Most of these cars
Image 1. Wirbelwind based on Pz IV chassis.
 During the later years of World War II, the German air force had lost control of the air. This was particularly true on the western front. British and American planes roamed almost at will seeking ground
Installing the Wireless Charging upgrade kit in a 2018 XT5 (Platinum version)
") Installing the Wireless Charging upgrade kit in a 2018 XT5 (Platinum version) September 2, 2018 Tools needed: Wireless charger upgrade kit Plastic trim tools 7 mm nut driver Background: I purchased the
Installing the Wireless Charging upgrade kit in a 2018 XT5 (Platinum version) September 2, 2018 Tools needed: Wireless charger upgrade kit Plastic trim tools 7 mm nut driver Background: I purchased the
13 October, 2014 Page 1
 13 October, 2014 In my second and last Helicycle I want to make everything better than the first one. That includes not only a transmission chip detector, but one for the tail rotor as well. The transmission
StuH 42 L/28 Alkett ( )
") StuH 42 L/28 Alkett (05.1944) Over the last few years I had build some other tanks with Zimmerit but this was to be my first tank with a complete Zimmerit coating already moulded in place. Thank you Dragon
StuH 42 L/28 Alkett (05.1944) Over the last few years I had build some other tanks with Zimmerit but this was to be my first tank with a complete Zimmerit coating already moulded in place. Thank you Dragon
Tamiya s Fairey Swordfish
 Tamiya s Fairey Swordfish by Dick Smith When the British entered World War II, their main torpedo bomber was a slow, obsolete bi-plane that had made its maiden flight nearly ten years earlier. With its
RoR Step-by-Step Review * 1977 Jeep CJ-7 Renegade 1-24 Revell Kit Review
 RoR Step-by-Step Review 20130120* 1977 Jeep CJ-7 Renegade 1-24 Revell 85-2180 Kit Review Being a Jeep owner, you tend to get a little fanatical about them. I ve been an avid off-roader for about 15 years;
Water-Gauge, Water Level Test Valve and Boiler Blow Down Valve
 Water-Gauge, Water Level Test Valve and Boiler Blow Down Valve Troubles from the get go on the water gauge. While modeling the upper fitting for the water gauge I encountered a problem with the side hole
Mustang Radiator Conversion DIY. By GearHeadPeter. January 27, 2011
 1964-1966 Mustang Radiator Conversion DIY By GearHeadPeter January 27, 2011 We all know that the radiators in our cars are not the best, especially if you have done any customization to the engine, which
Cleveland Quickie Piper Cub
 Cleveland Quickie Piper Cub This plan package is not a 100% copy of the original kit. As you make your way through the instructions you will see the differences. Here s just a few of them: The one thing
283F & 327F Engines : Distributor Cap Modification Kit Development Project
 283F & 327F Engines : Distributor Cap Modification Kit Development Project By Dick Morland Chris Craft offered the "F" series engines (283 F & 327 F) in Commanders from 23' to 35'. There are a lot of these
4TH GEN SEATS IN A 3RD GEN TRUCK
 4TH GEN SEATS IN A 3RD GEN TRUCK by Flopster843 02 Oct 2016 If you drive a 3rd generation Dodge Ram truck, I am sure you have discovered that the OEM seats are not the greatest (Figure 1.) They are extremely
MGB V8 Roadster restoration project Report 138
 24th May 2017. FITTING THE CARPETS - continued I have included quite a lot of detail and photographs on the carpet and trim fitting, as it may help those who decide to do this job on their own car. The
PYRTE. Building The Front Axle, Fork and Steering
 PYRTE Building The Front Axle, Fork and Steering The front axle on this traction engine is a very simple affair, in that it is a rectangular steel rod, sat on edge, with a pivot in the centre, which is
Right On Replicas, LLC Step-by-Step Review * 1970 Plymouth HEMI Cuda 1:25 Scale Revell Model Kit # Review
 Right On Replicas, LLC Step-by-Step Review 20140923* 1970 Plymouth HEMI Cuda 1:25 Scale Revell Model Kit #85-4268 Review Review and Photos by Will Emerson In 1964 Plymouth developed the Barracuda from
RoR Review USS Buckley 1:249 scale Revell Review
 RoR Review 20100728 - USS Buckley 1:249 scale Revell 85-3013 Review Smaller than destroyers, the destroyer escorts (DE) were a World War Two ship type whose primary tasks were convoy, escort and anti-submarine
Scratchbuilding a Class Fk Flat Car
 Scratchbuilding a Class Fk Flat Car The Class Fk flat car is apparently the last all wood flat car design adopted by the Pennsylvania. The design dates to 1898 and it appears to be the last all wooden
Mustang CDC Lightbar (94-04) - Installation Instructions
 - Installation Instructions") Mustang CDC Lightbar (94-04) - Installation Instructions The below installation instructions work for the following products: Classic Design Concepts Mustang Convertible Lightbar (94-04 Carbon Fiber) Classic
Mustang CDC Lightbar (94-04) - Installation Instructions The below installation instructions work for the following products: Classic Design Concepts Mustang Convertible Lightbar (94-04 Carbon Fiber) Classic
Winter Project Dec-Jan Peter Kitching Rear Axle Rebuild: Rolls-Royce 25/ GRM23 Reg. AV8692
 Winter Project Dec-Jan 2009-2010 Peter Kitching Rear Axle Rebuild: Rolls-Royce 25/30 1936 - GRM23 Reg. AV8692 During the past two years I noticed that oil was running from the central wheel nut locking
MAIN ROTOR TRANSMISSION CHIP DETECTOR
 MAIN ROTOR TRANSMISSION CHIP DETECTOR 13 October, 2014 In my second and last Helicycle I want to make everything better than the first one. That includes not only a transmission chip detector, but one
Installing AMP-wiring in a New Beetle
 Installing AMP-wiring in a New Beetle Vehicle used: New Beetle 2.0i Type 9C (1999) Used set of cables: Dietz 35mm² power cable, double shielded Dietz chinch cable ( 35mm² Professional Line ) First of all:
My Hawk build Part 8 by Stuart Clarke
 My Hawk build Part 8 by Stuart Clarke Front hubs, brakes and brake lines. There was still no news on my rear springs so I thought I d find something else to get on with. I had the front hubs, brake calipers
Ag Leader Technology. Combine Installation New Holland TC 57, 59. Monitor Installation
 Monitor Installation Figure 1. Monitor installed on right side cab window using window mount bracket. 1. If you are in very humid conditions where moisture may condense on the glass where you are mounting
Some tips and tricks I learned from getting clutch out of vehicle Skoda Octavia year 2000
 Some tips and tricks I learned from getting clutch out of vehicle Skoda Octavia year 2000 Last change 2013-Oct-11 I bought Haynes manual for a starter. That s something well worth it s cost I believe.
Part One of Two - RoR Step-by-Step Review * K.S. Pittman Willys Drag Coupe Revell # :25 Scale Review Click Here to Buy This Kit
 Part One of Two - RoR Step-by-Step Review 20120607* K.S. Pittman Willys Drag Coupe Revell #85-4990 1:25 Scale Review Click Here to Buy This Kit 000 This review is of the reissued Revell 1941 Willys Drag
Disco 3 Clock Spring / Rotary Coupler replacement
 Disco 3 Clock Spring / Rotary Coupler replacement I recently had to change my Clock spring and thought some folks may find it helpful to see what it entailed. I did lots of reading around but couldn t
Fly Rocket Fly: Design Lab Report. The J Crispy and The Airbus A
 Fly Rocket Fly: Design Lab Report The J Crispy and The Airbus A380 800 Rockets: Test 1 Overall Question: How can you design a water, bottle rocket to make it fly a maximum distance. It needs to be made
Hasegawa F-86 Sabre in 1/48 Scale by Mike Hanlon
 Hasegawa F-86 Sabre in 1/48 Scale by Mike Hanlon Introduced in 1996, the Hasegawa F-86 was released in two versions, the F-86F-30 and 40. Priced at $40 when released, subsequent releases have ranged from
Rebuilding the Power Steering Pump for a 2007 Honda Accord 4CYL
 Rebuilding the Power Steering Pump for a 2007 Honda Accord 4CYL Disclaimer: I have benefited greatly from others who have taken the time to post auto repair videos/tutorials online. To try and return the
Scratchbuilding PRR Class Gd, Gn and Gg Wooden Hoppers By David J. Vinci
 Scratchbuilding PRR Class Gd, Gn and Gg Wooden Hoppers By David J. Vinci During the first 25 years of the 20 th century, the rolling stock mixture on the Pennsy was really interesting to
Tip: and Orient Express LED Light Upgrade Date: Correction
 Hi All, I have since inherited my friend Rudolf s 42755 Orient Express with the extra 42760 car set and wanted to complete the LED light upgrade as we had planned. Side view of the Restaurant car with
J&M Mustang Adjustable Panhard Rod (05-09) - Installation Instructions
 - Installation Instructions") J&M Mustang Adjustable Panhard Rod (05-09) - Installation Instructions The below installation instructions work for the following products: J&M Mustang Adjustable Panhard Rod (05-09) Please read through
J&M Mustang Adjustable Panhard Rod (05-09) - Installation Instructions The below installation instructions work for the following products: J&M Mustang Adjustable Panhard Rod (05-09) Please read through
Replacing MK4 Golf/Jetta radiator mounts in-car
 Replacing MK4 Golf/Jetta radiator mounts in-car This is a guide to replacing the radiator mounts in a MK4 Golf/Jetta. This involves moving the core support to the service position which allows you to do
Revell F-117 Stealth Fighter. 1/48 th Scale Kit # 5834
 Revell F-117 Stealth Fighter. 1/48 th Scale Kit # 5834 By Mark Murray I won t go into the history of this aircraft, as it s offered by many other sources, far better than I can expound upon. Suffice it
MGB V8 Roadster restoration project Report 128
 20th March 2017. Sorry to keep you in suspenders between report 127 and report 128, with regards to the indicator stalk switch. INDICATOR & HORN STALK SWITCH - continued After removing all the internal
How to Change Front Brake Pads on a Toyota Corolla
 How to Change Front Brake Pads on a Toyota Corolla Link to this article on (All other links in this document are disabled) Follow this picture guide to change the front brake pads on a 2003-2008 Toyota
Figure 1: Valve housing smooth vs. o-ring groove
 If you are driving an older Corvette, and by that I mean a C2 or C3, it will eventually get to a point where the Power Steering Control Valve (PSCV) will leak and require attention. In 2002, I had to repair
Aamir_bt The legend..
 Aamir_bt The legend.. How to do timing on a 4XE1-W (DOHC) engine. well i decided to to a write up for DOHC timing since there was only the SOHC written up, and i had to do a timing belt on my stylus anyways,
Guide to fitting a MK2.5 (Facelift) Centre Console into a MK2 Focus. The Parts
 Centre Console into a MK2 Focus. The Parts") Guide to fitting a MK2.5 (Facelift) Centre Console into a MK2 Focus For the latest project on my MK2 Focus I decided that a Facelift centre console would tie my previous interior uplift together. As I
Guide to fitting a MK2.5 (Facelift) Centre Console into a MK2 Focus For the latest project on my MK2 Focus I decided that a Facelift centre console would tie my previous interior uplift together. As I
Dexter Never-Adjust Brake Install
 Dexter Never-Adjust Brake Install Arctic Fox 2007 29-5T Warning: This involves lifting your trailer, working under and around it. If you do not have the correct equipment and knowledge for this, please
Connecting the rear fog light on the A4 Jetta, while keeping the 5 Light Mod
 Connecting the rear fog light on the A4 Jetta, while keeping the 5 Light Mod DISCLAIMER: I'm human and make mistakes. If you spot one in this how to, tell me and I'll fix it This was done on my 99.5 Jetta.
Oshkosh MATV 1. generation
 Oshkosh MATV 1. generation MATV stands for Mine Resistant Ambush Protected All Terrain Vehicle (MRAP- ATV) developed by Oshkosh Corporation and used by US Army and other armies in NATO. It is replacing
Application Note. Atlas RS-3 Tsunami Digital Sound Decoder Installation Notes
 Application Note Atlas RS-3 Tsunami Digital Sound Decoder Installation Notes Overview This application note describes how to install a TSU-AT1000 digital sound decoder into an HO Atlas RS-3. Skill Level
Conversion to Renault NG 5 speed gearbox with cable actuated gear change
 Europa Series 2 (1969) Conversion to Renault NG 5 speed gearbox with cable actuated gear change NB: this is theoretical it shifts very precisely without too much effort in the garage with no oil in the
Please use this How to in conjunction with the workshop manual pdf on the same subject.
 Please use this How to in conjunction with the workshop manual pdf on the same subject. The workshop manual is a decent guide but fails to mention a few things which would hinder progress and probably
Before you build that scale model a few things to consider
 Before you build that scale model a few things to consider Fred Cronenwett, clscale@rocketmail.com It is easy to say to want to build a scale model but there are a few steps that have to happen first before
Headlamp Adjusters motorised conversion by: Ant (Banjo1981)
") Headlamp Adjusters motorised conversion by: Ant (Banjo1981) What you will need: E30 adjuster switch assembly E30 Headlight adjusters E36 Adjuster motors (pref with the plugs still attached) Variable resistor
Headlamp Adjusters motorised conversion by: Ant (Banjo1981) What you will need: E30 adjuster switch assembly E30 Headlight adjusters E36 Adjuster motors (pref with the plugs still attached) Variable resistor
 Installing Seat Belts in my Tudor August 2009 My '29 Tudor was restored about 25 years ago by my brother-in-law. He restored it to close to original, but made a few changes that many will claim are for
RoR Step-by-Step Review * 1967 Dodge Coronet R/T Foose Design Revell Review
 RoR Step-by-Step Review 20130112* 1967 Dodge Coronet R/T Foose Design Revell 85-4906 Review Having been a long time fan of Chip Foose I could hardly wait to get this kit and with it being a MoPar with
RoR Step-by-Step Review * Ferrari 458 Italia 1:24 Scale Revell Kit # Review
 RoR Step-by-Step Review 20111016* Ferrari 458 Italia 1:24 Scale Revell Kit #85-4912 Review The Ferrari 458 Italia combines the power and performance of a Formula One race car with an ultramodern design
Shotgun Single Barrel HPFP install guide
 Shotgun Single Barrel HPFP install guide Thank you for your purchase of the VTT Shotgun Single Barrel HPFP upgrade! First thing to do when you open your box is to make sure all parts are in their respective
Ford Racing BOSS 302 Engine Oil Cooler (11-14 GT)
") Tools needed: 14mm hex socket 7mm socket/wrench 8mm socket/wrench Ford Racing BOSS 302 Engine Oil Cooler (11-14 GT) 10mm socket (for airbox removal) ¾ inch or 19mm wrench Torque wrench Appropriate ratchets
Tools needed: 14mm hex socket 7mm socket/wrench 8mm socket/wrench Ford Racing BOSS 302 Engine Oil Cooler (11-14 GT) 10mm socket (for airbox removal) ¾ inch or 19mm wrench Torque wrench Appropriate ratchets
07-08/2013. page 1 1/32. Heinkel He 219A Armament set for Revell kit
 S EW N 0-08/03 CMK, Mezilesí 8, 93 00, Praha 9, Czech Republic tel.: +40 8 93 909 fax: +40 8 93 90 e-mail: cmk@mpm.cz official website and e-shop: www. cmkkits.com 508 Heinkel He 9A Armament set for Revell
REAL SWORD TYPE 97 REVIEW (as of Oct 13, 2008) BY TITO E. PERALTA
 BY TITO E. PERALTA") REAL SWORD TYPE 97 REVIEW (as of Oct 13, 2008) BY TITO E. PERALTA tito1664@yahoo.com This is my personal review and impression of the gun. Please note that this is a work in progress so I will be updating
REAL SWORD TYPE 97 REVIEW (as of Oct 13, 2008) BY TITO E. PERALTA tito1664@yahoo.com This is my personal review and impression of the gun. Please note that this is a work in progress so I will be updating
Test of. Bell UH-1Y Venom. Produced by Area-51 Simulations
 Test of Bell UH-1Y Venom Produced by Area-51 Simulations The Bell UH-1Y Venom is a twin-engine, medium size utility helicopter featuring a four bladed rotor, upgraded avionic and a glass cockpit from its
The Merit 1:48 scale Late War 80 ft. Elco PT Boat -By- T. Garth Connelly
 The Merit 1:48 scale Late War 80 ft. Elco PT Boat -By- T. Garth Connelly Earlier this year, I heard that a company, Merit International, was going to be releasing two 1:48 scale kits of the eighty-foot
Physics Work with your neighbor. Ask me for help if you re stuck. Don t hesistate to compare notes with nearby groups.
 Physics 9 2016-04-13 Work with your neighbor. Ask me for help if you re stuck. Don t hesistate to compare notes with nearby groups. Today we ll build on what we did Monday with batteries and light bulbs.
PLEASE READ THROUGH THE WHOLE WRITE UP BEFORE ACTUALLY USING IT!!!!
 JDM power folding mirror switch install into stock USDM harness. By: Greg L., Zeke21 on twinturbo.net PLEASE READ THROUGH THE WHOLE WRITE UP BEFORE ACTUALLY USING IT!!!! This is how I was able to get the
Instructions: Pullman-Standard PS-3 Coal Hopper Kit Tangent Part Numbers: through /2015
 Instructions: Pullman-Standard PS-3 Coal Hopper Kit Tangent Part Numbers: 15000-01 through 15001-01 10/2015 Thank you for purchasing the Tangent Scale Models Pullman-Standard PS-3 Coal Hopper Kit! A few
Single Barrel Shotgun HPFP Install Guide
 Single Barrel Shotgun HPFP Install Guide Thank you for purchasing the VTT Single Barrel Shotgun HPFP upgrade kit! PLEASE READ THE ENTIRE GUIDE BEFORE BEGINNING INSTALLATION! The first thing you should
Scammell Scarab Demonstration Model by Bassett-Lowke
 Scammell Scarab Demonstration Model by Bassett-Lowke This is the story of the restoration of a 1:8 scale model Scammell Scarab and trailer that were built by the renowned model making company Bassett-Lowke.
The Holly Buddy. 2.5cc Model Diesel - Compression Ignition engine.
 The Holly Buddy 2.5cc Model Diesel - Compression Ignition engine. Firstly I want to dedicate this engine to David Owen. I didn t know David for very long, but his influence on me and my affection for these
 www.odometergears.com Mercedes-Benz Mechanical Odometer Repair This how to can be used for all mechanical repairs as the only difference will be the removal of the instrument cluster. http://www.dieselgiant.com/repairyourodometer.htm
Wine Glass Orchestra. Leah Buechley CSCI 7000 Things That Think
 Wine Glass Orchestra Leah Buechley CSCI 7000 Things That Think Abstract My wine glass orchestra project consists of three mechanical wine glass instruments coordinated with Crickets. The first automaton,
FAX
 INSTALLATION INSTRUCTIONS 6090 Air Suspension Kit (pat. pending) 1999-2006 Tahoe, Suburban, Avalanche, Yukon Thank you for purchasing a quality Hellwig Product. PLEASE READ THIS INSTRUCTION SHEET COMPLETELY
Improvements to Window Lifts on Rolls-Royce and Bentley Cars, 1972 to 1989
 C SCBZSOTO9HCH20037, 1987 Bentley Turbo R SBH13247, 1972 Bentley T-Series Improvements to Window Lifts on Rolls-Royce and Bentley Cars, 1972 to 1989 SY (Silver Shadow Series Cars) Chassis 13754 to SZ (Silver
Caley Coaches True Line kits in etched brass
 Caley Coaches True Line kits in etched brass 0141-772 37 Jim Smellie, 1 Tay Crescent, Bishopbriggs, Glasgow, G64 1EU. Jim Smellie Nov. 1992 10' Building Instructions for kit CC20 Caledonian Railway 1 Ton
Renault A442A Conversion By Evan Jones Table of Contents. Introduction:... 2 Frame/Bodywork:... 2.
 Renault A442A Conversion By Evan Jones www.eajonesgue.com/scalemodels Table of Contents Introduction:... 2 Frame/Bodywork:... 2 Page 1 of 10 Introduction: I wanted to do a collection theme in 2008 of a
These instructions show how to build the Remote Controlled Fart machine Sound Kit.
 Remote Controlled Fart Machine Assembly Instructions These instructions show how to build the Remote Controlled Fart machine Sound Kit. Tools Required Drill with 7/64, 3/16, and ¼ drill bits. Holt melt
Hasegawa 1/48 scale Messerschmitt bf-109e3 Condor Legion By Mike Hanlon
 Hasegawa 1/48 scale Messerschmitt bf-109e3 Condor Legion By Mike Hanlon Best remembered for its role in the Battle of Britain, the Me-109E series first saw action during the final year of the Spanish Civil
HASEGAWA: P-40E/K~1/48 th scale SuperScale Decals: Curtiss P-40K 64 th, 16 th & 25 th FS
 HASEGAWA: P-40E/K~1/48 th scale SuperScale Decals: Curtiss P-40K 64 th, 16 th & 25 th FS Norris Graser I built this model for the IPMS McKinstry September 2012 theme night for P-40 s. It s an easy enough
2 nd Generation Sport Trac LED 3 rd Brake Light Replacement Project By Kevin Collins
 2 nd Generation Sport Trac LED 3 rd Brake Light Replacement Project By Kevin Collins SCOPE: This project will assist you to replace the factory 3 rd Brake Light with Recon s LED 3 rd Brake Light: Part
Furness Railway Wagon Co. Glasgow & South Western Railway/LMS/BR 12ton Mineral Steel Under-Frame
 Furness Railway Wagon Co. Glasgow & South Western Railway/LMS/BR 12ton Mineral Steel Under-Frame Wheels, paint and transfers required to complete. Please note that to aid the folding of the various parts
Memories of a Power Brakes conversion on a 1971 Corvette
 Memories of a Power Brakes conversion on a 1971 Corvette I did the job all by myself, except for the brake bleeding. Looks like an easy job but its not, you definitely need some experience to avoid screw
AUSTIN HEALEY SPRITE MKI (FROG EYE) REBUILD CARRIED OUT DURING THE 1990s
 REBUILD CARRIED OUT DURING THE 1990s") AUSTIN HEALEY SPRITE MKI (FROG EYE) REBUILD CARRIED OUT DURING THE 1990s The car was owned by a friend who had it stored for a few years, when I first looked at it, the bonnet off and stored separate,
AUSTIN HEALEY SPRITE MKI (FROG EYE) REBUILD CARRIED OUT DURING THE 1990s The car was owned by a friend who had it stored for a few years, when I first looked at it, the bonnet off and stored separate,
Clinic Prepared for the NMRA MCR Convention Louisville, KY May 18-21, 2017 By Philip Gliebe
 A Kaleidoscope of Crummies, Hacks, Bobbers, and Cabooses I ve Built Clinic Prepared for the NMRA MCR Convention Louisville, KY May 18-21, 2017 By Philip Gliebe Introduction This clinic is dedicated to
Step #1 From your spool of 18 gauge primary wire, cut between 11 and 21 three inch strips of wire. You will only need 11 for the ROV, but it is good t
 How to make a ROV! Step #1 From your spool of 18 gauge primary wire, cut between 11 and 21 three inch strips of wire. You will only need 11 for the ROV, but it is good to have extras. Using the wire cutter,
Rear Speaker replacement.
 Rear Speaker replacement. First off you need the right rear speakers. The easy bit is 6x9 and better than a 15W paper cone, the difficult bit is getting a mounting depth under 74mm. Or to be more precise,
Hasse Mods for the Ampeg J20 Guitar Amp
 Hasse Mods for the Ampeg J20 Guitar Amp The following is adapted from a post I put up on The Gear Page, in the Amp Techincal forum. It shows the mods I did to my Ampeg J20. Okay, here s my mods for this
STEP #1: Remove the wheels from the truck. There are (6) 21mm lug nuts holding each wheel on... Remember Lefty Loosy, Righty Tighty.
 21mm lug nuts holding each wheel on... Remember Lefty Loosy, Righty Tighty.") - CustomTacos.com Page 1 of 36 How-To: Toytec Lift Install Read all of these install instructions prior to installing Toytec's suspension lift. I cannot be held responsible for any damages or personal
- CustomTacos.com Page 1 of 36 How-To: Toytec Lift Install Read all of these install instructions prior to installing Toytec's suspension lift. I cannot be held responsible for any damages or personal
'03 and up Dodge tube frame Chev HD (wide frame) 2011 (up) GM Trucks UP/Down Cylinder Boom
 2011 (up) GM Trucks UP/Down Cylinder Boom") Installation Manual 3 Series 5 Series Z Series Typical Installation Place truck on lift or suitable jack stands with rear wheels off the surface. Remove rear wheels, hitch & rear bumper. Remove spare tire
Installation Manual 3 Series 5 Series Z Series Typical Installation Place truck on lift or suitable jack stands with rear wheels off the surface. Remove rear wheels, hitch & rear bumper. Remove spare tire
Instructions to install the early ( ) Limited Slip Differential in the Late-model ( ) G28 Transaxle
 Limited Slip Differential in the Late-model ( ) G28 Transaxle") Instructions to install the early (1978-83) Limited Slip Differential in the Late-model (1985-1995) G28 Transaxle BACKGROUND: Most 928 owners know about the improvements to the 5- speed transaxle that
Instructions to install the early (1978-83) Limited Slip Differential in the Late-model (1985-1995) G28 Transaxle BACKGROUND: Most 928 owners know about the improvements to the 5- speed transaxle that
Fitting Radio Control to a Mamod Boulton
 Fitting Radio Control to a Mamod Boulton How To Fit Radio Control To A Mamod Boulton using FlySky Equipment I assume that you already have a Mamod Boulton and have fitted rechargeable AA batteries instead
How I installed new brake pads on my i with Sport Package (should be fine for other E39 s) By Robert B.
 By Robert B.") How I installed new brake pads on my 1999 528i with Sport Package (should be fine for other E39 s) How I installed new brake pads on my 1999 528i with Sport Package (should be fine for other E39 s) By
How I installed new brake pads on my 1999 528i with Sport Package (should be fine for other E39 s) How I installed new brake pads on my 1999 528i with Sport Package (should be fine for other E39 s) By
Tip: LED Lighting for the 3098 Locomotive and 4392 Coach Set Date: , ,
 Hi All, Over the past few months I have been working at a steady pace to install LED lighting in my passenger coaches. The coach lighting must have LED lights to reduce power consumption on the layout
BEST IN CLASS: 440HP SECOND-GENERATION 6.7L POWER STROKE
 BEST IN CLASS: 440HP SECOND-GENERATION 6.7L POWER STROKE THE WORLD S LARGEST DIESEL MAGAZINE BUILD IT RIGHT ULTIMATE POWER PLAN FOR YOUR DURAMAX 600HP 13-SECOND 05 SUPER DUTY BULLETPROOF 6.0L OIL COOLER
An I.P.M.S./ M.O.S.S. Publication October 2014 Volume 6 Issue 8 I N S I D E T H I S I S S U E
 An I.P.M.S./ M.O.S.S. Publication October 2014 Volume 6 Issue 8 IPMS/Missouri Ozarks Scale Specialists Branson, Missouri 65616 Newsletter Editor: Nate Jones www.ipmsmoss.com ipmsmoss@hotmail.com 417.230.6220
Building a Mick Reeves 1/4.5 Scale Hawker Hurricane...Instalment 9 Retracts, Door Covers, Radiator and Wing Centre Section
 Building a Mick Reeves 1/4.5 Scale Hawker Hurricane...Instalment 9 Retracts, Door Covers, Radiator and Wing Centre Section Finishing the Wing Set: Now that I ve got the tedious wing skinning behind me
LITTLE JOHN Mk2 REWIRING - SWITCH, MOTOR, & MAINS INPUT
 LITTLE JOHN Mk2 REWIRING - SWITCH, MOTOR, & MAINS INPUT Overview I could see that the machine needed rewiring by the state of the perished mains lead and the large quantity of insulation tape that Dad
Gearbox Assembly 101. Introduction. Before Beginning. By Mark Schutzer 4/13/06
 Gearbox Assembly 101 By Mark Schutzer 4/13/06 Introduction If you are planning to re-motor an old brass locomotive you may want to upgrade to a new gearbox at the same time. The early 60 s and 70 s gearboxes
Shotgun Double Barrel HPFP install guide
 Shotgun Double Barrel HPFP install guide Thank you for your purchase of the VTT Shotgun Double Barrel HPFP upgrade! First thing to do when you open your box is to make sure all parts are in their respective
NISSAN #2744. Gross Trailer Weight (Maximum)...16,000 lbs. Vertical Load Weight (Max. Pin Weight)...4,000 lbs. SYSTEM TOW CAPACITY
...16,000 lbs. Vertical Load Weight (Max. Pin Weight)...4,000 lbs. SYSTEM TOW CAPACITY") NISSAN 16K Industry Standard Rail Custom Mounting Kit #2744 Gross Trailer Weight (Maximum)...16,000 lbs. Vertical Load Weight (Max. Pin Weight)...4,000 lbs. SYSTEM TOW CAPACITY Please note, in order to
NISSAN 16K Industry Standard Rail Custom Mounting Kit #2744 Gross Trailer Weight (Maximum)...16,000 lbs. Vertical Load Weight (Max. Pin Weight)...4,000 lbs. SYSTEM TOW CAPACITY Please note, in order to
Kobo/XCSoar Large Battery Notes -
 Kobo/XCSoar Large Battery Notes - www.50k-or-bust.com These notes relate to the modification of Kobo Mini and Touch ebook readers by fitting a GPS chip (technically a GPS module) for navigation only or
RoR Step-by-Step Review * 1950 Oldsmobile Club Coupe 2n Kit Review
 RoR Step-by-Step Review 20130210* 1950 Oldsmobile Club Coupe 2n1 1-25 65-4254 Kit Review The 1950 Oldsmobile 88 is widely considered to be the first factory hot rod produced. With its powerful overhead
GWR 4 Wheel Parcel Van, Diagram W1
 GWR 4 Wheel Parcel Van, Diagram W1 From a Colin Waite bodyline kit with a scratch built underframe April 2013. While recovering from a very nasty cold and not feeling much like doing anything I was idly
2000 Mr2 Spyder Seat Cover Replacement Project
 2000 Mr2 Spyder Seat Cover Replacement Project Tool List: Plastic Trim Tool, Hog Ring Pliers, Medium or Heavy Duty Wire Cutters, 12mm socket, 14mm Socket, Ratchet, Extension, Flat Head Screwdriver & Gloves