2 nd Generation Sport Trac LED 3 rd Brake Light Replacement Project By Kevin Collins
|
|
|
- Rosamond Mosley
- 6 years ago
- Views:
Transcription
 or 264124BK (Smoked). RATING: Two (2) wrench. A very simple install; No experience required, just a little patience and care.")

1 2 nd Generation Sport Trac LED 3 rd Brake Light Replacement Project By Kevin Collins SCOPE: This project will assist you to replace the factory 3 rd Brake Light with Recon s LED 3 rd Brake Light: Part # CL (Clear) or BK (Smoked). RATING: Two (2) wrench. A very simple install; No experience required, just a little patience and care. The most difficult portion of this project is removing and reinstalling the interior trim, which is a snap if you have any experience whatsoever. CAVEAT EMPTOR: I assume no responsibilities for injuries, vehicle damage, etc. Install at your own risk! TIME TO COMPLETE: About 5 to 10 minutes MATERIALS NEEDED: Recon LED3 rd Brake Light (part # CL or BK) TOOLS NEEDED: Phillips Head Screwdriver PRODUCT PACKAGE (FRONT): PRODUCT PACKAGE (BACK):


2 STEP 1: REMOVE THE FACTORY INTERIOR TRIM PIECE TO ACCESS THE WIRING CONNECTOR Although accessible from inside the cab, for ease of replacement and to eliminate damage to the headliner, I recommend working from inside the bed of the truck. Roll down the rear window and locate the interior piece of trim. This piece is located at the rear, top, & center of the cab (just inside the windowsill.) Gently wiggle while pulling downward. Steadily increase your pull strength until you feel a trim connector piece free up. I recommend starting at one end, either the driver or passenger side, and moving across to the other end. This will create a gap between the interior trim piece and headliner for leverage and ease of removal. GAP PULL You may find this photo of the center trim connector piece helpful for damage prevention. It is a simple wedge design.
 driver side & two (2) passenger side trim connectors run parallel with the trim")

3 FYI: There are five (5) trim connectors affixing the trim to the cab. The two (2) driver side & two (2) passenger side trim connectors run parallel with the trim piece. The center one (1) runs perpendicular. Once the trim piece is completely removed, set it off to the side and out of the way for now. Below is a photo of the cab with the trim piece removed: (This completes Step 1)


4 STEP 2: DISCONNECT THE 3 rd BRAKE LIGHT WIRING CONNECTOR Locate the wiring connector for the brake light. It should be between the headliner and the cab itself, on the driver side near the headrest. You may have to slightly and gently pull down on the headliner to access the wiring connector. Depress the button on the underside of the passenger-side half of the wiring connector. While depressed; once again, wiggle, pull and slowly increase the pull strength toward the passenger side of the cab. FYI: The driver-side half of the connector will remain stationary, as it is attached to the cab itself. PULL DEPRESS

 Once backed out, remove the screws and set them off to the side & out of the way, for now.")
5 Disconnected wiring connector: FACTORY (DRIVER SIDE) WIRING CONNECTOR (This completes Step 2) 3 rd BRAKE LIGHT (PASSENGER SIDE) WIRING CONNECTOR STEP 3: REMOVE THE FACTORY 3 rd BRAKE LIGHT HOUSING ASSEMBLY AND WIRING From the outside of the cab, locate the two screws on top of the 3 rd brake light Using the Phillips Head Screwdriver, back out the two screws found. (Mine have been backed out for the photo) Once backed out, remove the screws and set them off to the side & out of the way, for now. Lift the housing assembly from the cavity and locate the wires entering the cab.


6 Pull the wires and wiring connector through the hole and do what you wish with the factory 3 rd brake light. PULL PULL (This completes Step 3)


7 STEP 4: INSTALL THE RECON 3 rd BRAKE LIGHT HOUSING ASSEMBLY & TESTING THE CONNECTION/PRODUCT ****CAUTION: Beware of the metal tabs on the underside/backside of the Recon 3 rd Brake Light housing assembly as you could potentially scratch the paint, injure yourself or bend out them of place preventing improper installation. **** After removing the Recon 3 RD Brake Light from the packaging, locate the attached wire connector. From the outside of the cab, feed the wiring connector and wire through the same hole the factory wiring was removed. FEED Ensure the brake light is not upside down (The LED bulbs should be facing outward, not upward). CAUTION Metal Tabs:


8 From inside the cab, locate the wiring connector, from the 3 rd brake light, and pull the slack out in the direction of the factory wiring connector. From the outside of the cab, carefully set the Recon 3 rd brake light housing in the cavity on the cab. PULL Ensure the depress button is, once again, on the underside of the 3 rd brake light connector and carefully join both connectors until you hear a click confirming a successful connection. JOIN CLICK (This completes Step 4) ****As this point you may want to test both the cabin and brake lights to confirm a complete circuit and properly working product.****

 STEP 6: INSTALLING THE RECON 3 rd BRAKE LIGHT HOUSING ASSEMBLY: From the outside of the cab, locate the two screws holes on top of the 3 rd brake light & retrieve")
9 STEP 5: REINSTALLING THE FACTORY INTERIOR TRIM PIECE: Before attaching the trim piece, gently pull the slack in the wire through the hole and out of the cab to prevent unintentional crimping of the wires. Retrieve the factory interior trim piece, ensure the piece is facing the correct direction by matching the contours of the trim with the contours of the interior of the cab. Carefully align all five connectors and gently press upward, into place. PRESS UPWARD (This completes Step 5) STEP 6: INSTALLING THE RECON 3 rd BRAKE LIGHT HOUSING ASSEMBLY: From the outside of the cab, locate the two screws holes on top of the 3 rd brake light & retrieve the factory screws that you set aside in Step 3. The two screws should have a small black rubber washer on the threads. Ensure that the washer is in good shape and completely atop the screw (against the screw head). This washer creates a proper water seal. If the washer is in poor shape, I would advise replacement. Using the Phillips Head Screwdriver, reinsert the two screws found and screw in. Be careful not to screw in to tightly as to not ruin the washer. (Mine have not yet been screwed into place for the photo) (This completes Step 6) PROJECT COMPLETE!!! As with any project, you must remember that you are doing this on your own. I can not be held responsible for damage to the vehicle or personal injury. This should only be used as a guide and nothing more. This project outline will help you decide if this is something you would be willing to do. All pictures are used with permission from the owner of the vehicle.


10 Below are some before and after pictures: BEFORE AFTER BEFORE AFTER BEFORE AFTER

")
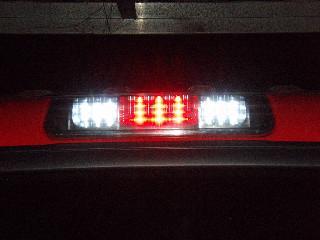
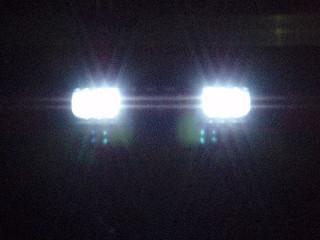
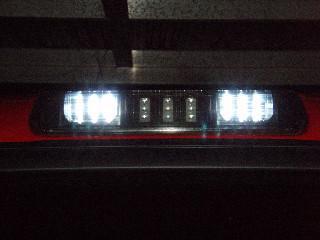
11 BEFORE AFTER BEFORE AFTER BEFORE (No photo on file) AFTER BEFORE (No photo on file) AFTER
Depress each tab as you pull the bezel off. The bezels are tight. L.H. shown.
 2013-2014 Ford Mustang V6 & Boss 302 Lower Valance Fog Light Kit Parts List: Quantity: Tool List: Fog light & bulb with bracket 2 Flat head & Phillips screwdriver Black bezels 2 Ratchet & Socket set OR
Installing the Side Rockers
 Page 1 of 12 Installing the Side Rockers The Prius PLUS Performance side rockers are without a doubt the easiest parts to install of the 7-piece package. It should take you no more than 20 minutes per
INSTALLATION GUIDE. AV8900H Dual Multimedia Headrest Replacement System
 INSTALLATION GUIDE AV8900H Dual Multimedia Headrest Replacement System NOTICE OF INTENDED INSTALLATION AND USE AV8900H VIDEO PRODUCTS ARE NOT INTENDED FOR VIEWING BY THE DRIVER, AND ARE TO BE INSTALLED
Ziza Audi A3 8V Sedan Interior lighting Kit. Installation Tutorial ES
 Ziza Audi A3 8V Sedan Interior lighting Kit Installation Tutorial ES2739194 General Tips When prying down on the assemblies to remove them, pry on the notched end of the lens. Insert the narrow tool tip
Heated Bed Installation Instructions
 Heated Bed Installation Instructions Overview The glass panel is heated by way of a heater element which is bonded to the glass panel and controlled by a digital temperature controller. The temperature
V70XC Hood Latch Cable Adjustment Tools and parts needed. Hood Latch Cable Adjustment ( )
") V70XC Hood Latch Cable Adjustment 1998-2000 I had an annoying problem with my 2000 V70 XC and I couldn t find any references to figure out and fix the problem. When I pulled the hood release handle inside
V70XC Hood Latch Cable Adjustment 1998-2000 I had an annoying problem with my 2000 V70 XC and I couldn t find any references to figure out and fix the problem. When I pulled the hood release handle inside
FOR SIT-STAND WORKSTATION
 INSTALLATION MANUAL FOR SIT-STAND WORKSTATION Weight Capacity: 6.5-24.5 lbs. 6017180 Rev. B Contents Tools Required / Supplied Part Kits / Warnings/Disclaimers...2 Base Installation Clamp Mount Base Location...3
Ford Mustang V6 OEM-Style Fog Light Kit Parts List: Quantity: Tool List:
 2015-2017 Ford Mustang V6 OEM-Style Fog Light Kit Parts List: Quantity: Tool List: LED Foglights/ Bezels 2 Flat head & Phillips screwdriver (if you ordered part#3600) Ratchet & Socket set OR Wiring harness
BMW E61 Hydraulic Pump replacement instructions
 BMW E61 Hydraulic Pump replacement instructions This DIY will guide you through the tasks needed to successfully replace your defective tailgate hydraulic pump Difficulty 3 of 10. The most difficult part
ELECTRICAL CONNECTORS B.1
 ELECTRICAL CONNECTORS B. GENERAL The following table provides a brief description of the connectors found on your motorcycle. Connector numbers are listed in [brackets] in this manual. Table B-. Electrical
Installation Instructions
 86-95 Suzuki Samurai Hood Latch & Release Cable (SKU# SEB- HLCK) Installation Instructions Note: S u z u k i h a s upgraded both of these parts and they will not work with the hood latches and release
Service Manual. Model Number: DF2426GB DF2426SS DF2550 DF2562. UL Part Number to 500
 Service Manual Model Number: DF2426GB DF2426SS DF2550 DF2562 UL Part Number 6905050100 to 500 IMPORTANT SAFETY INFORMATION: Always read this manual first before attempting to service this fireplace. For
Ford Mustang GT-Style Fog Light Kit Parts List: Quantity: Tool List:
 2013-2014 Ford Mustang GT-Style Fog Light Kit Parts List: Quantity: Tool List: Fog light (Left& Right) 2 Flat head & Phillips screwdriver Upper grille with surround 1 Ratchet & Socket set OR Lower grille
Final Assembly Instructions Casco Bay Cruiser
 Final Assembly Instructions Casco Bay Cruiser Thank you for buying your new bicycle from L.L.Bean. Read these instructions carefully before beginning the final assembly. Prior to shipping, our expert cycling
Stand Alone Fog Lights Installation Instructions
 Tools Required: 1. Trim Removal tool or protected flat screwdriver 2. #2 Phillips Screwdriver 3. 10mm socket 4. 10mm wrench 5. 8mm or 5/16 socket 6. Adjustable Pliers 7. Electrical Tape WARNING!!! Disconnect
Installation Manual TWM Performance Short Shift Kit Stage 1 and Stage 2 MazdaSpeed 6
 Page 1 Installation Manual TWM Performance Short Shift Kit Stage 1 and Stage 2 MazdaSpeed 6 Please Note: It is preferable to park on a flat surface, as you will have to engage and disengage the hand brake
GOMINIGO Third Brake Light Pulsar Kit. Installation Instructions
 Page 1 of 8 Mini Cooper Installation Instructions This kit allows the owner of any MINI Cooper or Cooper S to create a blinking effect from the third brake light assembly. The MINI Cooper being hit from
Item C& D Not Applicable C
 GENUINE PARTS INSTALLATION INSTRUCTIONS DESCRIPTION: APPLICATION: PART NUMBER(S) REQUIRED FOR INSTALLATION: KIT CONTENTS: LED Fog Lamp Upgrade Rogue Sport 999F1 V4001 A B Item C& D Not Applicable C D Do
TOYOTA RAV4/HV INTERIOR LIGHT KIT Preparation
 Preparation Part Number: PT413-42130 Kit Contents Item # Quantity Reqd. Description 1 1 Wire Harness 2 3 Hardware Bag Contents Item # Quantity Reqd. Description 1 20 Cable Tie 2 2 Scotchlok 3 2 Foam Pad
INSTALLATION GUIDE AV7900 Dual Multimedia Headrest Replacement System
 INSTALLATION GUIDE AV7900 Dual Multimedia Headrest Replacement System NOTICE OF INTENDED INSTALLATION AND USE AV7900 VIDEO PRODUCTS ARE NOT INTENDED FOR VIEWING BY THE DRIVER, AND ARE TO BE INSTALLED ONLY
Z-Gate Universal Shifter
 Installation Instructions Z-Gate Universal Shifter Fits: GM, Ford, Lincoln and Chrysler Transmissions See Application Guide for Specific Applications Part #80681 Rev 06/01/2018 WORK SAFELY! For maximum
- MK7 Mirror Integration Kit - Installation Instructions
 - MK7 Mirror Integration Kit - Thank you for choosing the Double Apex Gentex Mirror Integration kit for your Volkswagen MK7. If you have any questions about the installation please email us at support@dblapex.com.
Forge Motorsport BMW N54 Diverter Valves
 Forge Motorsport BMW N54 Diverter Valves Please thoroughly read through and familiarize yourself with these instructions in their entirety prior to beginning any part of the installation process of any
Deuce/Ace Installation Instructions
 HARDWARE KIT: Upper Mounting Plate: 2-7/16" (11mm) X 3.5" bolts 2-7/16" flange nuts 2-2" spacers 2-7/16" trim cap mounting washers 2 - plastic trim caps TOOLS NEEDED: safety glasses wrenches 16mm or 5/8"
Audi C6 A6 RS-style Grille Installation Tutorial
 Audi C6 A6 RS-style Grille Installation Tutorial Proper service and repair procedures are vital to the safe, reliable operation of all motor vehicles as well as the personal safety of those performing
INSTALLATION INSTRUCTIONS
 1. Note: It is recommended this install be done with a minimal amount of fuel in the tank. This will reduce fuel spills and make installation easier and safer. Draining the tank is recommended. INSTALLATION
Roll Bar (MMRB-6.1 to -6.7)
") 3430 Sacramento Dr., Unit D San Luis Obispo, CA 93401 Telephone: 805/544-8748 Fax: 805/544-8645 www.maximummotorsports.com 1994-04 Roll Bar (MMRB-6.1 to -6.7) NOTE: These instructions cover Roll Bars with
3430 Sacramento Dr., Unit D San Luis Obispo, CA 93401 Telephone: 805/544-8748 Fax: 805/544-8645 www.maximummotorsports.com 1994-04 Roll Bar (MMRB-6.1 to -6.7) NOTE: These instructions cover Roll Bars with
Gentex Homelink Installation Instructions
 Gentex Homelink Installation Instructions Kit Contents: Item Qty Part Description 1 Number GENK-41 NVS Homelink Mirror GENK-42 NVS Homelink w/mood lights 1 of the GENK-45 NVS Homelink w/compass following
Drag Race Roll Bar (MMRB-6, -7)
") 3430 Sacramento Dr., Unit D San Luis Obispo, CA 93401 Telephone: 805/544-8748 Fax: 805/544-8645 www.maximummotorsports.com 1994-04 Drag Race Roll Bar (MMRB-6, -7) The Maximum Motorsports 6-point Drag Race
3430 Sacramento Dr., Unit D San Luis Obispo, CA 93401 Telephone: 805/544-8748 Fax: 805/544-8645 www.maximummotorsports.com 1994-04 Drag Race Roll Bar (MMRB-6, -7) The Maximum Motorsports 6-point Drag Race
INSTALLATION & OWNER S MANUAL
 Rev. E p. of 3 INSTALLATION & OWNER S MANUAL V446 Front Cab Kit and V446 Rear Cab Kit for RTV 40 INSTALLATION & OWNER S MANUAL The contents of this envelope are the property of the owner. Be sure to leave
Installation Instructions
 Instructions Created by an: DIY Underhood LED Lighting Kit (SKU# DIY-E-UHLK) Installation Instructions NOTICE: This Under Hood Light Kit was installed on a 2002 Toyota Tacoma. However, these instructions
GENUINE PARTS INSTALLATION INSTRUCTIONS
 GENUINE PARTS INSTALLATION INSTRUCTIONS 1. 2. 3. 4. DESCRIPTION: Illuminated Kick Plate Kit APPLICATION: Murano PART NUMBER: 999G6 C2000, 999G6 C2100, 999G6 C2200 999Q9 AY001 - Accessory Service Connector
Remove the 3-11mm nuts holding mirror on. Don t drop the nuts!
 2005-2012 Ford Mustang Puddle Lamp Kit Parts List: Quantity: Tool List: LED Lamps 2 Flat head screwdriver Seals 2 Ratchet & Socket set OR Nuts 2 Adjustable Wrench Wiring harness 1 Drill & 11/16 th bit
INSTALLATION INSTRUCTIONS
 INSTALLATION INSTRUCTIONS Accessory Application Publications No. 2004 S2000 AII 26323-31611 Issue Date DEC 2005 PARTS LIST Rear defroster switch Hardtop 3-Pin subharness (If equipped, not used) 4-Pin subharness
Mo- Doors Garage Door Opener Installation Victory Vision
 Mo- Doors Garage Door Opener Installation Victory Vision Your Mo- Door opener is the best garage door opener system out there for your Victory Vision. We hope you enjoy your opener as much as we do designing
w w w. h d o n l i n e s h o p. d e CHROME SWITCH HOUSING KIT GENERAL HANDLEBAR SWITCH REMOVAL/INSTALLATION FXDWGI AND FXDBI MODEL TURN SIGNAL REMOVAL
 -J00 REV. 00-07-9 GENERAL Kit Number 70-9B, 70-9B, 708-9C Models For the most up-to-date model fitment information, please see the product label or www.harley-davidson.com. See Table for items contained
EFX Integrated LCD Screen Option. Cardio Theater Integrated Bracket Assembly Instructions
 EFX Integrated LCD Screen Option Cardio Theater Integrated Bracket Assembly Instructions Table of Contents 1 2 3 4 5 6 7 Before You Begin... 4 Obtaining Service... 4 Unpacking the Equipment... 4 Important
Mustang Clear Lens Instrument Cover (90-93) - Installation Instructions
 - Installation Instructions") Mustang Clear Lens Instrument Cover (90-93) - Installation Instructions The below installation instructions work for the following products: Mustang Clear Lens Instrument Cover (90-93) Please read through
Mustang Clear Lens Instrument Cover (90-93) - Installation Instructions The below installation instructions work for the following products: Mustang Clear Lens Instrument Cover (90-93) Please read through
Please read thoroughly before starting installation and check that kit contents are complete.
 Rear Vision System Mirror Display 2013-Current Ram (Kit part number 1009-9518) Please read thoroughly before starting installation and check that kit contents are complete. Items Included in the Kit: Rear
Installation Instructions. QuickSilver Shifter. Fits: GM, Ford, Chrysler Transmissions See Application Guide for Specific Applications Part # 80683
 Installation Instructions QuickSilver Shifter Fits: GM, Ford, Chrysler Transmissions See Application Guide for Specific Applications Part # 80683 WORK SAFELY! For maximum safety, perform this installation
BALLISTIC DOOR PANELS
 BALLISTIC DOOR PANELS (LEVEL IIIA) INSTALLATION GUIDE As shown on Ram 1500 Crew Cab Front Doors (2011 & NEWER MODELS) ALSO COMPATIBLE WITH: Ram 1500 Quad Cab (2011 & Newer Models) Ram 2500 Quad Cab (2011
Installation Procedures
 Installation Procedures Ziza Interior Lighting Package Installation for BMW E46 Sedan This tutorial is provided as a courtesy by ECS Tuning. Proper service and repair procedures are vital to the safe,
GENUINE PARTS INSTALLATION INSTRUCTIONS
 GENUINE PARTS INSTALLATION INSTRUCTIONS 1 DESCRIPTION: 2 APPLICATION: 3 PART NUMBER(S) REQUIRED FOR INSTALLATION: Fog Lamp Kit Rogue w/ AL 999F1 G2000 (Fog Lamp Kit) 4 KIT CONTENTS: Item Qty. Part Description
MacBook Pro 13" Unibody Mid 2009 LCD Replacement
 MacBook Pro 13" Unibody Mid 2009 LCD Replacement Written By: Walter Galan ifixit CC BY-NC-SA www.ifixit.com Page 1 of 25 INTRODUCTION Save money by replacing just the LCD rather than the whole display
Retrofitting an R Instrument Cluster
 Retrofitting an R Instrument Cluster This is a step-by-step tutorial for those wishing to incorporate the unique look of the R instrument gauges to their current modules. Before starting, be certain that
Volkswagen MKVI Jetta w/keyless Start Traction Control Button Retrofit Kit Installation Instructions
 Volkswagen MKVI Jetta w/keyless Start Traction Control Button Retrofit Kit Installation Instructions Proper service and repair procedures are vital to the safe, reliable operation of all motor vehicles
GENUINE PARTS INSTALLATION INSTRUCTIONS
 GENUINE PARTS INSTALLATION INSTRUCTIONS 1. DESCRIPTION: Fog Lamp Kit 2. APPLICATION: Pathfinder (2013) 3. PART NUMBER: 999F1 XZ000 - Fog Lamp Kit (P42K w/ AL) 999F1 XZ001 - Fog Lamp Kit (P42K w/o AL) 999F1
Connecting the rear fog light on the A4 Jetta, while keeping the 5 Light Mod
 Connecting the rear fog light on the A4 Jetta, while keeping the 5 Light Mod DISCLAIMER: I'm human and make mistakes. If you spot one in this how to, tell me and I'll fix it This was done on my 99.5 Jetta.
GENUINE PARTS INSTALLATION INSTRUCTIONS
 GENUINE PARTS INSTALLATION INSTRUCTIONS 1. DESCRIPTION: 2. APPLICATION: 3. PART NUMBER(S) REQUIRED FOR INSTALLATION: 4. KIT CONTENTS: Item Qty. Fog Lamp Kit Titan MY16 999F1 W4000 Fog Lamp Kit Part Description
HURST COMP STICK KIT 2008 and up DODGE CHALLENGER (with AUTO-STICK) Catalog # &
 Catalog # &") FORM 159 0402 03/09 HURST COMP STICK KIT 2008 and up DODGE CHALLENGER (with AUTO-STICK) Catalog #538 0402 & 538 0403 2009 by Hurst Perfomance Thank you for purchasing the Hurst Comp Stick Kit for your
FORM 159 0402 03/09 HURST COMP STICK KIT 2008 and up DODGE CHALLENGER (with AUTO-STICK) Catalog #538 0402 & 538 0403 2009 by Hurst Perfomance Thank you for purchasing the Hurst Comp Stick Kit for your
Installation Instructions Z-Gate Shifter
 Installation Instructions Z-Gate Shifter Part Number 80681 1998, 2001 by B&M Racing and Performance Products The B&M Z-Gate shifter can be used in vehicles equipped with most popular three speed automatic
Audi Q5/SQ5 Ziza LED Interior Lighting Kit Installation Instructions
 Audi Q5/SQ5 Ziza LED Interior Lighting Kit Installation Instructions Proper service and repair procedures are vital to the safe, reliable operation of all motor vehicles as well as the personal safety
Subaru Front Mount Intercooler Kit STI Subaru Front Mount Intercooler Kit STI
 Subaru Front Mount Intercooler Kit STI 2008-2014 715500 Subaru Front Mount Intercooler Kit STI 2008-2014 Congratulations on your purchase of the Subaru Front Mount Intercooler Kit STI 2008-2014. The following
Installation Manual Volvo C30 T5 Front Mount Intercooler System
 Installation Manual Volvo C30 T5 Front Mount System Volvo C30 T5 System / Installation Manual i C Contents Important Information i Parts List i Required Tools and Materials 1 1.0 - Vehicle Preparation
M V Intake Manifold INSTRUCTION SHEET
 Please visit www.fordracingparts.com for the most current instruction information.!!! PLEASE READ ALL OF THE FOLLOWING INSTRUCTIONS CAREFULLY PRIOR TO INSTALLATION. AT ANY TIME YOU DO NOT UNDERSTAND THE
Here I Will Explain How To Install Recon Cab Lights In A 3rd Gen Dodge Ram.
 1 P age Here I Will Explain How To Install Recon Cab Lights In A 3rd Gen Dodge Ram. *Now, There Are Many Ways of Installing Them, Including Wiring Methods, Wiring Connectors, And Other Variables - In This
2003 Dodge Dakota ENGINE PERFORMANCE Removal & Installation - Dakota
 FUEL LINE DISCONNECT FITTINGS NOTE: Fuel lines may contain single tab, dual tab or plastic retainer ring disconnect fitting. Determine type of disconnect fitting used and use proper procedure for proper
3D PRINTER. Pack 10. Anything you can imagine, you can make! 3D technology is now available for you at home! BUILD YOUR OWN
 BUILD YOUR OWN Pack 10 Anything you can imagine, you can make! 3D PRINTER Compatible with Windows 7 & 8 Mac OS X 3D technology is now available for you at home! BUILD YOUR OWN 3D PRINTER CONTENTS PACK
General Applicability Note: Recommended Tools. Personal & Vehicle Protection Safety Goggles Seat Covers Floor Covers Special Tools. Installation Tools
 TOYOTA HIGHLANDER/HIGHLANDER HV 2008- Preparation Part #: PT923-00111 Conflicts: JBL Audio, Factory Navigation NOTE: Part number of this accessory may not be the same as the part number shown. Kit Contents:
Installation Instructions Console Megashifter
 Installation Instructions Console Megashifter 1968-1969 Camaro Part Number 81035 This B&M Megashifter is designed to fit in the console of a 1968-1969 Chevrolet Camaro. In 1968, these vehicles were equipped
MacBook Unibody Model A1278 LVDS Display Cable Replacement
 MacBook Unibody Model A1278 LVDS Display Cable Replacement Replace the LVDS display cable in your MacBook Unibody Model A1278. Written By: Walter Galan ifixit CC BY-NC-SA www.ifixit.com Page 1 of 28 INTRODUCTION
Volkswagen MKVI 2.0T ECS Tuning Kohlefaser Luft-Technik System. Installation Tutorial ES ES
 Volkswagen MKVI 2.0T ECS Tuning Kohlefaser Luft-Technik System Installation Tutorial ES2712727 ES2739920 Required Tools: Flex Driver For Screw Type Hose Clamps* Phillips Screwdriver Torx T25 bit Torx T30
Curt Mfg. Trailer Hitch and Hoppy Wiring Kit Installation Instructions
 Curt Mfg. Trailer Hitch and Hoppy Wiring Kit Installation Instructions The Curt trailer hitch replaces the stock rear cross member in the Touareg. It attaches with 8 bolts just like the factory VW hitch.
The Chameleon Trac II Patent Pending M-Series User s Manual
 The Chameleon Trac II Patent Pending M-Series User s Manual YOU MAY ALSO VIEW OUR GENERAL OPERATION VIDEO ONLINE AT: www.marionbrush.com Please read entire manual prior to using this system. Page 1 The
Stowe Cargo Management System
 Installation Guide Stowe Cargo Management System Table of Contents 1. Pre-Installation (Page 2) a. Notes, Installation Kit contents & Tools needed 2. How to Install the Stowe Cargo Management System (Pages
 www.odometergears.com Mercedes-Benz Mechanical Odometer Repair This how to can be used for all mechanical repairs as the only difference will be the removal of the instrument cluster. http://www.dieselgiant.com/repairyourodometer.htm
SUT-450-I ASSEMBLY REQUIREMENTS
 SUT-450-I Torque wrench, carpenters square, wire cutters, Phillips screwdriver, 7/16, 9/16, and 3/4 combination wrenches, ratchet, 9/16,3/4,13/16, and 7/8 sockets. ASSEMBLY REQUIREMENTS *Torque all T-bolt
SCION FR-S FOG LIGHTS
 Part #: PT413-18130 Conflicts: Lowering Springs PTR07-18130-LL (California only) Kit Contents: For Anniversary Edition, Monogram & RS 2.0 vehicles, additional parts need to be ordered (PT413-18130-LL)
Avoid damage to the motorcycle. Protect painted surfaces with a soft cloth or blanket.
 HOUSINGS 7808 Thank You For Choosing Küryakyn! Protect yourself and others from potential injury and property damage or loss. Pay close attention to all instructions, warnings, cautions, and notices regarding
GruvenParts.com BRASS GM Power Folding Mirror Gear Replacement Instructions. Updated 8/25/2017 Additional Pictures / Tips Posted!
 Page 1 GruvenParts.com BRASS GM Power Folding Mirror Gear Replacement Instructions Updated 8/25/2017 Additional Pictures / Tips Posted! ** Latest Design is uses an ALL BRASS SPUR GEAR!!! ** ** If you don
FITTING OF (WESTFALIA) REMOVABLE TOWBAR ON SKODA OCTAVIA WITHOUT TOWBAR PREPARATION (04/11/16 CJ v1.0)
 REMOVABLE TOWBAR ON SKODA OCTAVIA WITHOUT TOWBAR PREPARATION (04/11/16 CJ v1.0)") FITTING OF (WESTFALIA) REMOVABLE TOWBAR ON SKODA OCTAVIA 2013+ WITHOUT TOWBAR PREPARATION (04/11/16 CJ v1.0) A. INTRO ALL STEPS COMPLETED AT YOUR OWN RISK! I AM NOT LIABLE FOR ANY LOSS OR DAMAGE! These
FITTING OF (WESTFALIA) REMOVABLE TOWBAR ON SKODA OCTAVIA 2013+ WITHOUT TOWBAR PREPARATION (04/11/16 CJ v1.0) A. INTRO ALL STEPS COMPLETED AT YOUR OWN RISK! I AM NOT LIABLE FOR ANY LOSS OR DAMAGE! These
How to Replace the Main Axle Gear on the Bachmann Spectrum GScale using the NWSL # upgrade gear.
 How to Replace the Main Axle Gear on the Bachmann Spectrum GScale 4-4-0 and 2-6-0 Mogul (2001era), using the NWSL #2223-6 upgrade gear. By Paul M. Newitt (all text and photos Copyright Paul M. Newitt,
Installation Instructions
 Instructions Created by an: Samurai Rear Diamond Plate Corners (Pre-bent) (SKU# SEB-RDP) Installation Instructions CAUTION: Safety glasses should be worn at all times when working with vehicles and related
GENUINE PARTS INSTALLATION INSTRUCTIONS
 GENUINE PARTS INSTALLATION INSTRUCTIONS 1 DESCRIPTION: 2 APPLICATION: 3 PART NUMBER(S) REQUIRED FOR INSTALLATION: Fog Lamp Kit (AL) Rogue (SV) 999F1 G2000 (Fog Lamp Kit) 4 KIT CONTENTS: Item Qty. Part
Installation Instructions Right Hand Drive Megashifter
 Installation Instructions Right Hand Drive Megashifter Part Number 80685 1995, 2001, 2006, 2010 by B&M Racing & Performance Products The B&M Right Hand Drive Megashifter is designed specifically for vehicles
Installation Manual TWM Performance Short Shifter Cobalt SS/SC, SS/TC, HHR SS, Ion Redline and Saab 9-3
 Page 1 Installation Manual TWM Performance Short Shifter Cobalt SS/SC, SS/TC, HHR SS, Ion Redline and Saab 9-3 Please Note: It is preferable to park on a flat surface, as you will have to engage and disengage
Light Truck MegaShifter
 Installation Instructions Light Truck MegaShifter The B&M Light Truck Megashifter shifter is designed to be used in most light trucks equipped with most popular three speed or four speed automatic transmissions.
SERIES A & AA ROLLER DOORS INSTALLATION GUIDE
 SERIES A & AA ROLLER DOORS INSTALLATION GUIDE THESE INSTRUCTIONS ARE PROVIDED FOR USE BY EXPERIENCED INSTALLERS OF GARAGE DOORS BY UNDER-TAKING THE INSTALLATION OF THIS DOOR, THE INSTALLER UNDERSTANDS
Hurst VMATIC3 INSTALLATION
 FORM 159 8530 07/12 Hurst VMATIC3 3-Speed & 4-Speed Automatic Shifter Catalog #3838530 2012 by Hurst Performance The Hurst Vmatic3 shifter can be used in vehicles equipped with most popular three speed
STEALTH BIG AIR KIT - Yamaha Roadliner/Stratoliner and Raider
 Page: 1 If you question your abilities it may be best for an experienced service technician perform this installation. A Yamaha Service Manual would be helpful to have on hand for reference. Revision:
CORKSPORT CX-3 Interior LED Light Kit
 I N S T A L L A T I O N I N S T R U C T I O N S CORKSPORT CX-3 Interior LED Light Kit 2016+ Mazda CX-3 PART #: CX3-9-011-10 Need Help With Your Installation? Call (360) 260-CORK PAGE 1 CORKSPORT CX-3 Interior
INSTALLATION INSTRUCTIONS CATCH CAN KIT
 INSTALLATION INSTRUCTIONS CATCH CAN KIT FORD FIESTA ST Document: 19-0175 Support: info@radiumauto.com STEPS 1-14 COVER THE PCV SIDE CATCH CAN KIT (P/N: 20-0377) STEPS 15-31 COVER THE CRANKCASE CATCH CAN
Installation Instructions
 Suzuki Samurai 1 Inch and 2 Inch Body Lift Kit (SKU# SSP-BL) Installation Instructions Background: These instructions are designed for installing the 2 body lift. Our approach is to raise the entire body
INSTALLATION INSTRUCTIONS REPAIR SEAL KIT PowerSurvivor 40E
 INSTALLATION INSTRUCTIONS REPAIR SEAL KIT PowerSurvivor 40E PURPOSE OF THE KIT The Repair Seal Kit should be installed after 1000 hours of operation. It should be installed regardless of whether or not
Installation Instructions Megashifter
 Installation Instructions Megashifter The B&M Megashifter shifter can be used in vehicles equipped with most popular three speed or four speed automatic transmissions. Your B&M Megashifter comes equipped
Audi S4 SMIC Installation. B5 Audi S4 Side Mount Intercooler installation
 Audi S4 SMIC Installation B5 Audi S4 Side Mount Intercooler installation Disclaimer: These installation instructions are to be used as a guide only. It is at the reader and/or installer s discretion to
Final Assembly Instructions Portside Cruiser
 Final Assembly Instructions Portside Cruiser Thank you for buying your new bicycle from L.L.Bean. Read these instructions carefully before beginning the final assembly. Prior to shipping, our expert cycling
INSTALLATION INSTRUCTIONS
 INSTALLATION INSTRUCTIONS X-08 TM /CEX-08 T M Type 1F HIGH SECURITY ELECTRONIC LOCK 1 Table of Contents INTRODUCTION... 3 BASIC TOOLS AND MATERIALS NEEDED... 3 LOCK PARTS FOR INSTALLATION... 4 INSTALLATION
Installation Instructions
 Option Code CSB Installation Instructions Accessory Deck Lid Spoiler 8W5-071-641 A- 3Q0 Fiber Mirror caps 8W0-072-530-A - 3Q0 (with side assist) Application 2017+ A4 Sedan Publication No. V 1.0 Installation
Installation Instructions Hammer Shifter Fits: GM, Ford, Chrysler Transmissions See Application Guide for Specific Applications Part # 80885
 Installation Instructions Hammer Shifter Fits: GM, Ford, Chrysler Transmissions See Application Guide for Specific Applications Part # 80885 WORK SAFELY! For maximum safety, perform this installation on
Mustang CDC Lightbar (94-04) - Installation Instructions
 - Installation Instructions") Mustang CDC Lightbar (94-04) - Installation Instructions The below installation instructions work for the following products: Classic Design Concepts Mustang Convertible Lightbar (94-04 Carbon Fiber) Classic
Mustang CDC Lightbar (94-04) - Installation Instructions The below installation instructions work for the following products: Classic Design Concepts Mustang Convertible Lightbar (94-04 Carbon Fiber) Classic
Installation instructions for Camaro/Firebird and Nova* Windshield Wiper Systems
 Installation instructions for 1967-69 Camaro/Firebird and 1968-74 Nova* Windshield Wiper Systems The Raingear 1967-69 Camaro/Firebird and 1964-74 Nova wiper system is designed for ease of installation
2015 Mustang Lightbar (All Models) CDC#
 CDC#") 2015 Mustang Lightbar (All Models) CDC# 1511-7000-01 Components: 1 CDC Lightbar Note: READ instructions before starting installation!!! CDC Part# Driver side bracket 0511-6001-05 Passenger side bracket
2015 Mustang Lightbar (All Models) CDC# 1511-7000-01 Components: 1 CDC Lightbar Note: READ instructions before starting installation!!! CDC Part# Driver side bracket 0511-6001-05 Passenger side bracket
RS-2 SINGLE ACTION REAR BUMPER WITH TIRE CARRIER INSTALL MANUAL FOR JEEP WRANGLER ALL MODELS.
 RS-2 SINGLE ACTION REAR BUMPER WITH TIRE CARRIER INSTALL MANUAL FOR 2007-2016 JEEP WRANGLER ALL MODELS. Rear Bumper Installation Instructions 1) Remove factory rear bumper, (this includes all tow hitch
Installation Procedures
 Installation Procedures Ziza Interior Lighting Package Installation for BMW E38 This tutorial is provided as a courtesy by ECS Tuning. Proper service and repair procedures are vital to the safe, reliable
MK7 GTI Electronic Folding Mirror Conversion
 MK7 GTI Electronic Folding Mirror Conversion 01 Mirror and Switch Installation 1. Using a soft pry tool remove the trim panel on the driver side door handle. 02 2. Remove 2 T-30 torx screws. 03 3. On the
Build your own THUNDERBIRD 2
 PACK 04 PAGE 19 Pod 3 base 66 20 Pod 3 details and Firefly 69 21 Pod 3 laboratory and Firefly 72 22 Pod 3 floor details and Firefly 75 23 Pod 3 inspection walkways 78 24 Pod 3 right inner wall 81 25 Pod
INSTALLATION INSTRUCTIONS Toyota FJ Cruiser DEMELLO-OFFROAD.
 INSTALLATION INSTRUCTIONS Item Description Vehicle 3 piece Rear Bumper 2007-2014 Toyota FJ Cruiser DEMELLO-OFFROAD www.demello-offroad.com 12785 magnolia ave Riverside ca 92503 Suite 1 phone: 1-951-735-4417
Installation Instructions
 86-89 Suzuki Samurai Pedal Rebuild Kit SKU# SIB-PRB! Instructions also includes clutch adjustment procedures. Installation Instructions W e a l s o s u p p l y replacement peddle pads. Click HERE for more
BODY-24, Late Model 944 ( and Newer) Dash Replacement
 Dash Replacement") BODY-24, Late Model 944 (1985.5 and Newer) Dash Replacement Introduction Replacing the dash in a late model 944 is not overly difficult. However, it is very tedious and a lot of patience is required. It's
BODY-24, Late Model 944 (1985.5 and Newer) Dash Replacement Introduction Replacing the dash in a late model 944 is not overly difficult. However, it is very tedious and a lot of patience is required. It's