Fourteenth Issue: November 2009
|
|
|
- Vanessa Lee
- 6 years ago
- Views:
Transcription


1 Fourteenth Issue: November Letter from the editor Summer is long gone and Fall is in full swing here in the eastern part of the US. Cooler days and nights are starting to prevail, and that means many cars are going to be shuttered for the winter in the garage mahals. With the fall came a sweeping of listings of cars for sale across the US. The economic situation seems to be affecting most everyone, and it's showing with the cars coming to light. Mostly projects, of course, but a few good runners as well. With a couple exceptions, many of the cars were in the sub $1K zone and were for sale for only a few days... sometimes only hours. The new owners had done their homework for the most part, and had already signed up with and were asking the right questions for their future builds. Others were shaking the idea tree to see what leaves would stick and what wouldn't! This issue is going to be a little disjointed - there's no one feature story, but a couple of builds and a couple nice tech step by steps to read through. Enjoy! 1

 own words: Dashboard and steering column; dashboard rises and the steering column shifts to the")
2 Well... could be. I think Mike deserves his 'retirement' after finally finishing off the last turnkey customer car. Mike offered up these photos back in August of last year, and finally have a page or two to showcase some of the mad fiberglass skills he developed building these cars. I think the customer will be quite pleased! So captioned in his (basically) own words: Dashboard and steering column; dashboard rises and the steering column shifts to the right automatically as the top opens. 2 (con t on pg 3)


 which can be turned on only when the")

3 Custom radio enclosure moving from inside the rear of the console to it's forward position just behind the gearshift lever, all automatically at the flip of a rocker switch. The car is also equipped with a GPS nav unit, backup sensors with voice warnings, A/C, yellow high intensity fog lights and high intensity driving lights (either/or) which can be turned on only when the headlights are on and an electrically retractable radio antenna. The car also has electric hood and rear louver latches and a high power lift pump for the top all controlled by a keychain remote. 3 Nice job Mike!


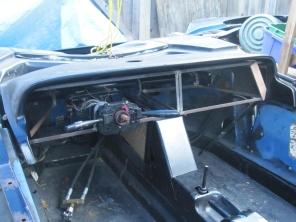
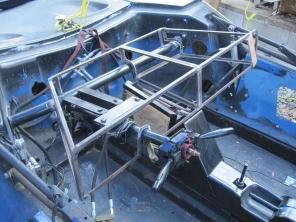
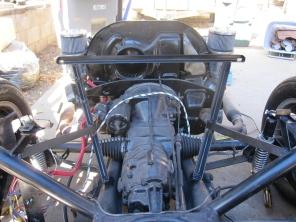
4 What should have been highlighted long ago, Steve Andrejeski's incredible V6 Sebring. Along with these photos is the article run by Kit Car Illustrated back in June, Those are scanned pages, sorry for the quality! 4 (con t on pg 5)
")
5 5 (con t on pg 6)
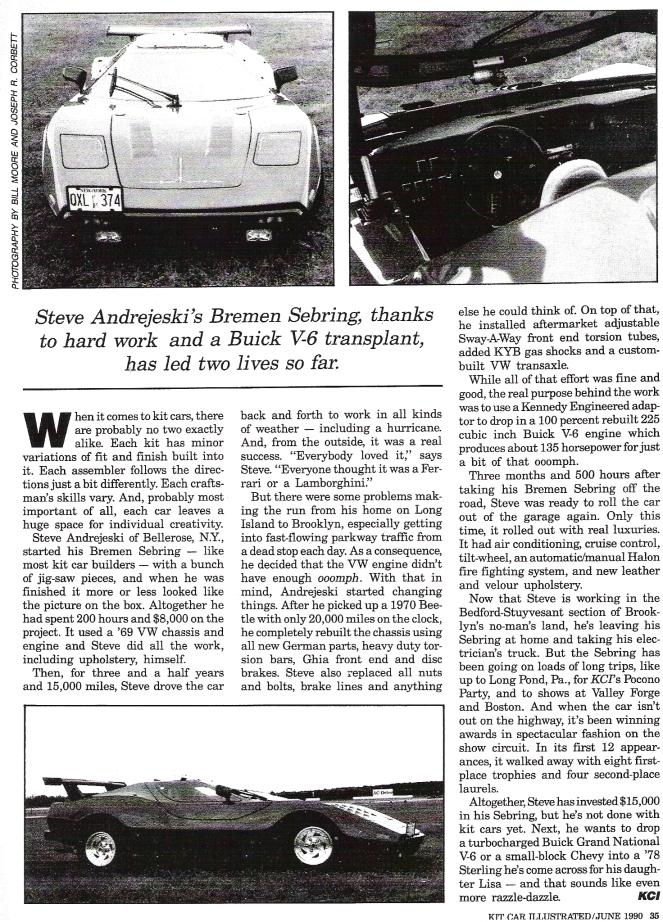
6 6
7 Chuck's excellent remake of the Sebring classic flip light setup... OK, here's the low down on how I swapped out the old wiper motor that was used as a headlight actuator for a new linear actuator. The linear actuator has a 3" stroke and rated at 150lbs push/pull. I got mine from Firgelli Automations. I just had some 1 1/2" X 1/4" bar stock laying around from another project. As you can see from the "AsWasFront" attached photo, both headlights are connected together via a hollow metal tube. In the original configuration, this tube had a 2" tab welded to it at a right angle. Attached to this tab through a Rubegoldberg linkage system is a old wiper motor mounted perpendicular to the metal tube. When energized, the motor would turn, lifting and then lowering the headlights through the linkage just like an old stream train and drive wheels. The down side is that there was no way to stop the up/down motion (no limit switches) and, as many folks know, the headlights tend to slam down when closing. The first step was to determine which actuator to get. The two main considerations were stroke length and push/pull strength. Since the cost difference between the 35lb and the 150lb was only $10, I went for more forceful option. No sense in straining a component unnecessarily. That being said, 35lbs of thrust is probably sufficient, I just tend over-engineer. Determining stroke length is a bit more challenging. To determine stroke length, the first thing I had to figure out was deflection (in degrees) between fully opened headlights and fully closed headlights. To do this, I used a simple angle compass. My deflection was 25 degrees. Next I drew a quick diagram of the bar stock in the 0 degree position, and drew a second representation of the bar stock off-set by 25 degrees. From the drawing, I could determine how long the bar stock needed to be with the different stroke lengths. All you have to do is measure the distance between the centerlines of the two drawn bars, and mark them when you reach 3" and 2". I've marked mine at the 3" mark with the an intersecting radius. Keeping in mind that the shorter the bar, the less leverage there would be to rotate the metal tube, I went with the 3 inch stroke. Another thing to keep in mind is that the distance of the drawn bars is the length from the pivot point on the metal tube (dead center inside) to the pivot point at the top of the actuator. Since the tube had a 1 1/2" diameter, I had to subtract 3/4" from the overall length of the bar. Likewise, I needed to add about 3/8" past the actuator pivot point to accommodate the pivot pin. Lastly, I had to cut/grind the tube end of the bar stock to fit the radius of the tube. To get the bar welded in the right position, I had left the old motor in place with the headlights locked in the full upright position. I then pinned my newly cut bar to the fully extended linear actuator. I positioned the base of the actuator where I wanted it to sit on the floor, and placed the radiused end on of the bar on the metal tube. The last thing to check was that the bar was still below hood line with headlights all the way up. My buddy came over and welded on the tube,and after screwing the new actuator base to the floor, I removed the old motor. The only thing left was to wire everything in. When the light switch is turned on, the headlights come up, the low beam lights come on, and the hi-beam relay is energized. You still have to use the floor mounted hi-beam switch to turn on the hi-beam lights. When the light switch is turned off, the lights go out and the headlights lower. Hi and low lights go out even if you don't switch off the hi-beams with the foot switch. Of course if you forget to turn off the hi-beams thru the foot switch, the next time you turn on the lights, the hi-beams will be on, but that's not a big deal. Let me know if you have any questions and I'll try to answer them. Chuck 7 (con t on pg 8)


8 Old setup with wiper motor "AsWasFront" angle of deflection tube held in place; arm welded in place finished with actuator in place 8


9 2 Bill Lewis' S050 incredible tube chassis and custom build - check it! 9 (con t on pg 10)
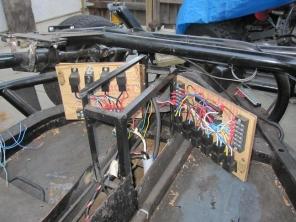
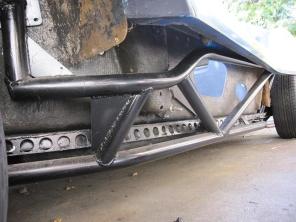
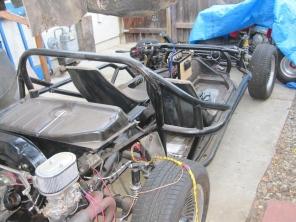
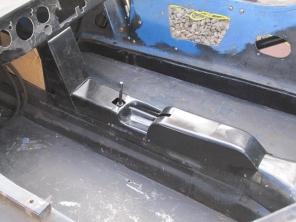
10 10 2


11 2 Over the years I have added scoops to the upper air intake holes on a couple of Sterlings I have built, and I thought they added to the overall racy look of the sleek body lines, and made the car look more finished. The more I studied the body and thought about it, the more I realized that scoops are really needed on all the air openings (or pseudo air openings) to really give the entire car more of a completed look. I set about doing so by first making a set of hand formed scoops, and then making some molds from those. After making the molds, I layed up all six scoops and proceeded to install them on the car. I took a few pictures of the various scoops in various stages of installation, and will attempt to describe and show step by step what to do to install them. If someone wants to add them, but not mold and bond them to their car, they could be laid up in black gelcoat by Dave, and the person installing them could simply glue the black scoops onto their car and not try to match or blend them into the existing finish color, and also that would save the mess and painstaking job of bonding and smoothing necessary to make them one piece with the body. You would simply scratch the paint off (if your car is painted) under and just inside the edge of the scoop in several places, apply blobs of epoxy glue to the fiberglass in those places, and press the scoop into the epoxy. Tape the scoop in position until the epoxy hardens, and you have it! Just be sure to wipe off any epoxy that gets on the outside of the scoop edge before it hardens, or can damage your visible surface around the scoop. A nice step by step by our own "Sterling Meister" Mike McBride! Now, for the other method of installation. I like to place the scoop into it's proper position on the car and draw or scratch a line around the outside edge onto the body. Take away the scoop and use a die grinder, disk sander, Dremel tool, etc., whatever you have that will grind down through the gelcoat and expose the fiberglass matting underneath and go to it. Make the area all the way around the scoop show the fiberglass out about 3/4" to 1" from the edge of the scoop. Scratch the gelcoat all the way around the edge of the scoop about an inch wide also, so that fiberglass will bond to it better. Cut thin fiberglass cloth (available at most hardware stores)into strips about one inch by three or four inches, making eight to twelve strips per scoop. Place the scoop in it's proper position and clamp it or tape it in three or four spots to hold it. Mix resin (also available at hardware stores or boat supply companies) and hardener in a small container in the proportions recommended by the manufacturer. 11 (con t on pg 12)


12 With a small disposable paint brush, paint the resin on the scoop and car in the area prepared in the previous steps and lay the fiberglass cloth strips around the edge of the scoop between clamps or tape strips, half on the scoop and half on the body to bond them together into one piece. Dab resin into the cloth with the paint brush, being careful not to make it too wet or runny. Wait 'til that hardens and then remove the clamps and/or tape holding the scoop, as they are no longer needed. Sand the fiberglass around and on the scoop to remove any bumps or stray strands sticking up, and scratch the resin surface, and fiberglass the areas not yet bonded because the clamps or tape were in the way. As before, after that cures, scratch that resin to smooth it, and mix more resin. Paint more resin around the scoop and put on a second layer of fiberglass, or even a third can be added at this time to finish the bonding process. After that, you simply mix up body filler and blend the scoop into the body all around, just as you would fill a minor dent on a steel bodied car. Just make sure you sand off any paint before applying body filler, as it will not bond well to paint. It sticks great to gelcoat or bare fiberglass, but be sure to wipe it down with solvent and sand the surface before applying Bondo. You will need a new brush for each new application of resin, or you will need to rinse the brush thoroughly with acetone after each application. Acetone is also available at most hardware stores in paint supplies section. I wrote this article with probably more information than some of you may need, but it was done with the idea that someone who has never worked with fiberglass would be able to do this successfully, I hope :-) The pictures were just for my own album and not for a step by step instruction tutorial, so will be different scoops in different stages of installation, but will show each step in the process as I did it. PS. Latex disposable gloves are a good idea, too! Mike McBride Created and published by: Arte All information contained within is deemed to be accurate at time of publication. Unauthorized reproduction prohibited. Copyright milne2@msn.com 12
Right On Replicas, LLC Step-by-Step Review * 1970 Plymouth HEMI Cuda 1:25 Scale Revell Model Kit # Review
 Right On Replicas, LLC Step-by-Step Review 20140923* 1970 Plymouth HEMI Cuda 1:25 Scale Revell Model Kit #85-4268 Review Review and Photos by Will Emerson In 1964 Plymouth developed the Barracuda from
SAM-1 Fan Kit Installation Into HENG S Range Hood Model #R C David Jeffs June 2015
 SAM-1 Fan Kit Installation Into HENG S Range Hood Model #R0623500C David Jeffs June 2015 If you own an RV you probably have come to the same conclusion that I have. Everything related to an RV is plagued
~~~~~~~~~~~~~~~~~~~~~~~~~~~~~~~~~~~~~~~~~~~~~~~~ ~~~~~~~~~~~~~~~~~~~~~~~~~~~~~~~~~~~~~~~~~~~~~~~~
 ~~~~~~~~~~~~~~~~~~~~~~~~~~~~~~~~~~~~~~~~~~~~~~~~ GSB Design Concepts Runnin' At Redline 7/9/17 ~~~~~~~~~~~~~~~~~~~~~~~~~~~~~~~~~~~~~~~~~~~~~~~~ Guest Shot: Gene Mills I've known Gene for a number of years,
HOW TO REPARE A DENT
 HOW TO REPARE A DENT Sometimes your car will receive a dent or gouge that's too small to justify the expense of a full body shop repair but too big to simply ignore. You can cut your repair costs by doing
1966 'Cuda Rally Hood
 1966 'Cuda Rally Hood By Roger Kizer I have been looking for ways to dress up the hood on my 1966 Barracuda and have seen many different hoods and scoops that came on the various Mopars over the years.
Mustang Radiator Conversion DIY. By GearHeadPeter. January 27, 2011
 1964-1966 Mustang Radiator Conversion DIY By GearHeadPeter January 27, 2011 We all know that the radiators in our cars are not the best, especially if you have done any customization to the engine, which
VW 1998 Jetta GLX or VR6 GTI PCV valve Modification
 Disclaimer: This is how I ended up modifying my stock PCV so I did not have to buy a complete intake hose (+/- $150). Don t blame me if this does not work or if it makes it worse You are doing this at
Volvo 1800 Dash Pad Replacement
 Volvo 1800 Dash Pad Replacement (courtesy of John Garden State Chapter Volvo Club America) Reupholstering the dash Well it has been some time since I have been online in the forum. Winter is a quite time
Part One of Two - RoR Step-by-Step Review * K.S. Pittman Willys Drag Coupe Revell # :25 Scale Review Click Here to Buy This Kit
 Part One of Two - RoR Step-by-Step Review 20120607* K.S. Pittman Willys Drag Coupe Revell #85-4990 1:25 Scale Review Click Here to Buy This Kit 000 This review is of the reissued Revell 1941 Willys Drag
Lincoln Mark VII T5 Swap Version submitted by 5.0 bird
 Lincoln Mark VII 1984-1989 T5 Swap Version 20070611 submitted by 5.0 bird I've decided to make an article to assist with the T5 swap for the 84-89 Mark VIIs, since I was just in there because my DOA didn't
Converting an A to 12v and Adding Turn Signals Bill Lee
 Converting an A to 12v and Adding Turn Signals Bill Lee Bill@WRLee.com When I bought my 1929 Tudor, it had been restored about 20 years earlier. It had halogens and had been converted to 12v negative ground,
 Installing Seat Belts in my Tudor August 2009 My '29 Tudor was restored about 25 years ago by my brother-in-law. He restored it to close to original, but made a few changes that many will claim are for
There was some debate whether or not there was a write up, with Pictures, for replacing the ignition switch.
 Replacing the Ignition Switch - Step by Step with Pictures. http://forums.audiworld.com/showthread.php?p=18927576 (Corey 02ALMSTT) (With updates/corrections by Dave F.) February 1, 2013 (I = Corey, mostly)
WARNING These following pages are instruction for C5 CE stripes; however, it is the same method applying vinyl. Please spend time to read thru these
 WARNING These following pages are instruction for C5 CE stripes; however, it is the same method applying vinyl. Please spend time to read thru these pages. At the end, it is your C5/C6 ME stripes' instruction.
Projector39/Umnitza BMW Headlight & Re-Installation for E39s Predator Angel Eyes, and Lamin-X Installation
 Projector39/Umnitza BMW Headlight & Re-Installation for E39s Predator Angel Eyes, and Lamin-X Installation Now it is time to remove the headlights! Obviously you have to open the hood to do this. 100_3630.jpg
U-Score U-Score AAC Rank AAC Rank Vocabulary Vocabulary
 go 1 927 you 2 7600 i 3 4443 more 4 2160 help 5 659 it 6 9386 want 7 586 in 8 19004 that 9 10184 like 10 1810 what 11 2560 make 12 1264 is 13 10257 on 14 6674 out 15 2350 do 16 2102 here 17 655 eat 18
MGB V8 Roadster restoration project Report 97
 28th November 2016 APPLYING SOUND DEADENING MATERIAL I thought that I better get on with applying the sound proofing to the bodyshell before the carpet set arrives from Moss. The first thing to do was
327. Repairing the bent and cracked fenders Tap out the dents from the back side of the fender with a fender hammer.
 Chapter 11 - Fender Repair (Video Clip 11) 327. Repairing the bent and cracked fenders. 328. Tap out the dents from the back side of the fender with a fender hammer. 329. Reform the fender edges by tapping
2007 Crown Victoria Police Interceptor (P71) Blend Door Actuator Replacement (If I did it, you can too.)
 Blend Door Actuator Replacement (If I did it, you can too.)") 2007 Crown Victoria Police Interceptor (P71) Blend Door Actuator Replacement (If I did it, you can too.) I'm not saying this is the only way, or even the right way, but it worked for me. First time I've
2007 Crown Victoria Police Interceptor (P71) Blend Door Actuator Replacement (If I did it, you can too.) I'm not saying this is the only way, or even the right way, but it worked for me. First time I've
Timing the 9N/2N Steering Sector Gears
 Timing the 9N/2N Steering Sector Gears by John Korschot - www.johnsoldiron.com (May 2010) The procedure for timing a set of steering gears in the 9/2n tractors is published in the I&T FO4 shop manual.
4TH GEN SEATS IN A 3RD GEN TRUCK
 4TH GEN SEATS IN A 3RD GEN TRUCK by Flopster843 02 Oct 2016 If you drive a 3rd generation Dodge Ram truck, I am sure you have discovered that the OEM seats are not the greatest (Figure 1.) They are extremely
Mounting a Garmin to an R1150R Motorcycle
 Mountain a Garmin GPS on your BMW Motorcycle Introduction The following document will describe how I mounted my Garmin 1490T GPS unit to my motorcycle. Garmin makes a specific GPS unit (the Zumo) for motorcycles
How to stick a 3.4L engine into your Boxster.
 How to stick a 3.4L engine into your Boxster. When I purchased my 99 Boxster in January, it was already equipped with a TPC supercharger setup. While fun and a great improvement over the rather anemic
Disco 3 Clock Spring / Rotary Coupler replacement
 Disco 3 Clock Spring / Rotary Coupler replacement I recently had to change my Clock spring and thought some folks may find it helpful to see what it entailed. I did lots of reading around but couldn t
Here's the difference (externally) in the and 04+ bumper and headlights: (00-03 on top, 04 on bottom)
 in the and 04+ bumper and headlights: (00-03 on top, 04 on bottom)") OK guys, I've been meaning to post this for awhile.. well here it goes. I did the '04 front end conversion on my '01 about 4-5 months ago, but then the dealer had to buy the car back for legal reasons.
OK guys, I've been meaning to post this for awhile.. well here it goes. I did the '04 front end conversion on my '01 about 4-5 months ago, but then the dealer had to buy the car back for legal reasons.
MGB V8 Roadster restoration project Report 138
 24th May 2017. FITTING THE CARPETS - continued I have included quite a lot of detail and photographs on the carpet and trim fitting, as it may help those who decide to do this job on their own car. The
Installation Instructions and Suggestions For Jeep YJ Fiberglass Replacement Bodies
 Installation Instructions and Suggestions For Jeep YJ Fiberglass Replacement Bodies Getting started with the removal of your existing Jeep body. Trust nothing to memory; take photos of everything at different
Hood stripes Tools needed from AutoZone or any auto parts store: bottle spray, squeegee, a towel that you re using to clean you car up after washing,
 WARNING These following pages are instruction for C5 CE stripes; however, it is the same method applying vinyl. Please spend time to read thru these pages. At the end, it is your C5 GS1 stripes instruction.
Conversion of a Turnigy 9X to Hall effect sensors
 Conversion of a Turnigy 9X to Hall effect sensors Because English is not my mother language I kindly ask to be gracious. Unfortunately I had several times some problems with the low quality potentiometers
Днепр) Russian Motorcycle Carburetors Part 2B: PZ-24 and PZ-28 Carburetor Assembly and Jet Drilling
 Russian Motorcycle Carburetors Part 2B: PZ-24 and PZ-28 Carburetor Assembly and Jet Drilling") Ural (Урал( Урал) - Dnepr (Днепр( Днепр) Russian Motorcycle Carburetors Part 2B: PZ-24 and PZ-28 Carburetor Assembly and Jet Drilling (applies also to K-37 K and K-38 K carbs) Ernie Franke eafranke@tampabay.rr.com
Ural (Урал( Урал) - Dnepr (Днепр( Днепр) Russian Motorcycle Carburetors Part 2B: PZ-24 and PZ-28 Carburetor Assembly and Jet Drilling (applies also to K-37 K and K-38 K carbs) Ernie Franke eafranke@tampabay.rr.com
2001 V70 T5 ETM Removal and Cleaning Directions
 2001 V70 T5 ETM Removal and Cleaning Directions Howard Cheng howardc64@gmail.com 10/24/05 Version 1.4 Read this before you start I performed this ETM cleaning because I had gotten 2 reduced performance
RoR Step-by-Step Review * 1967 Dodge Coronet R/T Foose Design Revell Review
 RoR Step-by-Step Review 20130112* 1967 Dodge Coronet R/T Foose Design Revell 85-4906 Review Having been a long time fan of Chip Foose I could hardly wait to get this kit and with it being a MoPar with
Improving the gearshift feel in an SW20.
 Improving the gearshift feel in an SW20. Part one In 3 parts. The SW20 gearshift can be often be greatly improved by eliminating play in the shift linkages, and this article covers three areas that need
The Borg Warner Overdrive
 The Borg Warner Overdrive by Tom Endy For the Model A Ford: Over the last 30 years the addition of an overdrive to a Model A Ford drive train has become a popular and practical convenience. The very first
Eleventh Issue: June 2008
 NATIONAL STERLING OWNERS ASSOCIATION Eleventh Issue: June 2008 www.nationalsterling.org Letter from the editor And just that fast, the summer has started! Weird weather patterns, to be sure. My sympathies
RoR Step-by-Step Review * 1977 Jeep CJ-7 Renegade 1-24 Revell Kit Review
 RoR Step-by-Step Review 20130120* 1977 Jeep CJ-7 Renegade 1-24 Revell 85-2180 Kit Review Being a Jeep owner, you tend to get a little fanatical about them. I ve been an avid off-roader for about 15 years;
Subaru SVX 1/43 Scale Model Assembly Instructions
 Subaru SVX 1/43 Scale Model Assembly Instructions Congratulations on your purchase of an unassembled 1/43 scale Subaru SVX! You now own a model that is even more rare than the car it represents. Currently
Here is the gap seal I used for the flaps, genuine hardware store quality. Note cross sectional shape visible on the right end.
 HOMEBUILT AIRCRAFT DRAG REDUCTION - Case Study with a Lancair IV Part 3 Copyright - Fred Moreno - January 2009 Rev. 1 Portions may be reproduced for private, individual use 3- REDUCED AIRFRAME DRAG FOR
W123 Transmission Vacuum Modulator Adjustment DIY - measure it the 'right' way
 W123 Transmission Vacuum Modulator Adjustment DIY - measure it the 'right' way Why do you need to do this?: You need to do this to properly check the internal hydraulic pressure of the transmission, either
SHARK UPPER WINDSHIELD FRAME & WINDSHIELD REPLACEMENT. Text and Photos by TOM BENFORD
 Text and Photos by TOM BENFORD I purchased a fathom green 69 big-block tri-power T-top coupe with only 42,000 original miles on it recently. I'm the third owner of the car, and I got it for a very good
How I Fitted the Digital Temperature Guage... By T-Cut
 How I Fitted the Digital Temperature Guage... By T-Cut Here's one way to install the digital temperature gauge designed by Hans Schaaper. I decided to fit mine into the redundant slot above the CD-80 radio
Giving your Tiger a Cool Gulp of Fresh Air with Functional Ram Air
 Giving your Tiger a Cool Gulp of Fresh Air with Functional Ram Air We have all heard that the LAT-79 option fiberglass hood was intended as a competition option to improve the performance of the Tiger
Thanks for Ordering The Kawasaki KLX Adjustable Lowering Kit From
 www.scootworks.com Thanks for Ordering The Kawasaki KLX Adjustable Lowering Kit From READ THIS BEFORE UNPACKING YOUR KIT! This instruction booklet contains detailed steps for installing the rear suspension
Ford Racing BOSS 302 Engine Oil Cooler (11-14 GT)
") Tools needed: 14mm hex socket 7mm socket/wrench 8mm socket/wrench Ford Racing BOSS 302 Engine Oil Cooler (11-14 GT) 10mm socket (for airbox removal) ¾ inch or 19mm wrench Torque wrench Appropriate ratchets
Tools needed: 14mm hex socket 7mm socket/wrench 8mm socket/wrench Ford Racing BOSS 302 Engine Oil Cooler (11-14 GT) 10mm socket (for airbox removal) ¾ inch or 19mm wrench Torque wrench Appropriate ratchets
Tools needed: Here is a pic of the shift kit I used. It is a Transgo brand and as you can see, it just a bag full of springs and one valve.
 Before installing a shift kit, be sure the transmission is in good operating order. If your transmission is making noises, slipping, shifting bad or the fluid looks brown or smells burnt, take the transmission
Mike and Barb s 1953 MG TD
 Mike and Barb s 1953 MG TD The first time I remember seeing an MG was in about 1959. I was like in 2 nd grade. I remember my dad bringing home a remote car for me. Not the remote you think of now, it had
Installing LED lights in a Hypercharger By Keith Edwards Joker s Wild! (Wildjokr)
") Installing LED lights in a Hypercharger By Keith Edwards Joker s Wild! (Wildjokr) THINGS YOU WILL NEED: A Hypercharger (duh!) LEDs (The ones I got were from Benny Bryant at Fantasies on Wheels in Sylacauga,
Installing LED lights in a Hypercharger By Keith Edwards Joker s Wild! (Wildjokr) THINGS YOU WILL NEED: A Hypercharger (duh!) LEDs (The ones I got were from Benny Bryant at Fantasies on Wheels in Sylacauga,
Right On Replicas, LLC Step-by-Step Review * 1953 Chevy Panel Truck Gasser 1:25 Scale Revell Model Kit # Review
 Right On Replicas, LLC Step-by-Step Review 20140410* 1953 Chevy Panel Truck Gasser 1:25 Scale Revell Model Kit #85-4189 Review Review and Photos by Tom Schaefer Retro drag racing seems to be all the rage
 Super how to Mod your Vr6 intake manifold/polish and paint. - Dubnet Volkswagen Enth... Page 1 of 33 www.bluenile.com Feedback - Ads by Google Dubnet Volkswagen Enthusiast Forum > Volkswagen And Audi >
3 AND 5 LINK INSTALLATION MANUAL
 1127 E. Curry Rd. #3 Tempe, Arizona 85281 (480) 446-8442 www.levyracing.com 3 AND 5 LINK INSTALLATION MANUAL Thank you for your purchase of this Levy Racing quality product. Like all Levy Racing products,
Hasegawa F-86 Sabre in 1/48 Scale by Mike Hanlon
 Hasegawa F-86 Sabre in 1/48 Scale by Mike Hanlon Introduced in 1996, the Hasegawa F-86 was released in two versions, the F-86F-30 and 40. Priced at $40 when released, subsequent releases have ranged from
 Updated May 2015 Okay this is what I learned while converting several Yamaha SUV 1200 jet skis with a 2 stroke engine to a 4 stroke engine. I believe that you can use a Yamaha FX or VX four stroke for
MGB V8 Roadster restoration project Report 67
 19th August 2016. This report jumps a bit from one subject to another. If I need to put some thought into a certain aspect of the rebuild I tend to get on with another job and sleep on the problem until
Peugeot 406 Coupe: Delocking your boot V.1 April 2005
 This is a first stab at a DIY guide to de-locking your 406 Coupe. It isn t a hard modification to do yourself, but you do need to be confident working on your cars electrics and removing and refitting
Water-Gauge, Water Level Test Valve and Boiler Blow Down Valve
 Water-Gauge, Water Level Test Valve and Boiler Blow Down Valve Troubles from the get go on the water gauge. While modeling the upper fitting for the water gauge I encountered a problem with the side hole
Door Panel Removal & Window Stop Adjustment
 Door Panel Removal & Window Stop Adjustment By: Jeff Wolford Disclaimer: This is simply an article of how I fixed my car. I m not responsible if you break, scratch, or mess up anything following my example.
I want to try my hand here at doing a TacoBill write up so here it goes.
 Here is part 3 of my tutorial for the conversion of my Shaker 1000 to the Kenwood DNX7100 Navigation / Head Unit. With the 7100, my new system will include the Kenwood I-pod Adapter (P.I.E. KNW/USB-AV),
The Ryan Overdrive by Tom Endy
 The Ryan Overdrive by Tom Endy The Ryan overdrive is a factory built overdrive designed for the Model a Ford. They were manufactured in Denver, Colorado and marketed between 1990 and 2000. They were discontinued
Five Ways to Latch Your Tailgate
 Five Ways to Latch Your Tailgate Many of our customers have told us they want to customize the tailgate of their pickup by eliminating the tailgate chains for a smooth clean look. New tailgates are available
RAFIG IDLE TUNING PROCESS
 RAFIG IDLE TUNING PROCESS I decided to PDF this process and bring everything I found into one document as when I went to idle tune it was in bits and pieces so I have gathered SSpdmon s info and put it
Wine Glass Orchestra. Leah Buechley CSCI 7000 Things That Think
 Wine Glass Orchestra Leah Buechley CSCI 7000 Things That Think Abstract My wine glass orchestra project consists of three mechanical wine glass instruments coordinated with Crickets. The first automaton,
The Sands Mechanical Museum
 The Sands Mechanical Museum How to Change Your Oil It is more difficult to change the oil in a Lotus Elise because the oil plug and filter are difficult to access. They are located behind an access panel.
Shay - Painting The Trucks & Frames
 Shay - Painting The Trucks & Frames Nelson Riedel Nelson@NelsonsLocomotive.com Initial:2/23/04 Last Revised: 06/06/2004 Painting of the locomotive trucks and frame are described in this page. The tender
Right On Replicas, LLC Step-by-Step Review * F-86D Sabre Dog 1:48 Scale Revell Model Kit # Review
 Right On Replicas, LLC Step-by-Step Review 20150410* F-86D Sabre Dog 1:48 Scale Revell Model Kit #85-5868 Review Further development of the F-86 led to the radar-guided, rocket armed F-86D or Dog Sabre.
LOWE Industries. Fiberglass Composite Components. Dragster noses
 LOWE Industries PO Box 180 Rosewood, Qld 4340 Australia www.kenlowe.com.au Phone 0411-699 535 Fiberglass Composite Components -----------------------------------------------------------------------------
Some tips and tricks I learned from getting clutch out of vehicle Skoda Octavia year 2000
 Some tips and tricks I learned from getting clutch out of vehicle Skoda Octavia year 2000 Last change 2013-Oct-11 I bought Haynes manual for a starter. That s something well worth it s cost I believe.
Installation of Transom Ladder on Montgomery 15 Sailboat By David Grah Winter 2012 / 2013
 Installation of Transom Ladder on Montgomery 15 Sailboat By David Grah Winter 2012 / 2013 For the few years we have had our 1986 Montgomery 15, we have used a removable ladder for getting back on the boat
HASPORT PERFORMANCE EFJ1
 HASPORT PERFORMANCE Installation Instructions For: Part Number EFJ1 for J-series V6 engines into 1988-1991 Honda Civic and CR-X Hasport Performance mounts are the result of extensive research and engineering.
Auto Detailing User Guide Part 1 Exterior & Part 2 Interior. Part 1 Exterior
 seperately Part 1 Exterior 1. Spot Cleaning Before washing the exterior of your vehicle, begin by spot cleaning of any particularly greasy, sticky, or dirty areas. Eco Green Auto Clean Freedom Multi-Purpose
Restoring the Strategic Air & Space Museum s E-4B Model
 Restoring the Strategic Air & Space Museum s E-4B Model By Don Joy IPMS Fort Crook I received a request from the SASM (Strategic Air and Space Museum) to do a restoration of the model. They had a member
Thanks for Ordering the Tour Pack and/or Mounting System for the Kawasaki 1500 Classic, 1500 Classic F.I., and Nomad from
 Thanks for Ordering the Tour Pack and/or Mounting System for the Kawasaki 1500 Classic, 1500 Classic F.I., and Nomad from READ THIS BEFORE UNPACKING YOUR KIT! This instruction booklet contains detailed
Building an Iconic Canadian Grand Prix Race Car in 1:12 scale
 Building an Iconic Canadian Grand Prix Race Car in 1:12 scale by Evan Jones C#3372 Guelph, Ontario Background Egbert Eppie Wietzes is a well-known Canadian race car driver who had success in the 1960 s
Right On Replicas, LLC Step-by-Step Review * Mack Fire Pumper 1:32 Scale Revell Model Kit # Review
 Right On Replicas, LLC Step-by-Step Review 20150915* Mack Fire Pumper 1:32 Scale Revell Model Kit #85-1945 Review The Mack CF600 Pumper is a familiar fire truck that is still widely used in firehouses
HASEGAWA: P-40E/K~1/48 th scale SuperScale Decals: Curtiss P-40K 64 th, 16 th & 25 th FS
 HASEGAWA: P-40E/K~1/48 th scale SuperScale Decals: Curtiss P-40K 64 th, 16 th & 25 th FS Norris Graser I built this model for the IPMS McKinstry September 2012 theme night for P-40 s. It s an easy enough
COLD AIR INTAKE INSTALLATION INSTRUCTIONS
 COLD AIR INTAKE INSTALLATION INSTRUCTIONS # D760-0030 Fits: 2007-10 135i (E82, E88; with N54 engine) 2007-08 335i/xi (E90) 2007-10 335i (E92, E93; with N54 engine) Congratulations for being selective enough
2k2GT Registered User
 1 of 44 7/22/2009 01:17 Corral Forums > Modular Tech Forums > GT & SOHC My J.R. Granatelli K-member install story...56k death Welcome, xomp. You last visited: Today at 12:07 AM Private Messages: Unread
BMW 528i E39 Sunroof Repair
 These instructions will help guide you through the repair process for broken sunroof control rails on an E39 chassis. Before I get started, I want to give a shout-out to a couple people who also posted
Figure 1: Valve housing smooth vs. o-ring groove
 If you are driving an older Corvette, and by that I mean a C2 or C3, it will eventually get to a point where the Power Steering Control Valve (PSCV) will leak and require attention. In 2002, I had to repair
Audi A8 Transmission Service By Barry Lenoble and Paul Waterloo
 Page 1 of 18 Technical & Maintenance Upgrades & Style Used A8 Buyer's Checklist Marketplace On Track Gallery Links Contact Home Audi A8 Transmission Service By Barry Lenoble and Paul Waterloo Background
Toyota Tacoma Winch Mount Bumper Installation Instructions Tools Required: Transmission cooler relocation brackets Torque Wrench
 2016-2017 Toyota Tacoma Winch Mount Bumper Installation Instructions Tools Required: Items Included: Small flat head screw driver Winch Mount Ratchet, 10mm, 12mm, 14mm, 17mm & Skid Plate 19mm sockets Transmission
Installing the Audiovox CCS-100 Cruise Control.
 Installing the Audiovox CCS-100 Cruise Control. This article was written by: Lon Lawrence w650kawasaki@leaco.net Cruise Control : Audiovox CCS-100 ($89) Webpage : www.summitracing.com Message: I've installed
At Mark's suggestion I thought I'd write this up so future Coupe lovers can have as much fun* as I did with this job.
 At Mark's suggestion I thought I'd write this up so future Coupe lovers can have as much fun* as I did with this job. My enormous thanks to forum members, particularly glorfindel, for their advice when
The Merit 1:48 scale Late War 80 ft. Elco PT Boat -By- T. Garth Connelly
 The Merit 1:48 scale Late War 80 ft. Elco PT Boat -By- T. Garth Connelly Earlier this year, I heard that a company, Merit International, was going to be releasing two 1:48 scale kits of the eighty-foot
As stated, these are solely based off of how I like to do the Pre-Trip. I give my personal opinions as well as some helpful tips.
 Here are our sections: Engine Compartment Drivers Door Fuel Area Coupling System Trailer (Please note in the type of suspension your trailer has) Light Check In-Cab Inspection and Brake Tests You will
Utility Trailer 5 x 8 Building Notes
 Utility Trailer 5 x 8 Building Notes This is a standard utility trailer model that is currently on the market (at least in Minnesota). The price tag seems to average around $900 - $1100. There is no doubt
X-Type w/ non-premium sound amplifier installation instructions
 X-Type w/ non-premium sound amplifier installation instructions 1. Pull radio from dash (see Radio Removal Instructions ) 2. Disconnect wiring harness from back of radio by pushing in tab on plug and pulling
Bachmann Spectrum Peter Witt in HO
 Bachmann Spectrum Peter Witt in HO By Bob Dietrich This is my impression of an unpainted Peter Witt from Bachmann Spectrum. The packaging of the car was impressive a large red box with a clear cover showing
INSTALLATION OF A WARN M8000 WINCH IN A HIDDEN MOUNT ON THE 2001 EXPLORER SPORT TRAC
 INSTALLATION OF A WARN M8000 WINCH IN A HIDDEN MOUNT ON THE 2001 EXPLORER SPORT TRAC By: Kyle Schwulst Email: bigmellon@yahoo.com BACKGROUND I have always wanted a winch on my vehicle. There is just something
RoR Step-by-Step Review * 1967 Corvette Convertible 1:25 Scale Revell Model Kit # Review
 RoR Step-by-Step Review 20131209* 1967 Corvette Convertible 1:25 Scale Revell Model Kit #85-4087 Review 1967 was to be the unveiling of the third generation "MAKO" styling. However design problems showed
Tutorial:Head Unit Installation
 Tutorial:Head Unit Installation From Tech Wiki : Nissan 350Z : Infiniti G35 : Nissan GT-R Here, I installed the Kenwood DDX7015 touch screen DVD system. I made this step-by-step tutorial to help those
2510 E Sunset Rd Suite #3 Las Vegas, NV Phone (702) or Fax (702) Mustang Depot all rights reserved
 or Fax (702) Mustang Depot all rights reserved") 1 Thank you for purchasing the Mustang Depot E Body Kit! This new kit has evolved through a careful process of improving fitment and overall quality over the last 8 years. The current manufacturer, FSI
1 Thank you for purchasing the Mustang Depot E Body Kit! This new kit has evolved through a careful process of improving fitment and overall quality over the last 8 years. The current manufacturer, FSI
Connecting the rear fog light on the A4 Jetta, while keeping the 5 Light Mod
 Connecting the rear fog light on the A4 Jetta, while keeping the 5 Light Mod DISCLAIMER: I'm human and make mistakes. If you spot one in this how to, tell me and I'll fix it This was done on my 99.5 Jetta.
2010 Toyota Prius model II Head Unit Upgrade
 2010 Toyota Prius model II Head Unit Upgrade Monday, December 21, 2009 Disclaimer: Use this document and its contents at your own risk. Forward: Huge thanks to those members on Priuschat.com that forged
Adjusting Carbs For Re-Jetting (Procedure written for an Intruder 1500 LC) NEWLY UPDATED: APRIL 2003
 NEWLY UPDATED: APRIL 2003") SECTION ONE: Get Prepared - Tools Adjusting Carbs For Re-Jetting (Procedure written for an Intruder 1500 LC) NEWLY UPDATED: APRIL 2003 Courtesy of: Half-Crazy Get a manual impact driver (the kind you hit
SECTION ONE: Get Prepared - Tools Adjusting Carbs For Re-Jetting (Procedure written for an Intruder 1500 LC) NEWLY UPDATED: APRIL 2003 Courtesy of: Half-Crazy Get a manual impact driver (the kind you hit
MGB V8 Roadster restoration project Report 86
 2 nd November 2016. There seems to be so much to do, odds and ends to order, not enough space to do stuff. This morning I think I better start writing down a list of things to do that are easier while
Dawson Tool-Less Guide-Rod Problem s Updated
 Dawson Tool-Less Guide-Rod Problem s Updated On Brian Enos Forum 2005: Dawson was making Tool-Less Guide-Rods Purchase History: Invoice # 013512 2014-05-21 and #014408 2014-05-30 first Tool-Less Guide-Rod
BMW 2002 M42 Swap Notes-THIS IS NOT FINISHED
 BMW 2002 M42 Swap Notes-THIS IS NOT FINISHED This document is to help those that want to install an m42 into a BMW 2002. It is based around an e30 engine, trans, and wiring. You can use the e36 block/head/wiring
Installation Instructions for TJ Jeep s Fiberglass Replacement Bodies and Parts
 Installation Instructions for 1997-2006 TJ Jeep s Fiberglass Replacement Bodies and Parts Getting started: We recommend that you take pictures as you dismantle your Jeep. These pictures will help you when
MGB V8 Roadster restoration project Report 130
 1 st April 2017. I promise I won t add in any April Fool jokes into this report. But of course anything is possible! Yesterday, I only managed an hour on the MG, as I helped Jaymic with their stock take.
Troubleshooting Guide for Limoss Systems
 Troubleshooting Guide for Limoss Systems NOTE: Limoss is a manufacturer and importer of linear actuators (motors) hand controls, power supplies, and cables for motion furniture. They are quickly becoming