VW 1998 Jetta GLX or VR6 GTI PCV valve Modification
|
|
|
- Owen Ferguson
- 5 years ago
- Views:
Transcription

 Heater connectors (see below) I got mine from the Autozone, but you could use a similar item I guess.")
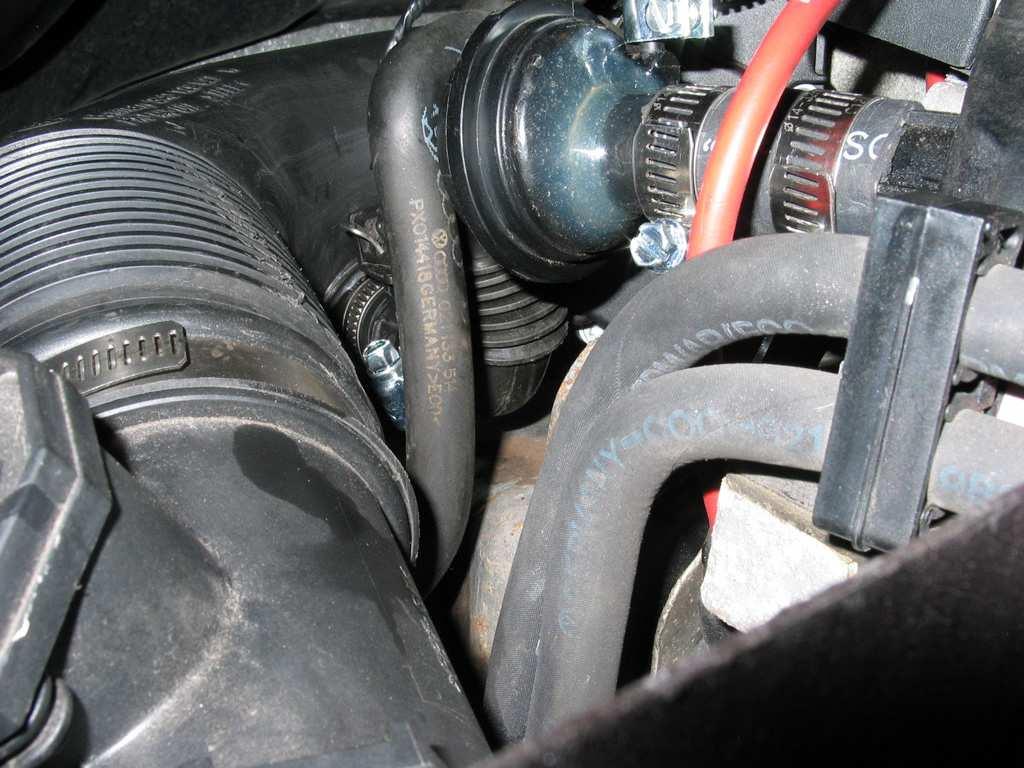
1 Disclaimer: This is how I ended up modifying my stock PCV so I did not have to buy a complete intake hose (+/- $150). Don t blame me if this does not work or if it makes it worse You are doing this at your own risk. Materials: (1) Plastic Epoxy (fast setting type) I used Loctite Plastic Epoxy (sets in 7 minutes) (2) 1 foot of ¾ inch (ID) radiator/heater hose. You only need about 3 but this is the minimum you could buy at the Autozone. (3) Heater connectors (see below) I got mine from the Autozone, but you could use a similar item I guess. These fit perfectly in the existing hole on the valve which is handy just as an fyi. (Help part number: 47065) (4) Minimum Two hose clamps sized for the heater hose. You can get more if you want to clamp everything down, like I did. (5) Some carburator cleaner. Step 1 Remove the entire intake pipe. Not exactly required, but it will be a good time to clean it out and get some of the gunked on oil residue off. On mine it was all over the place. Removing the intake pipe is a little different on some of the older VR6 models, but on the 98 this will involve loosening the two hose clamps on the intake hose (MAF and TB), the PCV vacuum line and the torn PCV hose/boot (else you probably would not be reading this ) connected to the valve cover. (Sorry no pics) Step 2 Disconnect and remove the PCV from the intake hose.


2 Step 3 Cut the rubber connecting hose (valve cover side of the PCV valve) free from the actual valve, if its not completely torn off. Clean all remaining rubber off the top of the valve and inside. OLD HOSE INSIDE RING VISIBLE Then remove the inside ring of the old hose. The picture (above) barely shows it. Below it was removed. (sorry no pics of the removal). I used a pair of thin long nose pliers to break the plastic ring it into smaller pieces to pulled them out. MAKE SURE YOU GET ALL THE PIECES!!! YOU DO NOT WANT THESE TO GET INTO THE INTAKE MANIFOLD. WILL NOT BE GOOD IF THEY GO THROUGH THE MOTOR!!! INSIDE RING REMOVED


3 Valve TOP nicely cleaned Step 4 Test fit the hose fitting for a nice snug fit. Cut the fitting to length. I eye-balled it to be close to the length of the old connector hose, minus a little. Will be cutting it around here Newly cut connector.

 Step 6 Mix your epoxy.")

4 Step 5 Test fit cut connector to valve body. I scuffed the edges of the new connector a little to help the bond. Also scuff the top of the valve to help the epoxy get a good grip (did this on my on second attempt not in the picture below) Step 6 Mix your epoxy. I put the valve in the vice (right). Put some epoxy around the new connector s edge and inserted it into the hole on the valve. I also filled in the existing holes (small ones where the old connecter fit) with epoxy.

 the valve upside down and around (if that makes any sense) so")


5 Step 7 Apply the rest of the epoxy liberally around the base of the connection. I then rolled (kept turning it by holding it on the other end of the valve) the valve upside down and around (if that makes any sense) so that the epoxy did not flow over the edges. Kept doing this until it set and it did not flow any longer. This is why the quick set epoxy was handy. Otherwise you would have to do this for 30 minutes! The logic behind this was to keep as much epoxy at the neck of the join, for strength. Eventually I put it back in the vice, but upside down to set (below). You can see the epoxy is nice and thick around the base of the connection, where most of the strain would be.


6 Step 8 Cut a piece of the heater hose to the length of the old connector hose and add the 2 new hose clamps. Step 9 Clean the inlet hose and other parts while the epoxy sets. Let the epoxy set for 24 hours before attempting to install. I tried to install it that same night and the next morning the connection had separated, so wait the 24 hours. Installing Slip the new hose extension over the new connector and fasten. Then put everything back the way it came out. Cut the connector hose and/or fitting if it does not fit. The finished product:

7
 fastened a")
. So far so good!")
8 SUB MODIFICATION The performance intake I put on my car pushes the PCV hose closer to the Exhaust manifold heat shield, so I loosened the inside hose clamp (below) fastened a piece of header wrap in between the hose and clamp. This helps to keep it away form the manifold (not on this picture). So far so good! I added a Heat Shield under this hose clamp
This is what we are trying to create in the steps below
 You will need: (1) Some 3/4 aluminium or steel flat bar (+/- 1 foot) (2) About 12 of 3 Aluminium or steel tubing. (2) Piece of 3X3 silicone hose and 2 hose clamps (3) 1 K&N (or similar) high flow filter
How I installed new brake pads on my i with Sport Package (should be fine for other E39 s) By Robert B.
 By Robert B.") How I installed new brake pads on my 1999 528i with Sport Package (should be fine for other E39 s) How I installed new brake pads on my 1999 528i with Sport Package (should be fine for other E39 s) By
How I installed new brake pads on my 1999 528i with Sport Package (should be fine for other E39 s) How I installed new brake pads on my 1999 528i with Sport Package (should be fine for other E39 s) By
HYUNDAI VELOSTER SHORT RAM 1.6T INTAKE INSTALLATION INSTRUCTIONS
 Installation: HYUNDAI VELOSTER SHORT RAM 1.6T INTAKE INSTALLATION INSTRUCTIONS Tools needed: 1/4 or 3/8 drive ratchet 12 extension (shorter ones work, but will be difficult to reach some bolts) 10mm socket
JRSC + BBK Install on SVTF. Neil A. Shah medicnas on focaljet September 2006
 JRSC + BBK Install on SVTF Neil A. Shah medicnas on focaljet September 2006 ECU up here. When removing make sure the smaller bundles of wires don t get wrapped around the bottom edge and break - this almost
Ford Super Duty 5.4L Spark Plug Change F250 4x4 XLT Sport Crew Cab
 1 of 32 Ford Super Duty 5.4L Spark Plug Change 2004 F250 4x4 XLT Sport Crew Cab Back to 2004 F250 Main Page Click Here for a PDF version of this article At close to 100k miles, I figured it was time for
How To: Fit an enclosed induction kit to the V6
 How To: Fit an enclosed induction kit to the V6 As a couple have done this I thought I'd have a go, but do a write up at the same time. Here's a quick summary of the equipment you'll be needing: 1 x Universal
Installing the Audiovox CCS-100 Cruise Control.
 Installing the Audiovox CCS-100 Cruise Control. This article was written by: Lon Lawrence w650kawasaki@leaco.net Cruise Control : Audiovox CCS-100 ($89) Webpage : www.summitracing.com Message: I've installed
Adjusting Carbs For Re-Jetting (Procedure written for an Intruder 1500 LC) NEWLY UPDATED: APRIL 2003
 NEWLY UPDATED: APRIL 2003") SECTION ONE: Get Prepared - Tools Adjusting Carbs For Re-Jetting (Procedure written for an Intruder 1500 LC) NEWLY UPDATED: APRIL 2003 Courtesy of: Half-Crazy Get a manual impact driver (the kind you hit
SECTION ONE: Get Prepared - Tools Adjusting Carbs For Re-Jetting (Procedure written for an Intruder 1500 LC) NEWLY UPDATED: APRIL 2003 Courtesy of: Half-Crazy Get a manual impact driver (the kind you hit
Some tips and tricks I learned from getting clutch out of vehicle Skoda Octavia year 2000
 Some tips and tricks I learned from getting clutch out of vehicle Skoda Octavia year 2000 Last change 2013-Oct-11 I bought Haynes manual for a starter. That s something well worth it s cost I believe.
Door Panel Removal & Window Stop Adjustment
 Door Panel Removal & Window Stop Adjustment By: Jeff Wolford Disclaimer: This is simply an article of how I fixed my car. I m not responsible if you break, scratch, or mess up anything following my example.
KIA FORTE SHORT RAM 1.6T INTAKE INSTALLATION INSTRUCTIONS
 Installation: KIA FORTE SHORT RAM 1.6T INTAKE INSTALLATION INSTRUCTIONS Tools needed: 1/4 or 3/8 drive ratchet 12 extension (shorter ones work, but will be difficult to reach some bolts) 10mm socket (deep
HYUNDAI VELOSTER COLD AIR 1.6T INTAKE
 HYUNDAI VELOSTER COLD AIR 1.6T INTAKE INSTALLATION INSTRUCTIONS Tools needed: 1/4 or 3/8 drive ratchet 12 extension (shorter ones work, but will be difficult to reach some bolts) 10mm socket (deep well)
How to Replace the B2 Piston Bore Seal
 Page 1 Home Cars for sale Trucks for sale Where we are Links to other diesel sites About us Why diesel? Diesel Videos How they work How they sound FAQ Dodge Diesel Maintenance tips, parts and DIY DVD's
Connecting the rear fog light on the A4 Jetta, while keeping the 5 Light Mod
 Connecting the rear fog light on the A4 Jetta, while keeping the 5 Light Mod DISCLAIMER: I'm human and make mistakes. If you spot one in this how to, tell me and I'll fix it This was done on my 99.5 Jetta.
Ford Racing BOSS 302 Engine Oil Cooler (11-14 GT)
") Tools needed: 14mm hex socket 7mm socket/wrench 8mm socket/wrench Ford Racing BOSS 302 Engine Oil Cooler (11-14 GT) 10mm socket (for airbox removal) ¾ inch or 19mm wrench Torque wrench Appropriate ratchets
Tools needed: 14mm hex socket 7mm socket/wrench 8mm socket/wrench Ford Racing BOSS 302 Engine Oil Cooler (11-14 GT) 10mm socket (for airbox removal) ¾ inch or 19mm wrench Torque wrench Appropriate ratchets
Vacuum and air hose replacement -- replacing all the old, crusty air and vacuum hoses under and around
 Vacuum and air hose replacement -- replacing all the old, crusty air and vacuum hoses under and around the intake manifold. Requires removing the intake manifold. While you've got the intake manifold off,
Timing belt change. Timing belt change
 Timing belt change Put 2 new Gates T275 timing belts on today. Tensioner drilled smooth and tight with less than 16,000 miles on her decided not to change the tensioners just the belts. You'll need some
Changing the Struts on a WK Jeep CRD
 Changing the Struts on a WK Jeep CRD Step by Step By Chirpz Disclaimer: I do not claim that this procedure is the right way or even the best way to change your struts. This is what I did after reading
C&L Cold Air Intake (03-04 Mach 1) - Installation Instructions
 - Installation Instructions") C&L Cold Air Intake (03-04 Mach 1) - Installation Instructions The below installation instructions work for the following products: C&L Cold Air Intake (03-04 Mach 1) Please read through the instructions
C&L Cold Air Intake (03-04 Mach 1) - Installation Instructions The below installation instructions work for the following products: C&L Cold Air Intake (03-04 Mach 1) Please read through the instructions
INSTALLATION INSTRUCTIONS
 Equipped with AEM Dryflow Filter No Oil Required! INSTALLATION INSTRUCTIONS PART NUMBER: 22-401 2000 HONDA Civic EX L4-1.6L C.A.R.B. E.O. # D-392-11 1994-1999 HONDA Civic EX L4-1.6L C.A.R.B. E.O. # D-392-6
Procharger Stage II Intercooled Supercharger System (11-14 GT)
") Procharger Stage II Intercooled Supercharger System (11-14 GT) Installation Time: Approximately one day. Installed on 2012 Mustang GT 5.0/Manual Required Tools 3/8 Socket Set (Standard and Metric) 1/2
Procharger Stage II Intercooled Supercharger System (11-14 GT) Installation Time: Approximately one day. Installed on 2012 Mustang GT 5.0/Manual Required Tools 3/8 Socket Set (Standard and Metric) 1/2
2001 V70 T5 ETM Removal and Cleaning Directions
 2001 V70 T5 ETM Removal and Cleaning Directions Howard Cheng howardc64@gmail.com 10/24/05 Version 1.4 Read this before you start I performed this ETM cleaning because I had gotten 2 reduced performance
HPFP DIY. Warning: The injector fuel lines, the rail, and the HPFP are pressurized long after you turn off the car, I recommend
 HPFP DIY Warning: The injector fuel lines, the rail, and the HPFP are pressurized long after you turn off the car, I recommend disconnecting the battery and letting the car sit over night before performing
INSTALLATION INSTRUCTIONS PART NUMBER AEM C (GUN METAL GRAY FINISH)
") Equipped with AEM Dryflow Filter No Oil Required! INSTALLATION INSTRUCTIONS PART NUMBER AEM-21-805C (GUN METAL GRAY FINISH) 2016.5-17 CHEVROLET CRUZE 1.4T ITEM NO. PART NUMBER DESCRIPTION QTY. 1 21-2038DK
Equipped with AEM Dryflow Filter No Oil Required! INSTALLATION INSTRUCTIONS PART NUMBER AEM-21-805C (GUN METAL GRAY FINISH) 2016.5-17 CHEVROLET CRUZE 1.4T ITEM NO. PART NUMBER DESCRIPTION QTY. 1 21-2038DK
Replacing MK4 Golf/Jetta radiator mounts in-car
 Replacing MK4 Golf/Jetta radiator mounts in-car This is a guide to replacing the radiator mounts in a MK4 Golf/Jetta. This involves moving the core support to the service position which allows you to do
Figure 1: Valve housing smooth vs. o-ring groove
 If you are driving an older Corvette, and by that I mean a C2 or C3, it will eventually get to a point where the Power Steering Control Valve (PSCV) will leak and require attention. In 2002, I had to repair
Rebuilding the HE-120 Redrive
 Rebuilding the HE-120 Redrive Rick Cavallaro Disclaimer: I am NOT an expert mechanic. If something looks or sounds wrong in these directions, it probably is. I d be happy to receive any tips or feedback
Improving the gearshift feel in an SW20.
 Improving the gearshift feel in an SW20. Part one In 3 parts. The SW20 gearshift can be often be greatly improved by eliminating play in the shift linkages, and this article covers three areas that need
Installing Rear Brake Pads on a WK Jeep
 Installing Rear Brake Pads on a WK Jeep Step by Step By Chirpz Disclaimer: I do not claim that this procedure is the right way or even the best way to change your rear brake pads. This is what I did after
Projector39/Umnitza BMW Headlight & Re-Installation for E39s Predator Angel Eyes, and Lamin-X Installation
 Projector39/Umnitza BMW Headlight & Re-Installation for E39s Predator Angel Eyes, and Lamin-X Installation Now it is time to remove the headlights! Obviously you have to open the hood to do this. 100_3630.jpg
Pypes Polished Shorty Headers (05-10 V6):
:") Pypes Polished Shorty Headers (05-10 V6): Introduction: The kit comes complete with replacement hardware and gaskets and can be easily done in your driveway. The hardware supplied for install includes
Pypes Polished Shorty Headers (05-10 V6): Introduction: The kit comes complete with replacement hardware and gaskets and can be easily done in your driveway. The hardware supplied for install includes
HOW TO MODIFY A STOCK DODGE KEGGER INTAKE MANIFOLD
 HOW TO MODIFY A STOCK DODGE KEGGER INTAKE MANIFOLD Even though this 3.9L V6 intake manifold is smaller than the 5.2L and 5.9L V8 intake manifolds, the same instructions apply to all 3 engines. If you are
Ford Racing Performance Improvement Intake Manifold (96-04 GT) Time Necessary: Approximately 4 hours
 Time Necessary: Approximately 4 hours") Ford Racing Performance Improvement Intake Manifold (96-04 GT) Time Necessary: Approximately 4 hours Tools Required: Ratchet and socket set Torque wrench Large adjustable wrench Needle nose pliers A dozen
Ford Racing Performance Improvement Intake Manifold (96-04 GT) Time Necessary: Approximately 4 hours Tools Required: Ratchet and socket set Torque wrench Large adjustable wrench Needle nose pliers A dozen
Disco 3 Clock Spring / Rotary Coupler replacement
 Disco 3 Clock Spring / Rotary Coupler replacement I recently had to change my Clock spring and thought some folks may find it helpful to see what it entailed. I did lots of reading around but couldn t
W123 Transmission Vacuum Modulator Adjustment DIY - measure it the 'right' way
 W123 Transmission Vacuum Modulator Adjustment DIY - measure it the 'right' way Why do you need to do this?: You need to do this to properly check the internal hydraulic pressure of the transmission, either
INSTALLATION INSTRUCTIONS PART NUMBER C (Gun Metal Grey Finish)
") Equipped with AEM Dryflow Filter No Oil Required! INSTALLATION INSTRUCTIONS PART NUMBER 21-763C (Gun Metal Grey Finish) 2011-2014 VOLKSWAGEN JETTA 2.0L DSL 1 ITEM NO. PART NUMBER DESCRIPTION QTY. 1 2-1542C
Equipped with AEM Dryflow Filter No Oil Required! INSTALLATION INSTRUCTIONS PART NUMBER 21-763C (Gun Metal Grey Finish) 2011-2014 VOLKSWAGEN JETTA 2.0L DSL 1 ITEM NO. PART NUMBER DESCRIPTION QTY. 1 2-1542C
Volvo 850 Radiator Replacement Jason Reed 29 March 2013
 This write up covers removing and replacing the radiator on a 97 855 GLT wagon with light pressure turbo and automatic transmission. This car has 162K miles. The radiator, which was original, developed
Prerequisites: Shop Manual (recommended) pages 3-9 through 3-13.
 pages 3-9 through 3-13.") Prerequisites: Order your gaskets average about $25.00 bucks X 2 so $50.00 4NK-11193-00-00 Obtain a shim kit (Should have several 265 and 270s) (Some dealers will exchange) Obtain a Valve Bucket Tool YM-33961
Prerequisites: Order your gaskets average about $25.00 bucks X 2 so $50.00 4NK-11193-00-00 Obtain a shim kit (Should have several 265 and 270s) (Some dealers will exchange) Obtain a Valve Bucket Tool YM-33961
GRAPHIC NOVELS BY STEFAN PETRUCHA & SHO MURASE
 2 TM GRAPHIC NOVELS BY STEFAN PETRUCHA & SHO MURASE Monkey Wrench Blues Dress Reversal BASED ON THE SERIES BY CAROLYN KEENE TM That s George holding the camera, Bess under the hood, and me, Nancy Drew,
HOW TO REPLACE THE SPOILER ON YOUR GEN 3 PRIUS
 HOW TO REPLACE THE SPOILER ON YOUR GEN 3 PRIUS Yup, it happened. The spoiler on your beloved Prius has departed this earth and now is in the great junkyard in the sky. This is how you make it all better
DIY: Repairing/Replacing the Timing Chain Tensioner
 DIY: Repairing/Replacing the Timing Chain Tensioner By Saki GT - February 8, 2012 [youtube=http://www.youtube.com/watch?v=24cil5_9yvq] The above video is an example of how a bad Timing Chain Tensioner
E46 FUEL FILTER CHANGE Pics from CI
 1 of 10 5/3/2010 1:48 PM E46 FUEL FILTER CHANGE Pics from 2001 330CI Bellows Expansion Joints Metal Bellows Expansion Joints in Every Style from Flexicraft www.flexicraft.com/metal_bellows Ask a BMW Mechanic
X-Type w/ non-premium sound amplifier installation instructions
 X-Type w/ non-premium sound amplifier installation instructions 1. Pull radio from dash (see Radio Removal Instructions ) 2. Disconnect wiring harness from back of radio by pushing in tab on plug and pulling
At Mark's suggestion I thought I'd write this up so future Coupe lovers can have as much fun* as I did with this job.
 At Mark's suggestion I thought I'd write this up so future Coupe lovers can have as much fun* as I did with this job. My enormous thanks to forum members, particularly glorfindel, for their advice when
b o o s t r e t a i n e r v a l v e
 b o o s t r e t a i n e r v a l v e i n s t a l l a t i o n i n s t r u c t i o n s For questions or tech support, CONTACT US! Email: greg@hiperformancestore.com sales@hpsimotorsports.com Sites: www.hiperformancestore-fiat.com
To Install the Jolley magnetic electronic ignition system and new matched coil and resistor in Daimler Ferret.
 To Install the Jolley magnetic electronic ignition system and new matched coil and resistor in Daimler Ferret. Ignition system parts purchased from Frank Jolley www.classicheads.com First problem is to
Intake Kit Supplement for CRV and Pathfinder
 Intake Kit Supplement for CRV and Pathfinder This guide will briefly outline how to install the intake kits for the Honda CRV and Nissan Pathfinder. This is a pretty basic job, but for the average person
Duramax LMM EGR Delete With Intake Tube
 Duramax LMM EGR Delete With Intake Tube PACKING LIST: QTY. 4 2 2 2 Description Intake Charge Pipe w/ O-Ring M8 Flange Nut M8x25 Flange Hex Bolt M0x20 Hex Head Bolts M8x25 Socket Head Bolts M8x20 Hex Head
INSTALLATION INSTRUCTIONS PART NUMBER:
 Equipped with AEM Dryflow Filter No Oil Required! INSTALLATION INSTRUCTIONS PART NUMBER: 22-417 1999-2000 HONDA Civic Si L4-1.6L C.A.R.B. E.O. # D-670 * NOTE: Legal in California only for racing vehicles
Mazdaspeed 6 Version 2 Oil Catch Can Kit Install Guide
 Mazdaspeed 6 Version 2 Oil Catch Can Kit Install Guide Copyright DD2, Inc. 1 WARNING: By installing this Product, you understand that: The buyer/user assumes all risk as to quality, performance and use
SR Performance Twin 62mm Throttle Body for GT
 Required Tools: SR Performance Twin 62mm Throttle Body for 2005-2010 GT Flat-head screwdriver Ratchet Small extension 10mm socket 8mm socket T20 Torx bit Needle nose pliers 5mm allen wrench Recommended
*Some speedometers have these additional electronic connections. If yours does, then remove the smaller slotted screws shown.
 www.odometergears.com 1981-1985 240 Cable-Driven Speedometers (NOT for 1986 and later electronic units) http://www.davebarton.com/240-odometer-repair.html For this set of instructions below, I will not
Installation Manual v1.1: Piece Pulse Flow Exhaust Manifold, Stock Replacement L Cummins
 Installation Manual v1.1: 204-927-2326 2-Piece Pulse Flow Exhaust Manifold, Stock Replacement 2007.5-2016 6.7L Cummins Please read all instructions before installation. We suggest purchasing new gaskets
Replacement Front Outer Tie Rod End (85-93 All)
") Replacement Front Outer Tie Rod End (85-93 All) Materials in the box: One outer tie rod end, castle nut, cotter pin, nut, and grease fitting. Tools Needed: Jack and Jack Stands Pry bar (you may or may
Replacement Front Outer Tie Rod End (85-93 All) Materials in the box: One outer tie rod end, castle nut, cotter pin, nut, and grease fitting. Tools Needed: Jack and Jack Stands Pry bar (you may or may
INSTALLATION INSTRUCTIONS
 Equipped with AEM Dryflow Filter No Oil Required! INSTALLATION INSTRUCTIONS PART NUMBER: 22-408 1994-1997 HONDA Accord L4-2.2L C.A.R.B. E.O. # D-670 1994-1995 HONDA Accord EX L4-2.2L C.A.R.B. E.O. # D-670
Stand Alone Fog Lights Installation Instructions
 Tools Required: 1. Trim Removal tool or protected flat screwdriver 2. #2 Phillips Screwdriver 3. 10mm socket 4. 10mm wrench 5. 8mm or 5/16 socket 6. Adjustable Pliers 7. Electrical Tape WARNING!!! Disconnect
H31 BOOSTER REBUILD & MASTER CYLINDER
 2010 1991 BMW 750iL George Fontes gajfontes@yahoo.com H31 BOOSTER REBUILD & MASTER CYLINDER Rebuild hydraulic booster and replace Master Cylinder. Page 1 of 16 Master Cylinder Removal & Brake Booster Rebuild
upper and lower ball joints ( I went with Moog from rockauto.com): two K80026 and two K8607T
: two K80026 and two K8607T") Parts required: two 5C3Z*4A322*AA = hub / steering knuckle o-ring two AC3Z*1S175*A = updated axle shaft "dust seal" two 5C3Z*3254*A = steering knuckle / axle shaft seal upper and lower ball joints ( I
Parts required: two 5C3Z*4A322*AA = hub / steering knuckle o-ring two AC3Z*1S175*A = updated axle shaft "dust seal" two 5C3Z*3254*A = steering knuckle / axle shaft seal upper and lower ball joints ( I
How I Installed the Edgerider Wheels on my Gammill Classic Plus
 How I Installed the Edgerider Wheels on my Gammill Classic Plus Jeffrey Lomicka May 15, 2004 I'd been looking forward to installing these wheels since I tried them this year at MQX. This is my pictorial
INSTALLATION INSTRUCTIONS FOR MK4 VOLKSWAGEN JETTA (BORA) /GOLF 1.8T, 2.0L, VR6, & R32 MODELS ALSO FITS ALL MODELS OF SEAT LEON & TOLEDO
 /GOLF 1.8T, 2.0L, VR6, & R32 MODELS ALSO FITS ALL MODELS OF SEAT LEON & TOLEDO") CI100001 INSTALLATION INSTRUCTIONS FOR 1999.5-2005 MK4 VOLKSWAGEN JETTA (BORA) /GOLF 1.8T, 2.0L, VR6, & R32 MODELS ALSO FITS ALL MODELS OF SEAT LEON & TOLEDO Thank you for choosing to purchase a Carbonio
CI100001 INSTALLATION INSTRUCTIONS FOR 1999.5-2005 MK4 VOLKSWAGEN JETTA (BORA) /GOLF 1.8T, 2.0L, VR6, & R32 MODELS ALSO FITS ALL MODELS OF SEAT LEON & TOLEDO Thank you for choosing to purchase a Carbonio
Tacoma 1 Body Lift
 Support@toyteclifts.com Read all of the installation instructions prior to ToyTec Lifts body lift installation. ToyTec Lifts L.L.C. recommends that this be installed by a certified auto technician 2005-2015
Cable Shift Linkage Kit
 Cable Shift Linkage Kit INSTALLATION INSTRUCTIONS ididit column to GM Trans FOR PART NUMBER S: 2801000010, 2802000010 ididit Column to 350 Trans...Pg 1-4 ididit Column to 400 Trans...Pg 5-8 ididit Column
Changing the Power Steering Belt
 Changing the Power Steering Belt Brett Dukes (Maverick) from the BigJimny Forum has contributed this article to the Website. Many thanks. Whilst off-roading on Sunday, my alternator Fan Belt snapped -
MAZDASPEED3 Intercooler Instructions
 MAZDASPEED3 Intercooler Instructions Congratulations on your purchase of the COBB Tuning Front Mount Intercooler System for your 2007-2009 Mazdaspeed3. The following instructions should assist you through
Installation Procedure Nissan Maxima SE 3L DOHC VE30DE
 Phenolic Performance Intake Spacers Installation Procedure 1992-1994 Nissan Maxima SE 3L DOHC VE30DE Disclaimer: These spacers should only be installed by a qualified mechanic. If you decide to do the
Attached Images. Attached Images
 Results from May 9 th : I'm sorry to say... I should have stayed home!.. Well, actually I'm glad I went, but the day was NOT a success from a competitive standpoint. It's always risky to take an untested
HR ZDX Throttle Body Install (06-11 Civic Si)
") HR ZDX Throttle Body Install (06-11 Civic Si) This guide will walk you through the steps to install a ZDX throttle body onto your RBC Intake manifold using the Hybrid Racing ZDX adapter. Written By: Hybrid
HR ZDX Throttle Body Install (06-11 Civic Si) This guide will walk you through the steps to install a ZDX throttle body onto your RBC Intake manifold using the Hybrid Racing ZDX adapter. Written By: Hybrid
1986 Rear Disk Brake Upgrade. All hard lines mounted to the rear axle with mounting screws. 1/4" fittings
 1986 Rear Disk Brake Upgrade Being well prepared for a project of this size is the key to success. I thought I was well prepared by doing a lot of research and getting all of the required parts before
BMW 528i E39 Sunroof Repair
 These instructions will help guide you through the repair process for broken sunroof control rails on an E39 chassis. Before I get started, I want to give a shout-out to a couple people who also posted
INSTALLATION INSTRUCTIONS
 Equipped with AEM Dryflow Filter No Oil Required! INSTALLATION INSTRUCTIONS PART NUMBER AEM-21-805C (GUN METAL GRAY FINISH) 2016.5-19 CHEVROLET CRUZE 1.4T 1 ITEM NO. PART NUMBER DESCRIPTION QTY. 1 21-2038DK
Equipped with AEM Dryflow Filter No Oil Required! INSTALLATION INSTRUCTIONS PART NUMBER C (Gun Metal Grey Finish) 2015 Ford Mustang 2.
 2015 Ford Mustang 2.") Equipped with AEM Dryflow Filter No Oil Required! INSTALLATION INSTRUCTIONS PART NUMBER 26-3001C (Gun Metal Grey Finish) 2015 Ford Mustang 2.3 Turbo ITEM NO. PART NUMBER DESCRIPTION QTY. 1 2-1523C TUBE;
Equipped with AEM Dryflow Filter No Oil Required! INSTALLATION INSTRUCTIONS PART NUMBER 26-3001C (Gun Metal Grey Finish) 2015 Ford Mustang 2.3 Turbo ITEM NO. PART NUMBER DESCRIPTION QTY. 1 2-1523C TUBE;
Mustang Radiator Conversion DIY. By GearHeadPeter. January 27, 2011
 1964-1966 Mustang Radiator Conversion DIY By GearHeadPeter January 27, 2011 We all know that the radiators in our cars are not the best, especially if you have done any customization to the engine, which
APIKOL AAN INTAKE MANIFOLD INSTALLATION INSTRUCTIONS
 APIKOL AAN INTAKE MANIFOLD INSTALLATION INSTRUCTIONS Estimated Installation Time: Approximately 2 hours Parts that will need to be modified/removed (Details provided later in the instructions): Intercooler
Crawford Performance Air/Oil Separator LGT / 08+ WRX TMIC (OEM Turbo) - (S0718)
 - (S0718)") Crawford Performance Air/Oil Separator 05-09 LGT / 08+ WRX TMIC (OEM Turbo) - (S0718) Parts List Part Number Quantity Description Sent Recvd S0709-1 1 TMIC Air/Oil Separator Version 2 F0365 1 Crank Case
Crawford Performance Air/Oil Separator 05-09 LGT / 08+ WRX TMIC (OEM Turbo) - (S0718) Parts List Part Number Quantity Description Sent Recvd S0709-1 1 TMIC Air/Oil Separator Version 2 F0365 1 Crank Case
Volvo 1800 Dash Pad Replacement
 Volvo 1800 Dash Pad Replacement (courtesy of John Garden State Chapter Volvo Club America) Reupholstering the dash Well it has been some time since I have been online in the forum. Winter is a quite time
Mustang 7.5 Limited Slip Differential (28 Spline) V8; V6:
 V8; V6:") Mustang 7.5 Limited Slip Differential (28 Spline) 79-85 V8; 86-10 V6: Required Tools: Ratchet Wrench Torque Wrench 1/2", 5/16, 3/4", 12mm and 15mm Sockets Lug nut Wrench Dial Indicator Digital Measuring
Mustang 7.5 Limited Slip Differential (28 Spline) 79-85 V8; 86-10 V6: Required Tools: Ratchet Wrench Torque Wrench 1/2", 5/16, 3/4", 12mm and 15mm Sockets Lug nut Wrench Dial Indicator Digital Measuring
Front Suspension Redo
 Front Suspension Redo Message: First, thanks to all the previous posters for guidance in my doing the suspension. As thanks, here s the updated document for doing the front suspension. Procedure: While
How To: Fix That Ugly Hanging E-Brake Cable A CFans Members Mod Project by dirtydawg
 How To: Fix That Ugly Hanging E-Brake Cable A CFans Members Mod Project by dirtydawg Skill Level: Easy Disclaimer: Please use caution and seek professional assistance when necessary. ColoradoFans.com,
Highlander Hybrid Engine Block Heater Installation
 Highlander Hybrid Engine Block Heater Installation By Evan E. Fusco, MD *Disclaimer: I am not a certified mechanic nor am I an expert on working on cars. I am a hobbiest and tinkerer. I post these instructions
GTO/Holden (VR-SDR) Instructions
 Instructions") The All new Pontiac GTO/Holden, VR-SDR (Vararam - Super Duty Racing Cold Air Induction System) GTO/Holden (VR-SDR) Instructions Tools needed 1. Flat head screwdriver or 8mm socket 2. Rotary saw with cutoff
The All new Pontiac GTO/Holden, VR-SDR (Vararam - Super Duty Racing Cold Air Induction System) GTO/Holden (VR-SDR) Instructions Tools needed 1. Flat head screwdriver or 8mm socket 2. Rotary saw with cutoff
INSTALLATION INSTRUCTIONS
 Equipped with AEM Dryflow Filter No Oil Required! INSTALLATION INSTRUCTIONS PART NUMBER: 22-401 2000 HONDA Civic EX L4-1.6L C.A.R.B. E.O. # D-392-11 1994-1999 HONDA Civic EX L4-1.6L C.A.R.B. E.O. # D-392-6
What s in your new header system kit?
 !"#$% "#$%& ' "())' **+ Congratulations on your purchase of the Dynatech / SuperMaXX system for the Dodge Magnum / Chrysler 300C. We believe, and think you will agree that this system is second to none
C&L Cold Air Intake w/ 80MM MAF (01 Bullitt)
") C&L Cold Air Intake w/ 80MM MAF (01 Bullitt) Install time: Approx. 30 min. Tools Required: 10mm Socket 8mm Socket 3/8in ratchet or 1/4in ratchet Flat head screw driver 1/4in bit driver for supplied T20
C&L Cold Air Intake w/ 80MM MAF (01 Bullitt) Install time: Approx. 30 min. Tools Required: 10mm Socket 8mm Socket 3/8in ratchet or 1/4in ratchet Flat head screw driver 1/4in bit driver for supplied T20
List of parts needed below. Tools needed
 1 BMW 645 Coolant leak repair (Cap with Seal Repair and Expanding Coolant Pipe Installation w Pics) By Michael R. Brown (Estimated time to complete the job is 6-8 hrs) List of parts needed below. BMW PART
INSTALLATION INSTRUCTIONS PART NUMBER C (Gun Metal Gray Finish)
") Equipped with AEM Dryflow Filter No Oil Required! INSTALLATION INSTRUCTIONS PART NUMBER 21-764C (Gun Metal Gray Finish) YEAR MAKE MODEL ENGINE SIZE 2014-2015 VW JETTA 1.8 TSI 2014-2015 VW JETTA GLI 2.0
Equipped with AEM Dryflow Filter No Oil Required! INSTALLATION INSTRUCTIONS PART NUMBER 21-764C (Gun Metal Gray Finish) YEAR MAKE MODEL ENGINE SIZE 2014-2015 VW JETTA 1.8 TSI 2014-2015 VW JETTA GLI 2.0
2001 BMW X5 4.4i. Fuel Filter Replacement
 P P 2001 BMW X5 4.4i Fuel Filter Replacement Symptoms for Replacement: OBDII code P0171, Lean Bank1, which could be a bad or dirty MAF sensor Sluggish engine performance including hesitation with Wide
Installing the Wireless Charging upgrade kit in a 2018 XT5 (Platinum version)
") Installing the Wireless Charging upgrade kit in a 2018 XT5 (Platinum version) September 2, 2018 Tools needed: Wireless charger upgrade kit Plastic trim tools 7 mm nut driver Background: I purchased the
Installing the Wireless Charging upgrade kit in a 2018 XT5 (Platinum version) September 2, 2018 Tools needed: Wireless charger upgrade kit Plastic trim tools 7 mm nut driver Background: I purchased the
BMW E46 Convertible Hydraulic Line #23 Replacement Guide Created by taylor192 of E46Fanatics.com
 BMW E46 Convertible Hydraulic Line #23 Replacement Guide Created by taylor192 of E46Fanatics.com BMW E46 Line #23 Replacment Guide, page 1 of 23 Background: Line #23 runs from the valve block on the driver's
Traditional method Oil Change Instructions For VW 1.9 TDI
 Traditional method Oil Change Instructions For VW 1.9 TDI Created by DeafBug This document provides instructions on changing the oil and filter on a VW 1.9 TDI engines. All the pictures here are taken
C&L Cold Air Intake (05-09 V6) - Installation Instructions
 - Installation Instructions") C&L Cold Air Intake (05-09 V6) - Installation Instructions The below installation instructions work for the following products: C&L Cold Air Intake (05-09 V6) Please read through the instructions carefully
C&L Cold Air Intake (05-09 V6) - Installation Instructions The below installation instructions work for the following products: C&L Cold Air Intake (05-09 V6) Please read through the instructions carefully
Part number RD1306. Maintaining your Cold air intake system: Tools required:
 Part number RD1306 06-07 Honda S2000 4 cyl. 2.2L 1-2 piece cold air intake 1-3 Injen filter (#1014) 1-2 3/4 x 3 silicone step hose (#3040) 1-3 straight hose (#3044) 4- Power-bands.362.048 (#4004) 1-1525
Installation Directions for FINGER STICK and Blocker Plate
 Installation Directions for FINGER STICK and Blocker Plate What is a Finger Stick? A Finger Stick is a simple circuit that modifies the MAF signal on LLY and LBZ engines (not LB7 engines) to expected levels
STARTER COMPONENTS FOR REMOVAL AND INSTALLATION
 Removal STARTER COMPONENTS FOR REMOVAL AND INSTALLATION Starter Components For Removal And Installation REMOVAL OF STARTER 1. DISCONNECT CABLE FROM NEGATIVE TERMINAL OF BATTERY CAUTION: Work must be started
Pre-Installed. 1 Seal Kit 10 Silicone O-ring, 3/32 W, Intake Port Seals 1 Throttle Body Seal
 Atomic AirForce Intake Manifold for LS7, 2006-2013 Corvette and 2014 Z28 Camaro - PN 2701 LS2, 2005-2007 Corvette and CTS-V, 2005-2006 GTO and SSR PN 2702 LS1/6*, 1997-2004 Corvette, 1998-2002 Camaro/Firebird,
MACE ENGINENEERING GROUP VN-VS V8 COLD AIR INTAKE FITTING INSTRUCTIONS COLD AIR INTAKE KIT TO SUIT HOLDEN VN-VS. Fitting Instructions
 COLD AIR INTAKE KIT TO SUIT HOLDEN VN-VS V8 Fitting Instructions PART 1: REMOVING STANDARD AIR BOX The position of the airbox is shown below. Note that VR-VS models have the washer bottle in front; earlier
Tools needed: Here is a pic of the shift kit I used. It is a Transgo brand and as you can see, it just a bag full of springs and one valve.
 Before installing a shift kit, be sure the transmission is in good operating order. If your transmission is making noises, slipping, shifting bad or the fluid looks brown or smells burnt, take the transmission
2014 & up MAZDA 3, 6 and CX5 2.0 & 2.5L Oil Catch Can Installation Instructions
 Page1 James Barone Racing Aftermarket Parts and Accessories 2014 & up MAZDA 3, 6 and CX5 2.0 & 2.5L Oil Catch Can Installation Instructions Tooling: Jack Jack stands or ramps Ratchet wrench 3 extension
Manual for the Dragonfly tattoo machine rev.2
 Manual for the Dragonfly tattoo machine rev.2 1 Introduction We are proud to present the Dragonfly tattoo machine. Designed with the tattoo artist in focus and manufactured with the highest quality materials
Preparation. With the car on the ground you will want to:
 Doing a stage 3 swap was a LOT of work Audi S4 Stage 3 (K04) Install Doing a stage 3 swap was a LOT of work. Just a lot of small and simple tasks really. Just make sure you keep track of what you re doing.
ENG-16, Turbocharger Replacement (Including Tips on K27 Turbocharger Installation)
") ENG-16, Turbocharger Replacement (Including Tips on K27 Turbocharger Installation) Introduction Replacing the turbocharger on a 951 is not extremely difficult. However, it is very tedious because there
ENG-16, Turbocharger Replacement (Including Tips on K27 Turbocharger Installation) Introduction Replacing the turbocharger on a 951 is not extremely difficult. However, it is very tedious because there