Highlander Hybrid Engine Block Heater Installation
|
|
|
- Lilian Bond
- 6 years ago
- Views:
Transcription

1 Highlander Hybrid Engine Block Heater Installation By Evan E. Fusco, MD *Disclaimer: I am not a certified mechanic nor am I an expert on working on cars. I am a hobbiest and tinkerer. I post these instructions only to assist others who might be interested in attempting to install an Engine Block Heater on their Highlander Hybrid. It is assumed those attempting have adequate tools, skills, and common sense to make adjustments. If you feel at all uncertain about your ability to begin or complete this installation please see a certified Toyota Service Center to perform the installation for you. I assume absolutely no liability if you damage your car or anyone else s during this installation or for any damage that might occur later as a result of it s installation whether you followed my instructions or not. This is for information purposes only. What This Is: These are instructions to assist in the installation of a Toyota Canada manufactured Engine Block Heater (EBH) into a 2006 Toyota Highlander Hybrid. It may be the same for future Model Year Toyota Highlander Hybrids, but it may not and you need to confirm this to be certain. It also should work for any V6 non-hybrid Highlander but this also has not been confirmed and you should do so before proceeding. Time and Difficulty: It took the author 4 hours to complete the installation. I would expect, with the assistance of these instructions, assuming you have all the appropriate tools, that
2 it could be accomplished in between 1-2 hours. Someone intimately familiar with the Highlander s engine compartment could probably do it in less than 1 hour. I consider this moderately to very difficult. You re working in a confined space much of the time and it is difficult to get leverage to loosen or tighten various nuts/bolts/screws/plates. You should be fairly dexterous with your fingers and have all the recommended tools. There is nothing technical or complicated in this, but you do need to follow the instructions very carefully and be patient and diligent in completing some of the more difficult steps. Tools & Parts: 1)Socket set in particular a 10mm & 12mm socket having one each shallow and deep (deep is esp. important for the 12mm in order to get the old plate off) will help, if you have to choose choose the deep socket. If you can find one a 6mm Hex/Allen that fits on a socket will help, but a regular Allen/Hex wrench will suffice. Ideally you need a 5mm Star socket (the socket should go over the star shaped end of the stud, not a star shaped socket that goes into a screw head), if you absolutely can t find that then a 5mm regular socket will probably work, but you risk stripping the studs). You should also have a selection of screwdriver handles, a small socket wrench, a medium wrench, and an extension for your socket wrench. 2) A standard size Phillips Head Screwdriver and Flat Head Screwdriver. 3)Vinyl tubing I think it s ¼ diameter that I used. What I ultimately found and used was an Aqua Culture Mini Gravel Vacuum Cleaner


3 for an aquarium that I found in the Fish supply section of Wal-Mart (~$5). The tubing was 72 long and that was just right. Surgical rubber tubing would also work fine. The firmer vinyl tubing use for home freezer lines will NOT work it s too small and inflexible. It s also NOT the smaller caliber tubing used for fish tanks, this is closer to ¼. You need a softer vinyl that will stretch slightly over the drain and vent tubes. 4) Car Ramps or Jack Stands You ll be under the car a bit and having the space is very nice. Decent ramps at Wal-mart were under $30.

4 5) A 6mm Allen/Hex Wrench. I d have one available even if you have the Allen Socket above since the socket may not reach some spots. 6) Either 2 1-Gallon Milk Jugs very clean. Or some other 1 ½ gallon plus clean jug. You will only be draining a pint over 1 gallon, but this may vary so be prepared for 2 gallons. It is also reused so your container must be free of contaminants and it s nice to be able to close it up to prevent spillage and contamination. 7) Bandaids for scraped knuckles. 8) And, of course, an Engine Block Heater. There are probably multiple sources available for this part.perhaps even in the US. But mine is Canadian made and was ordered from Langley Toyotatown at Toyotadepot.com. a3d610f03fa3b If you want to try calling them or checking other sources it is part # C I don t know if this is a temporary supply issue or what as they currently don t list any Highlander part at all. I would them to check the status. Someone also suggested an alternative that may work but I have not tried, tested, nor hear of anyone trying/testing and it may be a bit simpler of an installation thanks to a V-Loc connection system and it may not require the removal of the old studs from the Internal Combustion Engine (ICE). (see: s.pdf ) It is the ZeroStart Part No for the 1MZ-FE engine as well as the Toyota V6 3.3L which is the ICE that is in the HiHy. 9) Funnel


5 Installation *Let car sit at least 1-2 hours after use before starting so it will not be too hot. 1)Put car on ramps or Jack up (see owner s manual) and put jack stands in place. Be sure to put on the parking brake and use chocks on the rear wheels. 2)Remove the Engine Under Cover.

6 There are 2 stays that snap out. Put screws, cover and stays in a safe place. 3)Remove the cover over the radiator.
7

8 Removing those stays is tricky, I broke both in the process. If someone knows the proper technique to take them out without breaking them please let me know ( below). Note, we are NOT removing the cap from the coolant reservoir, but the radiator cap itself on the driver s side of the car under the black plastic cover just in front of the inverter. Remove the radiator cap.
 from above as well.")
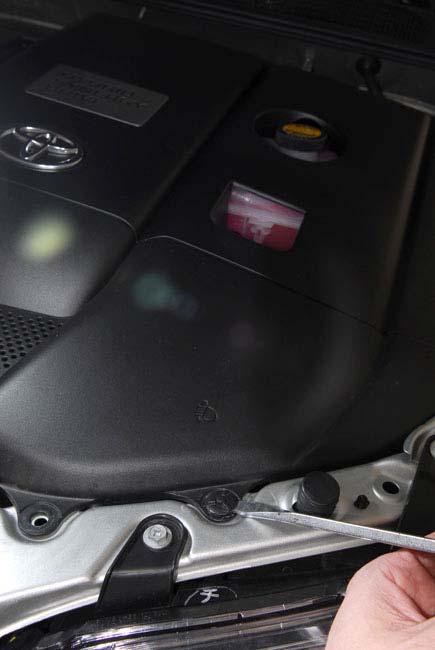
9 4)Remove the 2 bolts and one nut holding the metal cover over the manifold. This will loosen it up enough to help you see from above and access some of the parts (coolant drain plug, EBH nuts, etc) from above as well. Some of the Toyota instructions say to completely remove the manifold. While I have no doubt this would improve access dramatically I did not do it as I have no idea what s involved in getting it back on properly. 5) Identify the Engine Coolant drain plug and attach the drain hose with the hose running down and under the HiHy to one of the milk jugs.
10


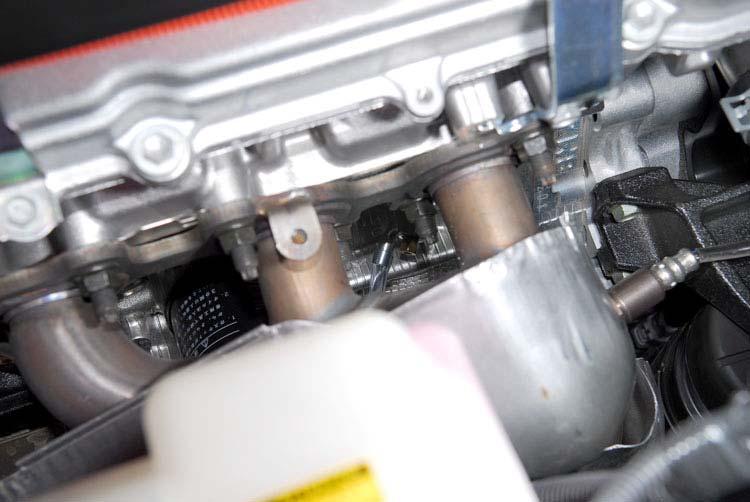
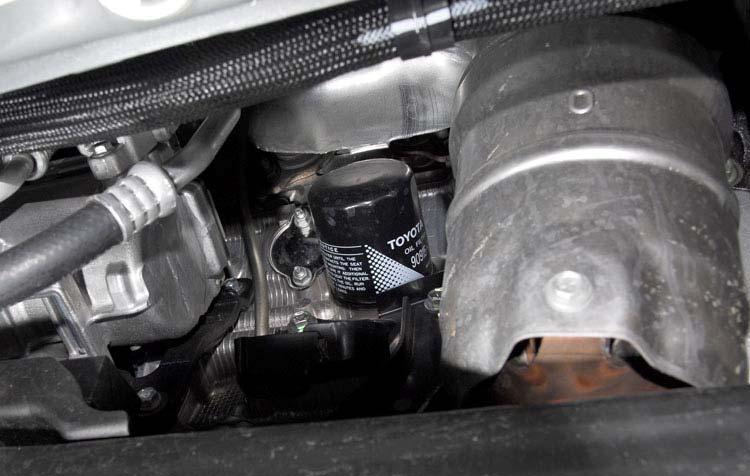
11 Use the 10mm socket and open the drain. Allow as much coolant to drain as will drain out. Note: We are NOT opening the radiator drain it s not necessary for the EBH install. It should drain just a bit over 1 gallon. Once it stops draining tighten the Engine Coolant plug and remove the vinyl hose. 6) From below the car reach up and remove the nuts holding the plate on the engine where the EBH will be inserted. It is right next to the Oil filter on the passenger side of the filter.
12
13

14 You probably don t have to worry about any leakage here as there is a strong sealant holding the plate on. 7)Remove the plate. This, I found, was one of the two most difficult parts of the installation. I used a flat head screw driver and wedged it b/w the plate and the engine block then twisted, tapped, levered, etc until I got the plate to loosen up. It will, but it isn t easy or wasn t for me b/c it s difficult to get leverage in the space. 8)Put your finger in the hole and carefully remove the old O-ring and any residual sealant inside the hole or making the outside not smooth. 9)Use your star socket or 5mm regular socket and remove the old studs/bolts that are screwed into the engine block that were holding on the old plate.
 Use the silicone lubricant and seal the O-ring on the new EBH. Insert it into the hole until firmly seated.")
15 These also require a decent amount of force to break free, but once they break free they come off easily. Note that if they do strip you may have to resort to using vice grips to get a firmer grip. They come out in a normal counter clockwise rotation. Remove both completely. 10) Use the silicone lubricant and seal the O-ring on the new EBH. Insert it into the hole until firmly seated. Note that ideally the prongs for where the cord will plug in should be 180 degrees opposite from how I have mine
Screw in the new bolts using the locking washer. Tighten firmly (but don t over tighten) with the 6mm Hex wrench or hex socket.")
16 positioned. It s not critical, but will make plugging the cord into it more logical and a little easier. 11) Place the retaining plate over the EBH with the prongs/flanges faceing TOWARD the engine. Try as I might the other way I just couldn t seat the bolts properly. 12)Screw in the new bolts using the locking washer. Tighten firmly (but don t over tighten) with the 6mm Hex wrench or hex socket. 13)Thread the cord for the EBH how you like.

17

18 passenger side of the lower grill. I went through the

19 There s a tiny gap that you can sort of force a little wider on the lower front bumper to get to the area behind that black grid shaped grill that then gives easy access to the engine compartment. I then plugged the orange connector into the EBH and secured the cord to a bracket nearby with a zip-tie. I also used a zip-tie to secure the plug-end of the cord right near the radiator. With this location I can tuck the cord completely behind the bumper when not in use so it s completely out of site, yet easy to get to when needed. 14)Replace the Lower Engine Cover. 15)Back HiHy off ramps or remove jack stands and lower the vehicle make sure you got everything out from underneath. 16)Loosen the upper radiator drain cock plug with the 6mm hex. Attach your vinyl tubing to the vent tube. You ll watch there to see
 Very slowly and carefully start pouring the coolant back into the radiator")

20 when your coolant is full as the tube will begin to fill. 17) Very slowly and carefully start pouring the coolant back into the radiator through the funnel. It won t go in very fast so be patient. Once the radiator and vent tube start to show overflow you ve got enough in. If you have any left just pour it in the reservoir.
Start up the HiHy and let it run a bit to circulate the coolant. While the ICE is running check underneath carefully for leaks (not just spillage from the install, but new leaking since refilling).")
21 18) Tighten the upper radiator fill plug, remove the vinyl tubing, close the radiator cap, and replace the plastic cover over the radiator. 19)Start up the HiHy and let it run a bit to circulate the coolant. While the ICE is running check underneath carefully for leaks (not just spillage from the install, but new leaking since refilling). If you see any shut down the car and return to tighten the EBH bracket up better. Make sure your bolts aren t cross threaded and that you ve very firmly tightened them down. You re done!!! Plug it in and see if your engine warms up. Alternatively, if you have a wattage meter like the Kill-a-watt meter you can see if it is drawing appropriately. Mine draws around 570 Watts the EBH is rated at 600W and 120V. I use a timer set to come on 2-4 hours before I leave for work on most days. This brings the coolant temperature up to around 130 F. That way I don t use any more electricity than necessary, but still start out with a prewarmed ICE that allows stealth mode and shortens the warm-up cycle considerably. Also, you get heat much more quickly on cold mornings.
22 ******************************************************************************************** ******************************************************************************************** Comments/suggestions: Thanks to Rick (unk. Last name), one of the Toyota Hybrid mechanics who supports and helps out on Priuschat.com and HiHychat.com This article is copyrighted by Evan E. Fusco, MD. I will freely give permission to use IF you ask me first an I approve the location and any changes you wish to make. If, however, us use it illegally without my permission I will pursue legal action against you for monetary compensation.
Ford Racing BOSS 302 Engine Oil Cooler (11-14 GT)
") Tools needed: 14mm hex socket 7mm socket/wrench 8mm socket/wrench Ford Racing BOSS 302 Engine Oil Cooler (11-14 GT) 10mm socket (for airbox removal) ¾ inch or 19mm wrench Torque wrench Appropriate ratchets
Tools needed: 14mm hex socket 7mm socket/wrench 8mm socket/wrench Ford Racing BOSS 302 Engine Oil Cooler (11-14 GT) 10mm socket (for airbox removal) ¾ inch or 19mm wrench Torque wrench Appropriate ratchets
The Sands Mechanical Museum
 The Sands Mechanical Museum How to Change Your Oil It is more difficult to change the oil in a Lotus Elise because the oil plug and filter are difficult to access. They are located behind an access panel.
2010 Prius Maintenance
 2010 Prius Maintenance Changing Oil Disclaimer: All the information stated in this document was provided by Prius owners. None were affiliated with Toyota Motor Corporation, except as customers. This document
VWvortex Forums > Golf IV & Jetta IV > DIY: Timing Belt And Coolant Pump Replacement on 2.0 AEG! Pics Inside! (Printable Version)
") VWvortex Forums > Golf IV & Jetta IV > DIY: Timing Belt And Coolant Pump Replacement on 2.0 AEG! Pics Inside! (Printable Version) Click here to print this topic. Post Title: DIY: Timing Belt And Coolant
VWvortex Forums > Golf IV & Jetta IV > DIY: Timing Belt And Coolant Pump Replacement on 2.0 AEG! Pics Inside! (Printable Version) Click here to print this topic. Post Title: DIY: Timing Belt And Coolant
List of parts needed below. Tools needed
 1 BMW 645 Coolant leak repair (Cap with Seal Repair and Expanding Coolant Pipe Installation w Pics) By Michael R. Brown (Estimated time to complete the job is 6-8 hrs) List of parts needed below. BMW PART
Improving the gearshift feel in an SW20.
 Improving the gearshift feel in an SW20. Part one In 3 parts. The SW20 gearshift can be often be greatly improved by eliminating play in the shift linkages, and this article covers three areas that need
We thank you for purchasing a manual petcock conversion kit from Murphs!
 We thank you for purchasing a manual petcock conversion kit from Murphs! The first step is removing the gas tank from the bike. We suggest running the tank down to reserve before removal, both for the
Two bolts at. Two each side where studs pass through. rear. Two bolts at. front. Front-most bolt for diagonal brace. Rear jacking point
 The following describes the process of changing the transmission s gear oil in my own 2008 CS 6sp. I have no relationship with any of the products mentioned, other than being a satisfied consumer. Exercise
Ford 6.7 EGR Delete Kit
 Fits: 2011 12 Powerstroke 6.7L Read instructions thoroughly before proceeding! ***This kit may void factory warranty please check with manufacturer.*** ***This kit is intended for off road use only.***
Go-ped ESR750 / ESR750EX Rear Brake Installation Instructions
 Go-ped ESR750 / ESR750EX Rear Brake Installation Instructions This kit provides all the parts you need to install a rear brake on your ESR750 or ESR750EX. It will not work on an ESR Sport, or other Go-ped
Door panel removal F07 5 GT
 Things needed Decent plastic trim removal tools Torx 30 Spare door clips 07147145753 I got away with a set of 5 but if I did it again I d be cautious and get 10. From prior experience if they are damaged
In summary, the procedures includes removal of the belly pans, draining of the engine block, draining of the radiator, coolant mixing and refilling.
 COOLANT DRAIN AND CHANGE PROCEDURE Recently, there was a request for a picture guide for draining/changing coolant (Robot808 and James-man) and since I was going to do this operation on Idaho (88), I took
PORSCHE V r Valve Timing Instructions. Copyright 2009 Written by Mike Frye Edited my Adam G.
 PORSCHE 928 32V r Valve Timing Instructions Copyright 2009 Written by Mike Frye Edited my Adam G. Sections: Overview.3 Disclaimer/warnings/things to watch for 4 Terms and naming conventions used in this
Troubleshooting Guide for Okin Systems
 Troubleshooting Guide for Okin Systems More lift chair manufacturers use the Okin electronics system than any other system today, mainly because they re quiet running and usually very dependable. There
GP114S-C CERAMIC COATED HEADER
 GP114S-C CERAMIC COATED HEADER HAS AIR INJECTION, OLD BODY STYLE FOR CHEVROLET/GMC 98-99 PICKUP 5.0L-5.7L 98-99 YUKON/DENALI/TAHOE 5.7L 98-99 SUBURBAN 5.7L 98-99 CADILLAC ESCALADE 5.7L 2/4 WD D GIBSON
X-Type w/ non-premium sound amplifier installation instructions
 X-Type w/ non-premium sound amplifier installation instructions 1. Pull radio from dash (see Radio Removal Instructions ) 2. Disconnect wiring harness from back of radio by pushing in tab on plug and pulling
The M7 Direct Flow Intercooler (DFIC) Installation Guide
 Installation Guide") The M7 Direct Flow Intercooler (DFIC) Installation Guide This information is meant only as a guide. The author of this information,, or any M7 Tuning employees assumes no liabilities for any outcomes resulting
The M7 Direct Flow Intercooler (DFIC) Installation Guide This information is meant only as a guide. The author of this information,, or any M7 Tuning employees assumes no liabilities for any outcomes resulting
Thermostats, Radiator, Coolant Hose, Hydraulic Fan/Steering R&R PT38 8V92
 REMOVING AND REPLACING THE THERMOSTATS, COOLANT HOSES, RADIATOR AND CHANGING THE HYDRAULIC FAN/STEERING FILTER/OIL/SHAFT SEALS ON A 1987 PT38 8V92 BY CURT SPRENGER March 2007 Thermostats, Radiator, Coolant
W C-230 Kompressor Sports Sedan 1.8l Thermostat Replacement & Antifreeze flush
 W203 2003 C-230 Kompressor Sports Sedan 1.8l Thermostat Replacement & Antifreeze flush First, I have to thank everyone who has contributed to the MBworld.org forums without you; I would not have gotten
Honda Civic Oil Change
 1988-1991 Honda Civic Oil Change Change the oil in your '88-'91 Honda Civic to improve engine performance and longevity. Written By: Phillip Takahashi ifixit CC BY-NC-SA www.ifixit.com Page 1 of 13 INTRODUCTION
Mark had the car on the lift when I got there. The dog was friendly, but not much help.
 Mark s 2015 Jetta. Changed oil and 10k service on 11 October 2015. Updated with 20k service on 28 February 2016. Mark had the car on the lift when I got there. The dog was friendly, but not much help.
Changing the Power Steering Belt
 Changing the Power Steering Belt Brett Dukes (Maverick) from the BigJimny Forum has contributed this article to the Website. Many thanks. Whilst off-roading on Sunday, my alternator Fan Belt snapped -
Procharger Stage II Intercooled Supercharger System (11-14 GT)
") Procharger Stage II Intercooled Supercharger System (11-14 GT) Installation Time: Approximately one day. Installed on 2012 Mustang GT 5.0/Manual Required Tools 3/8 Socket Set (Standard and Metric) 1/2
Procharger Stage II Intercooled Supercharger System (11-14 GT) Installation Time: Approximately one day. Installed on 2012 Mustang GT 5.0/Manual Required Tools 3/8 Socket Set (Standard and Metric) 1/2
UNDERDOG RACING DEVELOPMENT URD Traction Bar Installation
 URD Traction Bar Installation Introduction: UNDERDOG RACING DEVELOPMENT Thank you for choosing the URD Traction Bar for two wheel drive street trucks. More models coming soon! This bar is a true bolt on
Troubleshooting Guide for Limoss Systems
 Troubleshooting Guide for Limoss Systems NOTE: Limoss is a manufacturer and importer of linear actuators (motors) hand controls, power supplies, and cables for motion furniture. They are quickly becoming
Prerequisites: Shop Manual (recommended) pages 3-9 through 3-13.
 pages 3-9 through 3-13.") Prerequisites: Order your gaskets average about $25.00 bucks X 2 so $50.00 4NK-11193-00-00 Obtain a shim kit (Should have several 265 and 270s) (Some dealers will exchange) Obtain a Valve Bucket Tool YM-33961
Prerequisites: Order your gaskets average about $25.00 bucks X 2 so $50.00 4NK-11193-00-00 Obtain a shim kit (Should have several 265 and 270s) (Some dealers will exchange) Obtain a Valve Bucket Tool YM-33961
Replacing MK4 Golf/Jetta radiator mounts in-car
 Replacing MK4 Golf/Jetta radiator mounts in-car This is a guide to replacing the radiator mounts in a MK4 Golf/Jetta. This involves moving the core support to the service position which allows you to do
VW 1998 Jetta GLX or VR6 GTI PCV valve Modification
 Disclaimer: This is how I ended up modifying my stock PCV so I did not have to buy a complete intake hose (+/- $150). Don t blame me if this does not work or if it makes it worse You are doing this at
Mitsubishi Lancer Oil Change (2.0L I4 DOHC)
") 2002-2007 Mitsubishi Lancer Oil Change (2.0L I4 DOHC) Change the oil in your '02-'07 Mitsubishi Lancer, with 2.0L I4 DOHC engine, to improve engine performance and longevity. Written By: Phillip Takahashi
2002-2007 Mitsubishi Lancer Oil Change (2.0L I4 DOHC) Change the oil in your '02-'07 Mitsubishi Lancer, with 2.0L I4 DOHC engine, to improve engine performance and longevity. Written By: Phillip Takahashi
Trouble Shooting Guide for Hubbell Systems
 Trouble Shooting Guide for Hubbell Systems NOTE: Hubbell Special Products discontinued operations in 2008, so there is a very limited number of repair parts available for motor repair. In some ways, this
This is what we are trying to create in the steps below
 You will need: (1) Some 3/4 aluminium or steel flat bar (+/- 1 foot) (2) About 12 of 3 Aluminium or steel tubing. (2) Piece of 3X3 silicone hose and 2 hose clamps (3) 1 K&N (or similar) high flow filter
2001 BMW X5 4.4i. Fuel Filter Replacement
 P P 2001 BMW X5 4.4i Fuel Filter Replacement Symptoms for Replacement: OBDII code P0171, Lean Bank1, which could be a bad or dirty MAF sensor Sluggish engine performance including hesitation with Wide
BEW engine timing belt replacement procedure from MOGolf (as demonstrated on a 2004 Jetta).
.") BEW engine timing belt replacement procedure from MOGolf (as demonstrated on a 2004 Jetta). Based on the procedure published by Volkswagen, but modified for the "average" shadetree mechanic. Some special
BEW engine timing belt replacement procedure from MOGolf (as demonstrated on a 2004 Jetta). Based on the procedure published by Volkswagen, but modified for the "average" shadetree mechanic. Some special
Ford Mustang V6 OEM-Style Fog Light Kit Parts List: Quantity: Tool List:
 2015-2017 Ford Mustang V6 OEM-Style Fog Light Kit Parts List: Quantity: Tool List: LED Foglights/ Bezels 2 Flat head & Phillips screwdriver (if you ordered part#3600) Ratchet & Socket set OR Wiring harness
Volvo 850 Radiator Replacement Jason Reed 29 March 2013
 This write up covers removing and replacing the radiator on a 97 855 GLT wagon with light pressure turbo and automatic transmission. This car has 162K miles. The radiator, which was original, developed
Honda CRV Oil Change
 1995-2001 Honda CRV Oil Change Change the oil in your '95-'01 Honda CRV to improve engine performance and longevity. Written By: Phillip Takahashi ifixit CC BY-NC-SA www.ifixit.com Page 1 of 16 INTRODUCTION
HOW TO REPLACE THE SPOILER ON YOUR GEN 3 PRIUS
 HOW TO REPLACE THE SPOILER ON YOUR GEN 3 PRIUS Yup, it happened. The spoiler on your beloved Prius has departed this earth and now is in the great junkyard in the sky. This is how you make it all better
14-6. TSB Revision ENGINE COOLING ON-VEHICLE SERVICE
 14-6 RADIATOR CAP DRAIN PLUG ENGINE COOLING ON-VEHICLE SERVICE When removing the radiator cap, use care to avoid contact with hot coolant or steam Place a shop towel over the cap and turn the cap counterclockwise
84-86 Ford SVO Mustang AC Installation Guide
 84-86 Ford SVO Mustang AC Installation Guide This installation guide is for the AC installation kit from Late Model Restoration. The Vendor is Hose Wizards that manufactures this great kit that provides
Some tips and tricks I learned from getting clutch out of vehicle Skoda Octavia year 2000
 Some tips and tricks I learned from getting clutch out of vehicle Skoda Octavia year 2000 Last change 2013-Oct-11 I bought Haynes manual for a starter. That s something well worth it s cost I believe.
2015+ SUBARU STI FRONT-MOUNT INTERCOOLER PARTS LIST AND INSTALLATION GUIDE INSTALL DIFFICULTY DISCLAIMER CAUTION INSTALL PROCEDURE TOOLS NEEDED
 PARTS LIST AND PARTS INCLUDED 1PC ALUMINUM INTAKE PIPE 1PC BAR-AND-PLATE INTERCOOLER 1PC STEEL CRASH BAR W/ MOUNTING HARDWARE 2PC HOT-SIDE INTERCOOLER PIPES 2PC COLD-SIDE INTERCOOLER PIPES 1PC BPV FLANGE
H31 BOOSTER REBUILD & MASTER CYLINDER
 2010 1991 BMW 750iL George Fontes gajfontes@yahoo.com H31 BOOSTER REBUILD & MASTER CYLINDER Rebuild hydraulic booster and replace Master Cylinder. Page 1 of 16 Master Cylinder Removal & Brake Booster Rebuild
Connecting the rear fog light on the A4 Jetta, while keeping the 5 Light Mod
 Connecting the rear fog light on the A4 Jetta, while keeping the 5 Light Mod DISCLAIMER: I'm human and make mistakes. If you spot one in this how to, tell me and I'll fix it This was done on my 99.5 Jetta.
BBK LONG TUBE HEADERS (99-04 GT, Mach 1, Bullitt)
") BBK LONG TUBE HEADERS (99-04 GT, Mach 1, Bullitt) Install Time: Approx. 8-10 hrs Parts Needed: BBK Long Tube Headers Shorty mid pipe X/H O2 wiring harness extensions Hi-temp thread locker Tools Required:
BBK LONG TUBE HEADERS (99-04 GT, Mach 1, Bullitt) Install Time: Approx. 8-10 hrs Parts Needed: BBK Long Tube Headers Shorty mid pipe X/H O2 wiring harness extensions Hi-temp thread locker Tools Required:
Mustang Radiator Conversion DIY. By GearHeadPeter. January 27, 2011
 1964-1966 Mustang Radiator Conversion DIY By GearHeadPeter January 27, 2011 We all know that the radiators in our cars are not the best, especially if you have done any customization to the engine, which
Replacing a Brake Line by UCLA-Vstar, April 2007
 Replacing a Brake Line by UCLA-Vstar, April 2007 Replacing a brake line may seem intimidating if you ve never bled brakes before, and especially if you cannot find a stepby-step how-to. Here s a crude
Disco 3 Clock Spring / Rotary Coupler replacement
 Disco 3 Clock Spring / Rotary Coupler replacement I recently had to change my Clock spring and thought some folks may find it helpful to see what it entailed. I did lots of reading around but couldn t
SR Performance Aluminum Radiator - Manual (96 4.6L)
") SR Performance Aluminum Radiator - Manual (96 4.6L) Tools needed 1. Large and small pair of pliers 2. 8mm and 10mm deep socket and extensions 3. Spare Rags 4. Large Drain Pan 5. Funnel with small opening
SR Performance Aluminum Radiator - Manual (96 4.6L) Tools needed 1. Large and small pair of pliers 2. 8mm and 10mm deep socket and extensions 3. Spare Rags 4. Large Drain Pan 5. Funnel with small opening
J&M Mustang Adjustable Panhard Rod (05-09) - Installation Instructions
 - Installation Instructions") J&M Mustang Adjustable Panhard Rod (05-09) - Installation Instructions The below installation instructions work for the following products: J&M Mustang Adjustable Panhard Rod (05-09) Please read through
J&M Mustang Adjustable Panhard Rod (05-09) - Installation Instructions The below installation instructions work for the following products: J&M Mustang Adjustable Panhard Rod (05-09) Please read through
GP125S STAINLESS HEADER
 GP125S STAINLESS HEADER WITH EGR FITTING FORD EXCURSION 6.8L-V-10 2/4WD FORD SUPERDUTY TRUCK F250HD/F350 6.8L-V10 2/4WD GIBSON HEADERS ARE 50 STATE SMOG LEGAL 2/2 WARNING! Do not rely on bumper jacks or
Pypes Polished Shorty Headers (05-10 V6):
:") Pypes Polished Shorty Headers (05-10 V6): Introduction: The kit comes complete with replacement hardware and gaskets and can be easily done in your driveway. The hardware supplied for install includes
Pypes Polished Shorty Headers (05-10 V6): Introduction: The kit comes complete with replacement hardware and gaskets and can be easily done in your driveway. The hardware supplied for install includes
#TL T EA888 GEN 3 FUELING SYSTEM/ INSTALLATION INSTRUCTIONS
 #TL100069 2.0T EA888 GEN 3 FUELING SYSTEM/ INSTALLATION INSTRUCTIONS Notes: These instructions were written for a North American specification MkVII GTI. Other models, like the Golf R, are similar. When
2010 Toyota Prius model II Head Unit Upgrade
 2010 Toyota Prius model II Head Unit Upgrade Monday, December 21, 2009 Disclaimer: Use this document and its contents at your own risk. Forward: Huge thanks to those members on Priuschat.com that forged
Intake Kit Supplement for CRV and Pathfinder
 Intake Kit Supplement for CRV and Pathfinder This guide will briefly outline how to install the intake kits for the Honda CRV and Nissan Pathfinder. This is a pretty basic job, but for the average person
2015 WRX Engine Oil Cooler
 2015 WRX Engine Oil Cooler 2014-04-24 Thank you for purchasing this PERRIN product for your car! Installation of this product should only be performed by persons experienced with installation of aftermarket
Written By: David Hodson
 2008-Present Scion xb Oil Change Second generation Scion xb oil change. Written By: David Hodson ifixit CC BY-NC-SA www.ifixit.com Page 1 of 19 INTRODUCTION Change the oil in your 2008 or newer Scion xb
There is hence three things you can do - add oil, adjust the temp that the clutch begins to engage, or do both.
 As most of you may be aware, I have been doing a lot of research lately on our cooling system in the 80's including the fact that we have a dead spot on the OEM temp gauge which prompted me to not rely
Steeda S550 MT-82 Tri-Ax Race Short Throw Shifter Installation Instructions For Parts: ,
 Steeda S550 MT-82 Tri-Ax Race Short Throw Shifter Installation Instructions For Parts: 555-7317, 555-7318 Tools required 1. 7mm socket 2. 10mm socket 3. 13mm socket 4. 15mm socket 5. 18mm socket 6. 3/8
FLUSHING YOUR COOLING SYSTEM BY MIKE ALLEN Published on: October 1, 1997
 1 of 5 29/08/2006 12:28 PM SAVE THIS EMAIL THIS Close FLUSHING YOUR COOLING SYSTEM BY MIKE ALLEN Published on: October 1, 1997 You take off the cap and look at the coolant. It's a nice shade of green,
Changing the Struts on a WK Jeep CRD
 Changing the Struts on a WK Jeep CRD Step by Step By Chirpz Disclaimer: I do not claim that this procedure is the right way or even the best way to change your struts. This is what I did after reading
GP113S STAINLESS HEADER WITH STAINLESS Y-PIPE
 GP113S STAINLESS HEADER WITH STAINLESS Y-PIPE HAS NO AIR FITTING AT THE FRONT OF EACH MANIFOLD FOR CHEVROLET/GMC 96-00 PICKUP 7.4L 2/4WD 96-00 SUBURBAN 7.4L 2/4WD GIBSON HEADERS ARE 50 STATE SMOG LEGAL
DYNATRAC PRODUCTS V5.3
 DYNATRAC PRODUCTS V5.3 2000-2008 Dodge Hub Kit Stage 1 4x4, Front Axle Free Spin Conversion Kit Note: This Kit is not Approved for 2007 & up 3500 Cab and Chassis Trucks Due to a Larger U-Joint (If U-Joint
Remove the 3-11mm nuts holding mirror on. Don t drop the nuts!
 2005-2012 Ford Mustang Puddle Lamp Kit Parts List: Quantity: Tool List: LED Lamps 2 Flat head screwdriver Seals 2 Ratchet & Socket set OR Nuts 2 Adjustable Wrench Wiring harness 1 Drill & 11/16 th bit
Shotgun Single Barrel HPFP install guide
 Shotgun Single Barrel HPFP install guide Thank you for your purchase of the VTT Shotgun Single Barrel HPFP upgrade! First thing to do when you open your box is to make sure all parts are in their respective
SKID MARK GARAGE. Axillary Fuel Supply
 1 SKID MARK GARAGE Axillary Fuel Supply *Disclaimer: Our Axillary Fuel kits are designed to fit most late model GM vehicles with minimum modifications. While not quite a universal kit for all, it has been
Please forward any questions or comments regarding this Troubleshooting Guide to
 2009 Human Touch, LLC. All rights reserved. May 28, 2009 Please forward any questions or comments regarding this Troubleshooting Guide to documentation@humantouch.com. HT-1650 Troubleshooting This Troubleshooting
E30 Water Leaks Wet boot and damp dog smell getting you down? E30 water leaks are common but they re easy to solve.
 15 68 H A N D S ON E30 Water Leaks Wet boot and damp dog smell getting you down? E30 water leaks are common but they re easy to solve. YOU LL NEED S c r e w d r i v e r s Centre punch H a m m e r Silicone
Potentiometer Replacement
 Potentiometer Replacement Tools Required: 2x 7/16 1/2 Nut Driver 1/8 Allen Wrench Small Straight Screwdriver Medium Phillips A potentiometer is a device which translates mechanical rotation into variable
BHW Engine Coolant Temperature Replacement
 BHW Engine Coolant Temperature Replacement NEVER perform this procedure on a hot engine. Parts: 059 919 501 A dual temperature sensor 032 121 142 retaining spring N 903 168 02 sensor round seal N 905 216
Brake master cylinder replacement
 Brake master cylinder replacement 8-25-2010 I had replaced the front brake master cylinder a few years ago when it developed a bad leak, at that time, I ordered a new master cylinder from Spartan, very
SW20 Coolant System Maintenance.
 SW20 Coolant System Maintenance. This article contains information on how to change and bleed the coolant, as well as flushing the system. It is based on information in the service manual, tips gathered
Front Drive System - Big Block Chevy Installation Instructions Big Block Chevy with AC & with PS
 Front Drive System - Big Block Chevy Installation Instructions Big Block Chevy with AC & with PS All American Billet Store (800) 764-0926 www.allamericanbilletstore.com Items needed for install Jack Jack
Instant Chat off the main page of Or simply call our tech team at
 FRONT MOUNT INTERCOOLER 2015+ WRX 2017-07-07 Thank you for purchasing this PERRIN product for your car! Installation of this product should only be performed by persons experienced with installation of
A B C D E F. Tools Required (supplied by others)
") Page 1 of 17 Parts List Below Deck Automatic Retractable Security Cover Kit (1) Tube End Bearing Plate (A) (1) Rope Reel and Cover Drum Motor Assembly (B) (1) Cover Drum (1) Pulley Support Channel (2)
Page 1 of 17 Parts List Below Deck Automatic Retractable Security Cover Kit (1) Tube End Bearing Plate (A) (1) Rope Reel and Cover Drum Motor Assembly (B) (1) Cover Drum (1) Pulley Support Channel (2)
JRSC + BBK Install on SVTF. Neil A. Shah medicnas on focaljet September 2006
 JRSC + BBK Install on SVTF Neil A. Shah medicnas on focaljet September 2006 ECU up here. When removing make sure the smaller bundles of wires don t get wrapped around the bottom edge and break - this almost
I hope this guide helps you as much as Boomer Bob helped me. We re just sharing what we know to help out other folks. Best of luck! Phil C.
 A brief tutorial on swapping cams for the Victory Cross Roads and Cross Country on the Victory Freedom 106 inch V-Twin Engine with 6 speed over drive transmission Disclaimer: Swapping cams on a Victory
At Mark's suggestion I thought I'd write this up so future Coupe lovers can have as much fun* as I did with this job.
 At Mark's suggestion I thought I'd write this up so future Coupe lovers can have as much fun* as I did with this job. My enormous thanks to forum members, particularly glorfindel, for their advice when
Note: Please read through the entire guide before attempting any kind of installation.
 KIT-RSRTD Installation Guide Version 1.5 Auber Instruments, 730 Culworth Manor, Alpharetta, GA 30022 e-mail: info@auberins.com Tel: 770-569-8420 www.auberins.com This is a PID controller kit installation
Thermo-Bob 1 Installation Manual: Kawasaki Concours
 Thermo-Bob 1 Installation Manual: 1986-2006 Kawasaki Concours This is a basic guide for installing the Thermo-Bob 1 on a Kawasaki ZG-1000 Concours. The bike used in the following photos was a 1995 year
How to Keep your Treadmill Running
 How to Keep your Treadmill Running Buying a treadmill is hard enough. Choosing the best out of many treadmills in the market is nigh impossible. But once you ve got the treadmill you ve always wanted,
DODGE OFF ROAD T-STYLE STEERING KIT INSTALLATION INSTRUCTIONS
 Dodge Off Road, LLC Specializing in Dodge Ram Solid-Axle 4x4 Suspension and Steering for Off Road Applications 855.9009.DOR sales@dodgeoffroad.com dodgeoffroad.com DODGE OFF ROAD T-STYLE STEERING KIT INSTALLATION
DrVanos.com Stage II Installation Instructions. Tool rental is available with the purchase of a vanos kit *See website for more info*
 DrVanos.com Stage II Installation Instructions Special Tools Needed: Camshaft locking tool TDC Crank pin Sprocket turning tool Tool rental is available with the purchase of a vanos kit *See website for
Tools needed: Here is a pic of the shift kit I used. It is a Transgo brand and as you can see, it just a bag full of springs and one valve.
 Before installing a shift kit, be sure the transmission is in good operating order. If your transmission is making noises, slipping, shifting bad or the fluid looks brown or smells burnt, take the transmission
ACURA NSX ABS/ALB Modulator Rebuild Procedure
 Version 03 ACURA NSX ABS/ALB Modulator Rebuild Procedure I rebuilt my 1991 ABS/ALB modulator using this procedure. Please note that this will not guarantee that your ABS/ALB system issues will be resolved
Fanatec GT3RS V1 to GT3RS V2 Tutorial
 Fanatec GT3RS V1 to GT3RS V2 Tutorial by Roy Visser 1 How to update your Fanatec GT3RS V1 wheel to a GT3RS V2 wheel Welcome to this guided and detailed tutorial for upgrading your Fanatec GT3RS V1 wheel
Thermo-Bob Installation Manual: KLR650A ( )
") Thermo-Bob Installation Manual: KLR650A (1987-2007) Thank you for purchasing the Thermo-Bob radiator bypass system for the KLR650. Since the KLR already has a doohickey, it seemed that this thingamabob
Thermo-Bob Installation Manual: KLR650A (1987-2007) Thank you for purchasing the Thermo-Bob radiator bypass system for the KLR650. Since the KLR already has a doohickey, it seemed that this thingamabob
 Special Tools Needed: DrVanos.com Stage I Installation Instructions Camshaft locking tool TDC Crank pin Sprocket turning tool Tool rental is available with the purchase of a vanos kit *See website for
How to replace Air Filter and Serpentine Belt in less than one hour on a Porsche S
 How to replace Air Filter and Serpentine Belt in less than one hour on a Porsche 997.1 3.8S How to replace your Air Filter cartridge and serpentine belt on a 997.1 3.8S engine in less than one hour. Disclaimer:
Installation Directions for FINGER STICK and Blocker Plate
 Installation Directions for FINGER STICK and Blocker Plate What is a Finger Stick? A Finger Stick is a simple circuit that modifies the MAF signal on LLY and LBZ engines (not LB7 engines) to expected levels
DUAL REMOTE OIL FILTER MODIFICATION 4 TH GENERATION FIREBIRDS
 Written by Dave Dorey (lonetechie) Copyright FirebirdNation.com The following article details how I installed a dual remote oil filter system on my 2001 Formula Firebird. If you decide to tackle this project,
THE INFORMATION CONTAINED HERE IS PROVIDED FOR FREE
 Galaxy TDI Intake Manifold Cleaning Removal and cleaning of the intake assembly. (VW PD Engines) Preamble: Version: V1.07 06/07/2011 www.mirez.co.uk In common with a lot of diesel engines the Galaxy has
Rebuilding the HE-120 Redrive
 Rebuilding the HE-120 Redrive Rick Cavallaro Disclaimer: I am NOT an expert mechanic. If something looks or sounds wrong in these directions, it probably is. I d be happy to receive any tips or feedback
4 pieces of silicone hose Unless you have AEM then you have 2 2.5, 1 3, and 1 3.5
 The parts in your kit: 3 pieces of Mandrel-Bent Aluminized Tubing: 1 Straight 1 45 degree bend with straight section 1 curved section 4 pieces of silicone hose 1 2.5 1 3.5 2 3 Unless you have AEM then
ALL AMERICAN BILLET. Front Drive System - Small Block Ford Installation Instructions
 ALL AMERICAN BILLET Front Drive System - Small Block Ford Installation Instructions Small Block Ford with AC & PS All American Billet Store (800) 764-0926 www.allamericanbilletstore.com Items needed for
MAZDASPEED3 Intercooler Instructions
 MAZDASPEED3 Intercooler Instructions Congratulations on your purchase of the COBB Tuning Front Mount Intercooler System for your 2007-2009 Mazdaspeed3. The following instructions should assist you through
Thermo-Bob 3 Installation on a 2015-and-newer Versys 650
 Thermo-Bob 3 Installation on a 2015-and-newer Versys 650 Thank you for purchasing the Thermo-Bob 3 radiator bypass system for the Kawasaki Versys 650. Proper installation is critical: if you are not familiar
Porsche 928 with 16v LH-Jetronic Fuel System
 Porsche 928 with 16v LH-Jetronic Fuel System Toll-Free Tech Hot Line: 877-FOR-928M 877-367-9286 Please do not copy this manual and give copies to your friends. Our ability to bring you this supercharger
Dexter Never-Adjust Brake Install
 Dexter Never-Adjust Brake Install Arctic Fox 2007 29-5T Warning: This involves lifting your trailer, working under and around it. If you do not have the correct equipment and knowledge for this, please
REPLACING A COLEMAN MACH FAN MOTOR
 REPLACING A COLEMAN MACH FAN MOTOR Recently the fan motor on our front AC froze up. I ordered a new motor from Amazon https://www.amazon.com/gp/product/b007vjub9s/ref=oh_aui_detailpage_o00_s00?ie=utf8&psc=11
RHINO SUSPENSION SYSTEM INSTALLATION INSTRUCTIONS
 PARTS INCLUDED: 2 FRONT UPPER A-ARMS 2 FRONT LOWER A-ARMS 2 UNI-BALL JOINTS 2 UNI-BALL JOINT STUDS 2 UNI-BALL JOINT CAPS 2 RETAINING RINGS 1 FRONT SHOCK ASSEM. 2 DELRON STEERING STOPS 2 SHOCK MOUNT SPACERS