Stand Alone Fog Lights Installation Instructions
|
|
|
- Octavia Thomas
- 5 years ago
- Views:
Transcription
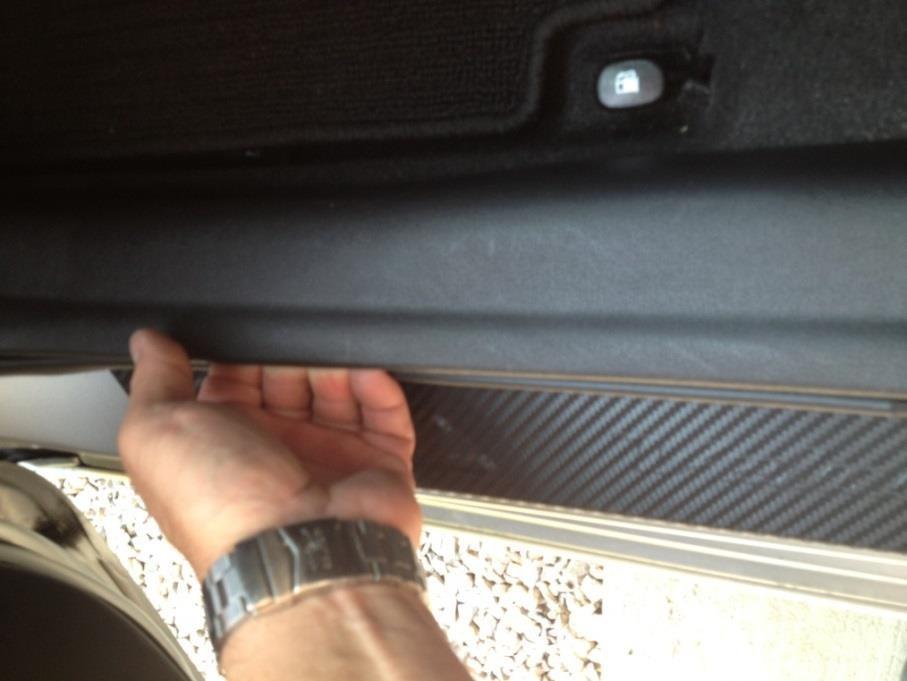
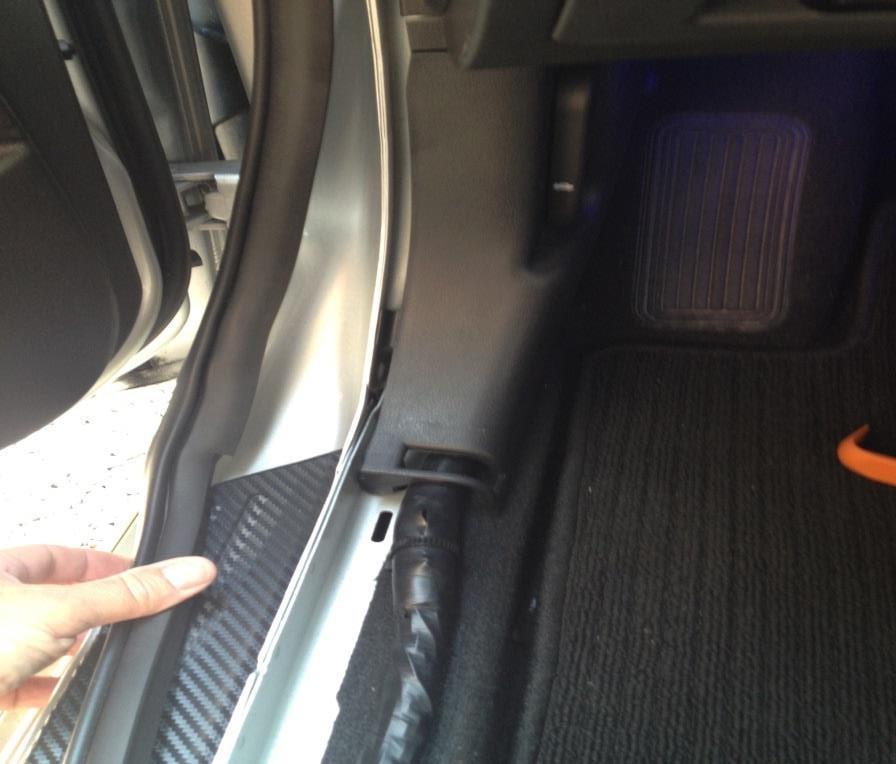
1 Tools Required: 1. Trim Removal tool or protected flat screwdriver 2. #2 Phillips Screwdriver 3. 10mm socket 4. 10mm wrench 5. 8mm or 5/16 socket 6. Adjustable Pliers 7. Electrical Tape WARNING!!! Disconnect the negative side of the battery before beginning any work. Note: It is not necessary to mount the relays in the same location as outlined in these instructions, I just found this to be a neat and out of the way location. If you mount them someplace else, Section III contains the instructions for connecting the wiring. SECTION I Trim Removal Step 1: Step 2: Using a plastic trim tool or a flat bladed screw driver (wrap a rag around the blade) lift the front edge of the left door sill trim (Pic 1). Lift the trim enough to get your fingers underneath (Pic2). Work back slowly and continue to pop the trim loose (Pic 3). Next we are going to remove the hood latch handle and foot well trim. First we want to get the door seal out of the way. It will just pull loose by grabbing and pulling away from the frame. Pull it past the foot well trim at the bottom and up the side to the top of the dash (Pic 4). Use a 8mm or 5/16 socket to push on the 4 fingers holding the latch(in the center). Push the socket on the fingers and the latch should pull right off (Pic 5 and 6). Now we can remove the trim. WARNING If not done correctly, you will break this trim piece. Do not pull towards the center. Use one hand to pull the trim straight back (towards the rear of the car) use the other hand to gently pull the trim from around the hood pull tab (you can reach over the top of the trim to help it from around the tab) (Pic 7 and 8). Page 1 of 20
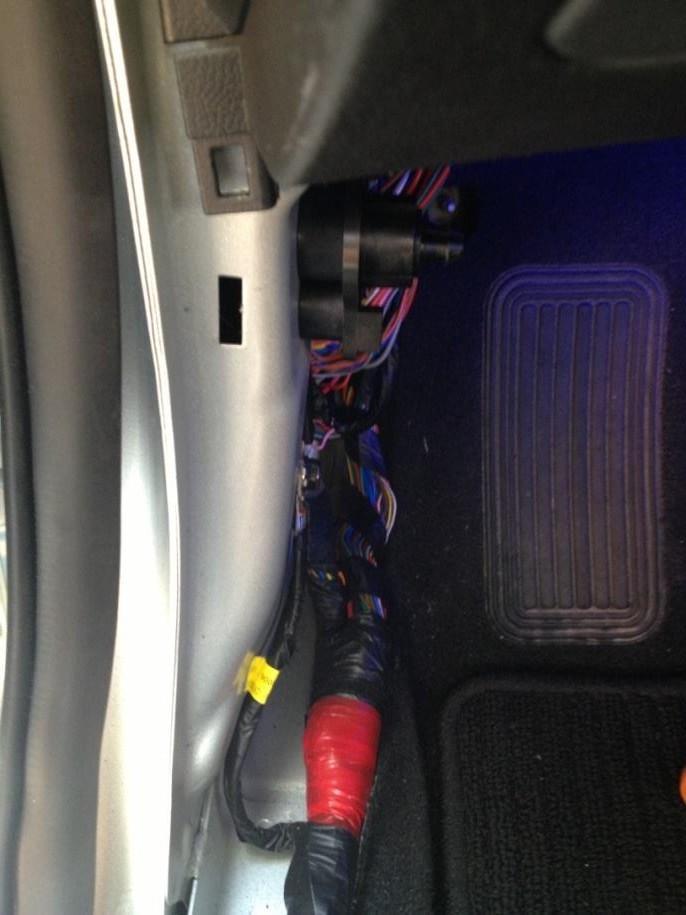
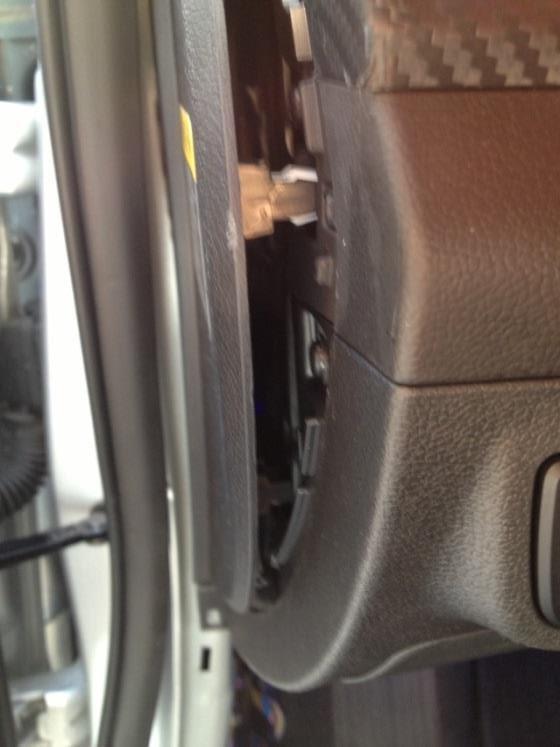
2 Step 3: Step 4: Step 5: Now we are going to remove the outboard trim on the side of the dash. There is a notch on the bottom (Pic 9) Continue around this piece until all the tabs are loose, and then pull free (Pic 10). Next, we are going to remove the vent assembly. Remove the two screws and gently pull outwards (towards the door and then back towards you) to clear the assembly from the tab. (Pic 11 and 12). Once past the tab, you can use your other hand on the inboard side of the vent to help pull straight towards you. The entire vent and duct will come out. Remove the three screws on the side and one screw underneath for the lower dash trim (Pics 13 and 14). Push the tabs on each side of the OBD port and slide it back (Pics 15 and 16). Pull the lower dash trim towards you until you can reach the connector for the Auxiliary buttons (Eco, Light dime, etc ) Push the tab and pull the connector loose. You can now remove this piece (Pic 17 sorry for the blur). SECTION II Fog Light Kit Installation Step 1: Before mounting the relay s, study picture 18 so you have an idea how they are mounting and which way to feed the wire bundle. Using a 10mm socket, remove the upper right bolt from the lower dash support frame (Pic 18). Place the removed bolt through the mount hole in Relay 1, then reinstall the bolt. Remove the bolt below and attach the ring terminal for ground here. Route the wires behind and along the lower support structure (towards the fuse panel. That is all there is to mount. SECTION III Electrical Connection Step 1: Remove the 2 upper nuts and 1 lower bolt holding the fuse panel (10mm socket and wrench) (Pic 19 and 20). Once these are removed, remove all of the connectors plugged into the fuse panel (Take a picture or label the connectors ). Now you can pull and gently twist the entire fuse block to get access to the 2 connectors on the back. Push the Page 2 of 20
3 tabs and pull both connectors loose and fish them down to the bottom. You will need to remove some of the tape to separate the 2 leads and get access to the wiring (approx. 3 to 4 ). The top connector from the back is the one we are going to splice our wires into (Pic 21 Connector C 23 pin). Step 2: Step 3: Step 4: Once you have the two connectors separated, mark the C connector as shown (Pic 22). One side will not have ridges; you want to mark the side with the ridges. Marking will make it easy to identify which wires we are splicing into. So, if you are looking at the connector and see the ridges, 1 is the first pin on the right and 12 is the last pin to your left. The second row is 13 to the right and 24 to the left. For those that have never tapped into a harness I am going to describe the taps and how to use them. If you are going to solder or are familiar with the use of these, proceed to step 4. Before starting, you may have noticed that I have included some extra wire and tap splices; this is in case you have never used these you can practice on the spare wire. Also, review the following picture for a visual guide as well (Pics 23, 24, 25 and 26). The way that these work is; one side will slip over the existing wire, the other side of the tap will only allow the wire to be inserted about half way (this will be the new wire we are adding). Between these two channels is a metal blade that when squeezed, will cut the insulation of both wires and act as a jumper between the two. To use these take the long practice wire and slip the tap over it so that it is sticking out of both ends. Now take the shorter wire and insert it into the other channel, making sure that it bottoms out in the hole. To squeeze the metal blade, I like to use a pair of adjustable water pump pliers (channel lock) grip the tap as shown in the pictures, check once more that the new wire is seated in the tap and squeeze until the metal blade is flush. Fold over the tab and lock into place. Done, pretty simple, and if done correctly will not cause any problems down the road. The first wire we are going to tap into is pin 11 of connector C this is a pink wire and is the next to last wire in the first row (from right to left). Pick a spot about 3 or 4 inches back from the connector and slip the tap onto the wire. Insert the wire labeled wire 11 from the new harness into the tap and squeeze. Now we are going to tap into pin 23. This wire is white and is the next to last wire on the second row (right to left). Repeat the procedure above for the wire labeled 23 of the new harness. We are done with that connector and you can wrap it back up with some electrical tape. Now we need to tap into a wire on connector A. In picture 21 it shows this connector as white, however, mine was blue. Of the two connectors on the bottom of the fuse panel it is the inboard one or the one on the right when looking at them in pic 21. Pull this connector free and again remove some of the tape. Place the wiretap over the wire in pin 6 this should be a Page 3 of 20
4 white wire (Pic 27 shows the numbering for this connector, and like the previous connector when looking at the ridges, 1 will be to the right of the first row and 12 will be to the left) You can tape that bundle back up and reconnect to the fuse box. Step 5: Step 6: Step 7: If all the connectors are back in place, you can now secure the fuse block back in place with the bolt and 2 nuts. We need to find a switched power source for the relays. If we don t, the fog lights may stay on when we turn the car off. I used the rear tail lights to tap into (second fuse up first row (left to right) pic 28). For this you must remove the fuse and insert the Add A Circuit tap (Pic 29). I have already inserted the proper fuses in the fuse tap. Now we can test the lights. Turn power on and place the light switch in the parking light position. Now turn on the fog lights and BAM!! They should be on. Leaving the fog lights on, turn the parking lights off. The fog lights should now be off. If these are the results you get, congratulations you are now one of the few VT owners that can do this. If you have any other results or if the fog lights do not come on, please give me a call and I will help you trouble shoot the problem. If all is well, then you can secure the wire bundle with the supplied ties and place the trim back in place What happens if after doing all this, my fog lights don t work? On the last page after the picture I have put some directions and a flow chart that should get things going. I want to thank you for your purchase. This was a great kit to put together and then test to see if what I put down on paper would work on the car. As with all my products, if you have any questions or concerns, please don t hesitate to give me a call. I will do whatever is needed to see that you are satisfied with your purchase. Bruce Tippett AKA BTJetman Page 4 of 20

5 Pic 1 Pic 2 Page 5 of 20

6 Pic 3 Pic 4 Page 6 of 20


7 Pic 5 Pic 6 Page 7 of 20

8 Pic 7 Pic 8 Page 8 of 20

9 Pic 9 Pic 10 Page 9 of 20


10 Pic 11 Pic 12 Page 10 of 20


11 Pic 13 Pic 14 Page 11 of 20


12 Pic 15 Pic 16 Page 12 of 20


13 Pic 17 Pic 18 Page 13 of 20


14 Pic 19 Pic 20 Page 14 of 20
 Pic 22")
 to the left) Page 15 of")
15 Pic 21 (Fuse block removed and upside down in this view) Pic 22 (Marked 1 to the right and 12 (not t2) to the left) Page 15 of 20


16 Pic 23 Pic 24 Page 16 of 20


17 Pic 25 Pic 26 Page 17 of 20
18 Pic 27 Page 18 of 20


19 Pic 28 Pic 29 Page 19 of 20
20 Troubleshooting 1. With power on, rotate the light switch to the Parking Light Position (first detent). Did you feel or hear Relay 1 click? Yes: Go to step 2. No: You have a bad connection for the Pin 11 wire on connector C. Check and fix this connection. 2. Leaving the lights switch in the parking position, rotate the fog light switch on. Did you hear or feel Relay 2 click? Yes: Go to step 3 No: You have a bad connection for the Pin 23 wire on Connector C. 3. Did the fog lights come on? Yes: Congratulations, You can now begin to reinstall the interior. No: You have a bad connection at the Pin 6 wire on Connector A. Page 20 of 20
Remove black panel shown. Save 6 retaining pins for re-install later. Pry up on center part of pin first. Then pry out entire retaining pin.
 2005-2009 Ford Mustang V6 Fog Light Wiring Kit Parts List: Quantity: Tools Required: Wiring harness 1 Flat head screwdriver Supplemental wire leads 2 Ratchet & Socket set OR Wire tap red 2 Adjustable Wrench
GIVE ME A BRAKE Light Kit 2005 / 2006 MINI Cooper/Cooper S Brake Light Modification
 Page 1 of 6 GIVE ME A BRAKE Light Kit 2005 / 2006 MINI Cooper/Cooper S Brake Light Modification ****Pages 1 and 2 apply only to non-convertible MINI s**** ****for convertibles please go to page 5**** This
Depress each tab as you pull the bezel off. The bezels are tight. L.H. shown.
 2013-2014 Ford Mustang V6 & Boss 302 Lower Valance Fog Light Kit Parts List: Quantity: Tool List: Fog light & bulb with bracket 2 Flat head & Phillips screwdriver Black bezels 2 Ratchet & Socket set OR
Installing Custom Puddle Lamps 2009 Subaru Forester
 Installing Custom Puddle Lamps 2009 Subaru Forester By John Perkins This guide will assist you in installing a set of LED puddle lamps on a 2009 Subaru Forester. This is NOT using the $150 Subaru kit.
Installation Instructions for Chevrolet Colorado, GMC Canyon, LT, Z71, With Factory Fog Lights
 Installation Instructions for 2015-2018 Chevrolet Colorado, GMC Canyon, LT, Z71, With Factory Fog Lights This kit is designed to allow use of your factory fog light operation along with an addition auxiliary
X-Type w/ non-premium sound amplifier installation instructions
 X-Type w/ non-premium sound amplifier installation instructions 1. Pull radio from dash (see Radio Removal Instructions ) 2. Disconnect wiring harness from back of radio by pushing in tab on plug and pulling
INSTALLATION INSTRUCTIONS
 INSTALLATION INSTRUCTIONS Accessory Application Publications No. SECURITY SYSTEM P/N 08E49-SDA-100 ACCORD 2- AND 4-DOOR AII 30666 Issue Date AUG 2005 PARTS LIST Hood switch harness Illustration of the
Connecting the rear fog light on the A4 Jetta, while keeping the 5 Light Mod
 Connecting the rear fog light on the A4 Jetta, while keeping the 5 Light Mod DISCLAIMER: I'm human and make mistakes. If you spot one in this how to, tell me and I'll fix it This was done on my 99.5 Jetta.
TOYOTA PRIUS C FOG LIGHT (Halogen & LED)
") TOYOTA PRIUS C 2012-14 FOG LIGHT (Halogen & LED) Part Number: TPC-312 / TPC-812 Kit Contents Item # Quantity Reqd. Description 1 2 Fog Lamps 2 2 Bezels 3 1 Switch Assembly 4 1 Fog Light Operation guide
TOYOTA PRIUS C 2012-14 FOG LIGHT (Halogen & LED) Part Number: TPC-312 / TPC-812 Kit Contents Item # Quantity Reqd. Description 1 2 Fog Lamps 2 2 Bezels 3 1 Switch Assembly 4 1 Fog Light Operation guide
INSTALLATION INSTRUCTIONS
 INSTALLATION INSTRUCTIONS Accessory Application Publications No. SYSTEM 2005 ACCORD All 27511 (DX, LX) 2-AND 4-DOOR Issue Date AUG 2004 PARTS LIST Security System Attachment (LX): P/N 08E55-SDA-100A Unit
Small knife. Remove black panel shown. Save 6 retaining pins for re-install later.
 2005-2009 Ford Mustang V6 Fog Light Wiring Kit Parts List: Quantity: Tools Required: Wiring harness 1 Flat head screwdriver PB-3425 Parts Bag 1 Ratchet & Socket set OR Ford OEM Switch (if you 1 Adjustable
INSTALLATION INSTRUCTIONS
 INSTALLATION INSTRUCTIONS Accessory REMOTE CONTROL Application 2011 ODYSSEY (EXCEPT LX) Publications No. AII 43923 Issue Date SEP 2010 PARTS LIST Remote Control Engine Starter Unit Kit P/N 08E91-E22-101A
2005 and 09 Mustang install instructions Sequential / Chase Unit Partial Plug-N-Play Kit Meter4it Eng. Updated: 3/28/09
 Updated: 3/28/09 Verify content of kit: 1- Unit with wiring harness 1- Red power wire with 15 amp fuse 1- Color instruction 2- Velcro for mounting 1-Driver taillight harness 1- Passenger taillight harness
CONTENTS: 1EA. SUBWOOFER HARNESS 2PIECE TOOLS REQUIRED:
 CONTENTS: 1EA. SUBWOOFER ENCLOSURE 1EA. SUBWOOFER HARNESS 2PIECE 2EA. T-TAP 1EA. FUSE 30 AMP 6EA. WIRE TIES 1EA. INSTRUCTIONS P/N 77KICK14SUBASSEMBLY P/N RHPM1 P/N RFTTAPB P/N RFUSE30 P/N RFZIP6 P/N RBI77KICK14
Part Number: TRA-316/TRA-816
 Date: 07.29.2016 TOYOTA RAV4 2016- FOG LIGHT (Halogen/LED) Part Number: TRA-316/TRA-816 Kit Contents Item # Quantity Reqd. Description 1 2 Light Housings 2 2 Light Bezels 3 1 Wire Harness Bag* 4 1 Connector
Ford Mustang V6 OEM-Style Fog Light Kit Parts List: Quantity: Tool List:
 2015-2017 Ford Mustang V6 OEM-Style Fog Light Kit Parts List: Quantity: Tool List: LED Foglights/ Bezels 2 Flat head & Phillips screwdriver (if you ordered part#3600) Ratchet & Socket set OR Wiring harness
Ford Mustang GT-Style Fog Light Kit Parts List: Quantity: Tool List:
 2013-2014 Ford Mustang GT-Style Fog Light Kit Parts List: Quantity: Tool List: Fog light (Left& Right) 2 Flat head & Phillips screwdriver Upper grille with surround 1 Ratchet & Socket set OR Lower grille
Part Number: TTU-BGB14-DRL TTU-BGP14-DRL
 11/15/16 TOYOTA TUNDRA 2014-17 Billet Grille w/led DRL Part Number: TTU-BGB14-DRL TTU-BGP14-DRL Kit Contents Item # Quantity Reqd. Description 1 2 LED DRL 2 1 Driver Box 3 1 Switch 4 1 User Card 5 2 Hardware
INSTALLATION INSTRUCTIONS
 INSTALLATION INSTRUCTIONS Accessory REMOTE CONTROL Application 2012 ODYSSEY (EXCEPT LX) Publications No. AII 46745 Issue Date SEP 2011 PARTS LIST Remote Control Engine Starter Unit Kit P/N 08E91-E22-101A
TOYOTA PRIUS FOG LIGHT (Halogen or LED)
") Part Number: TPR-413 / TPR-813 Kit Contents Item # Quantity Reqd. Description 1 2 Fog Lamps 2 1 Lower Grill 3 1 Switch Assembly 4 1 Fog Light Operation guide 5 1 Harness Bag Hardware Bag Contents Item
Part Number: TPR-413 / TPR-813 Kit Contents Item # Quantity Reqd. Description 1 2 Fog Lamps 2 1 Lower Grill 3 1 Switch Assembly 4 1 Fog Light Operation guide 5 1 Harness Bag Hardware Bag Contents Item
Procharger Stage II Intercooled Supercharger System (11-14 GT)
") Procharger Stage II Intercooled Supercharger System (11-14 GT) Installation Time: Approximately one day. Installed on 2012 Mustang GT 5.0/Manual Required Tools 3/8 Socket Set (Standard and Metric) 1/2
Procharger Stage II Intercooled Supercharger System (11-14 GT) Installation Time: Approximately one day. Installed on 2012 Mustang GT 5.0/Manual Required Tools 3/8 Socket Set (Standard and Metric) 1/2
LEXUS RC 350/RC-F ILLUMINATED DOOR SILLS Preparation
 Preparation Part Number: PT944-24150 Kit Contents Item # Quantity Reqd. Description 1 2 Inner LED Scuff 2 2 Outer Scuff 3 1 Hardware Bag Hardware Bag Contents Item # Quantity Reqd. Description 1 15 20
Raxiom Factory GPS Rear Back-up Camera Kit (07-17 Wrangler)
") Raxiom Factory GPS Rear Back-up Camera Kit (07-17 Wrangler) Installation Time: 2.5-3Hrs Tools Required: 7mm Socket & Driver 10mm Socket 10mm Open end wrench Knife / Razor blade Zip-ties Wire Cutters Needle
Raxiom Factory GPS Rear Back-up Camera Kit (07-17 Wrangler) Installation Time: 2.5-3Hrs Tools Required: 7mm Socket & Driver 10mm Socket 10mm Open end wrench Knife / Razor blade Zip-ties Wire Cutters Needle
TOYOTA CAMRY FOG LIGHT (Halogen and LED) Part Number: TCA-312 / TCA-812
 Part Number: TCA-312 / TCA-812") Part Number: TCA-312 / TCA-812 Kit Contents Item # Quantity Reqd. Description 1 2 Light Housings 2 2 Fog Light Bezels 3 1 Switch Assembly 4 1 Fog Light Operation Guide 5 1 Harness Bag Hardware Bag Contents
Part Number: TCA-312 / TCA-812 Kit Contents Item # Quantity Reqd. Description 1 2 Light Housings 2 2 Fog Light Bezels 3 1 Switch Assembly 4 1 Fog Light Operation Guide 5 1 Harness Bag Hardware Bag Contents
SCION FRS FOG LIGHTS. Part Number: SFR-313
 Part Number: SFR-313 Kit Contents Item # Quantity Reqd. Description 1 2 Light Housings 2 2 Fog Light bezels 3 1 Harness bag 4 1 User s card 5 1 Switch 6 1 Fuse jumper Hardware Bag Contents Item # Quantity
THE safety accessory of the 21 st Century.
 00 006 Chevrolet SSR Signal Mirror Installation Instructions THE safety accessory of the st Century. Note: Professional Installation Recommended Warranty does not cover damage to the vehicle or mirror
Installation Instructions
 Installation Instructions Jeep JK 2-Door (2011 Present) Mounting Bracket and Air Line System Kit for ARB On-Board Twin Air Compressor (CKMTA12) Made in the USA Kit Contents: 1 Flat Bracket 1 Formed Bracket
Part Number: TBL-016S
 5/18/17 TOYOTA TACOMA 2016-2017 LED Bed Light Kit Part Number: TBL-016S Kit Contents Item # Quantity Reqd. Description 1 2 LED Bed Light Harness (10 ) 2 2 LED Bed Light Harness (5 ) 3 1 Y Harness Extension
Part Number: TAV-713 TOYOTA AVALON LED DRL
 Part Number: TAV-713 Kit Contents Item # Quantity Reqd. Description 1 2 DRL s bezels w/led DRL 2 1 Driver Box 3 1 Harness bag 4 1 User s card 5 1 Cushion pad 6 1 Switch 7 2 Drill Jigs Hardware Bag Contents
TOYOTA RAV4/HV INTERIOR LIGHT KIT Preparation
 Preparation Part Number: PT413-42130 Kit Contents Item # Quantity Reqd. Description 1 1 Wire Harness 2 3 Hardware Bag Contents Item # Quantity Reqd. Description 1 20 Cable Tie 2 2 Scotchlok 3 2 Foam Pad
INSTALLATION INSTRUCTIONS
 INSTALLATION INSTRUCTIONS Accessory Application Publications No. CD CHANGER ATTACHMENT KIT ODYSSEY AII 22030 Issue Date AUG 2000 PARTS LIST CD Changer Attachment Kit: P/N 08B12-S0X-100 Right side rail
OEM Cruise Control Installation in GMC/Chevy NBS trucks
 OEM Cruise Control Installation in 99-02 GMC/Chevy NBS trucks May 2008 ~ Rampage_Rick Having just installed factory cruise control in my 00 Sierra, I thought I d share the fun. I followed the steps outlined
Audio System Upgrade Package Dodge Magnum, Chrysler 300C, Dodge Charger Jeep Commander (Premium Audio Only)
") 2005-2006 Dodge Magnum, Chrysler 300C, Dodge Charger 2005-2006 Jeep Commander (Premium Audio Only) 2005-2006 Dodge Ram (Regular Cab, Quad Cab, Mega Cab) 2005-2007 Jeep Grand Cherokee (Premium sound) TOOLS
2005-2006 Dodge Magnum, Chrysler 300C, Dodge Charger 2005-2006 Jeep Commander (Premium Audio Only) 2005-2006 Dodge Ram (Regular Cab, Quad Cab, Mega Cab) 2005-2007 Jeep Grand Cherokee (Premium sound) TOOLS
TOYOTA TACOMA FOG LIGHT (Halogen or LED)
") Part Number: TTA-312 / TTA-812 Kit Contents Item # Quantity Reqd. Description 1 2 Fog Lamps 2 1 Switch Assembly 3 1 Fog light operation guide 4 1 Harness bag Hardware Bag Contents Item # Quantity Reqd.
Part Number: TTA-312 / TTA-812 Kit Contents Item # Quantity Reqd. Description 1 2 Fog Lamps 2 1 Switch Assembly 3 1 Fog light operation guide 4 1 Harness bag Hardware Bag Contents Item # Quantity Reqd.
2016 HONDA 1000 Pioneer PN 3102 Turn signal / horn kit rev nc
 2016 Honda 1000 Pioneer STOP - THIS KIT IS DESIGNED SPECIFICALLY FOR 2016 HONDA 1000 PIONEER IF YOUR MACHINE IS NOT THIS MODEL DO NOT PROCEED. THIS KIT DOES NOT WORK ON THE PIONEER 500 nor 700 S. Contact
Installation Instructions for 2018 Jeep Grand Cherokee Laredo & Altitude and 2018 Dodge Durango SXT & SXT Plus
 Thank you for purchasing the SmartStopStart module! Please read this important information and keep this document with your vehicle owner's manual. Installation Instructions for 2018 Jeep Grand Cherokee
SCION tc FOG LIGHT. Part Number: STC-312 / STC-812
 SCION tc 2011-2013 FOG LIGHT Part Number: STC-312 / STC-812 Kit Contents Item # Quantity Reqd. Description 1 2 Fog Lamps 2 2 Fog Light bezels 3 1 Switch Assembly 4 1 Fog Light Operation guide 5 1 Harness
Part Number: TBL-016S
 5/18/17 TOYOTA TUNDRA 2014-2017 LED Truck Bed Light Kit Part Number: TBL-016S Kit Contents Item # Quantity Reqd. Description 1 2 LED Bed Light Harness (10 ) 2 2 LED Bed Light Harness (5 ) 3 1 Y Harness
INSTALLATION INSTRUCTIONS
 INSTALLATION INSTRUCTIONS Accessory BACKUP S Application 2012 ODYSSEY Publications No. AII 46724 Issue Date SEP 2011 PARTS LIST Backup Sensor Attachment Kit P/N 08V67-TK8-100A Right center sensor clip
TOYOTA VENZA 2009 TRAILER WIRE HARNESS Procedure
 Part Number: PT791-0T099 Kit Contents Item # Quantity Reqd. Description 1 1 Trailer Wire Harness Module 2 1 4-Flat Harness 3 1 Battery Power Wire Harness 4 1 Mounting Bracket, 4-Flat 5 2 Screw #10-24 6
TOYOTA PRIUS C FOG LIGHT
 TOYOTA PRIUS C 2012 - FOG LIGHT Part Number: 00016-47160 Accessory Code: LF10 Conflicts NONE Kit Contents Item # Quantity Reqd. Description 1 2 Fog Lamps 2 2 Fog Lamp s bezels 3 1 Switch Assembly 4 1 Fog
Prius XM Radio Installation Instructions. Eddie Bell
 2004-2005 Prius XM Radio Installation Instructions By Eddie Bell www.metrotpn.com 1 Let me begin by saying this is an easy but time consuming job. Set aside a few hours of your time for the install. If
INSTALLATION INSTRUCTIONS
 INSTALLATION INSTRUCTIONS Accessory REMOTE ENGINE STARTER SYSTEM Application 2010 CIVIC 4-DOOR Publications No. AII 42460 Issue Date AUG 2009 PARTS LIST Remote Engine Starter Unit Kit P/N 08E91-E22-100B
TOYOTA COROLLA L, LE FOG LIGHT (Halogen and LED) Part Number: TCO-314 / TCO-814
 Part Number: TCO-314 / TCO-814") TOYOTA COROLLA L, LE 2014-16 FOG LIGHT (Halogen and LED) Part Number: TCO-314 / TCO-814 Kit Contents Item # Quantity Reqd. Description 1 2 Light Housings 2 2 Fog Light bezels 3 1 Switch Assembly 4 1 Fog
TOYOTA COROLLA L, LE 2014-16 FOG LIGHT (Halogen and LED) Part Number: TCO-314 / TCO-814 Kit Contents Item # Quantity Reqd. Description 1 2 Light Housings 2 2 Fog Light bezels 3 1 Switch Assembly 4 1 Fog
TOYOTA CAMRY FOG LIGHT
 Date: 05.01.2014 TOYOTA CAMRY 2012-14 FOG LIGHT (Halogen and LED) Part Number: TCA-312 Kit Contents Item # Quantity Reqd. Description 1 2 Light Housings 2 2 Fog Light Bezels 3 1 Switch Assembly 4 1 Fog
PRELIMINARY INSTALLATION INSTRUCTIONS. Remote Engine Starter Attachment Kit P/N 08E92-SNA-100B
 INSTALLATION INSTRUCTIONS Accessory Application Publications No. REMOTE ENGINE STARTER SYSTEM 2008 CIVIC 2-DOOR AII 38215 Issue Date OCT 2007 PARTS LIST Remote Engine Starter Unit Kit P/N 08E91-E22-100B
Backside License Plate Mount for Jeep JK Wrangler
 REQUIRED TOOLS 10mm SOCKET 13mm SOCKET 4mm HEX KEY WIRE CRIMPS WIRE STRIPPERS ELECTICAL TAPE SCREW DRIVER KIT CONTAINS BACKSIDE MOUNT LICENSE PLATE BRACKET WITH LEDS PLASTIC PASS-THROUGH GROMMET STAINLESS
750 Paso Wiring Upgrade
 750 Paso Wiring Upgrade Supplies required: 2 Bosch 30A/12V Relays # #0 332 209 150 (with mounting tab) 1 30 Amp fuse holder 1 10 Amp fuse holder 12 inches of brown 12 gauge wire 60 inches of red 14 gauge
INSTALLATION INSTRUCTIONS
 INSTALLATION INSTRUCTIONS Accessory Application Publications No. AII 24075 2003 ACCORD P/N 08V31-SDN-100 2-DOOR Issue Date AUG 2002 NOTE: The outside temperature gauge can not be installed in a vehicle
Signal Mirror Installation Instructions
 Signal Mirror Installation Instructions Ford F-250 to F-750 Pick-Up, Super-Duty 1998-2007 Trailer Tow Mirror Ford Excursion XLT/Limited 2000-2002 Trailer Tow Mirror Ford Excursion (all models) 2003-2005
INSTALLATION INSTRUCTIONS
 INSTALLATION INSTRUCTIONS Accessory REMOTE CONTROL Application Publications No. 2012 ACCORD AII 46522 2-DOOR Issue Date (A/T ONLY) AUG 2011 PARTS LIST Remote Engine Starter Unit Kit P/N 08E91-E22-101A
LED Fog Light. Conflicts Note: 1832, 1852, 1856, 1872, General Applicability Fits Models
 LED Fog Light Year & Model Part Number 2017 Corolla TCO-817 Conflicts Note: 1832, 1852, 1856, 1872, 1874 General Applicability Fits Models 1863 1866 1864 1865 Additional Items Required For Installation
TOYOTA im INTERIOR LIGHT KIT Preparation
 Preparation Part Number: PT922-12170 Kit Contents Item # Quantity Reqd. Description 1 1 Main Wire Harness 2 1 Switch 3 1 Switch Header 4 1 ECU 5 1 ECU Bracket 6 1 Hardware Kit 7 1 Instruction Card 8 1
2015 Mustang Lightbar (All Models) CDC#
 CDC#") 2015 Mustang Lightbar (All Models) CDC# 1511-7000-01 Components: 1 CDC Lightbar Note: READ instructions before starting installation!!! CDC Part# Driver side bracket 0511-6001-05 Passenger side bracket
2015 Mustang Lightbar (All Models) CDC# 1511-7000-01 Components: 1 CDC Lightbar Note: READ instructions before starting installation!!! CDC Part# Driver side bracket 0511-6001-05 Passenger side bracket
GENUINE PARTS INSTALLATION INSTRUCTIONS
 GENUINE PARTS INSTALLATION INSTRUCTIONS 1. 2. 3. 4. DESCRIPTION: Accent light Kit APPLICATION: Versa (2012) PART NUMBER: 999F3 AW008 - Universal Accent Lighting Kit. KIT CONTENTS: Item QTY Description
Important! The subwoofer system is designed to be used only with the rear seat in the up position only.
 Important! The subwoofer system is designed to be used only with the rear seat in the up position only. CONTENTS 1EA. SUBWOOFER ASSEMBLY 2EA. BRACKET LOWER 2EA. BRACKET UPPER 1EA. OVERLAY HARNESS 2EA.
TOYOTA TACOMA LED DRL Black-Out
 TOYOTA TACOMA 2013 - LED DRL Black-Out Part Number: 00016-35021 Accessory Code: LDBO10 Conflicts - Fog Lights Kit Contents Item # Quantity Reqd. Description 1 2 DRL Housing 2 1 Driver Box 3 1 Harness bag
Wolverine Turn Signal / Horn Kit 2102
 All years Yamaha Wolverine STOP - THIS KIT IS DESIGNED SPECIFICALLY FOR ALL YEAR AND MODELS YAMAHA WOLVERINE. IF YOUR MACHINE IS NOT ONE OF THESE MODELS DO NOT PROCEED. Contact Ryco Motorsports or your
TOYOTA SIENNA FOG LIGHT (Halogen & LED)
") (Halogen & LED) Part Number: TSI-312 / TSI-812 Kit Contents Item # Quantity Reqd. Description 1 2 Fog Lamps 2 2 Fog Light bezels 3 1 Switch Assembly 4 1 Fog Light Operation guide 5 1 Harness Bag Hardware
(Halogen & LED) Part Number: TSI-312 / TSI-812 Kit Contents Item # Quantity Reqd. Description 1 2 Fog Lamps 2 2 Fog Light bezels 3 1 Switch Assembly 4 1 Fog Light Operation guide 5 1 Harness Bag Hardware
INSTALLATION INSTRUCTIONS
 INSTALLATION INSTRUCTIONS Accessory REMOTE CONTROL Application Publications No. 2009 ACCORD AII 39977-40931 4-DOOR Issue Date (A/T ONLY) NOV 2008 PARTS LIST Remote Engine Starter Unit Kit P/N 08E91-E22-100A
INSTALLATION INSTRUCTIONS
 INSTALLATION INSTRUCTIONS Accessory REMOTE CONTROL Application 2008 ACCORD 4-DOOR Publications No. AII 35365 Issue Date AUG 2007 PARTS LIST U Accessory User s Information Manual Remote Engine Starter Unit
Mustang One-Touch Convertible Top Module (2005+) - Installation Instructions
 - Installation Instructions") Mustang One-Touch Convertible Top Module (2005+) - Installation Instructions The below installation instructions work for the following products: Mustang One-Touch Convertible Top Module (2005+) Please
Mustang One-Touch Convertible Top Module (2005+) - Installation Instructions The below installation instructions work for the following products: Mustang One-Touch Convertible Top Module (2005+) Please
Part Number: TCA-712SE
 Date: 09.04.2013 TOYOTA CAMRY SE 2012-14 LED DRL Part Number: TCA-712SE Kit Contents Item # Quantity Reqd. Description 1 2 DRL s bezels w/led DRL 2 1 Driver Box 3 1 Harness bag 4 1 User s card 5 1 Cushion
TOYOTA VENZA 2009 TRAILER WIRE HARNESS Procedure
 Part Number: PT791-0T099 Kit Contents Item # Quantity Reqd. Description 1 1 Trailer Wire Harness Module 2 1 4-Flat Harness 3 1 Battery Power Wire Harness 4 1 Mounting Bracket, 4-Flat 5 2 Screw #10-24 6
Installation Instructions PowerBoard Automatic Retracting Running Board
 Installation Instructions PowerBoard Automatic Retracting Running Board Vehicle Application Dodge Ram Quad Cab Pickup 2002-2008 : 75101-15 Dodge Ram Quad Cab Pickup, 2500 / 3500 / HD 2003-2009 : 75101-15
2007 Crown Victoria Police Interceptor (P71) Blend Door Actuator Replacement (If I did it, you can too.)
 Blend Door Actuator Replacement (If I did it, you can too.)") 2007 Crown Victoria Police Interceptor (P71) Blend Door Actuator Replacement (If I did it, you can too.) I'm not saying this is the only way, or even the right way, but it worked for me. First time I've
2007 Crown Victoria Police Interceptor (P71) Blend Door Actuator Replacement (If I did it, you can too.) I'm not saying this is the only way, or even the right way, but it worked for me. First time I've
INSTALLATION INSTRUCTIONS
 INSTALLATION INSTRUCTIONS Accessory Application Publications No. P/N 08V31-SDA-102 2007 ACCORD 4-DOOR AII 32672 Issue Date JULY 2006 NOTE: Fog lights can be installed in a vehicle equipped with a factory
HOW TO FIT A KEYLESS ENTRY SYSTEM
 HOW TO FIT A KEYLESS ENTRY SYSTEM THE KITS ARE WIDELY AVAILABLE TO BUY FROM THE INTERNET AND OTHER GOOD STOCKISTS HERE IS AN IDEA OF WHAT YOU SHOULD RECIEVE IN YOUR KIT. PLUS WIRING DIAGRAM PLUS WIRING
#TL T EA888 GEN 3 FUELING SYSTEM/ INSTALLATION INSTRUCTIONS
 #TL100069 2.0T EA888 GEN 3 FUELING SYSTEM/ INSTALLATION INSTRUCTIONS Notes: These instructions were written for a North American specification MkVII GTI. Other models, like the Golf R, are similar. When
INSTALLATION INSTRUCTIONS
 INSTALLATION INSTRUCTIONS Accessory Application Publications No. ACCORD AII 24050 4-DOOR P/N 08V31-SDA-100 Issue Date AUG 2002 NOTE: The outside temperature gauge cannot be installed in a vehicle with
INSTALLATION INSTRUCTIONS
 INSTALLATION INSTRUCTIONS Accessory S Application 2010 ODYSSEY Publications No. AII 41818 Issue Date JUNE 2009 PARTS LIST Right center sensor clip (Black) Backup Sensor Attachment Kit P/N 08V67-SHJ-101C
TOYOTA COROLLA 2009 TVIP V4 PREPARATION
 PREPARATION Part #: PT398-02080 Conflicts: NOTE: Part number of this accessory may not be the same as the part number shown. Do not install into Manual Transmission Vehicles or Vehicles without RKE systems.
INSTALLATION INSTRUCTIONS
 INSTALLATION INSTRUCTIONS Accessory Application Publications No. S 1998 CIVIC 2/3/4-DOOR All 18767 Issue Date SEP 1997 PARTS LIST Fog Light Kit: P/N 08V31-S01-100 Right fog light (marked R ) Fuse label
INSTALLATION INSTRUCTIONS
 Rear Vision System Tailgate Emblem Camera Mirror Display 2009-Current Ford F-150 and 2010-Current Super Duty (Kit part number 1008-9527) Kit Contents: Mirror Tailgate Emblem Mount with Camera Interior
INSTALLATION INSTRUCTIONS
 INSTALLATION INSTRUCTIONS Accessory Application Publications No. AII 26042-26353 XM INTERFACE ODYSSEY EXCEPT EX-L WITH NAVI/RES Issue Date FEB 2004 PARTS LIST 8 Wire ties XM Radio Attachment P/N 08B15-S0X-100
INSTALLATION INSTRUCTIONS
 INSTALLATION INSTRUCTIONS Accessory REMOTE CONTROL Application 2012 CR-V Publications No. AII 12085 Issue Date DEC 2011 PARTS LIST Remote Control Engine Starter Unit Kit P/N 08E91-E22-101A Accessory User
Toyota Tundra Lightbar
 2014-2017 Toyota Tundra Lightbar Recommended Tools & Safety 1 Safety Glasses 1 Blanket/Fender Cover 1 10mm wrench 1 10mm socket 1 ¼ Drive 1 Razorblade 1 Plastic Trim Tool 1 Wire Router 1 Phillips Head
LEXUS GS 350/450h ILLUMINATED DOOR SILLS Preparation
 Preparation Part Number: PT922-30120 (GS350) PT922-30130 (GS450h) NOTE: Part number of this accessory may not be the same as the part number shown. Kit Contents Item # Quantity Req'd. Description 1 1 Illuminated
TOYOTA SIENNA LED DRL Black-Out
 TOYOTA SIENNA 2013 - LED DRL Black-Out Part Number: 00016-08021 Accessory Code: LDBO10 Conflicts - Fog Lights Kit Contents Item # Quantity Reqd. Description 1 2 DRL Housing 2 2 DRL s bezels 3 1 Driver
Remove the 3-11mm nuts holding mirror on. Don t drop the nuts!
 2005-2012 Ford Mustang Puddle Lamp Kit Parts List: Quantity: Tool List: LED Lamps 2 Flat head screwdriver Seals 2 Ratchet & Socket set OR Nuts 2 Adjustable Wrench Wiring harness 1 Drill & 11/16 th bit
INSTALLATION INSTRUCTIONS
 INSTALLATION INSTRUCTIONS Accessory REMOTE CONTROL Application 2014 TSX (L4) Publications No. BII 50198 Issue Date SEPT 2013 PARTS LIST Remote Engine Starter Unit Kit P/N 08E91-TK4-200A Fuse label Transmitter
INSTALLATION INSTRUCTIONS
 INSTALLATION INSTRUCTIONS Accessory Application Publications No. P/N 08V31-SDN-100 2004 ACCORD 2-DOOR AII 25735 Issue Date SEP 2003 NOTE: The outside temperature gauge can not be installed in a vehicle
TOYOTA TACOMA FOG LIGHT
 Date: 10.31.2013 TOYOTA TACOMA 2012-15 FOG LIGHT (Halogen or LED) Part Number: TTA-312 Kit Contents Item # Quantity Reqd. Description 1 2 Fog Lamps 2 1 Switch Assembly 3 1 Fog light operation guide 4 1
Conflicts. TOYOTA Prius Foglights. Part Number: Accessory Code: LF1. Factory Fog Lights
 TOYOTA Prius 2011- Foglights Part Number: 00016-47401 Accessory Code: LF1 Conflicts Factory Fog Lights Item # Quantity Reqd. Description 1 2 Fog Lamps 2 2 Fog Lamp s bezels 3 1 Switch Assembly 4 1 Fog
Part Number: T4R-2N1. Hardware Bag Contents. General Applicability XLE, Limited
 Date: 2.10.2016 TOYOTA RAV4 2016 2 in 1 LED UPGRADE KIT Part Number: T4R-2N1 Kit Contents Item # Quantity Reqd. Description 1 2 DRL + Fog Light Housing 2 1 Driver Box 3 1 Harness bag 4 1 User s card 5
CAMRY STRIP LED DRL TOYOTA Part Number: Accessory Code: LDRS10. PIO / DIO Rev. A 02/26/13. Doc
 Doc. 02.126.00 TOYOTA CAMRY PIO / DIO Rev. A 2013-02/26/13 STRIP LED DRL Part Number: 00016-32280 Accessory Code: LDRS10 Conflicts - Only works on Camry SE Kit Contents Item # Quantity Reqd. Description
Part Number: SFR-713. Hardware Bag Contents. General Applicability All models. Conflicts - Fog Lights. Date: SCION FRS LED DRL
 Date: 01.30.2014 SCION FRS 2013-2015 LED DRL Part Number: SFR-713 Kit Contents Item # Quantity Reqd. Description 1 2 DRL s bezels w/led DRL 2 1 Driver Box 3 1 Harness bag 4 1 User s card 5 1 Switch Hardware
MAX FLOW FUEL KIT KIA FORTE SX HYUNDAI VELOSTER TURBO INSTALLATION INSTRUCTIONS
 MAX FLOW FUEL KIT KIA FORTE SX 2014+ HYUNDAI VELOSTER TURBO INSTALLATION INSTRUCTIONS Installation: Tools needed: 1/4 or 3/8 drive ratchet Different length extensions 8mm socket / 10mm socket / 12mm socket
Ford Racing BOSS 302 Engine Oil Cooler (11-14 GT)
") Tools needed: 14mm hex socket 7mm socket/wrench 8mm socket/wrench Ford Racing BOSS 302 Engine Oil Cooler (11-14 GT) 10mm socket (for airbox removal) ¾ inch or 19mm wrench Torque wrench Appropriate ratchets
Tools needed: 14mm hex socket 7mm socket/wrench 8mm socket/wrench Ford Racing BOSS 302 Engine Oil Cooler (11-14 GT) 10mm socket (for airbox removal) ¾ inch or 19mm wrench Torque wrench Appropriate ratchets
INSTALLATION INSTRUCTIONS
 INSTALLATION INSTRUCTIONS Accessory Application Publications No. REMOTE CONTROL 2009 MDX BII 40030 Issue Date JULY 2008 PARTS LIST Remote Engine Starter Unit Kit P/N 08E91-E22-200B Remote Control Engine
Special Note About The JDM High Performance Water Pump:
 Page 1 of 30 JDM Engineering, Inc. home Call Us! 732-780- 0770 back to Installation Instructions Electric Fan Upgrade Kit Electric Fan Wiring Diagram Thank you for your purchase of the JDM Engineering
Installation Instructions PowerBoard Automatic Retracting Running Board
 Installation Instructions PowerBoard Automatic Retracting Running Board Vehicle Application Dodge Ram Quad Cab Pickup 2002-2008 Part Number: 75101-15 Dodge Ram Quad Cab Pickup, 2500 / 3500 / HD 2003-2009
Installation Instructions PowerBoard Automatic Retracting Running Board
 Installation Instructions PowerBoard Automatic Retracting Running Board Vehicle Application Ford F150 Super Crew Cab 2009 Current : 75141-15 www.bestop.com - We re here to help! Visit our web site and
PONTIAC FIREBIRD
 1974-78 PONTIAC FIREBIRD Two Panel Sequential LED Tail Light Kit Installation Guide Kit Contents: 2 LED panels 2 LED panel mount kits 6 rubber grommets 1 power wire 1 pigtail harness Kit 1 crimp terminal
Remove 4 circled pins. Route wiring along dashed line. Remove the 2 9mm nuts and black retaining plate that secure extractor.
 2015 Ford Mustang Turn Signal Hood Kit Parts List: Quantity: Tool List: Bracket & pre-installed lamp 2 Flat head screwdriver Wiring harness 1 Phillips screwdriver PB-3660 Parts Bag 1 Ratchet & Socket set
Part Number: TAV-713. Kit Contents Item # Quantity Reqd. Description 1 2 DRL s bezels w/led DRL. Hardware Bag Contents.
 Date: 09.04.2013 TOYOTA AVALON 2013 - LED DRL Part Number: TAV-713 Kit Contents Item # Quantity Reqd. Description 1 2 DRL s bezels w/led DRL 2 1 Driver Box 3 1 Harness bag 4 1 User s card 5 1 Cushion pad
Dodge Ram Quad Cab A Dodge Ram Quad Cab 2500/ A Dodge Ram Mega Cab A
 INSTALLATION GUIDE APPLICATION MODEL YR AMP PART # Dodge Ram Quad Cab 1500 2002-2008 5101-01A Dodge Ram Quad Cab 2500/3500 2003-2009 5101-01A Dodge Ram Mega Cab 2006-2009 5118-01A INSTALLATION TIME 3-5
Part Number: TCO-314 / TCO-814
 Date: 05.02.2014 TOYOTA COROLLA L, LE 2014-15 FOG LIGHT (Halogen and LED) Part Number: TCO-314 / TCO-814 Kit Contents Item # Quantity Reqd. Description 1 2 Light Housings 2 2 Fog Light bezels 3 1 Switch
TOYOTA COROLLA ILLUMINATED DOOR SILLS Preparation
 Preparation Part Number: PT942-02140 Kit Contents Item # Quantity Reqd. Description 1 1 Illuminated Scuff plate, Front Right Hand 2 1 Illuminated Scuff plate, Front Left Hand 3 1 Door Scuff plate, Rear