HOW TO REPLACE THE SPOILER ON YOUR GEN 3 PRIUS
|
|
|
- Jody McKenzie
- 6 years ago
- Views:
Transcription

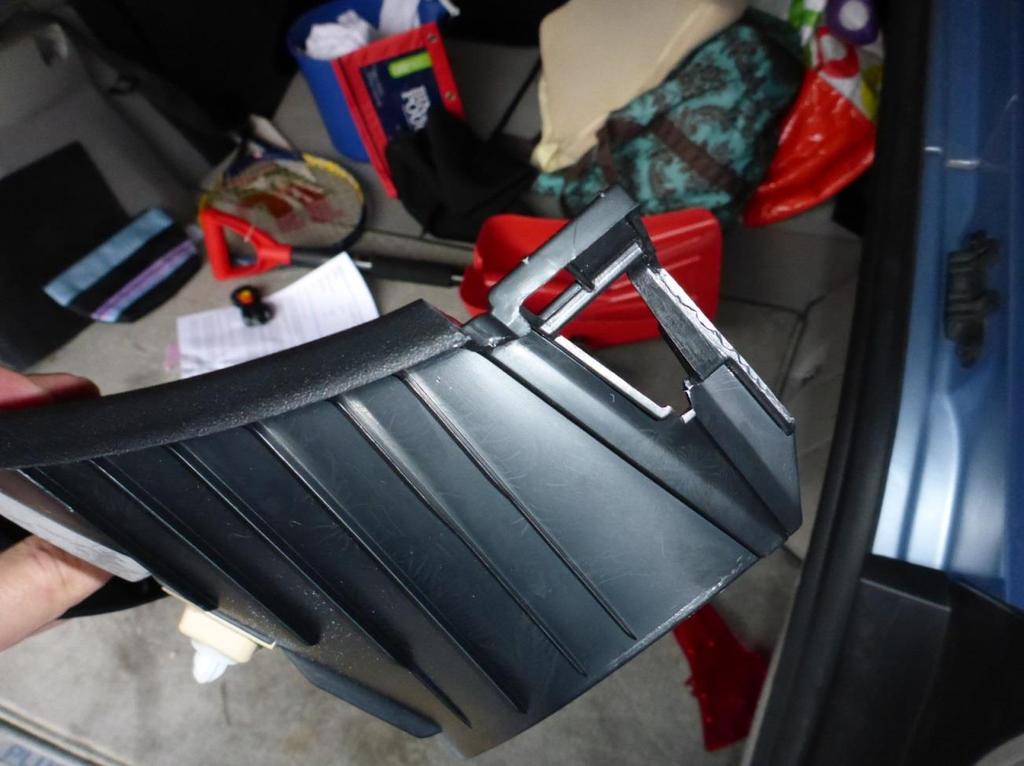
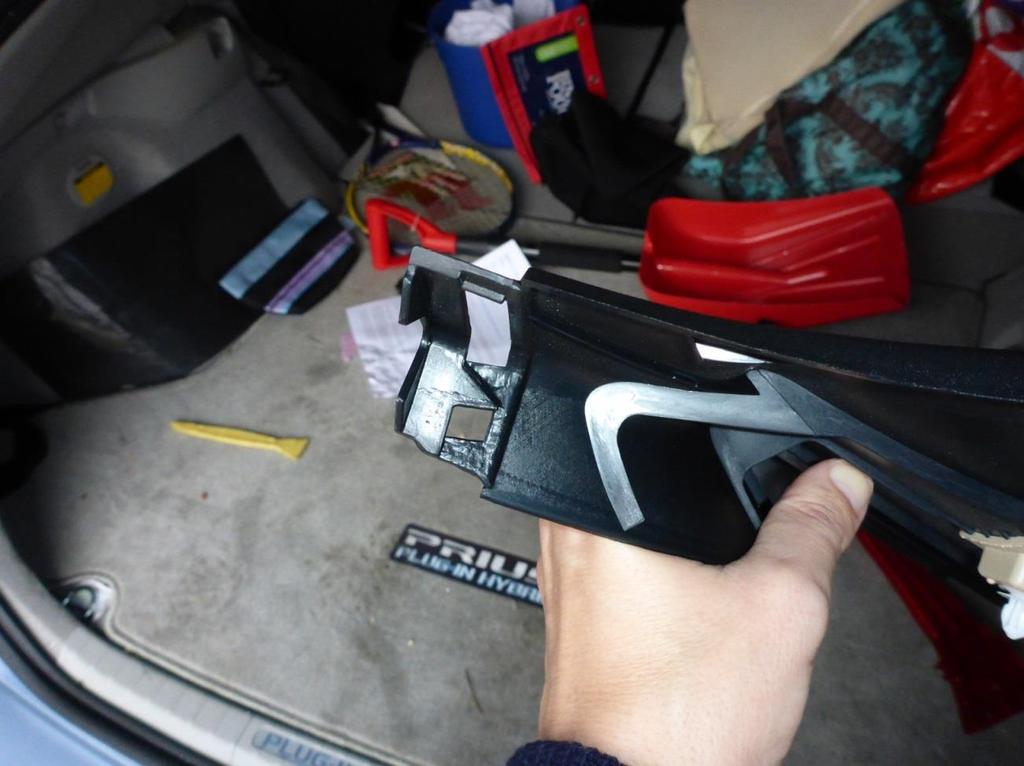
1 HOW TO REPLACE THE SPOILER ON YOUR GEN 3 PRIUS Yup, it happened. The spoiler on your beloved Prius has departed this earth and now is in the great junkyard in the sky. This is how you make it all better so the pain goes away What do you need? You ll need a plastic prying tool, a 10mm socket wrench, a phillips screwdriver, something to fish wire with (pipe cleaner or wire clothes hanger will do), and a shiny new spoiler. Can you do it? How long will it take? Just about anyone could do this job. On a scale of 1 to 10 in difficulty, I d rate it about a 5. I am mechanically inclined, but not terribly so. It took me about 1 ½ hours, and I was taking pictures along the way. Where do you get the spoiler? I got mine at AutoNation Gulf Freeway. It was the cheapest I could find. It cost me $ including taxes, shipping, and handling. It is part # When you look at the part on their website, it shows a list of the Prius that it will fit. Mine was a 2012 Prius Plug-in, but it looks like it fit all the Gen 3 Prius models. The spoiler arrives black and shiny, just like the one you or your loved one just heartlessly ripped off your trusty steed. No need to paint it or prep it in any way. It s good to go as is. It will also arrive with 2 embedded plastic rivets, one on each end of the spoiler, along with 5 embedded bolts sticking out. The only things you ll need are the nuts that go onto the bolts, but likely those are still screwed into your hatchback sheet metal from where the spoiler cleanly (hopefully!) sheared off your hatchback lid. More on that later.. Here s what your new spoiler looks like, brand new, from the underside: 5 bolts plastic rivets Now what? Head out to your Prius and clean out the tailgate area so you have room to play around in there. Fold down the back seats and put all the crap you had in the trunk on the folded down back seat seatbacks. So if you re sitting in the hatchback area, facing toward the rear of the car, you ll see the hatchback interior just in front of you. On the interior hatchback are some plastic panels. You re going to need to pop them off so that you can access the holes that the bolts on your new spoiler drop into. See the picture below. The inside of your hatchback should like this. If it doesn t, you re in the wrong car in your garage:

2 middle plastic panel seam lower plastic panel So as you re looking at the inside of your hatchback door, you ll see that it is made up of a few plastic panels. The only ones we are going to remove are the lower plastic panel and the middle plastic panel as noted above. As you can see in the picture, there is a seam between the two panels where one begins and the other one ends. On the edge of the lower panel, there are two little notches- one on one side of the lower plastic panel, one on the opposite side. Take your plastic prying tool and put it in that notch. See the picture below:

3 notches Carefully put your plastic prying tool into the notch and start prying the lower plastic panel away from the hatchback sheet metal. It takes a bit of force to do so. You re going to be afraid that you re going to break the plastic panel. The panels are pretty durable. As long as you don t excessively twist or otherwise torque them you ll be OK. Just pull the plastic panels straight away from the sheet metal, and you ll start to hear and feel the little pops of the plastic rivets letting go.

4 Plastic rivets you re trying to pop out of the hatchback sheet metal Keep prying all the way around the lower panel. Make sure you don t excessively bend the panel so it doesn t crack or break. Note that there is a thin point right where the hatchback latch hook is as shown below:

5 Metal loop thingy on the hatchback door that goes into the latching mechanism Don t bend too much here and here As you re popping that lower panel off, it would be easy to crack the lower plastic panel right where those arrows point above. Just carefully pry and you ll be OK. When you finally pop that lower panel off, the panel looks like this:

6 Left side, lower plastic panel

7 Right side, lower plastic panel Now that you have the plastic lower panel off, you can pop the middle plastic panel using the same technique. When you have those off, it will look like this:

8 Left side, middle plastic panel
. I have pictured the interlocking pieces below, but honestly they don t make much sense until you put them back together.")
9 Right side, middle plastic panel As you look at the lower plastic and middle plastic pieces, notice that they interlock at the seam (see picture of seam a few pages previous). I have pictured the interlocking pieces below, but honestly they don t make much sense until you put them back together.
10

11 Those two pictures above are the pictures that show the interlocking joint at the seam, but just ignore them for now. They ll fit together logically when you put the panels back on later. The middle and lower panels only go on one way, so it s not too hard to figure out how they connect when you get to that step. The next two pictures show what the interior of the hatchback looks like with the lower and middle panels removedmore for just general interest than anything else. We re interested in the place where the spoiler attaches to the hatchback: Left/center of interior hatchback

12 Right/center of interior hatchback OK, so a little explanation before the next set of photos below. My spoiler sheared off cleanly when it was damaged. If you look at the first picture of this document, you ll see that there are 5 bolts and 2 plastic rivets that hold the spoiler to the car. The bolts are embedded in the spoiler, as are the rivets. When my spoiler sheared off, the bolts broke off from the inside of the spoiler, as did the plastic rivets. So the plastic rivets were still riveted to my hatchback, and the bolts were still bolted to my hatchback as well. They did their job in that they sheared away from the cheap part (the spoiler) rather than pulling away from the expensive part (the hatchback), which would have torn metal and likely cost more than the $300 spoiler to repair. Anyway, the next three pictures are looking at the hatchback. The hatchback is open. I m standing at the rear of the car facing forward. Since I couldn t fit the entire width of the hatchback in one frame with sufficient detail, I took a left 1/3 (first photo), a right 1/3 (second photo), and then a center 1/3 (third photo) of the hatchback where the spoiler bolts come through the hatchback.

13 Left 1/3 of Hatchback, looking forward Leftmost two bolts still attached to my hatchback after the spoiler was sheared off

14 Right 1/3 of hatchback, looking forward Rightmost two bolts still attached to my hatchback after the spoiler was sheared off

15 Close-up of Center 1/3 of hatchback This is where the brake light in the center of the spoiler comes through the hatchback and plugs into its electrical source Center nut remaining after spoiler was sheared off Electrical wiring FROM spoiler As you can see because its brake wiring is still there, my spoiler was still slightly attached to my car, helped with some duct tape. I need to unplug the center brake light so that I can finally untape/remove the old spoiler from my car. It s easy. You just take a screw driver and press the little tab as shown below. When you press on the tab, the little wire plug just slides out. Easy-peasy.

16 Close up of above photo, Center 1/3 of hatchback Just use a screwdriver to press on that little tab, then slide the wire jack out of its receptacle PRESS IN THIS TAB Slide wire jack out of receptacle Once you have disconnected the wires, remove your spoiler from the car. Or perhaps it is already long since gone. In that case, hopefully that receptacle is still there to receive your center brake light wiring when you put the spoiler on! This is what the Prius looks like without its spoiler:

17 Side view, no spoiler

18 Rear view, no spoiler 5 bolts remaining in hatchback after having been sheared out of 2 rivets remaining in hatchback after having been sheared out of spoiler 5 bolts, 2 rivets- just like your shiny new spoiler. We gotta get the old bolts and rivets out so we can put that new spoiler in. For the two rivets, just use a flat head screwdriver to pop them out. You don t have to be too fussy because even if you scratch the metal a little bit, no one would be able to see it. However, you don t want the protective layer of paint to be damaged.

19 Pop them out- one on each side Getting the nuts off the bolts is a little bit trickier. There is some sort of Loctite substance on the threads of the bolts, so they don t come off easily. Further, you re going to need those nuts later to screw onto the new bolts on your new spoiler. The nuts and bolts are what really hold the spoiler in place. The problem is that if you unscrew the bolts while the hatchback is in the up position and you drop a bolt, it will drop into a recess in the hatchback and I imagine it would be a gigantic PITA to dig those bolts out. And if you couldn t dig that bolt out, I bet it would make quite a rattle while driving down the street. I took a pair of adjustable pliers to hold the head of the nut on the outside of the hatchback so it wouldn t spin. I then took a 10mm socket and unscrewed the nut from the bolt with the hatchback in a down position. Why a down position? If the nut falls off the bolt accidentally, it drops straight down into the trunk area rather than into the dark recesses of the hatchback. So I had the adjustable pliers in my left hand, the socket wrench in my right hand, and the tailgate almost closed. For the center nut, I had the person who sheared my spoiler off in the first place (who shall remain nameless) hold the wrench while I took the nut off from the inside of the trunk. My arms weren t long enough for this two handed operation with the center nut/bolt. If this all sounds confusing, just remove the bolts and their nuts from the hatchback any way you please. It s not rocket surgery. Just don t lose your nuts!

20 Use a pair of adjustable pliers to hold the bolt in place while you unscrew the nut from the inside with a 10mm socket. Don t lose those nuts into the dark recesses of the hatchback!!!! OK, so now your Prius is ready to accept the new spoiler, but. We have to take the center brake light OUT of the old spoiler and put it into the new spoiler. The new spoiler does not come with the brake light assembly installed.

21 The above photo is the brake light in the old spoiler. See the two screws? Just unscrew them and pull the lens assembly CAREFULLY out of the oil spoiler. Behind that lens assembly and attached to it is a length of wire. Carefully help the wire through the passage in the old spoiler. Don t lose the screws, and don t step on your spoilers as you re fussing around with them on the ground with these next few steps.

22 Carefully thread the wire through the old spoiler when removing the brake light assembly After you ve removed the old lens and its wiring, you ll obviously want to install it in your new spoiler. Remember how you kind of had to pull a bit hard to get the wiring through the old spoiler? Well, that tight channel for the wire is what makes it a PITA to thread it through the new spoiler! I got a foot long length of pipe cleaner and threaded it through the wire channel in the new spoiler. I tried an electrical wire fish, but it was too thick to make it through the bend and the openings on either end of the wire channel. A wire clothes hangar might work fine too. Anyway, thread the pipe cleaner through the wire channel in the new spoiler and CAREFULLY pull the brake light wiring through. DON T accidentally pull the little jack off the end of the wiring. Attach the pipe cleaner to the WIRE not the little jack at the end. PULL THE WIRE, NOT THE JACK- unless, of course, you like frustration and turning 2 hour jobs into 4 hour jobs. OK, you have the brake light assembly wiring threaded through the new spoiler. Now take the two screws that I told you not to lose and use them to screw the brake light into the new spoiler. Now your spoiler is ready to attach to the hatchback.

23 I unplugged the wiring from the brake light lens to help with the fishing process through the new spoiler. You can leave the brake light attached to the wiring if desired. That s about all I have for pictures because the rest is just the reverse of what I discussed above. You now have a new spoiler in your hands. It s black, shiny, covered in fingerprints, and it has your newly installed brake light assembly screwed into it. Walk over to your car. Thread the brake light wiring through its opening and make sure it goes through the hatchback. Line up the 5 bolts and 2 rivets in your spoiler with the 5 bolt holes and 2 rivet holes in your hatchback. Obviously the hatchback should be down during this step, unless you just like challenges. Use the pictures above as a reference if you get confused as to which hole is which. Line everything up, push down on the spoiler just above where the rivets are located, and pop them into place at either end. Now you just have to take the 5 nuts that I told you not to lose, get inside the trunk area, and screw the nuts onto the bolts. NOTE: With just the rivets holding the spoiler in place initially, don t do something crazy again (remember you already tore the spoiler off once) and open that hatchback wide open with just those two little rivets holding your $300 spoiler in place. You don t want that thing to go off flying as you raise the hatchback! I sat in the hatchback with the hatchback lid almost closed and attached the bolts. Again, carefully start the nuts on the bolts WITHOUT them falling off and getting lost into the dark recesses of the hatchback, never to be seen again. I suggest putting the bolts on with the hatchback in the down position so that if the bolts drop, they ll drop straight down into the trunk area and not into the hatchback voids.
24 How much should you tighten those nuts? I don t know how many NMs one is supposed to torque those nuts. I guess you could call a local Toyota dealer and see if there s a number in their manual. I just made them all SNUG-ish. Tight enough were the spoiler felt like it was secure, but not so tight where I would crack my brand new spoiler. If in doubt, start on the looser end of snug. You can always go back and tighten later if you have to. Plug your brake light wiring back into the receptacle on the hatchback. Have someone step on the brake to make sure the light is working. The last step is to put the lower and middle plastic panels back on. Put the middle one in first, but leave that last rivet closest to the seam out to help facilitate the mating of the middle plastic vinyl piece with the lower plastic piece along the aforementioned seam. The connection is a little fussy, but if you play with it a little bit the lower and middle pieces snap together to form a tight seam. Once they re together, just push all the rivets in along both the lower and middle plastic pieces so that they are snug to the hatchback and you re done!! I hope you found this helpful. Regards, PriusChat ualdriver
How I installed new brake pads on my i with Sport Package (should be fine for other E39 s) By Robert B.
 By Robert B.") How I installed new brake pads on my 1999 528i with Sport Package (should be fine for other E39 s) How I installed new brake pads on my 1999 528i with Sport Package (should be fine for other E39 s) By
How I installed new brake pads on my 1999 528i with Sport Package (should be fine for other E39 s) How I installed new brake pads on my 1999 528i with Sport Package (should be fine for other E39 s) By
Installing the Wireless Charging upgrade kit in a 2018 XT5 (Platinum version)
") Installing the Wireless Charging upgrade kit in a 2018 XT5 (Platinum version) September 2, 2018 Tools needed: Wireless charger upgrade kit Plastic trim tools 7 mm nut driver Background: I purchased the
Installing the Wireless Charging upgrade kit in a 2018 XT5 (Platinum version) September 2, 2018 Tools needed: Wireless charger upgrade kit Plastic trim tools 7 mm nut driver Background: I purchased the
Fitting the Bell Auto Services (B-A-S) TDV6 EGR Blanking Kit to a 2006 model Discovery 3 TDV6 HSE
 TDV6 EGR Blanking Kit to a 2006 model Discovery 3 TDV6 HSE") Fitting the Bell Auto Services (B-A-S) TDV6 EGR Blanking Kit to a 2006 model Discovery 3 TDV6 HSE Before I describe how I did this, I must first thank other members of the Disco3.co.uk forum (namely J,moore
Fitting the Bell Auto Services (B-A-S) TDV6 EGR Blanking Kit to a 2006 model Discovery 3 TDV6 HSE Before I describe how I did this, I must first thank other members of the Disco3.co.uk forum (namely J,moore
Connecting the rear fog light on the A4 Jetta, while keeping the 5 Light Mod
 Connecting the rear fog light on the A4 Jetta, while keeping the 5 Light Mod DISCLAIMER: I'm human and make mistakes. If you spot one in this how to, tell me and I'll fix it This was done on my 99.5 Jetta.
Disco 3 Clock Spring / Rotary Coupler replacement
 Disco 3 Clock Spring / Rotary Coupler replacement I recently had to change my Clock spring and thought some folks may find it helpful to see what it entailed. I did lots of reading around but couldn t
Replacing MK4 Golf/Jetta radiator mounts in-car
 Replacing MK4 Golf/Jetta radiator mounts in-car This is a guide to replacing the radiator mounts in a MK4 Golf/Jetta. This involves moving the core support to the service position which allows you to do
Speakers and Motors. Three feet of magnet wire to make a coil (you can reuse any of the coils you made in the last lesson if you wish)
") Speakers and Motors We ve come a long way with this magnetism thing and hopefully you re feeling pretty good about how magnetism works and what it does. This lesson, we re going to use what we ve learned
Speakers and Motors We ve come a long way with this magnetism thing and hopefully you re feeling pretty good about how magnetism works and what it does. This lesson, we re going to use what we ve learned
X-Type w/ non-premium sound amplifier installation instructions
 X-Type w/ non-premium sound amplifier installation instructions 1. Pull radio from dash (see Radio Removal Instructions ) 2. Disconnect wiring harness from back of radio by pushing in tab on plug and pulling
YOU MAY WANT TO FIRST TRY TO LOOSEN THE FILTER HOUSING
 2005 XC90 Tune-up (5-cyl) Including: Oil Change - Spark Plugs - Fuel Filter - Cabin Filter First off - let me say that I am an amateur (at best) mechanic, and I claim no responsibility for whatever you
Door Panel Removal & Window Stop Adjustment
 Door Panel Removal & Window Stop Adjustment By: Jeff Wolford Disclaimer: This is simply an article of how I fixed my car. I m not responsible if you break, scratch, or mess up anything following my example.
Ford Racing BOSS 302 Engine Oil Cooler (11-14 GT)
") Tools needed: 14mm hex socket 7mm socket/wrench 8mm socket/wrench Ford Racing BOSS 302 Engine Oil Cooler (11-14 GT) 10mm socket (for airbox removal) ¾ inch or 19mm wrench Torque wrench Appropriate ratchets
Tools needed: 14mm hex socket 7mm socket/wrench 8mm socket/wrench Ford Racing BOSS 302 Engine Oil Cooler (11-14 GT) 10mm socket (for airbox removal) ¾ inch or 19mm wrench Torque wrench Appropriate ratchets
Troubleshooting Guide for Okin Systems
 Troubleshooting Guide for Okin Systems More lift chair manufacturers use the Okin electronics system than any other system today, mainly because they re quiet running and usually very dependable. There
*Some speedometers have these additional electronic connections. If yours does, then remove the smaller slotted screws shown.
 www.odometergears.com 1981-1985 240 Cable-Driven Speedometers (NOT for 1986 and later electronic units) http://www.davebarton.com/240-odometer-repair.html For this set of instructions below, I will not
Troubleshooting Guide for Limoss Systems
 Troubleshooting Guide for Limoss Systems NOTE: Limoss is a manufacturer and importer of linear actuators (motors) hand controls, power supplies, and cables for motion furniture. They are quickly becoming
Door panel removal F07 5 GT
 Things needed Decent plastic trim removal tools Torx 30 Spare door clips 07147145753 I got away with a set of 5 but if I did it again I d be cautious and get 10. From prior experience if they are damaged
How to Change Front Brake Pads on a Toyota Corolla
 How to Change Front Brake Pads on a Toyota Corolla Link to this article on (All other links in this document are disabled) Follow this picture guide to change the front brake pads on a 2003-2008 Toyota
W C-230 Kompressor Sports Sedan 1.8l Thermostat Replacement & Antifreeze flush
 W203 2003 C-230 Kompressor Sports Sedan 1.8l Thermostat Replacement & Antifreeze flush First, I have to thank everyone who has contributed to the MBworld.org forums without you; I would not have gotten
Fitting Instructions For The TDV6 EGR Blanking Kit To A 2006 Model Discovery 3 TDV6 GHSE
 Part Number DA1112 Fitting Instructions For The TDV6 EGR Blanking Kit To A 2006 Model Discovery 3 TDV6 GHSE You do this modification at your own risk. Britpart won t be held responsible for what is written
 www.odometergears.com Mercedes-Benz Mechanical Odometer Repair This how to can be used for all mechanical repairs as the only difference will be the removal of the instrument cluster. http://www.dieselgiant.com/repairyourodometer.htm
Aamir_bt The legend..
 Aamir_bt The legend.. How to do timing on a 4XE1-W (DOHC) engine. well i decided to to a write up for DOHC timing since there was only the SOHC written up, and i had to do a timing belt on my stylus anyways,
CALDERA 10E Spur Gear Change
 CALDERA 10E Spur Gear Change www.thirdcoastrc.com ebay handle - little*oak Click Below to Visit our Ebay Store EBAY STORE (Please take a moment and bookmark my website, ebay store, and save me as an ebay
Moddit. How to Install Stance Coilovers on a Subaru
 Moddit How to Install Stance Coilovers on a Subaru BRZ Let's get LOW (and maybe lighter and stiffer suspension)! In this article, we will install Stance ST- ZN6-XS Coilovers on the FRSport Subaru BRZ.
Trouble Shooting Guide for Hubbell Systems
 Trouble Shooting Guide for Hubbell Systems NOTE: Hubbell Special Products discontinued operations in 2008, so there is a very limited number of repair parts available for motor repair. In some ways, this
Installing LED lights in a Hypercharger By Keith Edwards Joker s Wild! (Wildjokr)
") Installing LED lights in a Hypercharger By Keith Edwards Joker s Wild! (Wildjokr) THINGS YOU WILL NEED: A Hypercharger (duh!) LEDs (The ones I got were from Benny Bryant at Fantasies on Wheels in Sylacauga,
Installing LED lights in a Hypercharger By Keith Edwards Joker s Wild! (Wildjokr) THINGS YOU WILL NEED: A Hypercharger (duh!) LEDs (The ones I got were from Benny Bryant at Fantasies on Wheels in Sylacauga,
Kodak 750H Carousel Projector Repair
 Kodak 750H Carousel Projector Repair An AT YOUR OWN RISK PROJECT by Klaus Wolter, Rev B, 3-26-2016 Here I documen the repair of my 750H carousel. A common problem with this projector, and all of the projectors
2010 Toyota Prius Fog Light Retrofit
 2010 Toyota Prius Fog Light Retrofit A DIY prospective Last updated: Friday, December 25, 2009 *** Disclaimer Use this document and its contents at your own risk! *** Forward: This document was compiled
2000 Mr2 Spyder Seat Cover Replacement Project
 2000 Mr2 Spyder Seat Cover Replacement Project Tool List: Plastic Trim Tool, Hog Ring Pliers, Medium or Heavy Duty Wire Cutters, 12mm socket, 14mm Socket, Ratchet, Extension, Flat Head Screwdriver & Gloves
Ford F-150 Speaker Replacement Instructions
 Ford F-150 Speaker Replacement Instructions This article was downloaded from http://www.fordf150.net Be sure to go there to view and download the other how-to articles. Thanks to John Meyer for contributing
Sunroof Repair. Sunroof Repair TSB. The sunroof repair kit available for the J30 is part number Y20. See images at bottom of document.
 Sunroof Repair This document is the text/images from the TSB (technical service bulletin) issued by Infiniti concerning the repair procedure for sunroof issues. Be advised that this is a LARGE, TIME-CONSUMING
PLEASE READ THROUGH THE WHOLE WRITE UP BEFORE ACTUALLY USING IT!!!!
 JDM power folding mirror switch install into stock USDM harness. By: Greg L., Zeke21 on twinturbo.net PLEASE READ THROUGH THE WHOLE WRITE UP BEFORE ACTUALLY USING IT!!!! This is how I was able to get the
Volkswagen Cabriolet DIY Guide Engine & Transmission Mounts
 Volkswagen Cabriolet DIY Guide Engine & Transmission Mounts Component Front carrier (bracket) Part Numbers 171199329F Transmission/ Engine All (Automatic version is NLA) Photo Front carrier flange 171199319A
JRSC + BBK Install on SVTF. Neil A. Shah medicnas on focaljet September 2006
 JRSC + BBK Install on SVTF Neil A. Shah medicnas on focaljet September 2006 ECU up here. When removing make sure the smaller bundles of wires don t get wrapped around the bottom edge and break - this almost
M1A1 Thompson Upgrade
 M1A1 Thompson Upgrade If you are mechanically inclined at all. This should be no problem. I'll start off with a list of things you will need. Thompson M1A1 Whisky Cigarettes Tools: Flat screwdriver No.
Some tips and tricks I learned from getting clutch out of vehicle Skoda Octavia year 2000
 Some tips and tricks I learned from getting clutch out of vehicle Skoda Octavia year 2000 Last change 2013-Oct-11 I bought Haynes manual for a starter. That s something well worth it s cost I believe.
O ring installation guide
 AtomicRice.com O ring installation guide Tools and materials needed: 1) Phillips Screwdriver ( one medium and one large head) 2) Small or Medium sized flathead screwdriver or thin rigid shim 3) Vaseline
Peugeot 406 Coupe: Delocking your boot V.1 April 2005
 This is a first stab at a DIY guide to de-locking your 406 Coupe. It isn t a hard modification to do yourself, but you do need to be confident working on your cars electrics and removing and refitting
Troubleshooting Guide for Dewert Systems
 Troubleshooting Guide for Dewert Systems Dewert electronics aren t as common as Okin systems as they re mainly used by one manufacturer (Pride). However, Pride is the largest lift chair manufacturer in
MAX FLOW FUEL KIT KIA FORTE SX HYUNDAI VELOSTER TURBO INSTALLATION INSTRUCTIONS
 MAX FLOW FUEL KIT KIA FORTE SX 2014+ HYUNDAI VELOSTER TURBO INSTALLATION INSTRUCTIONS Installation: Tools needed: 1/4 or 3/8 drive ratchet Different length extensions 8mm socket / 10mm socket / 12mm socket
This is a guide to assist you adjust the valve clearance on a 2l V6 MIVEC engine found in a Mitsubishi FTO GPX
 Adjusting the valve clearance on a 2L V6 FTO engine This is a guide to assist you adjust the valve clearance on a 2l V6 MIVEC engine found in a Mitsubishi FTO GPX Disclaimer: This guide is to assist you
Peg-Harness installation instructions
 Peg-Harness installation instructions I know it s not the easiest thing to do, but PLEASE READ THESE INSTRUCTIONS COMPLETELY so you will understand what you are trying to accomplish before you start drilling
Fanatec GT3RS V1 to GT3RS V2 Tutorial
 Fanatec GT3RS V1 to GT3RS V2 Tutorial by Roy Visser 1 How to update your Fanatec GT3RS V1 wheel to a GT3RS V2 wheel Welcome to this guided and detailed tutorial for upgrading your Fanatec GT3RS V1 wheel
2001 BMW X5 4.4i. Fuel Filter Replacement
 P P 2001 BMW X5 4.4i Fuel Filter Replacement Symptoms for Replacement: OBDII code P0171, Lean Bank1, which could be a bad or dirty MAF sensor Sluggish engine performance including hesitation with Wide
Stand Alone Fog Lights Installation Instructions
 Tools Required: 1. Trim Removal tool or protected flat screwdriver 2. #2 Phillips Screwdriver 3. 10mm socket 4. 10mm wrench 5. 8mm or 5/16 socket 6. Adjustable Pliers 7. Electrical Tape WARNING!!! Disconnect
BMW 528i E39 Sunroof Repair
 These instructions will help guide you through the repair process for broken sunroof control rails on an E39 chassis. Before I get started, I want to give a shout-out to a couple people who also posted
Mustang CDC Lightbar (94-04) - Installation Instructions
 - Installation Instructions") Mustang CDC Lightbar (94-04) - Installation Instructions The below installation instructions work for the following products: Classic Design Concepts Mustang Convertible Lightbar (94-04 Carbon Fiber) Classic
Mustang CDC Lightbar (94-04) - Installation Instructions The below installation instructions work for the following products: Classic Design Concepts Mustang Convertible Lightbar (94-04 Carbon Fiber) Classic
Rear Speaker replacement.
 Rear Speaker replacement. First off you need the right rear speakers. The easy bit is 6x9 and better than a 15W paper cone, the difficult bit is getting a mounting depth under 74mm. Or to be more precise,
Rebuilding the Power Steering Pump for a 2007 Honda Accord 4CYL
 Rebuilding the Power Steering Pump for a 2007 Honda Accord 4CYL Disclaimer: I have benefited greatly from others who have taken the time to post auto repair videos/tutorials online. To try and return the
2007 Crown Victoria Police Interceptor (P71) Blend Door Actuator Replacement (If I did it, you can too.)
 Blend Door Actuator Replacement (If I did it, you can too.)") 2007 Crown Victoria Police Interceptor (P71) Blend Door Actuator Replacement (If I did it, you can too.) I'm not saying this is the only way, or even the right way, but it worked for me. First time I've
2007 Crown Victoria Police Interceptor (P71) Blend Door Actuator Replacement (If I did it, you can too.) I'm not saying this is the only way, or even the right way, but it worked for me. First time I've
Volvo 1800 Dash Pad Replacement
 Volvo 1800 Dash Pad Replacement (courtesy of John Garden State Chapter Volvo Club America) Reupholstering the dash Well it has been some time since I have been online in the forum. Winter is a quite time
STEP #1: Remove the wheels from the truck. There are (6) 21mm lug nuts holding each wheel on... Remember Lefty Loosy, Righty Tighty.
 21mm lug nuts holding each wheel on... Remember Lefty Loosy, Righty Tighty.") - CustomTacos.com Page 1 of 36 How-To: Toytec Lift Install Read all of these install instructions prior to installing Toytec's suspension lift. I cannot be held responsible for any damages or personal
- CustomTacos.com Page 1 of 36 How-To: Toytec Lift Install Read all of these install instructions prior to installing Toytec's suspension lift. I cannot be held responsible for any damages or personal
13 October, 2014 Page 1
 13 October, 2014 In my second and last Helicycle I want to make everything better than the first one. That includes not only a transmission chip detector, but one for the tail rotor as well. The transmission
Traditional method Oil Change Instructions For VW 1.9 TDI
 Traditional method Oil Change Instructions For VW 1.9 TDI Created by DeafBug This document provides instructions on changing the oil and filter on a VW 1.9 TDI engines. All the pictures here are taken
Changing the Struts on a WK Jeep CRD
 Changing the Struts on a WK Jeep CRD Step by Step By Chirpz Disclaimer: I do not claim that this procedure is the right way or even the best way to change your struts. This is what I did after reading
Ford Ranger and Mazda Pickup Odometer Worm Gear Replacement
 www.odometergears.com Ford Ranger and Mazda Pickup Odometer Worm Gear Replacement http://www.therangerstation.com/magazine/fall2008/odometer_worm_gear.htm ****************************************************************************************************
Remove the 3-11mm nuts holding mirror on. Don t drop the nuts!
 2005-2012 Ford Mustang Puddle Lamp Kit Parts List: Quantity: Tool List: LED Lamps 2 Flat head screwdriver Seals 2 Ratchet & Socket set OR Nuts 2 Adjustable Wrench Wiring harness 1 Drill & 11/16 th bit
Slave Cylinder Weep Hole Drilling Procedure
 Slave Cylinder Weep Hole Drilling Procedure Tools Required: T20 Torx Driver T25 Torx Driver T25 Torx Bit with ¼ Ratchet Wrench 4mm Hex Key (Allen wrench) 5mm Hex Key 6mm Hex Key 8mm Hex Key 12mm Hex Key
We will be upgrading from the factory, paper-cone disgrace to an Infinity Kappa 62.9i:
 In order to fully round out your stereo upgrade, the factory rear speakers must go. This is another easy job to tackle, but the fitment of the package tray and being hunched over in the rear glass area
FITTING OIL TEMP AND PRESSURE GUAGES
 FITTING OIL TEMP AND PRESSURE GUAGES this guide is of reference to fitting an oil temp and pressure sender/ sensor into a sandwich plate- not the sump plug temp sensor (although it wouldn't be much different
How to install the Barnett clutch and the stronger Oil Pump Drive Gear
 How to install the Barnett clutch and the stronger Oil Pump Drive Gear Written by WildFred I m from Germany so please excuse my English and the spelling. The following procedure is a combination of the
This is what we are trying to create in the steps below
 You will need: (1) Some 3/4 aluminium or steel flat bar (+/- 1 foot) (2) About 12 of 3 Aluminium or steel tubing. (2) Piece of 3X3 silicone hose and 2 hose clamps (3) 1 K&N (or similar) high flow filter
Installation Instructions Jeep CJ-7
 Retrofit Steering Column Installation Instructions 1976-86 Jeep CJ-7 For Part # s 1520800010, 152800020, 1520800051 www.ididitinc.com 610 S. Maumee St., Tecumseh, MI 49286 (517) 424-0577 (517) 424-7293
DrVanos.com Stage II Installation Instructions. Tool rental is available with the purchase of a vanos kit *See website for more info*
 DrVanos.com Stage II Installation Instructions Special Tools Needed: Camshaft locking tool TDC Crank pin Sprocket turning tool Tool rental is available with the purchase of a vanos kit *See website for
 This document provides instructions for removing and installing a Front Wheel / Rotor on a Ducati Superbike. The torque values used are for the 748/916/996 from 1994 to 2001 and may be applicable for later
J&M Mustang Adjustable Panhard Rod (05-09) - Installation Instructions
 - Installation Instructions") J&M Mustang Adjustable Panhard Rod (05-09) - Installation Instructions The below installation instructions work for the following products: J&M Mustang Adjustable Panhard Rod (05-09) Please read through
J&M Mustang Adjustable Panhard Rod (05-09) - Installation Instructions The below installation instructions work for the following products: J&M Mustang Adjustable Panhard Rod (05-09) Please read through
iphone 5s Front Panel Replacement
 iphone 5s Front Panel Replacement Replace the cracked or broken screen on your iphone 5s. Note: DIY at your own risk. New beginner must be careful, screens got problems mostly due to wrong installation
2015 Copyright Maxspeed-Motorsports.com
 1 Porsche PCM 3.1 Backup Camera Installation Instructions. Thank you for purchasing your product at www.maxspeedmotorsports.com Before you start please understand that these installation instructions are
 Special Tools Needed: DrVanos.com Stage I Installation Instructions Camshaft locking tool TDC Crank pin Sprocket turning tool Tool rental is available with the purchase of a vanos kit *See website for
BMW E61 Hydraulic Pump replacement instructions
 BMW E61 Hydraulic Pump replacement instructions This DIY will guide you through the tasks needed to successfully replace your defective tailgate hydraulic pump Difficulty 3 of 10. The most difficult part
PDC RETROFIT INSTALLATION By Kevin
 1 PDC RETROFIT INSTALLATION By Kevin Kshek369@hotmail.com 1 These instructions are intended to help those who chose to do this retrofit by showing you what you are in store for and to give you some instructions
Squeaking in the center console??? - Page 7 - GreenHybrid - Hybrid Cars. Register FAQ Members List Today's Posts Search
 GreenHybrid - Hybrid Cars > Hybrid Cars > Toyota Camry Hybrid Squeaking in the center console??? User Name User Name Remember Me? Password Log in Register FAQ Members List Today's Posts Search Toyota Camry
Intake Kit Supplement for CRV and Pathfinder
 Intake Kit Supplement for CRV and Pathfinder This guide will briefly outline how to install the intake kits for the Honda CRV and Nissan Pathfinder. This is a pretty basic job, but for the average person
Installing Rear Brake Pads on a WK Jeep
 Installing Rear Brake Pads on a WK Jeep Step by Step By Chirpz Disclaimer: I do not claim that this procedure is the right way or even the best way to change your rear brake pads. This is what I did after
iphone 5s Upper Component Cable Replacement
 iphone 5s Upper Component Cable Replacement Use this guide to replace the upper component cable containing the flash, microphone and sleep/power button cable. Written By: Sam Lionheart ifixit CC BY-NC-SA
Installing AMP-wiring in a New Beetle
 Installing AMP-wiring in a New Beetle Vehicle used: New Beetle 2.0i Type 9C (1999) Used set of cables: Dietz 35mm² power cable, double shielded Dietz chinch cable ( 35mm² Professional Line ) First of all:
My Hawk build Part 8 by Stuart Clarke
 My Hawk build Part 8 by Stuart Clarke Front hubs, brakes and brake lines. There was still no news on my rear springs so I thought I d find something else to get on with. I had the front hubs, brake calipers
Appendix B A Step-by-Step Guide to Changing the Front Oil Seals on the Volvo B-230 Engine
 Appendix B A Step-by-Step Guide to Changing the Front Oil Seals on the Volvo B-230 Engine When replacing the timing belt, check to see that there are no oil leaks around any of the pulleys. If no leaks,
Prius XM Radio Installation Instructions. Eddie Bell
 2004-2005 Prius XM Radio Installation Instructions By Eddie Bell www.metrotpn.com 1 Let me begin by saying this is an easy but time consuming job. Set aside a few hours of your time for the install. If
Hard Bar Sport, M1/M2 Hard Core Hardtop, M2 Sport, and Xtreme Installation Instructions
 HARDWARE KIT: Hard Bar Sport, M1/M2 Hard Core Shoulder Harness Guide Relocation Assemblies: 2-3/8" X 1" grade 8 bolts 4-3/8" flat washers 2-3/8" lock nuts 2 - brass bushings 2 - plastic trim caps 2-3/8"
The Sands Mechanical Museum
 The Sands Mechanical Museum How to Change Your Oil It is more difficult to change the oil in a Lotus Elise because the oil plug and filter are difficult to access. They are located behind an access panel.
Removing your Two-blade Hartzell HC-12 (?) 20 prop off a Franklin Engine (Or How do I change the prop cylinder O-rings! )
 20 prop off a Franklin Engine (Or How do I change the prop cylinder O-rings! )") Removing your Two-blade Hartzell HC-12 (?) 20 prop off a Franklin Engine (Or How do I change the prop cylinder O-rings! ) If you are having oil leaking around the propeller piston/cylinder assembly and
Removing your Two-blade Hartzell HC-12 (?) 20 prop off a Franklin Engine (Or How do I change the prop cylinder O-rings! ) If you are having oil leaking around the propeller piston/cylinder assembly and
2010 Toyota Prius model II Head Unit Upgrade
 2010 Toyota Prius model II Head Unit Upgrade Monday, December 21, 2009 Disclaimer: Use this document and its contents at your own risk. Forward: Huge thanks to those members on Priuschat.com that forged
VW 1998 Jetta GLX or VR6 GTI PCV valve Modification
 Disclaimer: This is how I ended up modifying my stock PCV so I did not have to buy a complete intake hose (+/- $150). Don t blame me if this does not work or if it makes it worse You are doing this at
CARE AND FEEDING OF YOUR XJ GAS CAP
 CARE AND FEEDING OF YOUR XJ GAS CAP Do you smell gas even when the cap is latched shut? Does your tank not want to drain even with the petcock set to prime? Does your key not want to turn in the lock?
TONNEAU INSTALLATION GUIDE
 TONNEAU INSTALLATION GUIDE Warranty, Care & Maintenance Model 4056 Toyota Tacoma Double Cab 5' Short Bed 2005-Current (With Multi-Track System) EASY AS 1-2-3! NORMAL INSTALLATION TIME 30 MINUTES For Warranty
UrS6 Brake Servo Replacement Douglas Fifield July 2006
 UrS6 Brake Servo Replacement Douglas Fifield (douglas.fifield@gmail.com) July 2006 This write-up covers the replacement of the brake servo on a 95.5 S6. The master cylinder remained intact and connected,
REPAIR for: Sidelamp Bulb(s) Faulty, Left Tail Lamp Faulty, Right Tail Lamp Faulty, Directional Indicator Faulty, Left Hand Stop Bulb Faulty
 Faulty, Left Tail Lamp Faulty, Right Tail Lamp Faulty, Directional Indicator Faulty, Left Hand Stop Bulb Faulty") REPAIR for: Sidelamp Bulb(s) Faulty, Left Tail Lamp Faulty, Right Tail Lamp Faulty, Directional Indicator Faulty, Left Hand Stop Bulb Faulty DIFFICULTY LEVEL: ***** Drilling, Wire Crimping, Tight Spaces,
REPAIR for: Sidelamp Bulb(s) Faulty, Left Tail Lamp Faulty, Right Tail Lamp Faulty, Directional Indicator Faulty, Left Hand Stop Bulb Faulty DIFFICULTY LEVEL: ***** Drilling, Wire Crimping, Tight Spaces,
REPLACING A COLEMAN MACH FAN MOTOR
 REPLACING A COLEMAN MACH FAN MOTOR Recently the fan motor on our front AC froze up. I ordered a new motor from Amazon https://www.amazon.com/gp/product/b007vjub9s/ref=oh_aui_detailpage_o00_s00?ie=utf8&psc=11
TONNEAU INSTALLATION GUIDE
 TONNEAU INSTALLATION GUIDE Warranty, Care & Maintenance Model 1080 GMC Sierra Ext/Crew Cab 5.7' Short Bed 2007-Current EASY AS 1-2-3! NORMAL INSTALLATION TIME 30 MINUTES For Warranty Issues, Contact UnderCover
Timing belt change. Timing belt change
 Timing belt change Put 2 new Gates T275 timing belts on today. Tensioner drilled smooth and tight with less than 16,000 miles on her decided not to change the tensioners just the belts. You'll need some
W123 Transmission Vacuum Modulator Adjustment DIY - measure it the 'right' way
 W123 Transmission Vacuum Modulator Adjustment DIY - measure it the 'right' way Why do you need to do this?: You need to do this to properly check the internal hydraulic pressure of the transmission, either
Fuel Pump & Sending Unit Repair
 If your C4 s fuel gauge reads full regardless of how much fuel you actually have, the sending unit in the tank is most likely at fault. If you have priced a new sending unit, you realize that they run
5X Racing Mazda Miata Aluminum Shifter Bushing Installation Instructions
 5X Racing Mazda Miata Aluminum Shifter Bushing Installation Instructions Thank you for your purchase! These instructions will explain how to properly install a 5X Racing Aluminum Shifter Bushing in your
Improving the gearshift feel in an SW20.
 Improving the gearshift feel in an SW20. Part one In 3 parts. The SW20 gearshift can be often be greatly improved by eliminating play in the shift linkages, and this article covers three areas that need
SunFlower Helicopter Rocket LUNAR Build Session: 9/25/08 By Tom Desmarais
 SunFlower Helicopter Rocket LUNAR Build Session: 9/25/08 By Tom Desmarais Contents of Kit: A. 3 1/16 x1 x11 basswood rotors B. 3 1/16 x2 x2 basswood fins C. 3 1/16 x5/16 x1/2 basswood hold spacer D. 3
OIL COOLER KIT INSTALLATION INSTRUCTIONS PART NUMBER D
 OIL COOLER KIT INSTALLATION INSTRUCTIONS PART NUMBER D570-0907 APPLICATION: 2011-12 E90 335i/xi (N55 engine) with BMW M-Technic bumper and without stock oil cooler Congratulations for being selective enough
4TH GEN SEATS IN A 3RD GEN TRUCK
 4TH GEN SEATS IN A 3RD GEN TRUCK by Flopster843 02 Oct 2016 If you drive a 3rd generation Dodge Ram truck, I am sure you have discovered that the OEM seats are not the greatest (Figure 1.) They are extremely
Mustang Radiator Conversion DIY. By GearHeadPeter. January 27, 2011
 1964-1966 Mustang Radiator Conversion DIY By GearHeadPeter January 27, 2011 We all know that the radiators in our cars are not the best, especially if you have done any customization to the engine, which
WARNING These following pages are instruction for C5 CE stripes; however, it is the same method applying vinyl. Please spend time to read thru these
 WARNING These following pages are instruction for C5 CE stripes; however, it is the same method applying vinyl. Please spend time to read thru these pages. At the end, it is your C5/C6 ME stripes' instruction.
Prerequisites: Shop Manual (recommended) pages 3-9 through 3-13.
 pages 3-9 through 3-13.") Prerequisites: Order your gaskets average about $25.00 bucks X 2 so $50.00 4NK-11193-00-00 Obtain a shim kit (Should have several 265 and 270s) (Some dealers will exchange) Obtain a Valve Bucket Tool YM-33961
Prerequisites: Order your gaskets average about $25.00 bucks X 2 so $50.00 4NK-11193-00-00 Obtain a shim kit (Should have several 265 and 270s) (Some dealers will exchange) Obtain a Valve Bucket Tool YM-33961
Cost - 41 ($68 approx) Time 2.5 hours approx
 Time 2.5 hours approx") Cost - 41 ($68 approx) Time 2.5 hours approx The early X3 (E83) from the first build to September 2004 was fitted with nasty black plastic door opener handles which were quickly superseded by a matt chrome
Cost - 41 ($68 approx) Time 2.5 hours approx The early X3 (E83) from the first build to September 2004 was fitted with nasty black plastic door opener handles which were quickly superseded by a matt chrome