HPFP DIY. Warning: The injector fuel lines, the rail, and the HPFP are pressurized long after you turn off the car, I recommend
|
|
|
- Jordan Spencer
- 5 years ago
- Views:
Transcription

1 HPFP DIY Warning: The injector fuel lines, the rail, and the HPFP are pressurized long after you turn off the car, I recommend disconnecting the battery and letting the car sit over night before performing this procedure. In performing this procedure, you do so at your own risk. AGAIN DISCONNECT THE BATTERY! This procedure is based on an i with an N54 motor that already has the cowling removed. My car does not have the stock charge pipe or intake. Removal of the stock charge pipe is virtually identical with the exception of an additional torx screw that mounts the charge pipe and my DV connections to the charge pipe are different. All pretty self explanatory. 1. Remove the cabin air filter and cowling. (No cowling on mine)


2 2. Remove the stock air box or DCI filters (Mine has DCI s)


3 3. Disconnect and remove the diverter valves a. Rotate the rear intake diverter line s gray connector about 1/16 of a turn counter clockwise to disconnect. b. Disconnect the vacuum line at the Y connector (don t disconnect manifold side to prevent breakage).

4 c. Disconnect the diverter valves from the charge pipe. If you have a stock CP, you will rotate the grey connectors clockwise. d. Disconnect the front intake diverter valve line.


5 e. After DV lines are removed, grey connectors can be rotated back to their original position to make installation easier as they will then just snap and lock in place when you push them back on. f. Diverter valves removed.


6 4. Remove charge pipe. a. Remove C-clip


7 b. Loosen the hose clamp from the FMIC side of the charge pipe.


8 c. Disconnect the MAP sensor from the charge pipe.


9 d. Another view of the Map sensor connection. e. Remove the charge pipe (there is an o-ring inside don t lose it and verify it s there)


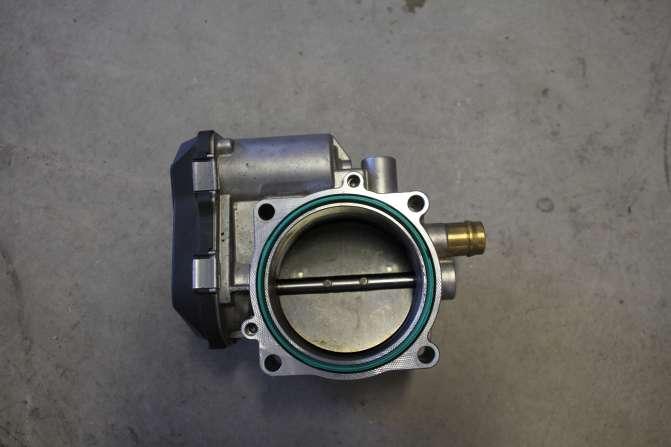
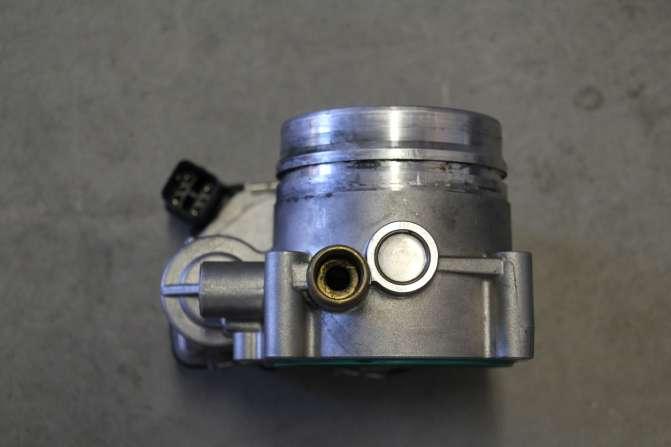
10 5. Remove the throttle body a. Remove the four 10mm bolts, there are two on the top side and two on the back side. b. Disconnect the vent line from the throttle body. Compress front and back side of connector while pulling away from throttle body to disconnect.


11 c. The vent line disconnected. d. Disconnect the electrical connection to the throttle body.


12 e. I use a small tweaker to lift the tab to disconnect it. (you won t have the Fuelab FPR on the right)
13


14 6. Disconnect the Evil black box from the intake manifold. a. This is the box that everybody complains about getting loose when doing the intake cleaning. b. Sorry bad picture. If you use a flat head screw driver to leverage against the tabs, you can push the metal tabs through the slots. The one on the left I use two screw drivers due to the distance.


15 c. Disconnect the two electrical connections on the left side of the black box to move it further out of the way. (optional but easier)
16
17


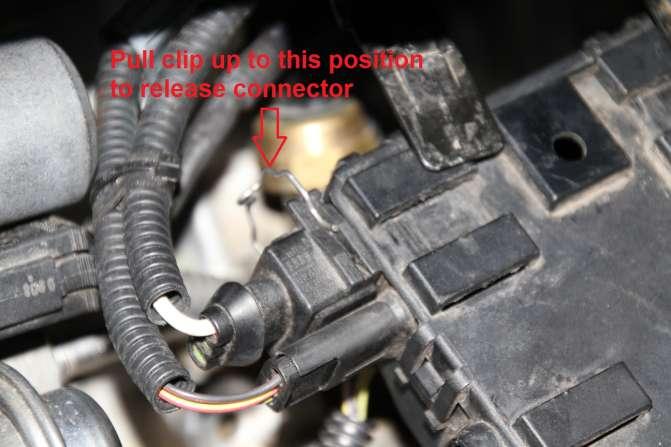
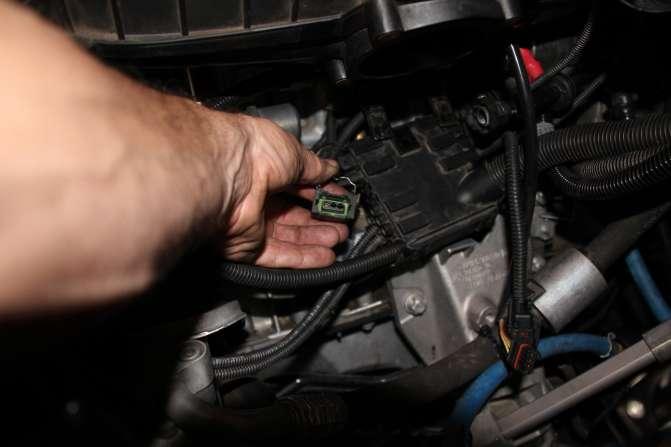
18 7. Remove old HPFP a. Disconnect electrical connector from HPFP s fuel flow control valve.

19 b. Here is a picture of the LPFP sensor for reference we won t be doing anything with it. c. Disconnect the inlet supply to the HPFP with a 17mm wrench. Rotate the wrench downward to loosen.


20 d. Sorry, bad picture of nut removed. e. After the inlet line is disconnected, there should be enough flex and room to push the inlet line away from the HPFP and toward the block to disconnect it from the HPFP. If it s too tight, you can loosen the clamp near the LPFP sensor so the line can slide. Sorry didn t get the size of the torx nut.


21 f. Loosen and slide the 17mm nut for the HPFP outlet up to disconnect. Turn wrench to the right. g. Loosen but do not remove the two 5mm allen bolts on the front side of the HPFP. Rotate CCW to loosen.


22 h. Now the hardest part there is one 5mm allen bolt on the back side of the pump. In this picture you can see the locations of the bolts. i. I use the following tool to reach behind and get to the bolt.


23 j. Picture of the location of bolt as seen from front side of HPFP. k. After you remove the rear bolt, then you can remove the two front bolts. l. Here is a picture of the HPFP removed, as you can see you will get some oil that comes out perfectly normal.
24 8. To install the new HPFP, reverse the process. A couple tips a. You need to align the HPFP spline with the one inside the vacuum pump before trying to insert it, as long as it s close, you ll be able to twist the pump to line them up. Make sure the pump is able to fit flush. b. After the pump is aligned, tilt the back of the pump down slightly and rotate it back to align the pump with the fuel outlet line to the rail. After doing so, start the fuel line nut and then put in the front 2 allen bolts in finger tight. c. After that is complete, then put the back bolt in and tighten it all the way before tightening the front two bolts. d. Then attach the fuel inlet line and tighten all the connections to the HPFP and the LPFP sensor bracket if you loosened it. e. After doing any fuel system work, I like to cycle the accessories power to the car without starting it a few times to pressurize the system and inspect for leaks. After starting the car, inspect for leaks again.
25
Injector change DIY. Warning: The injector fuel lines, the rail, and the HPFP are pressurized long after you turn off the car, I recommend
 Injector change DIY Warning: The injector fuel lines, the rail, and the HPFP are pressurized long after you turn off the car, I recommend disconnecting the battery and letting the car sit over night before
SR Performance Twin 62mm Throttle Body for GT
 Required Tools: SR Performance Twin 62mm Throttle Body for 2005-2010 GT Flat-head screwdriver Ratchet Small extension 10mm socket 8mm socket T20 Torx bit Needle nose pliers 5mm allen wrench Recommended
#TL T EA888 GEN 3 FUELING SYSTEM/ INSTALLATION INSTRUCTIONS
 #TL100069 2.0T EA888 GEN 3 FUELING SYSTEM/ INSTALLATION INSTRUCTIONS Notes: These instructions were written for a North American specification MkVII GTI. Other models, like the Golf R, are similar. When
OEM Cruise Control Installation in GMC/Chevy NBS trucks
 OEM Cruise Control Installation in 99-02 GMC/Chevy NBS trucks May 2008 ~ Rampage_Rick Having just installed factory cruise control in my 00 Sierra, I thought I d share the fun. I followed the steps outlined
Shotgun Double Barrel HPFP install guide
 Shotgun Double Barrel HPFP install guide Thank you for your purchase of the VTT Shotgun Double Barrel HPFP upgrade! First thing to do when you open your box is to make sure all parts are in their respective
Replacing MK4 Golf/Jetta radiator mounts in-car
 Replacing MK4 Golf/Jetta radiator mounts in-car This is a guide to replacing the radiator mounts in a MK4 Golf/Jetta. This involves moving the core support to the service position which allows you to do
Shotgun Single Barrel HPFP install guide
 Shotgun Single Barrel HPFP install guide Thank you for your purchase of the VTT Shotgun Single Barrel HPFP upgrade! First thing to do when you open your box is to make sure all parts are in their respective
Single Barrel Shotgun HPFP Install Guide
 Single Barrel Shotgun HPFP Install Guide Thank you for purchasing the VTT Single Barrel Shotgun HPFP upgrade kit! PLEASE READ THE ENTIRE GUIDE BEFORE BEGINNING INSTALLATION! The first thing you should
Integrated Engineering Audi RS3 8V & TTRS 8S Cold Air Intake Install Guide IEINCQ1
 Integrated Engineering Audi RS3 8V & TTRS 8S Cold Air Intake Install Guide IEINCQ1 Thank you for purchasing another high quality Integrated Engineering product! This instruction guide is used for installation
INSTALLATION INSTRUCTIONS FUEL RAIL
 INSTALLATION INSTRUCTIONS FUEL RAIL MITSUBISHI EVO X Document# 19-0067 Support: info@radiumauto.com WARNING: DON'T SMOKE OR WORK WITH OPEN SPARKS WHILE WORKING ON THE FUEL SYSTEM PREPARING THE VEHICLE:
2001 BMW X5 4.4i. Fuel Filter Replacement
 P P 2001 BMW X5 4.4i Fuel Filter Replacement Symptoms for Replacement: OBDII code P0171, Lean Bank1, which could be a bad or dirty MAF sensor Sluggish engine performance including hesitation with Wide
 Special Tools Needed: DrVanos.com Stage I Installation Instructions Camshaft locking tool TDC Crank pin Sprocket turning tool Tool rental is available with the purchase of a vanos kit *See website for
Procharger Stage II Intercooled Supercharger System (11-14 GT)
") Procharger Stage II Intercooled Supercharger System (11-14 GT) Installation Time: Approximately one day. Installed on 2012 Mustang GT 5.0/Manual Required Tools 3/8 Socket Set (Standard and Metric) 1/2
Procharger Stage II Intercooled Supercharger System (11-14 GT) Installation Time: Approximately one day. Installed on 2012 Mustang GT 5.0/Manual Required Tools 3/8 Socket Set (Standard and Metric) 1/2
7B1210 COBB BMW N54 Charge Pipe
 7B1210 COBB BMW N54 Charge Pipe Installation Instructions Congratulations on your purchase of the COBB BMW N54 Charge Pipe for your BMW. The following instructions will assist you through your installation
List of parts needed below. Tools needed
 1 BMW 645 Coolant leak repair (Cap with Seal Repair and Expanding Coolant Pipe Installation w Pics) By Michael R. Brown (Estimated time to complete the job is 6-8 hrs) List of parts needed below. BMW PART
Steeda Billet Charge Motion Control Plates (05-08 GT) - Installation Instructions
 - Installation Instructions") Steeda Billet Charge Motion Control Plates (05-08 GT) - Installation Instructions The below installation instructions work for the following products: Steeda Billet Charge Motion Control Plates (05-08
Steeda Billet Charge Motion Control Plates (05-08 GT) - Installation Instructions The below installation instructions work for the following products: Steeda Billet Charge Motion Control Plates (05-08
2006 Honda Civic SI Supercharger Kit Installation Instruction Kit #
 2006 Honda Civic SI Supercharger Kit Installation Instruction Kit #350-091 3239 MONIER CIRCLE, STE.5 RANCHO CORDOVA, CA 95742 916.635.4550 FAX 916.635.4632 www.ct-engineering.com INS-157 VERSION: 3.25.2009
Turner M50 Manifold Adapter Install. April 26, 2012
 April 26, 2012 Models: 1996-99 E36 328i/M3; 1997-98 E39 528i, 1997-98 Z3 2.8, 1998-2000 MZ3 S52 Product(s): Turner M50 Manifold Adapter Kit Subject: Installation Guidelines and Tips This guide will aid
APR, LLC
 + 1. 3 3 4. 5 0 2. 5 1 8 1 4 8 0 0 U S H W Y 2 8 0 W e s t, O p e l i k a, A l a b a m a 3 6 8 0 1 4 8 0 0 U S H W Y 2 8 0 W e s t, O p e l i k a, A l a b a m a 3 6 8 0 1 + 1. 3 3 4. 5 0 2. 5 1 8 1 NOTES:
Audi S1 Intake kit. Qty. Description
 Audi S1 Intake kit Description Qty Silicone Intake pipe 1 Vacuum hose 1 Heatshield 1 Bracket 1 Machined inlet 1 Vacuum connector 1 Filter 1 M6x16 cap head bolt 1 Tools Ratchet Extension Torx socket Sockets
DrVanos.com Stage II Installation Instructions. Tool rental is available with the purchase of a vanos kit *See website for more info*
 DrVanos.com Stage II Installation Instructions Special Tools Needed: Camshaft locking tool TDC Crank pin Sprocket turning tool Tool rental is available with the purchase of a vanos kit *See website for
Cost - 41 ($68 approx) Time 2.5 hours approx
 Time 2.5 hours approx") Cost - 41 ($68 approx) Time 2.5 hours approx The early X3 (E83) from the first build to September 2004 was fitted with nasty black plastic door opener handles which were quickly superseded by a matt chrome
Cost - 41 ($68 approx) Time 2.5 hours approx The early X3 (E83) from the first build to September 2004 was fitted with nasty black plastic door opener handles which were quickly superseded by a matt chrome
Ford Super Duty 5.4L Spark Plug Change F250 4x4 XLT Sport Crew Cab
 1 of 32 Ford Super Duty 5.4L Spark Plug Change 2004 F250 4x4 XLT Sport Crew Cab Back to 2004 F250 Main Page Click Here for a PDF version of this article At close to 100k miles, I figured it was time for
IE B9 A4/A5 Cold Air Intake Install Guide
 IE B9 A4/A5 Cold Air Intake Install Guide Thank you for purchasing another high quality Integrated Engineering product! This instruction guide is used for installation of IE s Cold Air Intake Kit for Audi
Professional Products Satin Upper Intake Plenum Installation Guide ( L 2V)
") Professional Products Satin Upper Intake Plenum Installation Guide (96-04 4.6L 2V) The below installation instructions work for the following products: Professional Products Satin Upper Intake Plenum (96-04
Professional Products Satin Upper Intake Plenum Installation Guide (96-04 4.6L 2V) The below installation instructions work for the following products: Professional Products Satin Upper Intake Plenum (96-04
Retro it Steering Column
 Retro it Steering Column INSTALLATION INSTRUCTIONS for 1976-86 CJ5 & CJ7 FOR PART NUMBER S: 1520800010, 1520800020, 1520800051, 1526800010, 1526800020, 1526800051 S I NCE 1986 Instruction # 8000000010
Intake Installation Instructions P/N 9046 (red filter) - P/N 9046B (blue filter) P/N 9046K (black filter)
 - P/N 9046B (blue filter) P/N 9046K (black filter)") Intake Installation Instructions P/N 9046 (red filter) - P/N 9046B (blue filter) P/N 9046K (black filter) Year/Make/Model/Engine 2012-17 Ford Focus 2.0L Parts List 1- Intake tube 1- Heat shield, Side 1-
Intake Installation Instructions P/N 9046 (red filter) - P/N 9046B (blue filter) P/N 9046K (black filter) Year/Make/Model/Engine 2012-17 Ford Focus 2.0L Parts List 1- Intake tube 1- Heat shield, Side 1-
Pypes Polished Shorty Headers (05-10 V6):
:") Pypes Polished Shorty Headers (05-10 V6): Introduction: The kit comes complete with replacement hardware and gaskets and can be easily done in your driveway. The hardware supplied for install includes
Pypes Polished Shorty Headers (05-10 V6): Introduction: The kit comes complete with replacement hardware and gaskets and can be easily done in your driveway. The hardware supplied for install includes
Industrial Injections Compound Turbo Installation For 6.7L Scorpion
 Industrial Injections Compound Turbo Installation For 6.7L Scorpion Step 1: Whenever you are doing an installation the first thing you should do is unhook the batteries to avoid arcing. You will need an
M52tu-M54 VANOS Assembly & Timing Using G.A.S. Professional Cam Tool Kit
 Home BMW Solutions Porsche Solutions DIY Tech Engine Services Dyno Services Machining About Contact Store Tool Rental M52tu-M54 VANOS Assembly & Timing Using G.A.S. Professional Cam Tool Kit This procedure
Wiring Harness Relocation by Flopster Mar 2012
 Wiring Harness Relocation by Flopster843 21 Mar 2012 On my 2008 Ram, there is a gigantic blob of electrical wiring that Dodge decided to put between the engine and the brake master cylinder, just behind
M7 R52S & R53 Cold Air Intake Installation Guide 53-3M7301
 M7 R52S & R53 Cold Air Intake Installation Guide 53-3M7301 M7 Speed engineers and manufactures the highest quality MINI COOPER accessories and performance parts available anywhere on Planet Earth! Please
Spark Plug replacement on VW 2.0L engine with AEG code
 Spark Plug replacement on VW 2.0L engine with AEG code This is document is an attempt to describe and illustrate to some extent the process of replacing the spark plugs on a Volkswagen 2.0L engine with
H31 BOOSTER REBUILD & MASTER CYLINDER
 2010 1991 BMW 750iL George Fontes gajfontes@yahoo.com H31 BOOSTER REBUILD & MASTER CYLINDER Rebuild hydraulic booster and replace Master Cylinder. Page 1 of 16 Master Cylinder Removal & Brake Booster Rebuild
Mustang Short Throw Sport Shifter (All 83 - Early 01 & V6 T-5/T-45 Transmission) - Installation Instructions
 - Installation Instructions") Mustang Short Throw Sport Shifter (All 83 - Early 01 & 01-04 V6 T-5/T-45 Transmission) - Installation Instructions The below installation instructions work for the following products: Mustang Short Throw
Mustang Short Throw Sport Shifter (All 83 - Early 01 & 01-04 V6 T-5/T-45 Transmission) - Installation Instructions The below installation instructions work for the following products: Mustang Short Throw
Installation Manual TWM Performance 2010 Mazda 3 short shifter 5 and 6 speed non-mazdaspeed
 Installation Manual TWM Performance 2010 Mazda 3 short shifter 5 and 6 speed non-mazdaspeed Begin the installation by parking on a flat surface, as you will have to engage and disengage the hand brake
Two seal rings will be installed in each piston groove, total of four rings installed in each piston.
 When seals removal is complete, piston grooves will have exposed metal with no seals. Wipe clean piston grooves (towel). Repeat seals removal for second piston. Note: Deteriorated O-rings will be flattened
Performance Air Intake, 2015+
 PARTS LIST AND PARTS LIST 1PC ALUMINUM INTAKE PIPE 1PC HIGH-FLOW, OILED AIR FILTER 1PC SILICONE INDUCTION HOSE 1PC AIRBOX 1PC 1/16 RUBBER STRIPPING, 9 LENGTH 1PC 1/16 RUBBER STRIPPING, 8.5 LENGTH 1PC WORM-GEAR
INSTALLATION INSTRUCTIONS BILLET FUEL RAIL KIT
 INSTALLATION INSTRUCTIONS BILLET FUEL RAIL KIT MITSUBISHI LANCER EVOLUTION X Document# 19-0067 Support: info@radiumauto.com WARNING: DON'T SMOKE OR WORK WITH OPEN SPARKS WHILE WORKING ON THE FUEL SYSTEM
Fizzle Intercooler Kit Installation Instructions
 Fizzle Intercooler Kit Installation Instructions Note: The minimum exhaust modification required for the installation of this intercooler is the removal of the OEM black plastic resonator box. It can easily
LML 3 Y-Bridge Kit or High Flow Intake Bundle Package
 2011-2016 LML 3 Y-Bridge Kit or High Flow Intake Bundle Package Covers installation of PN s: WCF100607, WCF100691, WCF100716, & WCF100353 Note: This Kit is for off road competition use only! Overview-
PORSCHE V r Valve Timing Instructions. Copyright 2009 Written by Mike Frye Edited my Adam G.
 PORSCHE 928 32V r Valve Timing Instructions Copyright 2009 Written by Mike Frye Edited my Adam G. Sections: Overview.3 Disclaimer/warnings/things to watch for 4 Terms and naming conventions used in this
CP3 Retrofit Pump Install:
 CP3 Retrofit Pump Install: 2A 4 2 5 3 6 1.) Clean this area very well. No dirt = No troubles!!!!! Lay lots of Rags under and around the pumps, alternator and belts!!!!! This will save dropped tools, parts,
Instant Chat off the main page of Or simply call our tech team at
 Adjustable Fuel Pressure Regulator Kit for 2008+STI 2018-10-03 PSP-FUL-301 Thank you for purchasing this PERRIN product for your car! Installation of this product should only be performed by persons experienced
OIL COOLER KIT INSTALLATION INSTRUCTIONS PART NUMBER D
 OIL COOLER KIT INSTALLATION INSTRUCTIONS PART NUMBER D570-0904 APPLICATION: 2011-2012 E90 335i/xi (N55 engine) with BMW standard bumper and with stock oil cooler Congratulations for being selective enough
MAZDASPEED3 Intercooler Instructions
 MAZDASPEED3 Intercooler Instructions Congratulations on your purchase of the COBB Tuning Front Mount Intercooler System for your 2007-2009 Mazdaspeed3. The following instructions should assist you through
3/8 Universal Joint Phillips Head Screwdriver
 Magnetic retrieval tool Pliers 1/4 Ratchet Drive T-35 Torx Socket 3/8 Ratchet Drive 5mm Allen Head Socket Torque Wrench 7-3/8 Drive Extension Flat Head Screwdriver 10mm Socket 8mm Socket 3/8 Universal
B5 A4 1.8t Front Mount Intercooler Install Instructions
 B5 A4 1.8t Front Mount Intercooler Install Instructions Only work underneath your vehicle after properly supporting it with adequate jack stands on a flat surface. NEVER work under a vehicle only supported
ENGINE ASSEMBLY STOCK TO 250 HP
 GM SPORT COMPACT Performance Build Book 25 ENGINE ASSEMBLY STOCK TO 250 HP Fig. 3 The stock ECOTEC engine has proven reliable to 250 hp.(fig. 3) Performance upgrades are available from GM Performance Parts
Bill of Materials for
 Bill of Materials for 77060012 1 2-P5153572 Inlet Pipe 1 21-202M 2.75" Filter 1 103-BLO-4820N Filter Hose Clamp 1 559999 Washer, Fender M6x25 1 1-3028 Washer, 1/4 SAE Flat 1 1-2072 Bolt, 1/4-20-UNC x 1
Weistec M156/M159 ENGINE
 Weistec M156/M159 ENGINE Oil / Air Separator System Installation Guide 2007-2011 S63 AMG 2007-2011 ML63 AMG 2007 R63 AMG 2007-2008 CLK63 AMG 2008 CLK63 Black Series 2007-2011 CLS63 AMG 2008-Present C63
OIL COOLER KIT INSTALLATION INSTRUCTIONS PART NUMBER D E92 335i/xi (N55 engine) with M-Technic bumper and without stock oil cooler
 with M-Technic bumper and without stock oil cooler") OIL COOLER KIT INSTALLATION INSTRUCTIONS PART NUMBER D570-0925 APPLICATION 2011-12 E92 335i/xi (N55 engine) with M-Technic bumper and without stock oil cooler Congratulations for being selective enough
OIL COOLER KIT INSTALLATION INSTRUCTIONS PART NUMBER D570-0925 APPLICATION 2011-12 E92 335i/xi (N55 engine) with M-Technic bumper and without stock oil cooler Congratulations for being selective enough
Chevy Sonic 1.4L Intake Manifold
 Chevy Sonic 1.4L Intake Manifold Install Time: 3 hours In the Box: (1) Racer X Intake manifold (6) M8x1.25 bolts (4) M6x1 bolts (2) 1/8 NPT plugs (1) 3/8 NPT plug (1) 1/4 NPT 90 degree barb (4) Small O-rings
OIL COOLER KIT INSTALLATION INSTRUCTIONS PART NUMBER D E92 335is (N54 engine) with BMW M-Technic bumper and with stock oil cooler
 with BMW M-Technic bumper and with stock oil cooler") OIL COOLER KIT INSTALLATION INSTRUCTIONS PART NUMBER D570-0923 APPLICATION: 2011 E92 335is (N54 engine) with BMW M-Technic bumper and with stock oil cooler Congratulations for being selective enough to
OIL COOLER KIT INSTALLATION INSTRUCTIONS PART NUMBER D570-0923 APPLICATION: 2011 E92 335is (N54 engine) with BMW M-Technic bumper and with stock oil cooler Congratulations for being selective enough to
INSTALLATION INSTRUCTIONS RATTLER STEEL RUNNING BOARDS FORD TRANSIT VAN (FULL SIZE)
") INSTALLATION INSTRUCTIONS PARTS LIST: 1 32-inch Steel Running Board 1 8-1.25mm x 35mm Hex Bolt 1 96-inch Steel Running Board 13 8-1.25mm x 25mm Hex Bolt 5 Passenger Side/Driver Side Mounting Brackets 20
INSTALLATION INSTRUCTIONS PARTS LIST: 1 32-inch Steel Running Board 1 8-1.25mm x 35mm Hex Bolt 1 96-inch Steel Running Board 13 8-1.25mm x 25mm Hex Bolt 5 Passenger Side/Driver Side Mounting Brackets 20
DOWNLOAD ENHANCED INSTALL MANUALS
 U 3 October 2016 1041564 6.7L Performance Intake Plate Manual (I-00371) 1 DOWNLOAD ENHANCED INSTALL MANUALS Cummins 6.7L High Flow Intake Plenum Cover 1041564 2008-2016 6.7L RAM 2500-3500 Pickup PLEASE
Perfect Performance Products, LLC
 PERFECT HI-VELOCITY 68MM THROTTLE BODY Installation Instructions Part # 65301 1991-1998 Jeep 4.0L Engines w/perfect Engine Management System P/N 65140, 65141 OR All Jeep 4.0L Engines in Cherokee, Grand
Performance Inlet Manifold
 Performance Inlet Manifold Tools needed (some tools not required on some models): 13mm Combination Wrench Flat Blade Screwdriver T30 Torx Driver T25 Torx Driver 10mm Combination Wrench and/or Socket with
The M7 Direct Flow Intercooler (DFIC) Installation Guide
 Installation Guide") The M7 Direct Flow Intercooler (DFIC) Installation Guide This information is meant only as a guide. The author of this information,, or any M7 Tuning employees assumes no liabilities for any outcomes resulting
The M7 Direct Flow Intercooler (DFIC) Installation Guide This information is meant only as a guide. The author of this information,, or any M7 Tuning employees assumes no liabilities for any outcomes resulting
TEL:1-866-XANATOS INSTALLATION INSTRUCTIONS PART#: SR-FOR SPARTAN RUNNING BOARD FORD ECONOLINE 99-14
 TEL:1-866-XANATOS INSTALLATION INSTRUCTIONS PART#: SR-FOR203796 SPARTAN RUNNING BOARD FORD ECONOLINE 99-14 PARTS LIST: 1 Driver/Left Side Spartan Running Board 2 10mm Lock Washers 1 Passenger/Right Side
CBEA/CJAA Timing belt procedure. Written by: greengeeker Photos by: DanG144, Kriesel, coalminer16. Required tools:
 CBEA/CJAA Timing belt procedure Written by: greengeeker Photos by: DanG144, Kriesel, coalminer16 Required tools: 1. Securing pin 3359 (you need two of them!) 2. Crankshaft stop T10050 3. Counter-hold tool
Forge Motorsport BMW N54 Diverter Valves
 Forge Motorsport BMW N54 Diverter Valves Please thoroughly read through and familiarize yourself with these instructions in their entirety prior to beginning any part of the installation process of any
CBEA/CJAA Timing belt procedure. Written by: greengeeker Photos by: DanG144, Kriesel, coalminer16. Required tools:
 CBEA/CJAA Timing belt procedure Written by: greengeeker Photos by: DanG144, Kriesel, coalminer16 Required tools: Securing pin 3359 (need two of them!) Crankshaft stop T10050 Counter-hold tool T10172 Special
Installation Instructions Jeep CJ-7
 Retrofit Steering Column Installation Instructions 1976-86 Jeep CJ-7 For Part # s 1520800010, 152800020, 1520800051 www.ididitinc.com 610 S. Maumee St., Tecumseh, MI 49286 (517) 424-0577 (517) 424-7293
Vacuum and air hose replacement -- replacing all the old, crusty air and vacuum hoses under and around
 Vacuum and air hose replacement -- replacing all the old, crusty air and vacuum hoses under and around the intake manifold. Requires removing the intake manifold. While you've got the intake manifold off,
IAG Street Series Air / Oil Separator (AOS) For 2017 WRX
 For 2017 WRX") P IAG Street Series Air / Oil Separator (AOS) For 2017 WRX Part# IAG-ENG-7152 Tools Required: Ratchet, torque wrench, extensions, needle nose pliers, hose cutter, snips/scissors, flathead screwdriver,
P IAG Street Series Air / Oil Separator (AOS) For 2017 WRX Part# IAG-ENG-7152 Tools Required: Ratchet, torque wrench, extensions, needle nose pliers, hose cutter, snips/scissors, flathead screwdriver,
Spikes-Spider Hub Installation
 Spikes-Spider Hub Installation The instructions that are provided with the Spikes Spiders are pretty good. I've created this page for two reasons: to show those that are thinking of buying a set exactly
2015+ HELLCAT 6.2L HEMI System vehicle specific plate system xx
 These installation instructions will guide you through installing the Nitrous Outlet 2015+ Hellcat 6.2L Hemi Vehicle Specific Plate System on your vehicle. Before you get started, remember to never use
Note: Injen strongly recommends that this system be installed by a professional mechanic. MR Technology, The World s First Tuned air Intake System!
 Part number SP6080 04-08 Mazda RX8 Rotary 1.3L 1-1 pc. cold air intake equipped with MR Tech and Air Fusion Power-Flow box- contents (PB375C-8) 1-8 inverted top filter (A) (#1022) 1-main body,top screen
Slingshot Rotrex Supercharger Kit
 Slingshot Rotrex Supercharger Kit This supercharger kit improves on the Slingshot by forcing more dense air into the engine and creating more power. Installation time of the supercharger depends on you
Another CJ picture guide to replacing the key cylinder in a non-tilt steering column
 Another CJ picture guide to replacing the key cylinder in a non-tilt steering column by John Strenk Well I'm sure it's happened to all of us one time or another. You park your jeep and go to turn off your
Ford Focus Zetec SVT Timing Belt
 2000-2004 Ford Focus Zetec SVT Timing Belt Replacement This guide will show you how to replace the timing belt on the 2.0L DOHC Zetec with VCT on a 2002 Ford Focus SVT. This is an interference motor. Written
Installation Manual TWM Performance Short Shifter Cobalt SS/SC, SS/TC, HHR SS, Ion Redline and Saab 9-3
 Page 1 Installation Manual TWM Performance Short Shifter Cobalt SS/SC, SS/TC, HHR SS, Ion Redline and Saab 9-3 Please Note: It is preferable to park on a flat surface, as you will have to engage and disengage
Fitting Instructions For The TDV6 EGR Blanking Kit To A 2006 Model Discovery 3 TDV6 GHSE
 Part Number DA1112 Fitting Instructions For The TDV6 EGR Blanking Kit To A 2006 Model Discovery 3 TDV6 GHSE You do this modification at your own risk. Britpart won t be held responsible for what is written
Another CJ picture guide to
 Another CJ picture guide to replacing the key cylinder in a non-tilt steering column by John Strenk Well I'm sure it's happened to all of us one time or another. You park your jeep and go to turn off your
Installation Instructions : Jaguar F-Type Intake System : Page 1
 Installation Instructions : Jaguar F-Type Intake System : Page 1 1. Remove the undertray all the Torx bolts and the hex bolts holding the splitters in place need to be removed. 2. Starting with the right
UNDERDOG RACING DEVELOPMENT URD Traction Bar Installation
 URD Traction Bar Installation Introduction: UNDERDOG RACING DEVELOPMENT Thank you for choosing the URD Traction Bar for two wheel drive street trucks. More models coming soon! This bar is a true bolt on
ALTERNATOR REPAIR FOR BMW 645 CI. E64 ENGINE N62 BY KEVIN BOWEN 6/9/2013
 ALTERNATOR REPAIR FOR BMW 645 CI. E64 ENGINE N62 BY KEVIN BOWEN 6/9/2013 Level of difficulty: If you follow these directions, moderate, hardest part is aligning the alternator back for repositioning. Length
C3 Syncro Drive Proclimb 1100 Installation Instructions
 Revision 4 Nov 8-2013 201A Old Town Road, Sicamous, BC. V0E 2V4 Ph 250-833 3538 Fax 888-716 5903 www.c3powersports.com Thank you for purchasing a ProClimb M, ProCross F & XF SyncroDrive Note: This modification
Stack Racing 70mm Throttle Body for Ford Mustang 5.0 (GT, Cobra)
") Stack Racing 70mm Throttle Body for 1994-1995 Ford Mustang 5.0 (GT, Cobra) Installation Time: Approximately 1 hour Tools Required: Flat head screwdriver Phillips head screwdriver ¼ or 3/8 ratchet 6-9 extension
Stack Racing 70mm Throttle Body for 1994-1995 Ford Mustang 5.0 (GT, Cobra) Installation Time: Approximately 1 hour Tools Required: Flat head screwdriver Phillips head screwdriver ¼ or 3/8 ratchet 6-9 extension
Turboback Exhaust
 501301 Turboback Exhaust 2014+ Ford Fiesta ST 501200 High Flow Catted Downpipe Page 2 501100 Catback Exhaust System Page 10 501200 High Flow Catted Downpipe 2014+ Ford Fiesta ST Congratulations on your
A Simple Guide to Installing the C2Motorsports 2.5L SRI
 A Simple Guide to Installing the C2Motorsports 2.5L SRI Special Thanks to Josh and the Crew at Nothing-Leaves-Stock **Disclaimer: This is an aid for installing the SRI on a 2.5L motor. C2Motorsports is
Ford Racing Performance Improvement Intake Manifold (96-04 GT) Time Necessary: Approximately 4 hours
 Time Necessary: Approximately 4 hours") Ford Racing Performance Improvement Intake Manifold (96-04 GT) Time Necessary: Approximately 4 hours Tools Required: Ratchet and socket set Torque wrench Large adjustable wrench Needle nose pliers A dozen
Ford Racing Performance Improvement Intake Manifold (96-04 GT) Time Necessary: Approximately 4 hours Tools Required: Ratchet and socket set Torque wrench Large adjustable wrench Needle nose pliers A dozen
HR ZDX Throttle Body Install (06-11 Civic Si)
") HR ZDX Throttle Body Install (06-11 Civic Si) This guide will walk you through the steps to install a ZDX throttle body onto your RBC Intake manifold using the Hybrid Racing ZDX adapter. Written By: Hybrid
HR ZDX Throttle Body Install (06-11 Civic Si) This guide will walk you through the steps to install a ZDX throttle body onto your RBC Intake manifold using the Hybrid Racing ZDX adapter. Written By: Hybrid
VRSC-DX Truck-Lite LED Headlight Installation Instructions
 VRSC-DX Truck-Lite LED Headlight Installation Instructions The following Instructions are for installing a 7 Truck-Lite LED headlight into a Harley Davidson VRSC-DX Night Rod Special fairing. Other 7 headlights
Fuel Pressure Regulator Kit PART# - RY12040-RRFPR-6S5
 APPLICATION(S): Yamaha FX-SHO, FZR & FZS Fuel Pressure Regulator Kit PART# - RY12040-RRFPR-6S5 We strongly recommend the use of a service manual to familiarize yourself with the various components and
2001 V70 T5 ETM Removal and Cleaning Directions
 2001 V70 T5 ETM Removal and Cleaning Directions Howard Cheng howardc64@gmail.com 10/24/05 Version 1.4 Read this before you start I performed this ETM cleaning because I had gotten 2 reduced performance
STEALTH BIG AIR KIT - Yamaha Roadliner/Stratoliner and Raider
 Page: 1 If you question your abilities it may be best for an experienced service technician perform this installation. A Yamaha Service Manual would be helpful to have on hand for reference. Revision:
DDMWorks Race Intake for Mazda Miata
 DDMWorks Race Intake for 1999-2005 Mazda Miata f This DDMworks Race Intake improves your Mazda Miata by supplying your engine with cold pressurized air for it to breathe in through a free flowing filter
G2 INSTALLATION MANUAL
 PERFORMANCE ENGINEERED SYSTEMS G2 INSTALLATION MANUAL FOR RACING OR OFF ROAD USE 1 INTRODUCTION PLEASE PURCHASE AUDI- ONLY POWER STEERING FLUID (PENTOSIN CHF 11S) Please note this an older version, and
INSTALLATION INSTRUCTIONS PART NUMBER: DC (GUN METAL GRAY)
") Equipped with AEM Dryflow Filter No Oil Required! INSTALLATION INSTRUCTIONS PART NUMBER: 21-8033DC (GUN METAL GRAY) 2014-15 Chevrolet Silverado 1500 5.3L/6.2L V8 2014-15 GMC Sierra 1500 5.3L/6.2L V8 2015
Equipped with AEM Dryflow Filter No Oil Required! INSTALLATION INSTRUCTIONS PART NUMBER: 21-8033DC (GUN METAL GRAY) 2014-15 Chevrolet Silverado 1500 5.3L/6.2L V8 2014-15 GMC Sierra 1500 5.3L/6.2L V8 2015
2014+ Ram 3.0 EcoDiesel EGR Delete
 2014+ Ram 3.0 EcoDiesel EGR Delete Installation Guide WARNING: This product is for competition use only in a sanctioned racing event. NOT FOR USE ON VEHICLES USED OR REGISTERED FOR USE ON A PUBLIC ROAD
Rebuilding the Power Steering Pump for a 2007 Honda Accord 4CYL
 Rebuilding the Power Steering Pump for a 2007 Honda Accord 4CYL Disclaimer: I have benefited greatly from others who have taken the time to post auto repair videos/tutorials online. To try and return the
IE Audi 3.0T Crank Pulley Upgrade Install Guide IEBAVJ3
 IE Audi 3.0T Crank Pulley Upgrade Install Guide IEBAVJ3 Thank you for purchasing your IE 3.0T crankshaft pulley upgrade! This instruction guide is used for installation of IE s lower overdrive pulley for
1996 Aerostar/Ranger/Explorer
 Page 1 of 11 Section 03-01B: Engine, 3.0L V-6 IN-VEHICLE SERVICE 1996 Aerostar and Ranger Vehicles Workshop Manual Water Pump SPECIAL SERVICE TOOL(S) REQUIRED Description Tool Number Fan Clutch Holding
MANUAL FOR THE NM100 ADJUSTABLE SHORT SHIFTER
 MANUAL FOR THE NM100 ADJUSTABLE SHORT SHIFTER P.O. BOX 313 ~ ODESSA, FL 33556 ~ 1-844-NUM-RACE Tools Needed T20 Torx Driver T27 Torx Driver Needle Nose Pliers ¼ Ratchet with 10MM Socket 3MM Allen Wrench
Part Number : DDM-07-RIS
 RACE INTAKE SYSTEM, R56 MINI Cooper S - 2007+ Part Number : DDM-07-RIS This kit includes: Part Number Description Qty DDM-07-006 DDMWorks PFB, Pressurized Filter Box 1 DDM-07-017 DDMWorks RAS, Ram Air
08-18 STI Flex Fuel Bluetooth Mk2 Kit Install Instructions For Cobb Tuning Access Port
 For Cobb Tuning Access Port Delicious Tuning 1948 Don Lee Place Suite #7 Escondido, CA 92029 408-480-0995 Rough Draft BJP Rev: 2.0 Date: 2/1/17 FFBT parts: (1) Ethanol Content Analyzer Module (1) Ethanol
8 Zip Tie Zip Tie 1 Union Fitting 1 ½ ½ Union Reducer Fitting Union 1 5/8 ½ (For Plastic Intake Manifold Vehicles)
") P IAG Street Series Air / Oil Separator (AOS) For 2017 STI Part# IAG-ENG-7151 Tools Required: Ratchet, torque wrench, extensions, needle nose pliers, hose cutter, snips/scissors, flat head screw driver,
P IAG Street Series Air / Oil Separator (AOS) For 2017 STI Part# IAG-ENG-7151 Tools Required: Ratchet, torque wrench, extensions, needle nose pliers, hose cutter, snips/scissors, flat head screw driver,
HI-FLOW FUEL RAIL. Installation Instructions for: Part Numbers , ,
 HI-FLOW FUEL RAIL Installation Instructions for: Part Numbers 25-100, 25-103, 25-112 ADVANCED ENGINE MANAGEMENT INC. 2205 126 TH Street, Unit A Hawthorne, CA. 90250 Phone: (310) 484-2322 Fax: (310) 484-0152