How I Fitted the Digital Temperature Guage... By T-Cut
|
|
|
- Charleen Peters
- 6 years ago
- Views:
Transcription


1 How I Fitted the Digital Temperature Guage... By T-Cut Here's one way to install the digital temperature gauge designed by Hans Schaaper. I decided to fit mine into the redundant slot above the CD-80 radio in my 2004 Connoisseur. Other interiors will have different alternatives and possibilities and some of the steps I took may be unnecessary. Anyway, here's a photo of my intended location. Image 1 The slot is originally fitted out with a small rubber mat which is dispensed with. The available space is the ideal shape and size to take the PCB mounted on a support board, together with a plastic fascia to take the display screen and bezel. The slot is slightly smaller than a standard single DIN fascia panel, which I bought for around a fiver from one of the ebay shops. I


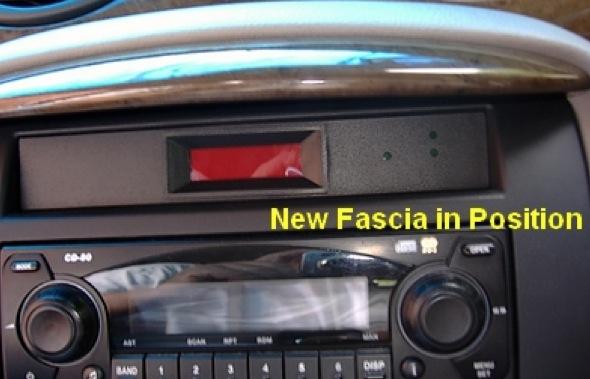
2 mage 2 Using a fine saw, a file and abrasive sheet, I cut down the DIN panel and cleaned it up so it was a nice close fit into the slot. This is nicely shaped so you can seat the fascia just inside. Below shows the size I needed. Notice the useful lugs on the back. The lower bit is the offcut which came in handy later. Image 3


3 Before cutting a hole for the display, I figured the best way to support the PCB was a small board of some kind fastened to the lugs on the rear. All I had available was hardboard, but plastic would be nicer. Since doing all this, I've acquired some eighth inch thick Perspex which I'll swap in due course. The display sits across the edge of the mounting board, so you have to cut some clearance for this as shown below. Image 4 (Top side) Image 5 (Under side)


4 I had to cut the board to take the gussets supporting the mounting brackets, but it all fits very nicely and is held with a couple of nuts and bolts. The next job was to cut out the window to take the display bezel. I guess this could be cut out using a Stanley knife, but I used a Dremmel with a fine abrasive disc. Some care is needed with this. Even at slow speed, the Dremmel cuts like a hot knife through butter, so ensure the blade doesn't go too far and spoil the job. Here's the window after trimming to fit the bezel. Image 5 Image 6


5 Image 7 I looked at ways of mounting the bezel with the integral studs, but it was too involved. The simplest way is to stick it permanently to the fascia using super glue. The studs then mount the display screen without complications. Here's the result. Image 8 Super glue gives off a powerful vapour which stains the plastic. This can be difficult to remove without marring the finish, so the absolute minimum of adhesive should be used. Don't get any on the visible fascia surface or it will look a mess. I decided to mount the PCB to one side of the board to give me room to make additions like the LED fan indicators described later. I drilled two mounting holes and used the screws and spacers included with the kit. Here it is in position. Notice I labelled the display so I won't fit it upside down, which is easily done.


6 Image 9 Before permanently installing the display, I decided to modify the screen a bit. The red screen piece allows the unlit LED matrix to be seen through it. Here's what I mean. Image 10

 is a reduction of the display intensity.")
7 To eliminate see-through, I cut some additional filters from bits of plastic sheet I had in my Odds & Sods drawer. In the event, I used the single grey one seen on the right. I added this between the LED unit and the red screen so when it's all fastened together the unlit LED matrix isn't visible. Image 12 A further benefit (in my opinion anyway) is a reduction of the display intensity. This is a personal thing and a dimmer display is less easy to read in bright sunlight. Anyway, I liked the result using the grey filter. Here's the with and without views.


8 Image 13 (No additional filter) Image 14 (With the grey filter) Having got so far, I then decided to add some indicators to tell me when the cooling fan is running. Mine's a 2-speed type and the simplest thing I could think of was a couple of LEDs wired into the slow and fast speed supplies to the motor. I thought green would be a logical colour and matches those on the climate control panel. There are hundreds of LED types to choose from and after experimenting with some ultra-bright ones, I decided on the lower candlepower ones. They show the best colour when throttled down to operating voltage using the resistors supplied (470 ohm I think). I chose the 3mm cylindrical type, which have a nice flat face and are long enough to be selfsupporting in the fascia. The first thing to do was solder the resistors to the LEDs. You can put them on either electrode, but my logic said anode. The anode (positive) is always the longer lead from the unit.


9 Image 15 (LEDs with resistors attached) Image 16 (Shrink wrap insulated) I'd already decided on a scheme for the indicators. One LED for slow speed and two for high speed. These are fitted to the right of the display in 3mm holes drilled through the fascia. To support the LED units and stop them poking out, I stuck a strip of that spare DIN fascia on the rear of the panel to thicken it. This also gives it some extra strength. Here's the drillings.

")
10 Image 17 Image 18 (LEDs in Place)
.")
 Image 20 (High")
11 Here's how they look when powered up (test). Image 19 (Low Speed Fan) Image 20 (High Speed Fan)
 The gizmo was now ready to install in the car.")
12 To connect up the LEDs, I soldered all three cathodes together and put them into a 3-place connector block screwed to the board. The anode from the low speed LED goes to one connector and both anodes from the high speed pair going into another. Image 21 (LED Connector Block) The gizmo was now ready to install in the car. This required removal of the 'eyebrow' above the slot. This is held by two self-tappers which you can access after unclipping the finisher panel on its underside. It just flips out using a fine screwdriver. The mounting screws can be slippery critters so I used one of those spring loaded grabber things to hold the heads and ease 'em out. After pulling out the eyebrow, the radio mounting panel can now be unscrewed. There's selftapper at each upper corner and these can be devils to retain. Use a grabber to stop them disappearing down the back. The radio fascia can then be manoeuvred out with radio attached. It comes out a good way so you can get at the wiring behind. You need to locate a suitable earth/ground wire (usually black), a switched live supply and an I-bus wire. There were several unconnected plugs with umpteen leads amongst the spaghetti of wiring. I found what I needed on these using a multi-meter.


13 Using short lengths of suitable cable, I connected the 12v supply, ground and I-bus terminals on the PCB to the corresponding wires using standard crimp connectors. Each was marked to identify them. Image 22 (12v Supply and Ground) Image 23 (I-Bus Connection)


14 Usefully, the rear end of the slot has some access holes, through which I fed the wires to the PBC. At this stage I haven't connected up the LEDs to the fan supply. This requires removal of the front bumper and that's scheduled for later this summer. I'll connect the low speed supply to the motor side of the slow speed resistor. That will allow me to monitor that it's still OK. If the resistor blows, the LED won't light up when the A/C is running. Image 24 I left the label on the beeper unit. I thought it was too loud without it. The unit is simply a push fit in the slot. The fascia holds it in nicely and it only needs a thin blade to withdraw it. After locating the unit, all the retaining screws were refitted along with the eyebrow pice. Image 25

15 Image 26 Image 27


16 This is how it looks in action. This photo was taken before I fitted the fan LEDs. Image 28 Image 29
Connecting the rear fog light on the A4 Jetta, while keeping the 5 Light Mod
 Connecting the rear fog light on the A4 Jetta, while keeping the 5 Light Mod DISCLAIMER: I'm human and make mistakes. If you spot one in this how to, tell me and I'll fix it This was done on my 99.5 Jetta.
Here's the difference (externally) in the and 04+ bumper and headlights: (00-03 on top, 04 on bottom)
 in the and 04+ bumper and headlights: (00-03 on top, 04 on bottom)") OK guys, I've been meaning to post this for awhile.. well here it goes. I did the '04 front end conversion on my '01 about 4-5 months ago, but then the dealer had to buy the car back for legal reasons.
OK guys, I've been meaning to post this for awhile.. well here it goes. I did the '04 front end conversion on my '01 about 4-5 months ago, but then the dealer had to buy the car back for legal reasons.
Converting an A to 12v and Adding Turn Signals Bill Lee
 Converting an A to 12v and Adding Turn Signals Bill Lee Bill@WRLee.com When I bought my 1929 Tudor, it had been restored about 20 years earlier. It had halogens and had been converted to 12v negative ground,
Tip: and Orient Express LED Light Upgrade Date: Correction
 Hi All, I have since inherited my friend Rudolf s 42755 Orient Express with the extra 42760 car set and wanted to complete the LED light upgrade as we had planned. Side view of the Restaurant car with
Guide to adding a current selection switch to the DIY Portable EVSE from ZCW
 Guide to adding a current selection switch to the DIY Portable EVSE from ZCW Introduction This guide is intended for those who have built the Zero Carbon World DIY Charging Station kit as depicted in the
Volvo 1800 Dash Pad Replacement
 Volvo 1800 Dash Pad Replacement (courtesy of John Garden State Chapter Volvo Club America) Reupholstering the dash Well it has been some time since I have been online in the forum. Winter is a quite time
At Mark's suggestion I thought I'd write this up so future Coupe lovers can have as much fun* as I did with this job.
 At Mark's suggestion I thought I'd write this up so future Coupe lovers can have as much fun* as I did with this job. My enormous thanks to forum members, particularly glorfindel, for their advice when
Peugeot 406 Coupe: Delocking your boot V.1 April 2005
 This is a first stab at a DIY guide to de-locking your 406 Coupe. It isn t a hard modification to do yourself, but you do need to be confident working on your cars electrics and removing and refitting
Tip: Water Crane with Servo Motor, LED Lantern, Moving Man Date: Update includes video
 Hi All, I ve had the Faller Swivel Water Spouts kit 120137 (B137 = old number) since 2000, which I will refer to as a Water Crane. I assembled the kit at the time with the intent of animating it with a
Guide to fitting a MK2.5 (Facelift) Centre Console into a MK2 Focus. The Parts
 Centre Console into a MK2 Focus. The Parts") Guide to fitting a MK2.5 (Facelift) Centre Console into a MK2 Focus For the latest project on my MK2 Focus I decided that a Facelift centre console would tie my previous interior uplift together. As I
Guide to fitting a MK2.5 (Facelift) Centre Console into a MK2 Focus For the latest project on my MK2 Focus I decided that a Facelift centre console would tie my previous interior uplift together. As I
Hard Bar Sport, M1/M2 Hard Core Hardtop, M2 Sport, and Xtreme Installation Instructions
 HARDWARE KIT: Hard Bar Sport, M1/M2 Hard Core Shoulder Harness Guide Relocation Assemblies: 2-3/8" X 1" grade 8 bolts 4-3/8" flat washers 2-3/8" lock nuts 2 - brass bushings 2 - plastic trim caps 2-3/8"
REPAIR for: Sidelamp Bulb(s) Faulty, Left Tail Lamp Faulty, Right Tail Lamp Faulty, Directional Indicator Faulty, Left Hand Stop Bulb Faulty
 Faulty, Left Tail Lamp Faulty, Right Tail Lamp Faulty, Directional Indicator Faulty, Left Hand Stop Bulb Faulty") REPAIR for: Sidelamp Bulb(s) Faulty, Left Tail Lamp Faulty, Right Tail Lamp Faulty, Directional Indicator Faulty, Left Hand Stop Bulb Faulty DIFFICULTY LEVEL: ***** Drilling, Wire Crimping, Tight Spaces,
REPAIR for: Sidelamp Bulb(s) Faulty, Left Tail Lamp Faulty, Right Tail Lamp Faulty, Directional Indicator Faulty, Left Hand Stop Bulb Faulty DIFFICULTY LEVEL: ***** Drilling, Wire Crimping, Tight Spaces,
what you need to do is hit the taper housing as hard as you can with your hammers AT THE SAME TIME and at a slight angle, what will happen is you
 first things first, get the car on axle stands and the wheels off. Open the bonnet to let more light through to the area in which you'll be working. The following guide shows the passenger side being done
Tip: LED Lighting for the 4367 SBB Euro City Set, 4366 and 4368 Cars Date: , Corrections Modified , Photos
 Hi All, I have had the 4367 SBB Euro City set with extra cars 4366 and 4368 since 1998, apart from a test run on the layout they have stayed in storage ever since. I decided to change some rolling stock
Some tips and tricks I learned from getting clutch out of vehicle Skoda Octavia year 2000
 Some tips and tricks I learned from getting clutch out of vehicle Skoda Octavia year 2000 Last change 2013-Oct-11 I bought Haynes manual for a starter. That s something well worth it s cost I believe.
A Fitting Guide for the Forge Motorsport Front Mounting Intercooler for the BMW Mini Cooper S Turbo R56 Models
 A Fitting Guide for the Forge Motorsport Front Mounting Intercooler for the BMW Mini Cooper S Turbo R56 Models (A copy of this guide is available online, in the media section of our website) A general
Rear Speaker replacement.
 Rear Speaker replacement. First off you need the right rear speakers. The easy bit is 6x9 and better than a 15W paper cone, the difficult bit is getting a mounting depth under 74mm. Or to be more precise,
Procharger Stage II Intercooled Supercharger System (11-14 GT)
") Procharger Stage II Intercooled Supercharger System (11-14 GT) Installation Time: Approximately one day. Installed on 2012 Mustang GT 5.0/Manual Required Tools 3/8 Socket Set (Standard and Metric) 1/2
Procharger Stage II Intercooled Supercharger System (11-14 GT) Installation Time: Approximately one day. Installed on 2012 Mustang GT 5.0/Manual Required Tools 3/8 Socket Set (Standard and Metric) 1/2
Fitting new lock and replacing a door latch assembly
 Fitting new lock and replacing a door latch assembly It has long been a problem with older MGBs and Midgets that once the door lock becomes worn the whole barrel assembly twists with the key as you try
Fitting HID Xenon Headlamp system to R75/MG-ZT
 Fitting HID Xenon Headlamp system to R75/MG-ZT By Ross R75 Time Required: 30-45 minutes Let me first of all start by saying that this subject in itself is an area of heated debate. The basic fact of the
Illustrated guide to changing the mode of a Spektrum DX6 transmitter
 Page 1 of 8 Illustrated guide to changing the mode of a Spektrum DX6 transmitter Purpose Follow this process if you want to change the mode of your Spektrum DX6 transmitter. You can change between mode
72 Mustang Mach 1 tachometer cluster and gauge conversion
 72 Mustang Mach 1 tachometer cluster and gauge conversion Dated: 02-17-2009 (drafted by a Chevy person working on his first Ford -not good-) Revised: 11-05-2010 The following information pertains to how
Adding an LED indicator to the X10-WS467 wall switch Credit: Bruce Stydnicki
 1 of 6 1/2/2009 4:33 PM Adding an LED indicator to the X10-WS467 wall switch Credit: Bruce Stydnicki 1. I had a need to monitor the status of my outdoor lights which are connected to X10-WS467 wall switches.
============================================================================
 Coleman 5.4V Flashcell Cordless Screwdriver - ultracapacitor Posted by opi - 2009/09/14 10:54 I've wanted to play with some ultracapacitors but the cost has been a little much for my small budget. However,
These instructions show how to build the Remote Controlled Fart machine Sound Kit.
 Remote Controlled Fart Machine Assembly Instructions These instructions show how to build the Remote Controlled Fart machine Sound Kit. Tools Required Drill with 7/64, 3/16, and ¼ drill bits. Holt melt
Ford F-150 Speaker Replacement Instructions
 Ford F-150 Speaker Replacement Instructions This article was downloaded from http://www.fordf150.net Be sure to go there to view and download the other how-to articles. Thanks to John Meyer for contributing
M1A1 Thompson Upgrade
 M1A1 Thompson Upgrade If you are mechanically inclined at all. This should be no problem. I'll start off with a list of things you will need. Thompson M1A1 Whisky Cigarettes Tools: Flat screwdriver No.
Triumph Street Triple VSM Grip Heater Install
 Triumph Street Triple VSM Grip Heater Install Introduction: With winter fast approaching and with painful memories of last winter riding with the club it was time to do something about getting some grip
Door Panel Removal & Window Stop Adjustment
 Door Panel Removal & Window Stop Adjustment By: Jeff Wolford Disclaimer: This is simply an article of how I fixed my car. I m not responsible if you break, scratch, or mess up anything following my example.
2005+ Mustang Trunk Lid Release and Trunk Lights Installation
 There is no warranty expressed or implied by this document, you follow these instructions at your own risk. These instructions worked for me, but your experience may vary. The final product of these instructions
FITTING OIL TEMP AND PRESSURE GUAGES
 FITTING OIL TEMP AND PRESSURE GUAGES this guide is of reference to fitting an oil temp and pressure sender/ sensor into a sandwich plate- not the sump plug temp sensor (although it wouldn't be much different
How to fit the remote parking heater module
 How to fit the remote parking heater module The function of this project is to convert a standard fuel burning heater on the diesel models of the Rover 75 and MG ZT to a remote controlled parking heater.
The N4YG DDS VFO and the Drake TR7
 The N4YG DDS VFO and the Drake TR7 Overview This document describes the installation of a N4YG DDS VFO into my Drake TR7 transceiver. The VFO is a terrific improvement over the original PTO and adds function
Shay - Painting The Trucks & Frames
 Shay - Painting The Trucks & Frames Nelson Riedel Nelson@NelsonsLocomotive.com Initial:2/23/04 Last Revised: 06/06/2004 Painting of the locomotive trucks and frame are described in this page. The tender
MGB V8 Roadster restoration project Report 86
 2 nd November 2016. There seems to be so much to do, odds and ends to order, not enough space to do stuff. This morning I think I better start writing down a list of things to do that are easier while
Figure 1. A CheapBot Robot
 A CheapBot controller needs a robot body to function. An ideal robot body for the beginner consists of two sheets of Syntra plastic, separated by four bolts. The bottom deck contains the robot controller
Guide to fitting an import digital dashboard & H.U.D. to a UK 200sx S13
 Guide to fitting an import digital dashboard & H.U.D. to a UK 200sx S13 By John Bennett Version 1 (June 2004) Print pages 5 & 8-12 for reference when fitting (the rest is just background info) The Japanese
2007 Crown Victoria Police Interceptor (P71) Blend Door Actuator Replacement (If I did it, you can too.)
 Blend Door Actuator Replacement (If I did it, you can too.)") 2007 Crown Victoria Police Interceptor (P71) Blend Door Actuator Replacement (If I did it, you can too.) I'm not saying this is the only way, or even the right way, but it worked for me. First time I've
2007 Crown Victoria Police Interceptor (P71) Blend Door Actuator Replacement (If I did it, you can too.) I'm not saying this is the only way, or even the right way, but it worked for me. First time I've
Stephenson's Valve Gear: 7mm cast white-metal kit 19 th Century swing-link version - non-working, cosmetic only. Instructions
 SER-Kits Stephenson's Valve Gear: 7mm cast white-metal kit 19 th Century swing-link version - non-working, cosmetic only Page 1 of 5 Instructions HEALTH & SAFETY: The castings contain some lead. Dispose
Spikes-Spider Hub Installation
 Spikes-Spider Hub Installation The instructions that are provided with the Spikes Spiders are pretty good. I've created this page for two reasons: to show those that are thinking of buying a set exactly
Tip: LED Lighting Improvements for Rheingold Set Date:
 Hi All, Recently I came into possession of the 41928 Rheingold set and was excited to see that I could add a function decoder to switch the light functions on and off. The first problem is Märklin don
PYRTE. Building The Front Axle, Fork and Steering
 PYRTE Building The Front Axle, Fork and Steering The front axle on this traction engine is a very simple affair, in that it is a rectangular steel rod, sat on edge, with a pivot in the centre, which is
No Drill Modern Gas Shock Installation on a 1931 Ford Model A Coupe
 No Drill Modern Gas Shock Installation on a 1931 Ford Model A Coupe Today we are not going to cover something new but just a little insider info in to what we do during our time off at Apex Tool Company.
Lincoln Mark VII T5 Swap Version submitted by 5.0 bird
 Lincoln Mark VII 1984-1989 T5 Swap Version 20070611 submitted by 5.0 bird I've decided to make an article to assist with the T5 swap for the 84-89 Mark VIIs, since I was just in there because my DOA didn't
U-Score U-Score AAC Rank AAC Rank Vocabulary Vocabulary
 go 1 927 you 2 7600 i 3 4443 more 4 2160 help 5 659 it 6 9386 want 7 586 in 8 19004 that 9 10184 like 10 1810 what 11 2560 make 12 1264 is 13 10257 on 14 6674 out 15 2350 do 16 2102 here 17 655 eat 18
HotGrips Installation
 Page 1 of 8 HotGrips Installation There are two general solutions when it comes to upgrading any motorcycle with heated grips. Heated membranes that fit under the stock grips or complete replacement grips
Installation of the AdMore Premium Light Bar on an Indian Motorcycle
 Installation of the AdMore Premium Light Bar on an Indian Motorcycle May 16, 2017 by Ken the Mucker Sexton Ref: AdMore Lighting, LED8020-SB, Premium LED Light Bar with Smart Brake Technology, https://www.admorelighting.com/product/admore-smt-light-bar-with-smart-brake-technology-new/
Cabin Light. Hi All, 1
 Hi All, My friend Rudolf set me a challenge for his 36331 electric locomotive, wanting Telex couplers fitted. When I opened up the locomotive I discovered there is very little room to add extra components
This article, written by forum member Paulages in September 2008, is from the SOHC/4 Tips and Tricks Forum.
 This article, written by forum member Paulages in September 2008, is from the SOHC/4 Tips and Tricks Forum. When Honda produced the SOHC CB650, it was immediately following the end of the CB550 production,
Tip: LED Lighting for the 3098 Locomotive and 4392 Coach Set Date: , ,
 Hi All, Over the past few months I have been working at a steady pace to install LED lighting in my passenger coaches. The coach lighting must have LED lights to reduce power consumption on the layout
JRSC + BBK Install on SVTF. Neil A. Shah medicnas on focaljet September 2006
 JRSC + BBK Install on SVTF Neil A. Shah medicnas on focaljet September 2006 ECU up here. When removing make sure the smaller bundles of wires don t get wrapped around the bottom edge and break - this almost
Hasse Mods for the Ampeg J20 Guitar Amp
 Hasse Mods for the Ampeg J20 Guitar Amp The following is adapted from a post I put up on The Gear Page, in the Amp Techincal forum. It shows the mods I did to my Ampeg J20. Okay, here s my mods for this
BMW 528i E39 Sunroof Repair
 These instructions will help guide you through the repair process for broken sunroof control rails on an E39 chassis. Before I get started, I want to give a shout-out to a couple people who also posted
Changing the Struts on a WK Jeep CRD
 Changing the Struts on a WK Jeep CRD Step by Step By Chirpz Disclaimer: I do not claim that this procedure is the right way or even the best way to change your struts. This is what I did after reading
B&W Turnover Ball Installation
 B&W Turnover Ball Installation by Flopster843 02 Jan 2012 I wanted to start this article out by stating one very important thing. Installing a gooseneck hitch is not a task to be taken lightly. If you
Application Note. Atlas RS-3 Tsunami Digital Sound Decoder Installation Notes
 Application Note Atlas RS-3 Tsunami Digital Sound Decoder Installation Notes Overview This application note describes how to install a TSU-AT1000 digital sound decoder into an HO Atlas RS-3. Skill Level
Projector39/Umnitza BMW Headlight & Re-Installation for E39s Predator Angel Eyes, and Lamin-X Installation
 Projector39/Umnitza BMW Headlight & Re-Installation for E39s Predator Angel Eyes, and Lamin-X Installation Now it is time to remove the headlights! Obviously you have to open the hood to do this. 100_3630.jpg
Simple DIY Rev Switch Switch on or off anything at an adjustable engine rpm!
 Simple DIY Rev Switch Switch on or off anything at an adjustable engine rpm! By Julian Edgar So what about making it a general-purpose rev switch, able to switch pretty well any electrical loads? That
Installation Manual for LCD Boost Controller device.
 Installation Manual for LCD Boost Controller device. Main Black box front view. The lonely white 4pin connector above means this box is equipped with the optional serial expansion card. Main black box
Conversion to Battery Power Del Tapparo
 Conversion to Battery Power Del Tapparo Converting a track powered locomotive to battery power eliminates all of the electrical continuity problems associated with track power. However, the process of
Air Compressor/Water Pump IV - Pilot Valve Stem, Test & Installation
 Page 1 of 8 Air Compressor/Water Pump Part IV Pilot Valve Stem, Test & Installation Nelson Riedel Nelson@NelsonsLocomotive.com Initial: 1/13/04 Last Revised: 0 Valve Test: I decided to test the steam valves
ESPA3D Photo Essay One page ESPA3D Plans are HERE Back to Spad Plans Index
 1 of 8 8/29/2012 12:28 PM ESPA3D Photo Essay One page ESPA3D Plans are HERE Back to Spad Plans Index This little airplane has turned out to be one of the most fun Spad projects we've ever done! It is built
Volvo 850 Radiator Replacement Jason Reed 29 March 2013
 This write up covers removing and replacing the radiator on a 97 855 GLT wagon with light pressure turbo and automatic transmission. This car has 162K miles. The radiator, which was original, developed
Another Shay Steam Brake Valve Nelson Riedel Initial: 1/30/2004 Last Revised: 02/26/2006
 Page 1 of 5 Another Shay Steam Brake Valve Nelson Riedel NARiedel@Adelphia.net Initial: 1/30/2004 Last Revised: 0 I was not happy with the valve described in the brake valve section Shay Steam Brake Valve
MGB V8 Roadster restoration project Report 103
 23th December 2016. Wishing all V8 members a Happy Christmas. I now have a list of jobs that need doing to the MG. I shall work through the list. If it s possible, I shall attempt to finish each job before
Improvements to Window Lifts on Rolls-Royce and Bentley Cars, 1972 to 1989
 C SCBZSOTO9HCH20037, 1987 Bentley Turbo R SBH13247, 1972 Bentley T-Series Improvements to Window Lifts on Rolls-Royce and Bentley Cars, 1972 to 1989 SY (Silver Shadow Series Cars) Chassis 13754 to SZ (Silver
SMITHS CAR CLOCK REPAIR KIT
 SMITHS CAR CLOCK REPAIR KIT Version 9 1 Introduction These instructions explain how to repair a Smith s electric car clock mechanism using the Clocks4Classics repair kit. This kit uses a specially developed
Днепр) Russian Motorcycle Carburetors Part 2B: PZ-24 and PZ-28 Carburetor Assembly and Jet Drilling
 Russian Motorcycle Carburetors Part 2B: PZ-24 and PZ-28 Carburetor Assembly and Jet Drilling") Ural (Урал( Урал) - Dnepr (Днепр( Днепр) Russian Motorcycle Carburetors Part 2B: PZ-24 and PZ-28 Carburetor Assembly and Jet Drilling (applies also to K-37 K and K-38 K carbs) Ernie Franke eafranke@tampabay.rr.com
Ural (Урал( Урал) - Dnepr (Днепр( Днепр) Russian Motorcycle Carburetors Part 2B: PZ-24 and PZ-28 Carburetor Assembly and Jet Drilling (applies also to K-37 K and K-38 K carbs) Ernie Franke eafranke@tampabay.rr.com
SHARK UPPER WINDSHIELD FRAME & WINDSHIELD REPLACEMENT. Text and Photos by TOM BENFORD
 Text and Photos by TOM BENFORD I purchased a fathom green 69 big-block tri-power T-top coupe with only 42,000 original miles on it recently. I'm the third owner of the car, and I got it for a very good
This year Märklin have released a coach which has included LED lighting with a currentconducting close coupler (single pole)
") Hi All, Over the past few months I have been working at a steady pace to install LED lighting in my passenger coaches. The coach lighting must have LED lights to reduce power consumption on the layout
Hi All, Over the past few months I have been working at a steady pace to install LED lighting in my passenger coaches. The coach lighting must have LED lights to reduce power consumption on the layout
STEP #1: Remove the wheels from the truck. There are (6) 21mm lug nuts holding each wheel on... Remember Lefty Loosy, Righty Tighty.
 21mm lug nuts holding each wheel on... Remember Lefty Loosy, Righty Tighty.") - CustomTacos.com Page 1 of 36 How-To: Toytec Lift Install Read all of these install instructions prior to installing Toytec's suspension lift. I cannot be held responsible for any damages or personal
- CustomTacos.com Page 1 of 36 How-To: Toytec Lift Install Read all of these install instructions prior to installing Toytec's suspension lift. I cannot be held responsible for any damages or personal
4TH GEN SEATS IN A 3RD GEN TRUCK
 4TH GEN SEATS IN A 3RD GEN TRUCK by Flopster843 02 Oct 2016 If you drive a 3rd generation Dodge Ram truck, I am sure you have discovered that the OEM seats are not the greatest (Figure 1.) They are extremely
There was some debate whether or not there was a write up, with Pictures, for replacing the ignition switch.
 Replacing the Ignition Switch - Step by Step with Pictures. http://forums.audiworld.com/showthread.php?p=18927576 (Corey 02ALMSTT) (With updates/corrections by Dave F.) February 1, 2013 (I = Corey, mostly)
STEPS FOR REMOVING REAR ASHTRAY & CUP HOLDER, CENTER ARMREST, E- BRAKE CONSOLE, FRONT ASHTRAY, LOWER CENTER CONSOLE AND GLOVE BOX
 Please give credit where credit is due! This DIY was completed ENTIRELY by the hardest working VW Vortex moderator on the site!! Gary Thompson, Ph.D. - vortex ID VGRT6, email address vgrt6@yahoo.com. Please
Installing Custom Puddle Lamps 2009 Subaru Forester
 Installing Custom Puddle Lamps 2009 Subaru Forester By John Perkins This guide will assist you in installing a set of LED puddle lamps on a 2009 Subaru Forester. This is NOT using the $150 Subaru kit.
X-Type w/ non-premium sound amplifier installation instructions
 X-Type w/ non-premium sound amplifier installation instructions 1. Pull radio from dash (see Radio Removal Instructions ) 2. Disconnect wiring harness from back of radio by pushing in tab on plug and pulling
Convenience Lighting
 Convenience Lighting by Flopster843 19 Dec 2011 In order to cut costs and make a larger profit, many automobile manufacturers decided to cut several minor items from the production line. Chrysler removed
2001 V70 T5 ETM Removal and Cleaning Directions
 2001 V70 T5 ETM Removal and Cleaning Directions Howard Cheng howardc64@gmail.com 10/24/05 Version 1.4 Read this before you start I performed this ETM cleaning because I had gotten 2 reduced performance
Repair of warped dial scale - Sony CRF-5090.
 Repair of warped dial scale - Sony CRF-5090. Apparently this is quite a common problem with this series of receivers. This one was bought on a local auction site where it was clearly advertised as having
Tools Required. Metric Wrench Set Screwdriver Set Metric Socket Set Pliers Heavy duty hydraulic Jack and Car Stands Box knife or similar Hacksaw WD40
 Subaru 2004+ Legacy GT & Outback XT For JDM 2.0 twinscroll turbo and USDM 2.5 turbo models Front Mount Intercooler Fitting Instructions PN# LEG-1348-000 You are now the proud owner of a highly tested and
Fitment Guide Volkswagen Golf GTI MK V1.0
 Fitment Guide Volkswagen Golf GTI MK6 2010 V1.0 www.ecliptech.com.au You need 3 wires to fit the Shift-I to the GTI. Power and Ground from the diagnostics port (near driver s side knee) and the RPM signal
How I installed new brake pads on my i with Sport Package (should be fine for other E39 s) By Robert B.
 By Robert B.") How I installed new brake pads on my 1999 528i with Sport Package (should be fine for other E39 s) How I installed new brake pads on my 1999 528i with Sport Package (should be fine for other E39 s) By
How I installed new brake pads on my 1999 528i with Sport Package (should be fine for other E39 s) How I installed new brake pads on my 1999 528i with Sport Package (should be fine for other E39 s) By
Yep no change - it still pumps out hot air no matter how things were set.
 Page 1/5 Frequently Asked Questions Question Heating fails to adjust to the temperature you set Answer If you have Dual Zone Heating / Ventillation / Air Conditioning you might find that either side continues
How To: Fit an enclosed induction kit to the V6
 How To: Fit an enclosed induction kit to the V6 As a couple have done this I thought I'd have a go, but do a write up at the same time. Here's a quick summary of the equipment you'll be needing: 1 x Universal
MR2 MKII Electric Aerial
 Introduction This document aims to provide as much information as you are likely to need for the MKII MR2 electric aerial. It has been compiled based on personal experience gained from installing my own
W123 Transmission Vacuum Modulator Adjustment DIY - measure it the 'right' way
 W123 Transmission Vacuum Modulator Adjustment DIY - measure it the 'right' way Why do you need to do this?: You need to do this to properly check the internal hydraulic pressure of the transmission, either
QUASAR KIT No THYRISTOR - TRIAC TESTER
 QUASAR KIT No. 1087 THYRISTOR - TRIAC TESTER GENERAL DESCRIPTION With this new kit Quasar Kit offers you a very useful instrument for your bench that will help you to test THYRISTORS and TRIACS. These
The Body Slinger
 http://www.scaryguys.com/slinger.htm The Body Slinger The body slinger is a nifty animation that looks like a benign corpse in a coffin until its triggered, then leaps almost straight up over your head!
Tailgate Light Bar Installation by Flopster Feb 2015
 Tailgate Light Bar Installation by Flopster843 23 Feb 2015 If you ever looked at the rear of a 3rd generation Dodge Ram dually pickup truck, you'll notice that there is a light bar with 3 red marker lights
How to Repair an Apple AC Adapter Broken
 How to Repair an Apple AC Adapter Broken Cable Learn how to repair a damaged AC Adapter cable. Written By: Angela Penaherrera ifixit CC BY-NC-SA www.ifixit.com Page 1 of 11 INTRODUCTION Sometimes the cable
Tip: 2856 LED Lighting for the Airport Express Set Date:
 Hi All, The 2856 Airport Express set was manufactured in 1983. On 09-11-1989 the locomotive was given a digital upgrade using a 6080 decoder. It has since had a digital upgrade to a high performance motor
Chevrolet Generator Rebuild and Restoration
 Rich Mozzetta PDF compiled by Dave Zuberer Chevrolet Generator Rebuild and Restoration I had 2 old Chevy generators and I used parts from both to create a new one for a 1960 Corvette project. Both generators
Shelby GT500 Front Fascia Conversion Kit (05-09 All) Item # Installation Time: 1 Day. Required tools:
 Item # Installation Time: 1 Day. Required tools:") Shelby GT500 Front Fascia Conversion Kit (05-09 All) Item #53611 Installation Time: 1 Day Required tools: Phillips Screw driver 10mm Socket + Ratchet/Wrench 8mm Socket + Ratchet/Wrench 5mm Socket + Ratchet/Wrench
Shelby GT500 Front Fascia Conversion Kit (05-09 All) Item #53611 Installation Time: 1 Day Required tools: Phillips Screw driver 10mm Socket + Ratchet/Wrench 8mm Socket + Ratchet/Wrench 5mm Socket + Ratchet/Wrench
The 72 Plant Vertical Garden.
 Food Living Outside Play Technology Workshop The 72 Plant Vertical Garden by LancePenney on December 30, 2011 Table of Contents The 72 Plant Vertical Garden 1 Intro: The 72 Plant Vertical Garden 2 Step
Conversion of a Turnigy 9X to Hall effect sensors
 Conversion of a Turnigy 9X to Hall effect sensors Because English is not my mother language I kindly ask to be gracious. Unfortunately I had several times some problems with the low quality potentiometers
Headlamp Adjusters motorised conversion by: Ant (Banjo1981)
") Headlamp Adjusters motorised conversion by: Ant (Banjo1981) What you will need: E30 adjuster switch assembly E30 Headlight adjusters E36 Adjuster motors (pref with the plugs still attached) Variable resistor
Headlamp Adjusters motorised conversion by: Ant (Banjo1981) What you will need: E30 adjuster switch assembly E30 Headlight adjusters E36 Adjuster motors (pref with the plugs still attached) Variable resistor
MGB V8 Roadster restoration project Report 138
 24th May 2017. FITTING THE CARPETS - continued I have included quite a lot of detail and photographs on the carpet and trim fitting, as it may help those who decide to do this job on their own car. The
INSTALLATION INSTRUCTIONS
 Qi Wireless Charging Installer Kit (Kit # FDMC-1210) INSTALLATION INSTRUCTIONS Please read thoroughly before starting installation and check that kit contents are complete. Items Included in the Kit: Qi
Water-Gauge, Water Level Test Valve and Boiler Blow Down Valve
 Water-Gauge, Water Level Test Valve and Boiler Blow Down Valve Troubles from the get go on the water gauge. While modeling the upper fitting for the water gauge I encountered a problem with the side hole
Harley Davidson Ultra Fairing Install on a 2003 RoadStar by Bennie Scarbrough (Basshawk84)
") Harley Davidson Ultra Fairing Install on a 2003 RoadStar by Bennie Scarbrough (Basshawk84) There is probably a dozen different ways to go about mounting this fairing on the bike. This is just the way that
Harley Davidson Ultra Fairing Install on a 2003 RoadStar by Bennie Scarbrough (Basshawk84) There is probably a dozen different ways to go about mounting this fairing on the bike. This is just the way that