BMW Z3 E36 Outside Wing Door Mirror Roadster Coupe Corroded Snapped Spindle Repair Fix Kit Installation Guide Instructions
|
|
|
- Prudence Conley
- 5 years ago
- Views:
Transcription


1 BMW Z3 E36 Outside Wing Door Mirror Roadster Coupe Corroded Snapped Spindle Repair Fix Kit Installation Guide Instructions by x8rltd on August 6, 2015 Intro: BMW Z3 E36 Outside Wing Door Mirror Roadster Coupe Corroded Snapped Spindle Repair Fix Kit Installation Guide Instructions The Problem The OEM mirror base and internal pillar are made from cast aluminium; these corrode and eventually the pillar snaps rendering the mirror useless. It is a very common fault with Z3 models for the wing mirror base to corrode and spoil the appearance of the mirror. This connects to the internal pillar/ spindle / frame, within the mirror which also corrodes and eventually snaps leaving your mirror hanging redundant. This spindle is also the mechanism that allows you to fold in the mirrors. The original base and spindle is made from cast aluminium, this is a poor quality cast and material for the environment in which the part is fitted, inevitably these components will oxidize / rust and snap. Previously the only option was to replace the complete mirror at vast expense from BMW. This causes further issues of colour matching and respraying to match your vehicle. The OEM part will also have the same internals which would just fail again. Symptoms of the fault Oxidised mirror base, snapped mirror spindle, mirror and base snapped and no longer joined leaving the mirror hanging. Vehicles affected and compatibility Z3 E36 E37 E Roadster and Coupe. Part numbers: Mirror component part numbers: , , , , , , , , , , , , , , , , , , , , , , , , , , , Our solution Fit our improved design replacement glass fiber strengthened mirror spindle and base unit and fix your mirror for the life of the vehicle. Replace your oxidized mirror base and snapped mirror spindle with our glass fiber strengthened plastic base and spindle. This can be fitted extremely quickly to your current wing mirror repairing it for the life of your vehicle. Our repair saves the cost of a new mirror / colour matching of the new mirror, which would just fail again because of the quality of the original aluminium parts. Our spindle operates in the same way as the original allowing you to fold in / out the mirrors with no danger of snapping or corrosion. The material of our item has been very carefully chosen to suit the strength and weatherproof properties needed to last the life of the vehicle. The base of our item can be painted to match the vehicle or left in the black finish shown, either way looking far superior to a corroded aluminium part. Replace just the parts that fail within the mirror and restore for life, our item comes fully constructed and can be fitted very quickly using our video and pictorial guides. Our kit 1x Constructed pillar and base unit as shown, featuring stainless steel sleeve, ring block, spring and fitting screws.


2 Step 1: Remove the mirror glass Clamp the mirror unit down to stop it moving around. If clamping in a vice be sure to use soft jaws. To remove the mirror glass you will need a small plastic pry bar or a flat blade screwdriver, take care not to damage the glass. Adjust the mirror glass so you re able to slot the pry bar under the glass and gently lever it back until you see the mirror pop off. Sometimes it only pops off on one side, if this happens move the pry bar to the side that s still attached and lever it off there also. Step 2: Remove the mirror cover Once the glass is removed you will see four T10 Torx screws, remove these. Once removed you will be able to lift both covers off of the mirror spindle.


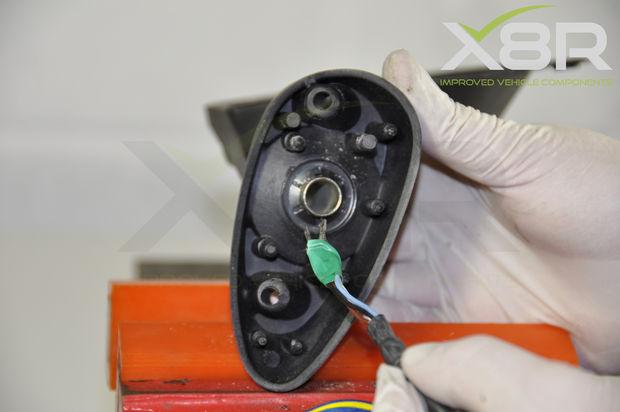
3 Step 3: Remove the servo motor form the mirror spindle Remove the four screws and detach the servo motor. On the back of the motor there are 4 wires which you need to remove, these four wires just pull out of the motor. Remove the wires by attaching pliers to the spade end and pulling, do not pull on the wires as the wires may separate from the spade connector. When all four wires are removed the motor is free to be removed from its casing.


4 Step 4: Remove the wiring from the mirror spindle and base. Remove the wiring from the spindle and base. The wiring can be pulled out from the spindle/base, be careful as there are a few places the wiring can snag. Remove the rubber seal from the base, this pulls off. The seal will normally be very dirty or have bits of paint attached to it. It's good practice to give the rubber seal a good clean so as when it comes to refitting it will sit correctly on the new base.


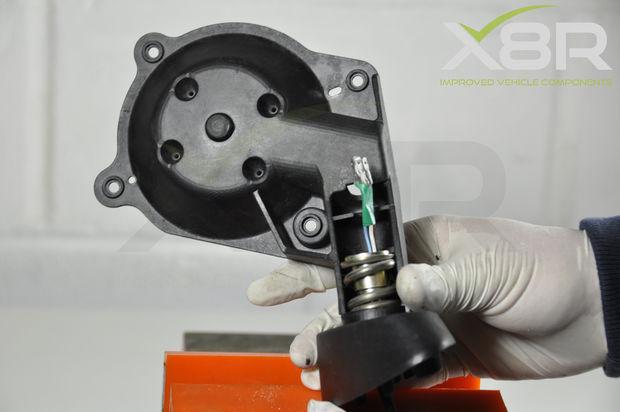
5 Step 5: Fit the wiring in to the new mirror base/spindle Before fitting the wiring in to our new base/spindle wrap the tip of the wiring in a little bit of tape. This will allow you to feed the wiring through the base/spindle easier. Slot the connector end of the wiring that you have just taped up through the base of the mirror and up until you see another cut away, push through the cut away, this will allow the wiring to go through to where the motor sits.


6


7 Step 6: Fit the servo motor The servo motor should be orientated on the spindle so as the writing on the back of the motor is the correct way up. Unwrap and push the wires in to their designated slots on the motor, making sure the connector is fully inserted. The text on the rear of the motor indicates which colour wire to connect to each slot. Once all four wires are in place you can slide the motor into position on the spindle. Once you have the motor in place fasten with the 4x screws.


8 Step 7: Fit the wing mirror cover Lay the back mirror cover down, slot the spindle in the cover making sure the tabs on the cover line up. Slot the top section of the mirror cover on top, making sure the tabs and screw holes line up. Take a look around the mirror covers to check they are lined up correctly, there shouldn't be any gaps all the way around. Screw the four T10 torxs in.


9 Step 8: Fit the mirror glass and base seal Line up the mirror on to the servo motor and click back in to position. Once it has clipped back into place you'll be able to move the glass side to side up and down. Fit the rubber seal on the bottom of the mirror base.


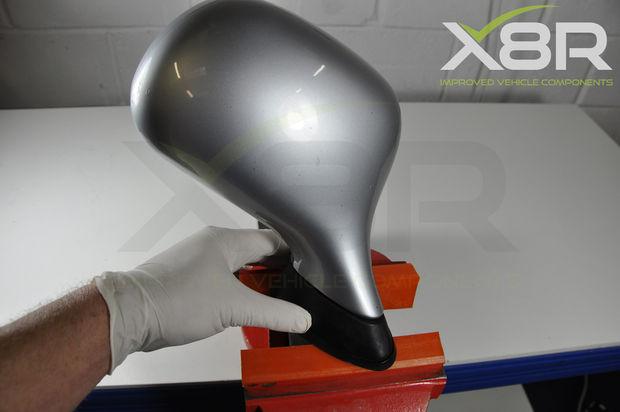
10 Step 9: The finished wing mirror You can now refit the mirror to the vehicle. If you need any further guidance on this install or would like to purchase the parts shown please call us on or us at Please also check out our instruction guide on YouTube. Installation is carried out at installers risk, if unsure please contact us or a professional, X8R Ltd cannot be held responsible for any adverse result of installing this product or any injuries caused by install, if in doubt ask a professional. All images and texts are copyright X8R Ltd 2013.


11 Advertisements
Audi A4 S4 RS4 B6 B7 8E SEAT Exeo ST 3R5 Glove Box Lid Hinge Snapped Broken Repair Fix Kit Brackets Install Instruction Guide
 Audi A4 S4 RS4 B6 B7 8E SEAT Exeo ST 3R5 Glove Box Lid Hinge Snapped Broken Repair Fix Kit Brackets Install Instruction Guide by x8rltd on September 8, 2015 Intro: Audi A4 S4 RS4 B6 B7 8E SEAT Exeo ST
y Handbrake Lever Release Soft Feel Parking Hand Park Brake Mechanism Replacement New Cable Repair Fix Install Instruc
 instructables Ford S-Max Galaxy Handbrake Lever Release Soft Feel Parking Hand Park Brake Mechanism Replacement New Cable Repair Fix Install Instruction Guide by x8rltd The Problem The handbrake lever
Mercedes Benz V6 M272 and V8 M273 Intake Inlet Manifold Air Flap Runner Lever Repair Kit Install Instructions Guide
 Mercedes Benz V6 M272 and V8 M273 Intake Inlet Manifold Air Flap Runner Lever Repair Kit Install Instructions Guide by x8rltd on August 18, 2016 Intro: Mercedes Benz V6 M272 and V8 M273 Intake Inlet Manifold
Vauxhall Vectra C and Signum Front Windscreen Wiper Linkage Mechanism Push Rod Arms Repair Kit Install Instructions Guide
 Vauxhall Vectra C and Signum 2005-2009 Front Windscreen Wiper Linkage Mechanism Push Rod Arms Repair Kit Install Instructions Guide by x8rltd on July 22, 2016 Intro: Vauxhall Vectra C and Signum 2005-2009
Mercedes Comand Controller Rotary Wheel Scroll Knob Switch Button Unit Shaft Repair Fix Kit Install Instructions Guide
 instructables Mercedes Comand Controller Rotary Wheel Scroll Knob Switch Button Unit Shaft Repair Fix Kit Install Instructions Guide by x8rltd Mercedes Comand Controller Rotary Wheel Scroll Knob Switch
es Benz Keyless Go Entry Door Exterior Handle Push Lock Button Square Cover Rubber Plastic Repair Kit Install Instructions:
 instructables Mercedes Benz Keyless Go Entry Door Exterior Handle Push Lock Button Square Cover Rubber Plastic Repair Kit Install Instructions by x8rltd The Problem It is common for the Keyless Go door
Mercedes Benz V6 M272 and V8 M273 Intake Inlet Manifold Air Flap Runner Lever Repair Instructions
 Mercedes Benz V6 M272 and V8 M273 Intake Inlet Manifold Air Flap Runner Lever Repair Instructions Introduction The Problem A plastic lever on the intake manifold snaps which leads to malfunction of the
Peugeot 106 Citroen Saxo Gear Linkage Push Rods 3pc kit with grease seals x 2452/e1 Repair Fix Kit Instruction Install Guide
 Peugeot 106 Citroen Saxo Gear Linkage Push Rods 3pc kit with grease seals 245283 + 2 x 2452/e1 Repair Fix Kit Instruction Install Guide by x8rltd on August 6, 2015 Intro: Peugeot 106 Citroen Saxo Gear
Universal Bosch Common Rail CP1 High Pressure Fuel Pump O-Rings Seal Seals Repair Fix Kit Leaks Instructions Install Guide
 Universal Bosch Common Rail CP1 High Pressure Fuel Pump O-Rings Seal Seals Repair Fix Kit Leaks Instructions Install Guide by x8rltd on February 25, 2016 Intro: Universal Bosch Common Rail CP1 High Pressure
Volkswagen VW New Beetle Golf Mk4 Jetta Bora 1J Glove Box Not Latching Dropping Down Lid Repair Fix Kit Instruction Install Guide
 Volkswagen VW New Beetle Golf Mk4 Jetta Bora 1J Glove Box Not Latching Dropping Down Lid Repair Fix Kit Instruction Install Guide by x8rltd on November 6, 2015 Intro: Volkswagen VW New Beetle Golf Mk4
Please check the part number on your compressor before ordering, we cannot confirm with 100% certainty from vehicle make / model.
 VW Audi Seat Skoda Air Conditioning Compressor Pump Clutch Hub Plate Disc 5N0820803, 5N0820803A, 5N0820803E, 5K0820803A Repair Fix Kit Instructions Install Guide by x8rltd on July 27, 2016 Intro: VW Audi
Audi VW 2.0 TFSI T FSI Inlet Intake Manifold Swirl Flap Runner Delete Repair Kit Plate Blanks Install Instruction Guide
 instructables Audi VW 2.0 TFSI T FSI Inlet Intake Manifold Swirl Flap Runner Delete Repair Kit Plate Blanks Install Instruction Guide by x8rltd Audi VW 2.0 TFSI T FSI Inlet Intake Manifold Swirl Flap Runner
Pierburg Intake Inlet Manifold Swirl Flap Blank Blanking Removal Repair Kit De-flap Kit Caps Delete Bungs
 Pierburg Intake Inlet Manifold Swirl Flap Blank Blanking Removal Repair Kit De-flap Kit Caps Delete Bungs by x8rltd on February 23, 2016 Intro: Pierburg Intake Inlet Manifold Swirl Flap Blank Blanking
Bosch CP1 Pump Seal Replacement Instructions
 Bosch CP1 Pump Seal Replacement Instructions Introduction The Problem It is a common fault for the seals, gaskets and orings to deteriorate within the CP1 fuel pump leading to leaks around the pump. These
Hitachi EAS Air Compressor Piston Seal Repair Kit Instructions
 Hitachi EAS Air Compressor Piston Seal Repair Kit Instructions Introduction Is your vehicles air suspension rising slowly, noisily, or perhaps failing to rise at all? EAS Amber light lit, Fault code C1A20,
Audi VW 2.0 TFSI T FSI Inlet Intake Manifold Swirl Flap Runner Delete Repair Kit Plate Blanks
 Audi VW 2.0 TFSI T FSI Inlet Intake Manifold Swirl Flap Runner Delete Repair Kit Plate Blanks Introduction Runner flaps fitted within the inlet manifold on Audi and VW 2.0 TFSI vehicles restrict airflow
Mercedes Benz ABC Hydraulic Valve Block Solenoid Oil Seal Repair Fix Rebuild Kit Seals O-Rings Overhaul Install Instructions
 instructables Mercedes Benz ABC Hydraulic Valve Block Solenoid Oil Seal Repair Fix Rebuild Kit Seals O-Rings Overhaul Install Instructions by x8rltd The Problem Vehicle sags on one or more corner after
Audi VW 2.0 TFSI T FSI Inlet Intake Manifold Swirl Flap Runner Delete Repair Kit Plate Blanks
 Audi VW 2.0 TFSI T FSI Inlet Intake Manifold Swirl Flap Runner Delete Repair Kit Plate Blanks Introduction Runner flaps fitted within the inlet manifold on Audi and VW 2.0 TFSI vehicles restrict airflow
AT Skoda VW VAG 2.0 TDI Intake Inlet Manifold Flap Actuator Motor Repair Bracket P2015 Error Fix Kit Install Instruction Guide
 instructables Audi SEAT Skoda VW VAG 2.0 TDI Intake Inlet Manifold Flap Actuator Motor Repair Bracket P2015 Error Fix Kit Install Instruction Guide by x8rltd The Problem P2015 error caused by over rotation
Instructions for Anti Shudder Valve Type EGR. Introduction
 BMW EGR Valve Delete Instructions for Anti Shudder Valve Type EGR Introduction These instructions show how to install our BMW EGR Delete for EGRs fitted with an anti shudder valve, for all other elements
Audi VW Seat Skoda 2.0 TFSI PCV Valve Delete Removal Plate Instructions
 Audi VW Seat Skoda 2.0 TFSI PCV Valve Delete Removal Plate Instructions Introduction, A diaphragm splits or deteriorates within the PCV unit causing vehicle faults. Symptoms of fault Poor MPG, rough idle,
i TDI CRDI CRTD CDI VDO Siemens Throttle Body Flap Actuator Air Delivery New Gear Repair Kit Fix Overhaul Replacement
 instructables Audi Seat Skoda VW Kia Hyundai TDI CRDI CRTD CDI VDO Siemens Throttle Body Flap Actuator Air Delivery New Gear Repair Kit Fix Overhaul Replacement Install Instructions Guide by x8rltd The
Fitting our replacement door lock springs Land Rover Discovery 1 Range Rover Classic FRONT DOORS
 Fitting our replacement door lock springs Land Rover Discovery 1 Range Rover Classic FRONT DOORS by x8rltd on May 23, 2014 Intro: Fitting our replacement door lock springs Land Rover Discovery 1 Range
INSTRUMENT PANEL WARPAGE REPAIR
 PAGE 1 OF 15 AFFECTED VEHICLES: INSTRUMENT PANEL WARPAGE REPAIR ALL 1999-2000 MODEL YEAR CONTOUR AND MYSTIQUE OVERVIEW NOTE! Revisions to the technical instructions are indicated in RED text. This document
INSTALLATION INSTRUCTIONS JEEP 2011-UP JK SECURITY FULL CONSOLE #274
 INSTALLATION INSTRUCTIONS JEEP 2011-UP JK SECURITY FULL CONSOLE #274 PARTS CHECKLIST Tuffy Console #9 Left Front Mounting Bracket #10 Right Front Mounting Bracket #11 Electronics mounting bracket #12 Divider
FITTING OF (WESTFALIA) REMOVABLE TOWBAR ON SKODA OCTAVIA WITHOUT TOWBAR PREPARATION (04/11/16 CJ v1.0)
 REMOVABLE TOWBAR ON SKODA OCTAVIA WITHOUT TOWBAR PREPARATION (04/11/16 CJ v1.0)") FITTING OF (WESTFALIA) REMOVABLE TOWBAR ON SKODA OCTAVIA 2013+ WITHOUT TOWBAR PREPARATION (04/11/16 CJ v1.0) A. INTRO ALL STEPS COMPLETED AT YOUR OWN RISK! I AM NOT LIABLE FOR ANY LOSS OR DAMAGE! These
FITTING OF (WESTFALIA) REMOVABLE TOWBAR ON SKODA OCTAVIA 2013+ WITHOUT TOWBAR PREPARATION (04/11/16 CJ v1.0) A. INTRO ALL STEPS COMPLETED AT YOUR OWN RISK! I AM NOT LIABLE FOR ANY LOSS OR DAMAGE! These
BMW 3Series (E46) Installation Guide StealthOne Version 1.6
 Installation Guide StealthOne Version 1.6") BMW 3Series (E46) Installation Guide StealthOne Version 1.6 Copyright Fontana Enterprises, 2008 All rights reserved. Product Information Copyright Copyright Fontana Enterprises, 2008 All rights reserved.
BMW 3Series (E46) Installation Guide StealthOne Version 1.6 Copyright Fontana Enterprises, 2008 All rights reserved. Product Information Copyright Copyright Fontana Enterprises, 2008 All rights reserved.
BMW 7 Series (E38) Installation Guide StealthOne Version 1.6
 Installation Guide StealthOne Version 1.6") BMW 7 Series (E38) Installation Guide StealthOne Version 1.6 Copyright Fontana Enterprises, 2008 All rights reserved. Product Information Copyright Copyright Fontana Enterprises 2008 All rights reserved.
BMW 7 Series (E38) Installation Guide StealthOne Version 1.6 Copyright Fontana Enterprises, 2008 All rights reserved. Product Information Copyright Copyright Fontana Enterprises 2008 All rights reserved.
Current Range Rover Sport STRUT Collection Installation Manual
 2014 - Current Range Rover Sport STRUT Collection Installation Manual 1 1. Removing Main Grille and Lower Fascia 1.1 Run a line of low tack masking tape across the front of the bumper below the grille
Installation instructions for Alpha Racing Quickshifter/Blipper for a pre-2014 S1000RR
 Skill Level: Intermediate Installation instructions for Alpha Racing Quickshifter/Blipper for a pre-2014 S1000RR Tools Required: Alen keys/socket/drivers Torx keys/sockets/drivers Metric box wrenches and
2015 Copyright Maxspeed-Motorsports.com
 1 Porsche PCM 3.1 Backup Camera Installation Instructions. Thank you for purchasing your product at www.maxspeedmotorsports.com Before you start please understand that these installation instructions are
MK7 GTI Electronic Folding Mirror Conversion
 MK7 GTI Electronic Folding Mirror Conversion 01 Mirror and Switch Installation 1. Using a soft pry tool remove the trim panel on the driver side door handle. 02 2. Remove 2 T-30 torx screws. 03 3. On the
INSTALLATION INSTRUCTIONS
 INSTALLATION INSTRUCTIONS FUEL PUMP SLEEVE INSTALLATION KIT 2001-2006 BMW E46 M3 Document# 19-0058 Customer Support: info@radiumauto.com 1. There are 2 common ways to relieve fuel pressure on the BMW.
Headliner: Service and Repair Headliner Removal/Installation
 2006 Acura Truck MDX V6-3.5L Copyright 2013, ALLDATA 10.52 Page 1 Headliner: Service and Repair Headliner Removal/Installation Special Tools Required KTC trim tool set SOJATP2014 * * Available through
Installation Manual TWM Performance Short Shifter Cobalt SS/SC, SS/TC, HHR SS, Ion Redline and Saab 9-3
 Page 1 Installation Manual TWM Performance Short Shifter Cobalt SS/SC, SS/TC, HHR SS, Ion Redline and Saab 9-3 Please Note: It is preferable to park on a flat surface, as you will have to engage and disengage
Installation Instructions
 Instructions Created by an: Suzuki Samurai Door-less Mirror and Light Mount by Low Range Off-Road (SKU# SEB-LR-DMB) Installation Instructions CAUTION: Safety glasses should be worn at all times when working
INSTALLATION INSTRUCTIONS
 INSTALLATION INSTRUCTIONS FUEL SURGE TANK INSTALLATION KIT 1999-2006 BMW E46 COUPE Document# 19-0056 Support: info@radiumauto.com Note: This kit was designed for a standard single pump Radium Engineering
Installation Manual TWM Performance Short Shift Kit 2006 and up Toyota Yaris
 Installation Manual TWM Performance Short Shift Kit 2006 and up Toyota Yaris 1. Unscrew the shift knob by rotating counter clockwise. 2. Remove the carpet or mat at the bottom of the cup holder at the
REARVIEW MIRROR AND BACKUP CAMERA KIT
 REARVIEW MIRROR AND BACKUP CAMERA KIT P/N 2881483 APPLICATION Verify accessory fitment at Polaris.com. BEFORE YOU BEGIN Read these instructions and check to be sure all parts and tools are accounted for.
How To: Replace Brembo front discs & pads
 How To: Replace Brembo front discs & pads Necessary Tools required Good quality socket set. T55 Torx/spline bit of very good quality. T30 Torx/spline bit. T27 Torx /spline bit WD40 Mallet. Punch. Brake
List of parts needed below. Tools needed
 1 BMW 645 Coolant leak repair (Cap with Seal Repair and Expanding Coolant Pipe Installation w Pics) By Michael R. Brown (Estimated time to complete the job is 6-8 hrs) List of parts needed below. BMW PART
Depress each tab as you pull the bezel off. The bezels are tight. L.H. shown.
 2013-2014 Ford Mustang V6 & Boss 302 Lower Valance Fog Light Kit Parts List: Quantity: Tool List: Fog light & bulb with bracket 2 Flat head & Phillips screwdriver Black bezels 2 Ratchet & Socket set OR
3M Overhaul Service Kit
 SERVICE INSTRUCTIONS FOR 3M 12,000 RPM 5 in. (127 mm) and 6 in. (150 mm) RANDOM ORBITAL SANDERS 3M Overhaul Service Kit The part number 20347, 3M Overhaul Service Kit, contains all the replacement parts
Agilent G1554A On-Column Capillary Inlet with EPC
 Agilent G1554A On-Column Capillary Inlet with EPC 6890 Gas Chromatograph Installation Guide Agilent Technologies Notices Agilent Technologies, Inc. 2002 No part of this manual may be reproduced in any
Installation Instructions
 86-95 Suzuki Samurai Hood Latch & Release Cable (SKU# SEB- HLCK) Installation Instructions Note: S u z u k i h a s upgraded both of these parts and they will not work with the hood latches and release
Installation Instructions Supertop for Truck
 Installation Instructions Supertop for Truck Vehicle Application: Ford F-150 5.5 Ft. Styleside 2004 and newer Part Number: 76309 www.bestop.com - We re here to help! Visit our web site and click on Ask
Remove the 3-11mm nuts holding mirror on. Don t drop the nuts!
 2005-2012 Ford Mustang Puddle Lamp Kit Parts List: Quantity: Tool List: LED Lamps 2 Flat head screwdriver Seals 2 Ratchet & Socket set OR Nuts 2 Adjustable Wrench Wiring harness 1 Drill & 11/16 th bit
Installation Manual TWM Performance Short throw shifter 2001 and up Hyundai Accent
 Installation Manual TWM Performance Short throw shifter 2001 and up Hyundai Accent 1. Place the vehicle on a flat surface with blocks in front and behind the wheels preventing unwanted movement. The car
Z-Truck (Vertical Moving) Z-truck Flag. Y-Truck (Horizontal Moving) FIGURE 1: VIEW OF THE Z-TRUCK. Flexshaft Assembly
 Z-truck Flag. Y-Truck (Horizontal Moving) FIGURE 1: VIEW OF THE Z-TRUCK. Flexshaft Assembly") Checking and Replacing the AC Motor To remove and replace the AC Motor you will need the following tools: #2 Phillips screwdriver (magnetic tip preferred) Removing the AC Motor 1. Ready the machine by
Checking and Replacing the AC Motor To remove and replace the AC Motor you will need the following tools: #2 Phillips screwdriver (magnetic tip preferred) Removing the AC Motor 1. Ready the machine by
Fabric Replacement Top Installation Instructions
 Fabric Replacement Top Installation Instructions For: GEO Tracker, Suzuki Sidekick & Vitara 1986-1994 Parts List Top, Soft (1) Rear Window (1) WARNING This product is designed to enhance the appearance
Last Revision: 30JN THRU 1979 C3 CORVETTE STANDARD (NON-ADJUSTABLE) STEERING COLUMN DISASSEMBLY & REPAIR INSTRUCTIONS PAPER #2
 STEERING COLUMN DISASSEMBLY & REPAIR INSTRUCTIONS PAPER #2") Last Revision: 30JN2007 1969 THRU 1979 C3 CORVETTE STANDARD (NON-ADJUSTABLE) STEERING COLUMN DISASSEMBLY & REPAIR INSTRUCTIONS PAPER #2 Disassembly and Repair Instructions Addressed in this Paper Degree
Last Revision: 30JN2007 1969 THRU 1979 C3 CORVETTE STANDARD (NON-ADJUSTABLE) STEERING COLUMN DISASSEMBLY & REPAIR INSTRUCTIONS PAPER #2 Disassembly and Repair Instructions Addressed in this Paper Degree
GruvenParts.com BRASS GM Power Folding Mirror Gear Replacement Instructions. Updated 8/25/2017 Additional Pictures / Tips Posted!
 Page 1 GruvenParts.com BRASS GM Power Folding Mirror Gear Replacement Instructions Updated 8/25/2017 Additional Pictures / Tips Posted! ** Latest Design is uses an ALL BRASS SPUR GEAR!!! ** ** If you don
Down South Vettes Leather Sun visor Installation Instructions.
 Down South Vettes Leather Sun visor Installation Instructions. Difficulty: 3 out of 5. Time: Plan on about 30 minutes. The tools used are:? A medium blade screw driver? A small flashlight may help get
SHARK UPPER WINDSHIELD FRAME & WINDSHIELD REPLACEMENT. Text and Photos by TOM BENFORD
 Text and Photos by TOM BENFORD I purchased a fathom green 69 big-block tri-power T-top coupe with only 42,000 original miles on it recently. I'm the third owner of the car, and I got it for a very good
Installation Instructions Supertop for Truck
 Installation Instructions Supertop for Truck Vehicle Application: Toyota Tacoma Double Cab 2005 - Current (5 ft.) Part Number: 76308 US Patent 6827391 www.bestop.com - We re here to help! Visit our web
Installation Instructions Supertop for Truck
 Installation Instructions Supertop for Truck Vehicle Application: Ford F-150 Regular / Super Cab 2004 2011 (6.5 ft.) Part Number: 76305 US Patent 6827391 www.bestop.com - We re here to help! Visit our
A Fitting Guide for the Forge Motorsport Front Mounting Intercooler for the BMW Mini Cooper S Turbo R56 Models
 A Fitting Guide for the Forge Motorsport Front Mounting Intercooler for the BMW Mini Cooper S Turbo R56 Models (A copy of this guide is available online, in the media section of our website) A general
1. Front Fascia Removal 1.1 Remove the 6 plastic clips that secure the upper valance, then remove. 1.2 Remove 6 upper bolts that hold the grille and f
 STRUT 2015 GMC Denali Collection Installation Manual " 1. Front Fascia Removal 1.1 Remove the 6 plastic clips that secure the upper valance, then remove. 1.2 Remove 6 upper bolts that hold the grille and
Installation Manual TWM Performance Short Shifter 2008 Mitsubishi Lancer
 Page 1 Installation Manual TWM Performance Short Shifter 2008 Mitsubishi Lancer Please Note: It is preferable to park on a flat surface, as you will have to engage and disengage the hand brake and shift
Tru-Billet Climate Control Knob Installation Instructions
 P/N S197-525-07 2007-08 Tru-Billet Climate Control Knob Installation Instructions Thank you for your purchase of SilverHorse Racing products. Please read all directions before beginning the installation.
Fitment Guide Volkswagen Golf GTI MK V1.0
 Fitment Guide Volkswagen Golf GTI MK6 2010 V1.0 www.ecliptech.com.au You need 3 wires to fit the Shift-I to the GTI. Power and Ground from the diagnostics port (near driver s side knee) and the RPM signal
Sensus Connected Touch
 Installation instructions, accessories Instruction No 31350401 Version 1.2 Part. No. 31399164, 31399165, 31399166 Sensus Connected Touch IMG-378798 Volvo Car Corporation Sensus Connected Touch- 31350401
2015 Mustang Lightbar (All Models) CDC#
 CDC#") 2015 Mustang Lightbar (All Models) CDC# 1511-7000-01 Components: 1 CDC Lightbar Note: READ instructions before starting installation!!! CDC Part# Driver side bracket 0511-6001-05 Passenger side bracket
2015 Mustang Lightbar (All Models) CDC# 1511-7000-01 Components: 1 CDC Lightbar Note: READ instructions before starting installation!!! CDC Part# Driver side bracket 0511-6001-05 Passenger side bracket
Installation Instructions Supertop with Tinted Side and Rear Windows
 Installation Instructions Supertop with Tinted Side and Rear Windows Vehicle Application: Jeep Wrangler TJ 1997 2006 Part Number: 54709 www.bestop.com - We re here to help! Visit our web site and click
C15C C15C. Page 1 of 20
 2 x Lid Front Hinge 1135 8 x M8 Bolt 8 x M8 Washer (3mm Thick) 4 x M6 Large washers 4 x M6 Spring washers 4 x M6 x 40mm Bolts 6 x M6 20mm Bolts 6 x M6 Washers 20 x Screws 2 x Lid mount gas strut bracket
2. With the rear door open remove pull-style clip from the passenger side just below the door latch.
 LoD Offroad FJ Cruiser Rear Bumper with Tire Carrier Installation Instructions 1. Begin with removing factory spare from the rear door. 2. With the rear door open remove pull-style clip from the passenger
REAR ROOF SPEAKER KIT
 REAR ROOF SPEAKER KIT P/N 2882876 APPLICATION Verify accessory fitment at Polaris.com. BEFORE YOU BEGIN Read these instructions and check to be sure all parts and tools are accounted for. Please retain
Suzuki Samurai to Toyota Front Spring Swap Kit, with Missing Link Shackles (SKU#SSP-TSFM) Installation Instructions
 Installation Instructions") Suzuki Samurai to Toyota Front Spring Swap Kit, with Missing Link Shackles (SKU#SSP-TSFM) Installation Instructions CAUTION: Safety glasses should be worn at all times when working with vehicles and related
Suzuki Samurai to Toyota Front Spring Swap Kit, with Missing Link Shackles (SKU#SSP-TSFM) Installation Instructions CAUTION: Safety glasses should be worn at all times when working with vehicles and related
Nissan GTR Alpha Fuel System
 Nissan GTR Alpha Fuel System Instructions V5 The goal of AMS is to provide the highest quality, best performing products available. By utilizing research and development, and rigorous testing programs
MAZDA BT-50 (October 2011 Production Onwards) 1 & 3 PIECE HARD TONNEAU REMOTE LOCKING KIT INSTALLATION INSTRUCTIONS
 1 & 3 PIECE HARD TONNEAU REMOTE LOCKING KIT INSTALLATION INSTRUCTIONS") MAZDA BT-50 (October 0 Production Onwards) & 3 PIECE HARD TONNEAU REMOTE LOCKING KIT INSTALLATION INSTRUCTIONS Installation Time: Approx. 0 Minutes Care Instructions: Clean Tonneau Cover with a mild detergent
MAZDA BT-50 (October 0 Production Onwards) & 3 PIECE HARD TONNEAU REMOTE LOCKING KIT INSTALLATION INSTRUCTIONS Installation Time: Approx. 0 Minutes Care Instructions: Clean Tonneau Cover with a mild detergent
Installation Instructions Sailcloth Replace-a-top with Tinted Windows
 Installation Instructions Sailcloth Replace-a-top with Tinted Windows Upper Door Skins not included Vehicle Application Jeep Wrangler (JK) 2 Door 2007 and newer Part Number: 79136 www.bestop.com - We re
Please read thoroughly before starting installation and check that kit contents are complete.
 Rear Vision System Mirror Display 2013-Current Ram (Kit part number 1009-9518) Please read thoroughly before starting installation and check that kit contents are complete. Items Included in the Kit: Rear
Installation instruction do88 performance Intercooler for Volvo S60/V60 T6 MY10-
 Installation instruction do88 performance Intercooler for Volvo S60/V60 T6 MY10-1. This instruction shows how to replace the OEM intercoolers with do88 performance intercoolers. At this type of installation
Mirror Solutions Bevel & Pivot Models Installation Instructions INSTALLATION INSTRUCTIONS. Figure 1
 Installation Instructions Mirror Solutions Bevel & Pivot Models 620095-620098 Mirror Solutions Bevel - Models # 620095 & 620096 Mirror Solutions Pivot - Models # 620097 & 620098 Figure 1 INSTALLATION INSTRUCTIONS
INSTALLATION INSTRUCTIONS
 INSTALLATION INSTRUCTIONS Accessory Application Publications No. AII 24642 BODY SIDE CLADDING 2003 CR-V P/N 08P21-S9A-100 Issue Date OCT 2002 PARTS LIST Right rear bumper piece Right front fender piece
Mustang CDC Lightbar (94-04) - Installation Instructions
 - Installation Instructions") Mustang CDC Lightbar (94-04) - Installation Instructions The below installation instructions work for the following products: Classic Design Concepts Mustang Convertible Lightbar (94-04 Carbon Fiber) Classic
Mustang CDC Lightbar (94-04) - Installation Instructions The below installation instructions work for the following products: Classic Design Concepts Mustang Convertible Lightbar (94-04 Carbon Fiber) Classic
INSTALLATION INSTRUCTIONS
 INSTALLATION INSTRUCTIONS Accessory Application Publications No. AUTOMATIC AII 27160 2005 CR-V Issue Date ATTACHMENT KIT SEP 2004 PARTS LIST Automatic Day/Night Mirror Attachment Kit (sold separately)
INSTALLATION INSTRUCTIONS
 INSTALLATION INSTRUCTIONS FUEL SURGE TANK INSTALLATION KIT 1999-2006 BMW E46 COUPE Document# 19-0056 Support: info@radiumauto.com Note: This kit wasn t designed for a FST-R, but can be accomplished. 1.
2012 SLK V6 (M276 Engine) Spark Plug Replacement
 Spark Plug Replacement") 2012 SLK 350 3.5 V6 (M276 Engine) Spark Plug Replacement Proceed at your own risk. I read the Mercedes repair documents pertaining to changing the R172 SLK M276 V6 engine s spark plugs that I could find
2012 SLK 350 3.5 V6 (M276 Engine) Spark Plug Replacement Proceed at your own risk. I read the Mercedes repair documents pertaining to changing the R172 SLK M276 V6 engine s spark plugs that I could find
Installation Instructions :AUDI 8V RS3 : Page 1
 Installation Instructions :AUDI 8V RS3 : Page 1 1. We will start by removing the stock airbox system. Remove the 2 screws holding the inlet duct in place. Then push the duct into the airbox to release
Installation Instructions Sailcloth Replace-a-top with Tinted Windows
 Installation Instructions Sailcloth Replace-a-top with Tinted Windows Upper Door Skins not included Vehicle Application Jeep Wrangler Unlimited (JK) 4 Door 2007 and newer Part Number: 79137 www.bestop.com
INSTALLATION GUIDE. Doc ID: A Doc Rev:
 REKLUSE MOTOR SPORTS EXP Kit for Harley-Davidson Big Twin Hydraulic-Actuated OVERVIEW INSTALLATION GUIDE Doc ID: 191-6200A Doc Rev: 061215 This kit replaces the OEM clutch pack (friction disks and drive
LEXUS CT 200h ILLUMINATED DOOR SILLS Preparation
 Preparation Part Number: PT922-89100 Kit Contents Item # Quantity Req'd. Description 1 1 Door Sill, Front Right Hand 2 1 Door Sill, Front Left Hand 3 1 Door Sill, Rear Right Hand 4 1 Door Sill, Rear Left
D40C HINGE # x Support Plate x M8 Bolt 8 x M8 Washer 6 x M6 20mm Bolts 6 x M6 Washers 19 x Screws
 HINGE # 1017 2 x Support Plate 1018 8 x M8 Bolt 8 x M8 Washer 6 x M6 20mm Bolts 6 x M6 Washers 19 x Screws 2 x Lid mount gas strut bracket 1041 2 x Self tap strut mount 1040 1 x Central Lock bracket 1510
TIP-OUT GLASS WINDSHIELD KIT
 TIP-OUT GLASS WINDSHIELD KIT P/N 2881108 APPLICATION Verify accessory fitment at Polaris.com. BEFORE YOU BEGIN Read these instructions and check to be sure all parts and tools are accounted for. Please
How to remove 206GTi front bumper ( PVL)
") This is how it looks like with the old grill... and this closer.. Remove the four mushroom clips (holding the plastic grill to the car) by ae second one three ribs to the right of the filler hole, in the
This is how it looks like with the old grill... and this closer.. Remove the four mushroom clips (holding the plastic grill to the car) by ae second one three ribs to the right of the filler hole, in the
English. Fitting Instructions: Trophy and Trophy SE A and A of 10 A Parts Supplied:
 English Fitting Instructions: Trophy and Trophy SE A95086and A950856 Thank you for choosing this Triumph genuine accessory kit. This accessory kit is the product of Triumph's use of proven engineering,
Technical Support (707)
") Installation Instructions CONSOLE MEGASHIFTER Fits: 1982-1992 Camaro & Firebird w/automatic Transmission *except 1988-1992 Firebird Formula Model Catalog # 80692 WORK SAFELY! For maximum safety, perform
Installation Instructions CONSOLE MEGASHIFTER Fits: 1982-1992 Camaro & Firebird w/automatic Transmission *except 1988-1992 Firebird Formula Model Catalog # 80692 WORK SAFELY! For maximum safety, perform
Mustang Clear Lens Instrument Cover (90-93) - Installation Instructions
 - Installation Instructions") Mustang Clear Lens Instrument Cover (90-93) - Installation Instructions The below installation instructions work for the following products: Mustang Clear Lens Instrument Cover (90-93) Please read through
Mustang Clear Lens Instrument Cover (90-93) - Installation Instructions The below installation instructions work for the following products: Mustang Clear Lens Instrument Cover (90-93) Please read through
Top Down Rollstar Shade Installation Instructions
 Top Down Rollstar Shade Installation Instructions Thank you for purchasing your new Rollstar shade. It has been custom-made from the highest quality materials to the dimensions you specified. With proper
R-1125 C HARNESS MOUNT BAR INSTALLATION INSTRUCTIONS Fits C7 Corvette Coupes, including Z06
 R-1125 C HARNESS MOUNT BAR INSTALLATION INSTRUCTIONS Fits C7 Corvette Coupes, including Z06 The R-1125 Harness Mount Bar has been designed and tested to provide a mounting point for the shoulder harness
INSTALLATION INSTRUCTIONS
 INSTALLATION INSTRUCTIONS Accessory Application 2014 CR-V Publications No. AII 49958 Issue Date JULY 2013 PARTS LIST Attachment Kit P/N 08V03-T0A-100 Automatic day/night mirror harness Automatic Day/Night
Installation Instructions Supertop for Truck
 Installation Instructions Supertop for Truck US Patent 6827391 Vehicle Application: Dodge Ram 1500 / 2500 Regular / Quad / Mega Cab 6.5' Bed 2002 2011 Part Number: 76304 www.bestop.com - We re here to
394: Handsfree, Bluetooth Handsfree, Bluetooth
 394: Handsfree, Bluetooth S80 (07-), 2008, B8444S, TF-80SC AWD, L.H.D, YV1AH852881073834, 073834 4/1/2013 PRINT 394: Handsfree, Bluetooth Handsfree, Bluetooth Installation instruction: 31310098 INTRODUCTION
Fitting Instructions For The TDV6 EGR Blanking Kit To A 2006 Model Discovery 3 TDV6 GHSE
 Part Number DA1112 Fitting Instructions For The TDV6 EGR Blanking Kit To A 2006 Model Discovery 3 TDV6 GHSE You do this modification at your own risk. Britpart won t be held responsible for what is written
Brake Upgrade Kit Fitting Instructions Bonneville America
 WARNING: Always have Triumph approved parts, accessories and conversions fitted by a trained technician of an authorised Triumph Dealer. The fitment of parts, accessories and conversions by a technician
Written By: Sam Lionheart
 iphone SE Battery Replacement Replace the battery in your iphone SE. Written By: Sam Lionheart ifixit CC BY-NC-SA www.ifixit.com Page 1 of 24 INTRODUCTION Use this guide to bring life back to an iphone
INSTALLATION GUIDE. KTM RFS Husaberg Polaris 450/525 Outlaw KTM 450/525 XC ATV Manual Revision:
 REKLUSE MOTOR SPORTS The z-start Pro Clutch INSTALLATION GUIDE KTM RFS 03-07 Husaberg Polaris 450/525 Outlaw KTM 450/525 XC ATV 191-833 Manual Revision: 010615 2002 Rekluse Motor Sports Rekluse Motor Sports,
1969 THRU 1982 C3 CORVETTE TILT AND TELESCOPING STEERING COLUMN DISASSEMBLY & REPAIR INSTRUCTIONS PAPER
 Last Revision: 09JA2010 1969 THRU 1982 C3 CORVETTE TILT AND TELESCOPING STEERING COLUMN DISASSEMBLY & REPAIR INSTRUCTIONS PAPER #2 Disassembly and Repair Instructions Addressed in this Paper Degree of
Installation Instructions Fabric Replacement Top with Tinted Side
 Installation Instructions Fabric Replacement Top with Tinted Side and Rear Windows Upper Door Skins not included Vehicle Application Jeep Wrangler Unlimited TJ 2004 2006 Part Number: 79140 www.bestop.com