Mercedes Benz V6 M272 and V8 M273 Intake Inlet Manifold Air Flap Runner Lever Repair Kit Install Instructions Guide
|
|
|
- Derek Butler
- 6 years ago
- Views:
Transcription
1 Mercedes Benz V6 M272 and V8 M273 Intake Inlet Manifold Air Flap Runner Lever Repair Kit Install Instructions Guide by x8rltd on August 18, 2016 Intro: Mercedes Benz V6 M272 and V8 M273 Intake Inlet Manifold Air Flap Runner Lever Repair Kit Install Instructions Guide The Problem A plastic lever on the intake manifold snaps which leads to malfunction of the tumble / swirl flaps and causes vehicle faults. Mercedes-Benz vehicles with the V6 M272 and V8 M273 engines commonly suffer from failure of the intake manifold. These manifolds are fitted with tumble / swirl flaps. The purpose of these is to increase air speed / tumble at low RPM which creates better torque for the motor at low RPM, enhanced fuel economy and reduces emissions. Unfortunately, the design of this mechanism is flawed and commonly fails. Previously necessitating replacement of the complete intake manifold at vast expense. In reality it is only a small part of the manifold that fails due to poor quality construction. On the intake manifold below the secondary air injection pump sits a plastic leverintegral to the manifolds function. As carbon builds up in the inside of the manifold over time this puts more pressure on the air doors / swirl flaps which connect to the lever, this inevitably cracks the plastic lever which is the inferior quality component. This leads to the lever no longer moving the air doors / swirl flaps inside the manifold runners. This is what causes the symptoms noted. Symptoms of the fault Symptoms can include some or all of the below: Check engine light (CEL) is lit / on with P code P2004, P2005 or P2006 stored in the system. Engine control module has stored pending codes for intake manifold, air flap or runner control system. Error messages; tumble flap stuck in activated position, intake manifold runner control stuck closed. Emissions test failure. Poor idle, loss of power, delayed acceleration, increased fuel consumption. To diagnose this fault; you can visually inspect the manifold, remove engine covers and inspect intake manifold from above, using a torch you should be able to see down the front of the manifold and see if the lever is damaged. Vehicles affected and compatibility This information should be used for guidance only, please inspect the intake manifold to ensure the lever is the fault: Mercedes C , 2007 Mercedes C 230 4MATIC Sedan 2008, 2009, 2010, 2011, 2012 Mercedes C 230 RWD Sedan 2008, 2009, 2010, 2011, 2012 Mercedes C 230 Sedan 2006, 2007, 2008, 2009, 2010, 2011 Mercedes C 250 4MATIC Sedan 2008, 2009, 2010, 2011, 2012 Mercedes C 250 RWD Sedan 2008, 2009, 2010, 2011, 2012 Mercedes C 250 Sedan 2008, 2009, 2010, 2011 Mercedes C 280 4MATIC Sedan 2006, 2007, 2008, 2009, 2010, 2011, 2012 Mercedes C 280 RWD Sedan 2006, 2007, 2008, 2009, 2010, 2011, 2012 Mercedes C 280 Sedan 2006, 2007, 2008, 2009, 2010, 2011 Mercedes C 300 4MATIC Sedan 2008, 2009, 2010, 2011, 2012 Mercedes C 300 RWD Sedan 2008, 2009, 2010, 2011, 2012 Mercedes C 300 Sedan 2008, 2009, 2010, 2011 Mercedes C 350 4MATIC Sedan 2006, 2007, 2008, 2009, 2010, 2011 Mercedes C 350 RWD Sedan 2006, 2007, 2008, 2009, 2010, 2011 Mercedes C 350 Sedan 2006, 2007, 2008, 2009, 2010, 2011 Mercedes CLC Mercedes CLK 350 Convertible 2006, 2007, 2008, 2009 Mercedes CLK 350 Coupe 2006, 2007, 2008, 2009 Mercedes E 280 4MATIC Sedan 2007, 2008, 2009 Mercedes E 280 RWD Sedan 2007, 2008, 2009 Mercedes E 350 4MATIC Sedan 2006, 2007, 2008, 2009, 2010, 2011
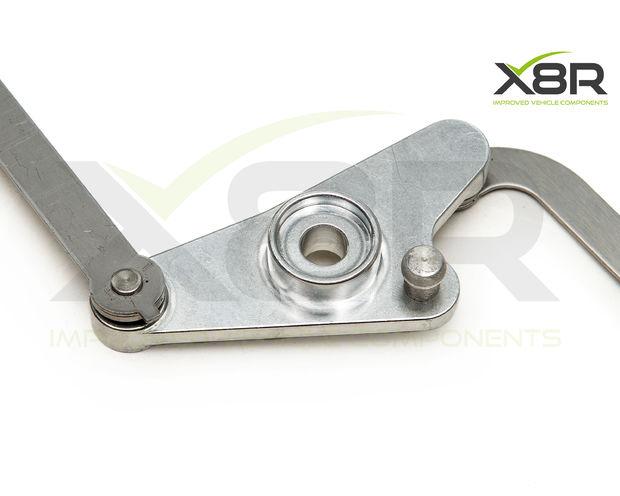
2 Mercedes E 350 4MATIC Wagon 2005, 2006, 2007, 2008, 2009, 2011 Mercedes E 350 Convertible 2011 Mercedes E 350 Coupe 2010, 2011 Mercedes E 350 RWD Sedan 2006, 2007, 2008, 2009, 2010, 2011 Mercedes E 350 RWD Wagon 2005, 2006, 2007, 2008, 2009, 2011 Mercedes E 350 Sedan 2006, 2007, 2008, 2009, 2010, 2011 Mercedes E 350 Wagon 2006 Mercedes GL Mercedes GLK , 2010, 2011, 2012 Mercedes GLK 350 4MATIC 2009, 2010, 2011, 2012 Mercedes GLK 350 RWD 2009, 2010, 2011, 2012 Mercedes ML , 2011 Mercedes ML , 2010, 2011 Mercedes ML 350 4MATIC 2005, 2006, 2007, 2008, 2009, 2010, 2011 Mercedes ML 350 RWD 2005, 2006, 2007, 2008, 2009, 2010, 2011 Mercedes ML 450 HYBRID 4MATIC 2010, 2011 Mercedes ML 450 HYBRID RWD 2010, 2011 Mercedes R , 2006, 2007, 2008, 2009, 2010, 2011 Mercedes R , 2006, 2007, 2008, 2009, 2010, 2011 Mercedes R , 2006, 2007, 2008, 2009, 2010, 2011 Mercedes R 350 4MATIC 2005, 2006, 2007, 2008, 2009, 2010, 2011 Mercedes R 350 RWD 2005, 2006, 2007, 2008, 2009, 2010, 2011 Mercedes S 400 HYBRID Sedan 2010, 2011, 2012 Mercedes SLK 280 Convertible 2006, 2007, 2008, 2009, 2010, 2011 Mercedes SLK 300 Convertible 2006, 2007, 2008, 2009, 2010, 2011 Mercedes SLK 350 Convertible 2005, 2006, 2007, 2008 Mercedes-Benz V6 M272 and V8 M273 engines only. Associated part numbers: , , , , , , , , , , , , , A , A , A , A , A , A , A , A Our solution Install our metal replacement lever and restore full function to the intake manifold, avoid the cost of a complete new manifold. An improved design part which won t fail. Mercedes-Benz solution to this common fault is to replace the complete intake manifold, not only is this extremely expensive but also a replacement manifold will have the same plastic lever which would just fail again. Our solution allows you to replace just the lever that fails. Our replacement lever is precision machined from high quality billet aluminium, meaning it will never fail like the OEM part. We provide this at a massive saving compared to a complete new manifold which would just fail again. Our part is perfectly machined to fit in the same way as the OEM part and takes moments to exchange once the manifold is removed. Our part will restore full function to the mechanism, check out our videos and instructions. We also include a repair for the vacuum actuator arm in case the original has snapped or the ball joint has worn. You will receive 1x Billet aluminium CNC machined lever 2x Linkage arms 1x Actuator arm repair


3


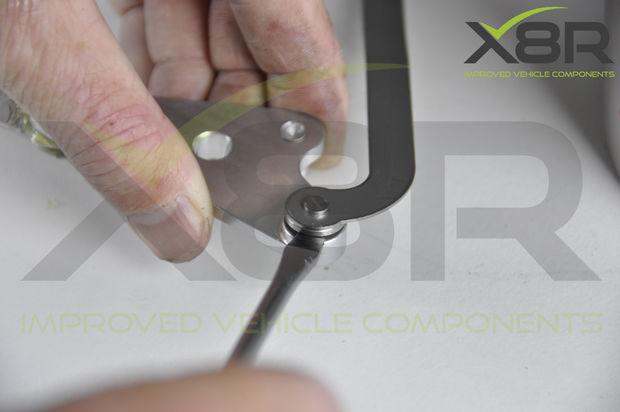
4 Step 1: Remove lever arms and actuator arm ball joint Using a pry tool or flat bladed screw driver gently pry the arms and the actuator ball loose from the lever.


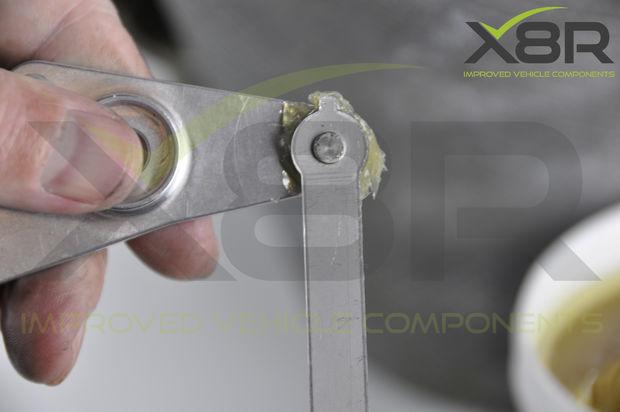
5 Step 2: Remove lever bolt and remove lever Using a T30 Torx screwdriver remove the bolt retaining the lever. Remove the lever and operating arms. Step 3: Grease the ball joints on the new lever and arms Apply a light covering of grease to all ball joints / ball joint receivers on the lever and linkage arms. Do not apply too much grease as this will inhibit fitting.


6


7 Step 4: Mount the new lever Mound the new lever and refasten the bolt. Apply thread lock compound to the bolt thread and torque up to 9nm / 80in lbs.


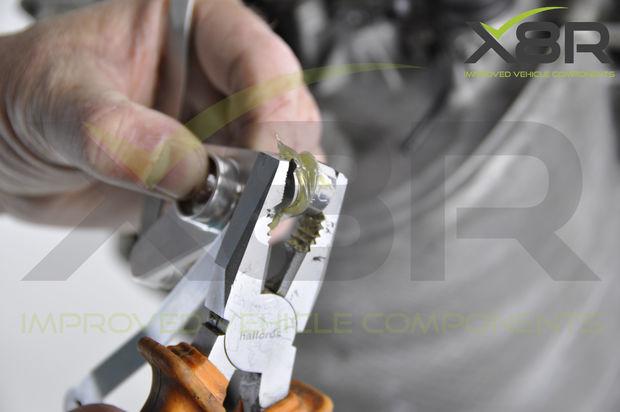
8 Step 5: Press fit linkage arms and actuator arm. Press the linkage arms in to the plastic receivers using a pair of pliers. Press the actuator arm on to the ball joint on the lever. Step 6: Actuator arm repair We also include in our repair kit a replacement actuator arm. This is rarely required as the lever is normally the fault, however on occasions this can snap or the ball joint receiver can wear causing issues. In this instance cut the arm off 25mm from the actuator end of the arm. Fit the new arm over the top and screw tight to fasten.


9 Advertisements Step 7: Test function of the mechanism This completes the repair, test the function of the lever and check all clearances are OK. Before refitting to the vehicle we recommend cleaning the internals of the manifold to remove as much of the carbon build up as possible, this will reduce the strain on the swirl / tumble flaps. Upon refitting the manifold to the vehicle the fault codes will need to be reset. This completes the repair. If you need any further guidance on this install or would like to purchase the parts shown please call us on or us at sales@x8r.co.uk. Please also check out our instruction guide on YouTube. Installation is carried out at installers risk, if unsure please contact us or a professional, X8R Ltd cannot be held responsible for any adverse result of installing this product or any injuries caused by install, if in doubt ask a professional. All images and texts are copyright X8R Ltd 2016
Mercedes Benz V6 M272 and V8 M273 Intake Inlet Manifold Air Flap Runner Lever Repair Instructions
 Mercedes Benz V6 M272 and V8 M273 Intake Inlet Manifold Air Flap Runner Lever Repair Instructions Introduction The Problem A plastic lever on the intake manifold snaps which leads to malfunction of the
Audi VW 2.0 TFSI T FSI Inlet Intake Manifold Swirl Flap Runner Delete Repair Kit Plate Blanks
 Audi VW 2.0 TFSI T FSI Inlet Intake Manifold Swirl Flap Runner Delete Repair Kit Plate Blanks Introduction Runner flaps fitted within the inlet manifold on Audi and VW 2.0 TFSI vehicles restrict airflow
y Handbrake Lever Release Soft Feel Parking Hand Park Brake Mechanism Replacement New Cable Repair Fix Install Instruc
 instructables Ford S-Max Galaxy Handbrake Lever Release Soft Feel Parking Hand Park Brake Mechanism Replacement New Cable Repair Fix Install Instruction Guide by x8rltd The Problem The handbrake lever
BMW Z3 E36 Outside Wing Door Mirror Roadster Coupe Corroded Snapped Spindle Repair Fix Kit Installation Guide Instructions
 BMW Z3 E36 Outside Wing Door Mirror Roadster Coupe Corroded Snapped Spindle Repair Fix Kit Installation Guide Instructions by x8rltd on August 6, 2015 Intro: BMW Z3 E36 Outside Wing Door Mirror Roadster
Mercedes Comand Controller Rotary Wheel Scroll Knob Switch Button Unit Shaft Repair Fix Kit Install Instructions Guide
 instructables Mercedes Comand Controller Rotary Wheel Scroll Knob Switch Button Unit Shaft Repair Fix Kit Install Instructions Guide by x8rltd Mercedes Comand Controller Rotary Wheel Scroll Knob Switch
Pierburg Intake Inlet Manifold Swirl Flap Blank Blanking Removal Repair Kit De-flap Kit Caps Delete Bungs
 Pierburg Intake Inlet Manifold Swirl Flap Blank Blanking Removal Repair Kit De-flap Kit Caps Delete Bungs by x8rltd on February 23, 2016 Intro: Pierburg Intake Inlet Manifold Swirl Flap Blank Blanking
Audi VW 2.0 TFSI T FSI Inlet Intake Manifold Swirl Flap Runner Delete Repair Kit Plate Blanks Install Instruction Guide
 instructables Audi VW 2.0 TFSI T FSI Inlet Intake Manifold Swirl Flap Runner Delete Repair Kit Plate Blanks Install Instruction Guide by x8rltd Audi VW 2.0 TFSI T FSI Inlet Intake Manifold Swirl Flap Runner
Vauxhall Vectra C and Signum Front Windscreen Wiper Linkage Mechanism Push Rod Arms Repair Kit Install Instructions Guide
 Vauxhall Vectra C and Signum 2005-2009 Front Windscreen Wiper Linkage Mechanism Push Rod Arms Repair Kit Install Instructions Guide by x8rltd on July 22, 2016 Intro: Vauxhall Vectra C and Signum 2005-2009
es Benz Keyless Go Entry Door Exterior Handle Push Lock Button Square Cover Rubber Plastic Repair Kit Install Instructions:
 instructables Mercedes Benz Keyless Go Entry Door Exterior Handle Push Lock Button Square Cover Rubber Plastic Repair Kit Install Instructions by x8rltd The Problem It is common for the Keyless Go door
Audi VW 2.0 TFSI T FSI Inlet Intake Manifold Swirl Flap Runner Delete Repair Kit Plate Blanks
 Audi VW 2.0 TFSI T FSI Inlet Intake Manifold Swirl Flap Runner Delete Repair Kit Plate Blanks Introduction Runner flaps fitted within the inlet manifold on Audi and VW 2.0 TFSI vehicles restrict airflow
Volkswagen VW New Beetle Golf Mk4 Jetta Bora 1J Glove Box Not Latching Dropping Down Lid Repair Fix Kit Instruction Install Guide
 Volkswagen VW New Beetle Golf Mk4 Jetta Bora 1J Glove Box Not Latching Dropping Down Lid Repair Fix Kit Instruction Install Guide by x8rltd on November 6, 2015 Intro: Volkswagen VW New Beetle Golf Mk4
AT Skoda VW VAG 2.0 TDI Intake Inlet Manifold Flap Actuator Motor Repair Bracket P2015 Error Fix Kit Install Instruction Guide
 instructables Audi SEAT Skoda VW VAG 2.0 TDI Intake Inlet Manifold Flap Actuator Motor Repair Bracket P2015 Error Fix Kit Install Instruction Guide by x8rltd The Problem P2015 error caused by over rotation
Audi A4 S4 RS4 B6 B7 8E SEAT Exeo ST 3R5 Glove Box Lid Hinge Snapped Broken Repair Fix Kit Brackets Install Instruction Guide
 Audi A4 S4 RS4 B6 B7 8E SEAT Exeo ST 3R5 Glove Box Lid Hinge Snapped Broken Repair Fix Kit Brackets Install Instruction Guide by x8rltd on September 8, 2015 Intro: Audi A4 S4 RS4 B6 B7 8E SEAT Exeo ST
Instructions for Anti Shudder Valve Type EGR. Introduction
 BMW EGR Valve Delete Instructions for Anti Shudder Valve Type EGR Introduction These instructions show how to install our BMW EGR Delete for EGRs fitted with an anti shudder valve, for all other elements
Please check the part number on your compressor before ordering, we cannot confirm with 100% certainty from vehicle make / model.
 VW Audi Seat Skoda Air Conditioning Compressor Pump Clutch Hub Plate Disc 5N0820803, 5N0820803A, 5N0820803E, 5K0820803A Repair Fix Kit Instructions Install Guide by x8rltd on July 27, 2016 Intro: VW Audi
Universal Bosch Common Rail CP1 High Pressure Fuel Pump O-Rings Seal Seals Repair Fix Kit Leaks Instructions Install Guide
 Universal Bosch Common Rail CP1 High Pressure Fuel Pump O-Rings Seal Seals Repair Fix Kit Leaks Instructions Install Guide by x8rltd on February 25, 2016 Intro: Universal Bosch Common Rail CP1 High Pressure
Audi VW Seat Skoda 2.0 TFSI PCV Valve Delete Removal Plate Instructions
 Audi VW Seat Skoda 2.0 TFSI PCV Valve Delete Removal Plate Instructions Introduction, A diaphragm splits or deteriorates within the PCV unit causing vehicle faults. Symptoms of fault Poor MPG, rough idle,
Peugeot 106 Citroen Saxo Gear Linkage Push Rods 3pc kit with grease seals x 2452/e1 Repair Fix Kit Instruction Install Guide
 Peugeot 106 Citroen Saxo Gear Linkage Push Rods 3pc kit with grease seals 245283 + 2 x 2452/e1 Repair Fix Kit Instruction Install Guide by x8rltd on August 6, 2015 Intro: Peugeot 106 Citroen Saxo Gear
Bosch CP1 Pump Seal Replacement Instructions
 Bosch CP1 Pump Seal Replacement Instructions Introduction The Problem It is a common fault for the seals, gaskets and orings to deteriorate within the CP1 fuel pump leading to leaks around the pump. These
Mercedes Benz ABC Hydraulic Valve Block Solenoid Oil Seal Repair Fix Rebuild Kit Seals O-Rings Overhaul Install Instructions
 instructables Mercedes Benz ABC Hydraulic Valve Block Solenoid Oil Seal Repair Fix Rebuild Kit Seals O-Rings Overhaul Install Instructions by x8rltd The Problem Vehicle sags on one or more corner after
i TDI CRDI CRTD CDI VDO Siemens Throttle Body Flap Actuator Air Delivery New Gear Repair Kit Fix Overhaul Replacement
 instructables Audi Seat Skoda VW Kia Hyundai TDI CRDI CRTD CDI VDO Siemens Throttle Body Flap Actuator Air Delivery New Gear Repair Kit Fix Overhaul Replacement Install Instructions Guide by x8rltd The
Hitachi EAS Air Compressor Piston Seal Repair Kit Instructions
 Hitachi EAS Air Compressor Piston Seal Repair Kit Instructions Introduction Is your vehicles air suspension rising slowly, noisily, or perhaps failing to rise at all? EAS Amber light lit, Fault code C1A20,
Fitting our replacement door lock springs Land Rover Discovery 1 Range Rover Classic FRONT DOORS
 Fitting our replacement door lock springs Land Rover Discovery 1 Range Rover Classic FRONT DOORS by x8rltd on May 23, 2014 Intro: Fitting our replacement door lock springs Land Rover Discovery 1 Range
Oregon Fuel Injection
 Cummins PT Fuel Pump Diagnostic No Start, with no smoke 1. This could be caused by the fuel pump not turning or a seized gear pump. Remove the fuel supply hose and the fuel inlet fitting from the gear
Section 10 Chapter 17
 Section 10 Chapter 17 24 Valve, 8.3 Liter Engine Air Intake System Note: All coding used in the 8.3 Liter and 9 Liter engine manuals are Cummins engine codes. These engine codes have no meaning to New
Perfect Performance Products, LLC Painless Performance Products Division 2501 Ludelle St. Fort Worth, Texas (800)
") PERFECT HI-VELOCITY 62MM THROTTLE BODY Installation Instructions Part # 65302 2005-2006 Jeep 4.0L All Jeep 4.0L Engines in Cherokee, Grand Cherokee, Wrangler and Rubicon. Perfect Performance Products,
PERFECT HI-VELOCITY 62MM THROTTLE BODY Installation Instructions Part # 65302 2005-2006 Jeep 4.0L All Jeep 4.0L Engines in Cherokee, Grand Cherokee, Wrangler and Rubicon. Perfect Performance Products,
On Board Diagnostics II A PCED
 Page 1 of 5 1998 PCED On Board Diagnostics II A SECTION 5A: Pinpoint Tests KE: Idle Air Control (IAC) Valve KE: Introduction KE1 IDLE CONCERNS OR STALLS: RUN KOER SELF-TEST AND OUTPUT CONTINUOUS MEMORY
PERFECT HI-VELOCITY 62MM THROTTLE BODY
 PERFECT HI-VELOCITY 62MM THROTTLE BODY Installation Instructions Part # 65300 1991-1998 Jeep 4.0L Engines OR All Jeep 4.0L Engines in Cherokee, Grand Cherokee and Wrangler 1991-2005 w/4 wire IAC ONLY.
Your Trade Pricing. Mercedes-Benz Genuine Parts Steering & Suspension Promotion. 18 th August st January 2015
 Your Trade Pricing Mercedes-Benz Genuine Parts Steering & Suspension Promotion 18 th August 2014-31 st January 2015 Your Trade Pricing Mercedes-Benz Genuine Parts Steering & Suspension Promotion 18 th
Weistec M156/M159 ENGINE
 Weistec M156/M159 ENGINE Oil / Air Separator System Installation Guide 2007-2011 S63 AMG 2007-2011 ML63 AMG 2007 R63 AMG 2007-2008 CLK63 AMG 2008 CLK63 Black Series 2007-2011 CLS63 AMG 2008-Present C63
Mercedes E63/CLS AMG Carbon Turbo Intake System Instructions
 Mercedes E63/CLS AMG Carbon Turbo Intake System Instructions The goal of Alpha Performance is to provide the highest quality, best performing products available. By utilizing research and development,
Mercedes Diesel Valve Adjustment Procedure
 1 of 30 5/30/2008 12:58 PM Home Cars for sale Trucks for sale Where we are Links to other diesel sites About us Why diesel? Diesel Videos How they work How they sound FAQ Dodge Diesel Maintenance tips,
APR, LLC
 + 1. 3 3 4. 5 0 2. 5 1 8 1 4 8 0 0 U S H W Y 2 8 0 W e s t, O p e l i k a, A l a b a m a 3 6 8 0 1 4 8 0 0 U S H W Y 2 8 0 W e s t, O p e l i k a, A l a b a m a 3 6 8 0 1 + 1. 3 3 4. 5 0 2. 5 1 8 1 NOTES:
ENGINE TUNE-UP INSPECTION OF ENGINE COOLANT INSPECTION OF ENGINE OIL INSPECTION OF BATTERY. INSPECTION OF AIR FILTER (Paper Filter Type)
") ENGINE MECHANICAL - Engine Tune-Up EM-17 ENGINE TUNE-UP INSPECTION OF ENGINE COOLANT (See steps 1 and 2 on page CO-4) INSPECTION OF ENGINE OIL (See steps 1 and 2 on page LU-5) INSPECTION OF BATTERY (See
ENGINE MECHANICAL - Engine Tune-Up EM-17 ENGINE TUNE-UP INSPECTION OF ENGINE COOLANT (See steps 1 and 2 on page CO-4) INSPECTION OF ENGINE OIL (See steps 1 and 2 on page LU-5) INSPECTION OF BATTERY (See
TV-Free. Video-in-motion Interface TF-NTG2.
 TV-Free Video-in-motion Interface For Mercedes Benz Comand APS NTG2, NTG2.5, NTG4-204, NTG4-212 and Comand Online NTG4.5 navigation systems Legal Information By law, watching moving pictures while driving
LABOUR ESTIMATE GUIDE
 INSTALLATION INSTRUCTIONS FOR 2003-Current Audi S4 (B6 & B7) Includes Sedan, Avant, & Cabriolet These instructions are applicable to vehicles equipped with either manual or automatic tiptronic transmissions
EXHAUST SYSTEM AND INTAKE MANIFOLD
 J EXHAUST SYSTEM AND INTAKE MANIFOLD 11-1 EXHAUST SYSTEM AND INTAKE MANIFOLD CONTENTS page EXHAUST SYSTEM... 1 EXHAUST SYSTEM DIAGNOSIS... 2 page SERVICE PROCEDURES... 3 TORQUE SPECIFICATIONS... 10 EXHAUST
Zoom and Print Options
 Vehicle» Engine, Cooling and Exhaust» Engine» Service and Repair» Removal and Replacement» Engine Replacement Engine Replacement ^ Tools Required - J 38185 Hose Clamp Pliers Removal Procedure 1. Remove
CARBURETION. Tank Mount, Horizontal Crankshaft. Vacu-Jet - All
 Page 1 of 1 Vacu-Jet - All Carburetor Adjustment Initial 1. Turn adjustment needle clockwise until it makes light contact with the seat. Do not force. 2. The initial setting of adjustment needle is made
APT14 Automatic Pump Trap Installation and Maintenance Instructions
 6120250/7 IM-P612-04 ST Issue 7 APT14 Automatic Pump Trap Installation and Maintenance Instructions 1 Product information 2 Operation 3 Installation Closed loop steam systems only 4 Commissioning 5 Maintenance
Performance Inlet Manifold
 Performance Inlet Manifold Tools needed (some tools not required on some models): 13mm Combination Wrench Flat Blade Screwdriver T30 Torx Driver T25 Torx Driver 10mm Combination Wrench and/or Socket with
G.A.S. M54 DISA Repair Kit D.I.Y. Instructions
 Home BMW Solutions Porsche Solutions DIY Tech Engine Services Dyno Services Machining About G.A.S. Contact G.A.S. M54 DISA Repair Kit D.I.Y. Instructions The installation of the German Auto Solutions DISA
Troubleshooting 3Z8 038 Rev B
 Troubleshooting 3Z8 038 Rev B INSTRUCTIONS WARNING INJECTION HAZARD This form is only a quick reference for troubleshooting Graco sprayers. To reduce the risk of serious injury, including fluid injection,
 www.thecarproblems.com/automotive-service-centre How You Diagnose Your Car Problems And Save Money A Quick Look At An Automotive Service Turbo For Your Car - Benefits, Precautions And Just How Does It
Oregon Fuel Injection
 2001 2006 Dodge Mercedes - Freightliner Sprinter Diagnostics In order to do proper diagnostics you will need a scan tool and some special tools available from Mopar Special Tools http://mopar.snapon.com.
P0441-EVAP PURGE SYSTEM PERFO... P0441-EVAP PURGE SYSTEM PERFORMANCE
 P0441-EVAP PURGE SYSTEM PERFO... P0441-EVAP PURGE SYSTEM PERFORMANCE For a complete wiring diagram, refer to the Wiring Information. Theory of Operation EVAP SYSTEM COMPONENTS CALLOUT DESCRIPTION 1 Filter
IMPORTANT FITTING INSTRUCTIONS PLEASE READ THESE INSTRUCTIONS BEFORE FITTING YOUR TURBO. FAILING TO FOLLOW THEM COULD INVALIDATE THE WARRANTY.
 IMPORTANT FITTING INSTRUCTIONS! PLEASE READ THESE INSTRUCTIONS BEFORE FITTING YOUR TURBO. FAILING TO FOLLOW THEM COULD INVALIDATE THE WARRANTY. 1WHY DID THE LAST TURBO FAIL? Turbochargers are very reliable:
CAUTION: When aligning timing marks, always rotate engine by turning the crankshaft. Failure to do so will result in valve and/or piston damage.
 REMOVAL Timing Chain 1. Disconnect negative battery cable. 2. Drain cooling system. 3. Remove upper intake manifold. 4. Remove cylinder head covers, crankshaft vibration damper, and timing chain cover.
Intake Manifold Flap Linkage Pair, Billet Aluminum, B7 Audi RS4 4.2L FSI
 Intake Manifold Flap Linkage Pair, Billet Aluminum, B7 Audi RS4 4.2L FSI The installation of your 034Motorsport Billet Aluminum Intake Manifold Flap Linkage Pair for the B7 Audi RS4 is an involved process
New Parts Guide. Summer Every part we put into a TechSmart box is a direct result of a conversation with a professional technician.
 Te c h S m a r t P a r t s. c o m ew Parts Guide Summer 2014 Every part we put into a TechSmart box is a direct result of a conversation with a professional technician. Think TechSmart First. TechSmart
Typical Install Instructions
 Typical Install Instructions Read & understand all steps of these instructions before beginning this installation. WEBER Conversion Kit, VW T-1/2, up to 1835cc 32 / 36 DFEV Weber Carburetor These instructions
2007 Hummer H Driveline/Axle Wheel Drive Shafts - H3. Fastener Tightening Specifications Specification Application
 2007 Driveline/Axle Wheel Drive Shafts - H3 SPECIFICATIONS FASTENER TIGHTENING SPECIFICATIONS Fastener Tightening Specifications Specification Application Metric English Front Wheel Drive Shaft Nut 260
Installation instruction do88 performance Intercooler for Volvo S60/V60 T6 MY10-
 Installation instruction do88 performance Intercooler for Volvo S60/V60 T6 MY10-1. This instruction shows how to replace the OEM intercoolers with do88 performance intercoolers. At this type of installation
2000 Chrysler SEBRING
 2000 Chrysler SEBRING Submodel: JX Engine Type: V6 Liters: 2.5 Fuel Delivery: FI Fuel: GAS 2.0L SOHC and 2.4L DOHC Engines The intake manifold for the 2.0L SOHC engine is a long branch design made of a
Diesel Help Australia Diesel diagnostic assistance check-in
 Diesel Help Australia Diesel diagnostic assistance check-in G day and welcome to Diesel help Australia check-in counter. We look forward to assisting with your diesel diagnostics. To ensure a positive
DTC P0172 Fuel Trim System Rich
 Page 1 of 6 1997 Chevrolet Cavalier Cavalier, Sunfire (VIN J) Service Manual Document ID: 47788 DTC P0172 Fuel Trim System Rich System Description A Closed Loop air/fuel metering system is used to provide
Engine Performance Troubleshooting Tree - Signature and ISX CM870
 File: 70-t02-1001 Page 1 of 64 Engine Performance Troubleshooting Tree - Signature and ISX CM870 This troubleshooting procedure should be followed for the following symptoms: Engine Acceleration or Response
PIERBURG. Carburetor: 2E3
 PIERBURG Carburetor: 2E3 1 fast idle adjusting screw 2 throttle lever 3 fuel mixture adjusting screw 4 main body 5 idle cut off valve 6 stop screw 7 accelerator pump cover 8 diaphragm 9 spring 10 valve
Perfect Performance Products, LLC Painless Performance Products Division 2501 Ludelle St. Fort Worth, Texas (800)
") PERFECT HI-VELOCITY 68MM THROTTLE BODY Installation Instructions Part # 65301 1991-1998 Jeep 4.0L Engines w/perfect Engine Management System P/N 65140, 65141 OR All Jeep 4.0L Engines in Cherokee, Grand
PERFECT HI-VELOCITY 68MM THROTTLE BODY Installation Instructions Part # 65301 1991-1998 Jeep 4.0L Engines w/perfect Engine Management System P/N 65140, 65141 OR All Jeep 4.0L Engines in Cherokee, Grand
APT10-2 Automatic Pump Trap
 6120050/3 IM-P612-18 ST Issue 3 APT10-2 Automatic Pump Trap Installation and Maintenance Instructions 1. General safety information 2. Product information 3. Installation Closed loop steam systems only
First printing. Disclaimer
 2009 by ProgRama Inc. All rights reserved. No part of this manual may be reproduced, stored in a retrieval system or transmitted in any form or by any means without the prior written authorization of ProgRama
Part No amatic 350
 Watch our installation video on YouTube Installation Instructions Shift Improver Kit Part No. 30262 1968-1981 TurboHy urbohydr drama amatic 350 B&M Racing and Performance Products 2002 Congratulations!
CARBURETOR - HITACHI 2-BBL
 CARBURETOR - HITACHI 2-BBL 1986 Isuzu Trooper II 1986 Hitachi Carburetors HITACHI DCH340, DCR384, DFP340, DFP384 & DHP340 2-BARREL P UP & Trooper II DESCRIPTION Carburetor is a 2-barrel downdraft type
IMPORTANT FITTING INSTRUCTIONS PLEASE READ THESE INSTRUCTIONS BEFORE FITTING YOUR TURBO. FAILING TO FOLLOW THEM COULD INVALIDATE THE WARRANTY.
 IMPORTANT FITTING INSTRUCTIONS! PLEASE READ THESE INSTRUCTIONS BEFORE FITTING YOUR TURBO. FAILING TO FOLLOW THEM COULD INVALIDATE THE WARRANTY. 1WHY DID THE LAST TURBO FAIL? Turbochargers are very reliable:
TwoStep linkage. Installation guide Read this first. 2. Tools required for installation WARNING!
 TwoStep linkage Installation guide HOT ROD CARBURETION CLOTHING & COLLECTIBLES SERVICE PARTS LINKAGE & FUEL DELIVERY If you need further information or assistance, please contact your Genuine Stromberg
Installation Instructions for the EVO3 Height-Adjustable Ultimate Short Shifter. for F80 M3 and F82 M4
 Installation Instructions for the EVO3 Height-Adjustable Ultimate Short Shifter for 2013+ F80 M3 and F82 M4 part number USSF80 Thank you for purchasing the Ultimate Shift Kit. Please read these directions
Code 32. Diagnostic Trouble Code 32
 Code 32 Diagnostic Trouble Code 32 EGR Solenoid Circuit CIRCUIT DESCRIPTION The ECM operates a solenoid to control the Exhaust Gas Recirculation (EGR) valve. This solenoid is normally close EGR valve.
Tru-Billet Climate Control Knob Installation Instructions
 P/N S197-525-07 2007-08 Tru-Billet Climate Control Knob Installation Instructions Thank you for your purchase of SilverHorse Racing products. Please read all directions before beginning the installation.
Replace brake pads and discs - front * (Volkswagen Sharan 2010-Present)
") Replace brake pads and discs - front * (Volkswagen Sharan 2010-Present) *Caution! This instructions are created by random users and must be used as a reference only! Please, take all safety precautions,
Replace brake pads and discs - front * (Volkswagen Sharan 2010-Present) *Caution! This instructions are created by random users and must be used as a reference only! Please, take all safety precautions,
See the PDF attachment B Preliminary Work.pdf for removal of the intake manifold and valve cover.
 SI B11 03 14 Engine April 2014 Technical Service SUBJECT Diesel Intake Carbon Cleaning MODEL E90 (3 Series Sedan) With M57Y engine (335d) SITUATION The Service Engine Soon light is on and the engine may
APIKOL AAN INTAKE MANIFOLD INSTALLATION INSTRUCTIONS
 APIKOL AAN INTAKE MANIFOLD INSTALLATION INSTRUCTIONS Estimated Installation Time: Approximately 2 hours Parts that will need to be modified/removed (Details provided later in the instructions): Intercooler
Valve Body: Service and Repair
 2007 Chevy Truck TrailBlazer 2WD L6-4.2L Copyright 2013, ALLDATA 10.52SS Page 1 Valve Body: Service and Repair Valve Body and Pressure Switch Replacement Removal Procedure 1. Ensure that removal of the
Virtual EGR system for vehicles equipped with analog or digital positive measurement coefficient hot film air flow mass meters
 Virtual EGR system for vehicles equipped with analog or digital positive measurement coefficient hot film air flow mass meters 1. Product description: 1.1. This product is designed to replace faulty or
Rzeppa Factory Replacement CV Joint
 1 Rzeppa Factory Replacement CV Joint #1744014 JK Rzeppa CV Factory Replacement Kit Important Notes: Prior to beginning this or any installation read these instructions to familiarize yourself with the
Rzeppa Factory Replacement CV Joint
 1 Rzeppa Factory Replacement CV Joint www.teraflex.com #1744014 Important Notes: Prior to beginning this or any installation read these instructions to familiarize yourself with the required steps and
Symptom: P0068-MANIFOLD PRESSURE/THROTTLE POSITION CORRELA- TION - VACUUM LEAK DETECTED
 Symptom: P0068-MANIFOLD PRESSURE/THROTTLE POSITION CORRELA- TION - VACUUM LEAK DETECTED When Monitored and Set Condition: VAC- UUM LEAK DETECTED When Monitored: During all drive modes. Set Condition: If
List of parts needed below. Tools needed
 1 BMW 645 Coolant leak repair (Cap with Seal Repair and Expanding Coolant Pipe Installation w Pics) By Michael R. Brown (Estimated time to complete the job is 6-8 hrs) List of parts needed below. BMW PART
POLAR BT INSTALLATION MANUAL FOR SKODA OCTAVIA (1Z)
") POLAR BT INSTALLATION MANUAL FOR SKODA OCTAVIA (1Z) I N D E X 1. BEGINNING 2 2. DISASSEMBLY 3 3. HOW TO CONNECT POLAR BT 10 4. FINISHING THE INSTALLATION 13 Polar BT Installation manual Rev. A Sheet :
POLAR BT INSTALLATION MANUAL FOR SKODA OCTAVIA (1Z) I N D E X 1. BEGINNING 2 2. DISASSEMBLY 3 3. HOW TO CONNECT POLAR BT 10 4. FINISHING THE INSTALLATION 13 Polar BT Installation manual Rev. A Sheet :
#TL T EA888 GEN 3 FUELING SYSTEM/ INSTALLATION INSTRUCTIONS
 #TL100069 2.0T EA888 GEN 3 FUELING SYSTEM/ INSTALLATION INSTRUCTIONS Notes: These instructions were written for a North American specification MkVII GTI. Other models, like the Golf R, are similar. When
Holden VE SIDI series II V6 OTR CAI Installation Instructions
 Holden VE SIDI series II V6 OTR CAI Installation Instructions 1 P a g e Shown above is a standard V6 VE LFW SIDI engine bay. Your MAF Loom may need to be extended by an auto electrician. Please check the
1 of 7 12/18/2016 9:15 PM
 1 of 7 12/18/2016 9:15 PM P0456-EVAP SYSTEM SMALL LEAK Special Tools: For a complete wiring diagram, refer to the Wiring Information. 2 of 7 12/18/2016 9:15 PM Theory of Operation 3 of 7 12/18/2016 9:15
Description and Operation
 1 of 3 5/26/2008 9:01 AM Home Account Contact ALLDATA Log Out Help Select Vehicle New TSBs Technician's Reference Component Search: METRO TOYOTA OK 1997 Mercedes Benz E 300D (210.020) L6-3.0L DSL (606.912)
Perfect Performance Products, LLC
 PERFECT HI-VELOCITY 68MM THROTTLE BODY Installation Instructions Part # 65301 1991-1998 Jeep 4.0L Engines w/perfect Engine Management System P/N 65140, 65141 OR All Jeep 4.0L Engines in Cherokee, Grand
2012+ FORD FOCUS, ST, & FOCUS RS MUD FLAP INSTALLATION INSTRUCTIONS
 2012+ FORD FOCUS, ST, & 2016+ FOCUS RS MUD FLAP INSTALLATION INSTRUCTIONS PLEASE REVIEW THESE INSTRUCTIONS IN ITS ENTIRETY BEFORE ATTEMPTING INSTALLATION For high resolution color images of these instructions,
Mercedes Benz E320 Cdi 2017 Repair Manual
 Mercedes Benz E320 Cdi 2017 Repair Manual 2017 Mercedes Benz E320 4Matic 6 Cyl 3.2L. Replace a Washer Tank. Difficulty: Moderate Select your vehicle and download your Mercedes-Benz Owners Manual. Learn
Cooling System. Water Pump. Radiator
 The cooling system is engineered to remove waste heat from the engine cylinder block and cylinder head to prevent damage caused by overheating of those components. The waste heat is transferred through
Agilent G1554A On-Column Capillary Inlet with EPC
 Agilent G1554A On-Column Capillary Inlet with EPC 6890 Gas Chromatograph Installation Guide Agilent Technologies Notices Agilent Technologies, Inc. 2002 No part of this manual may be reproduced in any
Turner M50 Manifold Adapter Install. April 26, 2012
 April 26, 2012 Models: 1996-99 E36 328i/M3; 1997-98 E39 528i, 1997-98 Z3 2.8, 1998-2000 MZ3 S52 Product(s): Turner M50 Manifold Adapter Kit Subject: Installation Guidelines and Tips This guide will aid
INDEX TECHNICAL SPECIFICATIONS 2 SPECIAL TOOLS 3-4 PERIODIC MAINTENANCE 5 LUBRICANTS 6 TROUBLESHOOTING 7-14 TIGHTENING TORQUE TABLE 15
 INDEX TECHNICAL SPECIFICATIONS 2 SPECIAL TOOLS 3-4 PERIODIC MAINTENANCE 5 LUBRICANTS 6 TROUBLESHOOTING 7-14 TIGHTENING TORQUE TABLE 15 ENGINE DISASSEMBLY 16-24 ENGINE REASSEMBLY 25-37 SPECIAL 3-SHOE CLUTCH
INSTALLATION INSTRUCTIONS FOR ELECTRIC CHOKE KIT P/Ns , S, &
 INSTALLATION INSTRUCTIONS FOR ELECTRIC CHOKE KIT P/Ns 45-224, 45-224S, & 745-224 INTRODUCTION: Congratulations on your purchase of a new electric choke kit from Holley! These kits can be used to convert
EPUB # 2010 MERCEDES BENZ S CLASS OPERATING INSTRUCTIONS
 21 November, 2017 EPUB # 2010 MERCEDES BENZ S CLASS OPERATING INSTRUCTIONS Document Filetype: PDF 115.04 KB 0 EPUB # 2010 MERCEDES BENZ S CLASS OPERATING INSTRUCTIONS Get in-depth info on the 2010 Mercedes-Benz
Audi S1 Intake kit. Qty. Description
 Audi S1 Intake kit Description Qty Silicone Intake pipe 1 Vacuum hose 1 Heatshield 1 Bracket 1 Machined inlet 1 Vacuum connector 1 Filter 1 M6x16 cap head bolt 1 Tools Ratchet Extension Torx socket Sockets
Holley High Performance Intake System* For Port 13B Engines (Includes B 6-Port engines converted to 4-Port)
") Holley High Performance Intake System* For 1974-1978 4-Port 13B Engines (Includes 1984-85 13B 6-Port engines converted to 4-Port) Installation Instructions I-18038 Note: These instructions assume: The
Holley High Performance Intake System* For 1974-1978 4-Port 13B Engines (Includes 1984-85 13B 6-Port engines converted to 4-Port) Installation Instructions I-18038 Note: These instructions assume: The
M-7210-Z3 Focus Short-Throw Shifter (fits 2000-April 2002) INSTALLATION INSTRUCTIONS
 INSTALLATION INSTRUCTIONS") Please visit www.fordracingparts.com for the most current instruction information!!! PLEASE READ ALL OF THE FOLLOWING INSTRUCTIONS CAREFULLY PRIOR TO INSTALLATION. AT ANY TIME YOU DO NOT UNDERSTAND THE
Please visit www.fordracingparts.com for the most current instruction information!!! PLEASE READ ALL OF THE FOLLOWING INSTRUCTIONS CAREFULLY PRIOR TO INSTALLATION. AT ANY TIME YOU DO NOT UNDERSTAND THE
Troubleshooting:Passenger Car
 Troubleshooting:Passenger Car Troubleshooting If the engine or other parts has the problem, it is possible to break the exchange turbocharger again. Please confirm the notes below and inspect each part
Manual Mercedes E320 Cdi 2017 READ ONLINE
 Manual Mercedes E320 Cdi 2017 READ ONLINE Download 2017 Mercedes-Benz E320 Cdi Owners Manual - Auto - 2017 Mercedes-Benz E320 Cdi Owners Manual Download For Free in PDF format from our database website
ME-SFI Fuel Injection/Ignition System PE07.61-U-2101DD (Sheet 2) Wiring Diagram, Part 1
 Wiring Diagram, Part 1") 1 of 5 6/16/2008 9:49 AM Home Account Contact ALLDATA Log Out Help Select Vehicle New TSBs Technician's Reference Component Search: METRO TOYOTA OK 2003 Mercedes Benz E 500 (211.070) V8-5.0L (113.967)
1 of 5 6/16/2008 9:49 AM Home Account Contact ALLDATA Log Out Help Select Vehicle New TSBs Technician's Reference Component Search: METRO TOYOTA OK 2003 Mercedes Benz E 500 (211.070) V8-5.0L (113.967)
Mercedes Benz E270cdi Owners Manual 2018
 Mercedes Benz E270cdi Owners Manual 2018 If searched for a ebook Mercedes benz e270cdi owners manual 2018 in pdf format, then you have come on to faithful website. We presented the full option of this
Dismantling and assembling transmission
 27-640 Dismantling and assembling transmission Operation number of the operation texts and work units or standard texts and flat rates: 27-4010 P27-5367-61 Control pressure cable (98) Slacken, remove and
22-1 GROUP 22 MANUAL TRANSAXLE CONTENTS MANUAL TRANSAXLE... 22A MANUAL TRANSAXLE OVERHAUL... 22B
 22-1 GROUP 22 MANUAL TRANSAXLE CONTENTS............................... 22A OVERHAUL..................... 22B 22A-2 GROUP 22A MANUAL TRANSAXLE CONTENTS GENERAL DESCRIPTION......... 22A-3 DIAGNOSIS 22A-6