Sensus Connected Touch
|
|
|
- Kellie Lewis
- 5 years ago
- Views:
Transcription
1 Installation instructions, accessories Instruction No Version 1.2 Part. No , , Sensus Connected Touch IMG Volvo Car Corporation Sensus Connected Touch V1.2 Page 1 / 70


2 Special tools Cylindrical knife Tool number: Tool description:cylindrical knife Tool boards: Key Tool number: Tool description:key Tool boards: Anti-static strap Tool number: Tool description:anti-static strap Tool boards:39 Materials Designation Part number Electrical tape Equipment IMG IMG IMG IMG Page 2 / 70

3 IMG Page 3 / 70
4 IMG Page 4 / 70

5 Information 1 Read through all of the instructions before starting installation. Notifications and warning texts are for your safety and to minimise the risk of something breaking during installation. Ensure that all tools stated in the instructions are available before starting installation. Certain steps in the instructions are only presented in the form of images. Explanatory text is also given for more complicated steps. In the event of any problems with the instructions or the accessory, contact your local Volvo dealer. Further information 2 These installation instructions show installation on left hand drive cars. When installing on right-hand drive cars, perform the procedures on the opposite side and/or mirrored. Where the procedure differs, the right-hand version is also shown with text and image. Color symbols 3 Note! This colour chart displays (in colour print and electronic version) the importance of the different colours used in the images of the method steps. 1. Used for focused component, the component with which you will do something. 2. Used as extra colors when you need to show or differentiate additional parts. 3. Used for attachments that are to be removed/installed. May be screws, clips, connectors, etc. IMG Used when the component is not fully removed from the vehicle but only hung to the side. 5. Used for standard tools and special tools. 6. Used as background color for vehicle components. Page 5 / 70


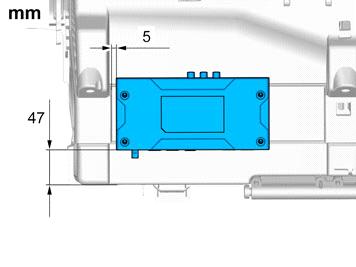
6 Accessory installation Vehicles with roof opening panel 4 Measure and mark as illustrated. IMG Applies to all other vehicles 5 Measure and mark as illustrated. IMG Removal All vehicles Page 6 / 70


7 6 Note! The removal steps may contain installation details. 7 Set the ignition key to position 0. IMG IMG Page 7 / 70


8 9 IMG IMG IMG Page 8 / 70


9 12 IMG IMG Remove the screws. IMG Page 9 / 70

10 15 IMG IMG Page 10 / 70


11 17 Remove the screws. Tightening torque: M6, 10 Nm IMG Repeat the steps when removing on opposite side. IMG Remove the panel. IMG Page 11 / 70


12 20 Remove the weatherstrip. IMG Caution! The front and upper sill panel must be removed and installed as one unit. IMG IMG Page 12 / 70

13 23 IMG IMG Vehicles with roof opening panel Page 13 / 70


14 25 IMG IMG All vehicles Page 14 / 70


15 27 IMG Disconnect the connector. IMG Remove the screws. IMG Page 15 / 70


16 30 Adjust the seat to center position so that the seat fastening bolts can be removed. IMG IMG Remove the screws. Tightening torque: Front seat to body, 40 Nm IMG Page 16 / 70

17 33 IMG Remove the screws. Tightening torque: Front seat to body, 40 Nm IMG Page 17 / 70


18 35 Disconnect the connector. IMG Vehicles without rear passenger entertainment system (RSE) 36 Disconnect the connectors. IMG All vehicles Page 18 / 70


19 37 IMG IMG Unhook the clip(s). IMG Page 19 / 70


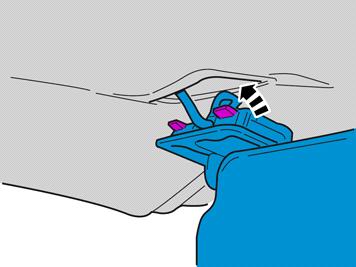
20 40 IMG IMG Remove the screws. Tightening torque: M6, 10 Nm IMG Page 20 / 70


21 43 IMG Remove the screws. Detach the panel. IMG Page 21 / 70


22 45 Disconnect the connector. Remove the panel. IMG Remove the screws. IMG IMG Page 22 / 70


23 48 Remove the screws. IMG IMG Disconnect the connector. IMG Page 23 / 70


24 51 Unhook the cable harness clips. IMG Accessory installation 52 Fold the carpet to the side. IMG Page 24 / 70


25 53 Caution! Do not pull the connector when installing the wiring. IMG IMG IMG Page 25 / 70


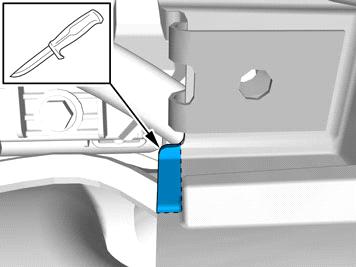
26 56 Caution! Do not pull the connector when installing the wiring. IMG Caution! Ensure that the roof is not damaged. Caution! Take extra care not to crease the headliner. Use special tool: T , Cylindrical knife IMG IMG Page 26 / 70


27 59 IMG Note! Make sure that the direction arrow points towards the driver. IMG Page 27 / 70


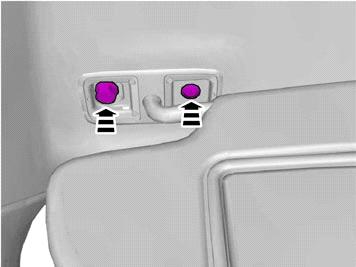
28 61 Install the catch. IMG Connect the connector. IMG Turn once. Tear off the excess foam tape. IMG Page 28 / 70


29 64 Adjust the position of the wiring harness. IMG Installation 65 IMG Page 29 / 70

30 66 IMG IMG IMG Page 30 / 70

31 69 IMG Repeat the steps when installing on opposite side. IMG IMG Page 31 / 70
32 72 Reinstall the screws. IMG IMG Removal Page 32 / 70


33 74 Remove the panel. IMG Fold the carpet to the side. IMG Unhook the cable harness clips. Disconnect the connector. IMG Page 33 / 70


34 77 Remove the panel. IMG IMG IMG Page 34 / 70


35 80 Remove the screws. IMG Remove the screws. IMG Cars with manual transmissions Page 35 / 70


36 82 Release the lock ring which is located inside the gear lever boot. Pull the locking sleeve and gear lever boot down. Take care so that the boot does not come loose from the lock ring. IMG IMG Cars with automatic transmissions Page 36 / 70


37 84 IMG Release the shift-lock function. IMG All vehicles Page 37 / 70


38 86 IMG IMG Caution! Be careful not to damage the catches. Remove the panel. IMG Page 38 / 70


39 89 Remove the screws. IMG IMG Disconnect the connector, if applicable. IMG Page 39 / 70
40 92 Attach the connector to the wiring harness. Use:, Electrical tape The connector is not to be used. IMG Note! The number of connectors may vary depending on the vehicle's equipment level. Disconnect the connectors. IMG Page 40 / 70


41 94 Use special tool: T , Key IMG IMG Remove the panel. IMG Page 41 / 70


42 97 Remove the screws. IMG IMG Disconnect the connector. IMG Page 42 / 70

43 100 Attach the connector to the wiring harness. Use:, Electrical tape The connector is not to be used. IMG Note! The number of connectors may vary depending on the vehicle's equipment level. Disconnect the connectors. IMG Page 43 / 70


44 102 IMG Accessory installation 103 Note! Orientation view IMG Page 44 / 70

45 104 IMG IMG IMG Page 45 / 70


46 107 Locate the existing connector in the vehicle's cable harness. IMG Connect the cable harness. IMG Turn once. Tear off the excess foam tape. IMG Page 46 / 70


47 110 Locate the existing connector in the vehicle's cable harness. IMG Connect the cable harness. IMG Page 47 / 70


48 112 Turn once. Tear off the excess foam tape. IMG IMG IMG Page 48 / 70


49 115 Note! This step requires considerable force. IMG IMG Use special tool: T , Anti-static strap IMG Page 49 / 70


50 118 IMG Note! Note the position. IMG Page 50 / 70


51 120 A click confirms that the component is in the correct position. IMG Tighten the cable tie. IMG IMG Page 51 / 70


52 123 IMG Installation 124 IMG Page 52 / 70


53 125 Connect the prerouted cable. IMG Note! The number of connectors may vary depending on the vehicle's equipment level. Connect the connectors. IMG IMG Page 53 / 70


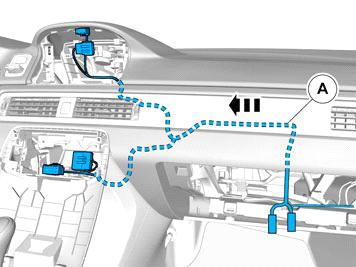
54 128 Caution! Before tightening, make sure that the frame does not conflict with the dash board. IMG Note! Orientation view IMG IMG Page 54 / 70


55 131 IMG Remove the tool. IMG Vehicles with DVD-player Page 55 / 70


56 133 IMG Connect the prerouted cable. IMG Vehicles without DVD-player Page 56 / 70

57 135 IMG Attach the connector to the wiring harness. Use:, Electrical tape The connector is not to be used. IMG All vehicles Page 57 / 70

58 137 Note! The number of connectors may vary depending on the vehicle's equipment level. Connect the connectors. IMG Reinstall the removed part. IMG Reinstall the screws. IMG Page 58 / 70


59 Accessory installation 140 IMG IMG Page 59 / 70


60 142 IMG IMG Remove the protective film. IMG Page 60 / 70


61 145 Fold the insulation to one side. IMG IMG Note that the part's double-sided tape will only be partially attached to the surface. IMG Page 61 / 70


62 148 Refit the insulation. IMG IMG Page 62 / 70


63 150 IMG IMG IMG Page 63 / 70

64 Vehicles with diesel engines 153 IMG All vehicles 154 Measure and mark as illustrated. IMG Page 64 / 70


65 155 IMG Deburr the hole edges. IMG IMG Page 65 / 70


66 158 IMG Connect the connectors. IMG IMG Page 66 / 70


67 161 IMG IMG Page 67 / 70
 for the accessory's function according to the service information in VIDA.")
68 163 Reinstall the removed parts in reverse order. IMG Download software (application) for the accessory's function according to the service information in VIDA. Order and download software according to: IMG Place the manual for this accessory in a suitable location in the car. IMG Page 68 / 70


69 Check Turn on the ignition. 2. Press the button marked "Media". 3. Choose Sensus Connected Touch in the menu. 4. The Sensus Connected Touch start menu should show. 5. Move your finger from right to left over the display. Start from the inner edge of the display. 6. A new menu should now show. 7. Turn off the ignition. IMG Applies when customer has chosen Map Information as an extra option Removal 167 The part is not to be reused. IMG Accessory installation Page 69 / 70

70 168 IMG IMG Page 70 / 70
Installation instructions, accessories. Parking assistance, camera, front (Plug-in Hybrid)
") Installation instructions, accessories Instruction No 31428779 Version 1.0 5 Part. No. 9487189 Parking assistance, camera, front (Plug-in Hybrid) IMG-374543 Volvo Car Corporation Parking assistance, camera,
Installation instructions, accessories Instruction No 31428779 Version 1.0 5 Part. No. 9487189 Parking assistance, camera, front (Plug-in Hybrid) IMG-374543 Volvo Car Corporation Parking assistance, camera,
Installation instructions, accessories. Polestar Performance Intake and Exhaust kit
 Installation instructions, accessories Instruction No 31664128 Version 1.0 Part. No. 31664126, 31664125, 31664522, 31664523 Polestar Performance Intake and Exhaust kit Volvo Car Corporation Polestar Performance
Installation instructions, accessories. Towbar, detachable (Plug-in Hybrid)
") Installation instructions, accessories Instruction No 31373200 Version 1.2 5 Part. No. 31359557, 30791002 Towbar, detachable (Plug-in Hybrid) IMG-371662 Volvo Car Corporation Towbar, detachable (Plug-in
Installation instructions, accessories Instruction No 31373200 Version 1.2 5 Part. No. 31359557, 30791002 Towbar, detachable (Plug-in Hybrid) IMG-371662 Volvo Car Corporation Towbar, detachable (Plug-in
Installation instructions, accessories. Parking assistance, rear
 Installation instructions, accessories Instruction No 31330676 Version 1.4 Part. No. 30758088, 9487266, 30786087, 31359215 Parking assistance, rear Volvo Car Corporation Parking assistance, rear- 31330676
394: Handsfree, Bluetooth Handsfree, Bluetooth
 394: Handsfree, Bluetooth S80 (07-), 2008, B8444S, TF-80SC AWD, L.H.D, YV1AH852881073834, 073834 4/1/2013 PRINT 394: Handsfree, Bluetooth Handsfree, Bluetooth Installation instruction: 31310098 INTRODUCTION
Installation instructions, accessories. Multimedia monitor with DVD, Dual screen. Multimedia monitor with DVD, Dual screen V1.
 Installation instructions, accessories Instruction No 30756560 Version 1.2 5 Part. No. 30756177 Multimedia monitor with DVD, Dual screen Volvo Car Corporation Multimedia monitor with DVD, Dual screen-
Installation instructions, accessories. Electric engine block heater, connector outlet, 4-cyl
 Installation instructions, accessories Instruction No 31359444 Version 1.2 5 Part. No. 31359438 Electric engine block heater, connector outlet, 4-cyl IMG-247665 Volvo Car Corporation Electric engine block
Installation instructions, accessories. Satellite radio, Sirius
 Installation instructions, accessories Instruction No 31201184 Version 1.3 5 Part. No. 31296261, 31359449 Satellite radio, Sirius IMG-246543 Volvo Car Corporation Satellite radio, Sirius- 31201184 - V1.3
Installation instructions, accessories RTI S80
 Installation instructions, accessories Instruction No 8685714 Version 1.0 5 Part. No. RTI S80 Volvo Car Corporation RTI S80-8685714 - V1.0 Page 1 / 25 Equipment A0000161 A0000162 A0801178 D8802049 Page
USB and ipod Music interface
 Installation instructions, accessories Instruction No 30775542 Version 1.2 Part. No. USB and ipod Music interface Volvo Car Corporation USB and ipod Music interface- 30775542 - V1.2 Page 1 / 16 Equipment
Installation instructions, accessories. Body kit
 Installation instructions, accessories Instruction No 31265373 Version 1.1 5 Part. No. Body kit IMG-256263 Volvo Car Corporation Body kit - 31265373 - V1.1 Page 1 / 42 Equipment A0000162 A0000163 IMG-239664
Installation instructions, accessories. Subwoofer
 Installation instructions, accessories Instruction No 9162298 Version 1.0 5 Part. No. Subwoofer Volvo Car Corporation Subwoofer - 9162298 - V1.0 Page 1 / 24 Equipment A0000162 A0801178 A0000161 R8802817
Installation instructions, accessories. Handsfree, Bluetooth
 Installation instructions, accessories Instruction No 31310097 Version 1.3 5 Part. No. 31285547 Handsfree, Bluetooth Volvo Car Corporation Handsfree, Bluetooth- 31310097 - V1.3 Page 1 / 28 Equipment A0000162
393: Multimedia system for the rear seat Multimedia system for the rear seat
 393: Multimedia system for the rear seat S80 (07-), 2008, B8444S, TF-80SC AWD, L.H.D, YV1AH852881073834, 073834 4/1/2013 PRINT 393: Multimedia system for the rear seat Multimedia system for the rear seat
Installation instructions, accessories - Bluetooth, Mute kit XC / Volvo Car Corporation Göteborg, Sweden
 XC90 Section Group Weight(Kg/Pounds) Year Month 3 393 0.5/1.1 2006 11 XC90 2003, XC90 2004, XC90 2005, XC90 2006, XC90 2007, XC90 2008, XC90 2009, XC90 2010 Page 1 of 15 Required tools A0000162 IMG-242205
Installation instructions, accessories - Rear Seat Entertainment
 XC90 Section Group Weight(Kg/Pounds) Year Month 3 39 2004 10 XC90 2003, XC90 2004, XC90 2005, XC90 2006, XC90 2007, XC90 2008 Replaces issue: 2003 12 J3904620 Page 1 of 18 Required tools A0000162 A0000163
Installation instructions, accessories TV NTSC/PAL
 Instruction No Version Part. No. 8637033 1.0 5 TV NTSC/PAL Page 1 / 17 Page 2 / 17 INTRODUCTION Read through all of the instructions before starting installation. Notifications and warning texts are for
Installation instructions, accessories - Bluetooth XC / Volvo Car Corporation Göteborg, Sweden
 XC90 Section Group Weight(Kg/Pounds) Year Month 3 393 1/2.2 2008 03 XC90 2003, XC90 2003, XC90 2004, XC90 2004, XC90 2005, XC90 2005, XC90 2006, XC90 2006, XC90 2007, XC90 2007, XC90 2008, XC90 2008, XC90
Installation instructions, accessories. Electric engine block heater, 230V, 5 cyl diesel
 Installation instructions, accessories Instruction No 30795311 Version 1.2 Part. No. 31373138 Electric engine block heater, 230V, 5 cyl diesel IMG-256423 Volvo Car Corporation Electric engine block heater,
Installation instructions, accessories - Fuel driven heater 912-D
 XC90 Section Group Weight(Kg/Pounds) Year Month 8 87 2002 10 XC90 2003 D5244T, XC90 2004 D5244T, XC90 2005 D5244T AW50/51 AWD, XC90 2006 D5244T, XC90 2006 D5244T AW50/51 AWD D5244T R8703687 Page 1 of 20
Installation instructions, accessories - Bluetooth, swan neck microphone
 S80 (-06) / V70 XC (01-) / XC70 (-07) / S60 / V70 (00-08) / XC90 / S40 (04-) / V50 / C70 (06-) / S80 (07-) / C30 / V70 (08-) / XC70 (08-) Section Group Weight Year Month (Kg/Pounds) 3 394 0.5/1 2006 10
Installation instructions, accessories - Volvo Navigation System, widescreen
 S60 Section Group Weight(Kg/Pounds) Year Month 3 39 2001 04 S60 2001, S60 2002 Page 1 of 21 Page 2 of 21 Required tools A0000162 A0000161 A0801178 M8802509 M3903563 Page 3 of 21 M3903565 M8503983 Page
Installation instructions, accessories
 Volvo Car Corporation Göteborg, Sweden Installation instructions, accessories S60/V70 (00-)/V70XC (01-)/S80/XC90 Section Group Weight (Kg/Pounds) Year Month 8 89 2002 06 Tow bar wiring, 13-pin M3702161
Instruction No Version Part. No , , , , , , , ,
 Instruction No Version Part. No. 30744180 1.2 30794160, 30794013, 30794026, 30794039, 31213192, 30794102, 30794138, 30794151, 30794075 Body kit IMG-256183 Page 1 / 13 Equipment A0000162 A0000163 IMG-239940
Part Number: PT
 Preparation Part Number: PT374-02090 Kit Contents Item # Quantity Reqd. Description 1 1 Auto Dimming Mirror Assembly w/ shift area light 2 1 Hardware bag Hardware Bag Contents Item # Quantity Reqd. Description
TOYOTA Yaris Hatchback EC REARVIEW MIRROR Preparation
 Preparation Part Number: PT374-02090 Kit Contents Item # Quantity Reqd. Description 1 1 Auto Dimming Mirror Assembly w/ shift area light 2 1 Hardware bag Hardware Bag Contents Item # Quantity Reqd. Description
INSTALLATION INSTRUCTIONS
 Rear Vision System Tailgate Emblem Camera Mirror Display 2009-Current Ford F-150 and 2010-Current Super Duty (Kit part number 1008-9527) Kit Contents: Mirror Tailgate Emblem Mount with Camera Interior
GENUINE PARTS INSTALLATION INSTRUCTIONS
 GENUINE PARTS INSTALLATION INSTRUCTIONS DESCRIPTION: APPLICATION: PART NUMBER: KIT CONTENTS: Illuminated Kick Plate Maxima (Applicable ONLY to U.S. Market Vehicles with Build Date June 2012 or later) 999G6
Front seats. Special tools and equipment. VAS 5094 airbag adapter. Connecting page 72-9.
 Page 1 of 23 72-1 Front seats Special tools and equipment VAS 5094 airbag adapter Connecting page 72-9. Page 2 of 23 72-2 Front seats, removing and installing WARNING! Before starting work on seats, connect
SCION xb EC REARVIEW MIRROR Preparation
 Preparation Part Number: PT374-02090 Kit Contents Item # Quantity Reqd. Description 1 1 AD Mirror Assembly w/ PRNDL 2 1 Hardware bag Hardware Bag Contents Item # Quantity Reqd. Description 1 2 T-tap Connectors,
SCION xb AUTO-DIMMING MIRROR Preparation
 Preparation Part Number: PT374-02090 Kit Contents Item # Quantity Reqd. Description 1 1 AD Mirror Assembly w/ PRNDL 2 1 Hardware bag Hardware Bag Contents Item # Quantity Reqd. Description 1 2 T-tap Connectors,
TOYOTA COROLLA ILLUMINATED DOOR SILLS Preparation
 Preparation Part Number: PT942-02140 Kit Contents Item # Quantity Reqd. Description 1 1 Illuminated Scuff plate, Front Right Hand 2 1 Illuminated Scuff plate, Front Left Hand 3 1 Door Scuff plate, Rear
SCION xb HEADREST DVD RSE Section I Installation Preparation. Part Number: PT
 Section I Installation Preparation Part Number: PT900-52080 Kit Contents Item # Quantity Reqd. Description 1 2 DVD Headrest Unit 2 2 Headrest Extension Cables 3 1 Audio Interface Module 4 1 Audio Interface
Installation instructions, accessories - Electric engine block heater
 S60 / V70 (00-08) / S80 (-06) / V70 XC (01-) / XC70 (-07) / XC90 Section Group Weight Year Month (Kg/Pounds) 8 876 2/4.4 2006 09 S60 2001 D5244T, S60 2002 D5244T, S60 2002 D5244T2, S60 2003 D5244T, S60
1 of 21 9/30/2011 3:16 PM
 Engine Block Heater, Service and Repair, Removal and Replacement: Ele... 1 of 21 9/30/2011 3:16 PM 2005 Volvo S60 L5-2.5L Turbo VIN 59 B5254T2 Engine Block Heater Service and Repair, Removal and Replacement:
Installation instructions, accessories - Alarm, basic kit S60 / S80 / V70 / V70 XC / XC /
 S60 / S80 / V70 / V70 XC / XC70 Section Group Weight(Kg/Pounds) Year Month 3 36 0.67/1.47 2005 05 S60 2001, S60 2002, S60 2003, S60 2004, S60 2005, S60 2006, S60 2007, S60 2008, S60 2009, S80 (-06) 1999,
TECHNICAL INSTRUCTIONS FOR SPECIAL SERVICE CAMPAIGN 40F
 TECHNICAL INSTRUCTIONS FOR SPECIAL SERVICE CAMPAIGN 40F 2002 THROUGH EARLY 2004 MODEL YEAR NORTH AMERICAN PRODUCED (NAP) TOYOTA CAMRY CURTAIN SIDE AIRBAG Page 1 of 26 I. OPERATION FLOW CHART Verify Vehicle
INSTALLATION INSTRUCTIONS
 INSTALLATION INSTRUCTIONS Accessory Application Publications No. REMOTE CONTROL 2009 MDX BII 40030 Issue Date JULY 2008 PARTS LIST Remote Engine Starter Unit Kit P/N 08E91-E22-200B Remote Control Engine
INSTALLATION INSTRUCTIONS
 Accessory Application Publication No. INSTALLATION INSTRUCTIONS 12V ACCESSORY SOCKET P/N 08U79-MKC-A00 GL1800/B/BD/D/DA Honda Dealer: Please give a copy of these instructions to your customer. MII 16426
Conflicts: Vehicles without a sunroof Vehicles with a single sunroof
 Toyota Sienna (Dual Sunroof) 2011-10.2 Overhead Video Part Number: 00016-00110 00016-00110-17 Fit Kit 00016-00120 00016-00120-17 Fit Kit Accessory Code: ED5 Conflicts: Vehicles without a sunroof Vehicles
GENUINE ACCESSORIES INSTALLATION INSTRUCTIONS. ITEM QTY DESCRIPTION Usage Chart Service Part Number. 1 1 Mirror Assembly w/ Compass 1
 AUTO PART NUMBER: 0000 8C P4 (DIO)/ 0000 89 P25 (PIO) REQUIRED COMPONENTS: INSTALLATION KIT: 2 SA Harness - 2 Conductor 3 0 Wire Ties 4 Wire Cover 5 A-Pillar Tether Clip (D09W-6862) 6 3 Foam Tape 7 3 Electro-Tap(wire
INSTALLATION INSTRUCTIONS
 Rear Vision System Liftgate Emblem Camera Mirror Display 2009-2012 Ford Flex (Kit part number 1008-9527) Kit Contents: Mirror Liftgate Emblem Mount with Camera Interior (shorter) Harness Chassis (longer)
INSTALLATION INSTRUCTIONS
 Rear Vision System Tailgate Handle Camera Mirror Display 2004-2014 Ford F-150 and 2008-2015 Ford Super Duty (Kit part numbers 9002-9521) Kit Contents: Mirror Tailgate Handle with camera and harness Interior
PRELIMINARY INSTALLATION INSTRUCTIONS. PARTS LIST Attachment Kit(sold separately): P/N 08B23-S9V-100B. Display bracket.
: P/N 08B23-S9V-100B. Display bracket.") INSTALLATION INSTRUCTIONS Accessory Application Publications No. in- ENTERTAINMENT SYSTEM 2006 PILOT All 30502 Issue Date SEP 2005 PARTS LIST Attachment Kit(sold separately): P/N 08B23-S9V-100B Display
INSTALLATION INSTRUCTIONS Accessory Application Publications No. in- ENTERTAINMENT SYSTEM 2006 PILOT All 30502 Issue Date SEP 2005 PARTS LIST Attachment Kit(sold separately): P/N 08B23-S9V-100B Display
TOYOTA FJ CRUISER AIR DAM/LIGHT BAR Preparation
 Preparation Part Number: PT278-35071 Kit Contents Item # Quantity Reqd. Description 1 1 Air Dam / Light Bar Hardware Bag 1 Contents Item # Quantity Reqd. Description 1 2 Screw, M6x33mm, Wafer Head 2 2
Conflicts. TOYOTA 4Runner REARSIGHT. Part Number: Code: MC90 KIT CONTENTS ADDITIONAL ITEMS REQUIRED FOR INSTALL RECOMMENDED TOOLS
 TOYOTA 4Runner 2010 - REARSIGHT Part Number: 00016-00085 Code: MC90 Conflicts KIT CONTENTS ITEM QTY DESCRIPTION 1 1 MIRROR/MONITOR 2 1 REAR CAMERA ASSEMBLY 3 1 CAMERA EXTENSION HARNESS 4 1 SACK PARTS 5
INSTALLATION INSTRUCTIONS
 INSTALLATION INSTRUCTIONS Accessory Application Publications No. in- ENTERTAINMENT SYSTEM 2004 TSX BII 24811 Issue Date APRIL 2003 PARTS LIST Attachment Kit P/N 08B23-SDA-101A Monitor bracket harness FM
GENUINE PARTS INSTALLATION INSTRUCTIONS
 Important: Read Before Installation *550-0022-000* 550-0022AAA Dealer Installation Recommended. To avoid serious personal injury or property damage, obtain the Installation Instructions before attempting
TOYOTA COROLLA EC REARVIEW MIRROR Preparation
 Preparation Part Number: PT374-02090 Kit Contents Item # Quantity Reqd. Description 1 1 AD Mirror Assembly w/ PRNDL 2 1 Hardware bag Hardware Bag Contents Item # Quantity Reqd. Description 1 2 T-tap Connectors,
INSTALLATION INSTRUCTIONS
 INSTALLATION INSTRUCTIONS Accessory REMOTE ENGINE STARTER SYSTEM Application 2010 CIVIC 4-DOOR Publications No. AII 42460 Issue Date AUG 2009 PARTS LIST Remote Engine Starter Unit Kit P/N 08E91-E22-100B
GENUINE PARTS INSTALLATION INSTRUCTIONS
 GENUINE PARTS INSTALLATION INSTRUCTIONS 1. 2. 3. 4. DESCRIPTION: Illuminated Kick Plate APPLICATION: INFINITI M45 (2010) PART NUMBER: G6950-1MA0B KIT CONTENTS: Item QTY Description SERVICE PART NUMBER
* * APPLICABLE MODELS: 2014 > Mazda 3
 PART NUMBER: 0000 8C L48 (DIO) / 0000 89 L84 (PIO) GENUINE ACCESSORIES INSTALLATION INSTRUCTIONS Rev. AAA *550-0700-000* APPLICABLE MODELS: 2014 > Mazda 3 REQUIRED COMPONENTS: ITEM QTY DESCRIPTION Usage
American Honda Motor Co., Inc. Page 1 of 11
 2008 ACCORD - Headliner Removal/Installation (page 20-131) Special Tools Required KTC trim tool set SOJATP2014* *Available through the Honda Tool and Equipment Program; call 888-424-6857 SRS components
INSTALLATION INSTRUCTIONS
 INSTALLATION INSTRUCTIONS Accessory REMOTE CONTROL Application 2008 CR-V Publications No. AII 35843-38422 Issue Date DEC 2007 PARTS LIST Caution label Remote Engine Starter Kit P/N 08E91-E22-100B Transmitter
* * APPLICABLE MODELS: 2014 > Mazda 6
 PART NUMBER: 0000 8C H02(DIO) / 0000 89 H18(PIO) GENUINE ACCESSORIES INSTALLATION INSTRUCTIONS Rev. AAA *550-0694-000* APPLICABLE MODELS: 2014 > Mazda 6 REQUIRED COMPONENTS: ITEM QTY DESCRIPTION Usage
* * APPLICABLE MODELS: 2016 > CX-3
 PART NUMBER: 0000 8C S01(DIO) / 0000 89 S07(PIO) GENUINE ACCESSORIES INSTALLATION INSTRUCTIONS Rev. AAA *550-0688-000* APPLICABLE MODELS: 2016 > CX-3 REQUIRED COMPONENTS: ITEM QTY DESCRIPTION Usage Chart
* * APPLICABLE MODELS: 2017 > CX-5
 PART NUMBER: 0000 8C R06(DIO) / 0000 89 R28(PIO) GENUINE ACCESSORIES INSTALLATION INSTRUCTIONS Rev. AAA *550-0681-000* APPLICABLE MODELS: 2017 > CX-5 REQUIRED COMPONENTS: ITEM QTY DESCRIPTION Usage Chart
Conflicts NOTE: XLE, LE, AND SE MODELS
 TOYOTA SIENNA 2011- REARSIGHT Part Number: 00016-00085 Accessory Code: MC9 Conflicts NOTE: XLE, LE, AND SE MODELS KIT CONTENTS ITEM QTY DESCRIPTION 1 1 MIRROR/MONITOR 2 1 REAR CAMERA ASSEMBLY 3 1 CAMERA
Accessory Fitting Instructions
 Accessory Fitting Instructions Kit Number Models Affected A9689 Thruxton 00 A96808 Thruxton 00 R Low Handlebar Kit Front Fairing Kit Kit Number Models Affected A97080 Thruxton 00 A97084 Thruxton 00 R Note:
5 Mechanisms and accessories
 5 Mechanisms and accessories 51A SIDE OPENING ELEMENT MECHANISMS 52A NON-SIDE OPENING ELEMENT MECHANISMS 54A WINDOWS 55A EXTERIOR PROTECTION 56A EXTERIOR EQUIPMENT 57A INTERIOR EQUIPMENT 59A SAFETY ACCESSORIES
Convertible roof. Hall sensor, replacing. Preparatory work. Chapter title Header text. Positioning the hall sensor
 Convertible roof Chapter title Hall sensor, replacing Obs! The illustrations in this service information are used for different model years and/or models. Some variation may occur. However, the essential
GENUINE PARTS INSTALLATION INSTRUCTIONS
 GENUINE PARTS INSTALLATION INSTRUCTIONS 1. 2. 3. 4. DESCRIPTION: APPLICATION: PART NUMBER: KIT CONTENTS: Illuminated Kick Plate G CONVERTIBLE G6950 JJ500 Item QTY A 1 B 1 C 1 D 11 E 12 F 9 G 1 Description
Toyota Prius C 2015 Frameless EC Mirror w/ Compass & HomeLink
 Toyota Prius C 2015 Frameless EC Mirror w/ Compass & HomeLink Part Number: 00016-05463 Accessory Code: ME4000 Note: This accessory requires replacement A-Pillar clip 62217-52120 to complete the installation
INSTALLATION INSTRUCTIONS
 INSTALLATION INSTRUCTIONS Contents Description: Auto-Dimming Rearview Mirror with Compass Part Number: 990B0-35007 Applications: SX4 Hatchback, 2007- SX4 Sedan, 2008- Installation Time:.5 HRS Ref. Part
INSTALLATION INSTRUCTIONS
 INSTALLATION INSTRUCTIONS Accessory Application Publications No. SYSTEM ACCORD 2-DOOR (LX/EX L4, LX V6) AII 25749 Issue Date FEB 2004 PARTS LIST Double-sided adhesive tape XM Radio Attachment Kit : P/N
INSTALLATION INSTRUCTIONS
 INSTALLATION INSTRUCTIONS Accessory Application Publications No. (Trunk Mount) 2009 CIVIC 4-DOOR AII 40184 Issue Date AUG 2008 PARTS LIST 8 Cushion tapes Changer Attachment (Sold Separately) P/N 08B26-SNA-101
INSTALLATION INSTRUCTIONS
 INSTALLATION INSTRUCTIONS Accessory Application Publications No. All 30528 INTERFACE 2006 CR-V Issue Date SEP 2005 PARTS LIST XM Radio Unit Kit (sold separately): P/N 08A15-EX5-000 2 Wire tie with clips
 Page 1 of 10 43: Transmission, automatic, B5254T2, AW50/51 AWD V70 XC (01-) / XC70 (-07), 2004, B5254T2, AW50/51 AWD, L.H.D, YV1SZ59H241147306, 147306 15/10/2011 PRINT 43: Transmission, automatic, B5254T2,
2011 Mercedes-Benz C350 Sport
 Fig. 3: Identifying Seat-Back Lining, Tabs And Guides Model 207, 204.3 shown with front seat removed Fig. 4: Identifying Seat-Back Lining, Tabs And Screws Remove/install 1.1 Adjust left or right front
INSTALLATION INSTRUCTIONS
 Rear Vision System Aftermarket and Factory 5.0, 8.4 and 6.1 MyGig Touch Screen Display (Factory Display requires Chrysler/Dodge dealer to activate) 2009 Current* Dodge Ram (Kit part number 1009-6503) *NOTE:
INSTALLATION INSTRUCTIONS
 INSTALLATION INSTRUCTIONS Accessory Application Publications No. AII 27996 ATTACHMENT KIT 2005 CIVIC HYBRID Issue Date AUG 2004 PARTS LIST Changer Attachment Kit: P/N 08B26-S5B-100 4 Washer-screws, 4 x
GENUINE PARTS INSTALLATION INSTRUCTIONS
 GENUINE PARTS INSTALLATION INSTRUCTIONS DESCRIPTION: ILLUMINATED KICK PLATE APPLICATION: QUEST(2010) PART NUMBER: ILLUMINATED KICK PLATE (G6950-1JA0A(BEIGE)/G6950-1JA0B(GRAY)) KIT CONTENTS: Item QTY Part
TOYOTA COROLLA ILLUMINATED DOOR SILLS Preparation
 Preparation Part Number: PT942-02140 Kit Contents Item # Quantity Reqd. Description 1 1 Illuminated Scuff plate, Front Right Hand 2 1 Illuminated Scuff plate, Front Left Hand 3 1 Door Scuff plate, Rear
TOYOTA HIGHLANDE R REARSIGHT Part Number: Code: MC90 KIT CONTENTS ADDITIONAL ITEMS REQUIRED FOR INSTALL RECOMMENDED TOOLS
 TOYOTA HIGHLANDE R 2009- REARSIGHT Part Number: 00016-00085 Code: MC90 KIT CONTENTS ITEM QTY DESCRIPTION 1 1 MIRROR/MONITOR 2 1 REAR CAMERA ASSEMBLY 3 1 CAMERA EXTENSION HARNESS 4 1 SACK PARTS 5 1 OWNER
LEXUS CT 200h ILLUMINATED DOOR SILLS Preparation
 Preparation Part Number: PT922-89100 Kit Contents Item # Quantity Req'd. Description 1 1 Door Sill, Front Right Hand 2 1 Door Sill, Front Left Hand 3 1 Door Sill, Rear Right Hand 4 1 Door Sill, Rear Left
INSTALLATION INSTRUCTIONS
 INSTALLATION INSTRUCTIONS Accessory REMOTE CONTROL ENGINE STARTER Application 2010 CR-V Publications No. AII 42612-42916 Issue Date OCT 2009 PARTS LIST Remote Engine Starter Unit Kit P/N 08E91-E22-101B
INSTALLATION INSTRUCTIONS
 9002-6513 Rear Vision System W/ Zoom Aftermarket and Factory 8.4 Touch Screen Display (Factory Display requires Chrysler/Dodge dealer to activate) 2009 2012 RAM (Part B) 2013 Current RAM (Part A) NOTE:
RAV4 TNS310 (Traffic) Plus
 Plus") TNS310 (Traffic) Plus RHD installation instructions Model year: 005 Vehicle code: **A3***-*****W Part number TNS310 Plus: Sub wire harness No 1: 08673-64801 Sub wire harness No : 08673-64800 Part number
TNS310 (Traffic) Plus RHD installation instructions Model year: 005 Vehicle code: **A3***-*****W Part number TNS310 Plus: Sub wire harness No 1: 08673-64801 Sub wire harness No : 08673-64800 Part number
TOYOTA TACOMA HANDS FREE BLU LOGIC Preparation. Item 5 Item 6 Item 7 Item 8. Item 4. General Applicability Note: Recommended Tools
 TOYOTA TACOMA 2008- HANDS FREE BLU LOGIC Preparation Part #: PT923-00098 Conflicts: JBL Audio, Factory Navigation Kit Contents: NOTE: Part number of this accessory may not be the same as the part number
Installation Instructions
 Installation Instructions Jeep JK 2-Door (2011 Present) Mounting Bracket and Air Line System Kit for ARB On-Board Twin Air Compressor (CKMTA12) Made in the USA Kit Contents: 1 Flat Bracket 1 Formed Bracket
TOYOTA SIENNA XM SATELLITE RADIO Preparation
 Preparation Part Number: Mounting Kit: PT546-08070 Tuner Assy: 86180-0W031 Tuner Assy Kit Contents (86180-0W031) Item # Quantity Reqd. Description 1 1 Tuner Assy, Stereo Component Mounting Kit Contents
TOYOTA TUNDRA HANDS FREE BLU LOGIC Preparation
 TOYOTA TUNDRA 2008- HANDS FREE BLU LOGIC Preparation Part #: PT923-00111 Conflicts: JBL Audio NOTE: Part number of this accessory may not be the same as the part number shown. Kit Contents: For kits manufactured
INSTALLATION INSTRUCTIONS
 INSTALLATION INSTRUCTIONS Accessory REMOTE CONTROL Application 2014 TSX (L4) Publications No. BII 50198 Issue Date SEPT 2013 PARTS LIST Remote Engine Starter Unit Kit P/N 08E91-TK4-200A Fuse label Transmitter
INSTALLATION INSTRUCTIONS
 INSTALLATION INSTRUCTIONS Accessory Application Publications No. XM RADIO SYSTEM 2006 CIVIC 4 DOOR (EX) AII 30852 Issue Date JAN 2006 PARTS LIST XM Radio Attachment (sold separately): P/N 08B15-SNA-100A
General Applicability Note: Recommended Tools. Personal & Vehicle Protection Safety Goggles Seat Covers Floor Covers Special Tools. Installation Tools
 TOYOTA HIGHLANDER/HIGHLANDER HV 2008- Preparation Part #: PT923-00111 Conflicts: JBL Audio, Factory Navigation NOTE: Part number of this accessory may not be the same as the part number shown. Kit Contents:
PRELIMINARY INSTALLATION INSTRUCTIONS. Remote Engine Starter Attachment Kit P/N 08E92-SNA-100B
 INSTALLATION INSTRUCTIONS Accessory Application Publications No. REMOTE ENGINE STARTER SYSTEM 2008 CIVIC 2-DOOR AII 38215 Issue Date OCT 2007 PARTS LIST Remote Engine Starter Unit Kit P/N 08E91-E22-100B
INSTALLATION INSTRUCTIONS
 INSTALLATION INSTRUCTIONS Accessory REMOTE CONTROL Application Publications No. 2009 ACCORD AII 39977-40931 4-DOOR Issue Date (A/T ONLY) NOV 2008 PARTS LIST Remote Engine Starter Unit Kit P/N 08E91-E22-100A
GENUINE PARTS INSTALLATION INSTRUCTIONS
 GENUINE PARTS INSTALLATION INSTRUCTIONS 1. DESCRIPTION: Auto-Dimming Mirror with Compass and Homelink 2. APPLICATION: Juke (2011) 3. PART NUMBER: 999L1 VW002 4. KIT CONTENTS: Item Qty Description Service
Removing/installing final drive
 1(16) Removing/installing final drive Special tools: 998 5972, 999 5561, 999 5652, 999 5659, 999 5660 Removing Note! Position the rear lifting arms on the arrows on the sills. This is so the support arm
INSTALLATION INSTRUCTIONS
 INSTALLATION INSTRUCTIONS Accessory REMOTE CONTROL Application 2008 ACCORD 4-DOOR Publications No. AII 35365 Issue Date AUG 2007 PARTS LIST U Accessory User s Information Manual Remote Engine Starter Unit
INSTALLATION INSTRUCTIONS
 Rear Vision System Mirror Display 2004 onwards Ford F-150 and 2008 onwards Ford Super Duty (Kit part numbers 1008-9520 and 1008-9525) Kit Contents: RVS Interior (shorter) Harness RVS Chassis (longer) Harness
 INSTALLATION INSTRUCTIONS Accessory Application Publications No. XM RADIO SYSTEM 2006-2008 CIVIC 2- AND 4-DOOR (Si) AII 37662 Issue Date AUG 2007 PARTS LIST XM Radio Attachment (sold separately): P/N 08B15-SNA-100B
TECHNICAL INSTRUCTIONS FOR SAFETY RECALL E0G SUB HARNESS (FILTER) INSTALLATION
 INSTALLATION") TECHNICAL INSTRUCTIONS FOR SAFETY RECALL E0G SUB HARNESS (FILTER) INSTALLATION 2003 2004 MODEL YEAR AVALON COLUMN MOUNTED SHIFT LEVER (FRONT BENCH SEAT) All dealership associates involved in the recall
TECHNICAL INSTRUCTIONS FOR SAFETY RECALL E0G SUB HARNESS (FILTER) INSTALLATION 2003 2004 MODEL YEAR AVALON COLUMN MOUNTED SHIFT LEVER (FRONT BENCH SEAT) All dealership associates involved in the recall
Rear Door: Service and Repair REAR DOOR
 2007 Toyota Matrix L4-1.8L (1ZZ-FE) Copyright 2013, ALLDATA 10.52 Page 1 Rear Door: Service and Repair REAR DOOR Rear Door 2007 Toyota Matrix L4-1.8L (1ZZ-FE) Copyright 2013, ALLDATA 10.52 Page 2 ISASSEMBLY
 INSTALLATION INSTRUCTIONS Accessory Application Publications No. All 38163 XM SATELLITE RADIO SYSTEM 2008 ODYSSEY Issue Date OCT 2007 PARTS LIST XM Radio Attachment (sold separately): P/N 08B15-SHJ-100A
INSTALLATION INSTRUCTIONS
 INSTALLATION INSTRUCTIONS Accessory Application Publications No. XM RADIO SYSTEM (EXCEPT LX) 2006 ODYSSEY All 30392 Issue Date AUG 2005 PARTS LIST XM Radio Attachment (sold separately): P/N 08B15-SHJ-100
In area - A -, a proper seal must be made against the top of the window glass.
 Door window, adjusting Page 1 of 3 Audi > B3 > 1994-1998 Body Exterior, Interior 61 - Convertible top, checking and adjusting Door window, adjusting Sections C-C and D-D. Adjust door window so that window
DVD REAR SEAT VIDEO SYSTEM
 Read entire instructions thoroughly before starting. TOOLS REQUIRED: DVD REAR SEAT VIDEO SYSTEM MINIVANS WITH ROOF RAILS INSTALLATION INSTRUCTIONS Non-metal trim stick Phillips screwdriver T15, T20, T25
Soumatrix speakers installation guide
 Soumatrix speakers installation guide Preface Soumatrix coaxial speakers combine bass and treble loudspeaker in one unit. Just replace the car original bass loudspeaker in each of the front and rear doors.