GruvenParts.com BRASS GM Power Folding Mirror Gear Replacement Instructions. Updated 8/25/2017 Additional Pictures / Tips Posted!
|
|
|
- Aldous Stewart
- 6 years ago
- Views:
Transcription
1 Page 1 GruvenParts.com BRASS GM Power Folding Mirror Gear Replacement Instructions Updated 8/25/2017 Additional Pictures / Tips Posted! ** Latest Design is uses an ALL BRASS SPUR GEAR!!! ** ** If you don t want to bother with any of this, you can now buy a rebuilt mirror drive unit and send back your core. ** You Must Use the GruvenParts.com replacement motors when using this brass gear. This is because the OEM motor sends current through the motor case, which isn t a issue with the plastic spur gear. However, when using the brass spur gear, the current path could proceed to ground. Our motors do not use the motor case for the ground and therefore must be used with the brass spur gear. Please reference the motor DIY article for instructions on how to use the GruvenParts.com Motor found on the GruvenParts.com motor product page : If you are reading this DIY article, you are like many others who have a GM truck with power folding mirrors which no longer function due to a broken gear within the fold mechanism or a dead power mirror motor. This often occurs during normal operation, and especially with a light impact to the mirror housing. A broken folding mirror gear is evident when the mirror stops power folding. Sometimes you can hear the motor whirring but the mirror refuses to fold in or out. Other times, the broken gear just jams the motor and you hear nothing. You can still fold the mirror by hand. What s happened is a gear within the assembly was made from very brittle, weak plastic. Be advised that there are MANY aftermarket replacement mirrors out on the market READ THEIR REVIEWS. The aftermarket mirrors are very poor quality and allow the mirror itself to vibrate so badly, you cannot even see out of the mirror while driving. Not to mention the replacement mirrors will also come with the same weak spur gear that that caused this dilemma in the 1 st place. The best option is to fix the OEM GM mirror with the GruvenParts.com reinforced spur gear. Also note, we now include the Hi-Torque replacement motors with this kit. Visit and click on the GM Trucks Section on the left banner to access the folding mirror product page.
 - Vice or small arbor press - 24 hour cure 2 part metal to metal Epoxy")
2 Page 2 Tools Needed : - Plastic pry wedge. I used a bicycle tire change lever in the pics shown below. - T10 torx - T20 torx - Small Phillips head screw driver - Small hammer and thin punch (can also use the Phillips screw driver) - Vice or small arbor press - 24 hour cure 2 part metal to metal Epoxy such as JB Weld 8265 with 3,960 psi cure strength or equivalent. DO NOT USE a 5 Minute Epoxy! They are not as strong as the 24 hour 2 part epoxy. - Gear grease such as Permatex White Lithium Grease P/N There is NO NEED to remove the interior door panel, or mirror base from the door. This can all be done with the mirror mounted on the door, working from outside the vehicle. Motor Motor Worm Gear Mirror Base Main Shaft Spur Gear (Often Broken) Above shows a cut away picture of the motor drive unit with the key parts you will need to reference. Please get familiar with this cut away. As you can see, the motor drive unit is very compact, and the design is actually quite nice. Unfortunately, GM has allowed the use of some cheap components within this assembly.

3 Page 3 The picture below shows the components of the mirror drive unit. The unit is assembled starting with the Mirror Base in the Upper Left, and progresses to the Right as shown. Mirror Base Lower Case Half Collet Large Gear Main Gear Shaft Replacement Brass Gear Black Plastic Basket Spring Hat Spring Spring Retainer


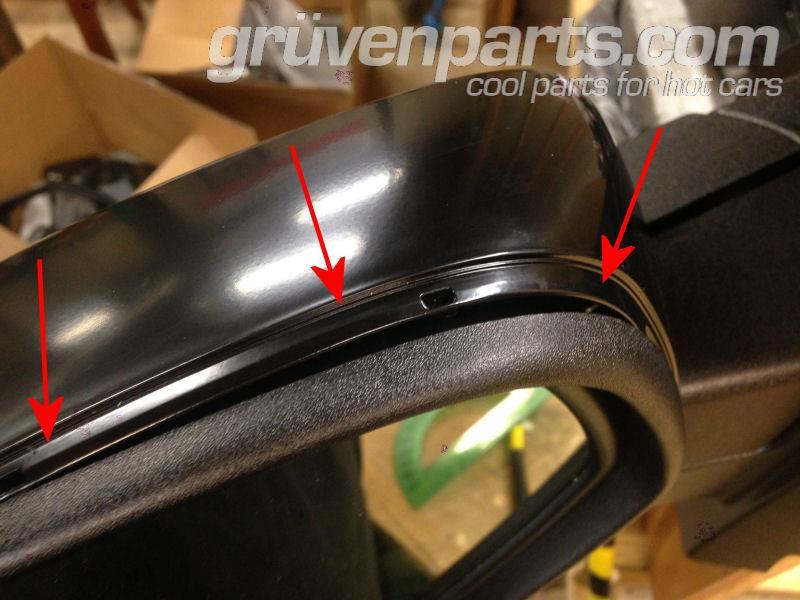
4 Page 4 Step 1 : Plastic Shroud Removal Fold mirror inwards and use a plastic pry tool such as plastic bicycle tire lever. Start on the inside edge as shown in the picture and gently separate the upper and lower trim shrouds as shown. Slowly and gently work around the mirror shroud and remove both upper and lower plastic shrouds as 1 piece. You use hand force here, perhaps some gentle prying with the plastic lever.
5 Page 5

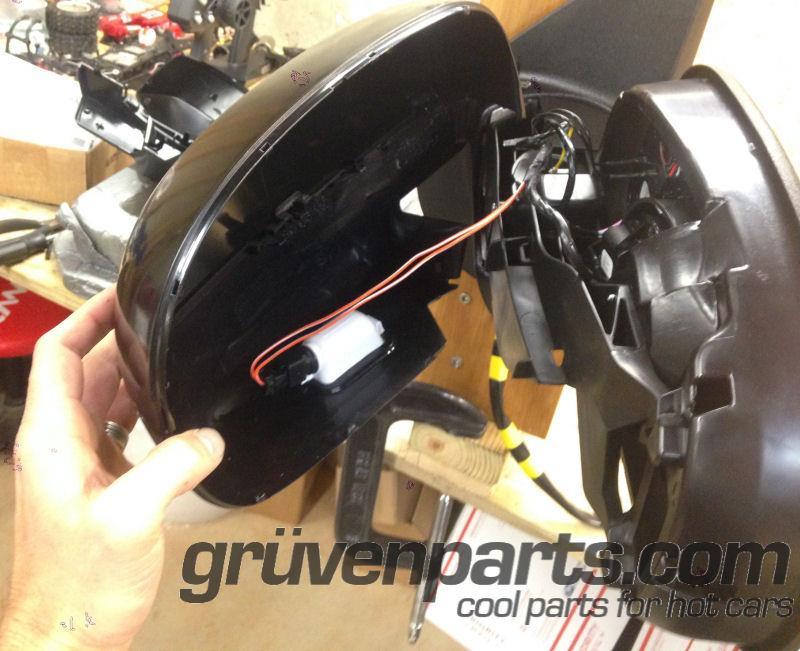
6 Page 6 Upper/Lower Plastic Shrouds Removed Step 2 Disconnect Wiring from Mirror Unplug the various connectors from their electrical connections. Mirrors may have heater wires, turn signal wires, and of course the folding mirror motor wire harness. These are all unique wire harnesses that can only be plugged in 1 way. If the mirror is a heated mirror, there will be 2 small black wires that will connect to the heater element within the mirror. These wires can be plugged into either socket on the mirror heater (you can see the 2 metal mirror heater tabs just above the white connector Im holding in the pic below).

7 Page 7 Step 3 Remove Mirror Glass The mirror glass is clipped into the mirror base in 4 places using small plastic tabs. You will need to disengage 1 or 2 of the plastic tabs. The mirror will move upward relative to the mirror bracket. A small screw driver can be used to push the mirror tab upward. To access the mirror tabs, it is helpful to angle the mirror facing as far down as possible. Be careful here, it s a great idea to put some tape across the front of the mirror to prevent the mirror glass from suddenly popping out and landing face down on the driveway! See following pics.


8 Page 8 Arrow shows 1 of the mirror tabs, mirror installed looking at back side of mirror. Mirror removed, see 4 tabs. Any 2 must be pushed upward to release mirror from base.
9 Page 9 Mirror mounting base, mirror is removed in this picture. View looking aft. Arrows show the mating tabs which the mirror clips onto. When reinstalling mirror, align tabs and push mirror down onto tabs until a click is heard. Step 4 Removing Mirror Base Remove (4) T10 torx screws as shown in picture. Mirror base will come off, but is still connected via the mirror adjustment wire harness. Unplug wire harness.


10 Page 10 Unplug this connector

11 Page 11 Step 5 Mirror Frame Removal Simply unsnap the mirror frame from the mirror assembly. Mirror Frame is touched by arrow. Mirror Frame unsnapped from mirror assembly. It can be set aside at this point.


12 Page 12 Step 6 : Remove Mirror Skeleton The mirror skeleton is held in with 3 push pins as shown in picture. Push pins can be gently tapped out to remove using a small punch or phillips head screw driver and gentle hammer taps.


13 Page 13 Mirror Skeleton removed, set it aside for now. Step 7 Remove Motor Assembly The motor drive unit is attached to the mirror housing with (4) T20 torx screws. Remove all 4 torx screws and feed wiring harness through center of the motor drive unit. This is the housing we re after.


14 Page 14 Motor Drive Unit removed.

15 Page 15 Step 8 Open Motor Assembly Place the motor assembly in a vice with the circular base facing up as shown in the pics. You will need to pry the case halves outward a bit to disengage the snap fit. There are 4 areas where the case halves are snap fit together as shown in the pictures. You can use gentle taps from hammer to force the metal case halves outward. (4) Arrows show the locations of the snap fits. Flat head screw driver is inserted between the case halves, forcing outer half outward. Gently tap flat head screw driver downward to force case walls outward. Pry center portion upwards to separate.
 as shown. Use a suitable socket or collar to push down on the spring retaining ring.")
16 Page 16 Case halves separated. Note motor on bottom right. Motor can be gently pulled straight up to disengage from the motor drive unit. Step 9 Open Motor Bracket In order to open the motor bracket, place it in an arbor press (or vice) as shown. Use a suitable socket or collar to push down on the spring retaining ring. With the spring compressed, rotate the socket or collar approximately 1/6 turn and slowly release compression on the spring. This will align the male tabs in the shaft with the female indents on the retaining ring, and allow the ring to come off the shaft. Release compression slowly, this is a pretty heavy spring. You might need to help the retaining collar to rotate while compressed, if its being stubborn. Just use a pair of channel locks or large pliers to grip the spring, and rotate while slightly compressed.

17 Page 17 Arrow showing the retaining ring sitting just above the spring. You need to compress this and rotate the socket or collar about 1/6 turn either direction to disengage the retaining ring. Release compression slowly as the spring is heavy. You can also do this by hand with a deep well socket, by pressing down firmly on the spring then rotating. Use eye protection and be careful, the spring is heavy. Step 10 Remove / Replace Worm Gear Remove retaining ring, spring, lower spring perch. Then remove the black plastic motor housing and flip over to see the discrepant worm gear that GM never wanted you to find. Gently pop this worm/spur gear out using a small flat head screw driver. Retain the brass bushings on either end.

18 Page 18 Discrepant gear shown. Note the plastic spur gear over-molded onto the metal worm gear. This is what has likely broken if you hear the motor whirring but nothing happens.

19 Page 19 Step 11 Prepare Worm Shaft for Installation of GruvenParts.com Reinforced Spur Gear Remove the OEM spur gear, and any remnants still stuck onto worm gear shaft. It should just pull right off. You can use a box cutter or other sharp blade if needed, you won t hurt the underlying steel worm shaft. You could also use a propane torch and simply melt the old plastic spur gear off the steel worm shaft. Usually it just crumbles right off and leaves little or no residue. OEM main worm shaft with over-molded plastic spur gear show on the far left. OEM main worm shaft 2 nd from left shown with plastic spur section removed. GruvenParts.com brass spur gear shown 2 nd from right. GruvenParts brass spur gear shown installed via epoxy on far right.
20 Page 20 Step 12 Install GruvenParts.com Brass Spur Gear onto Worm Shaft First, test fit the new gear dry. Then, apply generous coat of 2 part epoxy such as JB Weld 24 hour cure or equivalent strong 2 part metal to metal epoxy to the underlying steel worm gear teeth. Don t use a 5 minute epoxy here, use a strong 24 hour cure 2 part epoxy such as JB Weld Make sure to fully coat the grooves where the new gear will reside. Mix epoxy per manufacturers instructions. Install GruvenParts.com brass spur gear onto worm shaft by threading it on, similar to installing a nut onto a bolt. There are no internal spirals on the GruvenParts spur gear, but a threading motion helps to move the epoxy to all the surfaces. Brass gear should be installed such that of shaft is protruding beyond face of gear. Ensure gear rests straight on the shaft so it spins true once cured. The epoxy will do all the work holding the new gear onto shaft, so it doesn t need to be tight on the shaft. Wipe off any excess epoxy and allow to fully cure per manufacturers instructions for a full 24 hours. Once epoxy has fully cured, reinstall the main shaft worm gear with the new brass gear and motor and ensure motor gear teeth make proper contact with new brass spur gear. You may need to adjust the brass bushings that the shaft rides on to ensure the gear stays centered in the motor slot. You can reposition those brass bushings slightly to ensure the shaft doesn t have much play. Plug in motor connection and operate motor back and forth several times to ensure everything is aligned properly before reassembling you will need to hold the motor in place if running it without the metal cover installed.

21 Page 21 Assembly is the reverse of removal. Use Permatex White Lithium grease P/N or equivalent on all the moving parts of the mechanism when reassembling. Note the assembly order and orientation as shown on Page 3.

22 Page 22 Regarding the Collet : note that it can only fit onto the Mirror Base in 1 orientation, so you will need to rotate it on the Mirror Base until you find that correct orientation. Also regarding the Collet you should grind off completely the 2 protrusions on the BOTTOM side. See picture below. The reason for this is because these Tabs/Protrusions are meant to act as detents or stops for when the plastic gear breaks. It will lock the unit in the extended or retracted position, with no chance of the unit back driving due to the force of the air pushing on the mirror. These detents put a huge strain on the unit, and since the plastic gear has been changed out with a proper metal gear, these are no longer needed and therefore these tabs/protrusions can be ground flat. Use eye protection when grinding this. Grind Tab Flat Grind Tab Flat Collet Bottom Side Shown, Remove the Tabs

23 Page 23 Once the case unit has been reassembled, make sure the spring hat is sitting flat on the black plastic basket as shown in the pic below. If its riding up off the basket, it means you do not have the main gear or collet situated properly. Repeat the assembly until the spring hat is sitting flat as shown below. Spring Hat Sitting Flush to Black Plastic Basket
24 Page 24 ** TROUBLE SHOOTING / TIPS SECTION ** 1. Ensure the brass gear internal bore and the main shaft worm gear are CLEAN and free of any debris before applying epoxy. 2. The new brass gear is slightly thicker in cross section. If it rubs the bottom of the black plastic housing, you can use a dremel tool or sharp knife to gently clearance the area directly under the gear. Ensure the gear can spin freely without contacting the black plastic housing. 3. When installing the brass spur gear, check to make sure its perpendicular to the main worm shaft (not crooked). Let the epoxy cure fully while the gear is held concentric to the main worm shaft. It can be a little bit off, but make sure you don t have it too crooked to the main worm shaft. The new brass gear can wobble slightly as it turns, that s not an issue. 4. If there is any binding in the new gear shaft, resolve the binding. Make sure the new gear shaft isn t poking too far out on 1 side or the other past the brass bushings because it will hit the metal case that goes around it. That will jam the whole mechanism. If you need to, trim a bit of the shaft off so it doesn t protrude past the brass bushings on either end. Use a dremel tool or similar for this, wear eye protection. It s a hardened steel shaft, so sparks will be flying as you trim the ends off. 5. If all else fails, us paul@gruvenparts.com and we will help. We stand behind everything we sell. We realize this process seems difficult, due to the poor design of the OEM mechanism which we re designing a fix for.
Installation Manual TWM Performance Short Shifter Cobalt SS/SC, SS/TC, HHR SS, Ion Redline and Saab 9-3
 Page 1 Installation Manual TWM Performance Short Shifter Cobalt SS/SC, SS/TC, HHR SS, Ion Redline and Saab 9-3 Please Note: It is preferable to park on a flat surface, as you will have to engage and disengage
Instructions for repairing the F-Body Hatch Pull-Down Unit By Lon Salgren (ls90rs)
") Instructions for repairing the 1986-87 F-Body Hatch Pull-Down Unit By Lon Salgren (ls90rs) Lonsal@adelphia.net CAUTION: Completely read and understand the instructions before proceeding. There are some
Instructions for repairing the 1986-87 F-Body Hatch Pull-Down Unit By Lon Salgren (ls90rs) Lonsal@adelphia.net CAUTION: Completely read and understand the instructions before proceeding. There are some
Fluid-O-Tech ROTOFLOW ROTARY VANE PUMP REBUILD MANUAL
 Fluid-O-Tech PUMP TECHNOLOGY AT ITS BEST WWW.FLUID-O-TECH.COM Office: 161 Atwater St., Plantsville, CT 06479 Phone: (860) 276-9270 Fax: (860) 620-0193 ROTOFLOW ROTARY VANE PUMP REBUILD MANUAL 08/09 Ed.,
Depress each tab as you pull the bezel off. The bezels are tight. L.H. shown.
 2013-2014 Ford Mustang V6 & Boss 302 Lower Valance Fog Light Kit Parts List: Quantity: Tool List: Fog light & bulb with bracket 2 Flat head & Phillips screwdriver Black bezels 2 Ratchet & Socket set OR
Stand Alone Fog Lights Installation Instructions
 Tools Required: 1. Trim Removal tool or protected flat screwdriver 2. #2 Phillips Screwdriver 3. 10mm socket 4. 10mm wrench 5. 8mm or 5/16 socket 6. Adjustable Pliers 7. Electrical Tape WARNING!!! Disconnect
Troubleshooting Guide for Okin Systems
 Troubleshooting Guide for Okin Systems More lift chair manufacturers use the Okin electronics system than any other system today, mainly because they re quiet running and usually very dependable. There
Installation Manual TWM Performance Short Shifter Subaru STi 2008+
 - 1 - Installation Manual TWM Performance Short Shifter Subaru STi 2008+ Please Note: It is preferable to park on a flat surface, as you will have to engage and disengage the hand brake and shift from
Installation Instructions
 Instructions Created by an: Inchworm Tacoma Dual Case Adapter Installation Instructions Suggested Tools: CAUTION: Safety glasses should be worn at all times when working with vehicles and related tools
Maintenance Information
 Form 04584058 Edition 1 November 2004 Air Impactool 2141P and 2141PSP Maintenance Information Save These Instructions Disassembly General Instructions 1. Do not disassemble the tool any further than necessary
Bag 1. Bag 1. Center Pivot. Center Pivot
 8 00734 01901 5 Center Pivot Bag 1 3374 - Center Pivot Socket 4019 - Alum Pivot ball 3254-2-56 Button Head *Note - Sometimes it is helpful to slightly over-tighten the top clamp screws, then work the ball
Troubleshooting Guide for Limoss Systems
 Troubleshooting Guide for Limoss Systems NOTE: Limoss is a manufacturer and importer of linear actuators (motors) hand controls, power supplies, and cables for motion furniture. They are quickly becoming
Ford Mustang GT-Style Fog Light Kit Parts List: Quantity: Tool List:
 2013-2014 Ford Mustang GT-Style Fog Light Kit Parts List: Quantity: Tool List: Fog light (Left& Right) 2 Flat head & Phillips screwdriver Upper grille with surround 1 Ratchet & Socket set OR Lower grille
Installation Instructions COMPETITION/PLUS SHIFTER Ford Mustang MT82 6-Speed Manual Transmission Catalog#
 Installation Instructions COMPETITION/PLUS SHIFTER 2015-2017 Ford Mustang MT82 6-Speed Manual Transmission Catalog# 3916037 Rev. 00 WORK SAFELY! For maximum safety, perform this installation on a clean,
Installation: Heater Core
 INTERIOR Changing the heater core in your 94-02 Dodge Ram has usually meant removing the entire dash and instrument panel, and then removing the heating-ventilating-air conditioning (HVAC) from the firewall.
Evo X Walbro 450 Pump System
 Evo X Walbro 450 Pump System Installation Guide Please contact us at sales@wtftuned.com with any additional questions Tools required: 8 mm socket and wrench, needle-nose pliers, razor, drill w/ 5/64 bit,
Service Manual Air Tech Second Stage
 Service Manual Air Tech Second Stage Copyright 2002, Cressi-sub Revised 3/2002 2 Air Tech Second Stage Service Manual Contents BEFORE STARTING... 3 DISASSEMBLY... 3 PARTS CLEANING AND LUBRICATION... 9
DrVanos.com Stage II Installation Instructions. Tool rental is available with the purchase of a vanos kit *See website for more info*
 DrVanos.com Stage II Installation Instructions Special Tools Needed: Camshaft locking tool TDC Crank pin Sprocket turning tool Tool rental is available with the purchase of a vanos kit *See website for
Tru-Billet Climate Control Knob Installation Instructions
 P/N S197-525-07 2007-08 Tru-Billet Climate Control Knob Installation Instructions Thank you for your purchase of SilverHorse Racing products. Please read all directions before beginning the installation.
MK7 GTI Electronic Folding Mirror Conversion
 MK7 GTI Electronic Folding Mirror Conversion 01 Mirror and Switch Installation 1. Using a soft pry tool remove the trim panel on the driver side door handle. 02 2. Remove 2 T-30 torx screws. 03 3. On the
Assembly Manual. 1/10th Formula 1 Car
 Assembly Manual 1/10th Formula 1 Car Center Pivot Bag 1 3374 - Center Pivot Socket 40194 - Hard Anodized Alum Pivot ball 3254-2-56 *Note - Sometimes it is helpful to slightly over-tighten the top clamp
Installation Manual TWM Performance Short Shifter 2008 Mitsubishi Lancer
 Page 1 Installation Manual TWM Performance Short Shifter 2008 Mitsubishi Lancer Please Note: It is preferable to park on a flat surface, as you will have to engage and disengage the hand brake and shift
*Some speedometers have these additional electronic connections. If yours does, then remove the smaller slotted screws shown.
 www.odometergears.com 1981-1985 240 Cable-Driven Speedometers (NOT for 1986 and later electronic units) http://www.davebarton.com/240-odometer-repair.html For this set of instructions below, I will not
BMW E61 Hydraulic Pump replacement instructions
 BMW E61 Hydraulic Pump replacement instructions This DIY will guide you through the tasks needed to successfully replace your defective tailgate hydraulic pump Difficulty 3 of 10. The most difficult part
Volkswagen New Beetle Body - Exterior 64 Glass, Window regulators (Page GR-64)
") 64 Glass, Window regulators (Page GR-64) Flush bonded windows Body flange, preparing for glass installation Broken rear window, removing Cleaning off excess adhesive material Curing time Installation instructions
64 Glass, Window regulators (Page GR-64) Flush bonded windows Body flange, preparing for glass installation Broken rear window, removing Cleaning off excess adhesive material Curing time Installation instructions
INSTALL/REMOVAL INSTRUCTIONS: WINDOW LIFT MOTOR
 REMOVAL/INSTALL OF WINDOW REGULATOR (742-269) Ford Mustang 1996 2004 General Tech Tips: Use painter s tape rather than duct tape to secure window. It will not damage paint or leave sticky residue. A plastic
JEEP TJ & (XJ 84-01) ATLAS 2 SP.
 ATLAS 2 SP.") KIT CONSISTS OF: No. Qty Part No. Description 4320 Aerotech Center Way, Page 1 of 9 1 1 302051-RLE BASE- TWIN STICK MOUNT 42RLE 2 1 302080 STUD BOLT 1/2"-13 X 7 (XJ) 3 1 303120 SERRATED LOCK NUT 1/2" X
KIT CONSISTS OF: No. Qty Part No. Description 4320 Aerotech Center Way, Page 1 of 9 1 1 302051-RLE BASE- TWIN STICK MOUNT 42RLE 2 1 302080 STUD BOLT 1/2"-13 X 7 (XJ) 3 1 303120 SERRATED LOCK NUT 1/2" X
Ford Mustang V6 OEM-Style Fog Light Kit Parts List: Quantity: Tool List:
 2015-2017 Ford Mustang V6 OEM-Style Fog Light Kit Parts List: Quantity: Tool List: LED Foglights/ Bezels 2 Flat head & Phillips screwdriver (if you ordered part#3600) Ratchet & Socket set OR Wiring harness
Peg-Harness installation instructions
 Peg-Harness installation instructions I know it s not the easiest thing to do, but PLEASE READ THESE INSTRUCTIONS COMPLETELY so you will understand what you are trying to accomplish before you start drilling
Installation Manual TWM Performance Short Shift Kit Stage 1 and Stage 2 MazdaSpeed 6
 Page 1 Installation Manual TWM Performance Short Shift Kit Stage 1 and Stage 2 MazdaSpeed 6 Please Note: It is preferable to park on a flat surface, as you will have to engage and disengage the hand brake
Nissan GTR Alpha Fuel System
 Nissan GTR Alpha Fuel System Instructions V5 The goal of AMS is to provide the highest quality, best performing products available. By utilizing research and development, and rigorous testing programs
Installation Manual TWM Performance Kia Forte Short Shifter
 Installation Manual TWM Performance Kia Forte 2009+ Short Shifter Begin the installation by parking on a flat surface, as you will have to engage and disengage the hand brake and shift from gears to neutral.
Installation Instructions
 Suzuki Samurai 1 Inch and 2 Inch Body Lift Kit (SKU# SSP-BL) Installation Instructions Background: These instructions are designed for installing the 2 body lift. Our approach is to raise the entire body
BMW 528i E39 Sunroof Repair
 These instructions will help guide you through the repair process for broken sunroof control rails on an E39 chassis. Before I get started, I want to give a shout-out to a couple people who also posted
Remove the 3-11mm nuts holding mirror on. Don t drop the nuts!
 2005-2012 Ford Mustang Puddle Lamp Kit Parts List: Quantity: Tool List: LED Lamps 2 Flat head screwdriver Seals 2 Ratchet & Socket set OR Nuts 2 Adjustable Wrench Wiring harness 1 Drill & 11/16 th bit
Installation Manual TWM Performance Short Shifter Nissan 350Z, 370Z Infiniti G35, G37
 Installation Manual TWM Performance Short Shifter Nissan 350Z, 370Z Infiniti G35, G37 It is preferable to park on a flat surface, as you will have to engage and disengage the hand brake and shift from
Replacing MK4 Golf/Jetta radiator mounts in-car
 Replacing MK4 Golf/Jetta radiator mounts in-car This is a guide to replacing the radiator mounts in a MK4 Golf/Jetta. This involves moving the core support to the service position which allows you to do
Hard Bar Sport, M1/M2 Hard Core Hardtop, M2 Sport, and Xtreme Installation Instructions
 HARDWARE KIT: Hard Bar Sport, M1/M2 Hard Core Shoulder Harness Guide Relocation Assemblies: 2-3/8" X 1" grade 8 bolts 4-3/8" flat washers 2-3/8" lock nuts 2 - brass bushings 2 - plastic trim caps 2-3/8"
INSTALLATION INSTRUCTIONS
 INSTALLATION INSTRUCTIONS FUEL PUMP SLEEVE INSTALLATION KIT 2001-2006 BMW E46 M3 Document# 19-0058 Customer Support: info@radiumauto.com 1. There are 2 common ways to relieve fuel pressure on the BMW.
Installation Instructions INDY SHIFTER Fits: Mustang Fastback & Convertible with MT-82 Transmission Catalog #
 Installation Instructions INDY SHIFTER Fits: 2015-2018 Mustang Fastback & Convertible with MT-82 Transmission Catalog # 3916036 Watch our installation video on YouTube WORK SAFELY! For maximum safety,
Front Bucket Seat Upholstery
 Specter Off-Road, Inc. 21600 Nordhoff St. Chatsworth, CA 91311 USA www.sor.com, (818)882-1238, Fax: (818) 882-7144 sor@sor.com Luxury Seat Upholstery Installation Instructions Front Bucket Seat Upholstery
OIL COOLER KIT INSTALLATION INSTRUCTIONS PART NUMBER D
 OIL COOLER KIT INSTALLATION INSTRUCTIONS PART NUMBER D570-0904 APPLICATION: 2011-2012 E90 335i/xi (N55 engine) with BMW standard bumper and with stock oil cooler Congratulations for being selective enough
Perfect Park 7000 Installation & Unloading Instructions Operating Manual
 Perfect Park 7000 Installation & Unloading Instructions Operating Manual 1) Always file a claim with the truck line if the lift has been damaged! (If you don t originally notice the damage, but find some
The Magazine For Slot Car Enthusiasts
 The Magazine For Slot Car Enthusiasts Building the Tomy Super G+ By Milt Surratt Tomy Super G+ slot cars have been around in the current form for about 12 years. Out of the package, the Tomy HO slot car
ADVANCE ADAPTERS INC. P/N: JEEP TJ & (XJ 84-01) ATLAS 4 SPEED CABLE SHIFTER units built after 5/1/12
 ATLAS 4 SPEED CABLE SHIFTER units built after 5/1/12") Paso Robles, CA 93447 PAGE 1 OF 9 Telephone: (800) 350-2223 Fax: (805) 238-4201 Page Rev. Date: 05-12-15 KIT CONSISTS OF: No. Qty Part No. Description 1 1 302051 BASE- TWIN STICK MOUNT 2 1 302080 STUD
Paso Robles, CA 93447 PAGE 1 OF 9 Telephone: (800) 350-2223 Fax: (805) 238-4201 Page Rev. Date: 05-12-15 KIT CONSISTS OF: No. Qty Part No. Description 1 1 302051 BASE- TWIN STICK MOUNT 2 1 302080 STUD
Trouble Shooting Guide for Hubbell Systems
 Trouble Shooting Guide for Hubbell Systems NOTE: Hubbell Special Products discontinued operations in 2008, so there is a very limited number of repair parts available for motor repair. In some ways, this
Changing the Struts on a WK Jeep CRD
 Changing the Struts on a WK Jeep CRD Step by Step By Chirpz Disclaimer: I do not claim that this procedure is the right way or even the best way to change your struts. This is what I did after reading
G.A.S. M54 DISA Repair Kit D.I.Y. Instructions
 Home BMW Solutions Porsche Solutions DIY Tech Engine Services Dyno Services Machining About G.A.S. Contact G.A.S. M54 DISA Repair Kit D.I.Y. Instructions The installation of the German Auto Solutions DISA
Installing Rear Brake Pads on a WK Jeep
 Installing Rear Brake Pads on a WK Jeep Step by Step By Chirpz Disclaimer: I do not claim that this procedure is the right way or even the best way to change your rear brake pads. This is what I did after
AmTryke Adult Recumbent Model HP1000 #50-HC-1000
 AmTryke Adult Recumbent Model HP1000 #50-HC-1000 TOOLS Needed for Assembly 5 mm Allen Wrench 8 mm Socket or Wrench 10 mm Socket or Wrench 14 mm Socket or Wrench 15 mm Socket or Wrench 22 mm Socket or Adjustable
Assembly Manual. 1/10th World GT car
 Assembly Manual 1/10th World GT car Center Pivot Bag 1 3374 - Center Pivot Socket 40194 - Hard Anodized Alum Pivot ball 3254-2-56 Button Head *Note - Sometimes it is helpful to slightly over-tighten the
2. With the rear door open remove pull-style clip from the passenger side just below the door latch.
 LoD Offroad FJ Cruiser Rear Bumper with Tire Carrier Installation Instructions 1. Begin with removing factory spare from the rear door. 2. With the rear door open remove pull-style clip from the passenger
3M Overhaul Service Kit
 SERVICE INSTRUCTIONS FOR 3M 12,000 RPM 3 in. (77 mm) RANDOM ORBITAL SANDERS 3M Overhaul Service Kit The part number 20346, 3M Overhaul Service Kit, contains all the replacement parts that naturally wear
Wheel Bearing Replacement Passat TDI
 Rear Bearing/hub assembly replacement This is a fairly straight forward process. Pictures are not necessary for most of this procedure for a person with skills to do this repair. Anyone who thinks they
 www.odometergears.com Mercedes-Benz Mechanical Odometer Repair This how to can be used for all mechanical repairs as the only difference will be the removal of the instrument cluster. http://www.dieselgiant.com/repairyourodometer.htm
INSTALLATION GUIDE CRF150R Manual Revision:
 REKLUSE MOTOR SPORTS The z-start Pro Clutch INSTALLATION GUIDE CRF150R 191-810 Manual Revision: 032508 2002 Rekluse Motor Sports Rekluse Motor Sports, Inc. 110 E. 43rd Street Boise, Idaho 83714 208-426-0659
Retro it Steering Column
 Retro it Steering Column INSTALLATION INSTRUCTIONS for 1976-86 CJ5 & CJ7 FOR PART NUMBER S: 1520800010, 1520800020, 1520800051, 1526800010, 1526800020, 1526800051 S I NCE 1986 Instruction # 8000000010
INSTALLATION INSTRUCTIONS
 INSTALLATION INSTRUCTIONS FUEL SURGE TANK INSTALLATION KIT 1999-2006 BMW E46 COUPE Document# 19-0056 Support: info@radiumauto.com Note: This kit was designed for a standard single pump Radium Engineering
OIL COOLER KIT INSTALLATION INSTRUCTIONS PART NUMBER D E92 335is (N54 engine) with BMW M-Technic bumper and with stock oil cooler
 with BMW M-Technic bumper and with stock oil cooler") OIL COOLER KIT INSTALLATION INSTRUCTIONS PART NUMBER D570-0923 APPLICATION: 2011 E92 335is (N54 engine) with BMW M-Technic bumper and with stock oil cooler Congratulations for being selective enough to
OIL COOLER KIT INSTALLATION INSTRUCTIONS PART NUMBER D570-0923 APPLICATION: 2011 E92 335is (N54 engine) with BMW M-Technic bumper and with stock oil cooler Congratulations for being selective enough to
OIL COOLER KIT INSTALLATION INSTRUCTIONS PART NUMBER D E92 335i/xi (N55 engine) with BMW Standard bumper and with stock oil cooler
 with BMW Standard bumper and with stock oil cooler") OIL COOLER KIT INSTALLATION INSTRUCTIONS PART NUMBER D570-0924 APPLICATION: 2011-12 E92 335i/xi (N55 engine) with BMW Standard bumper and with stock oil cooler Congratulations for being selective enough
OIL COOLER KIT INSTALLATION INSTRUCTIONS PART NUMBER D570-0924 APPLICATION: 2011-12 E92 335i/xi (N55 engine) with BMW Standard bumper and with stock oil cooler Congratulations for being selective enough
RS-2 SINGLE ACTION REAR BUMPER WITH TIRE CARRIER INSTALL MANUAL FOR JEEP WRANGLER ALL MODELS.
 RS-2 SINGLE ACTION REAR BUMPER WITH TIRE CARRIER INSTALL MANUAL FOR 2007-2016 JEEP WRANGLER ALL MODELS. Rear Bumper Installation Instructions 1) Remove factory rear bumper, (this includes all tow hitch
Installation Instructions
 Instructions Created by an: Inchworm Gear Clockable Toyota Dual Transfer Case Adapter Kit, 21 or 23 Spline SKU# TCASE-IW-300-000 Installation Instructions CAUTION: Safety glasses should be worn at all
The drawings are all available from the author or from the host websight. You will find these pictures and descriptions to be most helpful.
 Last Revision: 10JA2010 1969 THRU 1976 GM A & F-CAR STANDARD (NON-ADJUSTABLE) STEERING COLUMN DISASSEMBLY & REPAIR INSTRUCTIONS PAPER #1 Disassembly and Repair Instructions Addressed in this Paper Degree
M1A1 Thompson Upgrade
 M1A1 Thompson Upgrade If you are mechanically inclined at all. This should be no problem. I'll start off with a list of things you will need. Thompson M1A1 Whisky Cigarettes Tools: Flat screwdriver No.
INSTALLATION GUIDE. KTM 125, 144, Stroke KTM 250, Stroke KTM 250 SXF, XC, XC-W KTM 450, 505 SXF Manual Revision:
 REKLUSE MOTOR SPORTS The z-start Pro Clutch INSTALLATION GUIDE KTM 125, 144, 200 2-Stroke KTM 250, 300 2-Stroke KTM 250 SXF, XC, XC-W KTM 450, 505 SXF 191-836 Manual Revision: 050307 2002 Rekluse Motor
5X Racing Mazda Miata Aluminum Shifter Bushing Installation Instructions
 5X Racing Mazda Miata Aluminum Shifter Bushing Installation Instructions Thank you for your purchase! These instructions will explain how to properly install a 5X Racing Aluminum Shifter Bushing in your
1999 Corolla Valve Cover Gasket Replacement
 1999 Corolla Valve Cover Gasket Replacement While checking the spark plugs on my 1999 Corolla, I found the each plug sitting in a pool of oil. Oil on the spark plugs usually is indicative of major engine
INSTALLATION GUIDE. Doc ID: A Doc Rev:
 REKLUSE MOTOR SPORTS EXP Kit for Harley-Davidson Big Twin Hydraulic-Actuated OVERVIEW INSTALLATION GUIDE Doc ID: 191-6200A Doc Rev: 061215 This kit replaces the OEM clutch pack (friction disks and drive
1989 Jeep Cherokee. STEERING COLUMN' '1989 STEERING Jeep Steering Columns STEERING COLUMN STEERING Jeep Steering Columns
 STEERING COLUMN 1989 STEERING Jeep Steering Columns DESCRIPTION All models use collapsible steering columns. All columns have integral ignition switch and locking device. Optional tilt wheel is available
Installation Instructions
 Preparing your vehicle to install your brake system upgrade 1. Rack the vehicle. 2. If you don t have a rack, then you must take extra safety precautions. 3. Choose a firmly packed and level ground to
TOYOTA RAV4/HV INTERIOR LIGHT KIT Preparation
 Preparation Part Number: PT413-42130 Kit Contents Item # Quantity Reqd. Description 1 1 Wire Harness 2 3 Hardware Bag Contents Item # Quantity Reqd. Description 1 20 Cable Tie 2 2 Scotchlok 3 2 Foam Pad
Gearbox Assembly 101. Introduction. Before Beginning. By Mark Schutzer 4/13/06
 Gearbox Assembly 101 By Mark Schutzer 4/13/06 Introduction If you are planning to re-motor an old brass locomotive you may want to upgrade to a new gearbox at the same time. The early 60 s and 70 s gearboxes
Installation Instructions
 Installation Instructions Jeep JK 2-Door (2011 Present) Mounting Bracket and Air Line System Kit for ARB On-Board Twin Air Compressor (CKMTA12) Made in the USA Kit Contents: 1 Flat Bracket 1 Formed Bracket
M52tu-M54 VANOS Assembly & Timing Using G.A.S. Professional Cam Tool Kit
 Home BMW Solutions Porsche Solutions DIY Tech Engine Services Dyno Services Machining About Contact Store Tool Rental M52tu-M54 VANOS Assembly & Timing Using G.A.S. Professional Cam Tool Kit This procedure
82-01 Chevy S-10/ GMC Sonoma Front Kit Part No B
 www.airliftcompany.com 82-01 Chevy S-10/ GMC Sonoma Front Kit Part No. 75512B MN-481 (02105) ECN 3549 Please read these instructions completely before proceeding with installation Left Side Upper Shock
AmTryke Adult Recumbent Model JT2000 #50-FC-2000
 AmTryke Adult Recumbent Model JT2000 #50-FC-2000 TOOLS Needed for Assembly 5 mm Allen Wrench 8 mm Socket or Wrench 10 mm Socket or Wrench 14 mm Socket or Wrench 15 mm Socket or Wrench 22 mm Socket or Adjustable
Door Panel Removal & Window Stop Adjustment
 Door Panel Removal & Window Stop Adjustment By: Jeff Wolford Disclaimer: This is simply an article of how I fixed my car. I m not responsible if you break, scratch, or mess up anything following my example.
Sunroof Repair. Sunroof Repair TSB. The sunroof repair kit available for the J30 is part number Y20. See images at bottom of document.
 Sunroof Repair This document is the text/images from the TSB (technical service bulletin) issued by Infiniti concerning the repair procedure for sunroof issues. Be advised that this is a LARGE, TIME-CONSUMING
Ford Ranger and Mazda Pickup Odometer Worm Gear Replacement
 www.odometergears.com Ford Ranger and Mazda Pickup Odometer Worm Gear Replacement http://www.therangerstation.com/magazine/fall2008/odometer_worm_gear.htm ****************************************************************************************************
Remove black panel shown. Save 6 retaining pins for re-install later. Pry up on center part of pin first. Then pry out entire retaining pin.
 2005-2009 Ford Mustang V6 Fog Light Wiring Kit Parts List: Quantity: Tools Required: Wiring harness 1 Flat head screwdriver Supplemental wire leads 2 Ratchet & Socket set OR Wire tap red 2 Adjustable Wrench
R-1125 C HARNESS MOUNT BAR INSTALLATION INSTRUCTIONS Fits C7 Corvette Coupes, including Z06
 R-1125 C HARNESS MOUNT BAR INSTALLATION INSTRUCTIONS Fits C7 Corvette Coupes, including Z06 The R-1125 Harness Mount Bar has been designed and tested to provide a mounting point for the shoulder harness
Last Revision: 09JA THROUGH 1976 GM A & F-CAR TILT STEERING COLUMN DISASSEMBLY & REPAIR INSTRUCTIONS PAPER #3
 Last Revision: 09JA2010 1969 THROUGH 1976 GM A & F-CAR TILT STEERING COLUMN DISASSEMBLY & REPAIR INSTRUCTIONS PAPER #3 Disassembly and Repair Instructions Addressed in this Paper Degree of Difficulty Page
Installation Instructions
 Instructions Created by an: 86-95 Suzuki Samurai Samurai Front Axle Knuckle Rebuild Kits (SKU# SAX-KRK) Installation Instructions Revised 6-6-14 Suggested Tools: CAUTION: Safety glasses should be worn
3M Overhaul Service Kit
 SERVICE INSTRUCTIONS FOR 3M 12,000 RPM 5 in. (127 mm) and 6 in. (150 mm) RANDOM ORBITAL SANDERS 3M Overhaul Service Kit The part number 20347, 3M Overhaul Service Kit, contains all the replacement parts
OIL COOLER KIT INSTALLATION INSTRUCTIONS PART NUMBER D E92 335i/xi (N55 engine) with M-Technic bumper and without stock oil cooler
 with M-Technic bumper and without stock oil cooler") OIL COOLER KIT INSTALLATION INSTRUCTIONS PART NUMBER D570-0925 APPLICATION 2011-12 E92 335i/xi (N55 engine) with M-Technic bumper and without stock oil cooler Congratulations for being selective enough
OIL COOLER KIT INSTALLATION INSTRUCTIONS PART NUMBER D570-0925 APPLICATION 2011-12 E92 335i/xi (N55 engine) with M-Technic bumper and without stock oil cooler Congratulations for being selective enough
INSTALLATION INSTRUCTIONS
 INSTALLATION INSTRUCTIONS FUEL SURGE TANK INSTALLATION KIT 1999-2006 BMW E46 COUPE Document# 19-0056 Support: info@radiumauto.com Note: This kit wasn t designed for a FST-R, but can be accomplished. 1.
How to Replace the Main Axle Gear on the Bachmann Spectrum GScale using the NWSL # upgrade gear.
 How to Replace the Main Axle Gear on the Bachmann Spectrum GScale 4-4-0 and 2-6-0 Mogul (2001era), using the NWSL #2223-6 upgrade gear. By Paul M. Newitt (all text and photos Copyright Paul M. Newitt,
2013 RT / 2014RT / 2015 RT - Shock Spring Adjuster Installation Instructions
 2013 RT / 2014RT / 2015 RT - Shock Spring Adjuster Installation Instructions Billet Aluminum Adjusters (2) Shock Spring Compressors (Optional) Spanner Wrench (1) BajaRon Decals Not Shown (4) Adjuster Scuff
Installation Instructions for BMR Lowering Springs Performance ( Mustang GT)
") Installation Instructions for BMR Lowering Springs Performance (2015-2017 Mustang GT) Time Required: 3+ hours Notes: This install was done with the performance springs from BMR, but install should be the
Installation Instructions for BMR Lowering Springs Performance (2015-2017 Mustang GT) Time Required: 3+ hours Notes: This install was done with the performance springs from BMR, but install should be the
Go-ped ESR750 / ESR750EX Rear Brake Installation Instructions
 Go-ped ESR750 / ESR750EX Rear Brake Installation Instructions This kit provides all the parts you need to install a rear brake on your ESR750 or ESR750EX. It will not work on an ESR Sport, or other Go-ped
PARTS TOOLS. Set Screw. Washer (2) Blue Bushing (2) Black Bushing (2) B&M Short Throw Shifter. Jam Nut Grease. Retaining Ring (2) Insert (2)
 Blue Bushing (2) Black Bushing (2) B&M Short Throw Shifter. Jam Nut Grease. Retaining Ring (2) Insert (2)") Installation Instructions SHORT THROW SHIFTER Fits: Porsche Boxter, Boxter S, 911, 996 Cayman & Cayman S models See Application Guide for specific year ranges and engine sizes Catalog # 45135 WORK SAFELY!
Installation Instructions SHORT THROW SHIFTER Fits: Porsche Boxter, Boxter S, 911, 996 Cayman & Cayman S models See Application Guide for specific year ranges and engine sizes Catalog # 45135 WORK SAFELY!
Connecting the rear fog light on the A4 Jetta, while keeping the 5 Light Mod
 Connecting the rear fog light on the A4 Jetta, while keeping the 5 Light Mod DISCLAIMER: I'm human and make mistakes. If you spot one in this how to, tell me and I'll fix it This was done on my 99.5 Jetta.
Maintenance Information
 16575243 Edition 2 October 2013 Air Screwdrivers 1R Series Maintenance Information Save These Instructions Product Safety Information WARNING Failure to observe the following warnings, and to avoid these
OWNER S MANUAL. ROTARY SURFACE CLEANER Models 105C, 105F, 105CW, & 105FW. Revision 2.01
 OWNER S MANUAL ROTARY SURFACE CLEANER Models 105C, 105F, 105CW, & 105FW Revision 2.01 ROTARY SURFACE CLEANER WARNING HIGH PRESSURE CAN CAUSE SERIOUS INJURY, MAXIMUM WORKING PRESSURE IS 4000 P.S.I. Any
Installation Instructions QUICKSILVER CONSOLE SHIFTER Fits: Chevelle / El Camino
 WORK SAFELY! For maximum safety, perform this installation on a clean, level surface and with the engine turned off. Place blocks or wedges in front of and behind both rear wheels to prevent movement in
Installation Instructions Pro Bandit Shifter Fits: GM Powerglide Automatic Transmissions
 Installation Instructions Pro Bandit Shifter Fits: 1962-1973 GM Powerglide Automatic Transmissions Part # 80793 WORK SAFELY! For maximum safety, perform this installation on a clean, level surface and
TOYOTA VENZA 2009 TRAILER WIRE HARNESS Procedure
 Part Number: PT791-0T099 Kit Contents Item # Quantity Reqd. Description 1 1 Trailer Wire Harness Module 2 1 4-Flat Harness 3 1 Battery Power Wire Harness 4 1 Mounting Bracket, 4-Flat 5 2 Screw #10-24 6
Rebuilding the Power Steering Pump for a 2007 Honda Accord 4CYL
 Rebuilding the Power Steering Pump for a 2007 Honda Accord 4CYL Disclaimer: I have benefited greatly from others who have taken the time to post auto repair videos/tutorials online. To try and return the
MAZDASPEED3 Intercooler Instructions
 MAZDASPEED3 Intercooler Instructions Congratulations on your purchase of the COBB Tuning Front Mount Intercooler System for your 2007-2009 Mazdaspeed3. The following instructions should assist you through
Low Range HD 2 Inch Body Lift Kit (Sidekick, GV, Vitara, Tracker, X90) SKU# KSP-BL2
 SKU# KSP-BL2") Low Range HD 2 Inch Body Lift Kit (Sidekick, GV, Vitara, Tracker, X90) SKU# KSP-BL2 Installation Instructions Background: These instructions are designed for installing the 2 body lift. They can also be
Low Range HD 2 Inch Body Lift Kit (Sidekick, GV, Vitara, Tracker, X90) SKU# KSP-BL2 Installation Instructions Background: These instructions are designed for installing the 2 body lift. They can also be
PLEASE READ THESE INSTRUCTIONSFULLY BEFORE STARTING TO ASSEMBLE YOUR DIDICAR PLEASE PAY SPECIAL ATTENTION TO THE NOTES AND HINTS
 PLEASE READ THESE INSTRUCTIONSFULLY BEFORE STARTING TO ASSEMBLE YOUR DIDICAR PLEASE PAY SPECIAL ATTENTION TO THE NOTES AND HINTS ASSEMBLY INSTRUCTIONS Parts List iv) i) v) ii) iiib) iiia) vii) i) Car Body