HW Prowler Carburetor Installation Instructions
|
|
|
- Horatio Nash
- 5 years ago
- Views:
Transcription
1 HW Prowler Carburetor Installation Instructions Page 1 of 6 Carb Kit Contains: HW modified Mikuni 36mm pumper style carb Custom choke cable Fuel Line Clamp Instructions (2) Leaner and (2) richer main jets 120 Jet, 125 Jet, 135 Jet, 140 Jet 1. Remove both seats and the plastic seat pans under the seats. 2. Remove the engine cover 3. Remove the air-box by removing the cross-bar support that runs under the air-box to the framing on each side by the seat framing and disconnect the air box from the carburetor and from the plastic intake in the rear. 4. Disconnect the engine breather hose from the bottom of the air box 5. Set the air-box to the side 6. Disconnect the plug going to the stock carburetor, this is the electronic choke. Wrap the end left on the vehicle with electrical tape. 7. Cut the fuel line just above the fitting on the passenger side of the carb 8. Remove the side cover off the drivers side of the carb where the throttle cable goes in, see fig. #1 9. Pull the throttle cable out and then remove the throttle cable end from the throttle plate See Fig. #2 10. Loosen the clamp on the rear of the carb holding the carb on 11. Pull the carb out of the intake boot 12. Set OE carb to the side. 13. Push the new Carb into the intake boot making sure the carb is perfectly vertical and then tighten the clamp back up. The new carb is slightly larger than the stock one so some additional pressure will be needed to get it in. 14. Route all the breather lines connected to the carb down under the carb. 15. Connect the throttle cable onto the new carb but putting the cable end in the bottom hole of the throttle plate on the passenger side of the carb allowing the cable to ride in the slot in the plate and then turn the throttle plate clock wise allowing the threaded end of the cable to fit into the lower round hole of the throttle cable connection plate. See Fig. #3 16. Make sure you have a nut on each side of the plate turn the nut on the outside of the plate to take up the slack in the throttle cable then tighten the nut on the inside of the plate. See Fig. #3 17. Push the fuel line onto the fuel inlet on the passenger side of the carb and install the supplied clamp to hold it on. The fuel line will be a little hard to push on. 18. DO NOT ATTEMPT TO INSTALL THE CHOKE CABLE PARTS SUPPLIED IN THE KIT UNTIL AFTER THE CHOKE CABLE ITSELF IS INSTALLED AND READY TO SCREW INTO THE CARBUETOR. 19. To install the supplied choke cable, drill a 3/8 hole in the dash on the left side of the steering wheel in a location convenient to your left hand. 20. Remove the plastic nut from the bottom of the choke handle on the choke cable. 21. Push the choke cable thru the hole you drilled and then slide the nut over the cable to the inside of the dash and reinstall back on the back of the choke mechanism. Some dash screws maybe needed to be removed to accomplish this.


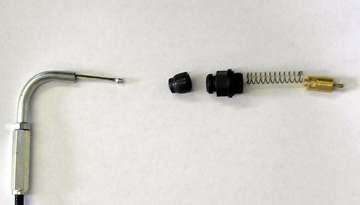
2 Page 2 of Route the choke cable down and thru the center section under the floorboard making sure you don t let it get in contact with the front drive shaft and then route it to the passenger side of the carburetor. 23. While holding the carburetor end of the choke cable that goes into carburetor push the included rubber grommet over the cable and onto the elbow, slide the black nylon nut on the same elbow and let the rubber grommet seal around the nut, next slide the spring onto the cable and lastly take the plunger holding it at a 90 degree angle push the spring back to point to where you can get the cable end to slip into the plunger. See Fig. # 5 Thru Fig. 7# 24. Install the carb end of the choke into the threaded hole in the carb just under the throttle cable plate. Tighten the plastic nut securing the choke cable to the carb. See Fig. #3 25. Connect the front rubber bellow going to the air-box to the carb and tighten down the clamp. 26. Without the air-box lid on reinstall the air-box by reversing the order in which you removed it. 27. Push the engine breather hose back onto the bottom of the air-box 28. Once the air-box is reinstalled you will need to modify your air-box lid as shown in Fig. #4 by cutting a rectangular hole that is 3 wide x 11 long so your new carb can get more air. Drill a small hole and then cut it out with a jigsaw. 29. Reinstall the air-box lid. 30. You are finished with the install. Fig. 1 Fig. 2


3 Page 3 of 6 Fig. #3 Fig. #4 Fig. #5


4 Page 4 of 6 Fig. #6 HW Prowler Carburetor Tuning Instructions Your new HW Prowler Carburetor has been modified for your vehicle; the only adjustment needed may be a main jet change due to your temp or elevation and idle adjustment. We have already set the accelerator pump, air screw and needle position along with modifying the throttle cable plate so it works with the stock cable. The following is an exert from our forum tech article on carburetor tuning. Carburetor tuning is really not an exact science and it is probably one of the most important adjustments you can make on your vehicle. Get it right and it runs great, get it wrong and it might run great until it stops. Tuning the stock carb mostly consist of moving the clip on the Jet Needle up and down and changing the main jet.
5 Page 5 of 6 On our aftermarket Mikuni carbs there is a lot more to work with but from my experience there is really not much more that needs to be worked with than the stock one. There are three basic circuits in all carbs and they are: Pilot Circuit which controls how your engine runs at idle. Idle speed for your Prowler will be between 1500 and 1750 RPM, set it with the white knob on the passenger side of the engine. See Fig. #1 below The Needle Jet and Jet needle controls how your engine runs from 1/4 throttle to 3/4 throttle. Moving the clip up makes the engine run leaner, moving it down the needle makes it run richer. Main Jet which controls your engine from 3/4 throttle to wide open. First off let me explain a lean and rich conditions. It is simply, one is not getting enough fuel and the other is too much. Which one can do the most damage? Lean. The bad part is a lean engine runs the best but it will run so hot to melt your piston and all other upper engine parts. We bought our Dyno with a air/fuel module so we can monitor the air/fuel ratio at all times while we dyno, I found out how far you can get off by using conventional tuning methods like color of the spark plug and how fast it runs. The air/fuel ratio is a measure in units of mass of air to fuel so for the perfect air/fuel ratio of 14.7:1 means there is 14.7 units of air to one unit of fuel. Ok, you don't have a $17,000 dyno to tune your carb but what you can do is $ and buy our Air/fuel Ratio gauge. The main jet is what most people have to change and they have to change it for various reasons. To change your main jet from the one supplied in your carb, remove the hex shaped cap on the bottom of the carb and you will find the main jet. Remove the main jet with a flat head screw driver and replace it with one of the other main jets included with your kit as you testing sees fit. See Fig. #1 and #2 below. The jets have numbers stamped into the top of them. The one in the carb is a 130. If you change your exhaust system or air intake so your engine breaths better you most likely will need to go to a bigger jet to compensate for the additional air flow. You might also have to raise your needle to allow more fuel thru too. If you ride in higher elevations mostly over 2000' then you might have go down in jet size. Several main jets on either side of the stock jet are supplied for any conditions that might warrant changing it. How to adjust it with your seat of the pants dyno: Start with a "fat" jet first, go high in number the first time and go run your vehicle wide open throttle while driving it, not in neutral, if it starts to stumble or cutting out at wide open throttle on extended runs, go down one jet size at a time until it runs smooth. If it does not stumble with the first jet selection, go up again and start over. Once the stumbling stops, you are pretty close and that is the best you can do without gauges Engines will be much more reliable with a slightly rich condition than a lean condition. We also have an Exhaust Gas Temperature analyzer which can tell us if the engine is lean or fat. When running wide open throttle it should read no more than 1300 degrees. We are considering putting a weld in bung with plug in future exhaust if an aftermarket exhaust is needed but otherwise buy your own gauge set up and you will always know whether or not your engine is running right or not.


6 Page 6 of 6 Fig.#1 Fig. #2
Motorcycle Carburetor Theory 101
 Motorcycle Carburetor Theory 101 Motorcycle carburetors look very complex, but with a little theory, you can tune your bike for maximum performance. All carburetors work under the basic principle of atmospheric
INSIDE YOUR HOLLEY CARBURETOR FUEL INLET SYSTEM
 INSIDE YOUR HOLLEY CARBURETOR The carburetor is quite simply a fuel metering device that operates under the logical and straightforward laws of physics. It has evolved over the years from a very simple
Днепр) Russian Motorcycle Carburetors Part 2B: PZ-24 and PZ-28 Carburetor Assembly and Jet Drilling
 Russian Motorcycle Carburetors Part 2B: PZ-24 and PZ-28 Carburetor Assembly and Jet Drilling") Ural (Урал( Урал) - Dnepr (Днепр( Днепр) Russian Motorcycle Carburetors Part 2B: PZ-24 and PZ-28 Carburetor Assembly and Jet Drilling (applies also to K-37 K and K-38 K carbs) Ernie Franke eafranke@tampabay.rr.com
Ural (Урал( Урал) - Dnepr (Днепр( Днепр) Russian Motorcycle Carburetors Part 2B: PZ-24 and PZ-28 Carburetor Assembly and Jet Drilling (applies also to K-37 K and K-38 K carbs) Ernie Franke eafranke@tampabay.rr.com
Jetting and understanding your CV carburetor
 Jetting and understanding your CV carburetor What do all these pieces do? You may also ask, how or why would I do this to my carb? The goal of this article is to unravel the mystery of carburetor jetting
HSR Carburetor. Total Kits. Installation Instructions. # Evo Big Twin # present Twin Cam
 HSR Carburetor Total Kits Installation Instructions HSR42 Kits: HSR45 Kits: #42-8 84-99 Evo Big Twin #42-19 99 - present Twin Cam #45-2 84-99 Evo Big Twin #45-3 84-99 Evo Big Twin #45-4 99 - present Twin
PRO-R AIR CLEANER FOR KAWASAKI 9462
 I N S TA L L AT I O N PRO-R AIR CLEANER FOR KAWASAKI 9462 FITS: 95-04 VN1500 (SINGLE CARB MODELS) PART # INCLUDED 500205 1 Pro R Hypercharger Chrome Assembly Including: 1 Dual Velocity Ring (in plastic
235/245400, , 28N
 Models 235/245400, 287000, 28N thru W, 310/312/313700 These carburetors have a fixed high speed main jet with adjustable idle, Fig 183. The different carburetors are identified as LMT 1 and up. The letters
Урал) - Dnepr (Днепр) Russian Motorcycle Carburetors
 - Dnepr (Днепр) Russian Motorcycle Carburetors") Ural (Урал( Урал) - Dnepr (Днепр) Russian Motorcycle Carburetors Part 8A: Adjustment and Overhaul of the Pekar K-65 Carburetors (see also Part 8-8 K-65 Carburetor and Part 8B- Setting Up K-65 K Carbs)
Ural (Урал( Урал) - Dnepr (Днепр) Russian Motorcycle Carburetors Part 8A: Adjustment and Overhaul of the Pekar K-65 Carburetors (see also Part 8-8 K-65 Carburetor and Part 8B- Setting Up K-65 K Carbs)
BA /02/03/04/06/07/08/13/13B/15 BIG AIR KIT (BAK) - Yamaha Road Star (99-07)
 - Yamaha Road Star (99-07)") BA-2020-00/02/03/04/06/07/08/13/13B/15 BIG AIR KIT (BAK) - Yamaha Road Star (99-07) Page: 1 Revision: 6.2-02/23/2011 Install Time: 1.5 Hours We recommend a qualified Yamaha technician install this kit
BA-2020-00/02/03/04/06/07/08/13/13B/15 BIG AIR KIT (BAK) - Yamaha Road Star (99-07) Page: 1 Revision: 6.2-02/23/2011 Install Time: 1.5 Hours We recommend a qualified Yamaha technician install this kit
KEIHIN CARBURATORS FOR 4-CYLINDER HONDA MOTORCYCLES
 KEIHIN CARBURATORS FOR 4-CYLINDER HONDA MOTORCYCLES Set of 4 Keihin carburetors marked 089A and used on 1976 CB550K GENERAL NOTES: All carburetors perform the same function: mixing air and fuel for supply
Tuning A Walbro Carb. Walbro Carb TUNE UP & Illustrated Guide
 Tuning A Walbro Carb Walbro Carb TUNE UP & Illustrated Guide by M. B. Fuess Walbro carbs aren t too difficult to tune up if you know what you re doing. First of all, you need to know how the carb works
Mikuni RS Carburetor Conversion
 Mikuni RS Carburetor Conversion After putting your carbies on the bench or the kitchen table if the wife is out, you will see that the linkages may be in different positions depending on which brand of
Electronic Jet Kit Instructions
 Ver. 1.01 KFX 450 TFI-6040ST Thank you for choosing the Techlusion Electronic Jet Kit for your KFX 450, the TFI. The TFI is usable only for the following models: Kawasaki KFX 450 Thank you for choosing
CARBURETION. Flo-Jet Carburetors. One Piece. One-Piece Flo-Jet. Main Jet Adjustment N eedle
 One Piece One-Piece Flo-Jet The small One-Piece Flo-Jet carburetor is illustrated in Fig. 122 and was used on early Model 170700. These are float feed carburetors with adjustable orifice main jet needle
THANK YOU FOR CHOOSING KÜRYAKYN! -cont.-
 I N S TA L L AT I O N H Y P E R C H A R G E R A I R C L E A N E R 9 4 1 0 FITS: KAWASAKI 95-UP VN800 VULCAN PART # INCLUDED 600163 1 Hypercharger Chrome with drilled back 8513 1 K&N Filter Element 8593
The Zenith Stromberg Water Choke
 Page 1 of 16 The Zenith Stromberg Water Choke Rick Jaskowiak Bemidji, MN 11/24/2001 Click here to email me. Return to my home page When my last Midget project ran poorly after an engine rebuild due to
DDMWorks Race Intake for Mazda Miata
 DDMWorks Race Intake for 1999-2005 Mazda Miata f This DDMworks Race Intake improves your Mazda Miata by supplying your engine with cold pressurized air for it to breathe in through a free flowing filter
VM Carb Rebuild Paul Musser October 2005 v1.0
 VM Carb Rebuild Paul Musser October 2005 v1.0 A big thank you to all the folks at GS Resources (www.thegsresources.com) for their invaluable assistance. Much of the information for his document came from
SLP PIPE INSTALLATION INSTRUCTIONS #09-9 & # & NEWER POLARIS INDY 650 & RXL PIPE SET EFFECTIVE 6-92
 Page 1 of 5 SLP PIPE INSTALLATION INSTRUCTIONS #09-9 & #09-10 1988 & NEWER POLARIS INDY 650 & RXL PIPE SET EFFECTIVE 6-92 READ INSTRUCTIONS CAREFULLY BEFORE ATTEMPTING TO INSTALL PIPE SET #09-9 (For stock
TOYOTA TUNDRA COLD AIR INTAKE Preparation SEQUOIA
 Preparation SEQUOIA 2008 - Part Number: PTR03-34070 (5.7L) PTR03-34072 (4.7L) Kit Contents: 5.7L Item # Quantity Reqd. Description 1 1 Lid: Air Filter 2 1 Inlet Pipe: 5.7L 3 1 Air Filter: TRD Conical 4
INSTALLATION HYPERCHARGER AIR CLEANER KIT 9400
 AIR CLEANER KIT 9400 PARTS INCLUDED 1 Hypercharger with K&N Filter 1 Adapter Hardware Kit Contains the Following: 1 Rubber Intake Duct with Rubber Carb Bumper 1 Main Support Bracket 1 Carb Bumper Bracket
HSR Carburetor. Total Kits. Installation Instructions. # Evo Big Twin # present Twin Cam
 HSR Carburetor Total Kits Installation Instructions HSR42 Kits: HSR45 Kits: #42-8 84-99 Evo Big Twin #42-19 99 - present Twin Cam #45-2 84-99 Evo Big Twin #45-3 84-99 Evo Big Twin #45-4 99 - present Twin
Setting up and adjusting SU/Hitachi carbs on the Datsun Roadster by Keith Williams. Service screw
 Setting up and adjusting SU/Hitachi carbs on the Datsun Roadster by Keith Williams Service screw This is the service screw it s only use it to raise the engine speed while adjusting the carbs. In normal
Adjusting Carbs For Re-Jetting (Procedure written for an Intruder 1500 LC) NEWLY UPDATED: APRIL 2003
 NEWLY UPDATED: APRIL 2003") SECTION ONE: Get Prepared - Tools Adjusting Carbs For Re-Jetting (Procedure written for an Intruder 1500 LC) NEWLY UPDATED: APRIL 2003 Courtesy of: Half-Crazy Get a manual impact driver (the kind you hit
SECTION ONE: Get Prepared - Tools Adjusting Carbs For Re-Jetting (Procedure written for an Intruder 1500 LC) NEWLY UPDATED: APRIL 2003 Courtesy of: Half-Crazy Get a manual impact driver (the kind you hit
Harley Davidson V-Rod Models
 2801190 REV. 8-11-05 User Manual 2002-2005 Harley Davidson V-Rod Models Part Number DFCH-5 Congratulations on your purchase of this Dynatek product. Please take a moment to read these instructions completely
HSR Carburetor Easy Kits Installation Instructions For Evo Big Twin Kit: # 42-7 Twin Cam Kit: # 42-18
 HSR Carburetor Easy Kits Installation Instructions For Evo Big Twin Kit: # 42-7 Twin Cam Kit: # 42-18 Revised 5/01/01 EK-1 Easy Kit Installation Instructions The HSR series carburetors are precise yet
TECH INFORMATION EMPI D Performance 2-Barrel Carburetor
 TECH INFORMATION EMPI D Performance 2-Barrel Carburetor The New EMPI D 2-Barrel Performance Carburetor.Built specifically for the VW Aftermarket. With all the features that you have asked for More Progression
FUEL AND LUBRICATION SYSTEM
 AND LUBRICATION SYSTEM 4-1 A-PDF Split DEMO : Purchase from www.a-pdf.com to remove the watermark AND LUBRICATION SYSTEM CONTENTS SYSTEM... 4-2 PUMP... 4-2 TANK/ COCK... 4-3 REMOVAL... 4-3 INSPECTION...
BRAWLER SERIES CARBURETORS
 BRAWLER SERIES CARBURETORS Installation Instructions Please Stop and Read these Instructions before proceeding. If you do not fully understand the installation and tuning instructions you should seek professional
Sherco Carb Jetting Instructions
 Sherco Carb Jetting Instructions This manual provides instructions on how to remove and reinstall the stock carburetor, it also shows you how to change the pilot jet and the main jet. It is intended to
This is what we are trying to create in the steps below
 You will need: (1) Some 3/4 aluminium or steel flat bar (+/- 1 foot) (2) About 12 of 3 Aluminium or steel tubing. (2) Piece of 3X3 silicone hose and 2 hose clamps (3) 1 K&N (or similar) high flow filter
QUICK FUEL TECHNOLOGY HOT ROD SERIES CARBURETORS SLAYER SERIES CARBURETORS SUPER STREET SERIES CARBURETORS
 QUICK FUEL TECHNOLOGY Installation Instructions HOT ROD SERIES CARBURETORS SLAYER SERIES CARBURETORS SUPER STREET SERIES CARBURETORS HR-580-VS 580 CFM Vac. Secondary!!! SS-680-VS 680 CFM Vac. Secondary
PLEASE READ CAREFULLY AND COMPLETELY BEFORE BEGINNING THIS INSTALLATION, you will find many helpful hints in the instructions.
 PLEASE READ CAREFULLY AND COMPLETELY BEFORE BEGINNING THIS INSTALLATION, you will find many helpful hints in the instructions. IF YOU ARE UNCOMFORTABLE WITH ANY ASPECT OF THIS INSTALLATION PLEASE REFER
Retro it Steering Column
 Retro it Steering Column INSTALLATION INSTRUCTIONS for 1976-86 CJ5 & CJ7 FOR PART NUMBER S: 1520800010, 1520800020, 1520800051, 1526800010, 1526800020, 1526800051 S I NCE 1986 Instruction # 8000000010
FUEL SYSTEM. Table of Contents. Specifications. Section 3A Fuel Delivery System. Models 6/8/9.9/10/15 CARBURETOR SPECIFICATIONS
 FUEL SYSTEM Section 3A Fuel Delivery System Table of Contents Specifications............................. 3A-1 WMC Carburetor Specifications............. 3A-2 WMC Carburetor Specifications.............
Backwater Performance Systems Large Vanguard Mikuni Twin Carburetor Kit
 Backwater Performance Systems Large Vanguard Mikuni Twin Carburetor Kit 1. Throttle Cable Twin (CKC-41) 2. Carburetor VM30mm (CKC-40) 3. Loctite 242.5mL (A-210) 4. Air Cleaner Filter 6000 (EC-86) 5. Rev
CARBURETION. Carburetor Identification. Models , , , , , , , , , , ,
 Carburetor Identification Models 110400, 110600, 111400, 111600, 113400, 120400, 120600, 121400, 121600, 122600, 123400, 123600 Models 28S700, 311700 Service Carburetor Briggs & Stratton/Walbro LMS Models
TCI FastGate Shifter Installation Instructions
 151 INDUSTRIAL DRIVE ASHLAND, MISSISSIPPI 38603 http://www.tciauto.com TELEPHONE: 662-224-8972 FAX LINE: 662-224-8255 E-MAIL: tech@tciauto.com TCI 616541 FastGate Shifter Installation Instructions The
COLD AIR INTAKE INSTALLATION INSTRUCTIONS. # D Fits: i (4.8L)
") COLD AIR INTAKE INSTALLATION INSTRUCTIONS # D760-0012 Fits: 2006-10 550i (4.8L) PARTS LIST Air Box Assembly Left tube Center tube Right tube Outer Tube AFM housing AFM/TB tube Hardware Kit Congratulations
COLD AIR INTAKE INSTALLATION INSTRUCTIONS # D760-0012 Fits: 2006-10 550i (4.8L) PARTS LIST Air Box Assembly Left tube Center tube Right tube Outer Tube AFM housing AFM/TB tube Hardware Kit Congratulations
Slingshot Rotrex Supercharger Kit
 Slingshot Rotrex Supercharger Kit This supercharger kit improves on the Slingshot by forcing more dense air into the engine and creating more power. Installation time of the supercharger depends on you
Moped Hospital Racing. Installation of performance parts MANUAL. Tecnigas Extreme Super 9
 Moped Hospital Racing Installation of performance parts MANUAL Tecnigas Extreme Super 9 Page 2 These pages are to help the shop/person installing the parts that we sell. It is a general explanation of
THE IDIOT S GUIDE TO TUNING SU CARBURETTERS
 THE IDIOT S GUIDE TO TUNING SU CARBURETTERS There are four distinct phases to tuning SU carburetters (carbies). The first is to set the fuel level in the float bowl, the second is to centre the needle
Cable Shift Linkage Kit
 Cable Shift Linkage Kit INSTALLATION INSTRUCTIONS ididit column to GM Trans FOR PART NUMBER S: 2801000010, 2802000010 ididit Column to 350 Trans...Pg 1-4 ididit Column to 400 Trans...Pg 5-8 ididit Column
Innovative Racing Electronics
 MPS Fast FI Mixture Control Installation Instructions The MPS Fast FI Mixture Control P/N 1-0337 is a simple means to adjust the fuel curves on your fuel-injected motorcycle. This allows for tuning after
1986 Rear Disk Brake Upgrade. All hard lines mounted to the rear axle with mounting screws. 1/4" fittings
 1986 Rear Disk Brake Upgrade Being well prepared for a project of this size is the key to success. I thought I was well prepared by doing a lot of research and getting all of the required parts before
BMW 2002 M42 Swap Notes-THIS IS NOT FINISHED
 BMW 2002 M42 Swap Notes-THIS IS NOT FINISHED This document is to help those that want to install an m42 into a BMW 2002. It is based around an e30 engine, trans, and wiring. You can use the e36 block/head/wiring
Your Steering Column Specialist
 Cable Shift Installation Instructions for: ididit Column to GM Trans www.ididitinc.com ididit Column to 350 Trans...PG1-4 ididit Column to 400 Trans...PG5-8 ididit Column to 700R4 & 4L60 Series Trans...PG9-12
Part number PF8050. Tools required: 1-8mm nut driver 1-8mm socket 1-10mm socket 1-13mm socket 1- ratchet 1- ratchet extension 1- set of allen wrenches
 Part number PF8050 2003-08 Dodge Ram 5.7L V8 Hemi 1- MR Tech Power-flow Intake system 1- Power Box-contents: PB400D-8 1-8 Inverted top filter (A) (#1022) 1- Main body, top and screen (B) (#15015) 1-4 velocity
13. FUEL SYSTEM/CARBURETOR/
 13 FUEL SYSTEM/CARBURETOR/FUEL PUMP FUEL SYSTEM --------------------------------------------------------- 13-1 SCHEMATIC DRAWING ---------------------------------------------- 13-2 OPERATION OF CARBURETOR
1 of 2 9/4/ :27 AM
 Ford Mustang IAC IAB - Solving your idle problems http://www.muscularmustangs.com/iac.php 1 of 2 9/4/2010 10:27 AM Solving idle problems part 1 - Cleaning your IAC Does your idle rise and fall over and
Z-Gate Universal Shifter
 Installation Instructions Z-Gate Universal Shifter Fits: GM, Ford, Lincoln and Chrysler Transmissions See Application Guide for Specific Applications Part #80681 Rev 06/01/2018 WORK SAFELY! For maximum
FUEL SYSTEM/CARBURETOR/FUEL PUMP
 13 FUEL SYSTEM/CARBURETOR/FUEL PUMP FUEL SYSTEM-------------------------------------------------------------------------------------13-1 SCHEMATIC DRAWING-------------------------------------------------------------------------13-2
Phil s Ear Shave Procedure
 http://06vn750.blogspot.com/2011/05/ear-shave-procedure-different-format.html 06VN750 Thursday, May 19, 2011 Ear Shave Procedure Phil s Ear Shave Procedure Preface: GENERALLY speaking: If you change the
Illustrated Parts List Vanguard to Compliance
 Non-Compliance Illustrated Parts List Vanguard Model Series 104700 to 104799 FORM MS-9878 7/93 REPLACES FORM MS-9878 5/92 FILE IN SECT. 2 OF SERVICE MANUAL 104700 to 104799 Compliance TYPE NUMBERS 0101,
Illustrated Parts List to
 Illustrated Parts List Model Series 176400 to 176499 TYPE NUMBERS 0035, 0049, 0050, 0101, 0103, 0113, 0114, 0115, 0116. FORM MS 0419 9/97 REPLACES FORM MS 0419 5/97 FILE IN SECT. 2 OF SERVICE MANUAL 176400
Cable Shift Linkage Kit
 Cable Shift Linkage Kit INSTALLATION INSTRUCTIONS ididit column to Chrysler 727/904 Trans FOR PART NUMBER S: 2801700010, 2802700010 S INCE 1986 www.ididitinc.com 610 S. Maumee St., Tecumseh, MI 49286 PH:
Holley Fuel Pressure Regulator Won't Adjust
 Holley Fuel Pressure Regulator Won't Adjust The GENSSI Fuel Pressure Regulator will ensure stable pressures are supplied with the Holley 12-803 Fuel Pump Fuel Pressure Regulator by Genssi for your more
Use these modules to gain valuable knowledge about STIHL policies, procedures and products that will be a benefit to you on the job immediately.
 Bronze Level Training Lesson 09 This is Bronze Level 09 of 10. Welcome to the Service Advantage Bronze Level Training on icademy. These modules are designed to enhance your knowledge base on topics such
Prerequisites: Shop Manual (recommended) pages 3-9 through 3-13.
 pages 3-9 through 3-13.") Prerequisites: Order your gaskets average about $25.00 bucks X 2 so $50.00 4NK-11193-00-00 Obtain a shim kit (Should have several 265 and 270s) (Some dealers will exchange) Obtain a Valve Bucket Tool YM-33961
Prerequisites: Order your gaskets average about $25.00 bucks X 2 so $50.00 4NK-11193-00-00 Obtain a shim kit (Should have several 265 and 270s) (Some dealers will exchange) Obtain a Valve Bucket Tool YM-33961
Electronic Jet Kit Instructions
 Rev 1.0.3 8027ST-TFI Patent Numbers: 7,000,599, 7,124,742 Electronic Jet Kit Instructions Thank you for choosing the Dobeck Performance Electronic Jet Kit for you re Arctic Cat F/M1000 Snowmobile. Dobeck
Thank you for choosing the Techlusion Electronic Jet Kit, the TFI. The TFI is usable for sequential fuel injection 2 cylinder Suzuki motorcycles **.
 Rev 1.1.1 2055ST TFI TFI Patent Numbers: 7,000,599 & 7,124,742 TFI Instructions Suzuki Thank you for choosing the Techlusion Electronic Jet Kit, the TFI. The TFI is usable for sequential fuel injection
I N S TA L L AT I O N
 I N S TA L L AT I O N k i t 9 9 5 4 Fits: all honda 750 shadow aero models Part # Included 509944 1 Skull head cover 1 Cage assembly 1 Backing plate, 3-point base 1 Dual velocity ring (not used) 1 Mounting
Tools needed: Here is a pic of the shift kit I used. It is a Transgo brand and as you can see, it just a bag full of springs and one valve.
 Before installing a shift kit, be sure the transmission is in good operating order. If your transmission is making noises, slipping, shifting bad or the fluid looks brown or smells burnt, take the transmission
Optimum performance, Factory safe air/fuel ratio. Patent Pending
 Part number SP2077 2005-06 Toyota Corolla S 2005-06 Toyota Matrix XR 1.8L 4 cyl. 1- MR Tech tuned cold air intake 1-2 3/4-2 1/2 step hose (#3116) 1-2.75 Injen tuned filter (#1013) 1-15 17mm heater hose
Russian Motorcycle Carburetors
 Ural (Урал) - Dnepr (Днепр) Russian Motorcycle Carburetors Part V-12: VM 28mm Mikuni (See Also Part V-12A: VM Mikuni Carb Manual and Part V-12B: Mikuni Overhaul) Ernie Franke eafranke@tampabay.rr.com 03
Vacuum Readings for Tuning and Diagnosis
 Vacuum Readings for Tuning and Diagnosis -Henry P. Olsen Once you learn to properly interpret its readings, a vacuum gauge can be one of the most useful tools in your toolbox. 22 FEATURE Some people consider
***FOR COMPETITION USE ONLY as per US EPA regulations *** Factory Pipe Bill of Materials Kawasaki Ultra 150 Triple Pipe
 ***FOR COMPETITION USE ONLY as per US EPA regulations *** Factory Pipe Bill of Materials Kawasaki Ultra 150 Triple Pipe Item Qty Part Number Part Description 1 1 COMASM0947 Ultra 150 PTO Chamber assembly
Remove Air Cleaner Cover and. Filter
 Remove Air Cleaner Cover and Inspect paper filter for tears Foam pre-cleaner is washable if equipped Replace if necessary Filter Remove Trim Panel Pull throttle lever knob off Remove 3, 8mm screws Remove
Illustrated Parts List to
 FORM MS-9491 6/94 REPLACES FORM MS-9491 8/93 FILE IN SECT. 2 OF SERVICE MANUAL 404700 to 404799 Illustrated Parts List Model Series 404700 to 404799 TYPE NUMBERS 1200 through 1207, 1211 through 1214, 1400,
POLARIS XLT 580/600 INSTALLATION INSTRUCTIONS PART # READ INSTRUCTIONS CAREFULLY BEFORE ATTEMPTING TO INSTALL PIPE SET
 Page 1 of 6 POLARIS 1993-97 XLT 580/600 INSTALLATION INSTRUCTIONS PART #09-595 READ INSTRUCTIONS CAREFULLY BEFORE ATTEMPTING TO INSTALL PIPE SET 1. Remove stock exhaust, y-pipe, front and rear muffler
7. FUEL SYSTEM ('04 - '05)
") 7. FUEL SYSTEM ('04 - '05) SYSTEM COMPONENTS 7-2 CARBURETOR DISASSEMBLY 7-81 SERVICE INFORMATION 7-3 CARBURETOR ASSEMBLY 7-14 TROUBLESHOOTING 7-4 CARBURETOR INSTALLATION 7-21 AIR CLEANER HOUSING 7-5 PILOT
7. FUEL SYSTEM ('04 - '05) SYSTEM COMPONENTS 7-2 CARBURETOR DISASSEMBLY 7-81 SERVICE INFORMATION 7-3 CARBURETOR ASSEMBLY 7-14 TROUBLESHOOTING 7-4 CARBURETOR INSTALLATION 7-21 AIR CLEANER HOUSING 7-5 PILOT
TOURING Models
 P/N FI-1252HPST Patent Numbers: 7,000,599 & 7,124,742 Electronic Jet Kit Instructions Thank you for choosing the Techlusion Electronic Jet Kit, the TFI. This TFI model is ONLY usable for the following
Illustrated Parts List to
 FORM MS-2442-9/93 REPLACES FORM MS-2442-11/92 FILE IN SECT. 2 OF SERVICE MANUAL Illustrated Parts List Industrial/Commercial Model Series TYPE NUMBERS 0101 through 0104, 0116 through 0120, 0122 through
BASIC INSTRUCTIONS SHIFTER KZ1 / KZ2 e X30 SHIFTER-TaG
 BASIC INSTRUCTIONS SHIFTER KZ1 / KZ2 e X30 SHIFTER-TaG FEEDING: by fuel mixture 98NO (min. 95NO) and 4% oil (CIK homologated). ATTENTION: the engine is supplied without oil in the gearbox. GEARBOX OIL
Днепр) Russian Motorcycle Carburetors Part 11: VM 28mm Mikuni
 Russian Motorcycle Carburetors Part 11: VM 28mm Mikuni") Ural (Урал( Урал) - Dnepr (Днепр( Днепр) Russian Motorcycle Carburetors Part 11: VM 28mm Mikuni (See Also Part 11A: VM Mikuni Carb Manual) Ernie Franke eafranke@tampabay.rr.com 04/2011 Mikuni VM-28 Round-Slide
Ural (Урал( Урал) - Dnepr (Днепр( Днепр) Russian Motorcycle Carburetors Part 11: VM 28mm Mikuni (See Also Part 11A: VM Mikuni Carb Manual) Ernie Franke eafranke@tampabay.rr.com 04/2011 Mikuni VM-28 Round-Slide
WARNING NO SMOKING! NO OPEN FLAME! U.S. Models only Kawasaki VN1500 Vulcan Stage 1&3 WHILE INSTALLING YOUR JET KIT. o CD.
 lank you tui pui'cfjssing^nt^dfpnnymjet Kit. This kit has been developed for a motorcycle which is set to the parameters listed at left in the descriptions. If your motorcycle does not meet any of these
Tools required: 1-8mm nut driver 1-10mm socket 1- ratchet 1- Allen wrenches 1- screwdriver
 Part number PF7055 07-08 Cadillac Escalade, EXT 6.2L V8 07-08 Chevrolet Avalanche 5.3L V8 07-08 Chevrolet Silverado 4.8L, 5.3L V8 07-08 Chevrolet Suburban 5.3L V8 07-08 Chevrolet Tahoe 4.8L, 5.3L V8 07-08
Cold Air Intake Installation Instructions
 BAVARIAN AUTOSPORT Cold Air Intake Installation Instructions PARTS LIST: PF BMWE36-4 PROCEDURE: 1. Using a flat-head screwdriver, loosen the hose clamp between the AFM and rubber boot leading to engine
XLT SPECIAL TRIPLE PIPE SET P.N Installation Instructions
 1995-97 XLT SPECIAL TRIPLE PIPE SET P.N. 09-598 Installation Instructions Revised 8/20/02 Read instructions carefully before installation 1 - Remove stock exhaust, Y-Pipe, front and rear muffler support.
YAMAHA RHINO 660 INSTALLATION INSTRUCTIONS
 YAMAHA RHINO 660 INSTALLATION INSTRUCTIONS PLEASE READ THE ENTIRE INSTRUCTIONS BEFORE STARTING THE INSTALLATION. THIS KIT INCLUDES ALL NECESSARY PARTS WHICH INCLUDES A GIBSON PERFORMANCE MUFFLER AND A
Do not bend or twist the control cable. Damaged control cable will not operate smoothly and may stick or bind.
 XL200 4. FUEL SYSTEM SERVICE INFORMATION 4-1 TROUBLESHOOTING 4-2 CARBURETOR 4-3 PILOT SCREW ADJUSTMENT 4-14 ACCELERATOR PUMP ADJUSTMENT 4-15 AIR CLEANER HOUSING 4-15 FUEL TANK 4-16 SERVICE INFORMATION
Factory safe air/fuel ratio s for Optimum performance Patent# 7,359,795 Now equipped with Air Fusion
 Part number PF7010 2010 Chevy Camaro 3.6L V6 1-4 diameter intake system equipped with MR Tech and Air Fusion 1-3 1/2 neck Injen/AMSOIL (#1021) Performance dry filter w/f1 style inverted top 1-3 1/8 x 3
POWER CELL FOR DYNA WITH CLEAN CHROME COVER 562
 POWER CELL FOR DYNA WITH CLEAN CHROME COVER 562 THANK YOU FOR CHOOSING CRUSHER! PROTECT YOURSELF AND OTHERS FROM POTENTIAL INJURY AND PROPERTY DAMAGE OR LOSS. PAY CLOSE ATTENTION TO ALL INSTRUCTIONS, WARNINGS,
Mobtown Offroad Toyota Tacoma Bolt On Rock Slider Installation Instructions
 Mobtown Offroad 2005+ Toyota Tacoma Bolt On Rock Slider Installation Instructions Tools Needed: 9/16 Box Wrench 9/16 Standard and Deep Well Socket, 3/8 Drive Ratchet, 3/8 Drive 3/4 Standard Socket 3/4
Ford 6.7L Powerstroke Positive Air Shutoff
 8 April 2013 Ford 6.7L 2011-2012 Positive Air Shutoff 1 2011-2012 Ford 6.7L Powerstroke Positive Air Shutoff P/N# 1036703 P/N# 1036703-M UPLEASE READ ALL INSTRUCTIONS BEFORE INSTALLATION BD Engine Brake
Installation Instructions Jeep CJ-7
 Retrofit Steering Column Installation Instructions 1976-86 Jeep CJ-7 For Part # s 1520800010, 152800020, 1520800051 www.ididitinc.com 610 S. Maumee St., Tecumseh, MI 49286 (517) 424-0577 (517) 424-7293
The kit includes everything seen here, and there are only a few upgrades or mods available.
 The kit includes everything seen here, and there are only a few upgrades or mods available. Complete Kit $1,445.00 1 pair trailing arms LH/RH, with poly lined Monster balls. Pinion angle corrected 1 pair
The All-New BIG97 Tri-Power. In Detail.
 The All-New BIG97 Tri-Power. In Detail. The all-new Stromberg BIG97. On the outside, it s Genuine 97 all the way. But on the inside, we re talking 250cfm, new improved fuel circuits, ported distributor
MAXI-BORE TM CARBURETTORS
 MAXI-BORE TM CARBURETTORS 26mm/28mm Mik bored to 30.5mm 33mm Smoothbores bored to 38.5mm Don t just rebuild your carbs MAXI-BORE TM them! MAXI-BORE TM carbs are more than just cleaned, rebuilt, or bored,
Super 1050 Chain Saw UT Page 1 of 16 Carburetor Chamber
 Super 1050 Chain Saw UT-10139 Page 1 of 16 Carburetor Chamber Super 1050 Chain Saw UT-10139 Page 2 of 16 Carburetor Chamber 1 58319A 1 RING- Retaining 2 592301 1 COVER- Air filter 3 A70326 1 NUT- Cover
PLEASE NOTE: This is a PRELIMINARY copy of the Carburetor Reference Manual.
 PLEASE NOTE: This is a PRELIMINARY copy of the Carburetor Reference Manual. Carburetor Service Kits The carburetors for most current production engines are serviced with convenient kits, which include
Installation Instructions Z-Gate Shifter
 Installation Instructions Z-Gate Shifter Part Number 80681 1998, 2001 by B&M Racing and Performance Products The B&M Z-Gate shifter can be used in vehicles equipped with most popular three speed automatic
4 pieces of silicone hose Unless you have AEM then you have 2 2.5, 1 3, and 1 3.5
 The parts in your kit: 3 pieces of Mandrel-Bent Aluminized Tubing: 1 Straight 1 45 degree bend with straight section 1 curved section 4 pieces of silicone hose 1 2.5 1 3.5 2 3 Unless you have AEM then
INSTALLATION HYPERCHARGER AIR FILTER KIT 9754
 9754 PARTS INCLUDED 1 Chrome Hypercharger Assembly 1 Support Bracket 1 Breather Hardware Kit, including: 2 1-1/4 Breather Bolts 2 Breather Hoses 4 Shim Washers 1 Twin Cam Breather Kit, Including: 1 Breather
Typical Install Instructions
 Typical Install Instructions Read & understand all steps of these instructions before beginning this installation. WEBER Conversion Kit, VW T-1/2, up to 1835cc 32 / 36 DFEV Weber Carburetor These instructions
What is a GLOW engine?
 Micro engines What is a GLOW engine? R/C models get power from various modes. Gliders, for example, do not need a power source other than what nature provides. But they are the exception. Normally all
COLD AIR INTAKE INSTALLATION INSTRUCTIONS. # D Fits: i (4.8L)
") COLD AIR INTAKE INSTALLATION INSTRUCTIONS # D760-0013 Fits: 2006-10 650i (4.8L) PARTS LIST Air Box Assembly Left tube Center tube Right tube Support bracket AFM housing AFM/TB tube Hardware Kit Congratulations
COLD AIR INTAKE INSTALLATION INSTRUCTIONS # D760-0013 Fits: 2006-10 650i (4.8L) PARTS LIST Air Box Assembly Left tube Center tube Right tube Support bracket AFM housing AFM/TB tube Hardware Kit Congratulations
Corrado Club of Canada. VR6 Engine FAQ. By: Dennis
 Corrado Club of Canada VR6 Engine FAQ By: Dennis I thought I would snap a few pics of the engine compartment on my 1994 VR6 Corrado. First, this is the updated engine management system so it does have
MT/FZ-09 O2 controller Mod
 kevxtx MT/FZ-09 O2 controller Mod DISCLAIMER: This instruction paper is for informational use. The O2 Controller modification is sold only for race use. The O2 Controller modifies the closed-loop fuel
Performer Series Carburetor Rebuild Kit Catalog #1477 Models
 Please read these instructions carefully before attempting to rebuild your carburetor. Make sure to refer to your carburetor Owner s Manual for further information if need be. If you have any questions