TOURING Models
|
|
|
- Sarah Lang
- 5 years ago
- Views:
Transcription

1 P/N FI-1252HPST Patent Numbers: 7,000,599 & 7,124,742 Electronic Jet Kit Instructions Thank you for choosing the Techlusion Electronic Jet Kit, the TFI. This TFI model is ONLY usable for the following Harley Davidson models: TOURING Models This controller should only be used on high horsepower/ high compression engine builds. The controller has double the fuel range of the standard version. It is designed to give the tuner the ability to add far more fuel than usual. This is an Electronic Jet Kit. Like jet kits in the past, the more you modify, the more responsibility you take in getting your fuel curve right. Go to will help you obtain better high horsepower tuning. Due to the complexity of the newer motorcycles, dealer install may be required. If you have any questions during installation or tuning please call tech support. Toll Free: USA: Business Hours: 8am-5pm MST Monday-Friday INSTALLATION PREP Install Time: 60 minutes Required Tools for: Disconnecting the negative terminal of the battery Removing your seat Loosening and propping up the fuel tank Fuel adjustments (small screwdriver)
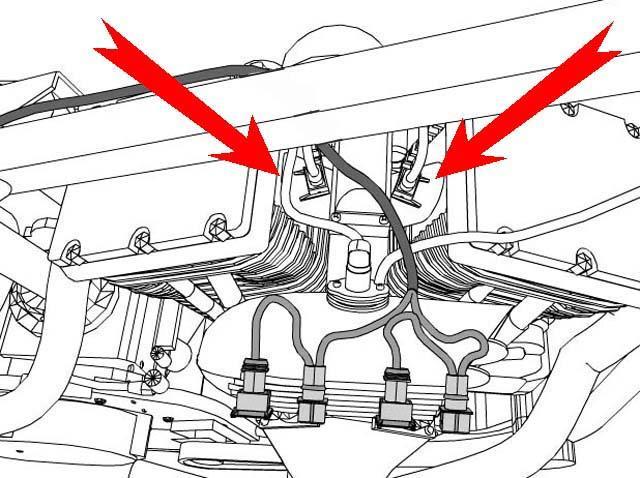
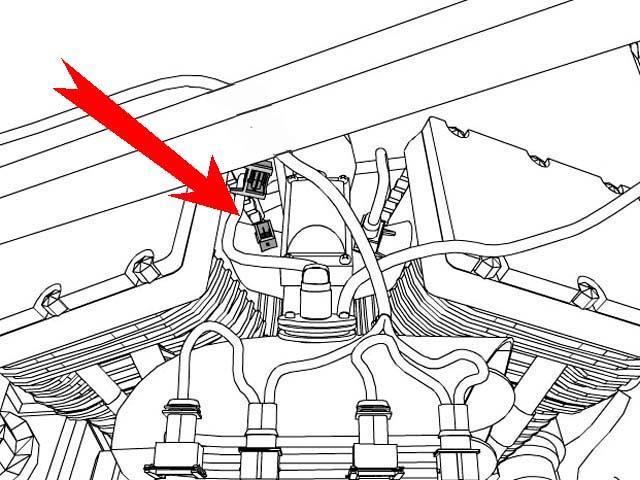
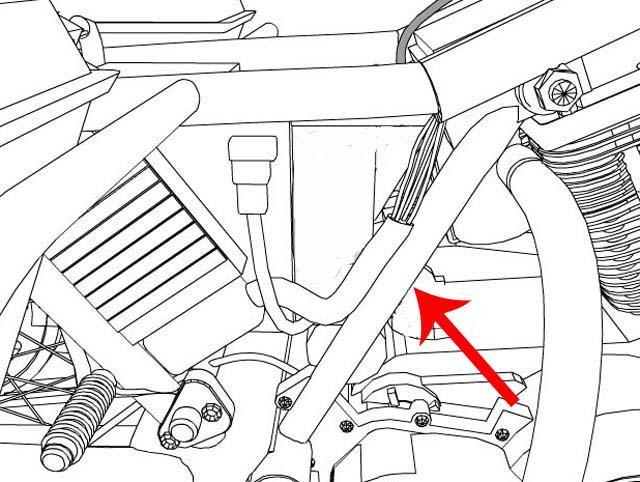
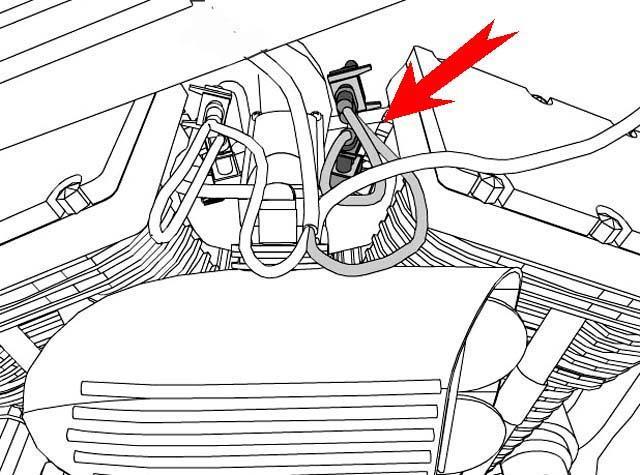
2 INSTALLATION 1. Before installing the TFI you must first disconnect the negative lead from the battery. 2. Determine a location for the TFI unit. We suggest under the seat or behind a side cover. (fig #1) 3. Making sure that your motorcycle is cold (be sure to disconnect the fuel line using the quick disconnect feature on the fuel fitting, DO NOT UNSCREW THE FITTING) and remove the rear tank mounting bolt (under the seat) loosen front bolt and lift the fuel tank up and forward(make sure not to come in contact with the steering with the front of the fuel tank when propping it up). You will need something to hold the fuel tank up (block of wood or a towel) from the frame to gain access to injectors. Removing air cleaner assembly can also help with gaining access to the injectors. 4. Underneath fuel tank locate the fuel injectors. (See owners manual for help if needed) 5. Disconnect factory injector connectors from fuel injectors and replace with TFI injector connectors from TFI unit, it does not matter which order they are hooked up. (Touring fig #4,5,6,7). It is a good idea to make sure there is a little slack in the harness to prevent engine vibration from damaging/breaking a wire on the connectors. 6. The front factory O2 connector is located: (see owners manual for help if needed) TOURING - O2 connector is zip tied to the cross member/down tube area on the front portion of the frame behind the front tire. (Touring fig #3) Disconnect factory 02 connection and plug in TFI bypass. The factory 02 sensor can be removed from the exhaust pipe used with a pipe plug and/or coil up original harness and secure. 7. The rear factory O2 connector is located: (see owners manual for help if needed) TOURING fig #2 - Follow the O2 harness from the rear head pipe down to the starter. Disconnect factory 02 connection and plug in TFI bypass. The factory 02 sensor can be removed from the exhaust pipe used with a pipe plug or coil up original harness and secure. 8. Replace the fuel tank. (Make sure all bolts are in place and fuel connections are correct). 9. Connect TFI ground lead to negative terminal of battery along with factory ground lead. (see owners manual for help if needed) 10. With rubber plug removed from TFI, turn motorcycle key switch to the ON position. As the bikes electrical system goes through initial start up mode you may see LED s flashing on TFI for a few seconds then go out, this is normal. 11. Start motorcycle. The green LED should now be on steady and the yellow will flash rapidly for up to 15 seconds, and then go out. If green or red LEDs continue flashing after startup please refer to TFI section in troubleshooting guide.
3 Tuning For reference, the pots are numbered from left to right on the TFI POT #1 - GREEN LED: AIR FUEL MIXTURE SCREW ADJUSTMENT With the TFI installed, bike fully warmed up, and screwdriver in hand, locate the GREEN LED and the first pot, which is right below it. Using the throttle, raise the RPM to a high idle or about 2000 RPM. Once there, slowly turn the green pot clockwise from the 1:00 position (off) until you achieve the highest RPM and smoothest running sound (like a mixture screw on a carburetor). You should find the best setting between 2:30 and 4:00 o clock. If you turn the green pot clockwise and the engine does not accept any more fuel (RPM drops when adding fuel) you may have one or more of these problems (See troubleshooting Motorcycle). POT #2 YELLOW LED ACCELERATION FUEL ADJUSTMENT Anytime the LED is on, this pot is adding fuel. In neutral raise the RPM slowly up through the mid range and see no yellow LED. However, opening the throttle quickly from idle you should see the yellow LED come on. Fine tuning: Start with the suggested setting and then add one clock position at a time until the bike says too much (hesitation) then back off 2 clock positions, if adding makes it worse go opposite direction. The yellow pot adds its fuel below 70% of maximum RPM. If no yellow LED there is not enough load to turn it on. At that point the street or dyno will be able to show the difference. POT #3 RED LED: MAIN FUEL ADJUSTMENT The TFI adds about 5 points of main jet fuel with every clock position. For example, one clock position is the same as 150 to 155 main jets. Fine tuning: Start with the suggested setting and then add one clock position at a time until the bike says too much (hesitation) then back off 1 clock position, if adding makes it worse go opposite direction. The red pot adds most of its fuel above 70% of maximum RPM. POT #4 RPM SWITCH POINTS SERVES TWO PURPOSES 1 - SETS RPM THE RED LED (main jet fuel) TURNS ON. One clock position is roughly 1000 RPM. This pot should be set to about 70% of redline. (For example: Harley Softail redlines at 5600 rpm and 4000 is roughly 70% of redline which would be 4:00 o clock). Verify setting by raising the RPM in neutral, look for GREEN and YELLOW LEDs to shut off and the red to turn on at the chosen RPM. Refer to suggested settings if you have no tachometer. 2 SHUTS OFF IDLE FUEL. In some cases modified engines can produce a richer than normal idle mixture. 1:00 o clock through 6:00 o clock sets RPM that the RED LED (main jet fuel) turns on. When the 4 th pot is turned to 7:00 o clock the software is instructed NOT to add fuel until 1250 RPM. Also, when setting the 4 th pot at 7:00 o clock the software automatically defaults to 4000 RPM (internally) as the RPM for the RED LED (main jet fuel) to turn on. Some vehicles modifications with Techlusion Inc. products must not be used on public roads and in some cases may be restricted to close course competition. Those products not identified as US EPA legal are intended for off-road or marine applications only. Not intended for use on emission controlled vehicles.
4 TROUBLESHOOTING Motorcycle Fuel injected bikes all have the same exact fuel curve and is corrected everyday by the on board weather station. Nothing is leaner than a stock fuel injection map. With our box installes and the bike fully warmed up, if you slowly turn on the green pot and the engine does not accept any more fuel (RPM drops when adding fuel) then you may have one or more of these problems: 1. Engine not fully warmed up. 2. A vacuum leak on the intake. 3. High lift cams affecting map at light loads and low RPM. 4. The loss of TPS and ECU sync. 5. Cylinder head temp sensor malfunction. NOTE: The listed problems are ordered from most common to least common TFI If just the GREEN or RED LEDs FLASH after startup or no LEDs are visible or bike doesn t start then please confirm/check connections and retry. If you still experience a problem call tech support. If needed call tech support. Toll Free: USA: Business Hours: 8am-5pm MST Monday-Friday POOR MILEAGE Solution: 1. Check your GREEN POT setting. This setting is generally responsible for 90% of your mileage. In the hundreds of installs performed, we have never gone beyond the 4:00 o clock setting. Try backing down the green setting slightly. You can slightly lower the yellow and red settings also. 2. RPM pot adjusted too low. Make sure the RED LED is turning on no lower than 70-75% of the maximum rpm. NOTE: Some engine setups can dictate a higher or lower setting on the RPM pot. 3. Make sure your engine passes the 2000-RPM test at the beginning of the Tuning chapter. If you still have mileage issues call tech support for further assistance.


5 Figure 1 Figure 2 Figure 3 Figure 4 Figure 5

6 Figure 6 Figure 7
7 RECOMMENDED POT SETTINGS: HIGH COMPRESSION / BIG BORE GRN: 2:30 YEL: 4:00 RED: 3:30 RPM: 4:00 High compression / Big bore NOTE: ALL SETTINGS ARE GIVEN AS ACTUAL WALL CLOCK SETTINGS. PLEASE IGNORE THE NUMBERS ON THE POTS!!
8 Techlusion Corporation dba Dobeck Performance warrants that this product carries a warranty for 2 years from date of purchase against original defects in materials and workmanship to the original purchaser. Should this product fail to perform for either of the above reasons, Techlusion will repair or replace it with an equivalent product at no charge except for postage. To obtain the benefits of this warranty, the purchaser must first call Techlusion to obtain a Return Merchandise Authorization (RMA) number. The purchaser can then send the product with proof of purchase date to: Dobeck Performance Attn: Warranty Department 157 Progressive Drive Belgrade, MT Toll Free: USA: Business Hours: 8am-5pm MST Monday-Friday
Thank you for choosing the Techlusion Electronic Jet Kit, the TFI. The TFI is usable for sequential fuel injection 2 cylinder Suzuki motorcycles **.
 Rev 1.1.1 2055ST TFI TFI Patent Numbers: 7,000,599 & 7,124,742 TFI Instructions Suzuki Thank you for choosing the Techlusion Electronic Jet Kit, the TFI. The TFI is usable for sequential fuel injection
Electronic Jet Kit Instructions
 Rev 1.0.3 FI-1040ST Electronic Jet Kit Instructions Thank you for choosing the Techlusion Electronic Jet Kit, the TFI. The TFI is usable for both early and late model fuel injected Harley Davidson s. This
Electronic Jet Kit Instructions
 MFG P/N FI-1049ST Patent Number: 7,000,599 & 7,124,742 Electronic Jet Kit Instructions Thank you for choosing the Techlusion Electronic Jet Kit, the TFI. This TFI is usable for the following models: Polaris
WILD THINGS FUEL INJECTION CONTROLLER 9219
 I N S TA L L AT I O N WILD THINGS FUEL INJECTION CONTROLLER 9219 BY D O B E C K P E R F O R M A N C E FITS: 06-UP SOFTAIL, DRESSER, AND ROAD KING WITH DELPHI FUEL INJECTION Thank you for choosing the Wild
Electronic Jet Kit Instructions
 Ver. 1.01 KFX 450 TFI-6040ST Thank you for choosing the Techlusion Electronic Jet Kit for your KFX 450, the TFI. The TFI is usable only for the following models: Kawasaki KFX 450 Thank you for choosing
Electronic Jet Kit Instructions
 Rev 1.0.3 8027ST-TFI Patent Numbers: 7,000,599, 7,124,742 Electronic Jet Kit Instructions Thank you for choosing the Dobeck Performance Electronic Jet Kit for you re Arctic Cat F/M1000 Snowmobile. Dobeck
Innovative Racing Electronics
 MPS Fast FI Mixture Control Installation Instructions The MPS Fast FI Mixture Control P/N 1-0337 is a simple means to adjust the fuel curves on your fuel-injected motorcycle. This allows for tuning after
PACKAGE CONTENTS
 Thank you for purchasing the Electronic Jet Kit (EJK) from Dobeck Performance. This EFI controller is designed to be used on stock or modified vehicles. The following instructions will walk you through
Application(s) > Items Supplied > Instruction Manual >
 > Items Supplied > Instruction Manual >") 301 E. La Palma Ave., Yorba Linda, Ca 97 Ph. 714.69.10, Fax. 714.69.5016 Items Supplied > Application(s) > www.fi000r.com 1 Fi000R Fuel Injection Module Zip Ties 1 Velcro Strip Oxygen Sensor Eliminators
301 E. La Palma Ave., Yorba Linda, Ca 97 Ph. 714.69.10, Fax. 714.69.5016 Items Supplied > Application(s) > www.fi000r.com 1 Fi000R Fuel Injection Module Zip Ties 1 Velcro Strip Oxygen Sensor Eliminators
Harley Davidson V-Rod Models
 2801190 REV. 8-11-05 User Manual 2002-2005 Harley Davidson V-Rod Models Part Number DFCH-5 Congratulations on your purchase of this Dynatek product. Please take a moment to read these instructions completely
Items Supplied > Application(s) > Instruction Manual > 1 Fi2000R Fuel Injection Module 2 Zip Ties 1 Velcro Strip
 > Instruction Manual > 1 Fi2000R Fuel Injection Module 2 Zip Ties 1 Velcro Strip") 301 E. La Palma Ave., orba Linda, Ca 97 Ph. 714.69.10, Fax. 714.69.5016 Items Supplied > 1 Fi000 Fuel Injection Module Zip Ties 1 Velcro Strip Application(s) > HALE SOFTAIL 01 05 DNA 04 05 Fuel Injection
301 E. La Palma Ave., orba Linda, Ca 97 Ph. 714.69.10, Fax. 714.69.5016 Items Supplied > 1 Fi000 Fuel Injection Module Zip Ties 1 Velcro Strip Application(s) > HALE SOFTAIL 01 05 DNA 04 05 Fuel Injection
FUEL MOTO MICRO EFI TUNER POLARIS RZR800 / S / 4. 1 Micro Tuner Module 1 USB Cable 1 Alcohol swab. 1 Installation Guide 2 Velcro 2 Zip ties
 FUEL MOTO MICRO EFI TUNER INSTALLATION INSTRUCTIONS 2011-2014 POLARIS RZR800 / S / 4 PARTS LIST 1 Micro Tuner Module 1 USB Cable 1 Alcohol swab 1 Installation Guide 2 Velcro 2 Zip ties PLEASE READ ALL
Honda VTX1800
 2801191 Rev 06-28-05 User Manual 2002-2005 Honda VTX1800 Part Number DFCM-1 Congratulations on your purchase of this Dynatek product. Please take a moment to read these instructions completely before installing
ACCEL Distributor Model #A557
 FORM 1627 REV1 INSTALLATION INSTRUCTIONS ACCEL Distributor Model #A557 CAUTION: CAREFULLY READ INSTRUCTIONS BEFORE PROCEEDING. NOT LEGAL FOR USE OR SALE ON POLLUTION CONTROLLED VECHICLES OVERVIEW ACCEL
Engine Management System
 Engine Management System 6 0 4-0 0 1 I N S T R U C T I O N S For 2005-2010 Harley-Davidson FXS (Softail) Models 2 Revolution Performance was founded with two major goals in mind to go that extra mile providing
FUEL MOTO MICRO EFI TUNER HARLEY-DAVIDSON V-ROD MODELS. 1 Micro Tuner Module 1 USB Cable 1 CD-ROM 1 Installation Guide 1 Zip-tie
 FUEL MOTO MICRO EFI TUNER INSTALLATION INSTRUCTIONS 2002-2011 HARLEY-DAVIDSON V-ROD MODELS PARTS LIST 1 Micro Tuner Module 1 USB Cable 1 CD-ROM 1 Installation Guide 1 Zip-tie 2 Velcro 1 Alcohol swab 1
INSTALLATION HYPERCHARGER AIR FILTER KIT 9754
 9754 PARTS INCLUDED 1 Chrome Hypercharger Assembly 1 Support Bracket 1 Breather Hardware Kit, including: 2 1-1/4 Breather Bolts 2 Breather Hoses 4 Shim Washers 1 Twin Cam Breather Kit, Including: 1 Breather
FUEL MOTO MICRO EFI TUNER YAMAHA GRIZZLY YAMAHA GRIZZLY 700 FIG. FIG. 1 Micro Tuner Module 1 USB Cable 1 Alcohol swab
 FIG. FUEL MOTO MICRO EFI TUNER INSTALLATION INSTRUCTIONS 2009-2014 YAMAHA GRIZZLY 550 2007-2016 YAMAHA GRIZZLY 700 FIG. 1 Micro Tuner Module 1 USB Cable 1 Alcohol swab PARTS LIST 1 Installation Guide 2
INSTALLATION HYPERCHARGER AIR FILTER KIT 9992
 9992 PARTS INCLUDED 1 Chrome Hypercharger Assembly with Chrome Blood Groove Trap Door and Chrome Butterflies 1 Support Bracket 1 Breather Hardware Kit, including: 2 1-1/4 Breather Bolts 2 Breather Hoses
Engine Management System
 Engine Management System 6 0 4-0 0 1 I N S T R U C T I O N S For 2005-2007 Harley-Davidson FL Models 2 Revolution Performance was founded with two major goals in mind to go that extra mile providing a
Direct Link Basic Tuning Guide (Delphi)
") Direct Link Basic Tuning Guide (Delphi) This Guide is intended to answer basic Direct Link tuning questions and to act as a Quick Start Guide. It is not intended to be the Gospel on the tuning process
Direct Link Basic Tuning Guide (Delphi) This Guide is intended to answer basic Direct Link tuning questions and to act as a Quick Start Guide. It is not intended to be the Gospel on the tuning process
HSR Carburetor Easy Kits Installation Instructions For Evo Big Twin Kit: # 42-7 Twin Cam Kit: # 42-18
 HSR Carburetor Easy Kits Installation Instructions For Evo Big Twin Kit: # 42-7 Twin Cam Kit: # 42-18 Revised 5/01/01 EK-1 Easy Kit Installation Instructions The HSR series carburetors are precise yet
QUICK START GUIDE 199R10546
 QUICK START GUIDE 199R10546 1.0 Overview This contains detailed information on how to use Holley EFI software and perform tuning that is included within the software itself. Once you load the software,
INSIDE YOUR HOLLEY CARBURETOR FUEL INLET SYSTEM
 INSIDE YOUR HOLLEY CARBURETOR The carburetor is quite simply a fuel metering device that operates under the logical and straightforward laws of physics. It has evolved over the years from a very simple
FUEL MOTO MICRO EFI TUNER YAMAHA RAPTOR Micro Tuner Module 1 USB Cable 1 Alcohol swab. 1 Installation Guide 2 Velcro strips
 FUEL MOTO MICRO EFI TUNER INSTALLATION INSTRUCTIONS 2006-2017 YAMAHA RAPTOR 700 PARTS LIST 1 Micro Tuner Module 1 USB Cable 1 Alcohol swab 1 Installation Guide 2 Velcro strips PLEASE READ ALL DIRECTIONS
FUEL INJECTION SYSTEM - MULTI-POINT
 FUEL INJECTION SYSTEM - MULTI-POINT 1988 Jeep Cherokee 1988 Electronic Fuel Injection JEEP MULTI-POINT 4.0L Cherokee, Comanche, Wagoneer DESCRIPTION The Multi-Point Electronic Fuel Injection (EFI) system
ELECTRONIC FUEL INJECTION
 Table of Contents ELECTRONIC FUEL INJECTION Section 3B - Troubleshooting and Diagnostics TROUBLESHOOTING AND DIAGNOSTICS Specifications........................... 3B-1 Special Tools...........................
INSTALLATION INSTRUCTIONS UNLEASH. THE SMARTEST PERFORMANCE TUNING TECHNOLOGY
 INSTALLATION INSTRUCTIONS R UNLEASH. THE SMARTEST PERFORMANCE TUNING TECHNOLOGY FUEL MANAGEMENT FUEL + QS + TRACTION CONTROL HARLEY DAVIDSON TRIKE 2008-2013 F253 T253 1>READ WARNINGS > INSTALLING We strongly
PLEASE READ ALL DIRECTIONS BEFORE STARTING INSTALLATION
 PARTS LIST 2009-2011 Yamaha R1 Installation Instructions 1 Power Commander 1 USB Cable 1 Installation Guide 2 Power Commander Decals 2 Dynojet Decals 2 Velcro strips 1 Dual Lock strip 1 Alcohol swab 1
FMI (Fuel Management Interface) Part# Can-Am DS450. FMI kit bill of materials
 Part# Can-Am DS450. FMI kit bill of materials") 18550 Minthorn Street, Lake Elsinore, CA, 92530 (951) 587-9222 (951) 296-1552 fax FMI (Fuel Management Interface) Part# 80-6001 2008 Can-Am DS450 FMI kit bill of materials 1 Instruction sheet 1 Adhesive
18550 Minthorn Street, Lake Elsinore, CA, 92530 (951) 587-9222 (951) 296-1552 fax FMI (Fuel Management Interface) Part# 80-6001 2008 Can-Am DS450 FMI kit bill of materials 1 Instruction sheet 1 Adhesive
A Simple View of Fuel Injection
 A Simple View of Fuel Injection Your engine is an air pump, the more air you pump through it, the more power you make. Figure 1 Any internal combustion engine will flow air at a rate determined by many
MSD Pro-Billet Digital E-Curve Distributor PN U.S. Patent
 MSD Pro-Billet Digital E-Curve Distributor PN 8394 - U.S. Patent 6820602 Important: Read these Instructions before attempting the installation. Parts Included: 1 - Digital E-Curve Distributor 1 - Rotor,
G - TESTS W/CODES - 2.2L
 G - TESTS W/CODES - 2.2L 1994 Toyota Celica 1994 ENGINE PERFORMANCE Toyota 2.2L Self-Diagnostics Celica INTRODUCTION If no faults were found while performing F - BASIC TESTING, proceed with self-diagnostics.
PLEASE READ ALL DIRECTIONS BEFORE STARTING INSTALLATION
 Parts List 2013-2014 Honda CBR600RR Installation Instructions 1 Power Commander FC 1 USB Cable 1 Installation Guide 2 Dynojet Decals 2 Velcro 1 Alcohol swab 1 O2 Optimizer THE IGNITION MUST BE TURNED OFF
HSR Carburetor. Total Kits. Installation Instructions. # Evo Big Twin # present Twin Cam
 HSR Carburetor Total Kits Installation Instructions HSR42 Kits: HSR45 Kits: #42-8 84-99 Evo Big Twin #42-19 99 - present Twin Cam #45-2 84-99 Evo Big Twin #45-3 84-99 Evo Big Twin #45-4 99 - present Twin
MSD Pro-Billet Chevrolet HEI Distributor PN 8365
 MSD Pro-Billet Chevrolet HEI Distributor PN 8365 ONLINE PRODUCT REGISTRATION: Register your MSD product online and you ll be entered in our monthly 8.5mm Super Conductor Spark Plug Wire give-away! Registering
MegaSquirt III for Gen 3 HEMI. Hardware Install THE FOLLOWING SENSOR PART NUMBERS APPLY TO ALL HARNESSES FOR ENGINES 2004 TO CURRENT:
 MegaSquirt III for Gen 3 HEMI MegaSquirt controllers are experimental devices intended for educational purposes. MegaSquirt controllers are not for sale or use on pollution controlled vehicles. Check the
DFE PARTS LIST INSTALLATION INSTRUCTIONS PLEASE READ ALL DIRECTIONS BEFORE STARTING INSTALLATION
 1 Fusion Module 1 USB Cable 1 Installation Guide PARTS LIST INSTALLATION INSTRUCTIONS 2 Velcro Strips 1 Alcohol Swab 1 O2 Optimizer 2014 KAWASAKI TERYX 4 DFE-17-054 PLEASE READ ALL DIRECTIONS BEFORE STARTING
E-STREET 2 EFI IGNITION CONTROL KIT Part #3674, 3675, 3676, 3679, 3680 INSTALLATION INSTRUCTIONS
 E-STREET 2 EFI IGNITION CONTROL KIT Part #3674, 3675, 3676, 3679, 3680 INSTALLATION INSTRUCTIONS PLEASE study these instructions carefully before beginning this installation. Most installations can be
#5460 GM Gen IV 2009-Present VVT Cam Phaser Limiter Kit Patent #8,291,876 B2
 INSTRUCTIONS #5460 GM Gen IV 2009-Present VVT Cam Phaser Limiter Kit Patent #8,291,876 B2 Thank you for choosing products; we are proud to be your manufacturer of choice. Please read this instruction sheet
WARNING! USE ONLY IN RACE OR OTHER CLOSED COURSE APPLICATIONS AND NEVER ON PUBLIC ROADS
 2010-2012 Ducati Hypermotard 1100 EVO / EVO SP 2010-2013 Ducati Hypermotard 796 Z-Fi INSTALLATION INSTRUCTIONS PN F183, F184 WARNING! USE ONLY IN RACE OR OTHER CLOSED COURSE APPLICATIONS AND NEVER ON PUBLIC
Honda CBR600RR
 Parts List 2007-2012 Honda CBR600RR Installation Instructions 1 Power Commander 1 USB Cable 1 CD-ROM 1 Installation Guide 2 Power Commander Decals 2 Dynojet Decals 2 Velcro Strip 1 Alcohol Swab The ignition
5. FUEL SYSTEM FUEL SYSTEM 5-0
 5 FUEL SYSTEM 5-0 SERVICE INFORMATION GENERAL INSTRUCTIONS SERVICE INFORMATION...5-1 CARBURETOR INSTALLATION...5-9 TROUBLESHOOTING...5-1 PILOT SCREW ADJUSTMENT...5-10 CARBURETOR REMOVAL...5-2 AUTO BYSTARTER...5-3
MSD Pro-Billet Chevrolet HEI Distributor PN 83651, PN 8365/83653
 MSD Pro-Billet Chevrolet HEI Distributor PN 83651, PN 8365/83653 ONLINE PRODUCT REGISTRATION: Register your MSD product online. Registering your product will help if there is ever a warranty issue with
Holley High Performance Intake System* For Port 13B Engines (Includes B 6-Port engines converted to 4-Port)
") Holley High Performance Intake System* For 1974-1978 4-Port 13B Engines (Includes 1984-85 13B 6-Port engines converted to 4-Port) Installation Instructions I-18038 Note: These instructions assume: The
Holley High Performance Intake System* For 1974-1978 4-Port 13B Engines (Includes 1984-85 13B 6-Port engines converted to 4-Port) Installation Instructions I-18038 Note: These instructions assume: The
INSTALLATION TRUE DUAL HEADPIPES 497
 TRUE DUAL HEADPIPES 497 PARTS INCLUDED 1 Front Head Pipe 1 Rear Head Pipe 1 Front Heat Shield 1 Rear Heat Shield 1 Bracket (stamped 422-P) 1 Bracket (stamped 423-P) 2 1/2 x 1-1/4 Socket Head Cap Screw
Motorcycle Carburetor Theory 101
 Motorcycle Carburetor Theory 101 Motorcycle carburetors look very complex, but with a little theory, you can tune your bike for maximum performance. All carburetors work under the basic principle of atmospheric
MSD Pro-Billet Digital E-Curve Distributor Ford 289/302 PN U.S. Patent
 MSD Pro-Billet Digital E-Curve Distributor Ford 289/302 PN 8503 - U.S. Patent 6820602 ONLINE PRODUCT REGISTRATION: Register your MSD product online and you ll be entered in our monthly 8.5mm Super Conductor
MSD Pro-Billet Digital E-Curve Distributor Ford 289/302 PN U.S. Patent
 MSD Pro-Billet Digital E-Curve Distributor Ford 289/302 PN 8503 - U.S. Patent 6820602 Important: Read these Instructions before attempting the installation. Parts Included: 1 - Digital E-Curve Distributor
MSD Pro-Billet Chevrolet HEI Distributor PN 8365
 MSD Pro-Billet Chevrolet HEI Distributor PN 8365 Important: Read these instructions before attempting the installation. Parts Included: 1 - Pro-Billet Distributor, PN 8365 1 - Rotor, PN 84101 1 - Distributor
MSD Single Cylinder Programmable Ignition PN 4217
 MSD Single Cylinder Programmable Ignition PN 4217 Parts Included: 1 - PN 4217 1 - PN 4217 Wire Harness 1 - CD Rom 9609 1 - Parts Bag 1 - Serial Cable WARNING: During installation, disconnect the battery
POWER CELL FOR DYNA WITH CLEAN CHROME COVER 562
 POWER CELL FOR DYNA WITH CLEAN CHROME COVER 562 THANK YOU FOR CHOOSING CRUSHER! PROTECT YOURSELF AND OTHERS FROM POTENTIAL INJURY AND PROPERTY DAMAGE OR LOSS. PAY CLOSE ATTENTION TO ALL INSTRUCTIONS, WARNINGS,
INSTALLATION INSTRUCTIONS FOR DODGE/JEEP MODULE
 INSTALLATION INSTRUCTIONS FOR DODGE/JEEP MODULE ENGINEERED FOR POWER TECHNICAL ASSISTANCE: (714) 848-5515 Jet Performance Products 17491 Apex Circle Huntington Beach, CA 92647 Phone: (714) 848-5515 Fax:
PLEASE READ ALL DIRECTIONS BEFORE STARTING INSTALLATION
 Parts List 2008-2014 Honda CBR1000RR Installation Instructions 1 Power Commander FC 1 USB Cable 1 Installation Guide 2 Dynojet Decals 2 Velcro 1 Alcohol swab 1 O2 Optimizer THE IGNITION MUST BE TURNED
Ducati Monster Ducati Monster 796 (Euro Spec Only) Z-Fi Installation Instructions P/N F192
 Z-Fi Installation Instructions P/N F192") 2009-2013 Ducati Monster 696 2010-2013 Ducati Monster 796 (Euro Spec Only) Z-Fi Installation Instructions P/N F192 WARNING! USE ONLY IN RACE OR OTHER CLOSED COURSE APPLICATIONS AND NEVER ON PUBLIC ROADS
2009-2013 Ducati Monster 696 2010-2013 Ducati Monster 796 (Euro Spec Only) Z-Fi Installation Instructions P/N F192 WARNING! USE ONLY IN RACE OR OTHER CLOSED COURSE APPLICATIONS AND NEVER ON PUBLIC ROADS
PLEASE READ ALL DIRECTIONS BEFORE STARTING INSTALLATION
 PARTS LIST 2010 MV Agusta Brutale 1090 Installation Instructions 1 Power Commander 1 USB Cable 1 CD-ROM 1 Installation Guide 2 Power Commander Decals 2 Dynojet Decals 2 Velcro 1 Dual Velcro 1 Alcohol swab
Honda Accord/Prelude
 Honda Accord/Prelude 1984-1995 In Tank Fuel Pumps TEST 1. Turn the ignition OFF. 2. On the Accord, remove the screws securing the underdash fuse box to its mount. Remove the fuel cut off relay from the
MSD Pro-Billet Digital E-Curve Distributor PN U.S. Patent
 MSD Pro-Billet Digital E-Curve Distributor PN 8394 - U.S. Patent 6820602 ONLINE PRODUCT REGISTRATION: Register your MSD product online. Registering your product will help if there is ever a warranty issue
Part number SP1305. Maintaining your Cold air intake system: Tools required:
 Part number SP1305 2000-03 Honda S2000 4 cyl. 2.0L 2004-06 Honda S2000 4 cyl. 2.2L 1-2 piece cold air intake 1-3 Injen filter (#1014) 1-2 3/4 x 3 silicone step hose (#3040) 1-3 straight hose (#3044) 1-
Before continuing with the installation, here are a few definitions you should be aware of:
 MSD Ford Billet Distributors PN 8473: 2.3L, PN 8580: 351C, 351M, 400, 429, 460 PN 8582: 289, 302, PN 8584: 351W PN 85805: 351W w/edelbrock Victor Jr. Intake Important: Read these instructions before attempting
WARNING! USE ONLY IN RACE OR OTHER CLOSED COURSE APPLICATIONS AND NEVER ON PUBLIC ROADS
 2008-2010 KTM RC8 2009-2010 RC8 R Z-Fi TC / Z-FI QS INSTALLATION INSTRUCTIONS P/Ns S542S, S542R, T542S, T542R WARNING! USE ONLY IN RACE OR OTHER CLOSED COURSE APPLICATIONS AND NEVER ON PUBLIC ROADS Z-Fi
MegaSquirt III for LS Style Engines. Hardware Install. 1. Disconnect and remove the battery from the vehicle.
 MegaSquirt III for LS Style Engines MegaSquirt controllers are experimental devices intended for educational purposes. MegaSquirt controllers are not for sale or use on pollution controlled vehicles. Check
PLEASE READ ALL DIRECTIONS BEFORE STARTING INSTALLATION
 Parts List 2004-2007 Honda CBR1000RR Installation Instructions 1 Power Commander FC 1 USB Cable 1 Installation Guide 2 Dynojet Decals 2 Velcro 1 Alcohol swab THE IGNITION MUST BE TURNED OFF BEFORE INSTALLATION!
Typical Install Instructions
 Typical Install Instructions Read & understand all steps of these instructions before beginning this installation. WEBER Conversion Kit, VW T-1/2, up to 1835cc 32 / 36 DFEV Weber Carburetor These instructions
MSD Pro-Billet Ready-to-Run Chrysler Distributor PN /354 Early Hemi PN Early Hemi
 MSD Pro-Billet Ready-to-Run Chrysler Distributor PN 8391-331/354 Early Hemi PN 8389-392 Early Hemi ONLINE PRODUCT REGISTRATION: Register your MSD product online. Registering your product will help if there
PLEASE READ ALL DIRECTIONS BEFORE STARTING INSTALLATION
 Parts List 2008-2011 Yamaha TMax 500 Installation Instructions 1 Power Commander FC 1 USB Cable 1 Installation Guide 2 Dynojet Decals 2 Velcro 1 Alcohol swab THE IGNITION MUST BE TURNED OFF BEFORE INSTALLATION!
PLEASE READ ALL DIRECTIONS BEFORE STARTING INSTALLATION
 PARTS LIST 2013 Honda CBR600RR Installation Instructions 1 Power Commander 1 USB Cable 1 CD-ROM 1 Installation Guide 2 Power Commander Decals 2 Dynojet Decals 2 Velcro 1 Alcohol swab 1 O2 Optimizer THE
MSD Pro-Billet Small Diameter Ready-to-Run Ford V8 Distributor PN 8350/83503; 351C-460, PN 8354; 351W PN 8352/83523; 289/302
 MSD Pro-Billet Small Diameter Ready-to-Run Ford V8 Distributor PN 8350/83503; 351C-460, PN 8354; 351W PN 8352/83523; 289/302 ONLINE PRODUCT REGISTRATION: Register your MSD product online. Registering your
Installation Instructions for: EMS P/N Ford Mustang 5.0L
 Installation Instructions for: EMS P/N 30-1400 1986-93 Ford Mustang 5.0L! WARNING: This installation is not for the tuning novice nor the PC illiterate! Use this system with EXTREME caution! The AEM EMS
PLEASE READ ALL DIRECTIONS BEFORE STARTING INSTALLATION
 PARTS LIST 1999-2001 Harley Davidson Touring Models Installation Instructions 1 Power Commander 1 USB Cable 1 Installation Guide 2 Power Commander Decals 2 Dynojet Decals 2 Velcro strips 1 Alcohol swab
MSD Pro-Billet Ready to Run Distributor Ford Y-Block, PN 8383 Ford FE, PN 8595
 MSD Pro-Billet Ready to Run Distributor Ford Y-Block, PN 8383 Ford FE, PN 8595 ONLINE PRODUCT REGISTRATION: Register your MSD product online and you ll be entered in our monthly 8.5mm Super Conductor Spark
Lambda Control Fuel Adaptation and Fuel Trim
 Lambda Control Fuel Adaptation and Fuel Trim Q: What is Lambda and Lambda Control? A: In the case of a gasoline engine, the optimal mixture of air to fuel for complete combustion is a ratio of 14.7 parts
D - ADJUSTMENTS Article Text 1992 Dodge Colt For a a a a a Copyright 1998 Mitchell Repair Information Company, LLC Saturday, April 27, :46PM
 Article Text ARTICLE BEGINNING 1992 ENGINE PERFORMANCE Chrysler Motors/Mitsubishi On-Vehicle Adjustments Dodge; Colt, Colt 200 Eagle; Summit Mitsubishi: Mirage Plymouth; Colt, Colt 200 ENGINE MECHANICAL
MCL-5100, 5200, & 5400 Bar mount digital speedometer with indicators.
 MCL-5100, 5200, & 5400 Bar mount digital speedometer with indicators. *To avoid damage to motorcycle, please see Speedometer and Indicators sections for details on locating VSS and indicator wires for
FUEL MOTO MICRO EFI TUNER
 FUEL MOTO MICRO EFI TUNER INSTALLATION INSTRUCTIONS 2014-2017 HONDA FOREMAN 500 2014-2017 HONDA RANCHER 420 PARTS LIST 1 Micro Tuner Module 1 USB Cable 1 Alcohol swab 2 Velcro 1 Posi-tap 1 O2 Optimizer
Instant Chat off the main page of Or simply call our tech team at
 Adjustable Fuel Pressure Regulator Kit for 2008+STI 2018-10-03 PSP-FUL-301 Thank you for purchasing this PERRIN product for your car! Installation of this product should only be performed by persons experienced
PLEASE READ ALL DIRECTIONS BEFORE STARTING INSTALLATION
 PARTS LIST FUEL AND IGNITION 2010-2012 Ducati Multistrada 1200 Installation Instructions 1 Power Commander 1 USB Cable 1 Installation Guide 2 Power Commander Decals 2 Dynojet Decals 2 Velcro strips 1 Alcohol
MSD Pro-Billet Ready-to-Run Chevrolet V8 Distributor, PN 8360 Chevrolet 348, 409 Distributor, PN 8393
 MSD Pro-Billet Ready-to-Run Chevrolet V8 Distributor, PN 8360 Chevrolet 348, 409 Distributor, PN 8393 ONLINE PRODUCT REGISTRATION: Register your MSD product online and you ll be entered in our monthly
HSR Carburetor. Total Kits. Installation Instructions. # Evo Big Twin # present Twin Cam
 HSR Carburetor Total Kits Installation Instructions HSR42 Kits: HSR45 Kits: #42-8 84-99 Evo Big Twin #42-19 99 - present Twin Cam #45-2 84-99 Evo Big Twin #45-3 84-99 Evo Big Twin #45-4 99 - present Twin
CRUSHER MAVERICK 2 INTO 2, BLACK 566
 CRUSHER MAVERICK 2 INTO 2, BLACK 566 THANK YOU FOR CHOOSING CRUSHER! PROTECT YOURSELF AND OTHERS FROM POTENTIAL INJURY AND PROPERTY DAMAGE OR LOSS. PAY CLOSE ATTENTION TO ALL INSTRUCTIONS, WARNINGS, CAUTIONS,
INSTALLATION INSTRUCTIONS FOR DODGE/JEEP MODULE
 INSTALLATION INSTRUCTIONS FOR DODGE/JEEP MODULE ENGINEERED FOR POWER TECHNICAL ASSISTANCE: (714) 848-5515 Jet Performance Products 17491 Apex Circle Huntington Beach, CA 92647 Phone: (714) 848-5515 Fax:
PLEASE READ ALL DIRECTIONS BEFORE STARTING INSTALLATION
 FUEL AND IGNITION 2011-2013 Suzuki Kingquad 400 Installation Instructions PARTS LIST 1 Power Commander 1 USB Cable 1 CD-ROM 1 Installation Guide 2 Power Commander Decals 2 Dynojet Decals 2 Velcro Strips
QUICK FUEL TECHNOLOGY HOT ROD SERIES CARBURETORS SLAYER SERIES CARBURETORS SUPER STREET SERIES CARBURETORS
 QUICK FUEL TECHNOLOGY Installation Instructions HOT ROD SERIES CARBURETORS SLAYER SERIES CARBURETORS SUPER STREET SERIES CARBURETORS HR-580-VS 580 CFM Vac. Secondary!!! SS-680-VS 680 CFM Vac. Secondary
2009 Yamaha Apex Snowmobile
 PARTS LIST 2009 Yamaha Apex Snowmobile Installation Instructions quantity description 1 power commander 1 USB cable 1 cd-rom 1 installation guide 2 power commander decals 2 dynojet decals 2 velcro strip
Installation Instructions For #64066 Striker I Power Module Ford Powerstroke 6.0L Diesel Copyright
 Installation Instructions For #64066 Striker I Power Module 2003-2006 Ford Powerstroke 6.0L Diesel 2 nd Edition August 2007 Copyright 2006 by Perfect Performance Products, LLC 2501 Ludelle Street Fort
INSTALLATION INSTRUCTIONS FOR DODGE/JEEP MODULE
 INSTALLATION INSTRUCTIONS FOR DODGE/JEEP MODULE ENGINEERED FOR POWER TECHNICAL ASSISTANCE: (714) 848-5515 Jet Performance Products 17491 Apex Circle Huntington Beach, CA 92647 Phone: (714) 848-5515 Fax:
Items Supplied > Application(s) > Instruction Manual >
 > Instruction Manual >") Items Supplied > Application(s) > 1 Powrpro Black Fuel Injection Module 6 Zip Ties 8 2 Zip Ties 2 1 Velcro Stripe Vegas 8-Ball 2008-2014 Victory High Ball 2012-2014 Victory Judge 2013-2014 Hammer 8 Ball
Items Supplied > Application(s) > 1 Powrpro Black Fuel Injection Module 6 Zip Ties 8 2 Zip Ties 2 1 Velcro Stripe Vegas 8-Ball 2008-2014 Victory High Ball 2012-2014 Victory Judge 2013-2014 Hammer 8 Ball
Perfect Performance Products, LLC Painless Performance Products Division 2501 Ludelle St. Fort Worth, Texas (800)
") PERFECT HI-VELOCITY 68MM THROTTLE BODY Installation Instructions Part # 65301 1991-1998 Jeep 4.0L Engines w/perfect Engine Management System P/N 65140, 65141 OR All Jeep 4.0L Engines in Cherokee, Grand
PERFECT HI-VELOCITY 68MM THROTTLE BODY Installation Instructions Part # 65301 1991-1998 Jeep 4.0L Engines w/perfect Engine Management System P/N 65140, 65141 OR All Jeep 4.0L Engines in Cherokee, Grand
PLEASE READ ALL DIRECTIONS BEFORE STARTING INSTALLATION
 Parts List 2004-2014 Suzuki GSX-R600/GSX-R750 Installation Instructions 1 Power Commander FC 1 USB Cable 1 Installation Guide 2 Dynojet Decals 2 Velcro 1 Alcohol swab 1 O2 Optimizer THE IGNITION MUST BE
MSD Pro-Billet Chrysler V8 Distributor PN , 400 PN , 440
 MSD Pro-Billet Chrysler V8 Distributor PN 8545-383, 400 PN 8546-426, 440 Important: Read these instructions before attempting the installation. Note: An MSD Ignition Control is required to use these distributors.
2011 KTM RC8 / 2011 KTM RC8R Z-Fi Installation Instructions P/N F543
 R 2011 KTM RC8 / 2011 KTM RC8R Z-Fi Installation Instructions P/N F543 WARNING! USE ONLY IN RACE OR OTHER CLOSED COURSE APPLICATIONS AND NEVER ON PUBLIC ROADS Z-Fi products do not meet California CARB
Fuel System (Central SFI)
") Page 1 of 6 1997 GMC Truck GMC K Pickup - 4WD Chevy Pickup, GMC Pickup, Suburban, Tahoe, Yukon (VIN C/K) Service Manual Engine Engine Controls - 5.0L, 5.7L, and 7.4L Description and Operation Document
Page 1 of 6 1997 GMC Truck GMC K Pickup - 4WD Chevy Pickup, GMC Pickup, Suburban, Tahoe, Yukon (VIN C/K) Service Manual Engine Engine Controls - 5.0L, 5.7L, and 7.4L Description and Operation Document
PLEASE READ ALL DIRECTIONS BEFORE STARTING INSTALLATION
 PARTS LIST 2006-2007 Yamaha R6 Installation Instructions 1 Power Commander 1 USB Cable 1 Installation Guide 2 Power Commander Decals 2 Dynojet Decals 2 Velcro strips 1 Alcohol swab 1 Posi-tap THE IGNITION
PLEASE READ ALL DIRECTIONS BEFORE STARTING INSTALLATION
 PARTS LIST 2010-2012 MV Agusta Brutale 1090 Installation Instructions 1 Power Commander 1 USB Cable 1 Installation Guide 2 Power Commander Decals 2 Dynojet Decals 2 Velcro strips 1 Dual Lock strip 1 Alcohol
PLEASE READ ALL DIRECTIONS BEFORE STARTING INSTALLATION
 PARTS LIST 2017 Victory 106 Models Installation Instructions 1 Power Commander 1 USB Cable 1 Installation Guide 2 Power Commander Decals 2 Dynojet Decals 2 Velcro strips 1 Alcohol swab 2 O2 Optimizers
WEBER CARBURETOR TROUBLESHOOTING GUIDE
 This guide is to help pinpoint problems by diagnosing engine symptoms associated with specific vehicle operating conditions. The chart will guide you step by step to help correct these problems. For successful
MSD Kawasaki Jet Ski 750 Enhancer CD Ignition PN 4251
 MSD Kawasaki Jet Ski 750 Enhancer CD Ignition PN 4251 Parts Included: 1 - MSD Enhancer CD Ignition 2-6mm Stainless Steel Flatwashers 2 - Zip Ties Supplies Required For Installation 1 Tube of Blue Loctite
MCL-3000 SERIES AIR PRESSURE PART# MCL-3K-A
 MCL-3000 SERIES AIR PRESSURE PART# MCL-3K-A Thank you for purchasing the Dakota Digital MCL-3K-A gauge for your Harley Davidson Touring bike. This gauge is designed to be a direct, plug in replacement
PLEASE READ ALL DIRECTIONS BEFORE STARTING INSTALLATION
 PARTS LIST FUEL AND IGNITION 2017-2018 Husqvarna 701SM Installation Instructions 1 Power Commander 1 USB Cable 1 Installation Guide 2 Power Commander Decals 2 Dynojet Decals 2 Velcro strips 1 Alcohol swab
CARBURETOR SERVICE INFORMATION TROUBLESHOOTING THROTTLE VALVE DISASSEMBLY THROTTLE VALVE INSTALLATION...
 11 CARBURETOR SERVICE INFORMATION... 11-2 TROUBLESHOOTING... 11-2 THROTTLE VALVE DISASSEMBLY... 11-3 THROTTLE VALVE INSTALLATION... 11-4 CARBURETOR REMOVAL... 11-5 AUTO BYSTARTER... 11-6 FLOAT CHAMBER...