THANK YOU FOR CHOOSING KÜRYAKYN! -cont.-
|
|
|
- Vincent Cross
- 5 years ago
- Views:
Transcription

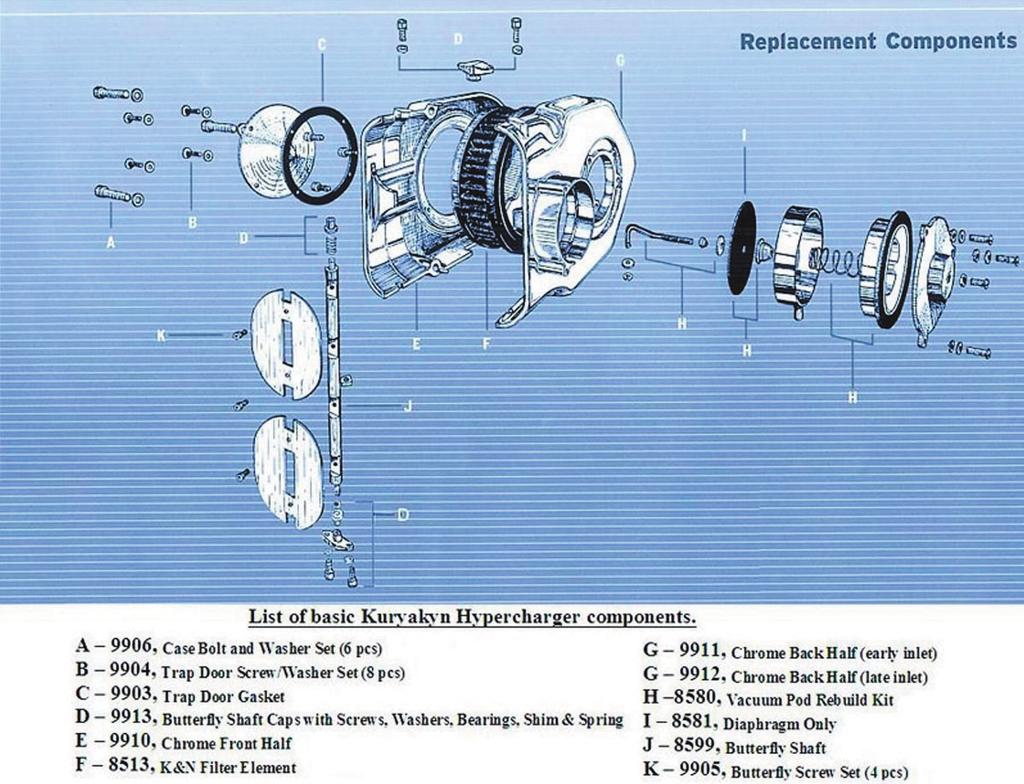
1 I N S TA L L AT I O N H Y P E R C H A R G E R A I R C L E A N E R FITS: KAWASAKI 95-UP VN800 VULCAN PART # INCLUDED Hypercharger Chrome with drilled back K&N Filter Element Mounting Kit containing the following: 1 Carburetor Adapter 1 Carburetor Support Bracket 1 Breather Adapter for Vulcan Gasket, Late Style with Adhesive 2 Gasket, Late Style 3 1/4 20 x 2 SHCS with Blue Patch 1 1/4 20 x 5/8 SHCS Stainless 2 M6 1.0 x 16mm HHCS Stainless 4 1/4 Flat Washer Chrome 1 16 Length 5/32 Vacuum Hose 1 6 Length 3/8 Hose 1 Mini Three-Way Tee 1 1/8 NPT Nipple 1 3/8 Connector, Barbed 1 Cap.562 ID X.69 OD X Male 1/8 27 Threaded 90 Elbow 3 Hose Clamps Stainless Jet Kit for VN800 Including the Following: 1 Fuel Injection Needle 2 E Clip for Fuel Needle Needle Shim 1 5/32 Drill Bit 1 12 X 3/4 Slotted Pan Screw 1 #160 Main Jet 1 #165 Main Jet 1 #170 Main Jet 1 #180 Main Jet Installation Instructions THANK YOU FOR CHOOSING KÜRYAKYN! WARNING Gasoline is extremely flammable. To reduce the possibility of harmful or fatal fire from accidental ignition of fuel from the tank, we suggest disconnecting the battery cables from the battery before beginning this install. Use good judgment and do not smoke. CUSTOMER SERVICE (toll free) QUESTIONS techsupport@kuryakyn.com or call LIMITED WARRANTY Küryakyn warrants that any Küryakyn products sold hereunder, shall be free of defects in materials and workmanship for a period of one (1) year from the date of purchase by the consumer excepting the following provisions: Küryakyn shall have no obligation in the event the customer is unable to provide a receipt showing the date the customer purchased the product(s). The product must be properly installed, maintained and operated under normal conditions. Küryakyn makes no warranty, expressed or implied, with respect to any gold plated products. Küryakyn shall not be liable for any consequential and incidental damages, including labor and paint, resulting from failure of a Küryakyn product, failure to deliver, delay in delivery, delivery in nonconforming condition, or for any breech of contract or duty between Küryakyn and a customer. Küryakyn products are often intended for use in specific applications. Küryakyn makes no warranty if a Küryakyn product is used in applications other than intended. Küryakyn electrical products are warranted for one (1) year from the date of purchase by the consumer. Components of Küryakyn products containing L.E.D.s will be warranted for defects in materials and workmanship for 3 years from the date of purchase. Küryakyn makes no warranty of any kind in regard to other manufacturer s products distributed by Küryakyn. Küryakyn will pass on all warranties made by the manufacturer and where possible, will expedite the claim on behalf of the customer, but ultimately, responsibility for disposition of the warranty claim lies with the manufacturer. ABOUT OUR CATALOG For purchasing Küryakyn products, you can receive a complete catalog free of charge. Send the Proof-of-Purchase below with your address to: Küryakyn, P.O. Box 339, Somerset, WI Please indicate either Accessories Catalog for Harley-Davidson or GL & Metric Cruisers. Be sure to ask your local dealer about other Küryakyn products, the motorcycle parts and accessories designed for riders by riders Küryakyn USA All Rights reserved. PROOF-OF-PURCHASE HD-0705


2 DISCLAIMER PLEASE READ BEFORE PROCEEDING: Any modifications to a motorcycle s exhaust or intake tract require carburetor re-jetting to achieve maximum performance and maintain drivability. If you are uncomfortable with the process of tuning your carburetor, we recommend that you bring your motorcycle to a qualified motorcycle mechanic to have this kit installed. The jets included in this kit were selected based on test results with various combinations of components that we felt would represent the majority of the customers purchasing this kit. However, no two motorcycles are exactly alike. Depending on the individual case, additional jets may need to be purchased from an outside source. Kuryakyn warrants the parts included in this kit to be free of defects in materials and workmanship, but makes no claim whatsoever in regard to costs associated with installation or tuning. PIC.1 NOTE Please read each step of the instruction carefully before proceeding with the installation. Refer to your factory service manual during this installation as needed. PROCEDURE STEP 1 Remove the seat from the motorcycle. PIC.2 STEP 2 Remove the dash from the fuel tank. You will have to unplug two plugs, and unscrew the speedometer cable from the speedometer head. STEP 3 Make sure the fuel petcock is closed. Remove the fuel line and vacuum line from the petcock and the vent hoses from the fuel tank. Remove the fuel tank mounting bolts and remove the tank from the motorcycle. STEP 4 STEP 5 PIC.2. Remove the air box from the bike. See PIC.1. Remove the chrome air cleaner cover, filter, and backing plate from the bike. See PIC.3 STEP 6 Remove the hoses shown in PIC.3 from the rear of the stock air cleaner. Insert the vinyl cap onto the end of the largest hose (fresh air induction). STEP 7 Remove the stock air cleaner support bracket. Set it and its fasteners aside as they will be reused. See PIC.4. STEP 8 Using a 3mm Allen wrench, loosen the clamp that secures the carb spigot to the intake manifold. PIC.4 STEP 9 See PIC.5. Remove the vacuum line, float bowl vent, fuel line, throttle control cables, and enrichener control from the carburetor. STEP 10 Pull the carb free of the manifold and remove it from the motorcycle. Install the Jet Kit provided. Now is a good time to proceed with re-jetting the carburetor. Consult your factory service manual for details of this procedure. We have supplied jets to cover many common configurations. PIC.5 2

 Carefully drain all gas from the carburetor. B) See FIG.1. Set the carburetor on its top with the float bowl facing upwards. Observe the cylindrical casting to the rear of the float bowl.")


3 CARBURETOR RE-JETTING PROCEDURE NOTE Different combinations of aftermarket exhaust and air cleaners will have a significant impact on carburetor jetting. The supplied jetting components have been tested and found to be a good combination to produce drivability and performance with stock or free flowing, muffled/ baffled exhaust pipes. We highly recommend NOT using drag pipes (open style). Using drag pipes in conjunction with our air cleaner may require additional jetting above and beyond the components included in this kit. A) Carefully drain all gas from the carburetor. B) See FIG.1. Set the carburetor on its top with the float bowl facing upwards. Observe the cylindrical casting to the rear of the float bowl. Notice the brass plug in the end of that casting. Use a center punch to make a divot in the end of this plug. Using the supplied drill bit carefully drill out the center of the plug. IMPORTANT: Located below the plug is a brass adjustment screw. Be extremely careful not to allow the drill bit to break through the plug and damage the screw below. Start the supplied slotted pan screw into the hole you drilled and thread it in just enough for the threads to bite. Grasp the screw with pliers and gently wiggle the screw back and fourth while pulling outward to remove the plug. Turn the adjustment screw all the way in until it lightly bottoms out. Back the adjustment screw out 3-1/2 turns from bottomed. FIG.1 C) Carefully remove the float bowl. The stock #48 low speed jet is located in the deep cylindrical recess. Remove and replace the main jet with one of the following... #160 Used in high elevations and/or with stock or restrictive exhaust #165 Used with baffled drag pipes (like the Vance & Hines Straight Shots) #170 Muffled performance pipes (like Cobra or Vance & Hines Duals) #180 Open drag pipes D) Replace the float bowl. E) Carefully remove the carburetor top, slide spring, and slide. The rubber diaphragm is very fragile. Use caution not to tear, puncture or stretch it. The needle can be addressed one of two ways. 1) The stock needle works well when installed with the three supplied needle shims placed under the head of the needle, raising the installed position of the needle. 2) The supplied needle may also be installed providing further adjustment if additional performance modifications will be made. F) Once your choice of needle has been installed, Replace the nylon needle retainer, slide, and slide spring. G) Carefully place the lip of the diaphragm into the groove in the top of the carburetor body and install the carburetor top. IMPORTANT: Be sure the diaphragm has not been pinched or damaged in any way during installation. ANY leak in this seal will cause the bike to run poorly and will require replacement of the diaphragm. CARBURETOR TUNING TIPS Several factors can influence the tuning and drivability of your motorcycle. Altitude, temperature, and choice of exhaust will all affect performance. Further adjustments may be required based on these factors. Backfires through the intake generally indicate a lean condition. Blubbering, shuddering, smoking and plug fowling indicate a rich condition. If jet changes are required be certain that you change the jet causing the problem. EXAMPLE: If your bike exhibits a cough or backfire through the intake, changing the main jet would not change the condition. From idle to 1/8 throttle is controlled by the idle mixture screw Just off idle to 1/4 throttle is controlled by the low speed jet 1/4 throttle to 3/4 throttle is controlled by the needle and needle jet 3/4 throttle to wide open is controlled by the main jet 3

. If there is a gap between the stock air cleaner mounting bracket and the new carb support, shim with the supplied 1/4 flat washers.")


 and add the 6 length of 3/8 I.D.")

4 STEP 11 Reinstall the carb on the manifold, and re-connect all hoses, cables etc. Tighten the intake manifold clamp. STEP 12 Reinstall the stock carb support bracket. STEP 13 Install the billet aluminum carburetor adapter on the mouth of the carburetor. The adapter s slot should be in the 3 o clock position with the pinch bolt installed from the top. Do not tighten the pinch bolt at this time. Install the peel and stick gasket to the exposed surface of the adapter. STEP 14 Install the chrome carb support bracket using the M6-1.0 x 15mm hex head cap screws provided. (PIC.6). If there is a gap between the stock air cleaner mounting bracket and the new carb support, shim with the supplied 1/4 flat washers. In some cases it may be necessary to slightly bend the stock bracket so the carb support will lay flat against the adapter when the M6 screws are tightened. STEP 15 Install the 1/8 NPT x 3/8 O.D. nipple in the threaded hole in the bottom of the breather adapter. STEP 16 Remove the trap door from the front with a 1/8 hex key, remove the trap door on the front of the Hypercharger. Install the Hypercharger and breather adapter as one unit. The three 1/4 20 x 2 socket head cap screws will go through the back of the Hypercharger, the breather adapter, and the carb support then thread into the carb adapter. Be sure to install gaskets between the Hypercharger and breather adapter and the breather adapter and support bracket. The breather nipple should point downward. Note that one of the four holes in the Hypercharger will not be used - it is a vent hole for H-D applications. See PIC.7 (In PIC.7 we have removed the front of the Hypercharger and the filter for clarity. You need only remove the trap door.) Adjust the Hypercharger so it is horizontal before tightening the 1/4 20 x 2 screws. Reinstall the trap door and securely tighten the adapter pinch bolt. PIC.6 PIC.7 PIC.8 STEP 17 Insert the 3/8 barbed connector into the breather hose (PIC.3) and add the 6 length of 3/8 I.D. hose included in the kit. Plug the extended breather hose onto the breather adapter s nipple. Secure all connections with the hose clamps provided (PIC.8). STEP 18 VERY IMPORTANT! Install the plastic 90 elbow in the threaded hole on the back of the Hypercharger. The stock float bowl vent hose is routed from the carb back to a dead end location under the seat. Pull this hose free from under the seat, but leave it connected to the carb fitting. Run this hose from the carb down to the 90 fitting on the back of the Hypercharger, cut it to length, and connect it to the fitting. See PIC.9. PIC.9 STEP 19 See PIC.10. Locate the vacuum line going to the fuel petcock. At a convenient location, cut the line and install the T as shown. Install the supplied length of vacuum hose to the T and connect the remaining end to the vacuum nipple on the bottom of the Hypercharger. (The butterflies will be wide open when the bike is off, or at full throttle, and mostly closed when the bike is at idle. PIC.10 STEP 20 Re-install the tank, dash, and seat in the same manner it was removed. NOTE Before starting engine check all fasteners to make sure they are tight. Check all hoses to make sure they are connected and not kinked. Check throttle operation to make sure it operates freely. Ride On! 4

5 HYPER 5
PRO-R AIR CLEANER FOR KAWASAKI 9462
 I N S TA L L AT I O N PRO-R AIR CLEANER FOR KAWASAKI 9462 FITS: 95-04 VN1500 (SINGLE CARB MODELS) PART # INCLUDED 500205 1 Pro R Hypercharger Chrome Assembly Including: 1 Dual Velocity Ring (in plastic
INSTALLATION HYPERCHARGER AIR CLEANER KIT 9400
 AIR CLEANER KIT 9400 PARTS INCLUDED 1 Hypercharger with K&N Filter 1 Adapter Hardware Kit Contains the Following: 1 Rubber Intake Duct with Rubber Carb Bumper 1 Main Support Bracket 1 Carb Bumper Bracket
I N S TA L L AT I O N
 I N S TA L L AT I O N k i t 9 9 5 4 Fits: all honda 750 shadow aero models Part # Included 509944 1 Skull head cover 1 Cage assembly 1 Backing plate, 3-point base 1 Dual velocity ring (not used) 1 Mounting
INSTALLATION HYPERCHARGER AIR FILTER KIT 9992
 9992 PARTS INCLUDED 1 Chrome Hypercharger Assembly with Chrome Blood Groove Trap Door and Chrome Butterflies 1 Support Bracket 1 Breather Hardware Kit, including: 2 1-1/4 Breather Bolts 2 Breather Hoses
INSTALLATION HYPERCHARGER AIR FILTER KIT 9754
 9754 PARTS INCLUDED 1 Chrome Hypercharger Assembly 1 Support Bracket 1 Breather Hardware Kit, including: 2 1-1/4 Breather Bolts 2 Breather Hoses 4 Shim Washers 1 Twin Cam Breather Kit, Including: 1 Breather
I N S TA L L AT I O N
 I N S TA L L AT I O N k i t 9 9 5 6 fits: 99-up v-star 1100 Part # Included 509944 1 Skull Air Cleaner Kit Including: 1 Skull Head Cover 1 Backing Plate 1 Filter Cage Black Powder Coated 1 Dual Velocity
INSTALLATION TRUE DUAL HEADPIPES 497
 TRUE DUAL HEADPIPES 497 PARTS INCLUDED 1 Front Head Pipe 1 Rear Head Pipe 1 Front Heat Shield 1 Rear Heat Shield 1 Bracket (stamped 422-P) 1 Bracket (stamped 423-P) 2 1/2 x 1-1/4 Socket Head Cap Screw
INSTALLATION LIGHTED CURVED LAY DOWN LICENSE PLATE MOUNT 3166
 INSTALLATION LIGHTED CURVED LAY DOWN LICENSE PLATE MOUNT 3166 PARTS INCLUDED 1 Lighted Curved Lay Down License Plate Assembly 1 Hardware Kit Including: 6 Cable Ties 1 Dielectric Grease Pack 1 1 x 8 Tape
I N S TA L L AT I O N
 I N S TA L L AT I O N 5008 fits: H-D: '80-Up Electra glide, tour glide, road king, road glide or street glide PartS Included 1 Right Fork Mount Assembly 1 Left Fork Mount Assembly 2 H3 Driving Light Assemblies
This indication alerts you to the fact that ignoring the contents described herein can result in minor or moderate potential injury.
 3990 THANK YOU FOR CHOOSING KϋRYAKYN! PROTECT YOURSELF AND OTHERS FROM POSSIBLE INJURY AND/OR PROPERTY DAMAGE OR LOSS. PAY CLOSE ATTENTION TO ALL INSTRUCTIONS, WARNINGS, CAUTIONS, AND NOTICES REGARDING
WILD THINGS FUEL INJECTION CONTROLLER 9219
 I N S TA L L AT I O N WILD THINGS FUEL INJECTION CONTROLLER 9219 BY D O B E C K P E R F O R M A N C E FITS: 06-UP SOFTAIL, DRESSER, AND ROAD KING WITH DELPHI FUEL INJECTION Thank you for choosing the Wild
INSTALLATION BLIND SPOT TURN SIGNAL MIRRORS 1457
 BLIND SPOT TURN SIGNAL MIRRORS 1457 PARTS INCLUDED 2 Blind Spot Turn Signal Mirror Assemblies 1 Wire Harness Kit Including: 2 Wiring Harness (four pin) 1 Adapter Harness (six pin) 2 3-Pin Female Connectors
INSTALLATION ZOMBIE L.E.D. FUEL & BATTERY GAUGE. THANK YOU FOR CHOOSING KϋRYAKYN!
 THANK YOU FOR CHOOSING KϋRYAKYN! PROTECT YOURSELF AND OTHERS FROM POSSIBLE INJURY AND PROPERTY DAMAGE OR LOSS. PAY CLOSE ATTENTION TO ALL INSTRUCTIONS, WARNINGS, CAUTIONS, AND NOTICES REGARDING THE, USE,
INSTALLATION. Note: Not all of the included parts will be used during this installation. -cont.-
 Driving Lights for Road Glide 5007 Fits: 98-up Road Glide PartS Included 1 Right Light Assembly 1 Left Light Assembly 1 Right Mounting Bracket 1 Left Mounting Bracket 1 Hardware Kit Including: 2 Narrow
INSTALLATION FORK MOUNTED DRIVING LIGHTS 5008
 5008 PARTS INCLUDED 1 Right Fork Mount Assembly 1 Left Fork Mount Assembly 2 H3 Driving Light Assemblies 1 12-Pin Wiring Adapter 1 Hardware Kit for Fork Mount Driving Lights, Including: 6 5/16-18 Nylock
INSTALLATION CONSTELLATION DRIVING LIGHTS 5009
 INSTALLATION CONSTELLATION DRIVING LIGHTS 5009 PARTS INCLUDED 1 Right Driving Light with Turn Signals 1 Left Driving Light with Turn Signals 1 Installation Component Kit Including: 8 Insulated Male Spades
INSTALLATION TURN SIGNAL MIRRORS 1432
 1432 PARTS INCLUDED 1 Left Side Turn Signal Mirror Assembly with Convex Glass 1 Right Side Turn Signal Mirror Assembly with Convex Glass 1 Hardware Kit, Including: 2 5/16-18 X 1-1/2 Socket Head Cap Screws
INSTALLATION CLAMP-ON FORK MOUNTED DRIVING LIGHTS 5015
 CLAMP-ON 5015 PARTS INCLUDED 2 Driving Lights 2 Side Mount Clamps-43mm/49mm 1 Hardware Kit Including: 2 49mm Spacers 4 43mm Spacers 2 Pivot Dome Washers 2 3/8-16 Serrated Hex Nut 1 Wiring Kit for Driving
INSTALLATION CONSTELLATION DRIVING LIGHTS 5009
 INSTALLATION CONSTELLATION DRIVING LIGHTS 5009 PARTS INCLUDED 1 Right Driving Light with Turn Signals 1 Left Driving Light with Turn Signals 1 Installation Component Kit Including: 8 Insulated Male Spades
INSTALLATION. DRIVING LIGHTS for FLHT/FLHX/FLHR BLACK. THANK YOU FOR CHOOSING KϋRYAKYN!
 THANK YOU FOR CHOOSING KϋRYAKYN! PROTECT YOURSELF AND OTHERS FROM POSSIBLE INJURY AND PROPERTY DAMAGE OR LOSS. PAY CLOSE ATTENTION TO ALL INSTRUCTIONS, WARNINGS, CAUTIONS, AND NOTICES REGARDING THE, USE,
INSTALLATION. DRIVING LIGHTS for FLHT/FLHX/FLHR 5005
 DRIVING LIGHTS for FLHT/FLHX/FLHR 5005 PARTS INCLUDED 1 Right Driving Light Assembly 1 Left Driving Light Assembly 1 Right Driving Light Bracket 1 Left Driving Light Bracket 4 Driving Light Bracket Plugs
INSTALLATION. Note: Not all parts will be used in the installation of this product. -cont.-
 5005 Fits: 06-up FLHX, 04-up Screamin Eagle Ultra Classic Electra Glide & Screamin Eagle Electra Glide Classic, '97-up FLHT, FLHTC, FLHTCU, FLHR PartS Included 1 Right Driving Light Assembly 1 Left Driving
CRUSHER TRUE DUAL HEADPIPES 513
 CRUSHER TRUE DUAL HEADPIPES 513 THANK YOU FOR CHOOSING CRUSHER! PROTECT YOURSELF AND OTHERS FROM POTENTIAL INJURY AND PROPERTY DAMAGE OR LOSS. PAY CLOSE ATTENTION TO ALL INSTRUCTIONS, WARNINGS, CAUTIONS,
POWER CELL FOR DYNA WITH CLEAN CHROME COVER 562
 POWER CELL FOR DYNA WITH CLEAN CHROME COVER 562 THANK YOU FOR CHOOSING CRUSHER! PROTECT YOURSELF AND OTHERS FROM POTENTIAL INJURY AND PROPERTY DAMAGE OR LOSS. PAY CLOSE ATTENTION TO ALL INSTRUCTIONS, WARNINGS,
INSTALLATION. led fairing lights for gl
 for gl1800 4627 Fits: 01-up GL1800 Parts Included 4 7-Color Lizard Lights 1 7-Color Controller/Switch 1 Hardware Kit including: 4 Replacement Adhesive Pads 4 18 Extensions 1 Double Male Lizard Light Connector
CRUSHER MAVERICK 2 INTO 2, BLACK 566
 CRUSHER MAVERICK 2 INTO 2, BLACK 566 THANK YOU FOR CHOOSING CRUSHER! PROTECT YOURSELF AND OTHERS FROM POTENTIAL INJURY AND PROPERTY DAMAGE OR LOSS. PAY CLOSE ATTENTION TO ALL INSTRUCTIONS, WARNINGS, CAUTIONS,
BA /02/03/04/06/07/08/13/13B/15 BIG AIR KIT (BAK) - Yamaha Road Star (99-07)
 - Yamaha Road Star (99-07)") BA-2020-00/02/03/04/06/07/08/13/13B/15 BIG AIR KIT (BAK) - Yamaha Road Star (99-07) Page: 1 Revision: 6.2-02/23/2011 Install Time: 1.5 Hours We recommend a qualified Yamaha technician install this kit
BA-2020-00/02/03/04/06/07/08/13/13B/15 BIG AIR KIT (BAK) - Yamaha Road Star (99-07) Page: 1 Revision: 6.2-02/23/2011 Install Time: 1.5 Hours We recommend a qualified Yamaha technician install this kit
INSTALLATION AIRMASTER DELUXE FAIRING 1335
 AIRMASTER DELUXE FAIRING 1335 PARTS INCLUDED 1 Airmaster Fairing 1 Dragon Wing Spacer kit 1 Light Bar Relocation Hardware Kit 2 1/2" Spacers 2 1" Spacers 6 5/16"-24 x 1" Button Head Cap Screw, Chrome 4
CARBURETOR REBUILD KIT (Vacuum Secondary) Models Demon Carburetors & Holley Model 4160 LIT704
 Models Demon Carburetors & Holley Model 4160 LIT704") CARBURETOR REBUILD KIT 190000 (Vacuum Secondary) Models Demon Carburetors & Holley Model 4160 LIT704 INSTRUCTIONS: Before getting to the actual rebuild, it should be noted that the carbs shown here are
CARBURETOR REBUILD KIT 190000 (Vacuum Secondary) Models Demon Carburetors & Holley Model 4160 LIT704 INSTRUCTIONS: Before getting to the actual rebuild, it should be noted that the carbs shown here are
INSTALLATION INSTRUCTIONS
 THANK YOU FOR CHOOSING KURYAKYN! Protect yourself and others from possible injury and property damage or loss. Pay close attention to all instructions, warnings, cautions, and notices regarding the installation,
INSTALLATION INSTRUCTIONS
 THANK YOU FOR CHOOSING KURYAKYN! Protect yourself and others from possible injury and property damage or loss. Pay close attention to all instructions, warnings, cautions, and notices regarding the installation,
DEMON CARBURETOR MANUAL CHOKE KIT #421441
 DEMON CARBURETOR MANUAL CHOKE KIT #421441 CHOKE INSTALLATION INSTRUCTIONS LIT703 This manual choke kit is designed to be used on any Demon Carburetor with a choke tower. This covers the Road Demon Jr.
HSR Carburetor. Total Kits. Installation Instructions. # Evo Big Twin # present Twin Cam
 HSR Carburetor Total Kits Installation Instructions HSR42 Kits: HSR45 Kits: #42-8 84-99 Evo Big Twin #42-19 99 - present Twin Cam #45-2 84-99 Evo Big Twin #45-3 84-99 Evo Big Twin #45-4 99 - present Twin
INSTALLATION INSTRUCTIONS
 THANK YOU FOR CHOOSING KURYAKYN! Protect yourself and others from possible injury and property damage or loss. Pay close attention to all instructions, warnings, cautions, and notices regarding the installation,
Street Sleeper III Air Cleaner Kit for '08 UP Touring and Trike 9606
 Street Sleeper III Air Cleaner Kit for '08 UP Touring and Trike 9606 THANK YOU FOR CHOOSING CRUSHER! PROTECT YOURSELF AND OTHERS FROM POTENTIAL INJURY AND PROPERTY DAMAGE OR LOSS. PAY CLOSE ATTENTION TO
INSTALLATION INSTRUCTIONS
 THANK YOU FOR CHOOSING KURYAKYN! Protect yourself and others from possible injury and property damage or loss. Pay close attention to all instructions, warnings, cautions, and notices regarding the installation,
INSTALLATION INSTRUCTIONS: 2018 HARLEY-DAVIDSON STREET BOB BIG RADIUS 2-2 PART# / 46077
 INSTALLATION INSTRUCTIONS: 2018 HARLEY-DAVIDSON STREET BOB BIG RADIUS 2-2 PART# 26077 / 46077 Congratulations, you have purchased the finest exhaust system available for your motorcycle. Your Vance & Hines
INSTALLATION INSTRUCTIONS: 2018 HARLEY-DAVIDSON SOFTAIL FAT BOY / BREAKOUT BIG RADIUS 2-2 PART# / 46075
 INSTALLATION INSTRUCTIONS: 2018 HARLEY-DAVIDSON SOFTAIL FAT BOY / BREAKOUT BIG RADIUS 2-2 PART# 26075 / 46075 Congratulations, you have purchased the finest exhaust system available for your motorcycle.
5. FUEL SYSTEM FUEL SYSTEM 5-0
 5 FUEL SYSTEM 5-0 SERVICE INFORMATION GENERAL INSTRUCTIONS SERVICE INFORMATION...5-1 CARBURETOR INSTALLATION...5-9 TROUBLESHOOTING...5-1 PILOT SCREW ADJUSTMENT...5-10 CARBURETOR REMOVAL...5-2 AUTO BYSTARTER...5-3
TECH INFORMATION EMPI D Performance 2-Barrel Carburetor
 TECH INFORMATION EMPI D Performance 2-Barrel Carburetor The New EMPI D 2-Barrel Performance Carburetor.Built specifically for the VW Aftermarket. With all the features that you have asked for More Progression
HSR Carburetor. Total Kits. Installation Instructions. # Evo Big Twin # present Twin Cam
 HSR Carburetor Total Kits Installation Instructions HSR42 Kits: HSR45 Kits: #42-8 84-99 Evo Big Twin #42-19 99 - present Twin Cam #45-2 84-99 Evo Big Twin #45-3 84-99 Evo Big Twin #45-4 99 - present Twin
Street Sleeper III Air Cleaner Kit for 99 Up Twin Cam 9605
 Street Sleeper III Air Cleaner Kit for 99 Up Twin Cam 9605 THANK YOU FOR CHOOSING CRUSHER! PROTECT YOURSELF AND OTHERS FROM POTENTIAL INJURY AND PROPERTY DAMAGE OR LOSS. PAY CLOSE ATTENTION TO ALL INSTRUCTIONS,
Installation Instructions for S&S Single Bore Throttle Bodies
 Instruction 51-1239 12-29-15 Rev 2 Copyright 2009, 2015 by S&S Cycle, Inc. All rights reserved. Printed in the U.S.A. S&S Cycle, Inc. 14025 Cty Hwy G PO Box 215 Viola, Wisconsin 54664 Phone: 608-627-1497
AEROMOTIVE Part # /2 4.6L SOHC Ford Fuel Rail Kit INSTALLATION INSTRUCTIONS
 AEROMOTIVE Part # 14125 96-98 1/2 4.6L SOHC Ford Fuel Rail Kit INSTALLATION INSTRUCTIONS CAUTION: Installation of this product requires detailed knowledge of automotive systems and repair procedures. We
S&S. Instruction Copyright 2014, Version 4 by S&S Cycle, Inc.
 Instruction 510-0295 10-02-2017 Copyright 2014, 2016. 2017 Version 4 by S&S Cycle, Inc. All rights reserved. Printed in the U.S.A. S&S Cycle, Inc. 14025 Cty Hwy G PO Box 215 Viola, Wisconsin 54664 Phone:
BoonDocker Nitrous System Installation Instructions for Kawasaki KFX-700 ATV
 BoonDocker Nitrous System Installation Instructions for Kawasaki KFX-700 ATV Before you begin, please read the instructions below and check kit contents Nitrous Kit Contents: 1 Nitrous Manifold with fittings
INSTALLATION INSTRUCTIONS: HARLEY-DAVIDSON SOFTAIL BIG SHOTS STAGGERED PART# / 47941
 INSTALLATION INSTRUCTIONS: HARLEY-DAVIDSON SOFTAIL BIG SHOTS STAGGERED PART# 17941 / 47941 Congratulations, you have purchased the finest exhaust system available for your motorcycle. Your Vance & Hines
5. FUEL SYSTEM 5-0 FUEL SYSTEM MXU 250R/300R
 5 FUEL SYSTEM 5 SERVICE INFORMATION------------------------------------------------ 5-2 TROUBLESHOOTING----------------------------------------------------- 5-3 FUEL TANK -----------------------------------------------------------------
SPEED & ROAD DEMON ELECTRIC CHOKE KIT #421440
 SPEED & ROAD DEMON ELECTRIC CHOKE KIT #421440 CHOKE INSTALLATION INSTRUCTIONS LIT702 Please make sure you have read and completely understand the instructions before you begin the installation. Keep in
HSR Carburetor Easy Kits Installation Instructions For Evo Big Twin Kit: # 42-7 Twin Cam Kit: # 42-18
 HSR Carburetor Easy Kits Installation Instructions For Evo Big Twin Kit: # 42-7 Twin Cam Kit: # 42-18 Revised 5/01/01 EK-1 Easy Kit Installation Instructions The HSR series carburetors are precise yet
AEROMOTIVE Part # Ford 5.4L GT500 Shelby Mustang Fuel Rail Kit INSTALLATION INSTRUCTIONS
 AEROMOTIVE Part # 14145 07 Ford 5.4L GT500 Shelby Mustang Fuel Rail Kit INSTALLATION INSTRUCTIONS CAUTION: Installation of this product requires detailed knowledge of automotive systems and repair procedures.
AEROMOTIVE Part # Subaru Fuel Rails for Top Feed Injectors WRX & STI INSTALLATION INSTRUCTIONS
 AEROMOTIVE Part # 14135 Subaru Fuel Rails for Top Feed Injectors 02-14 WRX & 07-14 STI INSTALLATION INSTRUCTIONS CAUTION: Installation of this product requires detailed knowledge of automotive systems
AIR CLEANER GENERAL REMOVAL. 1CAUTION Do not run engine without filter element in place. Debris could be drawn into the engine causing damage.
 AIR CLEANER GENERAL The air cleaner prevents foreign material from entering the carburetor and engine by trapping airborne dust and dirt in the filter element. Service air cleaner filter element every
INSTALLATION INSTRUCTIONS: 2017 HARLEY-DAVIDSON TOURING BIG RADIUS 2-2 PART# / 46073
 INSTALLATION INSTRUCTIONS: 2017 HARLEY-DAVIDSON TOURING BIG RADIUS 2-2 PART# 26073 / 46073 Congratulations, you have purchased the finest exhaust system available for your motorcycle. Your Vance & Hines
AEROMOTIVE Part # L 4V Fuel Rails INSTALLATION INSTRUCTIONS
 AEROMOTIVE Part # 14130 5.0L 4V Fuel Rails INSTALLATION INSTRUCTIONS CAUTION: Installation of this product requires detailed knowledge of automotive systems and repair procedures. We recommend that this
MOROSO PERFORMANCE PRODUCTS, INC. (203) , 80 CARTER DRIVE GUILFORD, CT
 , 80 CARTER DRIVE GUILFORD, CT") Parts List (2) Air Oil separator (2) Billet Clamp (1) Stainless Mounting Bracket (2) Ball Valve (2) 90 Degree drain (2) ¼-20X1 SHCS (4) ¼-20x5/8 SHCS (2) ¼-20X1 HHCS (2) ¼-20 Nylock Nuts (2) ½ x 90 Barbed
Parts List (2) Air Oil separator (2) Billet Clamp (1) Stainless Mounting Bracket (2) Ball Valve (2) 90 Degree drain (2) ¼-20X1 SHCS (4) ¼-20x5/8 SHCS (2) ¼-20X1 HHCS (2) ¼-20 Nylock Nuts (2) ½ x 90 Barbed
Installation Instructions for S&S Single Bore Throttle Bodies
 Instruction 1-1270 12-29-1 Rev 2 Copyright 2009, 201 by S&S Cycle, Inc. All rights reserved. Printed in the U.S.A. S&S Cycle, Inc. 1402 Cty Hwy G PO Box 21 Viola, Wisconsin 4664 Phone: 608-627-1497 Fax:
CARBURETOR SERVICE INFORMATION TROUBLESHOOTING THROTTLE VALVE DISASSEMBLY THROTTLE VALVE INSTALLATION...
 11 CARBURETOR SERVICE INFORMATION... 11-2 TROUBLESHOOTING... 11-2 THROTTLE VALVE DISASSEMBLY... 11-3 THROTTLE VALVE INSTALLATION... 11-4 CARBURETOR REMOVAL... 11-5 AUTO BYSTARTER... 11-6 FLOAT CHAMBER...
HSR Carburetor Sportster & Buell. Installation Manual. Revised 7/5/00
 HSR Carburetor Sportster & Buell Installation Manual Carb Kit# 42-10 Carb Kit# 42-11 94 - present Sportster All Buells Revised 7/5/00 SB-1 Sportster/Buell Installation The HSR series carburetors are precise
S&S. Installation Instructions for S&S Single Bore Tuned Induction Kit for 2008-Up Touring Models with Electronic Throttle Control
 Instruction 106-4891 06-24-14 Copyright 2009, 2014 by S&S Cycle, Inc. All rights reserved. Printed in the U.S.A. S&S Cycle, Inc. 14025 County Highway G PO Box 215 Viola, Wisconsin 54664 Phone: 608-627-1497
12. CARBURETOR 12-0 CARBURETOR VITALITY 50
 12 12 CARBURETOR SERVICE INFORMATION (2-STROKE)... 12-2 SERVICE INFORMATION (4-STROKE)... 12-3 THROTTLE VALVE (2-STROKE)... 12-5 CARBURETOR (2-STROKE)... 12-7 AIR SCREW ADJUSTMENT (2-STROKE)... 12-13 REED
Adjusting Carbs For Re-Jetting (Procedure written for an Intruder 1500 LC) NEWLY UPDATED: APRIL 2003
 NEWLY UPDATED: APRIL 2003") SECTION ONE: Get Prepared - Tools Adjusting Carbs For Re-Jetting (Procedure written for an Intruder 1500 LC) NEWLY UPDATED: APRIL 2003 Courtesy of: Half-Crazy Get a manual impact driver (the kind you hit
SECTION ONE: Get Prepared - Tools Adjusting Carbs For Re-Jetting (Procedure written for an Intruder 1500 LC) NEWLY UPDATED: APRIL 2003 Courtesy of: Half-Crazy Get a manual impact driver (the kind you hit
11. CARBURETOR 11-0 CARBURETOR ZX / SCOUT 50
 11 CARBURETOR SERVICE INFORMATION... 11-2 TROUBLESHOOTING... 11-2 THROTTLE VALVE DISASSEMBLY... 11-3 THROTTLE VALVE INSTALLATION... 11-4 CARBURETOR REMOVAL... 11-5 AUTO BYSTARTER... 11-6 FLOAT CHAMBER...
7. FUEL SYSTEM ('04 - '05)
") 7. FUEL SYSTEM ('04 - '05) SYSTEM COMPONENTS 7-2 CARBURETOR DISASSEMBLY 7-81 SERVICE INFORMATION 7-3 CARBURETOR ASSEMBLY 7-14 TROUBLESHOOTING 7-4 CARBURETOR INSTALLATION 7-21 AIR CLEANER HOUSING 7-5 PILOT
7. FUEL SYSTEM ('04 - '05) SYSTEM COMPONENTS 7-2 CARBURETOR DISASSEMBLY 7-81 SERVICE INFORMATION 7-3 CARBURETOR ASSEMBLY 7-14 TROUBLESHOOTING 7-4 CARBURETOR INSTALLATION 7-21 AIR CLEANER HOUSING 7-5 PILOT
INSTALLATION INSTRUCTIONS: 2017 HARLEY-DAVIDSON TOURING POWER DUALS PART# 16871
 INSTALLATION INSTRUCTIONS: 2017 HARLEY-DAVIDSON TOURING POWER DUALS PART# 16871 Congratulations, you have purchased the finest exhaust system available for your motorcycle. Your Vance & Hines exhaust is
AEROMOTIVE Part # / L SOHC Ford Fuel Rail Kit INSTALLATION INSTRUCTIONS
 AEROMOTIVE Part # 14119 98 1/2-04 4.6L SOHC Ford Fuel Rail Kit INSTALLATION INSTRUCTIONS CAUTION: Installation of this product requires detailed knowledge of automotive systems and repair procedures. We
INSTALLATION INSTRUCTIONS: 2017 HARLEY-DAVIDSON TOURING POWER DUALS PART# 46871
 INSTALLATION INSTRUCTIONS: 2017 HARLEY-DAVIDSON TOURING POWER DUALS PART# 46871 Congratulations, you have purchased the finest exhaust system available for your motorcycle. Your Vance & Hines exhaust is
INSTALLATION INSTRUCTIONS AOS-R (Air Oil Separator-Return) Turbo Subaru and STi Document# Support:
 Turbo Subaru and STi Document# Support:") INSTALLATION INSTRUCTIONS AOS-R (Air Oil Separator-Return) 02-14 Turbo Subaru and 2015+ STi Document# 19-0102 Support: info@radiumauto.com These instructions are based on a vehicle with an OEM turbocharger
INSTALLATION INSTRUCTIONS AOS-R (Air Oil Separator-Return) 02-14 Turbo Subaru and 2015+ STi Document# 19-0102 Support: info@radiumauto.com These instructions are based on a vehicle with an OEM turbocharger
AEROMOTIVE Part # GM LS1 Fuel Rails INSTALLATION INSTRUCTIONS
 AEROMOTIVE Part # 14106 GM LS1 Fuel Rails INSTALLATION INSTRUCTIONS CAUTION: Installation of this product requires detailed knowledge of automotive systems and repair procedures. We recommend that this
Typical Install Instructions
 Typical Install Instructions Read & understand all steps of these instructions before beginning this installation. WEBER Conversion Kit, VW T-1/2, up to 1835cc 32 / 36 DFEV Weber Carburetor These instructions
IAG Competition Series Air / Oil Separator (AOS) For 2017 STI
 For 2017 STI") P IAG Competition Series Air / Oil Separator (AOS) For 2017 STI Part# IAG-ENG-7251 Tools Required: Ratchet, torque wrench, extensions, needle nose pliers, hose cutter, snips/scissors, flat head screw driver,
P IAG Competition Series Air / Oil Separator (AOS) For 2017 STI Part# IAG-ENG-7251 Tools Required: Ratchet, torque wrench, extensions, needle nose pliers, hose cutter, snips/scissors, flat head screw driver,
Wrenches: ⅞, 8mm, 10mm, 13mm, 19mm P. allen, Other: Electrical Tape
 IAG Street Series Air / Oil Separator (AOS) For 2008-14 STI Part# IAG-ENG-7100 Tools Required: Ratchet, torque wrench, extensions, needle nose pliers, hose cutter, snips/scissors, flat head screw driver,
S&S. S&S Oil Supply Line Installation Kit PN (For Harley-Davidson Dyna Models) PN (For FLT Models)
 PN (For FLT Models)") Instruction 510-0039 03-07-13 Copyright 2011, 2013 by S&S Cycle, Inc. All rights reserved. Printed in the U.S.A. S&S Cycle, Inc. 14025 County Highway G PO Box 215 Viola, Wisconsin 54664 Phone: 608-627-1497
Instruction 510-0039 03-07-13 Copyright 2011, 2013 by S&S Cycle, Inc. All rights reserved. Printed in the U.S.A. S&S Cycle, Inc. 14025 County Highway G PO Box 215 Viola, Wisconsin 54664 Phone: 608-627-1497
INSTALLATION INSTRUCTIONS: HARLEY-DAVIDSON TOURING POWER DUALS PART# 16832
 INSTALLATION INSTRUCTIONS: HARLEY-DAVIDSON TOURING POWER DUALS PART# 16832 Congratulations, you have purchased the finest exhaust system available for your motorcycle. Your Vance & Hines exhaust is designed
PART NUMBER: MINI Cooper S L4-1.6L SEE * NOTE
 Equipped with AEM Dryflow Filter No Oil Required! INSTALLATION INSTRUCTIONS PART NUMBER: 21-699 2007-2010 MINI Cooper S L4-1.6L SEE * NOTE * NOTE: Legal in California only for racing vehicles which may
INSTALLATION INSTRUCTIONS
 INSTALLATION INSTRUCTIONS ROCKSTAR SOFTAIL MINIMUM REQUIRED TOOLS: FLAT HEAD SCREWDRIVER 1/2, 9/16, 14mm, 7/8 or 22mm WRENCHES 5/16, 1/2, 9/16 SOCKETS AND RATCHET SNAP RING PILERS 3/16, 1/4, 5/16 ALLEN
CARB EO K-006-3* covers the following combination of parts when used on Harley-Davidson Touring Models (excluding Trikes)
") INSTALLATION INSTRUCTIONS: PART# 16894 POWER DUALS CTR CARB EO# K-006-3 COVERS USE ON 2014-2016 HARLEY-DAVIDSON TOURING MODELS (EXCEPT TRIKES) Congratulations, you have purchased the finest exhaust system
INSTALLATION INSTRUCTIONS: PART# 16894 POWER DUALS CTR CARB EO# K-006-3 COVERS USE ON 2014-2016 HARLEY-DAVIDSON TOURING MODELS (EXCEPT TRIKES) Congratulations, you have purchased the finest exhaust system
INSTALLATION INSTRUCTIONS: 2017 HARLEY-DAVIDSON TOURING DRESSER DUALS PART# 17651
 INSTALLATION INSTRUCTIONS: 2017 HARLEY-DAVIDSON TOURING DRESSER DUALS PART# 17651 Congratulations, you have purchased the finest exhaust system available for your motorcycle. Your Vance & Hines exhaust
AEROMOTIVE Part # Ford 5.0 Liter INSTALLATION INSTRUCTIONS
 AEROMOTIVE Part # 14101 86-98 Ford 5.0 Liter INSTALLATION INSTRUCTIONS CAUTION: Installation of this product requires detailed knowledge of automotive systems and repair procedures. We recommend that this
HW Prowler Carburetor Installation Instructions
 HW Prowler Carburetor Installation Instructions Page 1 of 6 Carb Kit Contains: HW modified Mikuni 36mm pumper style carb Custom choke cable Fuel Line Clamp Instructions (2) Leaner and (2) richer main jets
INTAKE AIR TEMPERATURE SENSOR (IAT)
") INTAKE AIR TEMPERATURE SENSOR (IAT) 4.8 Refer to the ELECTRICAL DIAGNOSTIC MANUAL for information on the function and testing of the intake air temperature sensor (IAT sensor). sm054 To prevent accidental
INTAKE AIR TEMPERATURE SENSOR (IAT) 4.8 Refer to the ELECTRICAL DIAGNOSTIC MANUAL for information on the function and testing of the intake air temperature sensor (IAT sensor). sm054 To prevent accidental
BAKER CRUISE DRIVE TOP COVER BAKER 1.5 OIL PAN
 BAKER BAKER CRUISE 1.5 DRIVE OIL TOP PAN COVER PN: BD-1.5B Wrinkle Black Highlighted Pan Assembly BD-1.5CVO Granite Highlighted Pan Assembly CVO Models BD-1.5P Show Polished Pan Assembly BD-1.5C Chrome
Remove Air Cleaner Cover and. Filter
 Remove Air Cleaner Cover and Inspect paper filter for tears Foam pre-cleaner is washable if equipped Replace if necessary Filter Remove Trim Panel Pull throttle lever knob off Remove 3, 8mm screws Remove
INSTALLATION INSTRUCTIONS: 2018 HARLEY-DAVIDSON SOFTAIL SHORTSHOTS STAGGERED PART# 17233/47233
 INSTALLATION INSTRUCTIONS: 2018 HARLEY-DAVIDSON SOFTAIL SHORTSHOTS STAGGERED PART# 17233/47233 Congratulations, you have purchased the finest exhaust system available for your motorcycle. Your Vance &
IAG Street Series Air / Oil Separator (AOS) For WRX & WRX STI
 For WRX & WRX STI") IAG Street Series Air / Oil Separator (AOS) For 2006-07 WRX & 2004-07 WRX STI Part# IAG-ENG-7100 Tools Required: Ratchet, torque wrench, extensions, needle nose pliers, hose cutter, snips/scissors, flat
IAG Street Series Air / Oil Separator (AOS) For 2006-07 WRX & 2004-07 WRX STI Part# IAG-ENG-7100 Tools Required: Ratchet, torque wrench, extensions, needle nose pliers, hose cutter, snips/scissors, flat
Application(s) > Items Supplied > Instruction Manual >
 > Items Supplied > Instruction Manual >") 301 E. La Palma Ave., Yorba Linda, Ca 97 Ph. 714.69.10, Fax. 714.69.5016 Items Supplied > Application(s) > www.fi000r.com 1 Fi000R Fuel Injection Module Zip Ties 1 Velcro Strip Oxygen Sensor Eliminators
301 E. La Palma Ave., Yorba Linda, Ca 97 Ph. 714.69.10, Fax. 714.69.5016 Items Supplied > Application(s) > www.fi000r.com 1 Fi000R Fuel Injection Module Zip Ties 1 Velcro Strip Oxygen Sensor Eliminators
12. CARBURETOR/FUEL PUMP
 12 CARBURETOR/FUEL PUMP SERVICE INFORMATION... 12-2 TROUBLESHOOTING... 12-2 THROTTLE VALVE DISASSEMBLY... 12-3 THROTTLE VALVE INSTALLATION... 12-4 CARBURETOR REMOVAL... 12-5 AUTO BYSTARTER... 12-6 FLOAT
INSTALLATION INSTRUCTIONS: HARLEY-DAVIDSON SPORTSTER MINI GRENADES PART# / 46874
 INSTALLATION INSTRUCTIONS: HARLEY-DAVIDSON SPORTSTER MINI GRENADES PART# 16874 / 46874 Congratulations, you have purchased the finest exhaust system available for your motorcycle. Your Vance & Hines exhaust
INSTALLATION INSTRUCTIONS: INDIAN SCOUT HI-OUTPUT GRENADES PART# 18554/18654
 INSTALLATION INSTRUCTIONS: INDIAN SCOUT HI-OUTPUT GRENADES PART# 18554/18654 Congratulations, you have purchased the finest exhaust system available for your motorcycle. Your Vance & Hines exhaust is designed
IAG Street Series Air / Oil Separator (AOS) For 2017 WRX
 For 2017 WRX") P IAG Street Series Air / Oil Separator (AOS) For 2017 WRX Part# IAG-ENG-7152 Tools Required: Ratchet, torque wrench, extensions, needle nose pliers, hose cutter, snips/scissors, flathead screwdriver,
P IAG Street Series Air / Oil Separator (AOS) For 2017 WRX Part# IAG-ENG-7152 Tools Required: Ratchet, torque wrench, extensions, needle nose pliers, hose cutter, snips/scissors, flathead screwdriver,
AEROMOTIVE Part # Subaru STI Fuel Rail Kit INSTALLATION INSTRUCTIONS
 AEROMOTIVE Part # 14137 04-06 Subaru STI Fuel Rail Kit INSTALLATION INSTRUCTIONS CAUTION: Installation of this product requires detailed knowledge of automotive systems and repair procedures. We recommend
INSTALLATION INSTRUCTIONS Dual Catch Can Kit Subaru Turbo and STi Document# Support:
 INSTALLATION INSTRUCTIONS Dual Catch Can Kit 02-14 Subaru Turbo and 2015+ STi Document# 19-0099 Support: info@radiumauto.com This document covers the installation of a Radium dual catch can kit for the
Do not bend or twist the control cable. Damaged control cable will not operate smoothly and may stick or bind.
 XL200 4. FUEL SYSTEM SERVICE INFORMATION 4-1 TROUBLESHOOTING 4-2 CARBURETOR 4-3 PILOT SCREW ADJUSTMENT 4-14 ACCELERATOR PUMP ADJUSTMENT 4-15 AIR CLEANER HOUSING 4-15 FUEL TANK 4-16 SERVICE INFORMATION
AEROMOTIVE Volkswagen 1.8T Fuel Rail Part # INSTALLATION INSTRUCTIONS
 AEROMOTIVE Volkswagen 1.8T Fuel Rail Part # 14163 INSTALLATION INSTRUCTIONS CAUTION: Installation of this product requires detailed knowledge of automotive systems and repair procedures. We recommend that
Rochester Quadrajet Dodge
 Rochester Quadrajet Dodge ADJUSTMENTS Float Level EXTERNAL CHECK See Figure 1 Fig. 1: Float level external check for the Rochester Quadrajet 1. With the engine idling at normal operating temperature and
AEROMOTIVE Part # Ford 5.4L Shelby GT500 Mustang INSTALLATION INSTRUCTIONS
 AEROMOTIVE Part # 14144 07 Ford 5.4L Shelby GT500 Mustang INSTALLATION INSTRUCTIONS CAUTION: Installation of this product requires detailed knowledge of automotive systems and repair procedures. We recommend
Installation Manual TWM Performance 2010 Mazda 3 short shifter 5 and 6 speed non-mazdaspeed
 Installation Manual TWM Performance 2010 Mazda 3 short shifter 5 and 6 speed non-mazdaspeed Begin the installation by parking on a flat surface, as you will have to engage and disengage the hand brake
AEROMOTIVE Part # Subaru Fuel Rails for Top Feed Injectors WRX & STI INSTALLATION INSTRUCTIONS
 AEROMOTIVE Part # 14134 Subaru Fuel Rails for Top Feed Injectors 02-14 WRX & 07-14 STI INSTALLATION INSTRUCTIONS CAUTION: Installation of this product requires detailed knowledge of automotive systems
INSTALLATION INSTRUCTIONS: HARLEY-DAVIDSON TOURING DRESSER DUALS CHROME PART# 16752
 INSTALLATION INSTRUCTIONS: HARLEY-DAVIDSON TOURING DRESSER DUALS CHROME PART# 16752 Congratulations, you have purchased the finest exhaust system available for your motorcycle. Your Vance & Hines exhaust
STEALTH BIG AIR KIT - Yamaha Roadliner/Stratoliner and Raider
 Page: 1 If you question your abilities it may be best for an experienced service technician perform this installation. A Yamaha Service Manual would be helpful to have on hand for reference. Revision: