MOROSO PERFORMANCE PRODUCTS, INC. (203) , 80 CARTER DRIVE GUILFORD, CT
|
|
|
- Valerie Burns
- 5 years ago
- Views:
Transcription
1 Parts List (2) Air Oil separator (2) Billet Clamp (1) Stainless Mounting Bracket (2) Ball Valve (2) 90 Degree drain (2) ¼-20X1 SHCS (4) ¼-20x5/8 SHCS (2) ¼-20X1 HHCS (2) ¼-20 Nylock Nuts (2) ½ x 90 Barbed Fitting (1) 3/8 x 90 Barbed Fitting (1) 3/8 Straight Barbed Fitting (1) 3/8 Coupling (1) ½ x 5/8 Coupling (1) ½ x ½ Coupling (1) Vacuum Cap (1) ½ Tee (1) 21 Long 3/8 I.D. Hose (1) 31 Long 3/8 I.D. Hose (1) 58 Long ½ I.D. Hose (1) 4 ½ Long ½ I.D. Hose (1) 13 Long ½ I.D. Hose RevB 08/22/ INST

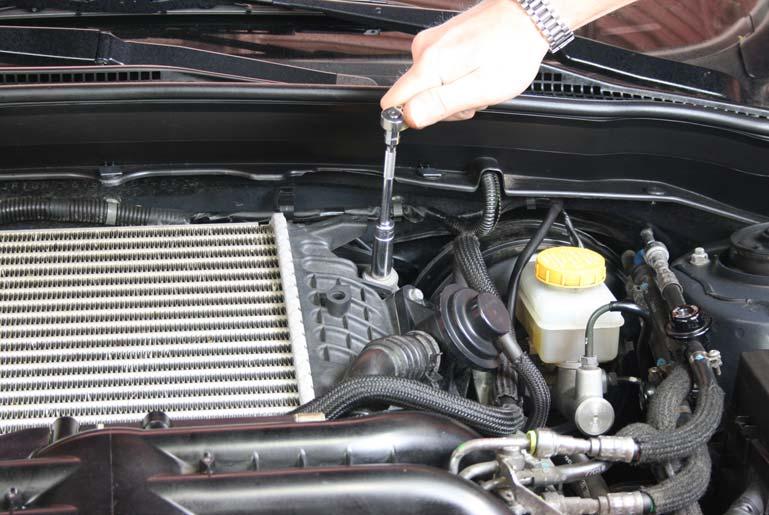
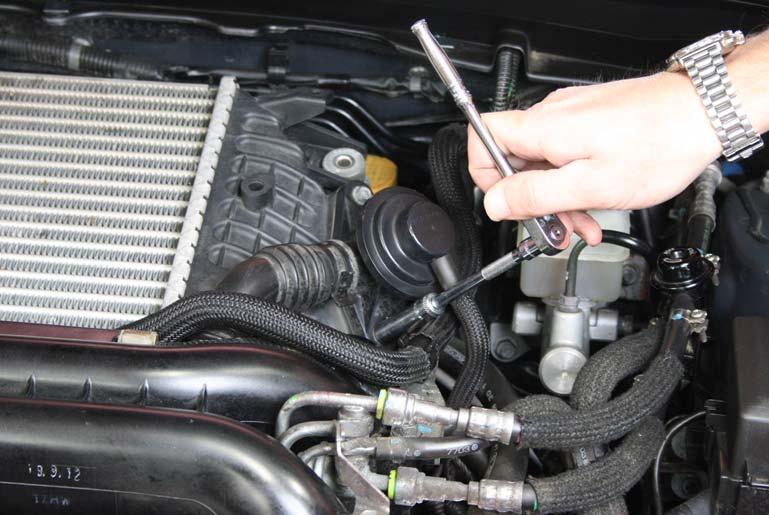
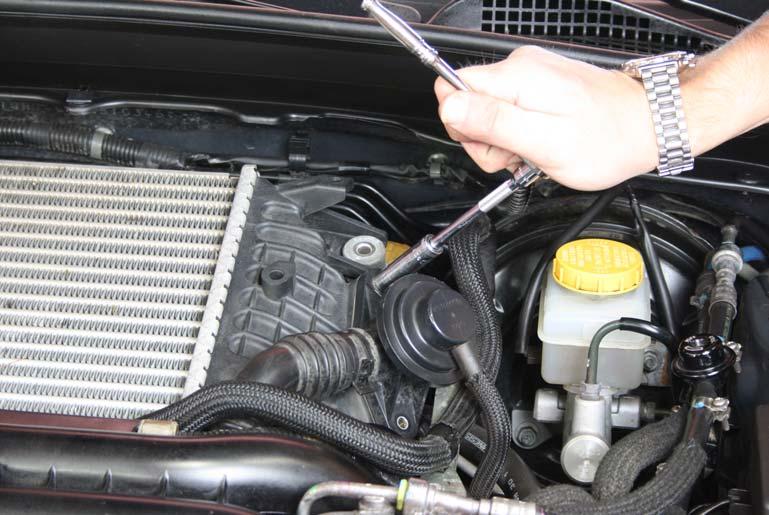
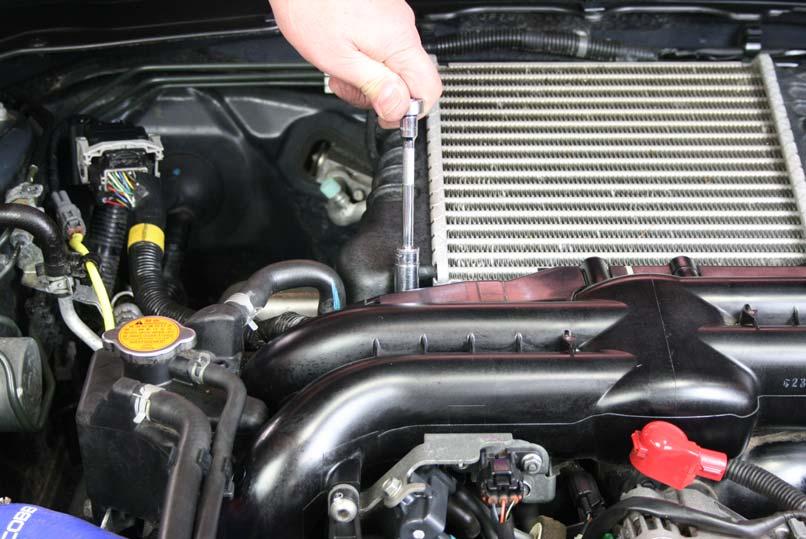
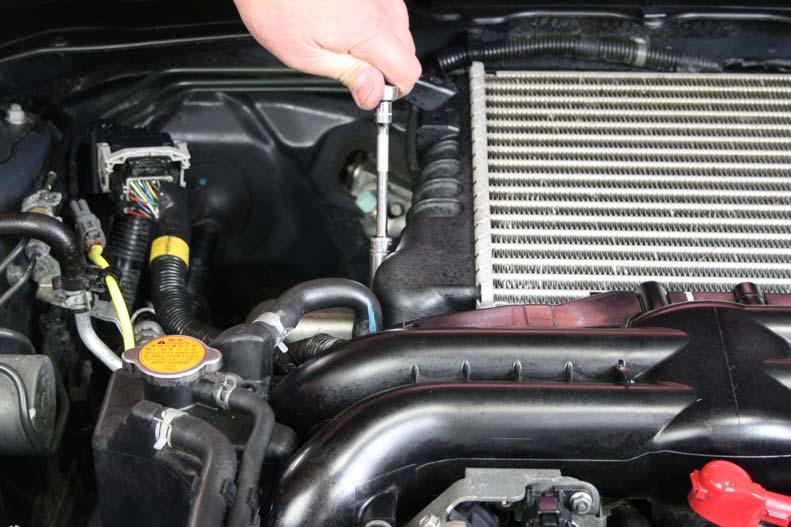
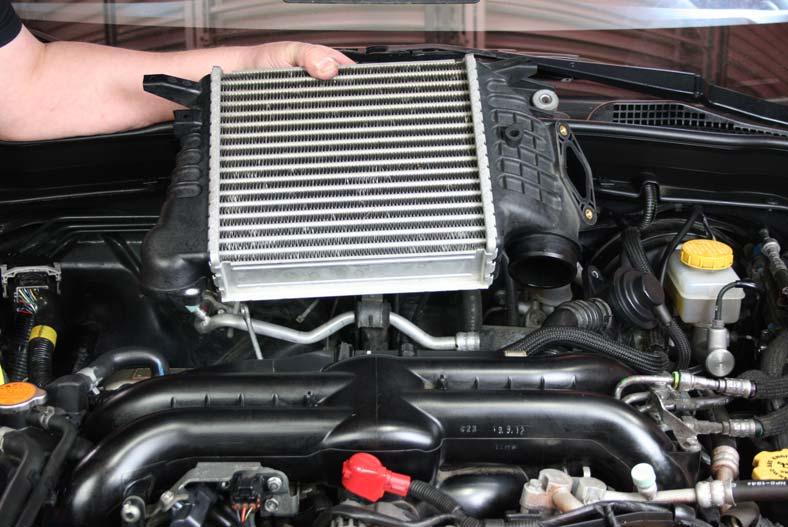
2 Step 1: Remove intercooler from vehicle.
3

4
5


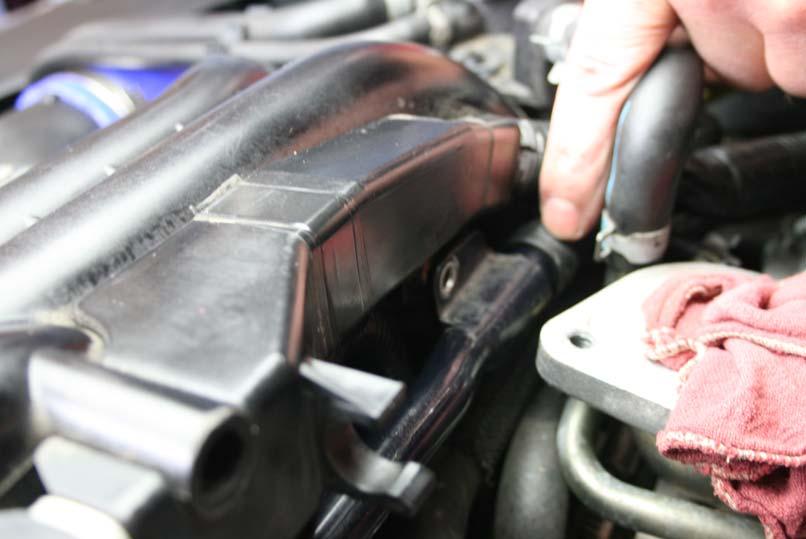
6 Step 2: Locate valve cover cross over breather tube behind intake and remove mounting bolts.


7 Step 3: Locate and remove breather line that runs from cross over tube to passenger side valve cover.
8


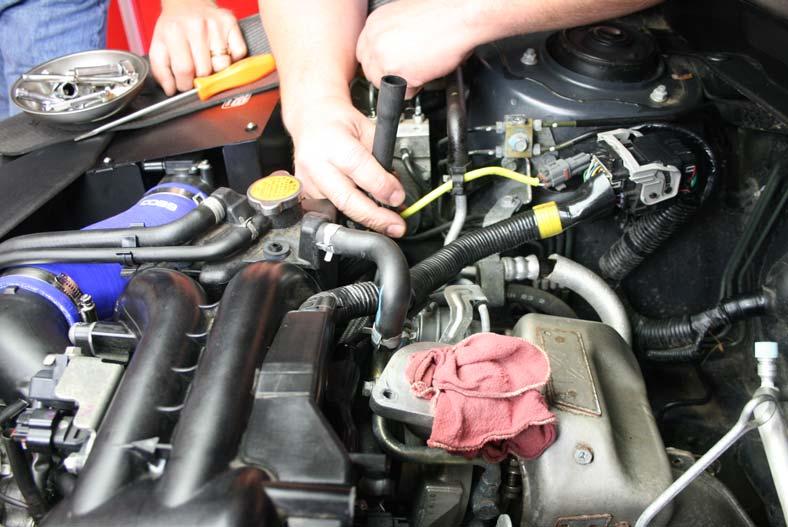
9 Step 4: Locate breather line that runs from air intake tube to valve cover cross over tube and remove line as shown. Solenoids removed for clarity


10 Step 5: Gently remove valve cover cross over tube from breather line


11 Step 6: Set line aside for use in step 10.


12 Step 7: Using cap provided cap valve cover cross over tube nipple removed in step 5.


13 Step 8: Locate ½ to 5/8 coupling in kit. Step 9: Insert ½ side of coupling into one end of 58 long ½ hose.


14 Step 10: Insert other end of coupling (5/8) into line removed in step 6.


15 Step 11: Reinstall original breather line removed in step 5 and 6 to nipple on air intake tube. (original location)


16 Step 12: Label other end of line #1, set aside. Step 13: Reinstall valve cover cross over tube mounting bolts.


17 Location of crank case vent line Step 14: Reinstall any r components that had been removed for ease of installation.


18 Remove this end from throttle body Step 15; Locate crank case vent line running between block and throttle body. (This line is locate on back side of block)


19 Step 16: Loosen clamp and turn crank case vent line back towards firewall. Step 17: Insert 3/8 coupling into one end of 21 long 3/8 hose.


20 Step 18: Insert other end of 3/8 coupling into crank case vent line and reinstall clamp. Step 19: Label other end of line #2, set aside.


21 Step 20: Insert 31 long 3/8 hose over throttle body nipple.


22 Step 21: Label other end of line #3, set aside. Step 22: Remove vent line from passenger side valve cover.


23 Cross over end Valvecoverend Step 23: Remove outer protector from vent line.


24 Step 24: Cut cross over end of tube at 2 1/8.


25 Step 25: Insert ½ coupling into end of 4 ½ long ½ hose. Step 26: Insert ½ side of line previously cut off in step 24 as shown.

26 Step 27: Insert ½ tee into other end of 4 ½ long hose as shown.


27 Step 28: Insert remainder of stock hose to ½ tee as shown.


28 Step 29: reinstall outer protector over stock line.


29 Step 30: Insert 13 long ½ hose over remaining nipple on tee as shown. Step 31: Label other end of 13 hose #4.


30 Step 32: Insert stock hose over nipple on valve cover. This end to crossover tube.


31 Step 33:Install 5/8 end of hose over crossover tube nipple. Hose # 1 from Air Intake Tube Hose #2 from crankcase vent line Hose #3 from throttle body Final hose routing shown with Air Oil Separators installed and intercooler removed for clarity.


32 Step 34: Reinstall intercooler. Step 35: Remove wire harness plug as shown from mounting bracket. (Locking tab on under side of harness plug)


33 Step 36: Unplug small 4 pin connector as shown. Step 37: Unclip wire retainer from hose as shown.


34 Step 38: Remove plug from bracket. Step 39: Locate and remove bracket mounting hardware.


35 Step 40: Remove bracket from vehicle and set aside.


36 ¼-20 x 1 Step 41: Assemble Air Oil Separators as shown. 3/8 straight barb 3/8 90 degree ½ 90 degree


37 4 places ¼-20 x 5/8 Set Air Oil Separator height at 1 ½. Set Air Oil Separator height at 1.


38 Step 42: Install wiring harness bracket to Air Oil Separator bracket using supplied Hex bolts and nylock nuts as shown.


39 Step 43: Install Air Oil Separator assemblies as shown.


40 Note wiring harness must pass between Air Oil Separators Install using stock bracket hardware.


41 Step 44: Reinstall wire harness plug on bracket.


42 Step 45: Reinstall 4 pin plug on bracket.


43 Step 46: Install hose #2 over straight barb as shown. Step 47: Wire tie hose #1 to inter cooler.


44 Step 48: Route hose # 1 to Air Oil Separator as shown and install over ½ 90 degree barb.


45 Step 49: Route hose #3 to Air Oil Separator as shown and install over 3/8 90 degree barb. Step 50: Route hose #4 from valve cover crossover hose assembly to ½ 90 degree barb.


46 Step 51: Remove hose label and make sure ball valves are in the closed position. Installation Complete
47 Draining of Air Oil Separator is needed; this will depend on driving conditions (i.e.) normal day to day driving check every 1,000 miles until a baseline is established. A good baseline is to drain the Air Oil Separator when it is about HALF full. This will vary with temperatures (cold winters vs. hot summers). For track usage Air Oil Separator will need to be drained after every outing. There are several different methods to draining Air Oil Separator. The first and simplest method is to place a cup or MOROSO part # under drain elbow and open ball valve, once draining is complete close ball valve. The second method is to run a length of ½ hose from elbow to under carriage of vehicle and place drain pan under vehicle at this time open ball valve, when draining is complete close ball valve. This hose may also be permanently installed for future draining.
Parts List 2) TANK BODY 2) BILLET CLAMP 2) BALL VALVE 2) 90 DEGREE DRAIN 1) STAINLESS STEEL BRACKET 2) 90 DEGREE 3/8 BARBED FITTINGS 2) 90 DREGREE ½
 TANK BODY 2) BILLET CLAMP 2) BALL VALVE 2) 90 DEGREE DRAIN 1) STAINLESS STEEL BRACKET 2) 90 DEGREE 3/8 BARBED FITTINGS 2) 90 DREGREE ½") Parts List 2) TANK BODY 2) BILLET CLAMP 2) BALL VALVE 2) 90 DEGREE DRAIN 1) STAINLESS STEEL BRACKET 2) 90 DEGREE 3/8 BARBED FITTINGS 2) 90 DREGREE ½ BARBED FITTINGS 1) LENGTH OF 3/8 HOSE 1) LENGTH OF ½
Parts List 2) TANK BODY 2) BILLET CLAMP 2) BALL VALVE 2) 90 DEGREE DRAIN 1) STAINLESS STEEL BRACKET 2) 90 DEGREE 3/8 BARBED FITTINGS 2) 90 DREGREE ½ BARBED FITTINGS 1) LENGTH OF 3/8 HOSE 1) LENGTH OF ½
MOROSO PERFORMANCE PRODUCTS, INC.
 85487 Air Oil Separator kit is designed for vehicles with automatic and standard transmissions. Determine what application applies and follow either Automatic Transmission or Standard Transmission directions.
INSTALLATION INSTRUCTIONS AOS-R (Air Oil Separator-Return) Turbo Subaru and STi Document# Support:
 Turbo Subaru and STi Document# Support:") INSTALLATION INSTRUCTIONS AOS-R (Air Oil Separator-Return) 02-14 Turbo Subaru and 2015+ STi Document# 19-0102 Support: info@radiumauto.com These instructions are based on a vehicle with an OEM turbocharger
INSTALLATION INSTRUCTIONS AOS-R (Air Oil Separator-Return) 02-14 Turbo Subaru and 2015+ STi Document# 19-0102 Support: info@radiumauto.com These instructions are based on a vehicle with an OEM turbocharger
6.7L Cummins EGR Delete
 6.7L Cummins EGR Delete H I A B E C D F J K G L PACKING LIST: Part# A B C D E F G H I J K L QTY. 4 Description Coolant Hose Coolant Hose Connector M0 Flange Nut 5/6 Bolts, Nuts, and Flat Washers /4-0 Bolt,
INSTALLATION INSTRUCTIONS AOS-R (Air Oil Separator-Return) Turbo Subaru and STi Document# Support:
 Turbo Subaru and STi Document# Support:") INSTALLATION INSTRUCTIONS AOS-R (Air Oil Separator-Return) 02-14 Turbo Subaru and 2015+ STi Document# 19-0102 Support: info@radiumauto.com These instructions are based on a vehicle with an OEM turbocharger
INSTALLATION INSTRUCTIONS AOS-R (Air Oil Separator-Return) 02-14 Turbo Subaru and 2015+ STi Document# 19-0102 Support: info@radiumauto.com These instructions are based on a vehicle with an OEM turbocharger
IAG Street Series Air / Oil Separator (AOS) For 2017 WRX
 For 2017 WRX") P IAG Street Series Air / Oil Separator (AOS) For 2017 WRX Part# IAG-ENG-7152 Tools Required: Ratchet, torque wrench, extensions, needle nose pliers, hose cutter, snips/scissors, flathead screwdriver,
P IAG Street Series Air / Oil Separator (AOS) For 2017 WRX Part# IAG-ENG-7152 Tools Required: Ratchet, torque wrench, extensions, needle nose pliers, hose cutter, snips/scissors, flathead screwdriver,
DURAMAX LML EGR DELETE
 2011-2012 DURAMAX LML EGR DELETE Sinister Diesel EGR Delete Kit A B C D E F G H PACKING LIST: QTY. A B C D E F G H QTY. 1 4 1 1 1 3 1 4 Description Blue Coolant Hose M8 x 25 Hex Head Bolts Exhaust Block
TABLE OF CONTENTS PARTS LIST
 TROUBLESHOOTING: Note: You will have a check engine light and/or other problems unless using this product with a compatible ECM calibration. Contact your tuning supplier to learn whether or not aftermarket
Ford 6.7 EGR Delete Kit
 Fits: 2011 12 Powerstroke 6.7L Read instructions thoroughly before proceeding! ***This kit may void factory warranty please check with manufacturer.*** ***This kit is intended for off road use only.***
8 Zip Tie Zip Tie 1 Union Fitting 1 ½ ½ Union Reducer Fitting Union 1 5/8 ½ (For Plastic Intake Manifold Vehicles)
") P IAG Street Series Air / Oil Separator (AOS) For 2017 STI Part# IAG-ENG-7151 Tools Required: Ratchet, torque wrench, extensions, needle nose pliers, hose cutter, snips/scissors, flat head screw driver,
P IAG Street Series Air / Oil Separator (AOS) For 2017 STI Part# IAG-ENG-7151 Tools Required: Ratchet, torque wrench, extensions, needle nose pliers, hose cutter, snips/scissors, flat head screw driver,
COLD AIR INTAKE SYSTEM
 COLD AIR INTAKE SYSTEM Installation Instructions for: Part Number 21-491 2005-2008 Mazda 6i 2.3L NON-PZEV Do not install a bypass valve on this intake system! ADVANCED ENGINE MANAGEMENT INC. 2205 126 TH
INSTALLATION MANUAL
 315000 INSTALLATION MANUAL EGR & Cooler Race Kit for 2015+ 6.7L Ford Powerstroke WARNING ONLY install this kit if you are using a tuner that disables the EGR sensors & circuit system. Any product that
INSTALLATION INSTRUCTIONS AOS-R (Air Oil Separator-Return) Turbo Subaru and STi
 Turbo Subaru and STi") INSTALLATION INSTRUCTIONS AOS-R (Air Oil Separator-Return) 02-14 Turbo Subaru and 2015+ STi These instructions are based on a vehicle with an OEM turbocharger and top-mount intercooler. If a front-mount
INSTALLATION INSTRUCTIONS AOS-R (Air Oil Separator-Return) 02-14 Turbo Subaru and 2015+ STi These instructions are based on a vehicle with an OEM turbocharger and top-mount intercooler. If a front-mount
IAG Competition Series Air / Oil Separator (AOS) For 2017 STI
 For 2017 STI") P IAG Competition Series Air / Oil Separator (AOS) For 2017 STI Part# IAG-ENG-7251 Tools Required: Ratchet, torque wrench, extensions, needle nose pliers, hose cutter, snips/scissors, flat head screw driver,
P IAG Competition Series Air / Oil Separator (AOS) For 2017 STI Part# IAG-ENG-7251 Tools Required: Ratchet, torque wrench, extensions, needle nose pliers, hose cutter, snips/scissors, flat head screw driver,
SCION xb PERFORMANCE AIR INTAKE Section I Installation Preparation 2.4L I-4
 Section I Installation Preparation 2.4L I-4 Part Number(s): PTR03-52110 Kit Contents Item # Quantity Description Reqd. 1 1 TRD Inlet Tube 2 1 TRD Upper Air Box with HC Trap 3 1 Hump Hose Coupler 4 1 Hump
INSTALLATION INSTRUCTIONS
 Equipped with AEM Dryflow Filter No Oil Required! INSTALLATION INSTRUCTIONS PART NUMBER: 21-448B (Blue Finish) 21-448C (Gun Metal Grey Finish) 21-448P (Vauum Metalized Chrome-VMC) 21-448R (Red Finish)
IAG Street Series Air / Oil Separator (AOS) For WRX & WRX STI
 For WRX & WRX STI") IAG Street Series Air / Oil Separator (AOS) For 2006-07 WRX & 2004-07 WRX STI Part# IAG-ENG-7100 Tools Required: Ratchet, torque wrench, extensions, needle nose pliers, hose cutter, snips/scissors, flat
IAG Street Series Air / Oil Separator (AOS) For 2006-07 WRX & 2004-07 WRX STI Part# IAG-ENG-7100 Tools Required: Ratchet, torque wrench, extensions, needle nose pliers, hose cutter, snips/scissors, flat
INSTALLATION INSTRUCTIONS FUEL RAIL
 INSTALLATION INSTRUCTIONS FUEL RAIL MITSUBISHI EVO X Document# 19-0067 Support: info@radiumauto.com WARNING: DON'T SMOKE OR WORK WITH OPEN SPARKS WHILE WORKING ON THE FUEL SYSTEM PREPARING THE VEHICLE:
IAG Air / Oil Separator (AOS) For STi
 For STi") IAG Air / Oil Separator (AOS) For 2008-14 STi Part# IAG-ENG-7000 Tools Required: Ratchet, torque wrench, extensions, needle nose pliers, hose cutter, snips/scissors Sockets: 10mm, 12mm 13mm Wrenches: 10mm,
IAG Air / Oil Separator (AOS) For 2008-14 STi Part# IAG-ENG-7000 Tools Required: Ratchet, torque wrench, extensions, needle nose pliers, hose cutter, snips/scissors Sockets: 10mm, 12mm 13mm Wrenches: 10mm,
Bill of Materials for
 Bill of Materials for 77060012 1 2-P5153572 Inlet Pipe 1 21-202M 2.75" Filter 1 103-BLO-4820N Filter Hose Clamp 1 559999 Washer, Fender M6x25 1 1-3028 Washer, 1/4 SAE Flat 1 1-2072 Bolt, 1/4-20-UNC x 1
COLD AIR INTAKE SYSTEM. Installation Instructions for: Part Number MazdaSpeed Protégé 2.0L Turbo
 COLD AIR INTAKE SYSTEM Installation Instructions for: Part Number 21-486 2003-2003.5 MazdaSpeed Protégé 2.0L Turbo ADVANCED ENGINE MANAGEMENT INC. 2205 126 TH Street, Unit A Hawthorne, CA. 90250 Phone:
PART NUMBER: MAZDA MX-5 L4-2.0L C.A.R.B. E.O. # D MAZDA MX-5 Miata L4-2.0L C.A.R.B. E.O. # D-670-6
 Equipped with AEM Dryflow Filter No Oil Required! INSTALLATION INSTRUCTIONS PART NUMBER:21-640 2006-2008 MAZDA MX-5 L4-2.0L C.A.R.B. E.O. # D-670-6 2006-2009 MAZDA MX-5 Miata L4-2.0L C.A.R.B. E.O. # D-670-6
4. Remove (4) 10mm and (1) 7mm bolt that holds fascia at front corners, on each side
 10mm and (1) 7mm bolt that holds fascia at front corners, on each side") 2010 Camaro LS3 1. Disconnect battery ground 2. Remove front wheels 3. Remove (5) push pins and (5) #20 torx screws on inner front wheel well liners and remove liners on each side 4. Remove (4) 10mm and
2010 Camaro LS3 1. Disconnect battery ground 2. Remove front wheels 3. Remove (5) push pins and (5) #20 torx screws on inner front wheel well liners and remove liners on each side 4. Remove (4) 10mm and
SLP Camaro ZL1 STAGE 3 (650 HP)
") SLP - 2012 Camaro ZL1 STAGE 3 (650 HP) PART #26002 PACKING LIST Before installation, use this check list to make sure all necessary parts have been included. ITEM QTY CHECK PART NUMBER DESCRIPTION 1. 1
SLP - 2012 Camaro ZL1 STAGE 3 (650 HP) PART #26002 PACKING LIST Before installation, use this check list to make sure all necessary parts have been included. ITEM QTY CHECK PART NUMBER DESCRIPTION 1. 1
INSTALLATION INSTRUCTIONS
 Equipped with AEM Dryflow Filter No Oil Required! INSTALLATION INSTRUCTIONS PART NUMBER: 21-507B (Blue Finish) 21-507C (Gun Metal Grey Finish) 21-507R (Red Finish) 2002-2006 ACURA RSX L4-2.0L Auto Trans.
INSTALLATION INSTRUCTIONS BILLET FUEL RAIL KIT
 INSTALLATION INSTRUCTIONS BILLET FUEL RAIL KIT MITSUBISHI LANCER EVOLUTION X Document# 19-0067 Support: info@radiumauto.com WARNING: DON'T SMOKE OR WORK WITH OPEN SPARKS WHILE WORKING ON THE FUEL SYSTEM
Brute Force Intake System. Installation Instructions for: Part Number Toyota 4Runner 3.4L V Toyota Tacoma 3.
 Brute Force Intake System Installation Instructions for: Part Number 21-8402 1999-2002 Toyota 4Runner 3.4L V6 1999-2004 Toyota Tacoma 3.4L V6 ADVANCED ENGINE MANAGEMENT INC. 2205 126 TH Street, Unit A
ITEM QTY CHECK PART NUMBER DESCRIPTION
 PART #21128 2010 Camaro Cold Air Induction Stage II PACKING LIST Before installation, use this check list to make sure all necessary parts have been included. ITEM QTY CHECK PART NUMBER DESCRIPTION 1.
IAG Street Series Air / Oil Separator (AOS) For WRX
 For WRX") IAG Street Series Air / Oil Separator (AOS) For 2008-14 WRX Part# IAG-ENG-7100 Tools Required: Ratchet, extensions, needle nose pliers, hose cutter, snips/scissors, flat head screw driver, hose clamping
IAG Street Series Air / Oil Separator (AOS) For 2008-14 WRX Part# IAG-ENG-7100 Tools Required: Ratchet, extensions, needle nose pliers, hose cutter, snips/scissors, flat head screw driver, hose clamping
INSTALLATION INSTRUCTIONS Dual Catch Can Kit Subaru Turbo and STi Document# Support:
 INSTALLATION INSTRUCTIONS Dual Catch Can Kit 02-14 Subaru Turbo and 2015+ STi Document# 19-0099 Support: info@radiumauto.com This document covers the installation of a Radium dual catch can kit for the
2015 Corvette Supercharger System Instructions
 2015 Corvette Supercharger System Instructions These instructions are meant to serve as a guide to the installation of the ECS 2015 Corvette Supercharging system. Please be sure to use all safety equipment
DURAMAX LMM EGR DELETE
 007.5-010 DURAMAX LMM EGR DELETE Duramax LMM EGR Delete B K I J F D G H A C PACKING LIST: E Part # A B C D E F G H I J K QTY. 1 1 1 1 Description Billet Intake Block Off Plate with O-ring Exhaust Block
PRO-R AIR CLEANER FOR KAWASAKI 9462
 I N S TA L L AT I O N PRO-R AIR CLEANER FOR KAWASAKI 9462 FITS: 95-04 VN1500 (SINGLE CARB MODELS) PART # INCLUDED 500205 1 Pro R Hypercharger Chrome Assembly Including: 1 Dual Velocity Ring (in plastic
Brute Force Intake System
 Brute Force Intake System Installation Instructions for: Part Number: 21-8209 2005-06 Dodge Dakota 4.7L V8 2006 Mitsubishi Raider Durocross/XLS 4.7L V8 ADVANCED ENGINE MANAGEMENT INC. 2205 126 TH Street,
05-08 GT. Hellion Power Systems Mustang Kit Instructions
 Hellion Power Systems 05-08 Mustang Kit Instructions 1. Disconnect Battery 2. Drain Radiator, keep fluid for re-installation. 3. Remove air box and inlethoses. 6. Next, underneath, punch oil pan for turbo
Equipped with AEM Dryflow Filter No Oil Required! INSTALLATION INSTRUCTIONS
 Equipped with AEM Dryflow Filter No Oil Required! INSTALLATION INSTRUCTIONS PART NUMBER: 21-8223DC (Gun Metal Grey Finish) 21-8223DP (Vacuum Metalized Chrome - VMC) 2008-2010 DODGE Challenger V8-6.1L C.A.R.B.
COLD AIR INTAKE SYSTEM. Installation Instructions for: Part Number Mitsubishi Lancer Ralliart Manual Transmission Only
 COLD AIR INTAKE SYSTEM Installation Instructions for: Part Number 21-436 2004-2005 Mitsubishi Lancer Ralliart Manual Transmission Only ADVANCED ENGINE MANAGEMENT INC. 2205 126 TH Street, Unit A Hawthorne,
COLD AIR INTAKE SYSTEM
 COLD AIR INTAKE SYSTEM Installation Instructions for: Part Number 21-488 2004-2008 Mazda 3 s 2.3L 4cyl Congratulations! You have just purchased the finest Air Induction & Filtration system for your car
Kit Part Number:
 10-677 Equipped with AEM DRYFLOW Filter No oil required! Kit Part Number: 21-677 Nissan 350Z 3.5L V6 2007-2008 CARB EO # D-392-30 Short Ram Intake Systems that are pending an Executive Order number (EO#)
Instruction Manual P/N: Make: Honda Model: Accord Year: Engine: L4-2.4L
 Instruction Manual P/N: 12559006 Make: Honda Model: Accord Year: 2008-2012 Engine: L4-2.4L Please read the entire instruction manual before proceeding. Ensure all components listed are present. If you
COLD AIR SYSTEM. Installation Instructions for: Part Number Acura RSX Type-S
 COLD AIR SYSTEM Installation Instructions for: Part Number 21-506 2002-2005 Acura RSX Type-S ADVANCED ENGINE MANAGEMENT INC. 2205 126 TH Street, Unit A Hawthorne, CA. 90250 Phone: (310) 484-2322 Fax: (310)
IAG Competition Series Air / Oil Separator (AOS) For WRX
 For WRX") P IAG Competition Series Air / Oil Separator (AOS) For 2015-16 WRX Part# IAG-ENG-7252 Tools Required: Ratchet, torque wrench, extensions, needle nose pliers, hose cutter, snips/scissors, flat head screw
P IAG Competition Series Air / Oil Separator (AOS) For 2015-16 WRX Part# IAG-ENG-7252 Tools Required: Ratchet, torque wrench, extensions, needle nose pliers, hose cutter, snips/scissors, flat head screw
Arctic Cat ProClimb Sidekick Installation Instructions
 2013-2017 Arctic Cat ProClimb Sidekick Installation Instructions 1.Remove side panels, front bumper, and hood 2. Remove pipe, muffler, heat shield and ECU 3. Remove cross brace. Unplug the servo motor
COBB 3-Port Electronic Boost Control Solenoid
 COBB 3-Port Electronic Boost Control Solenoid MazdaSpeed3/Mazdaspeed6 Congratulations on your purchase of the COBB Tuning 3-Port Electronic Boost Control Solenoid. The following instructions will assist
Equipped with AEM Dryflow Filter No Oil Required! INSTALLATION INSTRUCTIONS PART NUMBER DS (GUN METAL GRAY FINISH)
") Equipped with AEM Dryflow Filter No Oil Required! INSTALLATION INSTRUCTIONS PART NUMBER 21-823DS (GUN METAL GRAY FINISH) 1 ITEM NO. PART NUMBER DESCRIPTION QTY. 1 21-202DOSK AIR FILTER; OFFSET 2.75" X
Equipped with AEM Dryflow Filter No Oil Required! INSTALLATION INSTRUCTIONS PART NUMBER 21-823DS (GUN METAL GRAY FINISH) 1 ITEM NO. PART NUMBER DESCRIPTION QTY. 1 21-202DOSK AIR FILTER; OFFSET 2.75" X
GROUP E EXPLODED VIEW: EV FUEL SYSTEM 2.4L G2 DRAWING #: 0G1151 ITEM PART# QTY. DESCRIPTION
 EXPLODED VIEW: EV FUEL SYSTEM 2.4L G2 DRAWING #: 0G1151 GROUP E ITEM PART# QTY. DESCRIPTION 1 026915 2 NIPPLE CLOSE 3/4 X 1.375 2 075580 1 FLANGE FUEL INLET 3 0F6390C 1 REGULATOR ASSY 2.4L (25KW) 0F6390B
Procharger Stage II Intercooled Supercharger System (11-14 GT)
") Procharger Stage II Intercooled Supercharger System (11-14 GT) Installation Time: Approximately one day. Installed on 2012 Mustang GT 5.0/Manual Required Tools 3/8 Socket Set (Standard and Metric) 1/2
Procharger Stage II Intercooled Supercharger System (11-14 GT) Installation Time: Approximately one day. Installed on 2012 Mustang GT 5.0/Manual Required Tools 3/8 Socket Set (Standard and Metric) 1/2
PART NUMBER:
 Equipped with AEM Dryflow Filter No Oil Required! INSTALLATION INSTRUCTIONS PART NUMBER: 21-8020 2006 PONTIAC GTO V8-6.0L SEE * NOTE 2005 PONTIAC GTO V8-6.0L C.A.R.B. E.O. # D-670-2 * NOTE: Legal in California
IAG Street Series Air / Oil Separator (AOS) For WRX & WRX STI
 For WRX & WRX STI") IAG Street Series Air / Oil Separator (AOS) For 2006-07 WRX & 2004-07 WRX STI Part# IAG-ENG-7150 Tools Required: Ratchet, torque wrench, extensions, needle nose pliers, hose cutter, snips/scissors, flat
IAG Street Series Air / Oil Separator (AOS) For 2006-07 WRX & 2004-07 WRX STI Part# IAG-ENG-7150 Tools Required: Ratchet, torque wrench, extensions, needle nose pliers, hose cutter, snips/scissors, flat
INSTALLATION INSTRUCTIONS PART NUMBER:
 Equipped with AEM Dryflow Filter No Oil Required! INSTALLATION INSTRUCTIONS PART NUMBER: 21-488 2006-2008 MAZDA 3 L4 2.3L SEE * NOTE 2004-2008 MAZDA 3 L4 2.0L SEE * NOTE 2004-2005 MAZDA 3 L4 2.3L C.A.R.B.
Powerstroke EGR Delete A B C
 20-203 6.7 Powerstroke EGR Delete A B C D E F G H I J K Part # A B C D E F G H I J K PACKING LIST: QTY. 3 5 2 Description Sensor Bracket Exhaust Blockoff Plate Straights Barbed Brass Fitting 39 5/8 Coolant
SHORT RAM INTAKE SYSTEM. Installation Instructions for: Part Number Dodge SRT-4 2.4L
 SHORT RAM INTAKE SYSTEM Installation Instructions for: Part Number 22-425 2003-2005 Dodge SRT-4 2.4L ADVANCED ENGINE MANAGEMENT INC. 2205 126 TH Street, Unit A Hawthorne, CA. 90250 Phone: (310) 484-2322
IAG Street Series Air / Oil Separator (AOS) For WRX & WRX STI
 For WRX & WRX STI") IAG Street Series Air / Oil Separator (AOS) For 2006-07 WRX & 2004-07 WRX STI Part# IAG-ENG-7150 Tools Required: Ratchet, torque wrench, extensions, needle nose pliers, hose cutter, snips/scissors, flat
IAG Street Series Air / Oil Separator (AOS) For 2006-07 WRX & 2004-07 WRX STI Part# IAG-ENG-7150 Tools Required: Ratchet, torque wrench, extensions, needle nose pliers, hose cutter, snips/scissors, flat
COLD AIR INTAKE SYSTEM
 COLD AIR INTAKE SYSTEM Installation Instructions for: Part Number 21-549 2004-2006 Nissan Maxima SE/SL 3.5L V6 VQ35DE ADVANCED ENGINE MANAGEMENT INC. 2205 126 TH Street, Unit A Hawthorne, CA. 90250 Phone:
Equipped with AEM Dryflow Filter No Oil Required!
 Equipped with AEM Dryflow Filter No Oil Required! INSTALLATION INSTRUCTIONS PART NUMBER: 21-491B (Blue Finish) 21-491C (Gun Metal Grey Finish) 21-491P (Vacuum Metalized Chrome-VMC) 21-491R (Red Finish)
Kit Part Number:
 Equipped with AEM DRYFLOW Filter No Oil Required! Kit Part Number: 21-8502 2004-2009 Nissan Titan 5.6L V8 2004-2009 Nissan Armada 5.6LV8 2004-2009 Infiniti QX56 5.6L V8 C.A.R.B. E.O. D-392-33 C.A.R.B.
2017+ L5P Duramax 3 ½ Down Pipe & EGR Fix Kit
 2017+ L5P Duramax 3 ½ Down Pipe & EGR Fix Kit Covers installation of PN s: WCF100630, WCF100829 Note: This Kit is for off road competition use only! Off Road Competition Use Tuning & Exhaust System is
L Ford Power Stroke Intercooler Pipe Upgrade
 Rev: 10.30.14 TROUBLESHOOTING: Please read and understand all installation instructions before proceeding with the installation. If you have questions during the installation of this product, please email
Wrenches: ⅞, 8mm, 10mm, 13mm, 19mm P. allen, Other: Electrical Tape
 IAG Street Series Air / Oil Separator (AOS) For 2008-14 STI Part# IAG-ENG-7100 Tools Required: Ratchet, torque wrench, extensions, needle nose pliers, hose cutter, snips/scissors, flat head screw driver,
IAG Street Series Air / Oil Separator (AOS) For WRX
 For WRX") P IAG Street Series Air / Oil Separator (AOS) For 2015-16 WRX Part# IAG-ENG-7152 Tools Required: Ratchet, torque wrench, extensions, needle nose pliers, hose cutter, snips/scissors, flat head screw driver,
P IAG Street Series Air / Oil Separator (AOS) For 2015-16 WRX Part# IAG-ENG-7152 Tools Required: Ratchet, torque wrench, extensions, needle nose pliers, hose cutter, snips/scissors, flat head screw driver,
M-9603-M50CJ COLD AIR INTAKE INSTALLATION INSTRUCTIONS
 Please visit www.fordracingparts.com for the most current instruction information!!! PLEASE READ ALL OF THE FOLLOWING INSTRUCTIONS CAREFULLY PRIOR TO INSTALLATION. AT ANY TIME YOU DO NOT UNDERSTAND THE
INSTALLATION INSTRUCTIONS DUAL OIL CATCH CAN KIT
 INSTALLATION INSTRUCTIONS DUAL OIL CATCH CAN KIT SUBARU WRX FA20F ENGINE Document: 19-0135 Support: info@radiumauto.com This dual catch can kit installs in the right-hand side of the engine bay and intercepts
Hush-O-Matic MRS Control Package
 Hush-O-Matic MRS Control Package 06-49192 Congratulations on your purchase! The Hush-O-Matic MRS Control package allows you to choose a few different modes including always quiet and always loud. Controlling
INSTALLATION INSTRUCTIONS
 Equipped with AEM Dryflow Filter No Oil Required! INSTALLATION INSTRUCTIONS PART NUMBER: 21-696 2009-2010 DODGE Challenger V6-3.5L SEE * NOTE * NOTE: Legal in California only for racing vehicles which
Ford 6.0L. Part #: Part #: BD GASKET PART# will be needed for this installation.
 1 BD EGR COOLER 2003-2007 Ford 6.0L Part #: 1090201 Part #: 1090202 PLEASE READ ALL INSTRUCTIONS BEFORE INSTALLATION BD GASKET PART# 1090002 will be needed for this installation. 2 K I T C O N T E N T
Includes: 1. Silicone Hose 2. EGR Block Off Plates 1. Exhaust Block Off Plate 2. Hose Clamps 1. Spacer/Washer 8. Bolts 2. Nuts
 Includes: 1. Silicone Hose 2. EGR Block Off Plates 1. Exhaust Block Off Plate 2. Hose Clamps 1. Spacer/Washer 8. Bolts 2. Nuts WARNING: This product is not legal for sale or use on pollution controlled
2010+ Audi B8 S4/S5 3.0T S-FLO Intake Kit INSTALLATION GUIDE FOR RACING USE ONLY
 INSTALLATION GUIDE 2010+ Audi B8 S4/S5 3.0T S-FLO Intake Kit FOR RACING USE ONLY Congratulations on your purchase of the AWE Tuning S-FLO Intake for the 2010+ Audi B8 S4 and B8 S5 3.0T. Exquisite build
BD TrackMaster S D o d g e H P C R Installation Instructions
 7 July 2016 PN#1045701, 1045702, 1045704 Dodge 6.7L TMS400 (I-00361) 1 BD TrackMaster S400 2008-2012 D o d g e H P C R Installation Instructions 1045701 2008-2009 Dodge 6.7L TMS400 1045702 2010-2012 Dodge
COLD AIR INTAKE SYSTEM
 COLD AIR INTAKE SYSTEM Installation Instructions for: Part Number 21-433 2000-2004 Mitsubishi Eclipse RS & GS Congratulations! You have just purchased the finest Air Induction & Filtration system for your
Section 6 Exploded Views and Parts Lists. 42 Generac Power Systems, Inc.
 Control Panel Drawing No. 0D4946-A 42 Generac Power Systems, Inc. Control Panel Drawing No. 0D4946-A 1 091526 7 M5-0.8 X 12MM PHILLIPS PAN HD. MACH. SCR. 2 020093 1 BOX, CONTROL TOP 3 0D4226 1 BOX, CONTROL
Equipped with AEM Dryflow Filter No Oil Required! INSTALLATION INSTRUCTIONS
 Equipped with AEM Dryflow Filter No Oil Required! INSTALLATION INSTRUCTIONS PART NUMBER: 21-448 2005 CHEVROLET Cavalier Ecotec L4-2.2L SEE * NOTE 2005 PONTIAC Sunfire L4-2.2L C.A.R.B. E.O. # D-392-28 2003-2004
Holden VE SIDI series II V6 OTR CAI Installation Instructions
 Holden VE SIDI series II V6 OTR CAI Installation Instructions 1 P a g e Shown above is a standard V6 VE LFW SIDI engine bay. Your MAF Loom may need to be extended by an auto electrician. Please check the
THANK YOU FOR CHOOSING KÜRYAKYN! -cont.-
 I N S TA L L AT I O N H Y P E R C H A R G E R A I R C L E A N E R 9 4 1 0 FITS: KAWASAKI 95-UP VN800 VULCAN PART # INCLUDED 600163 1 Hypercharger Chrome with drilled back 8513 1 K&N Filter Element 8593
COBB 3-Port Electronic Boost Control Solenoid
 COBB 3-Port Electronic Boost Control Solenoid Mitsubishi Evolution X / Ralliart Congratulations on your purchase of the COBB Tuning 3-Port Electronic Boost Control Solenoid. The following instructions
INSTALLATION INSTRUCTIONS
 Bill of Materials for 77070045AB A 1 9-0398 MOPAR Air Box B 1 MP-M-1011 Air Filter Assembly C 1 102507 Rubber Edge Trim 30-1/2 D 1 27368M Air Filter Adaptor Tube E 1 8-184 Elbow; Reducer 3/4-5/8 F 5 08373
Fuel Tank Fitment Instructions Tusk/Rally Raid Products/Seat Concepts kit Husqvarna 701 Enduro
 Fuel Tank Fitment Instructions Tusk/Rally Raid Products/Seat Concepts kit Husqvarna 701 Enduro Part #1849120001, 1849120002, 1849110001, 1849110002 Thank you for purchasing the Tusk/Rally Raid Products
4 December 2017 PN# , , Dodge 6.7L Rumble B SXE (I-00400) 1. BD Rumble B SXE. D o d g e 6. 7 L H P C R Installation Instructions
 1. BD Rumble B SXE. D o d g e 6. 7 L H P C R Installation Instructions") 4 December 2017 PN#1045705, 1045706, 1045708 Dodge 6.7L Rumble B SXE (I-00400) 1 DOWNLOAD ENHANCED INSTALL MANUALS AT dieselperformance.com BD Rumble B SXE D o d g e 6. 7 L H P C R Installation Instructions
4 December 2017 PN#1045705, 1045706, 1045708 Dodge 6.7L Rumble B SXE (I-00400) 1 DOWNLOAD ENHANCED INSTALL MANUALS AT dieselperformance.com BD Rumble B SXE D o d g e 6. 7 L H P C R Installation Instructions
C WD 2 WHEEL LOW KIT FOR DODGE RAM 4WD VEHICLES
 C18056-4WD 2 WHEEL LOW KIT FOR 1994-2002 DODGE RAM 4WD VEHICLES Pacbrake s 4WD 2 Wheel Low Kit allows the vehicle operator to engage the transfer case into 4WD low range without engaging the front wheel
INSTALLATION INSTRUCTIONS PART NUMBER:
 Equipped with AEM Dryflow Filter No Oil Required! INSTALLATION INSTRUCTIONS PART NUMBER: 21-450B (Blue Finish) 21-450C (Gun Metal Grey Finish) 21-450P (Vacuum Metalized Chrome-VMC) 21-450R (Red Finish)
G2 INSTALLATION MANUAL
 PERFORMANCE ENGINEERED SYSTEMS G2 INSTALLATION MANUAL FOR RACING OR OFF ROAD USE 1 INTRODUCTION PLEASE PURCHASE AUDI- ONLY POWER STEERING FLUID (PENTOSIN CHF 11S) Please note this an older version, and
INSTALLATION HYPERCHARGER AIR CLEANER KIT 9400
 AIR CLEANER KIT 9400 PARTS INCLUDED 1 Hypercharger with K&N Filter 1 Adapter Hardware Kit Contains the Following: 1 Rubber Intake Duct with Rubber Carb Bumper 1 Main Support Bracket 1 Carb Bumper Bracket
COLD AIR INTAKE SYSTEM. Installation Instructions for: Part Numbers & Honda Civic EX M/T Honda Civic DX/LX M/T
 COLD AIR INTAKE SYSTEM Installation Instructions for: Part Numbers 21-500 & 21-502 2001-2005 Honda Civic EX M/T 2001-2005 Honda Civic DX/LX M/T ADVANCED ENGINE MANAGEMENT INC. 2205 126 TH Street, Unit
TOYOTA FJ CRUISER / 4RUNNER COLD AIR INTAKE Section I Installation Preparation. 4.0L V6 (1GR) Roller Rocker Part Number(s): PTR
 Roller Rocker Part Number(s): PTR") Section I Installation Preparation Part Number(s): PTR03-89100 Kit Contents Item # Quantity Reqd. Description 1 1 Air Filter (P/N: PTR43-00083) 2 1 Upper Air Box 3 1 Lower Air Box 4 1 Hump Coupler 5 1
Section I Installation Preparation Part Number(s): PTR03-89100 Kit Contents Item # Quantity Reqd. Description 1 1 Air Filter (P/N: PTR43-00083) 2 1 Upper Air Box 3 1 Lower Air Box 4 1 Hump Coupler 5 1
Installation Instructions
 2011-2013 LML DURAMAX COMPOUND-ADD 2011-2015 LML A Duramax TURBO KIT Add INSTALL A Turbo INSTRUCTIONS Compound Kit Installation Instructions 1-800-955-0476 - www.industrialinjection.com - info@industrialinjection.com
Included: 2. Intake Block Off Plates 1. Exhaust Block Off Plate 1. Coolant Hose - Reroutes the EGR Cooler Coolant 12. Pieces of mounting hardware -
 Included: 2. Intake Block Off Plates 1. Exhaust Block Off Plate 1. Coolant Hose - Reroutes the EGR Cooler Coolant 12. Pieces of mounting hardware - Nuts, Bolts, & Washers 2. Hose Clamps 1. Support Bracket
Crawford Performance Top Mount Air/Oil Separator Install Instructions Version 1.12
 Crawford Performance Top Mount Air/Oil Separator Install Instructions Version 1.12 Parts List Part Number Quantity Description Sent Received S0774 1 TMIC Air/Oil Separator F0365 1 Crank Case Breather Connector
COLD AIR SYSTEM. Installation Instructions for: Part Number Volkswagen Golf/GTI 1.8L Turbo Volkswagen Jetta 1.
 COLD AIR SYSTEM Installation Instructions for: Part Number 21-493 1999.5-2004 Volkswagen Golf/GTI 1.8L Turbo 1999.5-2004 Volkswagen Jetta 1.8L Turbo ADVANCED ENGINE MANAGEMENT INC. 2205 126 TH Street,
Kit Part Number:
 Equipped with AEM DRYFLOW Filter No oil required! Kit Part Number: 21-573 2006-2008 Toyota Yaris 1.5L *Legal in California only for racing vehicles which may never be used upon a highway. 2008, Advanced
Banks Brake. with installation instructions EXHAUST BRAKE SYSTEM Dodge 5.9L Cummins (12-valve) Turbo-Diesel Pickups with Manual Transmissions
 Turbo-Diesel Pickups with Manual Transmissions") OWNERS MANUAL with installation instructions Banks Brake EXHAUST BRAKE SYSTEM 1994-98 Dodge 5.9L Cummins (12-valve) Turbo-Diesel Pickups with Manual Transmissions THIS MANUAL IS FOR USE WITH SYSTEMS 55217
OWNERS MANUAL with installation instructions Banks Brake EXHAUST BRAKE SYSTEM 1994-98 Dodge 5.9L Cummins (12-valve) Turbo-Diesel Pickups with Manual Transmissions THIS MANUAL IS FOR USE WITH SYSTEMS 55217
INSTALLATION INSTRUCTIONS PART NUMBER:
 Equipped with AEM Dryflow Filter No Oil Required! INSTALLATION INSTRUCTIONS PART NUMBER: 21-518B (Blue Finish) 21-518C (Gun Metal Grey Finish) 21-518P (Vacuum Metalized Chrome-VMC) 21-518R (Red Finish)
MAIN CONTROL VALVE BODY. Removal 1. Disconnect the battery cables. 2. Remove the battery and tray.
 1 of 17 MAIN CONTROL VALVE BODY Removal 1. Disconnect the battery cables. 2. Remove the battery and tray. 3. Disconnect the breather tube and mass air flow (MAF) / intake air temperature (IAT) sensor.
Disconnect the breather tube and mass air flow (MAF) /intake air temperature (IAT) sensor.
 /intake air temperature (IAT) sensor.") 1 of 19 10/1/2011 11:11 AM oval 1. 2. Disconnect the battery cables. Remove the battery and tray. 3. Disconnect the breather tube and mass air flow (MAF) /intake air temperature (IAT) sensor. 4. Remove
1 of 19 10/1/2011 11:11 AM oval 1. 2. Disconnect the battery cables. Remove the battery and tray. 3. Disconnect the breather tube and mass air flow (MAF) /intake air temperature (IAT) sensor. 4. Remove
INSTALLATION INSTRUCTIONS PART NUMBER:
 Equipped with AEM Dryflow Filter No Oil Required! INSTALLATION INSTRUCTIONS PART NUMBER: 21-8207 2005 DODGE Durango V8-5.7L See * NOTE 2004 DODGE Durango V8-5.7L C.A.R.B. E.O. # D-670 * NOTE: Legal in
928 Motorsports Oil Control System Installation
 928 Motorsports Oil Control System Installation For 16 valve Non-Supercharged Motors (Installation on supercharged engines is different, and included with the supercharger kit installation instructions)
EGR Delete Kit Dodge 6.7L Cummins
 I N S TA L L AT I O N GUIDE: EGR Delete Kit 200 202 Dodge 6.7L Cummins ! WARNING: EMISSIONS LAWS Not legal for sale or use on pollution-controlled motor vehicles anywhere in the United States. Legal ONLY
COLD AIR INTAKE SYSTEM
 COLD AIR INTAKE SYSTEM Installation Instructions for: Part Number 21-483 2003-2008 Mazda 6 s V6 DO NOT install a bypass valve on this intake! Congratulations! You have just purchased the finest Air Induction
Included parts: 1 - BorgWarner SX-E Turbocharger 1 - SX-E 90-Degree Compressor Outlet Elbow 1 - HSM Cast Exhaust Manifold 1 - HSM Downpipe
 TROUBLESHOOTING: Please read and understand all installation instructions before proceeding with the installation. If you have questions during the installation of this product, please email H&S Motorsports
BRUTE FORCE INTAKE SYSTEM
 BRUTE FORCE INTAKE SYSTEM Equipped with AEM DRYFLOW Filter. No oil required! Installation Instructions for: Part Number 21-8600 2006-2008 Honda Ridgeline 3.5L V6 ADVANCED ENGINE MANAGEMENT INC. 2205 126
INSTALLATION INSTRUCTIONS
 Equipped with AEM Dryflow Filter No Oil Required! INSTALLATION INSTRUCTIONS PART NUMBER:21-8402 1999-2004 TOYOTA Tacoma V6-3.4L C.A.R.B. E.O. # D-670 1999-2002 TOYOTA 4Runner V6-3.4L C.A.R.B. E.O. # D-670
Slingshot Rotrex Supercharger Kit
 Slingshot Rotrex Supercharger Kit This supercharger kit improves on the Slingshot by forcing more dense air into the engine and creating more power. Installation time of the supercharger depends on you