INSTALLATION INSTRUCTIONS: 2018 HARLEY-DAVIDSON SOFTAIL FAT BOY / BREAKOUT BIG RADIUS 2-2 PART# / 46075
|
|
|
- Prosper Craig
- 6 years ago
- Views:
Transcription
1 INSTALLATION INSTRUCTIONS: 2018 HARLEY-DAVIDSON SOFTAIL FAT BOY / BREAKOUT BIG RADIUS 2-2 PART# / Congratulations, you have purchased the finest exhaust system available for your motorcycle. Your Vance & Hines exhaust is designed and crafted for performance, quality, and style. Please follow the instructions below, check exhaust system for missing or damaged parts and if you need any assistance please contact our technical support line (562) FOR CLOSED COURSE COMPETITION USE ONLY. NOT INTENDED FOR STREET USE PARTS LIST NO. PART NO. CH./BLK. Description Qty. 1 D1102FC / D1302FP Front Header 1 2 D1103FC / D1303FP Rear Header 1 3 D1102HC / D1302HP Front Heat Shield 1 4 D1103HC / D1303HP Rear Heat Shield 1 5 D308HC / D322HP Front Muffler Heat Shield 1 6 D309HC / D323HP-S Rear Muffler Heat Shield P Mount Bracket 1 8 A107HW 5/16 Washer 2 9 A195HW Nut Plate 2 10 A240HW 5/16-18 x 5/8 FHS 4 11 A270HW #20 Hose Clamp 5 12 A272HW #28 Hose Clamp 4 13 A288HW Nylon Cable Tie 1 14 A345HW 5/16-18 x 1.5 Hex Bolt 2 15 A644ST 18-12mm O2 Adaptor 2 16 A840HW 3/8-16 x 1.25 SHCS 2 17 A101HW 3/8-16 x 2.5 SHCS A RHS Footpeg Relocator A LHS Footpeg Relocator 1 Page 1 of 7
2 HARDWARE TOOLS REQUIRED Flat blade screwdriver Snapring Pliers 5/16 Nutdriver 1/2 & 14mm Combination Wrenches 3/16 & 5/16 Allen wrench T45 Torx Ft./Lbs. Ft.Lb. Torque Wrench 1/4 Ratchet & Extensions 1/2 & 3/4 Sockets 1/2 & 5/8 Deep sockets 5/32, 3/16 1/4, & 5/16 Allen Sockets Page 2 of 7
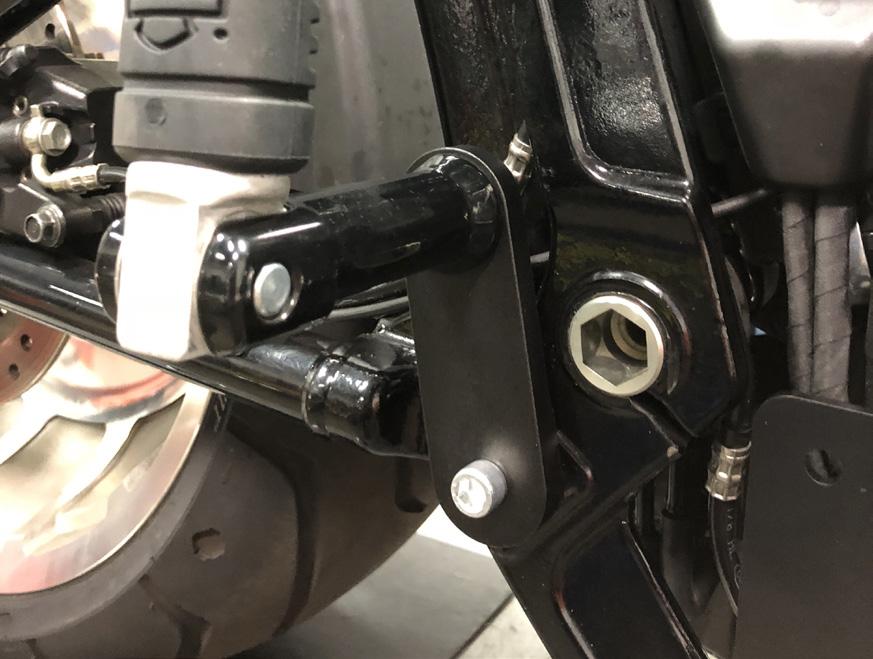
3 STOCK EXHAUST SYSTEM REMOVAL 1. Locate the rear O2 sensor connector. Remove the two bolts holding the right side cover in place and gently pull cover off bike. NOTE: Pay attention to the wire routing for re-installation. 2. Locate the front O2 sensor connector. Unplug the sensor and feed the end of the wire through the frame, freeing it from the motorcycle. 3. On models with floorboards, loosen the right-hand floor board mounting bolts to gain clearance for the exhaust removal and installation. 4. Loosen the heat shield clamps on both the front and rear exhaust pipes. 5. Remove the two mounting nuts from each head pipe, located at the cylinder head. 6. Remove the bolts attaching the mufflers to the mounting bracket. 7. Remove the entire exhaust system and set it aside. 8. Remove the stock mounting bracket. 9. If re-installing the passenger footpegs with the new relocators, the right side footpeg will need to be removed from the mounting bracket. Remove the clip holding the footpeg pin in place. Removing the pin and footpeg will expose a screw. Loosen to uninstall the footpeg from the mount bracket. 10. Carefully remove the exhaust port flanges and circlips from the stock exhaust system using the snap ring pliers. NOTE: Replace bent or damaged circlips. 11. Carefully remove the O2 sensors from the stock head pipes and save for re-use with the new system. 12. Check the condition of the exhaust gasket and replace if worn or damaged. Harley- Davidson part number B. VANCE & HINES EXHAUST INSTALLATION NOTE: Use appropriate Harley-Davidson service manual procedures when referring to exhaust installation. 1. Remove the bottom two bolts from the transmission cover. Position the mounting bracket 1139-P over the mounting location to determine which bolts to remove. Figure Attach the mounting bracket 1139-P to the transmission using the supplied bolts and washers. Tighten to ft-lbs. 3. For passenger footpeg mounting, mount the left side footpeg relocator 1147-A to the frame using the supplied 3/8-16 x 1-1/4 screw. Install the footpeg mounting rod to the relocator using the supplied 3/8-16 x 2-1/2 screw. Re-install the footpeg to the mounting rod using the stock pin and clip. Figure 3. Repeat this process for the right side footpeg relocator 1146-A. NOTE: The right side footpeg mounting rod and footpeg will need to be installed after the exhaust system has been installed. Figure 4. NOTE: When installing footpeg relocators apply Loctite 243 (blue) to the threads of all fasteners. Page 3 of 7
4 VANCE & HINES EXHAUST INSTALLATION CONTINUED 4. Remove head pipes and heat shields from their protective packaging. Place each heat shield on a non-abrasive surface such as a blanket or carpet. For Chrome use a felt tip pen and for black systems use a pencil, lightly mark outside edge of each heat shield to show location of mounting clips where hose clamps will loop through. NOTE: Pencil marks can be erased if care is taken not to harm coating. 5. Lay header assemblies into heat shields and loosely install the #20 hose clamps (supplied) into mounting clips. Screw heads should be accessible when the system is installed on motorcycle for adjustment purposes (Figure 5). Do not tighten at this time. NOTE: Muffler heat shields will be installed after pipes are on the motorcycle. 6. Apply a small amount of anti-sieze compound to the threads of the oxygen sensors and install them into the new head pipe. Install supplied 18mm to 12mm oxygen sensor adapter then install the 12mm oxygen sensors. 7. Install flanges and circlips from stock system onto the new header pipes. 8. Using stock flange nuts, carefully install the header assemblies onto the motorcycle. Finger tighten only at this time. 9. Use the nut plates and 5/16 x 5/8 flange bolts (supplied) to attach the pipes to the bracket. Do not tighten at this time. 10. Align pipes on motorcycle so the gap between the two muffler bodies is consistent from front to rear. Tighten the exhaust port flange nuts and the 5/16 x 5/8 flange bolts. 11. Using the #28 hose clamps (supplied) install the muffler heat shields beginning with the D308HC (D322HP) on the front head pipe followed by the D309HC (D323HP-S) on the rear head pipe. Screw heads should be accessible for adjustment purposes (Figure 5). Finger tighten only at this time. 12. Adjust all heat shields for the best alignment at the seam where they meet and tighten all hose clamps. (Figure 2) 13. Tighten the right-hand floor board mounting bolts. 14. Route O2 sensor wires away from hot areas of the motorcycle. Plug the O2 sensor wires back into wiring. 15. Install the right side footpeg mounting rod and footpeg onto the footpeg relocator. Figure Be sure to check that all fasteners including the hose clamps on the heat shields are tight. (See torque specifications in Harley-Davidson service manual). 17. After installation and before starting the motorcycle. For Chrome: completely clean pipes and mufflers with cleaning solvent and a clean soft cloth that will not leave residue. For Black: completely clean pipes and mufflers with warm soapy water and a clean soft cloth that will not leave residue. NOTE: Any residue, oil, or fingerprints will stain the finish when the metal heats up. Page 4 of 7
5 EXHAUST CARE (CHROME) 1. When installing a new set of chrome pipes, make sure your hands are clean and free of oil. After installation, thoroughly clean pipes with a soft cloth and cleaning solvent that will leave no residue before starting the motorcycle. 2. Avoid long periods of idling as this can cause discoloration. 3. Intake leaks can cause the engine to run lean and overheat, this could lead to discoloration. 4. Make sure there are no exhaust leaks at the junction of the exhaust pipes and cylinder head. We recommend replacing gaskets if they are worn. EXHAUST CARE (BLACK) 1. When installing a new set of black pipes, make sure your hands are clean and free of oil. After installation, thoroughly clean pipes with warm soapy water and a soft cloth. Dry with a clean towel to remove any residue before starting the motorcycle. Do NOT use anything abrasive to clean the pipes. 2. Avoid long periods of idling as this can cause discoloration. 3. Intake leaks can cause the engine to run lean and overheat, this could lead to discoloration. 4. Make sure there are no exhaust leaks at the junction of the exhaust pipes and cylinder head. We recommend replacing gaskets if they are worn. Page 5 of 7


6 FIGURE 1 FIGURE 2 FIGURE 3 FIGURE 4 Page 6 of 7
7 FIGURE 5 Emissions Notice: In California, in order to meet Air Resources Board emissions requirements, certain aftermarket part applications have been identified as replacements, and others have received ARB Executive Orders. All other emissions related aftermarket parts are for competition use only. A list of replacement parts and EO parts, and corresponding fitment is provided at vanceandhines.com/california. Warranty: All Vance & Hines products are warranted against defects in material and workmanship for a period of 90 days. This warranty does not cover discoloration or rust. This warranty shall be limited to the repair or replacement of the product, which may be proven defective under normal use. Vance & Hines will not warranty any system that has been abused, misused, improperly installed or modified. Dealers or distributors are not authorized to make dispositions binding upon Vance & Hines. Vance & Hines will not be responsible for any labor charges incurred in removing or replacing any system under warranty. A return authorization number and a copy of the original purchase invoice must accompany all returns. Parts returned without a return authorization may be refused ROSECRANS AVENUE / SANTA FE SPRINGS, CA SALES: (562) TECHNICAL: (562) FAX: (562) Page 7 of 7
INSTALLATION INSTRUCTIONS: 2018 HARLEY-DAVIDSON STREET BOB BIG RADIUS 2-2 PART# / 46077
 INSTALLATION INSTRUCTIONS: 2018 HARLEY-DAVIDSON STREET BOB BIG RADIUS 2-2 PART# 26077 / 46077 Congratulations, you have purchased the finest exhaust system available for your motorcycle. Your Vance & Hines
INSTALLATION INSTRUCTIONS: 2017 HARLEY-DAVIDSON TOURING BIG RADIUS 2-2 PART# / 46073
 INSTALLATION INSTRUCTIONS: 2017 HARLEY-DAVIDSON TOURING BIG RADIUS 2-2 PART# 26073 / 46073 Congratulations, you have purchased the finest exhaust system available for your motorcycle. Your Vance & Hines
INSTALLATION INSTRUCTIONS: HARLEY-DAVIDSON SOFTAIL BIG SHOTS STAGGERED PART# / 47941
 INSTALLATION INSTRUCTIONS: HARLEY-DAVIDSON SOFTAIL BIG SHOTS STAGGERED PART# 17941 / 47941 Congratulations, you have purchased the finest exhaust system available for your motorcycle. Your Vance & Hines
INSTALLATION INSTRUCTIONS: 2018 HARLEY-DAVIDSON SOFTAIL SHORTSHOTS STAGGERED PART# 17233/47233
 INSTALLATION INSTRUCTIONS: 2018 HARLEY-DAVIDSON SOFTAIL SHORTSHOTS STAGGERED PART# 17233/47233 Congratulations, you have purchased the finest exhaust system available for your motorcycle. Your Vance &
INSTALLATION INSTRUCTIONS: 2017 HARLEY-DAVIDSON TOURING POWER DUALS PART# 46871
 INSTALLATION INSTRUCTIONS: 2017 HARLEY-DAVIDSON TOURING POWER DUALS PART# 46871 Congratulations, you have purchased the finest exhaust system available for your motorcycle. Your Vance & Hines exhaust is
INSTALLATION INSTRUCTIONS: 2018 HARLEY-DAVIDSON SOFTAIL STREET BOB PRO PIPE PART# / 47587
 INSTALLATION INSTRUCTIONS: 2018 HARLEY-DAVIDSON SOFTAIL STREET BOB PRO PIPE PART# 17587 / 47587 Congratulations, you have purchased the finest exhaust system available for your motorcycle. Your Vance &
INSTALLATION INSTRUCTIONS: 2017 HARLEY-DAVIDSON TOURING DRESSER DUALS PART# 17651
 INSTALLATION INSTRUCTIONS: 2017 HARLEY-DAVIDSON TOURING DRESSER DUALS PART# 17651 Congratulations, you have purchased the finest exhaust system available for your motorcycle. Your Vance & Hines exhaust
INSTALLATION INSTRUCTIONS: 2017 HARLEY-DAVIDSON TOURING POWER DUALS PART# 16871
 INSTALLATION INSTRUCTIONS: 2017 HARLEY-DAVIDSON TOURING POWER DUALS PART# 16871 Congratulations, you have purchased the finest exhaust system available for your motorcycle. Your Vance & Hines exhaust is
INSTALLATION INSTRUCTIONS: HARLEY-DAVIDSON TOURING POWER DUALS PART# 16832
 INSTALLATION INSTRUCTIONS: HARLEY-DAVIDSON TOURING POWER DUALS PART# 16832 Congratulations, you have purchased the finest exhaust system available for your motorcycle. Your Vance & Hines exhaust is designed
INSTALLATION INSTRUCTIONS HARLEY-DAVIDSON SOFTAIL HI-OUTPUT 2-1 SHORT PART# / 46543
 INSTALLATION INSTRUCTIONS HARLEY-DAVIDSON SOFTAIL HI-OUTPUT 2-1 SHORT PART# 16543 / 46543 Congratulations, you have purchased the finest exhaust system available for your motorcycle. Your Vance & Hines
INSTALLATION INSTRUCTIONS: INDIAN SCOUT HI-OUTPUT GRENADES PART# 18554/18654
 INSTALLATION INSTRUCTIONS: INDIAN SCOUT HI-OUTPUT GRENADES PART# 18554/18654 Congratulations, you have purchased the finest exhaust system available for your motorcycle. Your Vance & Hines exhaust is designed
INSTALLATION INSTRUCTIONS: HARLEY-DAVIDSON SPORTSTER MINI GRENADES PART# / 46874
 INSTALLATION INSTRUCTIONS: HARLEY-DAVIDSON SPORTSTER MINI GRENADES PART# 16874 / 46874 Congratulations, you have purchased the finest exhaust system available for your motorcycle. Your Vance & Hines exhaust
INSTALLATION INSTRUCTIONS: HARLEY-DAVIDSON SOFTAIL BIG RADIUS 2-INTO-2 PART# 46069
 INSTALLATION INSTRUCTIONS: HARLEY-DAVIDSON SOFTAIL BIG RADIUS 2-INTO-2 PART# 46069 Congratulations, you have purchased the finest exhaust system available for your motorcycle. Your Vance & Hines exhaust
INSTALLATION INSTRUCTIONS: HARLEY-DAVIDSON TOURING DRESSER DUALS CHROME PART# 16752
 INSTALLATION INSTRUCTIONS: HARLEY-DAVIDSON TOURING DRESSER DUALS CHROME PART# 16752 Congratulations, you have purchased the finest exhaust system available for your motorcycle. Your Vance & Hines exhaust
INSTALLATION INSTRUCTIONS: HARLEY-DAVIDSON SPORTSTER 2-INTO-1 UPSWEEP PART# 17624/47624
 INSTALLATION INSTRUCTIONS: HARLEY-DAVIDSON SPORTSTER 2-INTO-1 UPSWEEP PART# 17624/47624 Congratulations, you have purchased the finest exhaust system available for your motorcycle. Your Vance & Hines exhaust
INSTALLATION INSTRUCTIONS: 2018 HARLEY DAVIDSON SOFTAIL ELIMINATOR SLIP-ON S PART# 16712/16722/46712
 INSTALLATION INSTRUCTIONS: 2018 HARLEY DAVIDSON SOFTAIL ELIMINATOR SLIP-ON S PART# 16712/16722/46712 Congratulations, you have purchased the finest exhaust system available for your motorcycle. Your Vance
INSTALLATION INSTRUCTIONS HARLEY-DAVIDSON SOFTAIL BREAKOUT HI-OUTPUT 2-1 SHORT PART# / 46545
 INSTALLATION INSTRUCTIONS HARLEY-DAVIDSON SOFTAIL BREAKOUT HI-OUTPUT 2-1 SHORT PART# 16545 / 46545 Congratulations, you have purchased the finest exhaust system available for your motorcycle. Your Vance
INSTALLATION INSTRUCTIONS: HARLEY-DAVIDSON DYNA 2-INTO-1 UPSWEEP PART# 17622/46722
 INSTALLATION INSTRUCTIONS: HARLEY-DAVIDSON DYNA 2-INTO-1 UPSWEEP PART# 17622/46722 Congratulations, you have purchased the finest exhaust system available for your motorcycle. Your Vance & Hines exhaust
INSTALLATION INSTRUCTIONS: HARLEY-DAVIDSON DYNA HI-OUTPUT 2-1 SHORT PART# 16541/46541
 INSTALLATION INSTRUCTIONS: HARLEY-DAVIDSON DYNA HI-OUTPUT 2-1 SHORT PART# 16541/46541 Congratulations, you have purchased the finest exhaust system available for your motorcycle. Your Vance & Hines exhaust
INSTALLATION INSTRUCTIONS: HARLEY-DAVIDSON TOURING HI-OUTPUT CARBON PART# 16465/46465
 INSTALLATION INSTRUCTIONS: HARLEY-DAVIDSON TOURING HI-OUTPUT CARBON PART# 16465/46465 Congratulations, you have purchased the finest exhaust system available for your motorcycle. Your Vance & Hines exhaust
INSTALLATION INSTRUCTIONS: 2018 HARLEY DAVIDSON SOFTAIL TWIN SLASH SLIP-ON S PART# 16875/46875
 INSTALLATION INSTRUCTIONS: 2018 HARLEY DAVIDSON SOFTAIL TWIN SLASH SLIP-ON S PART# 16875/46875 Congratulations, you have purchased the finest exhaust system available for your motorcycle. Your Vance &
INSTALLATION INSTRUCTIONS: HARLEY-DAVIDSON SOFTAIL HI-OUTPUT GRENADES 2-INTO-2 PART# 16846/16848/46846/46848
 INSTALLATION INSTRUCTIONS: HARLEY-DAVIDSON SOFTAIL HI-OUTPUT GRENADES 2-INTO-2 PART# 16846/16848/46846/46848 Congratulations, you have purchased the finest exhaust system available for your motorcycle.
INSTALLATION INSTRUCTIONS: HARLEY-DAVIDSON STREET ROD SLIP-ON PART# 47943
 INSTALLATION INSTRUCTIONS: HARLEY-DAVIDSON STREET ROD SLIP-ON PART# 47943 Congratulations, you have purchased the finest exhaust system available for your motorcycle. Your Vance & Hines exhaust is designed
INSTALLATION INSTRUCTIONS: HARLEY-DAVIDSON STREET 500/750 SLIP-ON PART# 47937
 INSTALLATION INSTRUCTIONS: HARLEY-DAVIDSON STREET 500/750 SLIP-ON PART# 47937 Congratulations, you have purchased the finest exhaust system available for your motorcycle. Your Vance & Hines exhaust is
MORE POWER : LESS NOISE
 SUPER RADIUS - BLACK PART# 46063 STOCK EXHAUST SYSTEM REMOVAL 1. Remove both left and right saddlebags and set them aside. Remove right side cover. 2. Loosen the pinch clamp bolt on the front end of muffler(s).
CARB EO K-006-3* covers the following combination of parts when used on Harley-Davidson Touring Models (excluding Trikes)
") INSTALLATION INSTRUCTIONS: PART# 16894 POWER DUALS CTR CARB EO# K-006-3 COVERS USE ON 2014-2016 HARLEY-DAVIDSON TOURING MODELS (EXCEPT TRIKES) Congratulations, you have purchased the finest exhaust system
INSTALLATION INSTRUCTIONS: PART# 16894 POWER DUALS CTR CARB EO# K-006-3 COVERS USE ON 2014-2016 HARLEY-DAVIDSON TOURING MODELS (EXCEPT TRIKES) Congratulations, you have purchased the finest exhaust system
MORE POWER : LESS NOISE
 HARLEY-DAVIDSON DYNA SWITCHBACK MONSTER DUALS INSTALLATION INSTRUCTIONS PART# 16855 STOCK EXHAUST SYSTEM REMOVAL 1. Remove both left and right saddlebags and set them aside. 2. Remove seat to access and
INSTALLATION INSTRUCTIONS: 2017 HARLEY-DAVIDSON STREET ROD FENDER ELIMINATOR PART# 16041
 INSTALLATION INSTRUCTIONS: 2017 HARLEY-DAVIDSON STREET ROD FENDER ELIMINATOR PART# 16041 Please follow the instructions below, check the kit system for missing or damaged parts and if you need any assistance
INSTALLATION INSTRUCTIONS: HARLEY-DAVIDSON SPORTSTER 90 DEGREE AIR INTAKE PART# 70029/70039/40029
 INSTALLATION INSTRUCTIONS: HARLEY-DAVIDSON SPORTSTER 90 DEGREE AIR INTAKE PART# 70029/70039/40029 Congratulations, you have purchased the finest air intake system for your motorcycle on the market. Your
MORE POWER : LESS NOISE
 YAMAHA V-STAR 1300 PRO-PIPE CHROME INSTALLATION INSTRUCTIONS PART# 25513 STOCK EXHAUST SYSTEM REMOVAL 1. Remove right side saddlebag (If equipped). Cover the right frame tube and radiator in front of the
INSTALLATION INSTRUCTIONS
 INSTALLATION INSTRUCTIONS ROCKSTAR SOFTAIL MINIMUM REQUIRED TOOLS: FLAT HEAD SCREWDRIVER 1/2, 9/16, 14mm, 7/8 or 22mm WRENCHES 5/16, 1/2, 9/16 SOCKETS AND RATCHET SNAP RING PILERS 3/16, 1/4, 5/16 ALLEN
INSTALLATION TRUE DUAL HEADPIPES 497
 TRUE DUAL HEADPIPES 497 PARTS INCLUDED 1 Front Head Pipe 1 Rear Head Pipe 1 Front Heat Shield 1 Rear Heat Shield 1 Bracket (stamped 422-P) 1 Bracket (stamped 423-P) 2 1/2 x 1-1/4 Socket Head Cap Screw
INSTALLATION INSTRUCTIONS
 MINIMUM REQUIRED TOOLS: INSTALLATION INSTRUCTIONS ROCKSTAR TOURING FLAT HEAD SCREWDRIVER 1/2, 9/16, 14mm, 7/8 or 22mm WRENCHES 5/16, 1/2, 9/16 SOCKETS AND RATCHET SNAP RING PILERS 3/16, 1/4, 5/16 ALLEN
 TRUE DUAL INSTALLATION INSTRUCTIONS EXHAUST SYSTEM REMOVAL Thank you for purchasing RUSH. We strive for excellence and take pride in making the best exhaust possible for your Harley- Davidson. We take
INSTALLATION INSTRUCTIONS
 INSTALLATION INSTRUCTIONS RIOT DYNA MINIMUM REQUIRED TOOLS: FLAT HEAD SCREWDRIVER 1/2, 9/16, 14mm, 7/8 or 22mm WRENCHES 5/16, 1/2, 9/16 SOCKETS AND RATCHET SNAP RING PILERS 3/16, 1/4, 5/16 ALLEN WRENCH
INSTALLATION INSTRUCTIONS
 MINIMUM REQUIRED TOOLS: INSTALLATION INSTRUCTIONS PRO DUALS TOURING FLAT HEAD SCREWDRIVER 1/2, 9/16, 14mm, 7/8 or 22mm WRENCHES 5/16, 1/2, 9/16 SOCKETS AND RATCHET SNAP RING PILERS 3/16, 1/4, 5/16 ALLEN
INSTALLATION INSTRUCTIONS
 MINIMUM REQUIRED TOOLS: INSTALLATION INSTRUCTIONS BANDIT SPORTSTER FLAT HEAD SCREWDRIVER 1/2, 9/16, 14mm, 7/8 or 22mm WRENCHES 5/16, 1/2, 9/16 SOCKETS AND RATCHET SNAP RING PILERS 3/16, 1/4, 5/16 ALLEN
CRUSHER MAVERICK 2 INTO 2, BLACK 566
 CRUSHER MAVERICK 2 INTO 2, BLACK 566 THANK YOU FOR CHOOSING CRUSHER! PROTECT YOURSELF AND OTHERS FROM POTENTIAL INJURY AND PROPERTY DAMAGE OR LOSS. PAY CLOSE ATTENTION TO ALL INSTRUCTIONS, WARNINGS, CAUTIONS,
INSTALLATION INSTRUCTIONS
 INSTALLATION INSTRUCTIONS RIOT DYNA MINIMUM REQUIRED TOOLS: FLAT HEAD SCREWDRIVER 1/2, 9/16, 14mm, 7/8 or 22mm WRENCHES 5/16, 1/2, 9/16 SOCKETS AND RATCHET SNAP RING PILERS 3/16, 1/4, 5/16 ALLEN WRENCH
INSTALLATION INSTRUCTIONS
 MINIMUM REQUIRED TOOLS: F-BOMB SOFTAIL INSTALLATION INSTRUCTIONS FLAT HEAD SCREWDRIVER 1/2, 9/16, 14mm, 7/8 or 22mm WRENCHES INCLUDED HARDWARE: 1. (2) 02 ADAPTER 2. (3) 02 PLUG SOCKET 3. (1) NUT PLATE
INSTALLATION INSTRUCTIONS
 INSTALLATION INSTRUCTIONS LEGACY CLASSIC SPORTSTER MINIMUM REQUIRED TOOLS: FLAT HEAD SCREWDRIVER 1/2, 9/1, 14mm, 7/8 or 22mm WRENCHES 5/1, 1/2, 9/1 SOCKETS AND RATCHET INCLUDED HARDWARE: SNAP RING PILERS
 WWW.RUSHRACINGPRODUCTS.COM 1. Remove the saddlebags, side covers, and seat; place them to the side. 2. Disconnect the battery. EXHAUST SYSTEM REMOVAL 3. Cover the primary housing and transmission covers
INSTALLATION INSTRUCTIONS
 PERFORMER 2 INTO 1 TOURING MINIMUM REQUIRED TOOLS: INSTALLATION INSTRUCTIONS FLAT HEAD SCREWDRIVER 1/2, 9/16, 14mm, 7/8 or 22mm WRENCHES 5/16, 1/2, 9/16 SOCKETS AND RATCHET SNAP RING PILERS 3/16, 1/4,
INSTALLATION INSTRUCTIONS
 MINIMUM REQUIRED TOOLS: INSTALLATION INSTRUCTIONS LOWDOWN SOFTAIL FLAT HEAD SCREWDRIVER 1/2, 9/16, 14mm, 7/8 or 22mm WRENCHES 5/16, 1/2, 9/16 SOCKETS AND RATCHET SNAP RING PILERS 3/16, 1/4, 5/16 ALLEN
INSTALLATION INSTRUCTIONS
 MINIMUM REQUIRED TOOLS: INSTALLATION INSTRUCTIONS LOWDOWN SPORTSTER FLAT HEAD SCREWDRIVER 1/2, 9/16, 14mm, 7/8 or 22mm WRENCHES 5/16, 1/2, 9/16 SOCKETS AND RATCHET SNAP RING PILERS 3/16, 1/4, 5/16 ALLEN
INSTALLATION INSTRUCTIONS
 INSTALLATION INSTRUCTIONS PRO DUALS TOURING MINIMUM REQUIRED TOOLS: FLAT HEAD SCREWDRIVER 1/2, 9/16, 14mm, 7/8 or 22mm WRENCHES 5/16, 1/2, 9/16 SOCKETS AND RATCHET SNAP RING PILERS 3/16, 1/4, 5/16 ALLEN
CRUSHER TRUE DUAL HEADPIPES 513
 CRUSHER TRUE DUAL HEADPIPES 513 THANK YOU FOR CHOOSING CRUSHER! PROTECT YOURSELF AND OTHERS FROM POTENTIAL INJURY AND PROPERTY DAMAGE OR LOSS. PAY CLOSE ATTENTION TO ALL INSTRUCTIONS, WARNINGS, CAUTIONS,
POWER CELL FOR DYNA WITH CLEAN CHROME COVER 562
 POWER CELL FOR DYNA WITH CLEAN CHROME COVER 562 THANK YOU FOR CHOOSING CRUSHER! PROTECT YOURSELF AND OTHERS FROM POTENTIAL INJURY AND PROPERTY DAMAGE OR LOSS. PAY CLOSE ATTENTION TO ALL INSTRUCTIONS, WARNINGS,
Harley Davidson FL Touring Current Xtreme
 ITEMS SUPPLIED Description Part # Qty Front Header (Chr/Blk) 100-0119/100-0123 1 Rear Header (Chr/Blk) 100-0120/100-0124 1 Front Heat Shield (Chr/Blk) 100-0121/100-0125 1 Rear Heat Shield (Chr/Blk) 100-0122/100-0126
2015 MSRP LIST Rosecrans Avenue, Santa Fe Springs, CA Phone: Fax:
 2015 MSRP LIST 13861 Rosecrans Avenue, Santa Fe Springs, CA 90670 Phone: 562-921-7461 Fax: 562-802-0110 RSD TRACKER 2-INTO-1 1986-2011 HARLEY-DAVIDSON SOFTAIL 11801 1800-0667 RD1000 701.96 RSD TRACKER
Slimline Duals Installation Instructions Harley-Davidson Touring Models 2009-Current
 Slimline Duals Installation Instructions Harley-Davidson Touring Models 2009-Current Thank you for buying a Rinehart Racing exhaust system. We are committed to providing premium products that with proper
Installation Guide Suzuki GSXR 1000
 S7 Installation Guide 2007-2008 Suzuki GSXR 1000!! THIS PRODUCT IS DESIGNED FOR USE IN CLOSED COURSE RACING AND IS NOT INTENDED FOR HIGHWAY USE!! Congratulations on the purchase of your new TaylorMade
Installation instructions
 Installation instructions Akrapovič Exhaust System: Slip-On Classic Line for the Harley-Davidson Sportster *503783* www.akrapovic.com www.akrapovic.com Congratulations on purchasing an Akrapovič exhaust
Installation instructions
 Installation instructions Akrapovič Exhaust System: Optional Valve Set for the Harley-Davidson Sportster *504169* www.akrapovic.com www.akrapovic.com Congratulations on purchasing an Akrapovič exhaust
RT1 DUAL OUTLET SLIP-ON EXHAUST TRIUMPH DAYTONA E: TECH: (216) REV.
 REV.") 08-50-43009 REV. C PARTS INCLUDED Ref. Part Number Description Qty 1) 00-200-00060 Slip-on S-bend Assembly 1 2) 00-200-00056 Carbon Fiber Dual Outlet Muffler 1 3) 04-24-42866 Supersport Fender Bracket
08-50-43009 REV. C PARTS INCLUDED Ref. Part Number Description Qty 1) 00-200-00060 Slip-on S-bend Assembly 1 2) 00-200-00056 Carbon Fiber Dual Outlet Muffler 1 3) 04-24-42866 Supersport Fender Bracket
Installation Guide Suzuki GSXR 600/750 FULL EXHAUST SYSTEM
 Full S6 Installation Guide 2006-2007 Suzuki GSXR 600/750 FULL EXHAUST SYSTEM!! THIS PRODUCT IS DESIGNED FOR USE IN CLOSED COURSE RACING AND IS NOT INTENDED FOR HIGHWAY USE!! Congratulations on the purchase
INSTALLATION INSTRUCTIONS
 INSTALLATION INSTRUCTIONS Part # 751-FP2500 IMPORTANT INFORMATION This Jagg oil cooler must be installed following these instructions. Read the easy-to-follow instructions fully prior to starting the installation
Installation Guide BMW S1000RR Full Exhaust System
 Installation Guide 2015-2016 BMW S1000RR Full Exhaust System!! THIS PRODUCT IS DESIGNED FOR USE IN CLOSED COURSE RACING AND IS NOT INTENDED FOR HIGHWAY USE!! Congratulations on the purchase of your new
Installation instructions
 Installation instructions Akrapovič Exhaust System: Optional Valve Set for the Harley-Davidson models: DYNA (parallel mounted mufflers models) *503324* Congratulations on purchasing an Akrapovič exhaust
Ref. Part Number Description Qty
 PARTS INCLUDED Ref. Part Number Description Qty 1) 00-200-00110 Carbon Fiber Muffler Assembly - Right 1 2) 00-200-00112 Carbon Fiber Muffler Assembly - Left 1 3) 04-11-42895 Muffler Adapter Bracket 2 4)
N41421 Peacemakers Exhaust for Harley- Davidson Dyna Series
 Please read these instructions carefully and thoroughly before beginning work. Before installing accessory, carefully consider whether one possesses the necessary technical skills and workshop tools to
Installation instructions
 Installation instructions Akrapovič Exhaust System: Optional Valve Set for the HARLEY-DAVIDSON TOURING *503119* www.akrapovic.com www.akrapovic.com Congratulations on purchasing an Akrapovič exhaust system.
N41422 Peacemakers Exhaust for Harley- Davidson Dyna Series 2006
 Please read these instructions carefully and thoroughly before beginning work. Before installing accessory, carefully consider whether one possesses the necessary technical skills and workshop tools to
Installation Guide Suzuki GSXR 1000 Exhaust Kit
 S9 Installation Guide 2009-2011 Suzuki GSXR 1000 Exhaust Kit!! THIS PRODUCT IS DESIGNED FOR USE IN CLOSED COURSE RACING AND IS NOT INTENDED FOR HIGHWAY USE!! Congratulations on the purchase of your new
Installation instructions
 Installation instructions Akrapovič Exhaust System: Slip-On for the Laborghini Gallardo 550-2 Coupe Laborghini Gallardo 560-4 Coupe / Spyder Laborghini Gallardo 570-4 Coupe / Spyder Congratulations on
Installation instructions
 Installation instructions Akrapovič Exhaust System: Open for the Harley-Davidson models: V-Rod Muscle V-Rod Night Rod *503494* www.akrapovic.com www.akrapovic.com Congratulations on purchasing an Akrapovič
Installation Guide 2016 Kawasaki ZX10-R Exhaust Kit
 Installation Guide 2016 Kawasaki ZX10-R Exhaust Kit!! THIS PRODUCT IS DESIGNED FOR USE IN CLOSED COURSE RACING AND IS NOT INTENDED FOR HIGHWAY USE!! Congratulations on the purchase of your new TaylorMade
Installation instructions
 Installation instructions Akrapovič Exhaust System: Evolution Header for the Ducati Monster 1200 Ducati Monster 1200S Ducati Monster 821 Ducati Monster 821 Dark *504286* Congratulations on purchasing an
***THE OWNER'S MANUAL MUST BE GIVEN TO THE END USE CUSTOMER AFTER COMPLETING THE INSTALLATION.***
 INSTALLATION INSTRUCTIONS FOR THE MOTOR TRIKE HARLEY MECHANICAL REVERSE 1999-2006 FIVE SPEED FLH LAST UPDATED: OCTOBER 2011 AS THE INSTALLER OF THIS MECHANICAL REVERSE, YOU MUST BECOME FAMILIAR WITH PROPER
Installation instructions
 Installation instructions Akrapovič Exhaust System: Open for the Harley-Davidson models: Dyna *503269* Congratulations on purchasing an Akrapovič exhaust system. Please read the entire installation manual
2018 HD SOFTAIL Stainless Steel 2-1 Full System Part #
 INSTALLATION INSTRUCTIONS * For images, please reference page 4 of these instructions. FATBOB 2018 HD SOFTAIL Stainless Steel 2-1 Full System Part # 005-4960199 NOTE: You will need the TBR Wide Tire kit
THY-388Y / THY-388Y-S CHEVY PICKUP, 92½-95 PICKUP, SUBURBAN PARTS INCLUDED TOOLS REQUIRED HARDWARE INCLUDED WARRANTY NOTES
 B Y S U M M I T I N D U S T R I E S THY-388Y / THY-388Y-S PARTS INCLUDED 1 - Right side header 1 - Left side header 1 - Y-pipe assembly 1 - Catalytic converter adapter 2 - Header gaskets 2 - Conical gaskets
RT1 DUAL OUTLET SLIP-ON EXHAUST TRIUMPH DAYTONA E: TECH: (216) REV.
 REV.") 08-50-46629 REV. C PARTS INCLUDED Ref. Part Number Description Qty 1) 00-200-02194 Slip-on Midpipe Assembly 1 2) 00-200-01201 Polished Dual Outlet Muffler 1 3) 04-24-42866 Supersport Fender Bracket 1 4)
08-50-46629 REV. C PARTS INCLUDED Ref. Part Number Description Qty 1) 00-200-02194 Slip-on Midpipe Assembly 1 2) 00-200-01201 Polished Dual Outlet Muffler 1 3) 04-24-42866 Supersport Fender Bracket 1 4)
Ref. Part Number Description Qty
 PARTS INCLUDED Ref. Part Number Description Qty 1) 00-200-02208 Aluminum Muffler Assembly - Right 1 2) 00-200-02207 Aluminum Muffler Assembly - Left 1 3) 00-200-02206 Midpipe Tube - Right 1 4) 00-200-02205
Installation instructions
 Installation instructions Akrapovič Exhaust System: Slip-On for the Harley-Davidson Sportster *503145* www.akrapovic.com www.akrapovic.com Congratulations on purchasing an Akrapovič exhaust system. Please
THANK YOU FOR CHOOSING KÜRYAKYN! -cont.-
 I N S TA L L AT I O N H Y P E R C H A R G E R A I R C L E A N E R 9 4 1 0 FITS: KAWASAKI 95-UP VN800 VULCAN PART # INCLUDED 600163 1 Hypercharger Chrome with drilled back 8513 1 K&N Filter Element 8593
Installation instructions
 Installation instructions Akrapovič Exhaust System: Slip-On for the Yamaha XJR 1300 *503789* www.akrapovic.com www.akrapovic.com Congratulations on purchasing an Akrapovič exhaust system. Please read the
Installation instructions
 Installation instructions Akrapovič Exhaust System Optional Header for the BMW R ninet * 504335* www.akrapovic.com www.akrapovic.com Congratulations on purchasing an Akrapovič exhaust system. Please read
GP1-R FULL EXHAUST SUZUKI GSX-R600 / GSX-R
 THIS EXHAUST SYSTEM IS DESIGNED FOR USE IN CLOSED COURSE RACING ONLY, AND IS NOT INTENDED FOR PUBLIC HIGHWAY USE. IN THE STATE OF CALIFORNIA, IT IS ILLEGAL TO MODIFY THE EMISSION CONTROL SYSTEM ON ANY
I N S TA L L AT I O N
 I N S TA L L AT I O N 5008 fits: H-D: '80-Up Electra glide, tour glide, road king, road glide or street glide PartS Included 1 Right Fork Mount Assembly 1 Left Fork Mount Assembly 2 H3 Driving Light Assemblies
Installation Guide GSXR 600/750 Full-Exhaust Kit
 Installation Guide 2011-2015 GSXR 600/750 Full-Exhaust Kit!! THIS PRODUCT IS DESIGNED FOR USE IN CLOSED COURSE RACING AND IS NOT INTENDED FOR HIGHWAY USE!! Congratulations on the purchase of your new TaylorMade
Installation instructions
 Installation instructions Akrapovič Exhaust System: Sports Cup for the Porsche 911 GT3 (type 991) www.akrapovic.com Installation instructions Akrapovič Exhaust System: Sports Cup for the Porsche 911 GT3
Installation instructions
 Installation instructions Akrapovič Exhaust System: Slip-On for the Harley-Davidson models: DYNA (parallel mounted mufflers models) *503323* www.akrapovic.com www.akrapovic.com Congratulations on purchasing
Installation instructions
 Installation instructions Akrapovič Exhaust System Optional Header for the Kawasaki Z1000 Kawasaki Z1000SX *504006* www.akrapovic.com www.akrapovic.com Congratulations on purchasing an Akrapovič exhaust
Installation instructions
 Installation instructions Akrapovič Exhaust System Slip-On for the HONDA VFR800F *504163* www.akrapovic.com www.akrapovic.com Congratulations on purchasing an Akrapovič exhaust system. Please read the
Application(s) > Items Supplied > Instruction Manual >
 > Items Supplied > Instruction Manual >") 301 E. La Palma Ave., Yorba Linda, Ca 97 Ph. 714.69.10, Fax. 714.69.5016 Items Supplied > Application(s) > www.fi000r.com 1 Fi000R Fuel Injection Module Zip Ties 1 Velcro Strip Oxygen Sensor Eliminators
301 E. La Palma Ave., Yorba Linda, Ca 97 Ph. 714.69.10, Fax. 714.69.5016 Items Supplied > Application(s) > www.fi000r.com 1 Fi000R Fuel Injection Module Zip Ties 1 Velcro Strip Oxygen Sensor Eliminators
Installation instructions
 Installation instructions Akrapovič Exhaust System: Optional Valve Set for the Harley-Davidson models: FLSTC Herittage Softail Classic FXSTB Night Train FXSTC Custom FXST Standard *503221* www.akrapovic.com
Installation Guide Suzuki GSXR 600/750
 Installation Guide 2006-2007 Suzuki GSXR 600/750 Congratulations on the purchase of your new TaylorMade underbelly exhaust kit for your GSXR. Your new exhaust is fabricated from thin wall stainless steel
Installation instructions
 Installation instructions Akrapovič Exhaust System: Racing for the YAMAHA YZF-R25 YAMAHA YZF-R3 *504503* www.akrapovic.com www.akrapovic.com Congratulations on purchasing an Akrapovič exhaust system. Please
Installation instructions
 Installation instructions Akrapovič Exhaust Systems: Slip-On for the HONDA CRF450R FOR CLOSED COURSE COMPETITION USE ONLY. NOT INTENDED FOR STREET USE. *503657* www.akrapovic.com www.akrapovic.com Congratulations
RT1 DUAL OUTLET SLIP-ON EXHAUST HONDA CBR600RR Rev B
 18-1022-723-02 08 50 44541 Rev B PARTS INCLUDED Ref. Part Number Description Qty 1) 00-200-00042 Slip-on S-bend Assembly 1 2) 00-200-01197 Stainless Steel Dual Outlet Muffler 1 3) 03-46-42766 Muffler Mounting
05-18 DODGE CHRYSLER CHALLENGER CHARGER 300 MAGNUM
 05-18 DODGE CHRYSLER CHALLENGER CHARGER 300 MAGNUM IMPORTANT! WARRANTY AND INSTALLATION INSTRUCTIONS Please Forward All Information to Consumer Be sure to review the enclosed instructions prior to beginning
THY-306Y1 / THY-306Y1-S CHEVROLET CLASS A MOTORHOME WITH TURBO 400 AUTO TRANS PARTS INCLUDED TOOLS REQUIRED HARDWARE INCLUDED
 B Y S U M M I T I N D U S T R I E S PARTS INCLUDED 1 - Right side header 1 - Left side header 1 - Y-pipe assembly 1 - Catalytic converter adapter 2 - Header gaskets 2 - Conical gaskets 1 - Collector gasket
Installation instructions
 Installation instructions Akrapovič Exhaust Systems: Racing and Evolution for the HONDA CRF250R *503981* www.akrapovic.com www.akrapovic.com Congratulations on purchasing an Akrapovič exhaust system. Please
INSTALLATION INSTRUCTIONS
 INSTALLATION INSTRUCTIONS Part # 751-FP2600 IMPORTANT INFORMATION This Jagg oil cooler must be installed following these instructions. Read the easy-to-follow instructions fully prior to starting the installation
I N S TA L L AT I O N
 I N S TA L L AT I O N k i t 9 9 5 6 fits: 99-up v-star 1100 Part # Included 509944 1 Skull Air Cleaner Kit Including: 1 Skull Head Cover 1 Backing Plate 1 Filter Cage Black Powder Coated 1 Dual Velocity
Installation Guide Kawasaki ZX10R Exhaust Kit
 Installation Guide 2011-2015 Kawasaki ZX10R Exhaust Kit!! THIS PRODUCT IS DESIGNED FOR USE IN Congratulations on the purchase of your new TaylorMade underbelly exhaust kit for your CLOSED 2011 Kawasaki
Installation instructions
 Installation instructions Akrapovič Exhaust System: Optional Header for the Ducati Scrambler *504779* www.akrapovic.com www.akrapovic.com Congratulations on purchasing an Akrapovič exhaust system. Please
Kawasaki Motors Corp.,U.S.A. Irvine, CA
 Kawasaki Motors Corp.,U.S.A. Irvine, CA 9271-2016 Accessory Part Installation Instructions For Model VN900 Classic Windshield Kit: Part No. 99994-005 Please read these instructions carefully and thoroughly
Installation Guide Suzuki GSXR 600/750
 Slip-On S6 Installation Guide 2006-2007 Suzuki GSXR 600/750!! THIS PRODUCT IS DESIGNED FOR USE IN CLOSED COURSE RACING AND IS NOT INTENDED FOR HIGHWAY USE!! Congratulations on the purchase of your new