I N S TA L L AT I O N
|
|
|
- Cathleen Mosley
- 5 years ago
- Views:
Transcription
 909944 1 Mounting Hardware Kit Including: 3 1 4 20 x 1 BSCS 18-8 3 1 4-20 x 3 4 SHCS 18-8 3 1 4 Clear Nylon Washer 400545 1 K&N Air Cleaner 609944 1 Plug & Elbow Kit")
1 I N S TA L L AT I O N k i t fits: 99-up v-star 1100 Part # Included Skull Air Cleaner Kit Including: 1 Skull Head Cover 1 Backing Plate 1 Filter Cage Black Powder Coated 1 Dual Velocity Ring (not used) Mounting Hardware Kit Including: x 1 BSCS x 3 4 SHCS Clear Nylon Washer K&N Air Cleaner Plug & Elbow Kit Including: 2 1/8 NTP Hex Threaded Plug (1 used) 2 90 Degree Barbed Elbow (1 used) Adapter Hardware Kit Contains the Following: 1 Rubber Intake Duct 1 Mounting Bracket 1 Hardware Kit Including: 3 M6 Tapered Socket Head Bolt Caps 3 M6 x 1.0 x 16mm Socket Head Cap Screw 1 6MM Flange Lock Nut 1 Step (Reducer) Washer 3 1/4 20 X 5/8 SHCS Alloy W/Patch 3 1/4 20 Flange Nut 1 12 Length of Vacuum Hose (Not used for this application) 8 M4 x.7 x 10mm SHCS 1 90 Degree Elbow (Not used for this application) 2 Needle Shim,.020 Thick 1 Galvanized Clamp Hook JK 1 Jet Kit Including: 1 #125 Main jet 1 #120 Main jet 1 #122.5 Main jet 2 #1.2 Pilot air Bleed 1 Installation Instructions note Not all of the parts listed above will be used. Please read and understand entire instructions before starting installation. Thank you for choosing Küryakyn! CUSTOMER SERVICE (toll free) QUESTIONS techsupport@kuryakyn.com or call LIMITED WARRANTY Küryakyn warrants that any Küryakyn products sold hereunder, shall be free of defects in materials and workmanship for a period of one (1) year from the date of purchase by the consumer excepting the following provisions: Küryakyn shall have no obligation in the event the customer is unable to provide a receipt showing the date the customer purchased the product(s). The product must be properly installed, maintained and operated under normal conditions. Küryakyn makes no warranty, expressed or implied, with respect to any gold plated products. Küryakyn shall not be liable for any consequential and incidental damages, including labor and paint, resulting from failure of a Küryakyn product, failure to deliver, delay in delivery, delivery in nonconforming condition, or for any breech of contract or duty between Küryakyn and a customer. Küryakyn products are often intended for use in specific applications. Küryakyn makes no warranty if a Küryakyn product is used in applications other than intended. Küryakyn electrical products are warranted for one (1) year from the date of purchase by the consumer. Components of Küryakyn products containing L.E.D.s will be warranted for defects in materials and workmanship for 3 years from the date of purchase. Küryakyn makes no warranty of any kind in regard to other manufacturer s products distributed by Küryakyn. Küryakyn will pass on all warranties made by the manufacturer and where possible, will expedite the claim on behalf of the customer, but ultimately, responsibility for disposition of the warranty claim lies with the manufacturer. ABOUT OUR CATALOG You ll find all our innovations for H-D, GL and Metric Cruisers in our annual catalogs. Order online today select the CATALOGS icon. Each Küryakyn product comes with a Proof-of-Purchase good for a complimentary catalog. Details in packaging. Be sure to ask your local dealer about other Küryakyn products, the motorcycle parts and accessories designed for riders by riders Küryakyn USA All Rights reserved. In order to protect you and others from possible injury and/ or property damage or loss, please pay close attention to all instructions, warnings, cautions and attention notes regarding the use and care of this product MC-0308


.")

2 ATTENTION! This indication alerts you to the fact that ignoring the contents described herein may negatively affect product performance and functionality. DISCLAIMER Please Read Before Proceeding: Any modifications to a motorcycle s exhaust or intake tract require carburetor re-jetting to achieve maximum performance and maintain drivability. If you are uncomfortable with the process of tuning your carburetor, we recommend that you bring your motorcycle to a qualified motorcycle mechanic to have this kit installed. The jets included in this kit were selected based on test results with various combinations of components that we felt would represent the majority of the customers purchasing this kit (see Addendum I). PIC.1 However, no two motorcycles are exactly alike. Depending on the individual case, additional jets may need to be purchased from an outside source. Kuryakyn warrants the parts included in this kit to be free of defects in materials and workmanship, but makes no claim whatsoever in regard to costs associated with installation or tuning. Strictly observe the following guidelines in order to use the product properly and avoid potentially dangerous accidents. PIC.2 Procedure STEP 1 Remove the driver and passenger seats from the bike. Remove the negative battery cable from the battery. STEP 2 Remove the two rear tank mounting bolts. Remove the plastic tank mounting snap stud. (Push in on its center to release). Slide the tank back to expose the top of the engine. Make sure the tank is solidly in place so it does not fall! You may remove the tank completely from the bike if you re not certain the tank will stay in place while you are performing this installation. PIC.3 STEP 3 Remove the stock air cleaner cover, element, and backing plate. The top and rear mounts are secured with screws, the front mount snaps into a grommet. STEP 4 See PIC.1 and PIC.2. Remove the grommet from the bracket. STEP 5 With a long shaft Phillips screwdriver as shown in PIC.3, loosen the clamp on the air duct and remove the duct. Remove and set aside the clamp from the duct, it will be reused. STEP 6 Re-jet carburetor. Refer to factory service manual for disassembly procedure and to Addendum I for baseline jetting recommendations. PIC.4 STEP 7 Install a Line Fitting Plug into the threaded hole in the Skull Air Cleaner back plate labeled as A in PIC.4 and tighten snugly. STEP 8 Install a 90 Degree Elbow into the threaded hole on the Skull Air Cleaner back plate labeled as B in PIC.4. Tighten snugly. STEP 9 Insert both flanges of the rubber air duct through the opening in the mounting bracket. See PIC.5. PIC.5 STEP 10 Wet the radius portion of the intake duct with soapy water solution and slide the Skull Air Cleaner back plate into place on the intake assembly. See PIC.6. When positioned correctly, the Skull Air Cleaner back plate should be between the two rubber flanges on the intake duct and the 90 Degree Elbow and Line Fitting Plug will be below the rubber intake duct. A 2 B


 washer and the M6 flanged nut.")
.")
. PIC.")
3 STEP 11 Line up the three holes in the back plate and the three holes in the flange of the rubber intake duct with the three holes in the support bracket. Insert the three supplied 1/4-20 x 5/8 socket head cap screws through the face of the Skull Air Cleaner back plate and secure on the back side of the main support bracket with the 1/4-20 thin Nylock nuts. You will need to pull back the inner flange of the rubber intake duct to access the holes. Hold the Nylock nuts with a 1/2 wrench as you tighten the socket head cap screws with a 3/16 hex key. See PIC.6. PIC.6 STEP 12 Place the galvanized clamp hook on the duct clamp as shown in PIC.6A. You will need to flatten this hook on the clamp. Place the Stock duct clamp on the new intake duct. The clamp screw should face forward. See PIC.6B. STEP 13 See PIC.7. Loosely install the mounting bracket and duct using the included M6 x 1.25 x 15mm socket heads and tapered socket head bolt caps, the front location will also require the step (reducer) washer and the M6 flanged nut. Slide the intake duct onto the air box but do not tighten the clamp at this time. Loosen the clamps securing the stock rubber elbows to the carburetors and air box. Gently wiggle the air box to ensure that the rubber intake duct is fully seated on the air box inlet (removing the air box lid makes it much easier to see if it is on completely). Once everything is situated and comfortably in place, tighten the clamp on the rubber intake duct first and then tighten the clamps on the stock rubber elbows. Replace the air box lid. Tighten the mounting bracket fasteners completely at this time. (PIC.7 shows the assembly thus far with out the back plate installed). PIC.6A STEP 14 Set the air filters into position on the back plate. Place the filter cage over the filter and secure be threading in and tightening the three x 1 BSCS fasteners from the back side of the back plate into the filter cage. STEP 15 Set the Skull Cover in place, lining up the 3 mounting holes. Insert and tighten the three x 3 4 SHCS fasteners and clear nylon washers through the skull cover securing it to the air cleaner assembly. It would be a good idea to use blue lock tight (not supplied) on these 3 fasteners. Do not over tighten. PIC.6B STEP 16 See PIC.8.This is the float bowl vent hose. Connect this hose to the 90 Degree fitting on the back plate. STEP 17 Replace the fuel tank and re-connect the negative battery cable, re-install seats. STEP 18 Recheck to make sure all fasteners are secure, no hoses are kinked, and throttle operates freely. PIC.7 Attention! It is the installers responsibility to make sure all fasteners (including pre-assembled) are tightened before operation of motorcycle. Küryakyn will not warranty components that are lost due to improper installation. Periodic maintenance may be required. Addendum I. The following recommendations are to be used as a starting point only, but should work well in the majority of cases. Individual bikes may need additional tuning to achieve maximum performance. These baselines were established at 700 feet above sea level. PIC.8 3
4 FIG.1 4
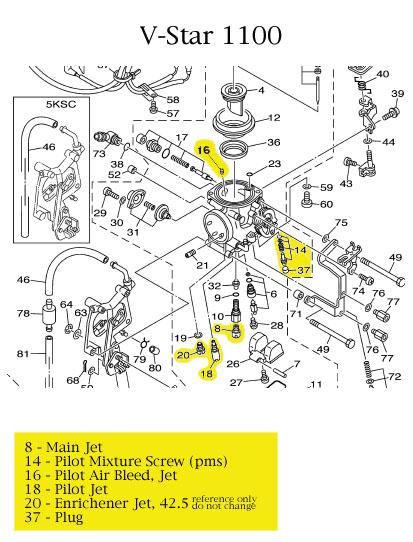
 2 turns out from lightly bottomed V-STAR with Vance & Hines, Samson, or open Drag pipes 1.")
5 V-STAR with stock pipes 1.2 Pilot Air Bleeds in both carburetors One.020 shim added to raise each needle Main Jet in the front cylinder s carb 120 Main Jet in the rear cylinder s carb Pilot Mixture Screw (PMS) 2 turns out from lightly bottomed V-STAR with Vance & Hines, Samson, or open Drag pipes 1.2 Pilot Air Bleeds in both carbs One.020 shim added to raise each needle 125 Main Jet in the front cylinder s carb Main Jet in the rear cylinder s carb Pilot Mixture Screw (PMS) 2 turns out from lightly bottomed NOTES 1. The factory installed plug covering the PMS will have to be removed in order to access the screw. 2. Because the float bowl screws are easily damage during removal, we have included eight M4 x.7 x 10mm SHCS replacement float bowl screws, just in case they are needed. Ride On! FIG.2 5
I N S TA L L AT I O N
 I N S TA L L AT I O N k i t 9 9 5 4 Fits: all honda 750 shadow aero models Part # Included 509944 1 Skull head cover 1 Cage assembly 1 Backing plate, 3-point base 1 Dual velocity ring (not used) 1 Mounting
INSTALLATION HYPERCHARGER AIR FILTER KIT 9754
 9754 PARTS INCLUDED 1 Chrome Hypercharger Assembly 1 Support Bracket 1 Breather Hardware Kit, including: 2 1-1/4 Breather Bolts 2 Breather Hoses 4 Shim Washers 1 Twin Cam Breather Kit, Including: 1 Breather
INSTALLATION HYPERCHARGER AIR FILTER KIT 9992
 9992 PARTS INCLUDED 1 Chrome Hypercharger Assembly with Chrome Blood Groove Trap Door and Chrome Butterflies 1 Support Bracket 1 Breather Hardware Kit, including: 2 1-1/4 Breather Bolts 2 Breather Hoses
INSTALLATION. Note: Not all of the included parts will be used during this installation. -cont.-
 Driving Lights for Road Glide 5007 Fits: 98-up Road Glide PartS Included 1 Right Light Assembly 1 Left Light Assembly 1 Right Mounting Bracket 1 Left Mounting Bracket 1 Hardware Kit Including: 2 Narrow
THANK YOU FOR CHOOSING KÜRYAKYN! -cont.-
 I N S TA L L AT I O N H Y P E R C H A R G E R A I R C L E A N E R 9 4 1 0 FITS: KAWASAKI 95-UP VN800 VULCAN PART # INCLUDED 600163 1 Hypercharger Chrome with drilled back 8513 1 K&N Filter Element 8593
PRO-R AIR CLEANER FOR KAWASAKI 9462
 I N S TA L L AT I O N PRO-R AIR CLEANER FOR KAWASAKI 9462 FITS: 95-04 VN1500 (SINGLE CARB MODELS) PART # INCLUDED 500205 1 Pro R Hypercharger Chrome Assembly Including: 1 Dual Velocity Ring (in plastic
INSTALLATION. Note: Not all parts will be used in the installation of this product. -cont.-
 5005 Fits: 06-up FLHX, 04-up Screamin Eagle Ultra Classic Electra Glide & Screamin Eagle Electra Glide Classic, '97-up FLHT, FLHTC, FLHTCU, FLHR PartS Included 1 Right Driving Light Assembly 1 Left Driving
INSTALLATION HYPERCHARGER AIR CLEANER KIT 9400
 AIR CLEANER KIT 9400 PARTS INCLUDED 1 Hypercharger with K&N Filter 1 Adapter Hardware Kit Contains the Following: 1 Rubber Intake Duct with Rubber Carb Bumper 1 Main Support Bracket 1 Carb Bumper Bracket
INSTALLATION. led fairing lights for gl
 for gl1800 4627 Fits: 01-up GL1800 Parts Included 4 7-Color Lizard Lights 1 7-Color Controller/Switch 1 Hardware Kit including: 4 Replacement Adhesive Pads 4 18 Extensions 1 Double Male Lizard Light Connector
INSTALLATION LIGHTED CURVED LAY DOWN LICENSE PLATE MOUNT 3166
 INSTALLATION LIGHTED CURVED LAY DOWN LICENSE PLATE MOUNT 3166 PARTS INCLUDED 1 Lighted Curved Lay Down License Plate Assembly 1 Hardware Kit Including: 6 Cable Ties 1 Dielectric Grease Pack 1 1 x 8 Tape
INSTALLATION BLIND SPOT TURN SIGNAL MIRRORS 1457
 BLIND SPOT TURN SIGNAL MIRRORS 1457 PARTS INCLUDED 2 Blind Spot Turn Signal Mirror Assemblies 1 Wire Harness Kit Including: 2 Wiring Harness (four pin) 1 Adapter Harness (six pin) 2 3-Pin Female Connectors
INSTALLATION TURN SIGNAL MIRRORS 1432
 1432 PARTS INCLUDED 1 Left Side Turn Signal Mirror Assembly with Convex Glass 1 Right Side Turn Signal Mirror Assembly with Convex Glass 1 Hardware Kit, Including: 2 5/16-18 X 1-1/2 Socket Head Cap Screws
This indication alerts you to the fact that ignoring the contents described herein can result in minor or moderate potential injury.
 3990 THANK YOU FOR CHOOSING KϋRYAKYN! PROTECT YOURSELF AND OTHERS FROM POSSIBLE INJURY AND/OR PROPERTY DAMAGE OR LOSS. PAY CLOSE ATTENTION TO ALL INSTRUCTIONS, WARNINGS, CAUTIONS, AND NOTICES REGARDING
I N S TA L L AT I O N
 I N S TA L L AT I O N 5008 fits: H-D: '80-Up Electra glide, tour glide, road king, road glide or street glide PartS Included 1 Right Fork Mount Assembly 1 Left Fork Mount Assembly 2 H3 Driving Light Assemblies
INSTALLATION TRUE DUAL HEADPIPES 497
 TRUE DUAL HEADPIPES 497 PARTS INCLUDED 1 Front Head Pipe 1 Rear Head Pipe 1 Front Heat Shield 1 Rear Heat Shield 1 Bracket (stamped 422-P) 1 Bracket (stamped 423-P) 2 1/2 x 1-1/4 Socket Head Cap Screw
INSTALLATION CONSTELLATION DRIVING LIGHTS 5009
 INSTALLATION CONSTELLATION DRIVING LIGHTS 5009 PARTS INCLUDED 1 Right Driving Light with Turn Signals 1 Left Driving Light with Turn Signals 1 Installation Component Kit Including: 8 Insulated Male Spades
INSTALLATION CLAMP-ON FORK MOUNTED DRIVING LIGHTS 5015
 CLAMP-ON 5015 PARTS INCLUDED 2 Driving Lights 2 Side Mount Clamps-43mm/49mm 1 Hardware Kit Including: 2 49mm Spacers 4 43mm Spacers 2 Pivot Dome Washers 2 3/8-16 Serrated Hex Nut 1 Wiring Kit for Driving
WILD THINGS FUEL INJECTION CONTROLLER 9219
 I N S TA L L AT I O N WILD THINGS FUEL INJECTION CONTROLLER 9219 BY D O B E C K P E R F O R M A N C E FITS: 06-UP SOFTAIL, DRESSER, AND ROAD KING WITH DELPHI FUEL INJECTION Thank you for choosing the Wild
INSTALLATION CONSTELLATION DRIVING LIGHTS 5009
 INSTALLATION CONSTELLATION DRIVING LIGHTS 5009 PARTS INCLUDED 1 Right Driving Light with Turn Signals 1 Left Driving Light with Turn Signals 1 Installation Component Kit Including: 8 Insulated Male Spades
INSTALLATION ZOMBIE L.E.D. FUEL & BATTERY GAUGE. THANK YOU FOR CHOOSING KϋRYAKYN!
 THANK YOU FOR CHOOSING KϋRYAKYN! PROTECT YOURSELF AND OTHERS FROM POSSIBLE INJURY AND PROPERTY DAMAGE OR LOSS. PAY CLOSE ATTENTION TO ALL INSTRUCTIONS, WARNINGS, CAUTIONS, AND NOTICES REGARDING THE, USE,
INSTALLATION. DRIVING LIGHTS for FLHT/FLHX/FLHR 5005
 DRIVING LIGHTS for FLHT/FLHX/FLHR 5005 PARTS INCLUDED 1 Right Driving Light Assembly 1 Left Driving Light Assembly 1 Right Driving Light Bracket 1 Left Driving Light Bracket 4 Driving Light Bracket Plugs
INSTALLATION. DRIVING LIGHTS for FLHT/FLHX/FLHR BLACK. THANK YOU FOR CHOOSING KϋRYAKYN!
 THANK YOU FOR CHOOSING KϋRYAKYN! PROTECT YOURSELF AND OTHERS FROM POSSIBLE INJURY AND PROPERTY DAMAGE OR LOSS. PAY CLOSE ATTENTION TO ALL INSTRUCTIONS, WARNINGS, CAUTIONS, AND NOTICES REGARDING THE, USE,
INSTALLATION FORK MOUNTED DRIVING LIGHTS 5008
 5008 PARTS INCLUDED 1 Right Fork Mount Assembly 1 Left Fork Mount Assembly 2 H3 Driving Light Assemblies 1 12-Pin Wiring Adapter 1 Hardware Kit for Fork Mount Driving Lights, Including: 6 5/16-18 Nylock
INSTALLATION AIRMASTER DELUXE FAIRING 1335
 AIRMASTER DELUXE FAIRING 1335 PARTS INCLUDED 1 Airmaster Fairing 1 Dragon Wing Spacer kit 1 Light Bar Relocation Hardware Kit 2 1/2" Spacers 2 1" Spacers 6 5/16"-24 x 1" Button Head Cap Screw, Chrome 4
POWER CELL FOR DYNA WITH CLEAN CHROME COVER 562
 POWER CELL FOR DYNA WITH CLEAN CHROME COVER 562 THANK YOU FOR CHOOSING CRUSHER! PROTECT YOURSELF AND OTHERS FROM POTENTIAL INJURY AND PROPERTY DAMAGE OR LOSS. PAY CLOSE ATTENTION TO ALL INSTRUCTIONS, WARNINGS,
CRUSHER MAVERICK 2 INTO 2, BLACK 566
 CRUSHER MAVERICK 2 INTO 2, BLACK 566 THANK YOU FOR CHOOSING CRUSHER! PROTECT YOURSELF AND OTHERS FROM POTENTIAL INJURY AND PROPERTY DAMAGE OR LOSS. PAY CLOSE ATTENTION TO ALL INSTRUCTIONS, WARNINGS, CAUTIONS,
INSTALLATION INSTRUCTIONS
 THANK YOU FOR CHOOSING KURYAKYN! Protect yourself and others from possible injury and property damage or loss. Pay close attention to all instructions, warnings, cautions, and notices regarding the installation,
CRUSHER TRUE DUAL HEADPIPES 513
 CRUSHER TRUE DUAL HEADPIPES 513 THANK YOU FOR CHOOSING CRUSHER! PROTECT YOURSELF AND OTHERS FROM POTENTIAL INJURY AND PROPERTY DAMAGE OR LOSS. PAY CLOSE ATTENTION TO ALL INSTRUCTIONS, WARNINGS, CAUTIONS,
INSTALLATION INSTRUCTIONS
 THANK YOU FOR CHOOSING KURYAKYN! Protect yourself and others from possible injury and property damage or loss. Pay close attention to all instructions, warnings, cautions, and notices regarding the installation,
INSTALLATION INSTRUCTIONS
 THANK YOU FOR CHOOSING KURYAKYN! Protect yourself and others from possible injury and property damage or loss. Pay close attention to all instructions, warnings, cautions, and notices regarding the installation,
INSTALLATION INSTRUCTIONS
 THANK YOU FOR CHOOSING KURYAKYN! Protect yourself and others from possible injury and property damage or loss. Pay close attention to all instructions, warnings, cautions, and notices regarding the installation,
Street Sleeper III Air Cleaner Kit for 99 Up Twin Cam 9605
 Street Sleeper III Air Cleaner Kit for 99 Up Twin Cam 9605 THANK YOU FOR CHOOSING CRUSHER! PROTECT YOURSELF AND OTHERS FROM POTENTIAL INJURY AND PROPERTY DAMAGE OR LOSS. PAY CLOSE ATTENTION TO ALL INSTRUCTIONS,
CARBURETOR REBUILD KIT (Vacuum Secondary) Models Demon Carburetors & Holley Model 4160 LIT704
 Models Demon Carburetors & Holley Model 4160 LIT704") CARBURETOR REBUILD KIT 190000 (Vacuum Secondary) Models Demon Carburetors & Holley Model 4160 LIT704 INSTRUCTIONS: Before getting to the actual rebuild, it should be noted that the carbs shown here are
CARBURETOR REBUILD KIT 190000 (Vacuum Secondary) Models Demon Carburetors & Holley Model 4160 LIT704 INSTRUCTIONS: Before getting to the actual rebuild, it should be noted that the carbs shown here are
Street Sleeper III Air Cleaner Kit for '08 UP Touring and Trike 9606
 Street Sleeper III Air Cleaner Kit for '08 UP Touring and Trike 9606 THANK YOU FOR CHOOSING CRUSHER! PROTECT YOURSELF AND OTHERS FROM POTENTIAL INJURY AND PROPERTY DAMAGE OR LOSS. PAY CLOSE ATTENTION TO
INSTALLATION INSTRUCTIONS
 THANK YOU FOR CHOOSING KURYAKYN! Protect yourself and others from possible injury and property damage or loss. Pay close attention to all instructions, warnings, cautions, and notices regarding the installation,
ROADTHUNDER FAIRING SPEAKER KIT BY MTX, CHROME 2717
 THANK YOU FOR CHOOSING KURYAKYN! Protect yourself and others from possible injury and property damage or loss. Pay close attention to all instructions, warnings, cautions, and notices regarding the installation,
INSTALLATION INSTRUCTIONS PART NUMBER:
 Equipped with AEM Dryflow Filter No Oil Required! INSTALLATION INSTRUCTIONS PART NUMBER: 21-462B (Blue Finish) 21-462C (Gun Metal Grey Finish) 21-462P (Vacuum Metalized Chrome-VMC) 21-462R (Red Finish)
advanced FLOW engineering Instruction Manual P/N: / Make: BMW Model: Z3 (E36/37) Year: Engine: L6-2.8L
 Year: Engine: L6-2.8L") advanced FLOW engineering Instruction Manual P/N: 51-11951 / 54-11951 Make: BMW Model: Z3 (E36/37) Year: 1997-1999 Engine: L6-2.8L Please read the entire instruction manual before proceeding. Ensure all
advanced FLOW engineering Instruction Manual P/N: 51-11951 / 54-11951 Make: BMW Model: Z3 (E36/37) Year: 1997-1999 Engine: L6-2.8L Please read the entire instruction manual before proceeding. Ensure all
Equipped with AEM Dryflow Filter No Oil Required! INSTALLATION INSTRUCTIONS PART NUMBER: DS (Plastic tube)
") Equipped with AEM Dryflow Filter No Oil Required! INSTALLATION INSTRUCTIONS PART NUMBER: 21-8316DS (Plastic tube) 2012-2016 Jeep Wrangler V6 3.6L C.A.R.B E.O. # D-670-24 Not legal for sale or use on any
Equipped with AEM Dryflow Filter No Oil Required! INSTALLATION INSTRUCTIONS PART NUMBER: 21-8316DS (Plastic tube) 2012-2016 Jeep Wrangler V6 3.6L C.A.R.B E.O. # D-670-24 Not legal for sale or use on any
INSTALLATION INSTRUCTIONS
 THANK YOU FOR CHOOSING KURYAKYN! Protect yourself and others from possible injury and property damage or loss. Pay close attention to all instructions, warnings, cautions, and notices regarding the installation,
INSTALLATION INSTRUCTIONS PART NUMBER:
 Equipped with AEM Dryflow Filter No Oil Required! INSTALLATION INSTRUCTIONS PART NUMBER: 21-488 2006-2008 MAZDA 3 L4 2.3L SEE * NOTE 2004-2008 MAZDA 3 L4 2.0L SEE * NOTE 2004-2005 MAZDA 3 L4 2.3L C.A.R.B.
INSTALLATION INSTRUCTIONS
 Equipped with AEM Dryflow Filter No Oil Required! INSTALLATION INSTRUCTIONS PART NUMBER: 21-718C (Gun Metal Grey Finish) 21-718P (Vacuum Metalized Chrome - VMC) 2011 Hyundai Elantra 1.8L Exclude Test Group
Tools required: 1-8mm socket 1-10mm socket 1-12mm socket 1- Phillips screw driver 1-8mm nut driver 1-55mm allen wrench 1- Disc grinder or Dremel
 Part number PF2019 2005-06 Toyota Tundra 4.7L V8 2005-06 Toyota Sequoia 4.7L V8 1- MR Tech Power-flow Intake system 1- Power Box-contents: PB375P-8 1-8 Inverted top filter (#1022) 1- Main body, top and
INSTALLATION INSTRUCTIONS PART NUMBER:
 Equipped with AEM Dryflow Filter No Oil Required! INSTALLATION INSTRUCTIONS PART NUMBER: 21-469B (Blue Finish) 21-469C (Gun Metal Grey Finish) 21-469P (Vacuum Metalized Chrome-VMC) 21-469R (Red Finish)
INSTALLATION INSTRUCTIONS PART NUMBER: DC
 Equipped with AEM Dryflow Filter No Oil Required! INSTALLATION INSTRUCTIONS PART NUMBER: 21-8033DC 2014-16 Chevrolet Silverado 1500 5.3L/6.2L C.A.R.B. E.O. # D-670-23 2014-16 GMC Sierra 1500 5.3L/6.2L
Equipped with AEM Dryflow Filter No Oil Required!
 Equipped with AEM Dryflow Filter No Oil Required! INSTALLATION INSTRUCTIONS PART NUMBER: 21-9210 1994-2002 DODGE Ram 2500 Pickup L6-5.9L DSL C.A.R.B. E.O. # D-670 1994-2002 DODGE Ram 3500 Pickup L6-5.9L
Equipped with AEM Dryflow Filter No Oil Required! INSTALLATION INSTRUCTIONS PART NUMBER DS BMW 335i 3.0L
 Equipped with AEM Dryflow Filter No Oil Required! INSTALLATION INSTRUCTIONS PART NUMBER 21-754DS 2012-2015 BMW 335i 3.0L 1 ITEM NO. PART NUMBER DESCRIPTION QTY. 1 21-2057DK AIR FILTER 1 2 9-0442 TUBE;
INSTALLATION INSTRUCTIONS
 Equipped with AEM Dryflow Filter No Oil Required! INSTALLATION INSTRUCTIONS PART NUMBER AEM-21-805C (GUN METAL GRAY FINISH) 2016.5-19 CHEVROLET CRUZE 1.4T 1 ITEM NO. PART NUMBER DESCRIPTION QTY. 1 21-2038DK
INSTALLATION INSTRUCTIONS
 Equipped with AEM Dryflow Filter No Oil Required! INSTALLATION INSTRUCTIONS PART NUMBER 21-818C (GUN METAL GRAY FINISH) 2017 Nissan Sentra SR Turbo 1.6T 1 ITEM NO. PART NUMBER DESCRIPTION QTY. 1 21-2157DK
INSTALLATION INSTRUCTIONS
 Equipped with AEM Dryflow Filter No Oil Required! INSTALLATION INSTRUCTIONS PART NUMBER AEM-21-796C (GUN METAL GRAY FINISH) 2015-2016 HYUNDAI GENESIS SEDAN 3.8L V6 C.A.R.B. E.O # D-670-24 1 ITEM NO. PART
INSTALLATION INSTRUCTIONS PART NUMBER: C/P
 Equipped with AEM Dryflow Filter No Oil Required! INSTALLATION INSTRUCTIONS PART NUMBER: 21-725C/P 2011-2016 SCION TC L4-2.5L LEGAL IN CALIFORNIA ONLY FOR RACING VEHICLES WHICH MAY NEVER BE USED, REGISTERED
INSTALL GUIDE Dodge/RAM 5.7L HEMI
 INSTALL GUIDE 2009-2017 Dodge/RAM 5.7L HEMI TABLE OF CONTENTS 3 GETTING STARTED 3 PARTS LIST 4 INSTALLATION INSTRUCTIONS 4 REMOVING THE STOCK INTAKE ASSEMBLY 6 INSTALLING THE AIR FILTER 7 INSTALLING THE
Dodge 24v ISBe
 BD SUPER B 2003-2004 Dodge 24v ISBe (Non 600 motors) Part # 1045230 PLEASE READ ALL INSTRUCTIONS BEFORE INSTALLATION This turbo system is not compatible with an AFE intake system WITHOUT MODIFICATIONS.
INSTALLATION INSTRUCTIONS: 2018 HARLEY-DAVIDSON SOFTAIL FAT BOY / BREAKOUT BIG RADIUS 2-2 PART# / 46075
 INSTALLATION INSTRUCTIONS: 2018 HARLEY-DAVIDSON SOFTAIL FAT BOY / BREAKOUT BIG RADIUS 2-2 PART# 26075 / 46075 Congratulations, you have purchased the finest exhaust system available for your motorcycle.
INSTALLATION INSTRUCTIONS
 Equipped with AEM Dryflow Filter No Oil Required! INSTALLATION INSTRUCTIONS PART NUMBER: 22-408 1994-1997 HONDA Accord L4-2.2L C.A.R.B. E.O. # D-670 1994-1995 HONDA Accord EX L4-2.2L C.A.R.B. E.O. # D-670
Part number PF8050. Tools required: 1-8mm nut driver 1-8mm socket 1-10mm socket 1-13mm socket 1- ratchet 1- ratchet extension 1- set of allen wrenches
 Part number PF8050 2003-08 Dodge Ram 5.7L V8 Hemi 1- MR Tech Power-flow Intake system 1- Power Box-contents: PB400D-8 1-8 Inverted top filter (A) (#1022) 1- Main body, top and screen (B) (#15015) 1-4 velocity
21-413B (Blue Finish) C (Gun Metal Grey Finish) P (Vacuum Metalized Chrome-VMC) R (Red Finish)
 C (Gun Metal Grey Finish) P (Vacuum Metalized Chrome-VMC) R (Red Finish)") Equipped with AEM Dryflow Filter No Oil Required! INSTALLATION INSTRUCTIONS PART NUMBER: 21-413B (Blue Finish) 21-413C (Gun Metal Grey Finish) 21-413P (Vacuum Metalized Chrome-VMC) 21-413R (Red Finish)
Equipped with AEM Dryflow Filter No Oil Required! INSTALLATION INSTRUCTIONS PART NUMBER: 21-413B (Blue Finish) 21-413C (Gun Metal Grey Finish) 21-413P (Vacuum Metalized Chrome-VMC) 21-413R (Red Finish)
CHROME ALLEY CAT L.E.D. FUEL & BATTERY GAUGE 7381
 CHROME ALLEY CAT L.E.D. FUEL & BATTERY GAUGE 7381 Thank You For Choosing Küryakyn! Protect yourself and others from potential injury and property damage or loss. Pay close attention to all instructions,
Avoid damage to the motorcycle. Protect painted surfaces with a soft cloth or blanket.
 HOUSINGS 7808 Thank You For Choosing Küryakyn! Protect yourself and others from potential injury and property damage or loss. Pay close attention to all instructions, warnings, cautions, and notices regarding
AWE AirGate Carbon Intake VW / Audi MQB 1.8T 2.0T. AWE website here
 Thank you for your purchase of the AWE AirGate Carbon Intake system for the 2015+ VW / Audi MQB 1.8T or 2.0T. For up to the minute fitment information, be sure to visit the Volkswagen or Audi section of
TK08 TUNING KIT TECHNICAL MANUAL FOR 16/26/27/28 SERIES SHOCKS Revised 6/17/14
 Tech Line: (952) 985-5675 Fax (952) 985-5679 21730 Hanover Ave. Lakeville, MN 55044 www.qa1.net www.facebook.com/qa1motorsports TK08 TUNING KIT TECHNICAL MANUAL CONTENTS UNDER PRESSURE! USE EXTREME CAUTION
ROUSH Performance Air Induction Kit Pt # Installation Instructions
 ROUSH Performance Air Induction Kit Pt #11099600 Application: 2009 Ford F-150 with 4.6L and 5.4L V8 Engines 2008-09 Ford F-250/F-350 Super Duty with 5.4L V8 and 6.8L V10 Engines For Off Road Use Only Installation
AWE S-FLO Carbon Intake System Mini F5X. AWE website here
 Thank you for purchasing the AWE S-FLO Carbon Intake System for the 2014+ Mini F5X. For up to the minute fitment information, be sure to visit the Mini section of the AWE website. As always, AWE Performance
INSTALLATION INSTRUCTIONS
 Equipped with AEM Dryflow Filter No Oil Required! INSTALLATION INSTRUCTIONS PART NUMBER 21-802C (GUN METAL GRAY FINISH) 2015-16 AUDI A3 2.0T 2016-18 VOLKSWAGEN GTI / Golf R 2.0T 2017-18 VOLKSWAGEN GTI
PERFECT HI-VELOCITY 62MM THROTTLE BODY
 PERFECT HI-VELOCITY 62MM THROTTLE BODY Installation Instructions Part # 65300 1991-1998 Jeep 4.0L Engines OR All Jeep 4.0L Engines in Cherokee, Grand Cherokee and Wrangler 1991-2005 w/4 wire IAC ONLY.
INSTALLATION INSTRUCTIONS
 Equipped with AEM Dryflow Filter No Oil Required! INSTALLATION INSTRUCTIONS PART NUMBER:41-1403 2010-2011 TOYOTA Corolla L4-1.8L LEGAL IN CALIFORNIA ONLY FOR RACING VEHICLES WHICH MAY NEVER BE USED, REGISTERED
TK08 TUNING KIT TECHNICAL MANUAL FOR 16/26/27/28 SERIES SHOCKS Revised 6/25/14 Tech Line: (952) Fax (952)
 Fax (952)") Tech Line: (952) 985-5675 Fax (952) 985-5679 21730 Hanover Ave. Lakeville, MN 55044 www.qa1.net www.facebook.com/qa1motorsports TK08 TUNING KIT TECHNICAL MANUAL CONTENTS UNDER PRESSURE! USE EXTREME CAUTION
Tech Line: (952) 985-5675 Fax (952) 985-5679 21730 Hanover Ave. Lakeville, MN 55044 www.qa1.net www.facebook.com/qa1motorsports TK08 TUNING KIT TECHNICAL MANUAL CONTENTS UNDER PRESSURE! USE EXTREME CAUTION
AEROMOTIVE Part # / L SOHC Ford Fuel Rail Kit INSTALLATION INSTRUCTIONS
 AEROMOTIVE Part # 14119 98 1/2-04 4.6L SOHC Ford Fuel Rail Kit INSTALLATION INSTRUCTIONS CAUTION: Installation of this product requires detailed knowledge of automotive systems and repair procedures. We
Thank you for purchasing the AWE SwitchPath Exhaust System for the Audi B9 S4.
 Thank you for purchasing the AWE SwitchPath Exhaust System for the 2017+ Audi B9 S4. Switchpath Exhaust Parts: 1 Driver downpipe upper section (part A10) 1 Driver downpipe lower section (part A12) 1 Passenger
INSTALLATION INSTRUCTIONS
 Equipped with AEM Dryflow Filter No Oil Required! INSTALLATION INSTRUCTIONS PART NUMBER 21-829C (GUN METAL GRAY FINISH) 2017 ACURA RDX 3.5L 1 ITEM NO. PART NUMBER DESCRIPTION QTY. 1 21-210ED ELEMENT PARTS
INSTALLATION INSTRUCTIONS PART NUMBER:
 Equipped with AEM Dryflow Filter No Oil Required! INSTALLATION INSTRUCTIONS PART NUMBER: 22-463 1997-1999 TOYOTA Tacoma L4-2.7L C.A.R.B. E.O. # D-392-18 1997-1999 TOYOTA Tacoma L4-2.4L C.A.R.B. E.O. #
INSTALLATION INSTRUCTIONS
 Equipped with AEM Dryflow Filter No Oil Required! INSTALLATION INSTRUCTIONS PART NUMBER: 21-703C (Gun Metal Grey Finish) 21-703P (Vacuum Metalized Chrome - VMC) 2011-2013 FORD Fiesta L4-1.6L C.A.R.B. E.O.
DEMON CARBURETOR MANUAL CHOKE KIT #421441
 DEMON CARBURETOR MANUAL CHOKE KIT #421441 CHOKE INSTALLATION INSTRUCTIONS LIT703 This manual choke kit is designed to be used on any Demon Carburetor with a choke tower. This covers the Road Demon Jr.
INSTALLATION INSTRUCTIONS
 Equipped with AEM Dryflow Filter No Oil Required! INSTALLATION INSTRUCTIONS PART NUMBER 21-783C (Gun Metal Gray Finish) 2016 HYUNDAI TUCSON 1.6L TURBO C.A.R.B. E.O# D-670-24 2017 HYUNDAI TUCSON 1.6L TURBO
AEROMOTIVE Part # GM LS1 Fuel Rails INSTALLATION INSTRUCTIONS
 AEROMOTIVE Part # 14106 GM LS1 Fuel Rails INSTALLATION INSTRUCTIONS CAUTION: Installation of this product requires detailed knowledge of automotive systems and repair procedures. We recommend that this
AEROMOTIVE Part # L 4V Fuel Rails INSTALLATION INSTRUCTIONS
 AEROMOTIVE Part # 14130 5.0L 4V Fuel Rails INSTALLATION INSTRUCTIONS CAUTION: Installation of this product requires detailed knowledge of automotive systems and repair procedures. We recommend that this
Perfect Performance Products, LLC Painless Performance Products Division 2501 Ludelle St. Fort Worth, Texas (800)
") PERFECT HI-VELOCITY 68MM THROTTLE BODY Installation Instructions Part # 65301 1991-1998 Jeep 4.0L Engines w/perfect Engine Management System P/N 65140, 65141 OR All Jeep 4.0L Engines in Cherokee, Grand
PERFECT HI-VELOCITY 68MM THROTTLE BODY Installation Instructions Part # 65301 1991-1998 Jeep 4.0L Engines w/perfect Engine Management System P/N 65140, 65141 OR All Jeep 4.0L Engines in Cherokee, Grand
INSTRUCTIONS PART NUMBER:
 Equipped with AEM Dryflow Filter No Oil Required! INSTALLATION INSTRUCTIONS PART NUMBER: 21-477 2006-2007 SUBARU Impreza WRX H4 2.5L Turbo C.A.R.B. E.O. # D-670-15 2004-2007 SUBARU Impreza WRX STi H4 2.5L
INSTALLATION INSTRUCTION PART NUMBER:
 Equipped with AEM Dryflow Filter No Oil Required! INSTALLATION INSTRUCTION PART NUMBER: 24-6003 1994-2001 ACURA Integra L4-1.8L Manual Trans. C.A.R.B. E.O. # D-670 Non VTEC models ONLY AEM bypass valves
SCION xb PERFORMANCE AIR INTAKE Section I Installation Preparation 2.4L I-4
 Section I Installation Preparation 2.4L I-4 Part Number(s): PTR03-52110 Kit Contents Item # Quantity Description Reqd. 1 1 TRD Inlet Tube 2 1 TRD Upper Air Box with HC Trap 3 1 Hump Hose Coupler 4 1 Hump
INSTALLATION INSTRUCTIONS
 Equipped with AEM Dryflow Filter No Oil Required! INSTALLATION INSTRUCTIONS PART NUMBER 21-778C (Gun Metal Gray Finish) 2015 MITSUBISHI LANCER 2.0 & 2.4L Excludes Test Group FMTXV02.0GEP C.A.R.B. E.O.
INSTALLATION INSTRUCTIONS PART NUMBER C (Gun Metal Gray Finish)
") Equipped with AEM Dryflow Filter No Oil Required! INSTALLATION INSTRUCTIONS PART NUMBER 21-765C (Gun Metal Gray Finish) 2014-16 MAZDA 3 2.0L *Manual Transmission Only 1 ITEM NO. PART NUMBER DESCRIPTION
Equipped with AEM Dryflow Filter No Oil Required! INSTALLATION INSTRUCTIONS PART NUMBER 21-765C (Gun Metal Gray Finish) 2014-16 MAZDA 3 2.0L *Manual Transmission Only 1 ITEM NO. PART NUMBER DESCRIPTION
INSTALLATION INSTRUCTIONS: 2018 HARLEY-DAVIDSON STREET BOB BIG RADIUS 2-2 PART# / 46077
 INSTALLATION INSTRUCTIONS: 2018 HARLEY-DAVIDSON STREET BOB BIG RADIUS 2-2 PART# 26077 / 46077 Congratulations, you have purchased the finest exhaust system available for your motorcycle. Your Vance & Hines
INSTALLATION INSTRUCTIONS PART NUMBER:
 Equipped with AEM Dryflow Filter No Oil Required! The installation of this AEM intake system requires some modification to the vehicle s inner fender. A specialized power tool will be needed to modify
HSR Carburetor. Total Kits. Installation Instructions. # Evo Big Twin # present Twin Cam
 HSR Carburetor Total Kits Installation Instructions HSR42 Kits: HSR45 Kits: #42-8 84-99 Evo Big Twin #42-19 99 - present Twin Cam #45-2 84-99 Evo Big Twin #45-3 84-99 Evo Big Twin #45-4 99 - present Twin
INSTALLATION INSTRUCTIONS PART NUMBER:
 Equipped with AEM Dryflow Filter No Oil Required! INSTALLATION INSTRUCTIONS PART NUMBER: 24-6004 1994-2001 ACURA Integra GSR L4-1.8L C.A.R.B. E.O. # D-670 AEM bypass valves are not compatible with this
INSTALLATION INSTRUCTIONS PART NUMBER:
 Equipped with AEM Dryflow Filter No Oil Required! INSTALLATION INSTRUCTIONS PART NUMBER: 41-1406 2006-2013 LEXUS IS250 V6-2.5L LEGAL IN CALIFORNIA ONLY FOR RACING VEHICLES WHICH MAY NEVER BE USED, REGISTERED
INSTALLATION INSTRUCTIONS
 CLASSIC EDITION WITH AUX-IN CHROME OR BLACK FINISH THANK YOU FOR CHOOSING STEEL HORSE AUDIO! Protect yourself and others from possible injury and property damage or loss. Pay close attention to all instructions,
INSTALLATION INSTRUCTIONS: INDIAN SCOUT HI-OUTPUT GRENADES PART# 18554/18654
 INSTALLATION INSTRUCTIONS: INDIAN SCOUT HI-OUTPUT GRENADES PART# 18554/18654 Congratulations, you have purchased the finest exhaust system available for your motorcycle. Your Vance & Hines exhaust is designed
INSTALLATION INSTRUCTIONS PART NUMBER DS
 INSTALLATION INSTRUCTIONS PART NUMBER 21-781DS 2014-2016 Mercedes Benz CLA250 2.0T C.A.R.B E.O # D-670-24 1 ITEM NO. PART NUMBER DESCRIPTION QTY. 1 21-1015DK ELEMENT; 6-3/8 OD B, 5-3/16 OD T; 8-7/8H 1
Procedure to Install the New Autogap components in ER-1225 and ER825 Brake with inverted Armature Hub
 Procedure to Install the New Autogap components in ER-15 and ER85 Brake with inverted P-30-1 819-0376 Installation & Operating Instructions Contents Introduction........................... Kit Parts List..........................
advanced FLOW engineering Instruction Manual P/N: & Make: BMW Model: 3-Series Year: Engine: L6-2.5L/2.8L/3.
 advanced FLOW engineering Instruction Manual P/N: 51-20442 & 54-20442 Make: BMW Model: 3-Series Year: 99-06 Engine: L6-2.5L/2.8L/3.0L Please read the entire instruction manual before proceeding. Ensure
INSTALLATION INSTRUCTIONS
 Equipped with AEM Dryflow Filter No Oil Required! INSTALLATION INSTRUCTIONS PART NUMBER: 21-9210 1994-2002 DODGE Ram 2500 Pickup L6-5.9L DSL C.A.R.B. E.O. # D-670 1994-2002 DODGE Ram 3500 Pickup L6-5.9L
WARNING OPERATING PRESSURES: READ INSTALLATION INSTRUCTIONS COMPLETELY BEFORE INSTALLING YOUR KIT
 4190 www.riderite.com OPERATING PRESSURES: MINIMUM (UNLOADED) MAX (LOADED) 5 PSI 35 PSI READ INSTALLATION INSTRUCTIONS COMPLETELY BEFORE INSTALLING YOUR KIT INSTALLATION INSTRUCTIONS Congratulations your
Raw Designs Scorpion Tips Install
 Raw Designs Scorpion Tips Install Disclaimer: The information contained in this website is for general information purposes only. The information is provided by mym109r.com and while I endeavor to keep
INSTALLATION INSTRUCTIONS
 Equipped with AEM Dryflow Filter No Oil Required! INSTALLATION INSTRUCTIONS PART NUMBER: 21-9034 YEAR MAKE MODEL Engine Info 2006-2007 CHEVROLET 2500HD Classic V8-6.6L DSL C.A.R.B. E.O. D-670-13 2006-2007
advanced FLOW engineering Instruction Manual P/N: / Make: Toyota Model: Tacoma Year: Engine: L4-2.7L
 advanced FLOW engineering Instruction Manual P/N: 51-82722 / 54-82722 Make: Toyota Model: Tacoma Year: 2005-2015 Engine: L4-2.7L Please read the entire instruction manual before proceeding. Ensure all
INSTALLATION INSTRUCTIONS
 Equipped with AEM Dryflow Filter No Oil Required! INSTALLATION INSTRUCTIONS PART NUMBER 21-742C (Gun Metal Grey Finish) 2014-16 Subaru Forester XT H4-2.0L Turbo C.A.R.B E.O.# D-670-24 1 ITEM NO. PART NUMBER
2019-ON RAM 1500 INSTALLATION INSTRUCTIONS
 2019-ON RAM 1500 INSTALLATION INSTRUCTIONS Thank you for purchasing ROCKSTARTM Splash Guard Mud Flaps. Agri-Cover, Inc. proudly manufactured these mud flaps using superior quality materials and workmanship.
HSR Carburetor. Total Kits. Installation Instructions. # Evo Big Twin # present Twin Cam
 HSR Carburetor Total Kits Installation Instructions HSR42 Kits: HSR45 Kits: #42-8 84-99 Evo Big Twin #42-19 99 - present Twin Cam #45-2 84-99 Evo Big Twin #45-3 84-99 Evo Big Twin #45-4 99 - present Twin