Fixing GM 3rd Gen tilt steering column
|
|
|
- Marian Parker
- 6 years ago
- Views:
Transcription


1 Fixing GM 3rd Gen tilt steering column Thanks to and Vader for this info compiled by Duck, Hawaii My steering column can move up and down a bit and now it its so loose the key doesnt want to come out and when i make turns the horn is beeping by itself. The bolts under the dash are tight, it looks like the play is coming from where the steering column tilts. The 4 inverted torx bolts have came loose. its a pretty big job if you have never been in a column before. if you fix it yourself, remember to use locktight on the 4 bolts shown below. lower right side of the steering column. There should be a small (#0) Phillips screw holding the knob in place. Find the release clip or bolts for the horn sounder pad and remove it. As the pad is removed from the wheel, unplug the horn wire from the connector on the pad. Remove the horn sounder wire and the insulator that guides the wire through the steering wheel. The insulating sleeve needs to be pushed inward slightly, twisted ¼ turn anticlockwise, and removed from the wheel. There is a light spring in the sleeve, so make sure all the parts are removed together. Your car will be a little easier if there is no VATS wiring and SIR coil/wiring/gas bag. If you have VATS, there are only two more wires that need to be handled. With SIR, you have an entire additional procedure to remove and reassemble the system. You really should have a service manual in hand for that procedure. Start by disconnecting the battery. Then center the steering wheel, so that the wheel can be replaced in exactly the same position on the shaft easily. The steering shaft is both marked and keyed, but centering the wheel makes the job easier to "eyeball", and keeps the turn signal cancelling cam out of the way in later steps. Next, remove the hazard flasher knob on the Remove the safety clip from the steering shaft, then remove the nut. You might have to have an assistant help hold the wheel while you turn the nut loose. Install the bolts from your steering wheel puller into the tapped holes in the wheel, and turn the puller screw to release the wheel from the steering shaft. Depress the notched wheel locking plate and remove the locking ring located at the center of the plate. There is a special tool for holding the wheel locking plate while the snap ring is removed, and it will be worth the $15.00 you'll pay for it. It can be done without the tool, but it is
2 an exercise in frustration unless you are an octopus. I've done it several times using the "Armstrong" method, now I have the tool and use the "Brainstrong" method instead.


3 right side of the column holds the lock cylinder in place. Before removing the lock cylinder, make sure to hold the plastic/metal foil contact assembly in place so it s not lost down the column when the lock is removed. This switch assembly is actuates the key warning buzzer/chime. If reinstallation is difficult, check to see if a small contact has dropped down inside, blocking reinsertion and push it back up. If you have VATS, there should be an additional pair of wires to unplug and feed down along the column. When the wheel locking plate is removed, you can look at the left lower side of the turn signal switch and see a pan head Phillips screw that holds the turn signal lever in place. Remove this screw and plate, then move the lever out of the way. There are three more pan head screws that hold the turn signal/hazard lamp switch to the upper column. Remove those and lift the turn signal switch out of the way. You may need to feed some extra wire from under the column to allow the switch to clear the steering shaft and move out of the way completely. Once the turn signal/hazard switch base is out of the way, another pan head screw on the upper


4 Remove the remaining upper bowl trim screws and lift the upper bowl off the column. Find the column tilt release lever and thread it back in hand tight for now. Remove the upper steering shaft bearing nut and retainer clip. Remove the upper bearing set. Remove the actuator rod link from the rack/sector that operates with the lock cylinder. Disconnect the link from the clip in the lower column. Remove the column tilt release lever by unscrewing it. Set it nearby since you will need to reinstall it after the upper bowl trim jacket is removed. Remove the turn signal/multifunction lever shaft by carefully pulling it out of the switch. Unplug the cruise control wire harness (if equipped). Remove the balance spring cap with a #2 or larger Phillips driver or larger square drive. This will allow the upper column fall to the lowest tilt position. Remove the pivot pins from either side of the upper column using an 8-32 screw and nuts as a puller. I used a screw, nut, a ½" 12-point socket with ¼" drive, and a washer or two to jack the pins out without damaging anything. If your car happens to have a metric thread in the pivot pins, you'll just have to find the right bolt and nut
, then back it off a turn or two in case the bolt snaps later.")
5 combination. My '94 still has an 8-32, however. Assemble the parts as shown, fully bottoming the screw by hand (to get the maximum thread bearing strength), then back it off a turn or two in case the bolt snaps later. Once the screw thread is set, run the nut down with a wrench to jack the pivot pin out of the column die casting. It the screw snaps, there should be adequate material to back it out by hand (which is why you didn't bottom it out to begin with). Usually, the pin will pull easily once it starts moving and deforms the stakes that were retaining it. Once the pins are removed, operate the column tilt release lever and remove the upper column half. Note the routing of the ignition switch linkage rod(s) when you remove the upper column half. Tilt the upper stub shaft and universal joint to allow the joint to be separated. At this point, you should be viewing the top of the lower column half and four Torx cap screws. Remove these screws one at a time, clean the threads, and apply a light coating of LocTite 242 or an equivalent medium strength removable thread locker. Tighten the bolts by hand until all four are reinstalled. Torque them to 180 in/lb. Reassemble the upper column half in reverse order. Take time to clean and grease all the moving parts so you can have another ten years of reliable operation. Every moving part, including the turn signal switch and cancelling cam, should be cleaned and lubricated with white lithium grease. It's a lot easier to install the upper column housing if the spring is removed from the tilt mechanism. Installing the spring is easy once you have the upper column in place, as long as you have a large Phillips screwdriver to compress/turn the retaining cap. I did it with the spring installed (until I realized you could take the retaining cap off) and it wasn't too bad, just had to engage the cogs for the tilt steering mechanism and using the leverage of the tilt part of the steering wheel, you can compress the spring. I agree however, that removing the cap and the spring will make the job a lot easier and you won't have to worry about getting the spring centered on the pin. When assembly is complete, torque the steering wheel nut to 35 ft/lb. There are already enough loose nuts behind steering wheels on our roadways... There is a possibility that some of the pan head screws are Torx instead of Phillips. I believe this was more common on 1985 and later cars, but yours may have them as well. There is also a very remote possibility that your car has an inflatable restraint, in which case you'll need to disconnect the battery and insulate all connections before you start. You should also have a service manual to detail the proper procedure for removing and re-centering the triggering coil and pickup for the SIR. You don't want to have that done incorrectly. Come to think of it, a manual is a good idea, anyway. One thing you probably won't have to deal with is the SIR coil and wiring. That should save you some time. Two supplies you'll need are a medium strength threadlocker (like LocTite 242) and white lithium grease (like Lubriplate 107). A small torque wrench would be helpful, but if you can guess at 15 ft/lb, you should be O.K.
6 The lock plate depressor and wheel puller are almost a necessity. Just clean and grease everything when you reassemble. You'll appreciate it later when the column operates smoothly for a long time. This should keep you busy this weekend. If you are having difficulty locating the pivot pins, they are shown in this diagram (Item #39): Some personal experiences Well, I was only able to tighten 1 torx bolt because i couldn't get the tilt section off the column, but that one bolt was enough to really tighten things up. It should hold for a few more days so I can make some time to do this right. Once I get the parts it should be easy as pie. Both You and Vader were right, assuming you take your time and clean/degrease/locktite the parts that need it it should only take about 2 to 3 hours. It took us around 4 1/2 hours because we didn't have the pin puller, and we still didn't get to the other 3. I'll really have to fix it sometime this week. Honestly though, Both Vader, and Bruce provided excellent directions and with the 3 right tools this job is easy as can be. Unfortunately if you don't have the right tools you'll spend days on this project. Since I pulled it apart twice in one day I expect that it'll only take about 1 to 2 hours if I'm lazy when I fix it permanantly next time. I have successfully fixed my tilt column!! And even come up with a small, cheap and easy way to get the locking plate retainer clip off! I used some nice strong thread and tied it into a slip knot. Then I looped it on the ring. Using a small flathead screwdriver I pulled on the string so I could get the flat head underneath the ring. Once it was under the ring it was easy as pie. steering shaft.put the 2 sockets side by side,but seperated by the steering shaft.put the washer on the shaft over the 2 sockets.then use the steering shaft nut to push the washer/sockets/lock ring plate down.this will give you room to remove the lock ring using to small flat head screwdrivers or?..its a little tricky,but its worked for me many times over. Installation is in reversal of removal. I bought a snap on pivot pin puller for $50 (canadian) and broke it! The pin was in so tight it mushroomed the collar on the tool and stripped out all of its threads! I did finally get it out with wd40,prying at the pin with a screwdriver from the inside of the column and using the first ghetto rigged tool! It was coated in loc tight! thats why it wouldnt come out. One thing I found difficult about reasembling the column was getting the hi-beam switch set correctly. It just didn't want to stay in place while I put it back together. Took me a few tries but I got it eventually. Duck July04 -- Hardest part was the unusual shapes in a puzzle-matrix, just follow the directions. Reinstalling the left side column cover was easier when moving the large column cover to enable the fit. This is really awkward due to the high-beam plastic piece constantly moving around and falling off. Afterwards check the high beam rod cause it probably fell off the lower switch too. I found it possible to remove, clean and Locktite all four torx bolts without dissembling the steering column joint. The improvement in tightness and steering response was fantastic, just like new. If anybody wants to try this.ive done it myself for removing/installing the lock ring.first you will need 2 sockets a 1/2 & 9/16,a large dia washer(not too thick)w/a hole big enough for the

7
8
9 Illustrated tilt steering column disassembly by Oliver Scholz The tilt steering column disassembly seems to be one of the last great mysteries of our time. Nobody likes to do it, but when you do'it's really not all that bad. At least it seems that way to me. Most people don't know how to disassemble it, and the description in the Factory Service Manual is sketchy at best. So I have decided to document the process of tearing into the column, when it was time for me to do so. This procedure should be useful if you're trying to do one of these repairs: Turn signal switch Key buzzer switch Ignition lock Ignition lock housing Wiper switch Loose tilt mechanism Some of the things described here can be done without removing the column from the car, however the deeper you have to go, the easier things get with the column out of the car. Plus, it's really simple to remove the column and put it back in. It's so much easier to do everything on a desk instead of crammed under the dash! So, I'd recommend to remove the steering wheel and locking plate while the column is in the car, and then remove the column from the car. Start off by disconnecting the negative (-) battery connection. This is important, since you'll be fiddling around with the ignition switch, and you don't want to cause any shorts. Next remove the center cap/horn button (depending on your steering wheel). Remove the horn switch contact by pushing it in and turning it 1/4 turn counterclockwise. Remove the clip (if present), center nut (22mm), and pull off the steering wheel. You will/b> need a steering wheel puller for this. You can get it e.g. at Sears. or just about any automotive supplier. Do not attempt to remove the wheel without this tool! Some wheels are loose enough on the shaft to be pulled manually, but don't use any brute force approach! Next remove the plastic lock plate cover by unlocking the tabs with a screwdriver. Once that's out of the way, you should use a lock plate compressor to push and hold down the lock plate. This allows you to slide the c- clip retainer onto the tool and
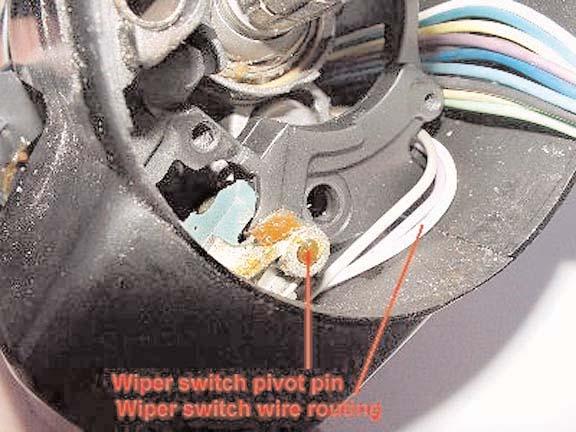
10 release the spring pressure (you can see this in the pictures). Remove the lock plate and cancelling cam. Be careful not to lose the spring located in the cancelling cam tower! Remove the Hazard warning switch with a philips screw driver. The switch consists of two parts, plus a spring and a screw. Don't lose them either. Remove the lock plate spring from the shaft. Next remove the three screws from the turn signal switch. You must move the turn signal switch in each direction to gain access to all screws. Now remove the philips screw from the turn signal lever. Pull the turn signal stalk from the column with the wiper in the off position. This is where I took the column out of the car. Remove the 11mm bolt attaching the column to the U-joint, and remove the two 15mm nuts and the two 15mm bolts holding the column in the car. Carefully lower the column. Disconnect the turn signal connector, the wiper switch connector and the cruise connector, if equipped. Remove the ignition switch connector. This is a two part connector, consisting of a black and a white part, both of which have two locking tabs, so don't force the connectors off. Remove the high beam switch connector (locking tabs!). If you have an automatic transmission, remove the park lock cable by removing the two tiny philips screws from the ignition switch. The column should now be free and you can carefully remove it from the vehicle. Put the ignition lock in the RUN position and carefully remove the key warning buzzer switch with a paper clip. Remove the TX20 bolt holding the ignition lock cylinder. Remove the lock cylinder. Remove the three TX30 screws attaching the ignition lock housing to the column. When you pull the lock housing off, the high beam actuator may fall out. Getting it back in place can be fun if you're putting things back together. So beware! If you're going to remove/replace either the turn signal switch or the wiper switch, remove the four bolts shown in the picture below, and the harness protector. You can fiddle connector and harness through the column even if it doesn't seem like it will fit. It will. When you reassemble, these bolts have to be put back in in the right order, and torqued to spec. Check the Helms manual for the recommended torque values for your vehicle.
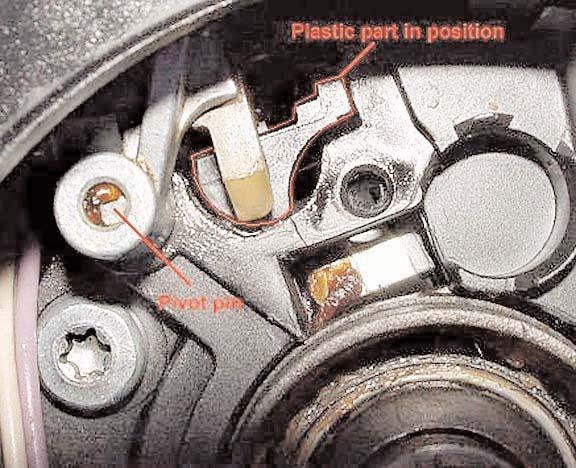
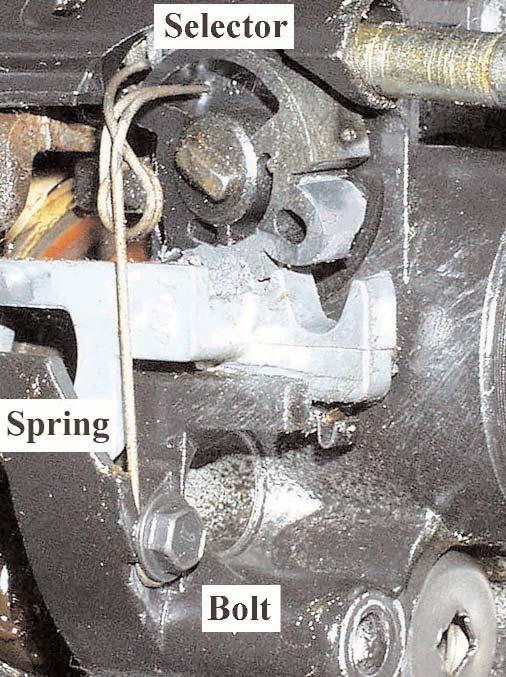
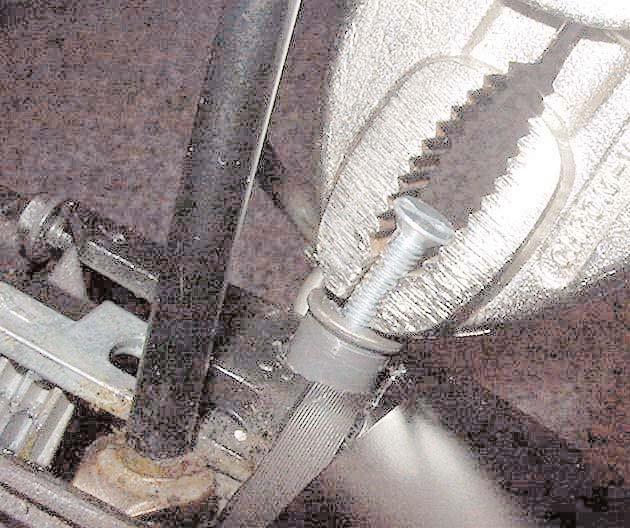
11 To remove the wiper switch, push the pivot pin out of the housing, and remove the switch. Remove the sector and spring by punching the shaft that goes to the lock cylinder through the sector with a screwdriver. The spring is held with a small bolt. Put the bolt back in place so you don't lose it. Next you have to remove the tilt mechanism spring retainer. This is the silver cap with the small rectangular hole. Insert a screwdriver, push down and make 1/4 turn counterclockwise to disengage the retainer. Remove the spring and retainer and set aside. Next is the trickiest part: removal of the pivot pins. GM has a special tool for this (J ), but you probably don't. Neither did I. So I screwed in a screw and pulled on it with vise grips, wiggling back and forth. Worked great. But be careful not to break off the screw, or you'll have to drill it out. Now the hard part is over. Pull on the tilt lever and put the column up as far as you can, then turn it right. You want to remove this part (see picture). This one actuates the rod that goes to the actual ignition switch. Just pull the upper part of the tilt housing off. By now you will see a few balls falling from the column. These are part of the lower bearing, don't lose any one of them! Now you can see the objects of our desire: the four infamous Torx head bolts. Tighten them well, and a drop of threadlocker may be a good idea. I didn't have a proper size Torx socket, so I used a 6mm Hex socket instead. Worked great. Reassembly is basically the reverse of the above. When reassembling, use a torque wrench to torque everything back to specs. You don't want the column to come apart when you're going 65 mph in heavy traffic! About the only tricky part when putting the column back together is the high beam switch actuator. Make sure the actuator is engaging the switch, and hold the column upright. The grease will "stick" the plastic part to the lower column shroud. Install the lock housing from above, and try to keep the plastic part in place. The picture shows what it should look like if you did it right. Install the turn signal stalk now to check if the high beam actuator works. Grease is a great helper to keep the balls inside a ball bearing.
REMOVAL & INSTALLATION
 REMOVAL & INSTALLATION Removal 1. Center steering wheel. Disconnect negative battery cable. Remove steering coupling shield (if equipped). Disconnect steering shaft at flexible coupling or pot joint. Note
Connecting the rear fog light on the A4 Jetta, while keeping the 5 Light Mod
 Connecting the rear fog light on the A4 Jetta, while keeping the 5 Light Mod DISCLAIMER: I'm human and make mistakes. If you spot one in this how to, tell me and I'll fix it This was done on my 99.5 Jetta.
M1A1 Thompson Upgrade
 M1A1 Thompson Upgrade If you are mechanically inclined at all. This should be no problem. I'll start off with a list of things you will need. Thompson M1A1 Whisky Cigarettes Tools: Flat screwdriver No.
The drawings are all available from the author or from the host websight. You will find these pictures and descriptions to be most helpful.
 Last Revision: 10JA2010 1969 THRU 1976 GM A & F-CAR STANDARD (NON-ADJUSTABLE) STEERING COLUMN DISASSEMBLY & REPAIR INSTRUCTIONS PAPER #1 Disassembly and Repair Instructions Addressed in this Paper Degree
1989 Jeep Cherokee. STEERING COLUMN' '1989 STEERING Jeep Steering Columns STEERING COLUMN STEERING Jeep Steering Columns
 STEERING COLUMN 1989 STEERING Jeep Steering Columns DESCRIPTION All models use collapsible steering columns. All columns have integral ignition switch and locking device. Optional tilt wheel is available
Another CJ picture guide to replacing the key cylinder in a non-tilt steering column
 Another CJ picture guide to replacing the key cylinder in a non-tilt steering column by John Strenk Well I'm sure it's happened to all of us one time or another. You park your jeep and go to turn off your
Last Revision: 09JA THROUGH 1976 GM A & F-CAR TILT STEERING COLUMN DISASSEMBLY & REPAIR INSTRUCTIONS PAPER #3
 Last Revision: 09JA2010 1969 THROUGH 1976 GM A & F-CAR TILT STEERING COLUMN DISASSEMBLY & REPAIR INSTRUCTIONS PAPER #3 Disassembly and Repair Instructions Addressed in this Paper Degree of Difficulty Page
Another CJ picture guide to
 Another CJ picture guide to replacing the key cylinder in a non-tilt steering column by John Strenk Well I'm sure it's happened to all of us one time or another. You park your jeep and go to turn off your
The drawings are all available from the author or from the host websight. You will find these pictures and descriptions to be most helpful.
 Last Revision: 09JA2010 1969 THROUGH 1976 GM A & F-CAR TILT STEERING COLUMN DISASSEMBLY & REPAIR INSTRUCTIONS PAPER #1 Disassembly and Repair Instructions Addressed in this Paper Degree of Difficulty Page
OEM Cruise Control Installation in GMC/Chevy NBS trucks
 OEM Cruise Control Installation in 99-02 GMC/Chevy NBS trucks May 2008 ~ Rampage_Rick Having just installed factory cruise control in my 00 Sierra, I thought I d share the fun. I followed the steps outlined
*Some speedometers have these additional electronic connections. If yours does, then remove the smaller slotted screws shown.
 www.odometergears.com 1981-1985 240 Cable-Driven Speedometers (NOT for 1986 and later electronic units) http://www.davebarton.com/240-odometer-repair.html For this set of instructions below, I will not
Volvo 1800 Dash Pad Replacement
 Volvo 1800 Dash Pad Replacement (courtesy of John Garden State Chapter Volvo Club America) Reupholstering the dash Well it has been some time since I have been online in the forum. Winter is a quite time
The drawings are all available from the author or from the host websight.
 Last Revision: 15OC2013 1969 THRU 1979 CORVETTE C3 STANDARD (NON-ADJUSTABLE) STEERING COLUMN DISASSEMBLY & REPAIR INSTRUCTIONS PAPER #1 Disassembly and Repair Instructions Addressed in this Paper Difficulty
Inside the GM Tilt Steering Column
 Inside the GM Tilt Steering Column By: JAZZMAN The first time I got into a GM tilt column (or any column for that matter) was when the column in my trusty old '84 Phoenix got so wobbly that it was scaring
Some tips and tricks I learned from getting clutch out of vehicle Skoda Octavia year 2000
 Some tips and tricks I learned from getting clutch out of vehicle Skoda Octavia year 2000 Last change 2013-Oct-11 I bought Haynes manual for a starter. That s something well worth it s cost I believe.
2010 Toyota Prius Fog Light Retrofit
 2010 Toyota Prius Fog Light Retrofit A DIY prospective Last updated: Friday, December 25, 2009 *** Disclaimer Use this document and its contents at your own risk! *** Forward: This document was compiled
Changing the Struts on a WK Jeep CRD
 Changing the Struts on a WK Jeep CRD Step by Step By Chirpz Disclaimer: I do not claim that this procedure is the right way or even the best way to change your struts. This is what I did after reading
BMW 528i E39 Sunroof Repair
 These instructions will help guide you through the repair process for broken sunroof control rails on an E39 chassis. Before I get started, I want to give a shout-out to a couple people who also posted
2001 V70 T5 ETM Removal and Cleaning Directions
 2001 V70 T5 ETM Removal and Cleaning Directions Howard Cheng howardc64@gmail.com 10/24/05 Version 1.4 Read this before you start I performed this ETM cleaning because I had gotten 2 reduced performance
Retro it Steering Column
 Retro it Steering Column INSTALLATION INSTRUCTIONS for 1976-86 CJ5 & CJ7 FOR PART NUMBER S: 1520800010, 1520800020, 1520800051, 1526800010, 1526800020, 1526800051 S I NCE 1986 Instruction # 8000000010
There was some debate whether or not there was a write up, with Pictures, for replacing the ignition switch.
 Replacing the Ignition Switch - Step by Step with Pictures. http://forums.audiworld.com/showthread.php?p=18927576 (Corey 02ALMSTT) (With updates/corrections by Dave F.) February 1, 2013 (I = Corey, mostly)
Installing the Wireless Charging upgrade kit in a 2018 XT5 (Platinum version)
") Installing the Wireless Charging upgrade kit in a 2018 XT5 (Platinum version) September 2, 2018 Tools needed: Wireless charger upgrade kit Plastic trim tools 7 mm nut driver Background: I purchased the
Installing the Wireless Charging upgrade kit in a 2018 XT5 (Platinum version) September 2, 2018 Tools needed: Wireless charger upgrade kit Plastic trim tools 7 mm nut driver Background: I purchased the
The steering column is of a modular construction and features easy to service electrical switches.
 file://c:\tso\tsocache\vdtom_5368\svk~us~en~file=svkb4a01.htm~gen~ref.htm Page 1 of 3 Section 11-04A: Steering Column, Ranger DESCRIPTION AND OPERATION 1997 Ranger Workshop Manual Steering Column NOTE:
Improving the gearshift feel in an SW20.
 Improving the gearshift feel in an SW20. Part one In 3 parts. The SW20 gearshift can be often be greatly improved by eliminating play in the shift linkages, and this article covers three areas that need
Rear Wheel Removal (by BassCliff)
") Rear Wheel Removal (by BassCliff) Hello to my GS riding friends! After picking up a nail in my rear tire (while on the freeway at 75mph!) I thought I would take a few pictures to help illustrate the rear
Rear Wheel Removal (by BassCliff) Hello to my GS riding friends! After picking up a nail in my rear tire (while on the freeway at 75mph!) I thought I would take a few pictures to help illustrate the rear
INSTALLATION INSTRUCTIONS
 INSTALLATION INSTRUCTIONS Accessory Application Publications No. BII 23302 2002 MDX Issue Date PN 08U97-S3V-210 (BLACK) P/N 08U97-S3V-270 (SADDLE) NOV 2001 PARTS LIST Wood trim steering wheel 1. Make sure
Installation Instructions COMPETITION/PLUS SHIFTER Ford Mustang MT82 6-Speed Manual Transmission Catalog#
 Installation Instructions COMPETITION/PLUS SHIFTER 2015-2017 Ford Mustang MT82 6-Speed Manual Transmission Catalog# 3916037 Rev. 00 WORK SAFELY! For maximum safety, perform this installation on a clean,
2007 Crown Victoria Police Interceptor (P71) Blend Door Actuator Replacement (If I did it, you can too.)
 Blend Door Actuator Replacement (If I did it, you can too.)") 2007 Crown Victoria Police Interceptor (P71) Blend Door Actuator Replacement (If I did it, you can too.) I'm not saying this is the only way, or even the right way, but it worked for me. First time I've
2007 Crown Victoria Police Interceptor (P71) Blend Door Actuator Replacement (If I did it, you can too.) I'm not saying this is the only way, or even the right way, but it worked for me. First time I've
Lincoln Mark VII T5 Swap Version submitted by 5.0 bird
 Lincoln Mark VII 1984-1989 T5 Swap Version 20070611 submitted by 5.0 bird I've decided to make an article to assist with the T5 swap for the 84-89 Mark VIIs, since I was just in there because my DOA didn't
 Special Tools Needed: DrVanos.com Stage I Installation Instructions Camshaft locking tool TDC Crank pin Sprocket turning tool Tool rental is available with the purchase of a vanos kit *See website for
DrVanos.com Stage II Installation Instructions. Tool rental is available with the purchase of a vanos kit *See website for more info*
 DrVanos.com Stage II Installation Instructions Special Tools Needed: Camshaft locking tool TDC Crank pin Sprocket turning tool Tool rental is available with the purchase of a vanos kit *See website for
Prerequisites: Shop Manual (recommended) pages 3-9 through 3-13.
 pages 3-9 through 3-13.") Prerequisites: Order your gaskets average about $25.00 bucks X 2 so $50.00 4NK-11193-00-00 Obtain a shim kit (Should have several 265 and 270s) (Some dealers will exchange) Obtain a Valve Bucket Tool YM-33961
Prerequisites: Order your gaskets average about $25.00 bucks X 2 so $50.00 4NK-11193-00-00 Obtain a shim kit (Should have several 265 and 270s) (Some dealers will exchange) Obtain a Valve Bucket Tool YM-33961
Steering Column. Disassembly. 1. Remove instrument panel cover and reinforcement from vehicle as described in this section.
 Page 1 of 14 Section 11-04A: Steering Column, Ranger 1997 Aerostar/Ranger Workshop Manual DISASSEMBLY AND ASSEMBLY Procedure revision date: 05/17/2000 Steering Column Disassembly 1. Remove instrument panel
How to install the Barnett clutch and the stronger Oil Pump Drive Gear
 How to install the Barnett clutch and the stronger Oil Pump Drive Gear Written by WildFred I m from Germany so please excuse my English and the spelling. The following procedure is a combination of the
1995 Mercury Grand Marquis GS
 AIR BAG SYSTEM CAUTION: Read the following safety precautions BEFORE servicing steering columns on vehicles equipped with air bag restraint system. ALWAYS wear safety glasses when servicing vehicle with
This write-up is subject to revision. PM me, eb2143 at tdiclub.com and I will update it if there are inaccuracies, typos, missing information, etc.
 1 A4 Door Switch Replacement, 1.0 Notes on this guide: The following guide is mostly a combination of two write-ups by VgRt6 on Vwvortex.com. Specific threads located here: http://forums.vwvortex.com/showthread.php?1015107
JRSC + BBK Install on SVTF. Neil A. Shah medicnas on focaljet September 2006
 JRSC + BBK Install on SVTF Neil A. Shah medicnas on focaljet September 2006 ECU up here. When removing make sure the smaller bundles of wires don t get wrapped around the bottom edge and break - this almost
There is hence three things you can do - add oil, adjust the temp that the clutch begins to engage, or do both.
 As most of you may be aware, I have been doing a lot of research lately on our cooling system in the 80's including the fact that we have a dead spot on the OEM temp gauge which prompted me to not rely
Slave Cylinder Weep Hole Drilling Procedure
 Slave Cylinder Weep Hole Drilling Procedure Tools Required: T20 Torx Driver T25 Torx Driver T25 Torx Bit with ¼ Ratchet Wrench 4mm Hex Key (Allen wrench) 5mm Hex Key 6mm Hex Key 8mm Hex Key 12mm Hex Key
1967 (Late) and 1968 CORVETTE TELESCOPING STEERING COLUMN DISASSEMBLY & REPAIR INSTRUCTIONS - PAPER #1
 and 1968 CORVETTE TELESCOPING STEERING COLUMN DISASSEMBLY & REPAIR INSTRUCTIONS - PAPER #1") Last Revision: 03SE2012 1967 (Late) and 1968 CORVETTE TELESCOPING STEERING COLUMN DISASSEMBLY & REPAIR INSTRUCTIONS - PAPER #1 Disassembly and Repair Instructions Addressed in this Paper Difficulty Page
Last Revision: 03SE2012 1967 (Late) and 1968 CORVETTE TELESCOPING STEERING COLUMN DISASSEMBLY & REPAIR INSTRUCTIONS - PAPER #1 Disassembly and Repair Instructions Addressed in this Paper Difficulty Page
INSTALLATION INSTRUCTIONS
 INSTALLATION INSTRUCTIONS Accessory TRIM Application 2009 ACCORD 4-DOOR Publications No. AII 40008 Issue Date JULY 2008 PARTS LIST Steering Wheel Trim (Without Navigation) P/N 08Z13-TA0-100 Right steering
Wiring checks below assume the vehicle is in reverse, secured so it won't roll, and key is on so backup lights are illuminated:
 Reverse Lockout Troubleshooting The way that the backup solenoid works is: When the backup lights are lit on your tow vehicle, 12 volt power should come down the blue wire through the trailer connector
FITTING OIL TEMP AND PRESSURE GUAGES
 FITTING OIL TEMP AND PRESSURE GUAGES this guide is of reference to fitting an oil temp and pressure sender/ sensor into a sandwich plate- not the sump plug temp sensor (although it wouldn't be much different
PLEASE READ THROUGH THE WHOLE WRITE UP BEFORE ACTUALLY USING IT!!!!
 JDM power folding mirror switch install into stock USDM harness. By: Greg L., Zeke21 on twinturbo.net PLEASE READ THROUGH THE WHOLE WRITE UP BEFORE ACTUALLY USING IT!!!! This is how I was able to get the
Installation Instructions Jeep CJ-7
 Retrofit Steering Column Installation Instructions 1976-86 Jeep CJ-7 For Part # s 1520800010, 152800020, 1520800051 www.ididitinc.com 610 S. Maumee St., Tecumseh, MI 49286 (517) 424-0577 (517) 424-7293
Installation Instructions Z-Gate Shifter
 Installation Instructions Z-Gate Shifter Part Number 80681 1998, 2001 by B&M Racing and Performance Products The B&M Z-Gate shifter can be used in vehicles equipped with most popular three speed automatic
Last Revision: 03JL2012
 1 Last Revision: 03JL2012 1969 THROUGH 1982 CORVETTE TILT & TELESCOPING STEERING COLUMN DISASSEMBLY & REPAIR INSTRUCTIONS PAPER #3 Disassembly and Repair Instructions Addressed in this Paper Degree of
BMW 3 Series Oxygen Sensor
 1984-1991 BMW 3 Series Oxygen Sensor Replacement Replace an old oxygen sensor on your E30 for better gas mileage. Written By: Andrew Bookholt ifixit CC BY-NC-SA www.ifixit.com Page 1 of 10 INTRODUCTION
what you need to do is hit the taper housing as hard as you can with your hammers AT THE SAME TIME and at a slight angle, what will happen is you
 first things first, get the car on axle stands and the wheels off. Open the bonnet to let more light through to the area in which you'll be working. The following guide shows the passenger side being done
Here's the difference (externally) in the and 04+ bumper and headlights: (00-03 on top, 04 on bottom)
 in the and 04+ bumper and headlights: (00-03 on top, 04 on bottom)") OK guys, I've been meaning to post this for awhile.. well here it goes. I did the '04 front end conversion on my '01 about 4-5 months ago, but then the dealer had to buy the car back for legal reasons.
OK guys, I've been meaning to post this for awhile.. well here it goes. I did the '04 front end conversion on my '01 about 4-5 months ago, but then the dealer had to buy the car back for legal reasons.
Re-building a Caliper
 Re-building a Caliper by Leslie Henson The pistons in the calipers on the 90 are in very poor condition, and although the brakes work ok, it plays on our mind that the pistons are badly corroded, and it
Installation Manual TWM Performance Short Shifter Subaru STi 2008+
 - 1 - Installation Manual TWM Performance Short Shifter Subaru STi 2008+ Please Note: It is preferable to park on a flat surface, as you will have to engage and disengage the hand brake and shift from
STEERING COLUMN - TILT
 STEERING COLUMN - TILT 1994 Toyota Celica 1994 STEERING Toyota - Steering Column - Tilt Wheel Celica DESCRIPTION & OPERATION Tilt steering wheels incorporate a mainshaft, attached by a "U" joint to an
BEW engine timing belt replacement procedure from MOGolf (as demonstrated on a 2004 Jetta).
.") BEW engine timing belt replacement procedure from MOGolf (as demonstrated on a 2004 Jetta). Based on the procedure published by Volkswagen, but modified for the "average" shadetree mechanic. Some special
BEW engine timing belt replacement procedure from MOGolf (as demonstrated on a 2004 Jetta). Based on the procedure published by Volkswagen, but modified for the "average" shadetree mechanic. Some special
HURST COMP/PLUS SHIFTER 2015 Ford Mustang (Getrag MT82 six-speed manual transmission) Catalog # by Hurst Performance
 Catalog # by Hurst Performance") FORM 159 0205 07/15 HURST COMP/PLUS SHIFTER 2015 Ford Mustang (Getrag MT82 six-speed manual transmission) Catalog #391 0205 2015 by Hurst Performance Thank you for purchasing the Hurst Comp/Plus Shifter.
FORM 159 0205 07/15 HURST COMP/PLUS SHIFTER 2015 Ford Mustang (Getrag MT82 six-speed manual transmission) Catalog #391 0205 2015 by Hurst Performance Thank you for purchasing the Hurst Comp/Plus Shifter.
BODY-24, Late Model 944 ( and Newer) Dash Replacement
 Dash Replacement") BODY-24, Late Model 944 (1985.5 and Newer) Dash Replacement Introduction Replacing the dash in a late model 944 is not overly difficult. However, it is very tedious and a lot of patience is required. It's
BODY-24, Late Model 944 (1985.5 and Newer) Dash Replacement Introduction Replacing the dash in a late model 944 is not overly difficult. However, it is very tedious and a lot of patience is required. It's
Converting an A to 12v and Adding Turn Signals Bill Lee
 Converting an A to 12v and Adding Turn Signals Bill Lee Bill@WRLee.com When I bought my 1929 Tudor, it had been restored about 20 years earlier. It had halogens and had been converted to 12v negative ground,
Wiper Transmission Repair Charles Bernhardt
 Wiper Transmission Repair Charles Bernhardt When I purchased this '59 Corvette most of the parts were in boxes. The wiper transmissions were one of the first parts that I decided to look at to see if they
BADEN'S BMW DIY #7 E46 Shock and Strut Replacement
 - Baden's Car Pages web site - http://www.badenscarpages.ca - DIY #7 E46 Shock and Strut Replacement Posted By Baden On February 15, 2010 @ 1:38 PM In E46 39 Comments BADEN'S BMW DIY #7 E46 Shock and Strut
Deuce/Ace Installation Instructions
 HARDWARE KIT: Upper Mounting Plate: 2-7/16" (11mm) X 3.5" bolts 2-7/16" flange nuts 2-2" spacers 2-7/16" trim cap mounting washers 2 - plastic trim caps TOOLS NEEDED: safety glasses wrenches 16mm or 5/8"
JDM B16 & OBD0 HONDA DISTRIBUTOR REPAIR
 PDF Built By: tonyguns Source: Honda Tech JDM B16 & OBD0 HONDA DISTRIBUTOR REPAIR There are two things you should be checking before you begin. First, check the condition of the wiring harness. Pay close
Z-Gate Universal Shifter
 Installation Instructions Z-Gate Universal Shifter Fits: GM, Ford, Lincoln and Chrysler Transmissions See Application Guide for Specific Applications Part #80681 Rev 06/01/2018 WORK SAFELY! For maximum
Tools needed: Here is a pic of the shift kit I used. It is a Transgo brand and as you can see, it just a bag full of springs and one valve.
 Before installing a shift kit, be sure the transmission is in good operating order. If your transmission is making noises, slipping, shifting bad or the fluid looks brown or smells burnt, take the transmission
Last Revision: 15OC THROUGH 1982 CORVETTE TILT & TELESCOPING STEERING COLUMN DISASSEMBLY & REPAIR INSTRUCTIONS PAPER #1
 Last Revision: 15OC2013 1969 THROUGH 1982 CORVETTE TILT & TELESCOPING STEERING COLUMN DISASSEMBLY & REPAIR INSTRUCTIONS PAPER #1 Disassembly and Repair Instructions Addressed in this Paper Difficulty Page
Door Panel Removal & Window Stop Adjustment
 Door Panel Removal & Window Stop Adjustment By: Jeff Wolford Disclaimer: This is simply an article of how I fixed my car. I m not responsible if you break, scratch, or mess up anything following my example.
Detroit Speed, Inc. Electric Headlight Door Kit Corvette P/N: &
 Detroit Speed, Inc. Electric Headlight Door Kit 1968-82 Corvette P/N: 122006 & 122007 The Detroit Speed Inc. Electric Headlight Door Kit replaces the stock vacuum actuated system on all 1968-82 Corvettes.
This is a hobby website dedicated to the Kawasaki KLR650 motorcycle. I make no claim concerning the
 KLR650 Homepage Contact Me You must remove the "REMOVE-THIS" in my email address for it to work. This is a hobby website dedicated to the Kawasaki KLR650 motorcycle. I make no claim concerning the accuracy
Installation Manual TWM Performance Kia Forte Short Shifter
 Installation Manual TWM Performance Kia Forte 2009+ Short Shifter Begin the installation by parking on a flat surface, as you will have to engage and disengage the hand brake and shift from gears to neutral.
Porsche 911 Gear and Pod Odometer Repair
 www.odometergears.com Porsche 911 Gear and Pod Odometer Repair http://efinnegan.com/porsche/repair%20maintenance%20and%20miscellaneous%20info/odometer-rebuild.htm http://p-car.com/diy/odometer/ *************************************************************************************************
Peugeot 406 Coupe: Delocking your boot V.1 April 2005
 This is a first stab at a DIY guide to de-locking your 406 Coupe. It isn t a hard modification to do yourself, but you do need to be confident working on your cars electrics and removing and refitting
Fanatec GT3RS V1 to GT3RS V2 Tutorial
 Fanatec GT3RS V1 to GT3RS V2 Tutorial by Roy Visser 1 How to update your Fanatec GT3RS V1 wheel to a GT3RS V2 wheel Welcome to this guided and detailed tutorial for upgrading your Fanatec GT3RS V1 wheel
Shay - Painting The Trucks & Frames
 Shay - Painting The Trucks & Frames Nelson Riedel Nelson@NelsonsLocomotive.com Initial:2/23/04 Last Revised: 06/06/2004 Painting of the locomotive trucks and frame are described in this page. The tender
HOW TO REPLACE THE SPOILER ON YOUR GEN 3 PRIUS
 HOW TO REPLACE THE SPOILER ON YOUR GEN 3 PRIUS Yup, it happened. The spoiler on your beloved Prius has departed this earth and now is in the great junkyard in the sky. This is how you make it all better
 Page 1 of 14 This install requires work on your supplemental restraint system and could cause injury or damage to your car. If you are not comfortable performing the steps detailed here then do not attempt
STEERING COLUMN SWITCHES
 STEERING COLUMN SWITCHES 1998 Pontiac Bonneville 1998 ACCESSORIES & EQUIPMENT General Motors Corp. - Steering Column Switches Buick; LeSabre Oldsmobile; Eighty Eight, LSS & Regency Pontiac; Bonneville
1967 (Late) CORVETTE STANDARD (NON-ADJUSTABLE) STEERING COLUMN DISASSEMBLY & REPAIR INSTRUCTIONS PAPER #2
 CORVETTE STANDARD (NON-ADJUSTABLE) STEERING COLUMN DISASSEMBLY & REPAIR INSTRUCTIONS PAPER #2") Last Revision: 03SE2012 1967 (Late) - 1968 CORVETTE STANDARD (NON-ADJUSTABLE) STEERING COLUMN DISASSEMBLY & REPAIR INSTRUCTIONS PAPER #2 Disassembly and Repair Instructions Addressed in this Paper Degree
Last Revision: 03SE2012 1967 (Late) - 1968 CORVETTE STANDARD (NON-ADJUSTABLE) STEERING COLUMN DISASSEMBLY & REPAIR INSTRUCTIONS PAPER #2 Disassembly and Repair Instructions Addressed in this Paper Degree
Presented at GMC Motorhomes International Fall Convention 9/28/06. By Richard Sowers
 Presented at GMC Motorhomes International Fall Convention 9/28/06 By Richard Sowers Tools needed to work on the column In addition to the normal tools for such a job as this, some special ones are required:
Replacing the Batteries on an Acorn 180 or Bison 80 Stairlift
 Replacing the Batteries on an Acorn 180 or Bison 80 Stairlift Remove the front cover by unscrewing the two philips screws and removing them. Find the two long batteries on either side of the circuit board.
Air Compressor/Water Pump III - Making the Steam Valves
 Page 1 of 14 Air Compressor/Water Pump Part III Making the Steam Valves Nelson Riedel Nelson@NelsonsLocomotive.com Initial: 1/09/04 Last Revised: 0 The cylinders pistons and water valves were completed
Ford Super Duty Dash Lighting LED Upgrade F250 4x4 XLT Sport Crew Cab
 Page 1 of 32 Ford Super Duty Dash Lighting LED Upgrade 2004 F250 4x4 XLT Sport Crew Cab Back to 2004 F250 Main Page Click Here for a PDF version of this article ** Updated 12/15/09 ** New version of the
At Mark's suggestion I thought I'd write this up so future Coupe lovers can have as much fun* as I did with this job.
 At Mark's suggestion I thought I'd write this up so future Coupe lovers can have as much fun* as I did with this job. My enormous thanks to forum members, particularly glorfindel, for their advice when
Retrofit Steering Column
 Retrofit Steering Column INSTALLATION INSTRUCTIONS for 1970-75 Camaro FOR PART NUMBER S: 1620860010, 1620860020, 1620860051, 1626860010, 1626860020, 1626860051 S INCE 1986 www.ididitinc.com 610 S. Maumee
Disco 3 Clock Spring / Rotary Coupler replacement
 Disco 3 Clock Spring / Rotary Coupler replacement I recently had to change my Clock spring and thought some folks may find it helpful to see what it entailed. I did lots of reading around but couldn t
G.A.S. M54 DISA Repair Kit D.I.Y. Instructions
 Home BMW Solutions Porsche Solutions DIY Tech Engine Services Dyno Services Machining About G.A.S. Contact G.A.S. M54 DISA Repair Kit D.I.Y. Instructions The installation of the German Auto Solutions DISA
1999 BMW K1200 LT: Plastic Removal
 1999 BMW K1200 LT: Plastic Removal Well, it had to happen. While removing the plastic that covers the handle bars to see where to route power for GPS and/or radar detector the tip of the torx driver fell
W123 Transmission Vacuum Modulator Adjustment DIY - measure it the 'right' way
 W123 Transmission Vacuum Modulator Adjustment DIY - measure it the 'right' way Why do you need to do this?: You need to do this to properly check the internal hydraulic pressure of the transmission, either
Tools & Parts I Used. Here's everything that comes with the kit.
 Ford Super Duty Power Tailgate Lock Install 2004 F250 4x4 XLT Sport Crew Cab Back to 2004 F250 Main Page This page describes the steps to install the Pop & Lock PL8250 power tailgate lock kit. This kit
Installation Instructions INDY SHIFTER Fits: Mustang Fastback & Convertible with MT-82 Transmission Catalog #
 Installation Instructions INDY SHIFTER Fits: 2015-2018 Mustang Fastback & Convertible with MT-82 Transmission Catalog # 3916036 Watch our installation video on YouTube WORK SAFELY! For maximum safety,
BMW E61 Hydraulic Pump replacement instructions
 BMW E61 Hydraulic Pump replacement instructions This DIY will guide you through the tasks needed to successfully replace your defective tailgate hydraulic pump Difficulty 3 of 10. The most difficult part
Ford Racing BOSS 302 Engine Oil Cooler (11-14 GT)
") Tools needed: 14mm hex socket 7mm socket/wrench 8mm socket/wrench Ford Racing BOSS 302 Engine Oil Cooler (11-14 GT) 10mm socket (for airbox removal) ¾ inch or 19mm wrench Torque wrench Appropriate ratchets
Tools needed: 14mm hex socket 7mm socket/wrench 8mm socket/wrench Ford Racing BOSS 302 Engine Oil Cooler (11-14 GT) 10mm socket (for airbox removal) ¾ inch or 19mm wrench Torque wrench Appropriate ratchets
upper and lower ball joints ( I went with Moog from rockauto.com): two K80026 and two K8607T
: two K80026 and two K8607T") Parts required: two 5C3Z*4A322*AA = hub / steering knuckle o-ring two AC3Z*1S175*A = updated axle shaft "dust seal" two 5C3Z*3254*A = steering knuckle / axle shaft seal upper and lower ball joints ( I
Parts required: two 5C3Z*4A322*AA = hub / steering knuckle o-ring two AC3Z*1S175*A = updated axle shaft "dust seal" two 5C3Z*3254*A = steering knuckle / axle shaft seal upper and lower ball joints ( I
RedlineGoods Tacoma Installation Manual
 RedlineGoods 2016+ Tacoma Installation Manual AUTOMATIC SHIFT BOOT AND EBRAKE BOOT Press down on the factory shift boot collar to disconnect it from the shift knob. Unscrew shift knob Pull up on the rear
Timing the 9N/2N Steering Sector Gears
 Timing the 9N/2N Steering Sector Gears by John Korschot - www.johnsoldiron.com (May 2010) The procedure for timing a set of steering gears in the 9/2n tractors is published in the I&T FO4 shop manual.
Last Revision: 30JN THRU 1979 C3 CORVETTE STANDARD (NON-ADJUSTABLE) STEERING COLUMN DISASSEMBLY & REPAIR INSTRUCTIONS PAPER #2
 STEERING COLUMN DISASSEMBLY & REPAIR INSTRUCTIONS PAPER #2") Last Revision: 30JN2007 1969 THRU 1979 C3 CORVETTE STANDARD (NON-ADJUSTABLE) STEERING COLUMN DISASSEMBLY & REPAIR INSTRUCTIONS PAPER #2 Disassembly and Repair Instructions Addressed in this Paper Degree
Last Revision: 30JN2007 1969 THRU 1979 C3 CORVETTE STANDARD (NON-ADJUSTABLE) STEERING COLUMN DISASSEMBLY & REPAIR INSTRUCTIONS PAPER #2 Disassembly and Repair Instructions Addressed in this Paper Degree
2008 Toyota Tundra 4WD Brake Job: A Quick Job and Even Quicker Write-Up.
 FRONT BRAKES: 2008 Toyota Tundra 4WD Brake Job: A Quick Job and Even Quicker Write-Up. 1. Remove this bolt holding brake line bracket to the suspension. 2. I had to replace all 4 rotors at 60K miles, so
Installation Instructions QUICKSILVER CONSOLE SHIFTER Fits: Chevelle / El Camino
 WORK SAFELY! For maximum safety, perform this installation on a clean, level surface and with the engine turned off. Place blocks or wedges in front of and behind both rear wheels to prevent movement in
Last Revision: 07SE2009
 Last Revision: 07SE2009 1967 (Late) and 1968 CORVETTE STANDARD (NON-ADJUSTABLE) STEERING COLUMN DISASSEMBLY & REPAIR INSTRUCTIONS PAPER #1 Disassembly and Repair Instructions Addressed in this Paper Difficulty
INSTALLATION INSTRUCTIONS
 COLD AIR INTAKE INSTALLATION INSTRUCTIONS PART NUMBER D760-0390C APPLICATION: 1999-2003 E39 M5 PARTS LIST 1 Left Aluminum Intake Tube 1 Air Pump Bracket (A) 1 Right Aluminum Intake Tube 1 Air Pump Bracket
Ford AOD-4R70W-AODE Cable Operated Shifter Installation Instructions
 Ford AOD-4R70W-AODE Cable Operated Shifter Installation Instructions Building American Quality With A Lifetime Warranty! TOLL FREE 1-877-469-7440 tech@lokar.com www.lokar.com Ford AOD-4R70W-AODE Cable
Seadoo Supercharger Removal Guide RXP
 Seadoo Supercharger Removal Guide RXP RXT, RXT X, RXP X and GTX models are very similar and Removal and Installation is similar. The Ceramic washers installed by the OE manufacturer do not completely disintegrate