BADEN'S BMW DIY #7 E46 Shock and Strut Replacement
|
|
|
- Maude Fitzgerald
- 5 years ago
- Views:
Transcription
1 - Baden's Car Pages web site DIY #7 E46 Shock and Strut Replacement Posted By Baden On February 15, 1:38 PM In E46 39 Comments BADEN'S BMW DIY #7 E46 Shock and Strut Replacement
2 Repair Job Summary Difficulty 3 (out of 5) Removing the springs from the front struts is Time to Complete (estimate) 6 hours really the biggest challenge Make sure that you re-assemble the stack of washers correctly when putting together the new struts IMPORTANT SAFETY INFORMATION Working on and under your car has inherent dangers. If you perform the work described here, be prepared to deal with problems which may arise that are not documented in these steps. Some of these problems may require tools which are not listed here or be beyond your skill level and almost always take longer to resolve than expected. Plan for the possibility that you car may need additional time to restore to working condition. Caution must be taken to properly secure your car when working underneath it to avoid injury (or death). WORKING ON YOU CAR'S SUSPENSION IS PARTICULARLY IMPORTANT AS IT CAN ADVERSELY AFFECT THE SAFE OPERATION OF YOUR CAR IF DONE IMPROPERLY. Before starting, you will need to assemble some tools and supplies:
 D. Bilstein HD rear shocks (with new upper lock nuts and washers for lower bolt) E. Shock mounts F.")
3 A. Bilstein HD struts (with new upper strut lock nuts) B. Upper strut bearings (optional depending on your car's mileage) C. Upper and lower rubber spring pads (optional depending on your car's mileage) D. Bilstein HD rear shocks (with new upper lock nuts and washers for lower bolt) E. Shock mounts F. Rear shock mount reinforcement plates G. Rear shock gaskets Not shown: New lock nuts for (E) shock mounts. 4 in total M8 metric size locking nuts available from Home Depot. Floor jack and two jack stands (having a second floor jack is often very helpful) Wheel chocks Socket set (metric, ½ ) with at least 13mm, 16mm, 18mm, 21mm and 22mm sockets Wrench set (metric) with at least a 17mm wrench 6mm hex socket Torque wrenches (½ size, small and large size to span 24 to 110 Nm) Vise grip Spring compressors Dead blow or rubber mallet

4 Impact wrench (highly recommended) or long breaker bar (at least 24 ) Brake cleaner + clean rags NOTE: While it is technically possible to install both the front struts and rear shocks by yourself, I have found that having a second pair of hands to be really helpful. Section 1: Rear Shock Installation The rear shocks in a E46 coupe are installed with one bolt at the bottom underneath the car and with two bolts at the top. The upper shock mounts are located inside the trunk so the carpeting and some of the trim pieces will need to be removed to be able to access the shock mounts. I have found that the lower shock bolts can be easily removed without needing to jack up the car but one the lower bolt is removed and the shock extends it may not be possible to remove it from under the car unless you jack up that side a few inches. Place wheel chocks on the front tires to prevent it from rolling. Release the hand brake. Remove the carpet and trim pieces in the trunk enough to expose the left and right upper shock mounts.

 an impact wrench if you have one.")
5 Using a 13mm socket, remove the two nuts on each side of the shock mount. Using an 18mm socket, remove the lower shock mounting bolt. Depending on the age of your car, removing this lower mounting bolt may require a breaker bar or (preferably) an impact wrench if you have one. When you remove the lower mounting bolt, the shock will drop to the ground.

6 Try and manoeuvrer the shock out from under the car. Due to the length of the shock, this this may not be possible until that side of the car is raised a few inches which may provide the clearance needed to remove the shock. Ensure that the original paper gasket is intact on the top of the old shock mount. If it's not, part or all of it may be stuck to the bottom of the shock mount opening into your trunk. Ensure that all of the original shock mount gasket has been removed before proceeding. Repeat on the other side to remove the old shock. The new Bilstein HD shocks will need to have some parts scavenged from the existing shocks so you will need to remove the 16mm top nut on the old shocks to remove these parts. You will need to remove four pieces from the old shocks: the bump stop and 3 metal washers. Using one of the new upper shock mounts and a new gasket, assemble the parts onto the metal shaft of the new Bilstein shock as follows:
7 Tighten the nut on the top of the Bilstein shock to 27 Nm. Place the strut mount reinforcement plate over the shock mounts. Working from the bottom of the car but looking at the exposed shock mount opening at the top of the rear tire, guide the assembled Bilstein shock into place. Hand tighten the two 13mm nuts. Remember to only use new lock nuts.


8 Lower the car to the ground before proceeding. Add the supplied washer to the lower shock mount bolt. As necessary, raise the bottom of the shock by hand or with a jack to align the lower shock mount bolt to the mounting bracket then hand thread the bolt as far as it will go.


9 Tighten the lower shock mount bolts to 100 Nm. Tighten the two 13mm upper strut mount nuts to 27 Nm.

10 Repeat on the other side of the car. Section 2: Front Strut Installation Removing and installing the front struts is considerably more work than working on the rear shocks. Not only is the removal and installation procedure more complicated but the front struts involve springs which must be removed from the original struts to be moved over the the new ones. This requires the use of a spring compressor and adds time and unique risks to the overall job. Place wheel chocks on the rear tires to prevent it from rolling. Loosen the bolts on both of the front wheels. Jack up the front of the car and place both sides of the car securely on jack stands. The car should be high enough so that you should have enough room to crawl under the front of the car easily. Remove the front wheels from both sides. Start on the passenger side, remove the 13mm nut from the bottom of the control arm to release the Xenon levelling switch. To fully release it from the control arm, it may need to be gently struck with a small hammer.

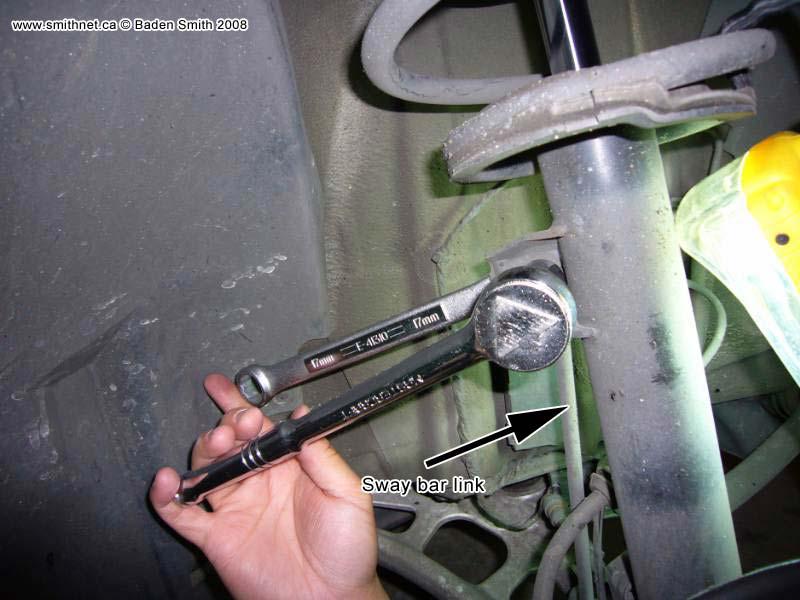
11 Disconnect the top of the sway bar link from the strut. This requires a 17mm wrench and a 16mm socket to be used at the same time. Rotate the sway bar link out of the way.
12

13 Remove the brake line and ABS sensor line from the clamp on the side of the strut. They are just held in place with a rubber grommet so the can both be released fairly easily by pushing on both sides of the hose at the bracket. On the driver's side, there will also be the brake sensor cable as well.

14 Remove two of the three 13mm nuts at the top of the strut tower. Loosen the third nut about half way.

15 Place a jack under the bottom of the ball joint. This will support the hub assembly when it is released from the bottom of the strut.

16 The bottom of the strut is held in place with a single 18mm bolt at the lower clamp. Remove this bolt. Removing this bolt may take some effort and you may need to employ a breaker bar or an impact wrench if you have one.

17 Have a large paint can ready covered with a cloth. This can be placed under the hub to support it on the outer side when the strut is removed.

18 Pushing down on the rotor or hub, attempt to disengage the strut from the strut clamp lowing the jack as necessary. I found that using a rubber dead blow hammer was useful in separating the strut from the clamp. If the strut doesn't want to release, try using some penetrating oil like WD40 and let it sit for a few minutes. Rotating the strut assembly by hand at the springs to ensure that it is loosed properly. Note: Make sure that you avoid getting any lubricant onto your brake rotor or pads. Also, you may wish to employ the use of a strut clamp spreader tool [1] to assist with the task of removing the strut from the clamp.

19 After the strut has been removed from the lower clamp, remove the final 13mm bolt at the top and remove the strut/spring assembly. Remove any penetrating oil from the bottom of the strut clamp and the surrounding area using a clean rag. Remove the upper plastic cap from the strut. Using spring compressors, compress the spring until the spring moves freely from the upper plate. Note: The springs are held in place with a lot of force and extreme caution must be taken when removing the strut springs.

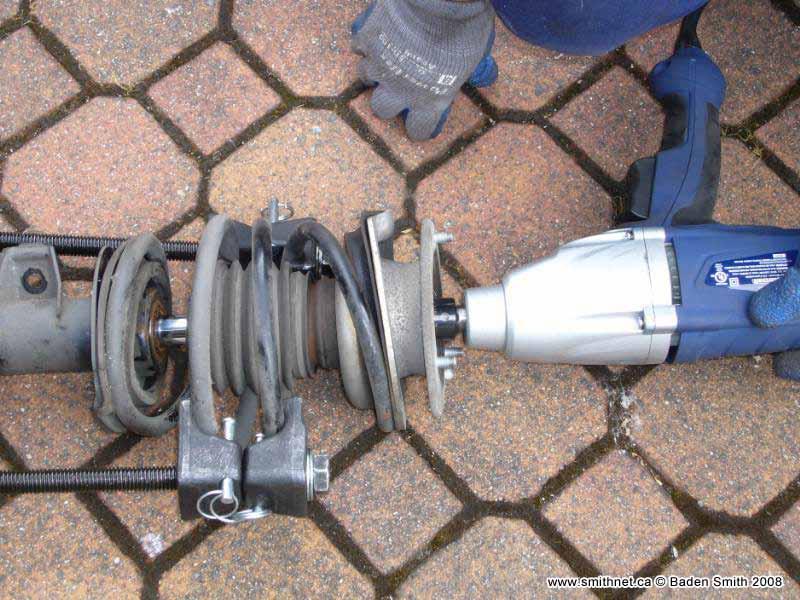
20 The top of the stock strut has a 21mm bolt that holds everything together. Remove this bolt. I have found that having an impact wrench makes this step extremely easy. If you don't have an impact wrench, you will have to use a 21mm socket held in place by a vise grip and a 6mm hex socket or hex key. Using this method, the 21mm socket will remain stationary and the hex socket will rotate in a clockwise manner to loosen the bolt.
21

22 After the top strut bolt has been removed, the entire strut assembly can be taken apart. Recover the the following parts from the original strut: spring, 2 washers, upper and lower spring plate, upper and lower rubber spring pads (if re-using), upper strut bearing plate (if re-using).

23 Choose the correct left or right Bilstein strut assembly depending on which side you are working on. Compare the orientation of the sway bar mounting bracket to determine which one is left or right. Assemble the parts onto your new Bilstein strut assembly as follows:
24

25 The Bilstein strut will come with a new 22mm self-locking top bolt. Attach this to the top of the strut and hand tighten with a socket wrench. Start releasing the spring compressor and ensure that the spring properly seats into the rubber spring pads and that the rubber spring pads are properly seated into the strut assembly. If the parts do not line up properly, you will need to compress the springs again and adjust. Tighten the top strut bolt to 63 Nm. The Bilstein strut will now be reinstalled back into the car. To do this, attach the strut onto the strut tower with one or two bolts tightened by hand. Ensure that the alignment pin from the upper strut bearing plate is correctly aligned with the hole in the strut tower. Manoeuvrer the bottom of the strut into the lower clamp and if necessary, jack up the bottom of the hub assembly until the strut is fully seated into the clamp. Add loc-tite (or similar material) to the clamp bolt and hand thread it into the clamp. Rotate the strut to ensure that the Left/Right indicator on the strut shaft is lined up with the slot on the clamp. Once the strut is aligned properly to the Left or Right marker (depending on which side of the car you're working on), start to tighten the clamp bolt ensuring that the bracket for the hoses is not touching the strut body.

26 Tighten the clamp bolt to 80 Nm. Hand tighten all three of the upper strut mounting bolts. Replace the hoses to the hose clamp. Replace the sway bar link and tighten to 65 Nm. Replace the bolt to the Xenon sensor at the bottom of the control arm. If the brake rotor has been touched in any way, clean the rotor with brake cleaner and a clean cloth. Remove any supports like the jack or paint can out from the hub assembly. Reinstall the wheel and tighten the wheel bolts to 110 Nm. Repeat the removal / installation process on the other side of the car. Remove the jack stands from the car and lower the car. Remove the wheel chocks. Tighten the three 13mm upper strut tower bolts to 24 Nm on each side of the car. This step should be done when the weight of the car is on the suspension. Road test the car to ensure that there are not any unusual new noises. Try to drive over some speed bumps or railway tracks as sometimes unusual suspension noises may not be heard on smooth roads. Clean up your tools. Your car will be needing a 4 wheel alignment. I have found that I like to drive the car for a week or so before getting an alignment to ensure that everything has settled in properly. Section 3: Commentary The installation job that I've documented here was done on my friend Al's E last weekend. About a month ago I also did a similar Bilstein HD strut/shock upgrade on my wife's E Cabrio. Doing two similar installations fairly close together allowed us to learn a lot about what would make the 2nd installation faster. The E36 front struts were considerably more difficult to remove as there are three bolts that need to be removed on both sides and they are all stuck on with a lock-tite material that took several additional
27 hours to remove. It was after we did this work that I decided to purchase an impact wrench (bought an electric impact wrench from Canadian Tire). Having the impact wrench made removing all of the hardware on Al's E46 much easier. I'm just surprised that it took me so long to get one. Of course you have to also get a bunch of impact sockets as you can't use the chrome sockets on an impact wrench. When we were planning out the work on Al's 328, we decided to replace the front rubber spring pads and the upper strut bearing. Al had mentioned that there was some weird noises coming from the front suspension when steering so we decided to add these parts. Realistically it may not be practical to disassemble your suspension and then decide if you want to replace these parts unless you can afford to keep your car in the garage for a few days (assuming that your BMW parts supplier isn't accessible on the day that you do the work). Comments from my friend Al: Background: Al wanted to add some comments to this page based on his perspective. Al's owned his E coupe for several years but traditionally has relied on a local garage who specialize in BMW (Nixon Automotive) for all of his repairs and upgrades. When Al and I were planning out the purchase of the Bilstein HD struts and shocks for his E46 and my wife's E36, Al expressed a lot of interest in doing both installations together. Since he really hadn't done a lot of work on his car it was the starting point for him to get a sense of how much work he would eventually want to do maintaining his car. Al's situation is pretty common with most people who are interested in doing more and more advanced work on their car. He has the desire to do more work but is limited by the tools that he owns and his own limited hand-on experience. If he continues down the do-it-yourself road, Al will likely end up owning several hundreds (if not thousands) of dollars in tools that most of us own to be able to do more of these types of upgrades. The main decision that always has to be faced at this point is if the investment in more and more expensive tools makes sense based on the likelihood of them being used to offset future repair costs. As always, the issue of availability of time and more importantly the desire to want to do the work has to be assessed. Al s comments: The Bentley manual (Baden: which Al bought for his car about two weeks before we did the Bilstein installation on his car) assumes that you have a reasonable level of familiarity with working on cars. Most of the steps leave out a lot of detail that you have to fill in the blanks with your past experience. I don't think a beginner like myself could buy the manual and tools and begin working on the car. If I did not have Baden's assistance the project would have been a disaster. If you want to take on projects like this you have to commit to the long term and many projects for the investment in the tools needed for this kind of upgrade to make financially sense (Baden: I should mention that Al s an accountant ). The investment in tools is significant and if you only do one job and then take your car to the dealer for everything else you won't really save any money after you factor in tools, manuals, etc.
28 With the new Bilsteins installed, the car feels more comfortable as the stock shocks were not working anywhere near where they should be. I'm not crashing over bumps anymore and I'm no longer getting unwanted steering changes after I hit a bump. I have not had an opportunity to really push the car but I expect it will handle better at the limit. Just driving around town you can't tell any performance benefit other than the comfort is greater. Having said that I expect my autocross times should improve. Many thanks to Nixon Automotive who provided some consultation over the phone for free (I take my car there a fair bit) and who even checked over the work we did to ensure it was done properly. I also took the car to them about 5 days after we did the Bilstein upgrade and they did the four wheel alignment. I'm satisfied enough that I'm willing to try a brake job next, which I think should be easier and I'm looking forward to doing the shocks and struts on Baden s M Roadster. I think that will be a gratifying job given our experience with the other cars. Note: Duplication of or linking to the information on this web page without permission is not allowed. To contact me about this or for any other questions, use this form [2] Article printed from Baden's Car Pages web site: URL to article: URLs in this post: [1] strut clamp spreader tool: [2] use this form: Copyright Baden's Car Pages web site. All rights reserved.
The following information shows the steps to change the rear brake pads and rotors on an E36 chassis.
 1 of 20 1/18/2010 9:15 PM See More DIY Articles Bookmark Site! The following information shows the steps to change the rear brake pads and rotors on an E36 chassis. Disclaimer: The following information
Front Suspension Redo
 Front Suspension Redo Message: First, thanks to all the previous posters for guidance in my doing the suspension. As thanks, here s the updated document for doing the front suspension. Procedure: While
COBB SPORT SPRINGS
 915760 - COBB SPORT SPRINGS 2008-2013 Subaru WRX/STi Congratulations on your purchase of the COBB Sport Springs for your 2008-2013 Subaru WRX/STi. The following instructions will assist you through your
COBB WRX Sports Springs West 1820 South Salt Lake City, UT USA (801)
") COBB 3362 West 1820 South Salt Lake City, UT 84104 USA (801) 713-0035 2008 WRX Sports Springs Congratulations on your purchase of the COBB Sports Springs. The following instructions should assist you through
COBB 3362 West 1820 South Salt Lake City, UT 84104 USA (801) 713-0035 2008 WRX Sports Springs Congratulations on your purchase of the COBB Sports Springs. The following instructions should assist you through
Eibach Pro-System-Plus
 Eibach Pro-System-Plus Tools : - Floor Jack - 3 Jack Stands (4 preferred) - 2 wheel stoppers - Car wrench set - Fire torch - Bolt thread locker (use on every bolt you tight) Disclaimer: This guide is not
Maximum Motorsports Camber Caster Plates (05-10):
:") Maximum Motorsports Camber Caster Plates (05-10): Tools Required: Lug Wrench 21mm Deep Socket 18mm Deep Socket 15mm Deep Socket 17mm Socket 13mm Socket 10mm Socket Torque Wrench (requires 166lb-ft capacity
Maximum Motorsports Camber Caster Plates (05-10): Tools Required: Lug Wrench 21mm Deep Socket 18mm Deep Socket 15mm Deep Socket 17mm Socket 13mm Socket 10mm Socket Torque Wrench (requires 166lb-ft capacity
Brake Caliper Rebuild - Part Numbers & Tips Per Jim Millet, 3/15/2005
 Per Jim Millet, 3/15/2005 Not too difficult a job. Rears are easier than fronts to access. You ll need the following gasket sets: Front caliper gasket set, P/N 34 11 1 157 037, MSRP $13.58 Rear caliper
SUSP-09, Rear Wheel Bearing Replacement - Steel Trailing Arm. Acrobat Printable Version
 SUSP-09, Rear Wheel Bearing Replacement - Steel Trailing Arm Introduction Acrobat Printable Version I'd like to thank Ben Davis for providing the pictures for this procedure. Ben took the time to take
RHINO SUSPENSION SYSTEM INSTALLATION INSTRUCTIONS
 PARTS INCLUDED: 2 FRONT UPPER A-ARMS 2 FRONT LOWER A-ARMS 2 UNI-BALL JOINTS 2 UNI-BALL JOINT STUDS 2 UNI-BALL JOINT CAPS 2 RETAINING RINGS 1 FRONT SHOCK ASSEM. 2 DELRON STEERING STOPS 2 SHOCK MOUNT SPACERS
Changing the Struts on a WK Jeep CRD
 Changing the Struts on a WK Jeep CRD Step by Step By Chirpz Disclaimer: I do not claim that this procedure is the right way or even the best way to change your struts. This is what I did after reading
 Installing Seat Belts in my Tudor August 2009 My '29 Tudor was restored about 25 years ago by my brother-in-law. He restored it to close to original, but made a few changes that many will claim are for
Fox 2.0 Adjustable Coilovers (Par# ) Installation on a 2013 F-150 (2WD)
 Installation on a 2013 F-150 (2WD)") Fox 2.0 Adjustable Coilovers (Par# 983-02-052-2) Installation on a 2013 F-150 (2WD) This guide is for the install of the Fox 2.0 adjustable leveling struts on a 2013 F-150 2WD, these are being installed
Fox 2.0 Adjustable Coilovers (Par# 983-02-052-2) Installation on a 2013 F-150 (2WD) This guide is for the install of the Fox 2.0 adjustable leveling struts on a 2013 F-150 2WD, these are being installed
Rear Wheel Removal (by BassCliff)
") Rear Wheel Removal (by BassCliff) Hello to my GS riding friends! After picking up a nail in my rear tire (while on the freeway at 75mph!) I thought I would take a few pictures to help illustrate the rear
Rear Wheel Removal (by BassCliff) Hello to my GS riding friends! After picking up a nail in my rear tire (while on the freeway at 75mph!) I thought I would take a few pictures to help illustrate the rear
STEP #1: Remove the wheels from the truck. There are (6) 21mm lug nuts holding each wheel on... Remember Lefty Loosy, Righty Tighty.
 21mm lug nuts holding each wheel on... Remember Lefty Loosy, Righty Tighty.") - CustomTacos.com Page 1 of 36 How-To: Toytec Lift Install Read all of these install instructions prior to installing Toytec's suspension lift. I cannot be held responsible for any damages or personal
- CustomTacos.com Page 1 of 36 How-To: Toytec Lift Install Read all of these install instructions prior to installing Toytec's suspension lift. I cannot be held responsible for any damages or personal
COBB SPORT SPRINGS
 913760 - COBB SPORT SPRINGS 2004-2007 Subaru WRX/STi Congratulations on your purchase of the COBB Sport Springs for your 2004-2007 Subaru WRX/STi. The following instructions will assist you through your
Product: Variable Height Spring. Part Numbers: N. Applications: BMW F8x, M2/M3/M
 Product: Variable Height Spring Part Numbers: 415-503001-N Applications: BMW F8x, M2/M3/M4 2014-17 Contents in the box: Qty Part # Description 1 00P-0A1646-B Front Passenger Sleeve Assembly 1 00P-0A1645-N
Installation Instructions for BMR Lowering Springs Performance ( Mustang GT)
") Installation Instructions for BMR Lowering Springs Performance (2015-2017 Mustang GT) Time Required: 3+ hours Notes: This install was done with the performance springs from BMR, but install should be the
Installation Instructions for BMR Lowering Springs Performance (2015-2017 Mustang GT) Time Required: 3+ hours Notes: This install was done with the performance springs from BMR, but install should be the
2001 V70 T5 ETM Removal and Cleaning Directions
 2001 V70 T5 ETM Removal and Cleaning Directions Howard Cheng howardc64@gmail.com 10/24/05 Version 1.4 Read this before you start I performed this ETM cleaning because I had gotten 2 reduced performance
BMW 745Li E65/E66 Rear Brake Pad Replacement By Jerry Incollingo (Jerry 745Li)
") Page 1 of 11 BMW 745Li E65/E66 Rear Brake Pad Replacement By Jerry Incollingo (Jerry 745Li) This guide will detail how to change the rear brakes on late model BMW E65 / E66 s. It was performed on a 2003
Page 1 of 11 BMW 745Li E65/E66 Rear Brake Pad Replacement By Jerry Incollingo (Jerry 745Li) This guide will detail how to change the rear brakes on late model BMW E65 / E66 s. It was performed on a 2003
Replace clutch and flywheel * (Volkswagen Sharan 2010-Present)
") Replace clutch and flywheel * (Volkswagen Sharan 2010-Present) *Caution! This instructions are created by random users and must be used as a reference only! Please, take all safety precautions, and if
Replace clutch and flywheel * (Volkswagen Sharan 2010-Present) *Caution! This instructions are created by random users and must be used as a reference only! Please, take all safety precautions, and if
WARNING: Only perform this installation if you are experienced, fully equipped mechanic.
 DYNATRAC V3.2 2005-Present Ford Super Duty 250/350-4x4, Front Axle, Free Spin Conversion Kit Some of the less common tools, which will be required: 6 point Spanner socket (OTC #7090-A or equivalent). These
INSTALLATION INSTRUCTIONS 88029
 INSTALLATION INSTRUCTIONS 88029 FOR SUSPENSION SYSTEMS RS6503: JEEP WRANGLER (TJ) READ ALL INSTRUCTIONS THOROUGHLY FROM START TO FINISH BEFORE BEGINNING INSTALLATION REV F IMPORTANT NOTES! WARNING: This
Lowering Spring Installation on a Mustang GT
 Lowering Spring Installation on a 99-04 Mustang GT This installation is very the same installation that many of the 79-04 Mustangs excluding Cobra require. Time to install: 2-3 hours to do alone with a
Steeda Sport Mustang Lowering Springs (2005+) - Installation Instructions
 - Installation Instructions") Steeda Sport Mustang Lowering Springs (2005+) - Installation Instructions The below installation instructions work for the following products: Steeda Sport Mustang Lowering Springs (2005+) Please read
Steeda Sport Mustang Lowering Springs (2005+) - Installation Instructions The below installation instructions work for the following products: Steeda Sport Mustang Lowering Springs (2005+) Please read
Installation Instructions
 2003-Present Toyota 4Runner 2007-2014 FJ Cruiser LRT 3" Lift Kit by Low Range Off-Road (SKU# LR-LRFJ4RU) Installation Instructions Suggested Tools: CAUTION: Safety glasses should be worn at all times when
2013 RT / 2014RT / 2015 RT - Shock Spring Adjuster Installation Instructions
 2013 RT / 2014RT / 2015 RT - Shock Spring Adjuster Installation Instructions Billet Aluminum Adjusters (2) Shock Spring Compressors (Optional) Spanner Wrench (1) BajaRon Decals Not Shown (4) Adjuster Scuff
Troubleshooting Guide for Okin Systems
 Troubleshooting Guide for Okin Systems More lift chair manufacturers use the Okin electronics system than any other system today, mainly because they re quiet running and usually very dependable. There
Rear End Installation and Bearing Kit - 8.8in (86-12 V8; V6)
") Rear End Installation and Bearing Kit - 8.8in (86-12 V8; 11-13 V6) Tools Required: Jack Stands 5 Floor Jack 2 Oil Pans 1 Wheel Blocks 2 Differential Oil 3 qts Friction Modifier 3 bottles Tube of Black
Rear End Installation and Bearing Kit - 8.8in (86-12 V8; 11-13 V6) Tools Required: Jack Stands 5 Floor Jack 2 Oil Pans 1 Wheel Blocks 2 Differential Oil 3 qts Friction Modifier 3 bottles Tube of Black
Suzuki Samurai to Toyota Front Spring Swap Kit, with Missing Link Shackles (SKU#SSP-TSFM) Installation Instructions
 Installation Instructions") Suzuki Samurai to Toyota Front Spring Swap Kit, with Missing Link Shackles (SKU#SSP-TSFM) Installation Instructions CAUTION: Safety glasses should be worn at all times when working with vehicles and related
Suzuki Samurai to Toyota Front Spring Swap Kit, with Missing Link Shackles (SKU#SSP-TSFM) Installation Instructions CAUTION: Safety glasses should be worn at all times when working with vehicles and related
Installation Instructions
 Suzuki Samurai 1 Inch and 2 Inch Body Lift Kit (SKU# SSP-BL) Installation Instructions Background: These instructions are designed for installing the 2 body lift. Our approach is to raise the entire body
BBK Ceramic Long Tube Headers (99-04 Cobra and Mach 1) - Installation Instructions
 - Installation Instructions") BBK Ceramic Long Tube Headers (99-04 Cobra and 03-04 Mach 1) - Installation Instructions The below installation instructions work for the following products: BBK Ceramic Long Tube Headers (99-04 Cobra
BBK Ceramic Long Tube Headers (99-04 Cobra and 03-04 Mach 1) - Installation Instructions The below installation instructions work for the following products: BBK Ceramic Long Tube Headers (99-04 Cobra
Ford F150 2 Suspension Kit
 92569000B Thank you for choosing Rough Country for all your suspension needs. 2014-17 Ford F150 2 Suspension Kit Rough Country recommends a certified technician install this system. In addition to these
NOTICE TO DEALER AND VEHICLE OWNER
 921751200 *1751BAG1* 1751BAG1 Thank you for choosing Rough Country for all your suspension needs. This kit will fit both 4WD and 2WD models, all brackets will be used for 4WD models. On 2WD models the
Installation Instructions
 Instructions Created by an: 2007-Present Toyota Tundra LRT Leveling Lift Kit - 4WD by Low Range Off-Road (SKU# LR-LRTundra) Instructions also apply to 2WD Kits. Installation Instructions Revised 7-11-17
Brake System Rebuilding the brake calipers
 Page 1 of 39 Brake System Rebuilding the brake calipers Written by the backyard hack mechanic Sean750 Document history: # 14 Jan 2004 added pictures of rear caliper rebuild kit # 13 Nov 2004 added more
PRODUCT USE INFORMATION
 921522000A *52200BAG3* 52200BAG3 Thank you for choosing Rough Country for all your suspension needs. 2009-18 Ford F150 2 Leveling Kit Rough Country recommends a certified technician install this system.
Ford Racing BOSS 302 Engine Oil Cooler (11-14 GT)
") Tools needed: 14mm hex socket 7mm socket/wrench 8mm socket/wrench Ford Racing BOSS 302 Engine Oil Cooler (11-14 GT) 10mm socket (for airbox removal) ¾ inch or 19mm wrench Torque wrench Appropriate ratchets
Tools needed: 14mm hex socket 7mm socket/wrench 8mm socket/wrench Ford Racing BOSS 302 Engine Oil Cooler (11-14 GT) 10mm socket (for airbox removal) ¾ inch or 19mm wrench Torque wrench Appropriate ratchets
Installation Instructions
 86-95 Suzuki Samurai Front Shackle (SKU# SSP-HDS1) Note: These instructions also apply to SKU# SSP-HDS3 Installation Instructions Suggested Tools: CAUTION: Safety glasses should be worn at all times when
Spikes-Spider Hub Installation
 Spikes-Spider Hub Installation The instructions that are provided with the Spikes Spiders are pretty good. I've created this page for two reasons: to show those that are thinking of buying a set exactly
Volvo 1800 Dash Pad Replacement
 Volvo 1800 Dash Pad Replacement (courtesy of John Garden State Chapter Volvo Club America) Reupholstering the dash Well it has been some time since I have been online in the forum. Winter is a quite time
Troubleshooting Guide for Limoss Systems
 Troubleshooting Guide for Limoss Systems NOTE: Limoss is a manufacturer and importer of linear actuators (motors) hand controls, power supplies, and cables for motion furniture. They are quickly becoming
M-Force E36 Camber Plate Installation
 Thank you for purchasing the Adjustable Camber Plate kit from Vorshlag Motorsports. In order to ensure proper installation and longevity of your kit, Vorshlag Motorsports recommends that you have your
Installation Instructions
 Instructions Created by an: Revised 7-11-17 LRT 2005-2017 3/1 Leveling/ Lift Kit for Toyota Tacoma by Low Range Off-Road (SKU# LR-LRTACO) Installation Instructions Suggested Tools: CAUTION: Safety glasses
Thanks for Ordering The Kawasaki KLX Adjustable Lowering Kit From
 www.scootworks.com Thanks for Ordering The Kawasaki KLX Adjustable Lowering Kit From READ THIS BEFORE UNPACKING YOUR KIT! This instruction booklet contains detailed steps for installing the rear suspension
Another CJ picture guide to
 Another CJ picture guide to replacing the key cylinder in a non-tilt steering column by John Strenk Well I'm sure it's happened to all of us one time or another. You park your jeep and go to turn off your
Rear Strong-Strut. Installation Instructions
 Rear Strong-Strut Installation Instructions Please read instructions completely before installing the rear Strong-Strut Forward Installation of the rear Strong-Strut is quite simple and involves the removal
This guide will explain how to remove the old springs from the car and replace them with lowering springs.
 fubar Guide: Fitting lowering springs to the Mk2 Clio The method described below worked for me. I am not saying it is the only method to complete the task. I will not accept any responsibility for damage
Sport Coil Springs Dodge Magnum, Chrysler 300C Dodge Challenger SRT Dodge Challenger R/T
 Sport Coil Springs 19101 - Dodge Magnum, Chrysler 300C 19107 - Dodge Challenger SRT-8 19108 - Dodge Challenger R/T Warning: This installation should be performed by a trained professional. The installation
9F1760/9F1761 COBB Sport Springs Ford Focus ST
 9F1760/9F1761 COBB Sport Springs 2013+ Ford Focus ST Installation Instructions Congratulations on your purchase of the COBB Sport Springs for your 2013+ Ford Focus ST. These instructions should only be
You will be removing the suspension of your vehicle. If you are not comfortable with this or do not have the proper tools, please do not proceed.
 Thank you for purchasing the CorkSport Mazda 3 and Mazdaspeed 3 Coilover Kit. This suspension system features 15-way adjustable dampening settings and full length adjustment to meet every driver s handling
Installation Instructions
 Instructions Created by an: 1986-1995 Toyota Pickup 4Runner Hilux Front Ball Joint Spacer Kit - 2.5" 64mm Lift by Low Range Off-Road (SKU# TSP-BJS-1.5 & TSP-BJS-1.5-W/Shocks) Installation Instructions
How to Change Front Brake Pads on a Toyota Corolla
 How to Change Front Brake Pads on a Toyota Corolla Link to this article on (All other links in this document are disabled) Follow this picture guide to change the front brake pads on a 2003-2008 Toyota
By AM Customer: Dean Smith, Aug. 8, 2014.
 Ford Racing Bullitt Axle-Back Exhaust (05-09 GT, GT500) By AM Customer: Dean Smith, Aug. 8, 2014. Tools for the Job: 13mm Wrench 13mm Socket 15mm Socket 15mm Deep Socket Ratchet(s) [I used a bigger one
63162K 2015 Chevrolet Colorado 4WD Leveling Kit w/ 1 Rear Lift Kit
 PRO COMP SUSPENSION 63162K 2015 Chevrolet Colorado 4WD Leveling Kit w/ 1 Rear Lift Kit This document contains very important information that includes warranty information and instructions for resolving
W205 C63 Suspension Adjustable Suspension Installation Guide
 W205 C63 Suspension Adjustable Suspension Installation Guide 2015+ C63 AMG Sedan 2015+ C63S AMG Sedan Thank you for your purchase of the Weistec W205 C63 Adjustable Suspension. Please follow all directions,
97-06 JEEP TJ/LJ LONG ARM UPGRADE KIT
 921663U00 97-06 JEEP TJ/LJ LONG ARM UPGRADE KIT Thank you for choosing Rough Country for your suspension needs. This kit is an upgrade kit only. This kit includes frame mounting points and adjustable long
Tacoma Front Suspension Install Instructions
 1995-04 Tacoma Front Suspension Install Instructions Important notices: These instructions are intended only as a general guide for installing All-Pro products. For some items, specialized mechanical skills,
Sport Coil Springs Chysler 300C SRT-8 05 Dodge Charger SRT-8
 Sport Coil Springs 19105 05 Chysler 300C SRT-8 05 Dodge Charger SRT-8 Warning: This installation should be performed by a trained professional. The installation requires lowering of the rear cradle from
Moddit. How to Install Stance Coilovers on a Subaru
 Moddit How to Install Stance Coilovers on a Subaru BRZ Let's get LOW (and maybe lighter and stiffer suspension)! In this article, we will install Stance ST- ZN6-XS Coilovers on the FRSport Subaru BRZ.
PRODUCT: JL Dual Rate Lift Kit, RockSport Edition READ INSTRUCTIONS IN FULL BEFORE INSTALLATION. QUESTIONS? CALL M-F 7:00 AM 5:00 PM PST
 PRODUCT: JL Dual Rate Lift Kit, RockSport Edition READ INSTRUCTIONS IN FULL BEFORE INSTALLATION. QUESTIONS? CALL 916-631-8071 M-F 7:00 AM 5:00 PM PST REV: A 08-07-2018 II-7633 The MetalCloak experience
LG CORVETTE GT2 COIL OVERS
 LG CORVETTE GT2 COIL OVERS THE MOST POWERFUL HEADERS ON THE PLANET Brought to you by LG Motorsports 972-429-1963 Parts Inventory: 1. Assembled Front shock and spring 2. Assembled Rear shock and spring
PRODUCT USE INFORMATION
 921545200 *54520BAG1* 54520BAG1 Thank you for choosing Rough Country for all your suspension needs. 2009-17 Ford F150 3 Suspension Kit Rough Country recommends a certified technician install this system.
what you need to do is hit the taper housing as hard as you can with your hammers AT THE SAME TIME and at a slight angle, what will happen is you
 first things first, get the car on axle stands and the wheels off. Open the bonnet to let more light through to the area in which you'll be working. The following guide shows the passenger side being done
PRODUCT: JL Game Changer Suspension, RockSport READ INSTRUCTIONS IN FULL BEFORE INSTALLATION. QUESTIONS? CALL M-F 7:00 AM 5:00 PM PST
 PRODUCT: JL Game Changer Suspension, RockSport READ INSTRUCTIONS IN FULL BEFORE INSTALLATION. QUESTIONS? CALL 916-631-8071 M-F 7:00 AM 5:00 PM PST REV: A 06-19-2018 II-7631 The MetalCloak experience includes
INSTALLATION INSTRUCTION 88092
 INSTALLATION INSTRUCTION 88092 FOR RANCHO SUSPENSION SYSTEM RS6592: NISSAN XTERRA & 2WD FRONTIER READ ALL INSTRUCTIONS THOROUGHLY FROM START TO FINISH BEFORE BEGINNING INSTALLATION Rev C IMPORTANT NOTES!
(800) MON-FRI 7AM-5PM PST OR WEBSITE: ReadyLIFT.COM **Please retain this document in your vehicle at all times**
 MON-FRI 7AM-5PM PST OR WEBSITE: ReadyLIFT.COM **Please retain this document in your vehicle at all times**") IF your ReadyLIFT product has a damaged or missing part, please contact customer service directly. For warranty issues please return to the place of installation and contact ReadyLIFT. A NEW REPLACEMENT
IF your ReadyLIFT product has a damaged or missing part, please contact customer service directly. For warranty issues please return to the place of installation and contact ReadyLIFT. A NEW REPLACEMENT
INSTALLATION INSTRUCTIONS: LONG TRAVEL KIT 07+ FJ CRUISER and 05+ TACOMA
 INSTALLATION INSTRUCTIONS: LONG TRAVEL KIT 07+ FJ CRUISER and 05+ TACOMA ISNTALLATION DIFFICULTY: Advanced APPROX TIME: 6-8 Hours REQUIRED TOOLS: 14mm-35mm sockets, wrenches, and ratchet 9/16 and 5/8 12
HP10253 KIT Ford F-150 2WD / 4WD 2" Leveling Kit
 HP10253 KIT 2004-2017 Ford F-150 2WD / 4WD 2" Leveling Kit KIT CONTENT A B C KIT CONTENTS A Upper Strut Spacer (2) B M10 x 1.5 Flange Nut (6) C M10 x 1.5 x 40 mm Socket Head Cap Screw (6) Make sure all
Another CJ picture guide to replacing the key cylinder in a non-tilt steering column
 Another CJ picture guide to replacing the key cylinder in a non-tilt steering column by John Strenk Well I'm sure it's happened to all of us one time or another. You park your jeep and go to turn off your
2009 & UP KC09113BK FRONT DODGE 1500/4WD 2009 & UP KC09114BK FRONT & REAR Kit 1500/4WD 2009 & UP KC09116BK REAR only KIT 2WD & 4WD
 2009 & UP KC09113BK FRONT DODGE 1500/4WD 2009 & UP KC09114BK FRONT & REAR Kit 1500/4WD 2009 & UP KC09116BK REAR only KIT 2WD & 4WD FRONT SPACERS & STUD EXTENDERS REAR SPACERS 1 Introduction is your number
Performance Brake Caliper Guide Bushing Set Installation Guide
 Performance Brake Caliper Guide Bushing Set Installation Guide Proper service and repair procedures are vital to the safe, reliable operation of all motor vehicles as well as the personal safety of those
DYNATRAC PRODUCTS V1.3
 DYNATRAC PRODUCTS V1.3 2007-2017 Jeep JK Wrangler ProGrip Performance Brake Kit Front & Rear Required tools: 13mm wrench 15mm wrench 18mm socket 21mm socket Calibrated torque wrench. Anti-Seize compound.
 This document provides instructions for removing and installing a Front Wheel / Rotor on a Ducati Superbike. The torque values used are for the 748/916/996 from 1994 to 2001 and may be applicable for later
STOP---READ THIS FIRST!
 STOP---READ THIS FIRST! **Read These Entire Instructions Before Starting Anything** 2003-2013 DODGE Ram 2500/3500, 8 LIFT KIT NOTE: * The factory wheels and tires WILL fit on the front of the vehicle once
STOP---READ THIS FIRST!
 STOP---READ THIS FIRST! **Read These Entire Instructions Before Starting Anything** 2007-2010 GM 1500 TRUCK LIFT KIT INSTRUCTIONS (PART# 50700 & 50720) 5680 W. Barstow, Fresno, CA 93722 PH: (559) 226-8196
BBK LONG TUBE HEADERS (99-04 GT, Mach 1, Bullitt)
") BBK LONG TUBE HEADERS (99-04 GT, Mach 1, Bullitt) Install Time: Approx. 8-10 hrs Parts Needed: BBK Long Tube Headers Shorty mid pipe X/H O2 wiring harness extensions Hi-temp thread locker Tools Required:
BBK LONG TUBE HEADERS (99-04 GT, Mach 1, Bullitt) Install Time: Approx. 8-10 hrs Parts Needed: BBK Long Tube Headers Shorty mid pipe X/H O2 wiring harness extensions Hi-temp thread locker Tools Required:
Installation manual. 3 suspension system Toyota Tacoma. Part # Part # Important customer information: Toyota Tacoma
 Installation manual 3 suspension system 2005 2008 Toyota Tacoma Part # 52907 sj111607rev.02 Part # 52907 2005-2008 Toyota Tacoma 3 suspension system Part # Description Qty. 52907-01 Pre-load spacer 2 52907-02
Suzuki Samurai Full Time 4WD Drive Flange Kit (SKU# SAX-DF)
") Instructions Created by an: Suzuki Samurai Full Time 4WD Drive Flange Kit (SKU# SAX-DF) We recommend that you consider replacing the hub bolts when installing this kit. Click HERE for more info. CAUTION:
Instructions Created by an: Suzuki Samurai Full Time 4WD Drive Flange Kit (SKU# SAX-DF) We recommend that you consider replacing the hub bolts when installing this kit. Click HERE for more info. CAUTION:
M7 R56 Strut Tower Brace (J-Brace Model) 56-5M7104 Installation Guide. THIS PRODUCT DOES NOT FIT ON THE BASE MODEL COOPER (Non S, Non-Turbo)
 56-5M7104 Installation Guide. THIS PRODUCT DOES NOT FIT ON THE BASE MODEL COOPER (Non S, Non-Turbo)") M7 R56 Strut Tower Brace (J-Brace Model) 56-5M7104 Installation Guide THIS PRODUCT DOES NOT FIT ON THE BASE MODEL COOPER (Non S, Non-Turbo) Tools (not included): 13 mm Socket 15 mm Socket or wrench Socket
M7 R56 Strut Tower Brace (J-Brace Model) 56-5M7104 Installation Guide THIS PRODUCT DOES NOT FIT ON THE BASE MODEL COOPER (Non S, Non-Turbo) Tools (not included): 13 mm Socket 15 mm Socket or wrench Socket
Manual Transmission Hard To Get Into Gear. When Cold >>>CLICK HERE<<<
 Manual Transmission Hard To Get Into Gear When Cold For the last month or so, it has been difficult to shift into gear (manually, not when the car is I can get it into reverse and to neutral with some
INSTALLATION INSTRUCTIONS FOR THE MOTOR TRIKE CROSS COUNTRY / CROSS ROADS / HARD BALL RAKE KIT
 INSTALLATION INSTRUCTIONS FOR THE MOTOR TRIKE CROSS COUNTRY / CROSS ROADS / HARD BALL RAKE KIT Thank you for choosing the Motor Trike Cross Country / Cross Roads / Hard Ball rake kit. We ask that you read
Rear drum to disk conversion for a 00 Toyota Camry LE 4 cylinder
 Rear drum to disk conversion for a 00 Toyota Camry LE 4 cylinder *** Read and use at your own discretion I assume no liability for what you or anyone else does with this information. By reading this, you
Wheel Bearing Replacement Passat TDI
 Rear Bearing/hub assembly replacement This is a fairly straight forward process. Pictures are not necessary for most of this procedure for a person with skills to do this repair. Anyone who thinks they
STOP---READ THIS FIRST!
 STOP---READ THIS FIRST! **Read These Entire Instructions Before Starting Anything** 2007-2013 GM 1500 TRUCK LIFT KIT INSTRUCTIONS (PART# 50700 & 50720) 5680 W. Barstow, Fresno, CA 93722 PH: (559) 226-8196
Installing Rear Brake Pads on a WK Jeep
 Installing Rear Brake Pads on a WK Jeep Step by Step By Chirpz Disclaimer: I do not claim that this procedure is the right way or even the best way to change your rear brake pads. This is what I did after
Steeda Lower Control Arms ( )
") Steeda Lower Control Arms (2005-2012) NOTE: The following installation was performed on a 2007 Mustang GT/California Special. The control arms were previously sold in a blue color, but now they are sold
Steeda Lower Control Arms (2005-2012) NOTE: The following installation was performed on a 2007 Mustang GT/California Special. The control arms were previously sold in a blue color, but now they are sold
HP10251 KIT. Chevrolet Silverado WD / 4WD * GMC Sierra WD / 4WD * 1.5" / 2.25" Leveling Kit L6401_REV3_ECN1-1963
 HP10251 KIT Chevrolet Silverado 1500 2WD / 4WD * GMC Sierra 1500 2WD / 4WD * 1.5" / 2.25" Leveling Kit *See PacPro Application Guide for proper fitment _REV3_ECN1-1963 KIT CONTENT A B C KIT CONTENTS A
02-10 GM 2500HD / HD & HD CLASSIC 6 2WD SUSPENSION KIT
 92122000 92127400 02-10 GM 2500HD / 01-06 1500HD & 07 1500HD CLASSIC 6 2WD SUSPENSION KIT Thank you for choosing Rough Country for your suspension needs. Rough Country recommends a certified technician
OME SUSPENSION KIT INSTALLATION FJ CRUISER, RUNNER
 OME SUSPENSION KIT INSTALLATION 07-11 FJ CRUISER, 03-11 4RUNNER Support@toyteclifts.com Read all of the installation instructions prior to installation. ToyTec Lifts L.L.C. recommends that this be installed
Installation Instructions
 Preparing your vehicle to install your brake system upgrade 1. Rack the vehicle. 2. If you don t have a rack, then you must take extra safety precautions. 3. Choose a firmly packed and level ground to
If you have any difficulties at all, please give us a call. Thank you and enjoy your MetalCloak Products!
 PRODUCT: TJ/LJ 3.5 Dual Rate Lift RockSport Edition READ INSTRUCTIONS IN FULL BEFORE INSTALLATION. QUESTIONS? CALL 916-631-8071 M-F 7:00 AM 5:00 PM PST The MetalCloak experience includes the ease of installation
Installations Instructions for Maier Racing Front Coilover Kit MS Ford Mustang
 22215 Meekland Avenue Hayward, CA 94541 Phone: (510) 581-7600 Fax: (510) 581-2406 Installations Instructions for Maier Racing Front Coilover Kit MS-02-001 1964-1973 Ford Mustang Contents Front Coilover
INSTALLATION INSTRUCTIONS
 INSTALLATION INSTRUCTIONS --300 W PONTIAC WAY CLOVIS, CA 93612 local: 559-875-0222 fax: 559-876-2249 toll free: 800-445-3767-- 25007 LIFT / LOWERING STRUT 2015+ FORD F-150 2WD (+1 to -3 ) 2015+ FORD F-150
Suspension System RS6582B
 Suspension System RS6582B Tahoe/Yukon READ ALL INSTRUCTIONS THOROUGHLY FROM START TO FINISH BEFORE BEGINNING INSTALLATION IMPORTANT NOTES! WARNING: This suspension system will enhance the off-road performance
M-3000-ZX3 SVT Focus Suspension Kit INSTALLATION INSTRUCTIONS
 Please contact the Tech Hot Line for the most current instruction information (586) 468-1356!!! PLEASE READ THE FOLLOWING INSTRUCTIONS CAREFULLY PRIOR TO INSTALLATION!!! INTRODUCTION: The components in
Installation manual. 3 suspension system Toyota Tacoma. 4x4 and 2WD PreRunner. Part # Part # Important customer information:
 Installation manual 3 suspension system 2005 2018 Toyota Tacoma 4x4 and 2WD PreRunner Part # 52907 sj11112011rev.05 Part # 52907 2005-2018 Toyota Tacoma 4x4 and 2WD PreRunner 3 suspension system Part #
Installation Instructions 7 Lift Kit 2015 F150 4WD ONLY( )
") IF YOUR ReadyLIFT OFF ROAD SUSPENSION PRODUCT IS MISSING A PART OR HAS A DAMAGED PART, PLEASE CONTACT CUSTOMER SERVICE DIRECTLY. A NEW REPLACEMENT PART WILL BE SENT TO YOU IMMEDIATELY Please read Instructions
IF YOUR ReadyLIFT OFF ROAD SUSPENSION PRODUCT IS MISSING A PART OR HAS A DAMAGED PART, PLEASE CONTACT CUSTOMER SERVICE DIRECTLY. A NEW REPLACEMENT PART WILL BE SENT TO YOU IMMEDIATELY Please read Instructions
TOYOTA FJ CRUISER 6 SUSPENSION KIT
 92177000 TOYOTA FJ CRUISER 6 SUSPENSION KIT Thank you for choosing Rough Country for your suspension needs. Rough Country recommends a certified technician installs this system. In addition to these instructions,
INSTALLATION INSTRUCTION 88094
 INSTALLATION INSTRUCTION 88094 FOR RANCHO SUSPENSION SYSTEM RS6594B 4WD & 2WD NISSAN TITAN READ ALL INSTRUCTIONS THOROUGHLY FROM START TO FINISH BEFORE BEGINNING INSTALLATION Rev D IMPORTANT NOTES! WARNING:
INSTALLATION INSTRUCTION 88088
 INSTALLATION INSTRUCTION 88088 For Rancho Suspension Systems RS6588 & RS6589: FORD F-150 READ ALL INSTRUCTIONS THOROUGHLY FROM START TO FINISH BEFORE BEGINNING INSTALLATION Rev B IMPORTANT NOTES! WARNING: