Making Instructions Version 2.1 for Windows
|
|
|
- Laurence Watson
- 5 years ago
- Views:
Transcription


1 Making Instructions Version 2.1 for Windows Ohbot Ltd. 2017

2 About Ohbot has seven motors. Each connects to the Ohbrain circuit board and this connects to a computer using a cable. Ohbot software allows humans to create programs to make Ohbot s motors move. Eyes turn motor Eyes tilt motor Lid blink motor Head tilt motor Bottom lip move motor Head turn motor Top lip move motor Ohbrain circuit board 2

3 Kit Parts A B D E C x3 3


4 You will need The Ohbot V2.1 kit scissors Long nose pliers The Ohbot Part Finder sheet A Win 7 or later PC and user rights that allow you to install software An hour or possibly a little more A bowl to hold small parts until they are needed 4

5 Instructions Each page is a step in constructing Ohbot The parts needed are shown on the top left of each page If you need tools it will show this too The main picture or pictures show how to assemble Look out for my tips too! 5


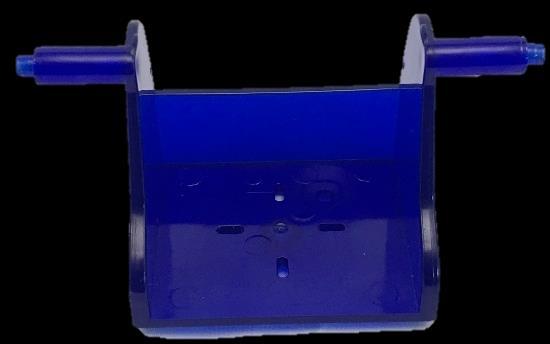
6 Feet underside of base Nice work! I don t want to brag, but Ohbots do have two more feet than you do! 6


7 Neck turn motor 1. Place the base so that the Ohbot sticker is facing toward you Ohbot sticker 2. Thread the motor s cable through the big hole on the top of the base then put the motor in so that the writing on the label is the right way up. This motor allows me to shake my head. No really, it does! 7
. 2.")

8 Fixing the neck turn motor back 1. Attach the motor to the base using the cable tie (shown in green). 2. Chop off the end of the cable tie front Don t chop your finger off while cutting the ties. Just saying! 3. Attach the motor to the base using the cable tie 4. Chop off the end of the cable tie 8


9 Attaching the neck Push down 9


10 Setting up the neck turn motor 1. Make sure the base is facing you with the Ohbot sticker to the front. Gently turn the neck piece clockwise as far as it will go 2. Lift off the neck piece 3. Orient the neck piece in the position shown, then push it back onto the motor Ohbot sticker front 4. Screw the neck piece onto the motor 10


11 Attaching lip motors Curved side of jaw Bottom lip motor Top lip motor Flat side of jaw Make sure the wires come out of the motors on the curved side of the jaw and go underneath the bottom lip motor. Label the wires for the top and bottom lip to make them easier to identify later. 11


12 Fixing left cheek motor left cheek 1. Orient the motor with the cable coming out towards the top of the cheek. Thread the cable through the hole. 2. Push the motor through at an angle, starting with the end of the motor where the cable comes out 3. Clip the motor in place It s easy to muddle right and left cheeks later. Why not label this one Ohbot s lovely left cheek so you can find it later. top top 12


13 Fixing right cheek motor You will need: right cheek 1. Orient the motor this way round, with the wire coming out of the motor to the top of the cheek. 2. Clip in place This motor allows me to roll my eyes. I know it s not polite, but Ohbots only do what they are programmed to do top top top The wire should be at the top 13


14 Attach the left cheek to the jaw lugs 1. Locate the lugs of the jaw in the slots on the cheek 2. Fasten the screw left cheek slots 14


15 Locating the jaw and cheek on the neck 1. Locate the pin on the neck in the hole in the left cheek 2. Hold in place ready for the next step pin hole 15


16 Attaching the right cheek to the jaw 16


17 Fixing the cheeks to the neck 1. Use screw to fasten the right cheek to the neck 2. Do the same for the left cheek 17


18 Fixing the eye turn motor Place the motor so that the motor shaft is on the opposite side to the posts. posts clip clip motor shaft To clip the motor in use the motor to push the clips apart. Find the end of the motor where the wire comes out and push this through the hole first. If it is tricky try taking the sticker off the motor. 18

19 Fixing the lid blink motor underneath motor shaft Make sure the cables for both the eye turn motor and the lid blink motor come out on the same side. Eye turn motor cable Lid blink motor cable 19


20 Attaching the eyelids hole eyebox hole Thread the link through this hole before clipping in the eyelid link arm eyelids arm pin pin link 20


21 Attachng the eyeballs down up If you find one of Ohbot s eyes is looking up and the other one down turn one of the eyeballs up the other way. turn upside down level 21


22 Attaching eyebox to the cheeks hole hole 1. Put the pins for the eyebox into the holes shown on the cheeks 2. Use screws to attach each cheek to the eyebox. pin pin 22


23 Nose fitting 23


 and the yellow wire is to the right")
24 Connecting motor 4 to Ohbrain Find the socket 4 at the end of the wire for the motor marked On the Ohbrain board locate the set of pins marked D4. 3. Attach the socket to the pins marked D4. Make sure the brown wire is to the left (-) and the yellow wire is to the right (S) Brown on this side Yellow on this side 24


25 Connecting motors to Ohbrain Find the socket for each motor in turn and plug it into the matching D numbered pins on the Ohbrain circuit board. Motor 5 goes to D5, Motor 6 to D6, Motor 7 to D7, Motor 8 to D8, Motor 9 to D9 and Motor 10 to D Take care to ensure that all sockets are connected this way: 25

26 Fixing Ohbrain to the base Back of base C C C Don t do these up too tight, just tighten enough to stop the board being wobbly. 26
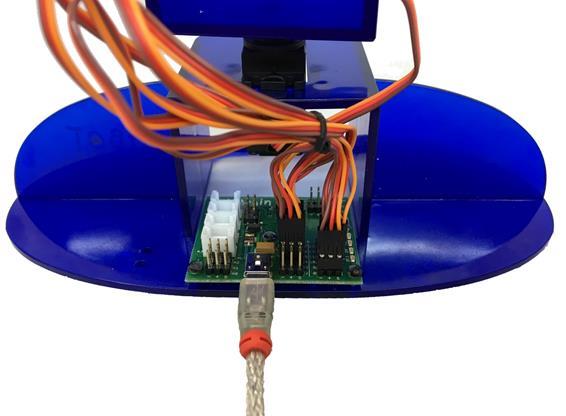

27 Connecting the cable to Ohbrain 27

28 Installing Ohbot software Go to 28

29 Connecting Ohbot to a computer Ohbot needs both USB plugs connected to your computer so that it has enough energy to work. 29


30 Setting up Motor 4 (makes Ohbot s head nod) Motor 4 1. Thread the link through the end hole of the motor arm Motor arm 2. With Ohbot connected to the computer start the Ohbot software. Click the reset button. 3. Hold Ohbot s head upright end hole link end hole Not like this Yes! That s right 4. Thread the link through the hole on the side of the neck 5. Find Motor 4. Push the arm onto the motor so it holds Ohbot s head upright. 6. Fix the arm onto the motor using screw B hole push onto motor 30


31 Setting up Motor 64 (makes my eyes turn) Motor 6 1. Thread the link through the end hole of the motor arm Motor arm 2. With Ohbot connected to the computer start the Ohbot software. Click the reset button. 3. Find Motor 6. Push the motor arm on in the position shown in the photo. Put the ends of the link through the holes in the eyeballs. link end hole end hole hole hole 4. Use pliers to bend the ends of the wires 6. Fix the arm onto the motor using screw B 31


32 Setting up Motor 74 (blinks my eyelids) Motor 7 1. With Ohbot connected to the computer start the Ohbot software. Click the reset button. 2. Thread the link onto the end hole on the arm. end hole arm 3. Push the arm onto the servo so that it holds the eyelids wide open 4. Tilt the eyebox up fix the arm onto the motor using screw B 32


33 Setting up Motor 104 (tilts my eyes) Motor Thread the hook end of the link through the end hole of the motor arm 2. With Ohbot connected to the computer start the Ohbot software. Click the reset button. 3. Thread the S shaped end of the link into the hole at the front corner of the eye box end hole go through the end hole hole arm s shaped end 5. Hold the eyebox so the upright on its front edge is flush with the cheek No Yippee 6. Find Motor 10. Push the arm onto the motor so it holds the eyebox horizontal. 6. Fix the arm onto the motor using screw B hook shaped end No push onto motor 33


34 Setting up Motor 84 (moves my top lip) Motor 8 1. With Ohbot connected to the computer start the Ohbot software. Click the reset button. 2. Attach the lip onto the servo so that it is horizontal Not like this Like this or this Ohbot s lips are identical and either can be used for top or bottom 3. Check it is in the right position by clicking the reset button again. The lip should remain in the horizontal position. 4. Use screw B to secure the lip in place 34


35 Setting up Motor 94 (moves my bottom lip) Motor 9 1. With Ohbot connected to the computer start the Ohbot software. Click the reset button. 2. Push the the Bottom Lip onto the the servo so that it is horizontal beneath the top lip just like in the picture Ohbot s lips are identical and either can be used for top or bottom 3. Check it is in the right position by clicking the reset button again. The lips should remain in the horizontal position. 4. Use screw B to secure the lip in place 35

36 Hooray! You ve assembled an Ohbot! This is just the start though. How your Ohbot behaves depends on on your imagination and programming. Happy inventing! 36
Disco 3 Clock Spring / Rotary Coupler replacement
 Disco 3 Clock Spring / Rotary Coupler replacement I recently had to change my Clock spring and thought some folks may find it helpful to see what it entailed. I did lots of reading around but couldn t
3D PRINTER. Pack 09. Anything you can imagine, you can make! 3D technology is now available for you at home! BUILD YOUR OWN
 BUILD YOUR OWN Pack 09 Anything you can imagine, you can make! 3D PRINTER Compatible with Windows 7 & 8 Mac OS X 3D technology is now available for you at home! www.model-space.com BUILD YOUR OWN 3D PRINTER
Tools needed: Here is a pic of the shift kit I used. It is a Transgo brand and as you can see, it just a bag full of springs and one valve.
 Before installing a shift kit, be sure the transmission is in good operating order. If your transmission is making noises, slipping, shifting bad or the fluid looks brown or smells burnt, take the transmission
CALDERA 10E Spur Gear Change
 CALDERA 10E Spur Gear Change www.thirdcoastrc.com ebay handle - little*oak Click Below to Visit our Ebay Store EBAY STORE (Please take a moment and bookmark my website, ebay store, and save me as an ebay
By Coranzo on VW Vortex:
 By Coranzo on VW Vortex: First off, let me just say, these bulbs are BRIGHT! They are a nice rich red LED that you see on newer high end cars nowadays. They have had these available for quite a while now
One- Touch Installation Instructions
 One- Touch Installation Instructions 1 1 Height Adjustable Pivot w/ screws 9 Upper Work Surface 2 Rail Mount Knobs 10 Back Cover 3 Transformer 11 Center Pivot w/ screws 4 Support Legs 12 Left Monitor Arm
Replacing the Gear Drive Motor Assembly and GFCI Module for Operation with the Chain Drive Motor Assembly
 Replacing the Gear Drive Motor Assembly and GFCI Module for Operation with the Chain Drive Motor Assembly Kit Contents B00009035-3 Motor Drive Assembly (Return original to CMI) B00007698-8 GFCI Module
DVL Cypress Face Installation Instructions (SKU )
") Table of Contents Compatibility... 1 Packing List... 1 Installation... 2 Prepare the Insert for Face Installation... 2 Assemble the Face... 6 Attach the Surround Panels (if applicable) and Face... 10 Hang
Table of Contents Compatibility... 1 Packing List... 1 Installation... 2 Prepare the Insert for Face Installation... 2 Assemble the Face... 6 Attach the Surround Panels (if applicable) and Face... 10 Hang
Prusa i3 Printer Assembly Guide
 Prusa i3 Printer Assembly Guide Special thanks to Carlos Sanchez and Miguel Sanchez for the graphics. All graphics captured from their great animation: http://www.carlos-sanchez.com/ Prusa3/ For copyright
INSTALLATION INSTRUCTIONS
 INSTALLATION INSTRUCTIONS Accessory Application Publications No. All 12035 SYSTEM 2012 RIDGELINE Issue Date NOV 2011 PARTS LIST Security System Attachment Kit: P/N 08E55-SJC-101 Flange bolt Unit bracket
Connecting the rear fog light on the A4 Jetta, while keeping the 5 Light Mod
 Connecting the rear fog light on the A4 Jetta, while keeping the 5 Light Mod DISCLAIMER: I'm human and make mistakes. If you spot one in this how to, tell me and I'll fix it This was done on my 99.5 Jetta.
Installation Instructions
 Installation Instructions Jeep JK 2-Door (2011 Present) Mounting Bracket and Air Line System Kit for ARB On-Board Twin Air Compressor (CKMTA12) Made in the USA Kit Contents: 1 Flat Bracket 1 Formed Bracket
Raxiom Factory GPS Rear Back-up Camera Kit (07-17 Wrangler)
") Raxiom Factory GPS Rear Back-up Camera Kit (07-17 Wrangler) Installation Time: 2.5-3Hrs Tools Required: 7mm Socket & Driver 10mm Socket 10mm Open end wrench Knife / Razor blade Zip-ties Wire Cutters Needle
Raxiom Factory GPS Rear Back-up Camera Kit (07-17 Wrangler) Installation Time: 2.5-3Hrs Tools Required: 7mm Socket & Driver 10mm Socket 10mm Open end wrench Knife / Razor blade Zip-ties Wire Cutters Needle
2010 Toyota Prius Fog Light Retrofit
 2010 Toyota Prius Fog Light Retrofit A DIY prospective Last updated: Friday, December 25, 2009 *** Disclaimer Use this document and its contents at your own risk! *** Forward: This document was compiled
SR500 PAPR How to Copyright 2015 by The S.E.A. Group 1
 SR500 PAPR How to Copyright 2015 by The S.E.A. Group 1 BEFORE YOU START: Make sure the respirator and all its parts are clean and intact Make sure you are familiar with the equipment and know how to use
DVS Cypress Face Installation Instructions (SKU )
") Table of Contents Compatibility... 1 Packing List... 1 Installation... 2 Prepare the Insert for Face Installation... 2 Attach the Surround Panels (if applicable)... 6 Assemble the Face... 7 Attach the
Table of Contents Compatibility... 1 Packing List... 1 Installation... 2 Prepare the Insert for Face Installation... 2 Attach the Surround Panels (if applicable)... 6 Assemble the Face... 7 Attach the
Installing the Wireless Charging upgrade kit in a 2018 XT5 (Platinum version)
") Installing the Wireless Charging upgrade kit in a 2018 XT5 (Platinum version) September 2, 2018 Tools needed: Wireless charger upgrade kit Plastic trim tools 7 mm nut driver Background: I purchased the
Installing the Wireless Charging upgrade kit in a 2018 XT5 (Platinum version) September 2, 2018 Tools needed: Wireless charger upgrade kit Plastic trim tools 7 mm nut driver Background: I purchased the
TRAILING ARM CHEVY PICK-UP
 TRAILING ARM 1947 1954 CHEVY PICK-UP Congrats on choosing the best riding and handling rear suspension for your Chevy. Trailing arm suspension can be tricky to install correctly, so please follow our recommendations,
Carousel Unit User Manual Replacing the Check Stand Motor
 Carousel Unit User Manual Replacing the Check Stand Motor 02/01/2017 1 Table of Contents Tools:... 3 Turn Off Power to the Unit:... 4 Remove Power Switch... 5 Remove Electric Eyes:... 6 Remove POS (Point-Of-Sale)
How To: Fit an enclosed induction kit to the V6
 How To: Fit an enclosed induction kit to the V6 As a couple have done this I thought I'd have a go, but do a write up at the same time. Here's a quick summary of the equipment you'll be needing: 1 x Universal
Porsche 928 with 16v LH-Jetronic Fuel System
 Porsche 928 with 16v LH-Jetronic Fuel System Toll-Free Tech Hot Line: 877-FOR-928M 877-367-9286 Please do not copy this manual and give copies to your friends. Our ability to bring you this supercharger
Fitting the Bell Auto Services (B-A-S) TDV6 EGR Blanking Kit to a 2006 model Discovery 3 TDV6 HSE
 TDV6 EGR Blanking Kit to a 2006 model Discovery 3 TDV6 HSE") Fitting the Bell Auto Services (B-A-S) TDV6 EGR Blanking Kit to a 2006 model Discovery 3 TDV6 HSE Before I describe how I did this, I must first thank other members of the Disco3.co.uk forum (namely J,moore
Fitting the Bell Auto Services (B-A-S) TDV6 EGR Blanking Kit to a 2006 model Discovery 3 TDV6 HSE Before I describe how I did this, I must first thank other members of the Disco3.co.uk forum (namely J,moore
Changing the Struts on a WK Jeep CRD
 Changing the Struts on a WK Jeep CRD Step by Step By Chirpz Disclaimer: I do not claim that this procedure is the right way or even the best way to change your struts. This is what I did after reading
C15C C15C. Page 1 of 20
 2 x Lid Front Hinge 1135 8 x M8 Bolt 8 x M8 Washer (3mm Thick) 4 x M6 Large washers 4 x M6 Spring washers 4 x M6 x 40mm Bolts 6 x M6 20mm Bolts 6 x M6 Washers 20 x Screws 2 x Lid mount gas strut bracket
3D PRINTER. Pack 10. Anything you can imagine, you can make! 3D technology is now available for you at home! BUILD YOUR OWN
 BUILD YOUR OWN Pack 10 Anything you can imagine, you can make! 3D PRINTER Compatible with Windows 7 & 8 Mac OS X 3D technology is now available for you at home! BUILD YOUR OWN 3D PRINTER CONTENTS PACK
VW SCIROCCO TWINTERCOOLER INSTALLATION INSTRUCTIONS
 VW SCIROCCO TWINTERCOOLER INSTALLATION INSTRUCTIONS Tools needed: T25 torx driver Small flat head screwdriver 12mm & 13mm socket, with ratchet Dremel or similar with cut off disc Large Phillips screwdriver
Installation Manual TWM Performance Short Shifter Cobalt SS/SC, SS/TC, HHR SS, Ion Redline and Saab 9-3
 Page 1 Installation Manual TWM Performance Short Shifter Cobalt SS/SC, SS/TC, HHR SS, Ion Redline and Saab 9-3 Please Note: It is preferable to park on a flat surface, as you will have to engage and disengage
Safe-T-element Installation Instructions
 Safe-T-element Installation Instructions For: PTI STEZA (2x2 Burner Configuration) & PTI STEZB (3x1 Burner Configuration) Revision K (May. 3 2012) TABLE OF CONTENTS 1. PREPARATION... 3 1.1 General Safety
Useless Machine. GM3 Edition
 Useless Machine GM3 Edition Shown with peelable protective brown paper As seen on: Saskview.com instructables.com/id/the-most-useless-machine/ makeprojects.com/project/the-most-useless-machine/91/1 www.solarbotics.com
Make sure all wiring is inserted into the cavity between the insert and the fireplace. Failure to do this may cause the wiring to become damaged.
 Installation Notes Large Flush Wood Hybrid-Fyre Insert: (96400539, 96400539A) Before installing, make sure to install the one-piece panel, and disconnect the power cords making sure the Molex connector
Rear Speaker replacement.
 Rear Speaker replacement. First off you need the right rear speakers. The easy bit is 6x9 and better than a 15W paper cone, the difficult bit is getting a mounting depth under 74mm. Or to be more precise,
OVERVIEW. Table of Contents. Bikes with a H4 or H7 (with P43t expander) headlamps
 headlamps") Overview P115W P115W-D Table of Contents Bikes with a H4 or H7 (with P43t expander) headlamps Mounting Daylight Sensor Sensitivity Programming FAQ New Design Simplified product application Single headlamp
Overview P115W P115W-D Table of Contents Bikes with a H4 or H7 (with P43t expander) headlamps Mounting Daylight Sensor Sensitivity Programming FAQ New Design Simplified product application Single headlamp
Fitting Instructions For The TDV6 EGR Blanking Kit To A 2006 Model Discovery 3 TDV6 GHSE
 Part Number DA1112 Fitting Instructions For The TDV6 EGR Blanking Kit To A 2006 Model Discovery 3 TDV6 GHSE You do this modification at your own risk. Britpart won t be held responsible for what is written
Build Instructions and User Guide
 Build Instructions and User Guide Getting Started To build the Rock Drill 4069 you will need: Solder Wire Cutters Soldering Iron Small pliers The kit is suitable for beginners or more experienced builders
The Zenith Stromberg Water Choke
 Page 1 of 16 The Zenith Stromberg Water Choke Rick Jaskowiak Bemidji, MN 11/24/2001 Click here to email me. Return to my home page When my last Midget project ran poorly after an engine rebuild due to
Head Lamp Installation Guide
 Head Lamp Installation Guide This document explains the steps that need to be performed to ensure precise installation of the Jaguar XK Projector headlight system. Step 1: Remove the existing head lights
Volvo 850 Radiator Replacement Jason Reed 29 March 2013
 This write up covers removing and replacing the radiator on a 97 855 GLT wagon with light pressure turbo and automatic transmission. This car has 162K miles. The radiator, which was original, developed
Assembly Manual. 1/10th Formula 1 Car
 Assembly Manual 1/10th Formula 1 Car Center Pivot Bag 1 3374 - Center Pivot Socket 40194 - Hard Anodized Alum Pivot ball 3254-2-56 *Note - Sometimes it is helpful to slightly over-tighten the top clamp
Fuel Pump & Sending Unit Repair
 If your C4 s fuel gauge reads full regardless of how much fuel you actually have, the sending unit in the tank is most likely at fault. If you have priced a new sending unit, you realize that they run
STAY ON TRACK WITH THIS LINE FOLLOW BUGGY WITH :MOVE LINE FOLLOW BOARD FOR BBC MICRO:BIT
 STAY ON TRACK WITH THIS LINE FOLLOW BUGGY WITH :MOVE LINE FOLLOW BOARD FOR BBC MICRO:BIT BUILD INSTRUCTIONS LIST OF FIXINGS M3 BOLTS M3 NUTS STANDOFFS 6mm x12 x4 x4 10mm x4 x12 12mm x2 30mm x2 20mm M-F
BJ74SY FITTING INSTRUCTIONS
 BJ74SY FITTING INSTRUCTIONS REPLACES: 00.00.00 REVISED: 05.08.13. Check installation hardware before commencing. 1. Lift bonnet. JEEP GRAND CHEROKEE OVERLAND WK MY14 6/13on BIG TUBE PROTECTION BAR WITH
GENUINE PARTS INSTALLATION INSTRUCTIONS
 GENUINE PARTS INSTALLATION INSTRUCTIONS 1. 2. 3. 4. DESCRIPTION: Accent light Kit APPLICATION: R42H (2011) PART NUMBER: 999F3 AW000 - Universal Accent Lighting Kit. KIT CONTENTS: Item QTY Description Service
928 Motorsports Supercharger Installation Copyright 2007, 928 Motorsports, LLC All Rights Reserved
 For Porsche 928 equipped with K-Jetronic (CIS) Fuel System Toll-Free Tech Hot Line: 877-FOR-928M 877-367-9286 Please do not copy this manual and give copies to your friends. Our ability to bring you this
Illustrated guide to changing the mode of a Spektrum DX6 transmitter
 Page 1 of 8 Illustrated guide to changing the mode of a Spektrum DX6 transmitter Purpose Follow this process if you want to change the mode of your Spektrum DX6 transmitter. You can change between mode
Do not have any open flame or heat sources close to the installation
 March 6, 2017 IS# 791 Page 1 of 16 Thank you for purchasing a Transfer Flow, Inc. 50-gallon replacement fuel system for your 2011-16 Ford diesel short bed pickup. This system will fit any 2x4 or 4x4 crew
5. E-axis assembly. 5. E-axis assembly. Written By: Jakub Dolezal manual.prusa3d.com/ Page 1 of 40
 5. E-axis assembly Written By: Jakub Dolezal 2018 manual.prusa3d.com/ Page 1 of 40 Step 1 Tools necessary for this chapter Needle-nose pliers for zip tie trimming. 2.5mm Allen key for M3 screws 2mm Allen
GENUINE PARTS INSTALLATION INSTRUCTIONS
 GENUINE PARTS INSTALLATION INSTRUCTIONS 1. 2. 3. 4. DESCRIPTION: APPLICATION: PART NUMBER: KIT CONTENTS: Accent light Kit Versa Note 999F3 4Z000 - Accent Lighting Kit. 999Q9 AY000 - Accessory Service Connector
Nissan GTR Alpha Fuel System
 Nissan GTR Alpha Fuel System Instructions V5 The goal of AMS is to provide the highest quality, best performing products available. By utilizing research and development, and rigorous testing programs
DODGE SLT Installation Instructions
 1994-97 DODGE SLT 40-20-40 Installation Instructions Step 1. Driver and Passenger Bottoms/DB&PB: All the parts of the seat cover are labeled inside. Use the seat cover piece identification chart to ID
Installation Instructions
 Installation Instructions Jeep JK Unlimited (2007 Present) Mounting Bracket and Air Line System Kit for ARB On-Board Twin Air Compressor (CKMTA12) Made in the USA Kit Contents: 1 Bracket for ARB Compressor
2. Remove the four bolts and lift the panel off. The white cap of filter module is underneath. It looks like this (seen removed from the tank).
.") This kit will fix the common non-start condition due to filter module separation. Both fuel pump and fuel filter are located in the fuel tank. The filter module is under the LHS (nearside) rear seat. The
This kit will fix the common non-start condition due to filter module separation. Both fuel pump and fuel filter are located in the fuel tank. The filter module is under the LHS (nearside) rear seat. The
SIM RIG GT. Product Manual
 SIM RIG GT Product Manual Introduction Thank you for purchasing the Heusinkveld Engineering Sim Rig GT! This is a compact, clean, adjustable and very stiff simulator frame for a GT-style simracing experience.
Steeda Lower Control Arms ( )
") Steeda Lower Control Arms (2005-2012) NOTE: The following installation was performed on a 2007 Mustang GT/California Special. The control arms were previously sold in a blue color, but now they are sold
Steeda Lower Control Arms (2005-2012) NOTE: The following installation was performed on a 2007 Mustang GT/California Special. The control arms were previously sold in a blue color, but now they are sold
INSTALLATION INSTRUCTIONS FOR
 For high temperature wells STEP 1 Clean Stuffing Box F8 & F8H Tools required: ratchet with 9/16 socket, 9/16 wrench, 3/32 Allen wrench, wire brush, cleaner/solvent, rags. DUAL PACK Dual Pack Stuffing Box
Replacing MK4 Golf/Jetta radiator mounts in-car
 Replacing MK4 Golf/Jetta radiator mounts in-car This is a guide to replacing the radiator mounts in a MK4 Golf/Jetta. This involves moving the core support to the service position which allows you to do
Cost - 41 ($68 approx) Time 2.5 hours approx
 Time 2.5 hours approx") Cost - 41 ($68 approx) Time 2.5 hours approx The early X3 (E83) from the first build to September 2004 was fitted with nasty black plastic door opener handles which were quickly superseded by a matt chrome
Cost - 41 ($68 approx) Time 2.5 hours approx The early X3 (E83) from the first build to September 2004 was fitted with nasty black plastic door opener handles which were quickly superseded by a matt chrome
EURO HEADLIGHT ADJUSTER REMOVAL AND INSTALLATION
 EURO HEADLIGHT ADJUSTER REMOVAL AND INSTALLATION This document is a step by step explanation of how to remove and replace the headlight adjusters in the Euro headlights. Parts needed to repair both headlights:
Bachmann GWR Earl (Dukedog) EM Finescale Conversion
 EM Finescale Conversion") Bachmann GWR Earl (Dukedog) EM Finescale Conversion Before you start, it is a good idea to have some small containers or snap top poly bags to put screws and components in for safe keeping...much better
Bachmann GWR Earl (Dukedog) EM Finescale Conversion Before you start, it is a good idea to have some small containers or snap top poly bags to put screws and components in for safe keeping...much better
Performance DSG Upgrade Installation Instructions using the Byteshooter tool version 1.4
 Performance DSG Upgrade Installation Instructions using the Byteshooter tool version 1.4 Applies to: 2009+ Volkswagen Golf/Jetta/Beetle/Passat and Similar This will guide you through the steps necessary
Fanatec GT3RS V1 to GT3RS V2 Tutorial
 Fanatec GT3RS V1 to GT3RS V2 Tutorial by Roy Visser 1 How to update your Fanatec GT3RS V1 wheel to a GT3RS V2 wheel Welcome to this guided and detailed tutorial for upgrading your Fanatec GT3RS V1 wheel
INSTALLATION INSTRUCTIONS
 INSTALLATION INSTRUCTIONS Accessory Application Publications No. REAR VIEW CAMERA ATTACHMENT PILOT AII 23620 Issue Date MAY 2002 PARTS LIST Attachment Kit : P/N 08B21-S9V-100 Control unit harness Rear
Assembly Guide for RedBot with Shadow Chassis
 Page 1 of 32 Assembly Guide for RedBot with Shadow Chassis Introduction The SparkFun RedBot is a platform for teaching basic robotics and sensor integration! It is based on the SparkFun RedBoard and fully
Installation instruction do88 Intercooler for Volvo S60 V70 XC70 S80 Turbo 00-09
 Installation instruction do88 Intercooler for Volvo S60 V70 XC70 S80 Turbo 00-09 1. This instruction shows how to replace the OEM intercooler with our performance intercooler. At this type of installation
GOMINIGO Third Brake Light Pulsar Kit. Installation Instructions
 Page 1 of 8 Mini Cooper Installation Instructions This kit allows the owner of any MINI Cooper or Cooper S to create a blinking effect from the third brake light assembly. The MINI Cooper being hit from
INSTALLATION INSTRUCTIONS
 INSTALLATION INSTRUCTIONS FUEL SURGE TANK INSTALLATION KIT 1999-2006 BMW E46 COUPE Document# 19-0056 Support: info@radiumauto.com Note: This kit was designed for a standard single pump Radium Engineering
GW-CRUISE Cruise Control Vanagon [84-91]
![GW-CRUISE Cruise Control Vanagon [84-91]](/thumbs/78/76865696.jpg "GW-CRUISE Cruise Control Vanagon [84-91]") Driving without cruise control on a long trip can be tiring. Update your vehicle with some modern convenience with this easy to install cruise control kit. Tools Needed Phillips screwdriver #2 Electric
Driving without cruise control on a long trip can be tiring. Update your vehicle with some modern convenience with this easy to install cruise control kit. Tools Needed Phillips screwdriver #2 Electric
INSTALLATION INSTRUCTIONS
 INSTALLATION INSTRUCTIONS Accessory Application Publications No. S 1998 CIVIC 2/3/4-DOOR All 18767 Issue Date SEP 1997 PARTS LIST Fog Light Kit: P/N 08V31-S01-100 Right fog light (marked R ) Fuse label
INSTALLATION INSTRUCTIONS
 INSTALLATION INSTRUCTIONS Accessory REMOTE ENGINE STARTER SYSTEM Application 2010 CIVIC 4-DOOR Publications No. AII 42460 Issue Date AUG 2009 PARTS LIST Remote Engine Starter Unit Kit P/N 08E91-E22-100B
Pontoon Assembly Instructions and manual. Read before using hoist.
 Page 1 Pontoon Assembly Instructions and manual. Read before using hoist. For Models 32BL18, 32BL22, 32BL25 and 42BL28 R Model 32BL22 Shown Proudly Made in Michigan By NuCraft Metal Products 402 Southline
LPE C5 Battery Relocation Kit
 LPE C5 Battery Relocation Kit The LPE C5 Corvette battery relocation kit improves vehicle weight distribution by moving weight to the rear of the vehicle. The improved weight distribution increases traction
Installation Instructions Table of Contents
 Installation Instructions Table of Contents Pre- Installation of Garage Storage Lift 2 Layout the Garage Storage Lift 3 Installing the strut Channels 3 Install the Drive Assembly 5 Install the Drive Shaft
INSTALLATION INSTRUCTIONS
 INSTALLATION INSTRUCTIONS Accessory REMOTE CONTROL ENGINE STARTER Application 2010 CR-V Publications No. AII 42612-42916 Issue Date OCT 2009 PARTS LIST Remote Engine Starter Unit Kit P/N 08E91-E22-101B
INSTALLATION INSTRUCTIONS
 INSTALLATION INSTRUCTIONS Accessory REMOTE CONTROL Application Publications No. 2012 ACCORD AII 46522 2-DOOR Issue Date (A/T ONLY) AUG 2011 PARTS LIST Remote Engine Starter Unit Kit P/N 08E91-E22-101A
The Go Baby Go Build Manual
 The Go Baby Go Build Manual The step-by-step guide to creating your own Go Baby Go Car 4488 Shockwave Robotics and Pacific University Index 1. List of Mat erials 2. Mechanical Assembly a. Installing the
Prerequisites: Shop Manual (recommended) pages 3-9 through 3-13.
 pages 3-9 through 3-13.") Prerequisites: Order your gaskets average about $25.00 bucks X 2 so $50.00 4NK-11193-00-00 Obtain a shim kit (Should have several 265 and 270s) (Some dealers will exchange) Obtain a Valve Bucket Tool YM-33961
Prerequisites: Order your gaskets average about $25.00 bucks X 2 so $50.00 4NK-11193-00-00 Obtain a shim kit (Should have several 265 and 270s) (Some dealers will exchange) Obtain a Valve Bucket Tool YM-33961
PRELIMINARY INSTALLATION INSTRUCTIONS. Remote Engine Starter Attachment Kit P/N 08E92-SNA-100B
 INSTALLATION INSTRUCTIONS Accessory Application Publications No. REMOTE ENGINE STARTER SYSTEM 2008 CIVIC 2-DOOR AII 38215 Issue Date OCT 2007 PARTS LIST Remote Engine Starter Unit Kit P/N 08E91-E22-100B
INSTALLATION INSTRUCTIONS
 INSTALLATION INSTRUCTIONS Accessory Application Publications No. SYSTEM S2000 AII 26324 Issue Date OCT 2004 PARTS LIST Headrest Speaker System P/N 08A54-S2A-100 3 Small wire ties 2 Headrest speakers 9
Modix Big-60 Assembly Manual Part 2
 Modix Big-60 Assembly Manual Part 2 Version 1.0, October 2017 Menu 1. Motors & End Stop Wiring... 3 2. Controller Wiring Check... 6 3. Extruder Wiring... 7 4. Electronic Box Cover... 9 5. Filament Sensor...
Hello, 0/ What you get in the package:
 Hello, Thanks for buying the Rade GARAGE 701 fairing kit. Before you start enjoying the conversion of your 701 into an Adventure bike, you can increase your self-confidence as a great mechanic by reading
INSTALLATION MANUAL. Thunderstone Manufacturing LLC 3400 West O Street Lincoln, NE (Fax)
") INSTALLATION MANUAL August 7 th 2018 43 /48 /50 2011 and Older Timpte STD/Split 36 Style Hopper Trailers with Roller Bearing Doors Kit #101533 for 96w & Kit #101534 for 102w Thunderstone Manufacturing
INSTALLATION MANUAL August 7 th 2018 43 /48 /50 2011 and Older Timpte STD/Split 36 Style Hopper Trailers with Roller Bearing Doors Kit #101533 for 96w & Kit #101534 for 102w Thunderstone Manufacturing
BMW E61 Hydraulic Pump replacement instructions
 BMW E61 Hydraulic Pump replacement instructions This DIY will guide you through the tasks needed to successfully replace your defective tailgate hydraulic pump Difficulty 3 of 10. The most difficult part
Combine Cover Manual
 Combine Cover Manual Installation Instructions Page 27 Operating Instructions Page 8 Warranty Page 8 Trouble Shooting Page 9 11 For Model s: Case I.H. 2388, 2188, 1688 and 1680 With a MAURER Hopper Extension
Combine Cover Manual
 Combine Cover Manual Installation Instructions Page 26 Operating Instructions Page 7 Warranty Page 7 Trouble Shooting Page 8 10 For Big Top Extension Model s: Case I.H. 8010, 8120 Please forward onto Customer
INSTALLATION INSTRUCTIONS
 INSTALLATION INSTRUCTIONS Accessory REMOTE CONTROL Application 2008 ACCORD 4-DOOR Publications No. AII 35365 Issue Date AUG 2007 PARTS LIST U Accessory User s Information Manual Remote Engine Starter Unit
INSTALLATION INSTRUCTIONS
 INSTALLATION INSTRUCTIONS Accessory REMOTE CONTROL Application Publications No. 2009 ACCORD AII 39977-40931 4-DOOR Issue Date (A/T ONLY) NOV 2008 PARTS LIST Remote Engine Starter Unit Kit P/N 08E91-E22-100A
Supply Valve Replacement
 This procedure is to help facilitate the replacement of the25.1-25.4 supply valves. Solenoid Supply Valves Note: You will need the following tools: Socket Wrench with extension and a 3/8 Socket Size 1
PASSENGER HAND WARMER KIT
 PASSENGER HAND WARMER KIT P/N 2879840 APPLICATION LOCK AND RIDE CONVERTIBLE PASSENGER SEAT BEFORE YOU BEGIN Read these instructions thoroughly and make sure all parts and tools are accounted for. Please
Automatic trunk lid retrofit BMW F10 Bj.2011 by laser21 bimmerfest.com
 Automatic trunk lid retrofit BMW F10 Bj.2011 by laser21 bimmerfest.com lukasko@gmail.com This is a short guide to help you retrofit the option SA316 - automatic trunk lid mechanism into your F10. That
Build your own THUNDERBIRD 2
 PACK 01 STAGE PAGE 01 Nose assembly and Elevator Car rear wheels 3 02 Cockpit interior and Elevator Car 1 completion 7 03 Missile launcher and Thunderbird 4 11 04 Nose assembly and the Tracy brothers 15
Educational Robot. Revision 2.0
 Educational Robot www.ridgesoft.com Revision 2.0 IntelliBrain-Bot Assembly Guide 1 Introduction This document provides instructions to guide you through assembly of your IntelliBrain -Bot. It takes approximately
1. Front Fascia Removal 1.1 Remove the 6 plastic clips that secure the upper valance, then remove. 1.2 Remove 6 upper bolts that hold the grille and f
 STRUT 2015 GMC Denali Collection Installation Manual " 1. Front Fascia Removal 1.1 Remove the 6 plastic clips that secure the upper valance, then remove. 1.2 Remove 6 upper bolts that hold the grille and
C4 Sound Deadening & Insulation Kit Interior Removal & Installation Instructions
 C4 Sound Deadening & Insulation Kit Interior Removal & Installation Instructions Ok, let's start with taking the radio bezel dash area off first. Here is what the OEM radio looks like, and the points you
V70XC Hood Latch Cable Adjustment Tools and parts needed. Hood Latch Cable Adjustment ( )
") V70XC Hood Latch Cable Adjustment 1998-2000 I had an annoying problem with my 2000 V70 XC and I couldn t find any references to figure out and fix the problem. When I pulled the hood release handle inside
V70XC Hood Latch Cable Adjustment 1998-2000 I had an annoying problem with my 2000 V70 XC and I couldn t find any references to figure out and fix the problem. When I pulled the hood release handle inside
2015 Mustang Lightbar (All Models) CDC#
 CDC#") 2015 Mustang Lightbar (All Models) CDC# 1511-7000-01 Components: 1 CDC Lightbar Note: READ instructions before starting installation!!! CDC Part# Driver side bracket 0511-6001-05 Passenger side bracket
2015 Mustang Lightbar (All Models) CDC# 1511-7000-01 Components: 1 CDC Lightbar Note: READ instructions before starting installation!!! CDC Part# Driver side bracket 0511-6001-05 Passenger side bracket
IMPORTANT! DO NOT THROW AWAY THE SHIPPING CARTON AND PACKING MATERIAL
 Operator s Manual IMPORTANT! DO NOT THROW AWAY THE SHIPPING CARTON AND PACKING MATERIAL ii Table of Contents Operator Safety... 1 Introduction... 2 Unpacking and Setup... 3 Unpacking... 3 Setup... 4 ROCKET
Rostra Electronic Cruise Control Install On a Stratoliner or Roadliner
 Rostra Electronic Cruise Control Install On a Stratoliner or Roadliner MATERIALS LIST: 1 - Rostra Part # 250-1223 (www.brandondist.com/products/cruise1223.htm) 1 - Signal Splitter part # 250-4369 1 - Engagement
Rebuilding the Power Steering Pump for a 2007 Honda Accord 4CYL
 Rebuilding the Power Steering Pump for a 2007 Honda Accord 4CYL Disclaimer: I have benefited greatly from others who have taken the time to post auto repair videos/tutorials online. To try and return the
Your G3 buggy is fitted with three switches on the front part of the body:
 CONTENTS Buggy operation... 3 General Maintenance... 5 Technical Maintenance... 6 Front wheel bearing replacement... 6 Rear wheel bearing replacement... 7 Chain replacement... 8 Chain Adjustment... 9 Brake
INSTALLATION INSTRUCTIONS
 INSTALLATION INSTRUCTIONS Accessory Application Publications No. ATTACHMENT (EX-L WITH NAVI) 2008 RIDGELINE AII 36587 Issue Date MAY 2007 PARTS LIST Attachment Kit P/N: 08B21-SJC-102 Template Rear camera