Head Lamp Installation Guide
|
|
|
- Marcus Alexander
- 6 years ago
- Views:
Transcription


1 Head Lamp Installation Guide This document explains the steps that need to be performed to ensure precise installation of the Jaguar XK Projector headlight system.

2 Step 1: Remove the existing head lights To remove the existing headlights per form the following steps: 1. Turn the steering wheel to full lock, as follows: 1. Right-hand headlamp left-hand lock. 2. Left-hand headlamp right-hand lock. Figure 1 2. Displace the wheel arch liner for access. 1. Remove the headlamp access panel cover by turning the T nut located at position 1 as displayed in Figure 1 until the cover comes free. 2. Lift the lower retaining catch and disconnect the lower edge of the access panel from the wheel arch liner. 3. Remove the access panel. 4. Remove the fixings which secure the front of the wheel arch liner to the body. 5. Reposition the wheel arch liner for access. NOTE: Removing the wheel arch liner from the body is not really necessary but it does make things a little easier.


3 Figure 2 3. Remove the headlamp. 1. The first nut is located at the bottom of the headlamp at position 2 as displayed in Figure 2. This nut is accessed via the headlamp access panel you just removed. NOTE: This nut is in a very awkward location and can be quite hard to remove. 2. Once you have the lower nut removed, remove the nut located at position 3 as displayed in Figure 2. This nut is attached to a bracket mounted onto the inner side of the engine frame as displayed in Figure 3. NOTE: Do not discard this nut as you will need to reuse it to install the new headlamp. Figure 3

4 3. With this nut removed, unscrew the bolt located at position 4 as displayed in Figure Now gently pull the headlamp towards the front of the car until it comes free. 5. If your car has headlamp washers, carefully disconnect the washer jet assembly from the headlamp and reposition clear of the headlamp. 6. With the headlamp free, unclip the electrical wire plug. NOTE: The plug has a clip mechanism on the back of it, and you have to lift the clip up to release the connectors. Lift this edge up to release the connector. Figure 4 You should now have the old headlamp removed.
5 Step 2: Install the new headlights. To install the new headlights perform the following steps: 1. Attach the rubber seal provided. Figure 5 The rubber seals can be found in the bag included in the package. The seals come joined together, so take the seals and gently pull them apart so you end up with two seals, one for each side. This leaves a 'clean' side and a slightly rough side. Make sure the 'clean' side is to the outside for a smooth look. Before attaching the seal, you need to clean the surface area that you will be attaching the seal to. Run your finger around the edge starting at the 'tip' of the wing and work around the edge. You will notice that there is a small lip; this is the area where you will be attaching the seal. NOTE: Even though the lip is small, don t worry the seal will stick. These things are REAL sticky. With the surface clean the seal should be attached by starting at the 'tip' of the wing and working your way around the edge, then tucking the last inch under where the light will go over the bumper as shown in figure 6, indicated by the white arrow. Figure 7 shows the seal in place.
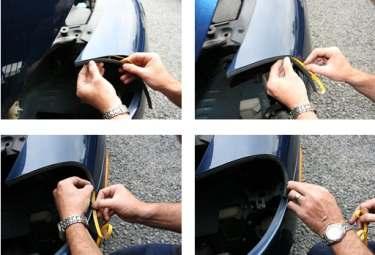
6 Figure 6
7 Figure 7 2. With the seal in place, take the new headlamp and position it in the headlight opening. 3. Connect the electrical plug. 4. Now gently wriggle the headlamp into place, making sure you line up the U bracket with the bolt attached to the bracket mounted onto the inner side of the engine frame as displayed in Figure 3 above. 5. Align the headlamp so that it is positioned correctly, i.e. it is positioned snuggly to the rubber seal. Then take the nut from the U bracket, and screw the nut onto the bolt securing it tightly. 6. Now take the top bolt that was supplied and screw it into place. 7. Check that the headlamp is aligned and positioned properly and now tighten the adjustable screw until it is nice and tight. Once you have done all this you should have the headlamp securely in place. Repeat for the other side. Now make sure you get your new lights aligned correctly and you are then good to go. Enjoy.
8


9 Daytime LED driving lights


10 Low Beam + Daytime LED driving lights


11 Low Beam + High Beam + Daytime LED driving lights
12 Low Beam + High Beam + Daytime LED driving lights + Hazards
VW SCIROCCO TWINTERCOOLER INSTALLATION INSTRUCTIONS
 VW SCIROCCO TWINTERCOOLER INSTALLATION INSTRUCTIONS Tools needed: T25 torx driver Small flat head screwdriver 12mm & 13mm socket, with ratchet Dremel or similar with cut off disc Large Phillips screwdriver
Installation instructions, accessories - Alarm, basic kit S60 / S80 / V70 / V70 XC / XC /
 S60 / S80 / V70 / V70 XC / XC70 Section Group Weight(Kg/Pounds) Year Month 3 36 0.67/1.47 2005 05 S60 2001, S60 2002, S60 2003, S60 2004, S60 2005, S60 2006, S60 2007, S60 2008, S60 2009, S80 (-06) 1999,
VW SCIROCCO R TWINTERCOOLER INSTALLATION INSTRUCTIONS
 VW SCIROCCO R TWINTERCOOLER INSTALLATION INSTRUCTIONS Tools needed: T25 torx driver Small flat head screwdriver 12mm & 13mm socket, with ratchet Dremel or similar with cut off disc Large Phillips screwdriver
Nissan Titan / / Front Bumper Installation Instructions. Removal. Hardware. 12mm/1.
 2004-2014 Nissan Titan 20-915-04 / 22-915-04 / 24-915-04 Front Bumper Installation Instructions Hardware 6 ½ Hex Bolts 10 ½ Lock Washers 16 ½ Flat washers 6 ½ Hex Nuts 4 12mm/1.25 x 35mm Removal 1. First,
Shelby GT500 Front Fascia Conversion Kit (05-09 All) Item # Installation Time: 1 Day. Required tools:
 Item # Installation Time: 1 Day. Required tools:") Shelby GT500 Front Fascia Conversion Kit (05-09 All) Item #53611 Installation Time: 1 Day Required tools: Phillips Screw driver 10mm Socket + Ratchet/Wrench 8mm Socket + Ratchet/Wrench 5mm Socket + Ratchet/Wrench
Shelby GT500 Front Fascia Conversion Kit (05-09 All) Item #53611 Installation Time: 1 Day Required tools: Phillips Screw driver 10mm Socket + Ratchet/Wrench 8mm Socket + Ratchet/Wrench 5mm Socket + Ratchet/Wrench
MAZDA 3 MPS FRONT MOUNTING INTERCOOLER INSTALLATION
 MAZDA 3 MPS FRONT MOUNTING INTERCOOLER INSTALLATION Tools needed: 7mm Hose clamp driver 10mm,12mm sockets and suitable ratchet with extensions Flat bladed screwdriver Pliers Phillips screwdriver KIT CONTENTS
Bulb Renewal TOP ACCESS COVER
 TOP ACCESS COVER To gain access to the headlight units, the top cover must be removed. Unscrew and remove the six fasteners (A). Remove the top cover. After changing the defective bulb, refit the cover,
FIAT 500 ABARTH FRONT MOUNTED INTERCOOLER INSTALLATION
 FIAT 500 ABARTH FRONT MOUNTED INTERCOOLER INSTALLATION Tools needed: T30 screwdriver/bit 10mm socket, suitable extension and ratchet 17mm socket, suitable extension and ratchet 10mm ratchet spanner Pozidriv/Phillips
VOLKSWAGEN GOLF MK5 GTI 2.0 TFSI FMIC INSTALLATION INSTRUCTIONS
 VOLKSWAGEN GOLF MK5 GTI 2.0 TFSI FMIC INSTALLATION INSTRUCTIONS Please thoroughly read through and familiarize yourself with these instructions in their entirety prior to beginning any part of the installation
Installation Instructions :BMW E39 M5 : Page 1
 Installation Instructions :BMW E39 M5 : Page 1 1. We will start by removing the front bumper. Remove the 3 x 8mm hex head bolts in the wheel arch liners on both sides. Turn the wheels to gain access. 2.
Fitting Instructions For The TDV6 EGR Blanking Kit To A 2006 Model Discovery 3 TDV6 GHSE
 Part Number DA1112 Fitting Instructions For The TDV6 EGR Blanking Kit To A 2006 Model Discovery 3 TDV6 GHSE You do this modification at your own risk. Britpart won t be held responsible for what is written
COLD AIR INTAKE INSTALLATION INSTRUCTIONS
 COLD AIR INTAKE INSTALLATION INSTRUCTIONS # D760-0030 Fits: 2007-10 135i (E82, E88; with N54 engine) 2007-08 335i/xi (E90) 2007-10 335i (E92, E93; with N54 engine) Congratulations for being selective enough
OIL COOLER KIT INSTALLATION INSTRUCTIONS PART NUMBER D
 OIL COOLER KIT INSTALLATION INSTRUCTIONS PART NUMBER D570-0904 APPLICATION: 2011-2012 E90 335i/xi (N55 engine) with BMW standard bumper and with stock oil cooler Congratulations for being selective enough
Ford Mustang V6 OEM-Style Fog Light Kit Parts List: Quantity: Tool List:
 2015-2017 Ford Mustang V6 OEM-Style Fog Light Kit Parts List: Quantity: Tool List: LED Foglights/ Bezels 2 Flat head & Phillips screwdriver (if you ordered part#3600) Ratchet & Socket set OR Wiring harness
Bulb Renewal OVERVIEW
 Bulb Renewal OVERVIEW It is important that only Jaguar bulbs of the type specified are used when renewing bulbs. Before renewing bulbs, switch off the ignition and light switches. Top cover To gain access
MHO57SY / NB7HO57SY / NBHO57SY FITTING INSTRUCTIONS
 MHO57SY / NB7HO57SY / NBHO57SY FITTING INSTRUCTIONS REPLACES: 17.06.07 REVISED: 09.07.10 HONDA CRV 2/07on MIDI TUBE, 76mm SERIES 2 NUDGE BAR & 76mm NUDGE BAR VEHICLE FRONTAL PROTECTION SYSTEM (VFPS) FOR
CBR250 Fitment Guide
 CBR250 Fitment Guide 35W Bulbs Before 60W GT150 Power2Night Bulbs The mod is designed to allow the headlights to be upgraded from the 35W bulbs to 60W bulbs. Normally, this would cause flat battery trouble
Installation Instructions : Jaguar F-Type Intake System : Page 1
 Installation Instructions : Jaguar F-Type Intake System : Page 1 1. Remove the undertray all the Torx bolts and the hex bolts holding the splitters in place need to be removed. 2. Starting with the right
The M7 Direct Flow Intercooler (DFIC) Installation Guide
 Installation Guide") The M7 Direct Flow Intercooler (DFIC) Installation Guide This information is meant only as a guide. The author of this information,, or any M7 Tuning employees assumes no liabilities for any outcomes resulting
The M7 Direct Flow Intercooler (DFIC) Installation Guide This information is meant only as a guide. The author of this information,, or any M7 Tuning employees assumes no liabilities for any outcomes resulting
COLD AIR INTAKE INSTALLATION INSTRUCTIONS
 COLD AIR INTAKE INSTALLATION INSTRUCTIONS # D760-0029 Fits: 2009-10 335i/xi (E90; with N54 engine) Congratulations for being selective enough to use a Dinan Engineering Cold Air Intake. We have spent many
Saab 9-3 CV M04-, 4D/5D M06-
 SCdefault 900 Installation instructions SITdefault MONTERINGSANVISNING INSTALLATION INSTRUCTIONS MONTAGEANLEITUNG INSTRUCTIONS DE MONTAGE Sports chassis Accessories Part No. Group Date Instruction Part
2. Remove the four bolts and lift the panel off. The white cap of filter module is underneath. It looks like this (seen removed from the tank).
.") This kit will fix the common non-start condition due to filter module separation. Both fuel pump and fuel filter are located in the fuel tank. The filter module is under the LHS (nearside) rear seat. The
This kit will fix the common non-start condition due to filter module separation. Both fuel pump and fuel filter are located in the fuel tank. The filter module is under the LHS (nearside) rear seat. The
ITEM QTY CHECK PART NUMBER DESCRIPTION
 PART #21128 2010 Camaro Cold Air Induction Stage II PACKING LIST Before installation, use this check list to make sure all necessary parts have been included. ITEM QTY CHECK PART NUMBER DESCRIPTION 1.
Installing Custom Puddle Lamps 2009 Subaru Forester
 Installing Custom Puddle Lamps 2009 Subaru Forester By John Perkins This guide will assist you in installing a set of LED puddle lamps on a 2009 Subaru Forester. This is NOT using the $150 Subaru kit.
INSTALLATION GUIDE PREMIUM FRONT BUMPER FOR RAM AEV30304AA Last Updated: 09/18/17
 AEV30304AA Last Updated: 09/18/17 PREMIUM FRONT BUMPER FOR RAM 1500 INSTALLATION GUIDE PLEASE READ BEFORE YOU START To guarantee a quality installation, we recommend reading these instructions thoroughly
RFB MK6 Jetta Fog Light Kit Wiles Rd.Coral Springs, FL
 What s Included: Tools Required: (2) Fog Lights (2) Front Grills Wire Harness Headlight Switch Hardware Kit T25 Torx Wire Cutters 10mm Socket and Rachet Headlight Switch Composite Wedge Tool 01 1. Remove
OIL COOLER KIT INSTALLATION INSTRUCTIONS PART NUMBER D E92 335is (N54 engine) with BMW M-Technic bumper and with stock oil cooler
 with BMW M-Technic bumper and with stock oil cooler") OIL COOLER KIT INSTALLATION INSTRUCTIONS PART NUMBER D570-0923 APPLICATION: 2011 E92 335is (N54 engine) with BMW M-Technic bumper and with stock oil cooler Congratulations for being selective enough to
OIL COOLER KIT INSTALLATION INSTRUCTIONS PART NUMBER D570-0923 APPLICATION: 2011 E92 335is (N54 engine) with BMW M-Technic bumper and with stock oil cooler Congratulations for being selective enough to
LEGO Ferrari F40 (10248) Lighting Kit Installation Instructions
 Lighting Kit Installation Instructions") LEGO Ferrari F40 (10248) Lighting Kit Installation Instructions This guide walks you through the steps to install the Brickstuff lighting kit for the LEGO Ferrari F40 (LEGO set #10248). Written By: Rob
LEGO Ferrari F40 (10248) Lighting Kit Installation Instructions This guide walks you through the steps to install the Brickstuff lighting kit for the LEGO Ferrari F40 (LEGO set #10248). Written By: Rob
There is also a 115 BHP version which uses a Siemens SID807 ECU, Siemens injectors and a Garrett GTD1244VZ VNT turbo charger.
 The 1.6 8V HDI engine is fitted to vehicles after 2010 and comes with three different power options. There are 75 BHP and 92 BHP models which both use the same injectors, turbo and ECU. These come fitted
INSTALLATION INSTRUCTIONS ARMOUR FRONT BUMPER W/O LED LIGHTS FOR CHEVY COLORADO PART # AFB-CO15
 INSTALLATION INSTRUCTIONS ARMOUR FRONT BUMPER W/O LED LIGHTS FOR CHEVY COLORADO 15-17 PART # AFB-CO15 ARMOUR FRONT BUMPER PARTS LIST: 1 ARMOUR Bumper Assembly 2 8mm x 25mm Hex Bolts 1 Driver/left Frame
Installation instruction do88 performance Intercooler for Volvo S60/V60 T6 MY10-
 Installation instruction do88 performance Intercooler for Volvo S60/V60 T6 MY10-1. This instruction shows how to replace the OEM intercoolers with do88 performance intercoolers. At this type of installation
OIL COOLER KIT INSTALLATION INSTRUCTIONS PART NUMBER D E92 335i/xi (N55 engine) with BMW Standard bumper and with stock oil cooler
 with BMW Standard bumper and with stock oil cooler") OIL COOLER KIT INSTALLATION INSTRUCTIONS PART NUMBER D570-0924 APPLICATION: 2011-12 E92 335i/xi (N55 engine) with BMW Standard bumper and with stock oil cooler Congratulations for being selective enough
OIL COOLER KIT INSTALLATION INSTRUCTIONS PART NUMBER D570-0924 APPLICATION: 2011-12 E92 335i/xi (N55 engine) with BMW Standard bumper and with stock oil cooler Congratulations for being selective enough
Subaru Front Mount Intercooler Kit STI Subaru Front Mount Intercooler Kit STI
 Subaru Front Mount Intercooler Kit STI 2008-2014 715500 Subaru Front Mount Intercooler Kit STI 2008-2014 Congratulations on your purchase of the Subaru Front Mount Intercooler Kit STI 2008-2014. The following
Vehicle Specific Instruction Notes
 Vehicle Specific Instruction Notes Most later model vehicles use a plastic and felt anchoring strip in place of the older metal rods. We have provided rod pouches on all of our new seat skins that will
EAT116SY. 5. Remove three 10mm head bolts from inner guards and pull rearward to clear bumper side.
 EAT116SY REPLACES: 30.05.12 REVISED: 22.08.12 FITTING INSTRUCTIONS TOYOTA PRADO 11/09on ARC PROTECTION BAR WITH PARKING SENSORS AND HID HEADLIGHTS VEHICLE FRONTAL PROTECTION SYSTEM (VFPS) FOR AIR BAG &
NB6K49SY FITTING INSTRUCTIONS KIA SORENTO 63MM STANDARD NUDGE BAR VEHICLE FRONTAL PROTECTION SYSTEM (VFPS) FOR AIR BAG & ADR COMPLIANT VEHICLES
 FOR AIR BAG & ADR COMPLIANT VEHICLES") NB6K49SY FITTING INSTRUCTIONS REPLACES: 00.00.00 REVISED: 31.05.07 Check installation hardware before commencing. 1. Lift bonnet KIA SORENTO 63MM STANDARD NUDGE BAR VEHICLE FRONTAL PROTECTION SYSTEM (VFPS)
NB6K49SY FITTING INSTRUCTIONS REPLACES: 00.00.00 REVISED: 31.05.07 Check installation hardware before commencing. 1. Lift bonnet KIA SORENTO 63MM STANDARD NUDGE BAR VEHICLE FRONTAL PROTECTION SYSTEM (VFPS)
Removal of bumper & intercooler:
 R56 Front Mount Intercooler 090107 Thank you for purchasing the ALTA Performance R56 Front Mount Intercooler kit. Persons experienced in the proper operation of MINI engines should only perform this installation.
Replacing MK4 Golf/Jetta radiator mounts in-car
 Replacing MK4 Golf/Jetta radiator mounts in-car This is a guide to replacing the radiator mounts in a MK4 Golf/Jetta. This involves moving the core support to the service position which allows you to do
Mustang GT Splitter Bracket Kit M-17A626-MB INSTALLATION INSTRUCTIONS
 !!! PLEASE READ THE FOLLOWING INSTRUCTIONS CAREFULLY PRIOR TO INSTALLATION!!! Caution: If you are not confident that you can complete the installation safely, have it completed by a certified technician!
2010 Toyota Prius Fog Light Retrofit
 2010 Toyota Prius Fog Light Retrofit A DIY prospective Last updated: Friday, December 25, 2009 *** Disclaimer Use this document and its contents at your own risk! *** Forward: This document was compiled
DODGE SLT Installation Instructions
 1994-97 DODGE SLT 40-20-40 Installation Instructions Step 1. Driver and Passenger Bottoms/DB&PB: All the parts of the seat cover are labeled inside. Use the seat cover piece identification chart to ID
C6 RS6 Front Headlight Bulb Change Procedure
 C6 RS6 Front Headlight Bulb Change Procedure This PDF is split into 3 sections as follows Remove the front Bumper Remove the Headlight Change the Bulb All of these procedures are taken from Elsawin, the
LAND ROVER DISCOVERY 3 ARB BULL BAR AND WINCH BAR WARNING
 LAND ROVER DISCOVERY 3 ARB BULL BAR AND WINCH BAR PART No 3432150 DISCOVERY 3 WINCH BAR PART No 3232150 DISCOVERY 3 BULL BAR WARNING FOR VEHICLES EQUIPPED WITH SRS AIRBAG WHEN INSTALLED IN ACCORDANCE WITH
KJ JEEP COMBINATION BULL BAR WARNING
 KJ JEEP COMBINATION BULL BAR PRODUCT NUMBER FITTING KIT NUMBER 3450120 6171962 WARNING FOR VEHICLES EQUIPPED WITH SRS AIRBAG WHEN INSTALLED IN ACCORDANCE WITH THESE INSTRUCTIONS, THE FRONT PROTECTION BAR
AUDI TT RS FRONT MOUNTED INTERCOOLER INSTALLATION
 AUDI TT RS FRONT MOUNTED INTERCOOLER INSTALLATION Tools needed: T20 screwdriver/bit T25 screwdriver/bit T30 screwdriver/bit 10mm deep reach socket and suitable ratchet Sharp Stanley knife or Dremel Brake
 1. Both Front Wheel Arch Protectors Front Side - Remove NOTE: Repeat this procedure on the opposite side. 1. Remove the screws (A) and the clips (B). 2. Detach the clips (C, D) with the trim tool, then
 This document provides instructions for removing and installing a Front Wheel / Rotor on a Ducati Superbike. The torque values used are for the 748/916/996 from 1994 to 2001 and may be applicable for later
NBN110SY FITTING INSTRUCTIONS. NISSAN X-TRAIL 01/10 on 76mm NUDGE BAR VEHICLE FRONTAL PROTECTION SYSTEM (VFPS) FOR AIR BAG AND ADR COMPLIANT VEHICLES
 FOR AIR BAG AND ADR COMPLIANT VEHICLES") NBN110SY FITTING INSTRUCTIONS REPLACES: 00.00.00 REVISED: 15.12.10 NISSAN X-TRAIL 01/10 on 76mm NUDGE BAR VEHICLE FRONTAL PROTECTION SYSTEM (VFPS) FOR AIR BAG AND ADR COMPLIANT VEHICLES Check installation
NBN110SY FITTING INSTRUCTIONS REPLACES: 00.00.00 REVISED: 15.12.10 NISSAN X-TRAIL 01/10 on 76mm NUDGE BAR VEHICLE FRONTAL PROTECTION SYSTEM (VFPS) FOR AIR BAG AND ADR COMPLIANT VEHICLES Check installation
Driver/left Corner Fill Panel. Passenger/Right Corner Fill Panel Left and Right Bar Light L Brackets. (2) Plastic Plugs. License Plate Bracket
 Plastic Plugs. License Plate Bracket") LD1 FRONT BUMPER PART#R102615 R102618 PARTS LIST: 1 LD1 Bumper Assembly 8 10mm Lock Washers 1 Driver/left Frame Mounting Bracket 8 10mm Hex Nuts 1 Passenger/right Frame Mounting Bracket 2 8-1.25mm x 25mm
LD1 FRONT BUMPER PART#R102615 R102618 PARTS LIST: 1 LD1 Bumper Assembly 8 10mm Lock Washers 1 Driver/left Frame Mounting Bracket 8 10mm Hex Nuts 1 Passenger/right Frame Mounting Bracket 2 8-1.25mm x 25mm
4 th Gen 4 Runner Front Bumper - Installation Instructions:
 www.shrockworks.com info@shrockworks.com 877-474-7625 4 th Gen 4 Runner Front Bumper - Installation Instructions: Thank you for purchasing a ShrockWorks product. We are confident you will enjoy it for
JBA Cat4ward Shorty Header Install (05-10 Mustang GT and Bullitt)
") JBA Cat4ward Shorty Header Install (05-10 Mustang GT and 08-09 Bullitt) Installation Time: 6-8 Hours (Depending on Tools and Help) Tools Required: 8mm Socket 10 mm Socket 13mm Socket 15mm Deep Socket Ratchet
JBA Cat4ward Shorty Header Install (05-10 Mustang GT and 08-09 Bullitt) Installation Time: 6-8 Hours (Depending on Tools and Help) Tools Required: 8mm Socket 10 mm Socket 13mm Socket 15mm Deep Socket Ratchet
OIL COOLER KIT INSTALLATION INSTRUCTIONS PART NUMBER D E92 335i/xi without stock oil cooler
 OIL COOLER KIT INSTALLATION INSTRUCTIONS PART NUMBER D570-0921 APPLICATION 2007-08 E92 335i/xi without stock oil cooler Congratulations for being selective enough to use a Dinan Engineering Oil Cooler
VRSC-DX Truck-Lite LED Headlight Installation Instructions
 VRSC-DX Truck-Lite LED Headlight Installation Instructions The following Instructions are for installing a 7 Truck-Lite LED headlight into a Harley Davidson VRSC-DX Night Rod Special fairing. Other 7 headlights
J2 Remove sound insulation/knee guard 1 and side panel 2 on center console
 J1 Preparations Drive car forward on a level surface so that wheels are straight. Disconnect battery negative lead. Turn ignition key to position 1 so that steering lock is off. J2 Remove sound insulation/knee
Important note. Important Note. Telephone: Fax: VAT Registration No.:
 Telephone: Fax: VAT Registration No.: Important note NOTE: Timing belt check and replacement intervals are subject to change at any time. To ensure that you are using the most up-to-date and accurate information
How to remove 206GTi front bumper ( PVL)
") This is how it looks like with the old grill... and this closer.. Remove the four mushroom clips (holding the plastic grill to the car) by ae second one three ribs to the right of the filler hole, in the
This is how it looks like with the old grill... and this closer.. Remove the four mushroom clips (holding the plastic grill to the car) by ae second one three ribs to the right of the filler hole, in the
Making Instructions Version 2.1 for Windows
 Making Instructions Version 2.1 for Windows Ohbot Ltd. 2017 About Ohbot has seven motors. Each connects to the Ohbrain circuit board and this connects to a computer using a cable. Ohbot software allows
Right Bar Light L Bracket Left Bar Light L Bracket. License Plate Bracket
 LD1 FRONT BUMPER PART#R102616 R102619 PARTS LIST: 1 LD1 Bumper Assembly 16 10mm x 27mm OD x 3mm Flat Washers 1 Driver/left Frame Mounting Bracket 8 10mm Lock Washers 1 Passenger/right Frame Mounting Bracket
SCdefault. 900 Installation instructions
 SCdefault 900 Installation instructions SITdefault Sports chassis MONTERINGSANVISNING INSTALLATION INSTRUCTIONS MONTAGEANLEITUNG INSTRUCTIONS DE MONTAGE Accessories Part No. Group Date Instruction Part
COLD AIR INTAKE INSTALLATION INSTRUCTIONS PART NUMBER D A. APPLICATION: E36/7 M-Roadster or M-Coupe 3.
 COLD AIR INTAKE INSTALLATION INSTRUCTIONS PART NUMBER D760-0323A APPLICATION: 1998-00 E36/7 M-Roadster or M-Coupe 3.2 Liter PARTS LIST Air Filter Assembly 3 1/2" Tube Intake Shield Silicone Hose Airflow
SCION xa 2004 FOG LIGHT Section I Installation Preparation. Part Number: General Applicability
 Section I Installation Preparation Part Number: 81025 52080 Section I Installation Preparation Kit Contents Item # Quantity Reqd. Description 1 1 Assembly, RH 2 1 Assembly, LH 3 1 Switch, 4 1 Relay, 5
BJ74SY FITTING INSTRUCTIONS
 BJ74SY FITTING INSTRUCTIONS REPLACES: 00.00.00 REVISED: 05.08.13. Check installation hardware before commencing. 1. Lift bonnet. JEEP GRAND CHEROKEE OVERLAND WK MY14 6/13on BIG TUBE PROTECTION BAR WITH
Nissan GT-R Intercooler Pipe Kit
 Nissan GT-R Intercooler Pipe Kit The goal of AMS is to provide the highest quality, best performing products available. By utilizing research and development, and rigorous testing programs AMS will never
AB65KVZS180 ITG Maxogen Airbox Kit Fitting Instructions
 AB65KVZS180 ITG Maxogen Airbox Kit Fitting Instructions 1 AB65KVZS Performance Air Box Fitting Instructions: Rover 45 MG ZS180 (2.5 V6) PARTS LIST: QTY Description 1 X AB65C Carbon Air Box (with 6mm drain
Fitting the Bell Auto Services (B-A-S) TDV6 EGR Blanking Kit to a 2006 model Discovery 3 TDV6 HSE
 TDV6 EGR Blanking Kit to a 2006 model Discovery 3 TDV6 HSE") Fitting the Bell Auto Services (B-A-S) TDV6 EGR Blanking Kit to a 2006 model Discovery 3 TDV6 HSE Before I describe how I did this, I must first thank other members of the Disco3.co.uk forum (namely J,moore
Fitting the Bell Auto Services (B-A-S) TDV6 EGR Blanking Kit to a 2006 model Discovery 3 TDV6 HSE Before I describe how I did this, I must first thank other members of the Disco3.co.uk forum (namely J,moore
RedlineGoods Tacoma Installation Manual
 RedlineGoods 2016+ Tacoma Installation Manual AUTOMATIC SHIFT BOOT AND EBRAKE BOOT Press down on the factory shift boot collar to disconnect it from the shift knob. Unscrew shift knob Pull up on the rear
Passenger/Right Top Support Bracket. (2) 10mm Nut Plates
 10mm Nut Plates") PARTS LIST: 1 Extreme Grille Guard 16 12mm x 32mm OD x 3mm Flat Washers 1 Driver/Left Frame Mounting Bracket 10 12mm Lock Washers 1 Passenger/Right Frame Mounting Bracket 10 12mm Hex Nuts 1 Driver/Left
PARTS LIST: 1 Extreme Grille Guard 16 12mm x 32mm OD x 3mm Flat Washers 1 Driver/Left Frame Mounting Bracket 10 12mm Lock Washers 1 Passenger/Right Frame Mounting Bracket 10 12mm Hex Nuts 1 Driver/Left
Mikuni RS Carburetor Conversion
 Mikuni RS Carburetor Conversion After putting your carbies on the bench or the kitchen table if the wife is out, you will see that the linkages may be in different positions depending on which brand of
GMC Mesh Grille
 921701560 GMC 2016-18 1500 Mesh Grille Thank you for choosing Rough Country for all your lighting needs. Please read instructions before beginning installation. Check the kit hardware against the kit contents
FMCZTINT Mitsubishi Colt CZT front mounting intercooler installation
 FMCZTINT Mitsubishi Colt CZT front mounting intercooler installation Tools needed: Drill with 8mm HSS drill bit, hacksaw, dremel/stanley knife 3/8 drive ratchet with extension and 10mm,13mm sockets Torx
SAFETY SENSORS FIELD OF VIEW WILL BE ALTERED WITH USE OF THE REPLACEMENT BUMPER. Injury hazard
 SAFETY Your safety and the safety of others is very important. In order to help you make informed decisions about safety, we have provided installation instructions and other information. These instructions
INSTALLATION INSTRUCTIONS
 INSTALLATION INSTRUCTIONS Accessory S P/N 08P00-T0A-00 Application 04 CR-V Publications No. AII 50030 Issue Date JULY 03 PARTS LIST TOOL AND SUPPLIES REQUIRED Phillips screwdriver Pushpin Left front splash
Replacing Your 2nd Generation Battery Pack
 Replacing Your 2nd Generation Battery Pack Video tutorial: https://www.youtube.com/watch?v=xvcfwpo8rok Tools needed: 4mm hex tool. If you do not have a hex wrench, please email us at recall@boostedboards.com
M MBKIT 2013 MUSTANG GT/V6 FRONT BOSS SPLITTER KIT INSTALLATION INSTRUCTIONS
 Please visit www.fordracingparts.com for the most current instruction information!!! PLEASE READ ALL OF THE FOLLOWING INSTRUCTIONS CAREFULLY PRIOR TO INSTALLATION. AT ANY TIME YOU DO NOT UNDERSTAND THE
Instructions for Assembling Driving Wheels, Axles and Crankpins
 Instructions for Assembling Driving Wheels, Axles and Crankpins (Version 1; October 2008) Introduction These instructions explain how to assemble Exactoscale 4mm scale driving wheels, axles and crankpins
09-12 Dodge 4WD /4 Body Lift
 92RC80000 09-12 Dodge 4WD 1500 1 1/4 Body Lift Thank you for choosing Rough Country for all your suspension needs. Rough Country recommends a certified technician install this kit. Attempts to install
Installation instructions, accessories - Fuel driven heater 912-D
 XC90 Section Group Weight(Kg/Pounds) Year Month 8 87 2002 10 XC90 2003 D5244T, XC90 2004 D5244T, XC90 2005 D5244T AW50/51 AWD, XC90 2006 D5244T, XC90 2006 D5244T AW50/51 AWD D5244T R8703687 Page 1 of 20
INSTALLATION INSTRUCTIONS ELEVATION FRONT BUMPER DODGE RAM
 INSTALLATION INSTRUCTIONS PARTS LIST: 1 Elevation Bumper Assembly 24 12mm x 37mm OD x 3mm Flat Washers 2 Frame Mounting Brackets 12 12mm Nylon Lock Nuts 8 12-1.75mm x 50mm Hex Bolts 2 License Plate Mounting
Lexus ES Fine Mesh and Adaptive Cruise Control Fine Mesh Grilles Upper and Lower Replacements
 IMPORTANT: PLEASE KEEP THIS INSTRUCTION MANUAL FOR FUTURE REFERENCE! 2013-15 Lexus ES Fine Mesh and Adaptive Cruise Control Fine Mesh Grilles Upper and Lower Replacements Part #1372-0102-13 / Black Ice
Heated Bed Installation Instructions
 Heated Bed Installation Instructions Overview The glass panel is heated by way of a heater element which is bonded to the glass panel and controlled by a digital temperature controller. The temperature
---Optional Items---
 1 2 3 4 5 6 ---Optional Items--- 10 9 11 7 8 12 This package should contain: 1. One (1) CorkSport Crashbar Weldment 2. Eight (8) M8x1.25x20 mm Bolts 3. Eight (8) M8x1.25mm Nyloc Nuts 4. Sixteen (16) M8
RS-2 SINGLE ACTION REAR BUMPER WITH TIRE CARRIER INSTALL MANUAL FOR JEEP WRANGLER ALL MODELS.
 RS-2 SINGLE ACTION REAR BUMPER WITH TIRE CARRIER INSTALL MANUAL FOR 2007-2016 JEEP WRANGLER ALL MODELS. Rear Bumper Installation Instructions 1) Remove factory rear bumper, (this includes all tow hitch
NBMB49SY REPLACES: REVISED:
 NBMB49SY REPLACES: 00.00.00 REVISED: 14.03.12 FITTING INSTRUCTIONS MERCEDES VITO 02-11 ON NUDGE BAR VEHICLE FRONTAL PROTECTION SYSTEM (VFPS) FOR AIR BAG & ADR COMPLIANT VEHICLES Check installation hardware
Cold Air Intake Installation Instructions
 Page 1/5 3.04 INS262 BAVARIAN AUTOSPORT Cold Air Intake Installation Instructions NOTE: Throughout the instructions the term AFM is used. It refers to the Air Flow Meter which is located between the engine
AEV30308AA Last Updated: 05/31/18. 4 DUALSPORT sc SUSPENSION system for RAM 1500 air ride standard and rebel INSTALLATION GUIDE
 AEV30308AA Last Updated: 05/31/18 4 DUALSPORT sc SUSPENSION system for RAM 1500 air ride standard and rebel INSTALLATION GUIDE PLEASE READ BEFORE YOU START TO GUARANTEE A QUALITY INSTALLATION, WE RECOMMEND
INSTALLATION INSTRUCTIONS
 COLD AIR INTAKE INSTALLATION INSTRUCTIONS PART NUMBER D760-0390C APPLICATION: 1999-2003 E39 M5 PARTS LIST 1 Left Aluminum Intake Tube 1 Air Pump Bracket (A) 1 Right Aluminum Intake Tube 1 Air Pump Bracket
ECLIPSE CCFL ANGEL EYES FITTING GUIDE COURTESY OF CHROMELINE DESIGN
 ECLIPSE CCFL ANGEL EYES FITTING GUIDE COURTESY OF BEN @ CHROMELINE DESIGN Page 1 of 8 : Thank you for purchasing Eclipse Lights for your BMW E36. Please read through these instructions carefully before
We thank you for purchasing a manual petcock conversion kit from Murphs!
 We thank you for purchasing a manual petcock conversion kit from Murphs! The first step is removing the gas tank from the bike. We suggest running the tank down to reserve before removal, both for the
LED Fog Light. Conflicts Note: 1226, General Applicability Fits Models Additional Items Required For Installation
 LED Fog Light Year & Model Part Number Conflicts Note: 1226, 1228 2017 Prius TPR-817 General Applicability Fits Models 1221 1225 1223 1227 1224 Additional Items Required For Installation Items 1 N/A 2
Z5 Coil (80) GENERAL. BAM: Bomber Aerospace Material. Special alloy developed from aerospace material. Ø TRAVEL 80 55
 GENERAL. BAM: Bomber Aerospace Material. Special alloy developed from aerospace material. Ø TRAVEL 80 55") (8) 175 8 Ø3 +.5 L.MAX=461 L.L.=451 L.MIN=371 ±2 396 ±2 TRAVEL 8 55 18 Ø3 15 2 -.1 +1 248.5 GENERAL The fork is sprung by a mechanical coil system and uses hydraulic rebound damping. Spring pre-load adjustment
(8) 175 8 Ø3 +.5 L.MAX=461 L.L.=451 L.MIN=371 ±2 396 ±2 TRAVEL 8 55 18 Ø3 15 2 -.1 +1 248.5 GENERAL The fork is sprung by a mechanical coil system and uses hydraulic rebound damping. Spring pre-load adjustment
MKVI Jetta Fog Light Kit
 MKVI Jetta Fog Light Kit Part Number VW Jetta Fog Light Installation This tutorial is provided as a courtesy by ECS Tuning. Proper service and repair procedures are vital to the safe, reliable operation
NBF38SY FITTING INSTRUCTIONS. FORD TERRITORY 7/14on 76MM NUDGE BAR VEHICLE FRONTAL PROTECTION SYSTEM (VFPS) FOR AIR BAG & ADR COMPLIANT VEHICLES
 FOR AIR BAG & ADR COMPLIANT VEHICLES") NBF38SY FITTING INSTRUCTIONS COMMENCES: 280417 REVISED: 000000 Check installation hardware before commencing FORD TERRITORY 7/14on 76MM NUDGE BAR VEHICLE FRONTAL PROTECTION SYSTEM (VFPS) FOR AIR BAG &
NBF38SY FITTING INSTRUCTIONS COMMENCES: 280417 REVISED: 000000 Check installation hardware before commencing FORD TERRITORY 7/14on 76MM NUDGE BAR VEHICLE FRONTAL PROTECTION SYSTEM (VFPS) FOR AIR BAG &
Your G3 buggy is fitted with three switches on the front part of the body:
 CONTENTS Buggy operation... 3 General Maintenance... 5 Technical Maintenance... 6 Front wheel bearing replacement... 6 Rear wheel bearing replacement... 7 Chain replacement... 8 Chain Adjustment... 9 Brake
Installation Guide for Rough Country 30 in. Chrome Series LED Light Bar w/ Hood Mounting Brackets
 Installation Guide for Rough Country 30 in. Chrome Series LED Light Bar w/ Hood Mounting Brackets Installation Time: 1 Hour Tools Required Trim removal tool (plastic or wood to prevent scratches on the
INSTALLATION INSTRUCTIONS
 HIGH FLOW AIRFLOW METER INSTALLATION INSTRUCTIONS PART NUMBER D763-1600A APPLICATION: 2001-06 E46 M3 Parts List: Hose clamp 64Z (7) Plastic Rivets Air Filter Temp Sensor & Harness (2) Button Head Screws
OIL COOLER KIT INSTALLATION INSTRUCTIONS PART NUMBER D
 OIL COOLER KIT INSTALLATION INSTRUCTIONS PART NUMBER D570-0907 APPLICATION: 2011-12 E90 335i/xi (N55 engine) with BMW M-Technic bumper and without stock oil cooler Congratulations for being selective enough
B5 A4 1.8t Front Mount Intercooler Install Instructions
 B5 A4 1.8t Front Mount Intercooler Install Instructions Only work underneath your vehicle after properly supporting it with adequate jack stands on a flat surface. NEVER work under a vehicle only supported
EAFT01SY FITTING INSTRUCTIONS FOTON TUNLAND 03/14- ARC BAR VEHICLE FRONTAL PROTECTION SYSTEM (VFPS) FOR AIR BAG & ADR COMPLIANT VEHICLES
 FOR AIR BAG & ADR COMPLIANT VEHICLES") EAFT01SY FITTING INSTRUCTIONS REPLACES: 00.00.00 REVISED: 09.03.15 Check installation hardware before commencing. 1. Lift bonnet. FOTON TUNLAND 03/14- ARC BAR VEHICLE FRONTAL PROTECTION SYSTEM (VFPS) FOR
EAFT01SY FITTING INSTRUCTIONS REPLACES: 00.00.00 REVISED: 09.03.15 Check installation hardware before commencing. 1. Lift bonnet. FOTON TUNLAND 03/14- ARC BAR VEHICLE FRONTAL PROTECTION SYSTEM (VFPS) FOR
EAGW10SY FITTING INSTRUCTIONS
 EAGW10SY FITTING INSTRUCTINS SUPERCEEDS: EAGW04SY REVISED: 05.02.13 Check installation hardware before commencing. 1. Lift bonnet. GREAT WALL V240 03/11on AND V200 08/11on ARC BAR WITH FG LIGHTS VEHICLE
Product Packing List
 Product Packing List Product: SDHQ-55-1650-G3 Description: 2016+ Toyota Tacoma Hidden Winch Mount (1) Winch Mount SDHQ-55-1650-G3-A (2) Lower Support Brackets SDHQ-55-1650-G3-B (1) Lower Bumper Bracket