991 ROLL BAR INSTALLATION:
|
|
|
- Augusta Blair
- 5 years ago
- Views:
Transcription

.")
1 991 ROLL BAR INSTALLATION: We highly recommend CMS roll bars be fitted by shops with experience in installing roll bars. 1. Move power seats to a location where the four bolts can be removed and remove bolts only (E12 socket). Then disconnect the battery at the negative terminal to prevent airbag faults before unplugging connector under seats.

. Pull seat up starting at back edge. 4.")

2 2. Lift up front of seat to unplug large yellow connector from seat. This is done by pulling the black lock bar straight out. Remove seats from car. 3. Remove rear seat lower cushion by first removing inner seat belt receivers. Pull trim cover straight out to access bolt for each receiver. Pull up rubber mat on bottom of center tray. Pick open access cover to nut securing lower seat assembly (13mm nut). Pull seat up starting at back edge. 4. (GT3 skip this step) Remove rear seat back rests by first removing the back half of the center pivot point trim. This piece pulls straight up. The front half can then be worked off from side to side towards the front of the car. The seat backs now slide into the center of the car then can be pulled up & out.


 6.")

3 5. Below the rear window is a carpeted piece that pulls out straight towards the front of the car. (Tip: On all interior panels to removed- after each piece is removed note where all clips and alignment cones go. Look for any clips, grommets, locating cones that may have fallen off during removal. A careful installation with all hardware back in position is key to a properly aligned and rattle free interior.) 6. The upper rear carpet shelf can now be removed by first prying off the tie down point trim, then pull the piece up from the middle allowing it to fold up and out. 7. Unbolt all four of the seat belt anchor points by opening plastic cover then removing bolt. (#10 triple square) You will need to remove the cap assembly from the seat belt attachment tab to allow for removal later. Pay attention to index of cap assembly.


4 8. C pillar trim is removed by pulling it out towards the middle of the car. You may choose to leave it attached by the retaining strap in the top corner. 9. B pillar seat belt trim pulls out from the top first then lift up. The rest of the B pillar trim piece pulls straight out to the middle of car. There is a lock tab that is difficult to release without a right angle pick tool. It can be accessed through a hole in the body with some careful maneuvering.


5 10. In the door jambs, pull off weather strip seal from bottom of quarter glass to front of the door sill. Then cover exposed body seam with tape. Please note: black stuff is very sticky and transferrable. 11. The door sill trims can be pulled straight up. Unplug connector on driver side. 12. Rear lower under carpet is removed by unscrewing black plastic discs. Then pull up from middle.


6 13. Place some tape over the lower flat area of the rear side panels. Mark the center line of the lateral beam below carpet onto the tape for both panels. This will be your reference for making the holes for the main hoop. 14. Rear side panels can now be removed by pulling them up. Remember to unplug the speakers right away after removing panel as the wires are not very long and are easy to break.


7 15. Fold the corners of the main floor carpeting to access the side body brackets to lateral beam. 16. Unbolt seat belt retractors (#10 triple square).


8 17. Remove the two through bolts to the lateral beam (16 mm bolt head) 18. Set new base brackets in place.


9 19. Use new bolts provided for the seat belt retractors at sides of new base brackets (16mm or 5/8 bolt head). (The new hex head bolts can be tightened properly since the roll bar connector blocks proper access to the factory style bolt). Start the lower through bolts. DO NOT tighten bolts yet! 20. Be sure no wires are pinched by new base mount on sides of car. Using pliers or a knife, break off tabs on bottom of wiring harness guides to allow for a tighter fit.

10 21. Put a thin coat of light weight grease on horizontal surfaces of interlock joint. 22. Preferably using 2 people, bring roll bar assembly into car for pre-fitting. Set onto interlock connectors and align rear mounts. It will take a firm shove at top corners of main hoop to get rear mounts to set in place.

.")


11 23. Align interlock connections and start all allen bolts (1/4 allen head). A tapered drift tool works best to align holes. 24. Make sure the rear mount bolts can be started. Tighten the allen bolts then the 3 bolts at each base mount. 25. Remove main bar assembly.


 27.")


12 26. Corners of floor carpet and lower seat carpet will need to be trimmed around the main hoop connectors. (Tin shears work well for cutting carpet) 27. Install rear lower carpet section. 28. Now cut the side panels. Using your centerline mark and a 1 7/8 hole saw mark out edge of cut out as close to vertical section as you can. Also mark the center.


13 29. Drill pilot hole. With exacto knife cut out shape in the vinyl layer and peel off 30. Drill hole out with 1 7/8 hole saw. Clean up the cut out with a rotary flap sander. 31. Begin installing panels by plugging speakers in first then carefully lining up all of the guide and attachment points.


14 32. Door sills, B pillar, and C pillar trim can now be put back on. 33. Take the lower rear seat assembly and begin unhooking the fabric along the sides and front by pulling it towards center of the seat assembly. Pull fabric back off of the plastic mold. Set back in place inside car to mark small relief s to be cut in plastic. Cut out the half moon shapes and recover the seat. Then install back in car.

15


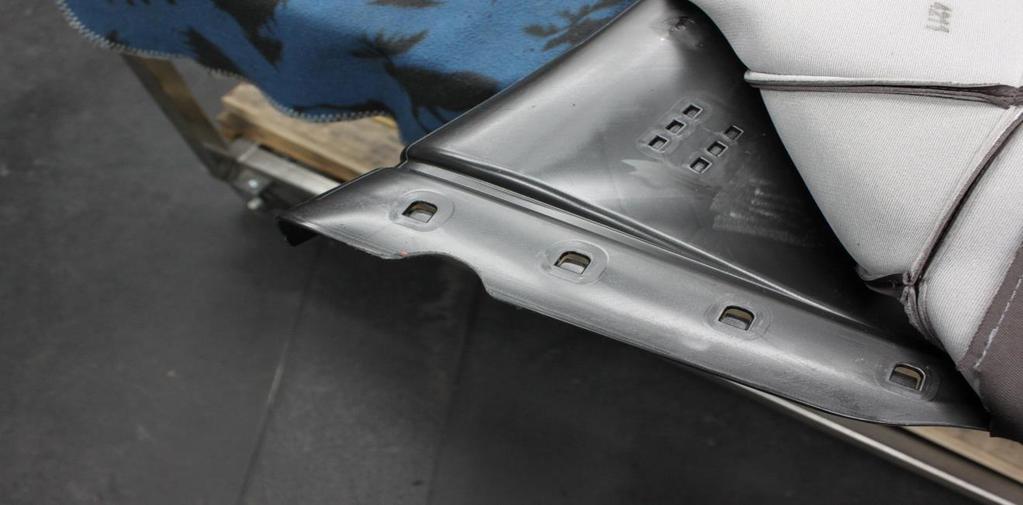
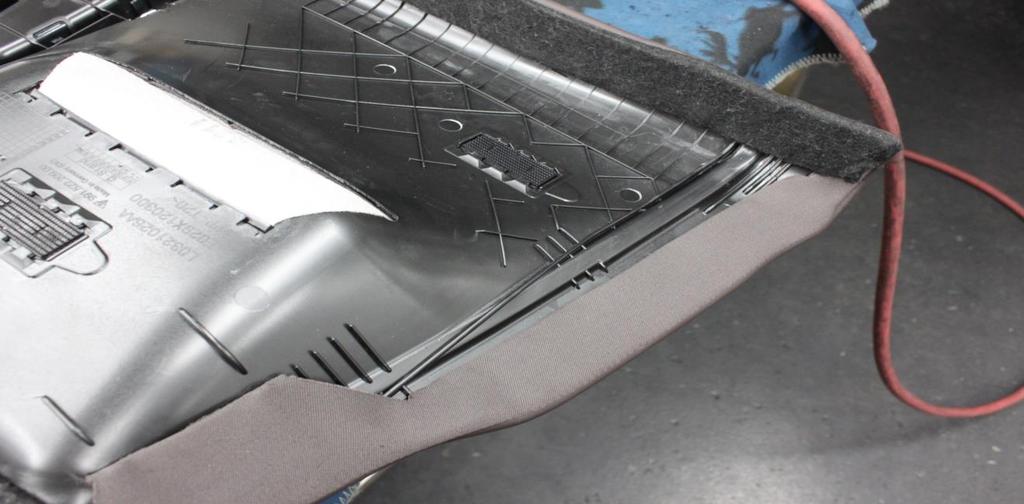
16 34. Cut off raised lip of carpet as shown in picture for easier installation of bar. (Do this on both sides. This will not be visible after complete assembly). 35. Using 2 people, install roll bar into car. It is a tight fit so each person should watch their side to avoid interior damage. The rear plates can be slid through the seam in the side panels where the carpet and leather sections meet to get to their mounting location. When set down close to final location the bar will need to be shoved simultaneously by both people at the top corners of the bar to get it to drop into location over the rear locating studs.


 38. After all bolts have been")
17 36. Starting on passenger side first, use a drift pin to help align the interlock holes. Start bolts ONLY. 37. Next, start drivers side followed by the rear mount bolts. (Lock washer for rear bolts goes between bolt head and flat washer. Bolts are 17mm bolt head.) 38. After all bolts have been started, tighten in the same order.


18 39. Cover lower corners of rear upper carpet section with tape to draw the cutouts. Retrace the impression line of the side panel on the carpet to the tape as a reference point. 40. In the car measure the location of the rear tubes on the roll bar from the side panel and lower seat carpet. 41. Draw out an oval that is approximately 1 ¾ by 3 based off of the location measurements.


19 42. After cutting out your marked oval in the carpet and foam backing, make a straight cut from the outside edge of the oval to the outside edge of the carpet piece. This allows for installation. 43. Install rear upper carpet by folding and maneuvering through the lower center opening of the rear X. 44. Install rear panel below rear window. 45. Bolt in all seat belt anchor points. 46. Rear seat backs can be installed in the folded forward position if desired. 47. Set in front seats and plug in large yellow connectors 48. Reconnect battery terminal. 49. Move seats to allow for bolt access and re-secure seats

20 Disclaimer: This product is intended for off-road purposes only. Cantrell Motorsports, Inc. and it s affiliates are not responsible or liable for any damages or possible injuries incurred upon possible accidents due to driver error, incorrect installations, poor maintenance, bad judgment, or act of nature/god.. Cantrell Motorsports, Inc. does not take responsibility over buyer installation, modification, and unusual stress of the products. The buyer/end user assumes all responsibilities and liability for determining the suitability of the products and operation of the product once installed.
2005+ Roll Bar (Mm5RB-20.1 to -20.6) Recommended Center punch 1/8" pilot drill 1-3/4" Hole saw 2" Hole saw
 Recommended Center punch 1/8 pilot drill 1-3/4 Hole saw 2 Hole saw") 3430 Sacramento Dr., Unit D San Luis Obispo, CA 93401 Telephone: 805/544-8748 Fax: 805/544-8645 www.maximummotorsports.com 2005+ Roll Bar (Mm5RB-20.1 to -20.6) Recommended Center punch 1/8" pilot drill
3430 Sacramento Dr., Unit D San Luis Obispo, CA 93401 Telephone: 805/544-8748 Fax: 805/544-8645 www.maximummotorsports.com 2005+ Roll Bar (Mm5RB-20.1 to -20.6) Recommended Center punch 1/8" pilot drill
2002 Convertible Cloth Sleeve Convertible Cloth Attachment
 2002 Glass Convertible Top on 2000-2001 Frame Submitted by Clovis, North Texas S2000 Owners Club So what s the difference? Honestly, not much. The 2000 soft top cloth has attachment points for each of
2015 Mustang Lightbar (All Models) CDC#
 CDC#") 2015 Mustang Lightbar (All Models) CDC# 1511-7000-01 Components: 1 CDC Lightbar Note: READ instructions before starting installation!!! CDC Part# Driver side bracket 0511-6001-05 Passenger side bracket
2015 Mustang Lightbar (All Models) CDC# 1511-7000-01 Components: 1 CDC Lightbar Note: READ instructions before starting installation!!! CDC Part# Driver side bracket 0511-6001-05 Passenger side bracket
Roll Bar (MMRB-6.1 to -6.7)
") 3430 Sacramento Dr., Unit D San Luis Obispo, CA 93401 Telephone: 805/544-8748 Fax: 805/544-8645 www.maximummotorsports.com 1994-04 Roll Bar (MMRB-6.1 to -6.7) NOTE: These instructions cover Roll Bars with
3430 Sacramento Dr., Unit D San Luis Obispo, CA 93401 Telephone: 805/544-8748 Fax: 805/544-8645 www.maximummotorsports.com 1994-04 Roll Bar (MMRB-6.1 to -6.7) NOTE: These instructions cover Roll Bars with
Drag Race Roll Bar (MMRB-6, -7)
") 3430 Sacramento Dr., Unit D San Luis Obispo, CA 93401 Telephone: 805/544-8748 Fax: 805/544-8645 www.maximummotorsports.com 1994-04 Drag Race Roll Bar (MMRB-6, -7) The Maximum Motorsports 6-point Drag Race
3430 Sacramento Dr., Unit D San Luis Obispo, CA 93401 Telephone: 805/544-8748 Fax: 805/544-8645 www.maximummotorsports.com 1994-04 Drag Race Roll Bar (MMRB-6, -7) The Maximum Motorsports 6-point Drag Race
Installation Manual TWM Performance Short Shifter Cobalt SS/SC, SS/TC, HHR SS, Ion Redline and Saab 9-3
 Page 1 Installation Manual TWM Performance Short Shifter Cobalt SS/SC, SS/TC, HHR SS, Ion Redline and Saab 9-3 Please Note: It is preferable to park on a flat surface, as you will have to engage and disengage
Deuce/Ace Installation Instructions
 HARDWARE KIT: Upper Mounting Plate: 2-7/16" (11mm) X 3.5" bolts 2-7/16" flange nuts 2-2" spacers 2-7/16" trim cap mounting washers 2 - plastic trim caps TOOLS NEEDED: safety glasses wrenches 16mm or 5/8"
Installation Manual TWM Performance Short Shift Kit Stage 1 and Stage 2 MazdaSpeed 6
 Page 1 Installation Manual TWM Performance Short Shift Kit Stage 1 and Stage 2 MazdaSpeed 6 Please Note: It is preferable to park on a flat surface, as you will have to engage and disengage the hand brake
RPM Rollbar Installation Instructions Ford Mustang 05-11
 RPM Rollbar Installation Instructions Ford Mustang 05-11 IMPORTANT READ BEFORE STARTING INSTALLATION Check for backing plate clearance between the undercarriage and fuel lines directly below area where
Installation Manual TWM Performance Short Shift Kit 2003 And Up Saturn Ion
 Installation Manual TWM Performance Short Shift Kit 2003 And Up Saturn Ion It s preferable to park on a flat surface, as you may have to engage and disengage the hand brake and shift from gears to neutral.
MUSTANG REAR SEAT DELETE INSTALLATION INSTRUCTIONS FOR HARD MOLD
 2015-2017 MUSTANG REAR SEAT DELETE INSTALLATION INSTRUCTIONS FOR HARD MOLD Tools required: 15MM deep well socket w/rachet T40 torques T47 torques (T45 will work) Drill & 5/16 drill bit. 12 ruler or tape
The world's first Bolt in Only stress bar for VW Mk 4 Chassis. Installation Manual V1.0.
 The world's first Bolt in Only stress bar for VW Mk 4 Chassis Installation Manual V1.0 www.yarrowsport.com Tools Needed: 1. 17mm, 10mm sockets and ratchet with 3inch extension 2. 10mm box end wrench 3.
MUSTANG TIGER CAGE INSTRUCTIONS MANUAL PAGE 1
 2005-2011 MUSTANG TIGER CAGE INSTRUCTIONS MANUAL PAGE 1 Thank you for purchasing our 2005-2011 Mustang Tiger Cage. Please read through all of the instructions first and then start installing the kit. We
Installation instructions, accessories - Bluetooth, Mute kit XC / Volvo Car Corporation Göteborg, Sweden
 XC90 Section Group Weight(Kg/Pounds) Year Month 3 393 0.5/1.1 2006 11 XC90 2003, XC90 2004, XC90 2005, XC90 2006, XC90 2007, XC90 2008, XC90 2009, XC90 2010 Page 1 of 15 Required tools A0000162 IMG-242205
INSTALLATION INSTRUCTIONS
 INSTALLATION INSTRUCTIONS Accessory Application Publications No. ATTACHMENT (EX-L WITH NAVI) 2008 RIDGELINE AII 36587 Issue Date MAY 2007 PARTS LIST Attachment Kit P/N: 08B21-SJC-102 Template Rear camera
HiBoy Maverick/Commander Doors Part # HiBoy4 Maverick/Commander Doors Black
 Racing 3191 N Washington St. Suite 2 Chandler, AZ 85225 1 (800) 708-9803 http://www.racing.com HiBoy Maverick/Commander Doors Part # 07-2001 HiBoy4 Maverick/Commander Doors Black Congratulations on your
2005+ Drag Race Roll Bar (Mm5RB-20)
") 3430 Sacramento Dr., Unit D San Luis Obispo, CA 93401 Telephone: 805/544-8748 Fax: 805/544-8645 www.maximummotorsports.com 2005+ Drag Race Roll Bar (Mm5RB-20) Note that the NHRA DOES allow the door bars
3430 Sacramento Dr., Unit D San Luis Obispo, CA 93401 Telephone: 805/544-8748 Fax: 805/544-8645 www.maximummotorsports.com 2005+ Drag Race Roll Bar (Mm5RB-20) Note that the NHRA DOES allow the door bars
INSTALLATION INSTRUCTIONS
 INSTALLATION INSTRUCTIONS Accessory S Application 2011 PILOT Publications No. AII 43298 Issue Date MARCH 2010 PARTS LIST Back-up Sensor Attachment Kit P/N 08V67-SZA-100A Back-up sensor harness Fuse label
SafeGuard Flex Seat Maintenance Guide
 SafeGuard Flex Seat Maintenance Guide 1) Preparation For Removal And Replacement Of Seat Back Covers And Retractor Assemblies a) Unlatch seat cushion and pivot cushion up and forward. b) Separate seat
In area - A -, a proper seal must be made against the top of the window glass.
 Door window, adjusting Page 1 of 3 Audi > B3 > 1994-1998 Body Exterior, Interior 61 - Convertible top, checking and adjusting Door window, adjusting Sections C-C and D-D. Adjust door window so that window
INSTALLATION INSTRUCTIONS
 INSTALLATION INSTRUCTIONS Accessory S P/N 08V67-SJC-101 Application 2012 RIDGELINE Publications No. AII 12006 Issue Date NOV 2011 PARTS LIST Back-up sensor harness 3 Wire ties with small clips (2 Not used)
Classic Light Bar Mustang
 Classic Light Bar 2005-2012 Mustang Note: Read installation instructions before starting. Component List: 1 Light Bar Part #110000 1 Driver Side Bracket w/set Screw Part #115003 1 Passenger Side Bracket
Installation Instructions
 Installation Instructions Jeep JK 2-Door (2011 Present) Mounting Bracket and Air Line System Kit for ARB On-Board Twin Air Compressor (CKMTA12) Made in the USA Kit Contents: 1 Flat Bracket 1 Formed Bracket
INSTALLATION INSTRUCTIONS
 INSTALLATION INSTRUCTIONS Accessory S P/N 08V67-SJC-101 Application 2010 RIDGELINE Publications No. AII 42117 Issue Date AUG 2009 PARTS LIST Back-up sensor harness 3 Wire ties with small clip (2 Not used)
Main Lift Cylinders. Level of difficulty: Not very hard, only a number of steps involved requires some patience, but is very rewarding!
 Main Lift Cylinders Level of difficulty: Not very hard, only a number of steps involved requires some patience, but is very rewarding! Tools needed: - Stubby Phillips screwdriver, or ratchet with Phillips
INSTALLATION INSTRUCTIONS
 INSTALLATION INSTRUCTIONS Model: 8510 & 8510TK Ford E Series Van 1994 2002 with stock power mirrors Tools required for the installation are: 7/16 socket, T20 screwdriver or 8mm socket, screwdriver, phillips
INSTALLATION INSTRUCTIONS
 INSTALLATION INSTRUCTIONS Accessory Application CR-V Publications No. AII 32953-34081 Issue Date NOV 2006 PARTS LIST 2 Corner sensor clips Backup Sensor Attachment Kit P/N 08V67-SWA-100A Back-up sensor
INSTALLATION INSTRUCTIONS
 INSTALLATION INSTRUCTIONS Accessory Application Publications No. CD CHANGER ATTACHMENT KIT 2005 CIVIC SI AII 27936 Issue Date AUG 2004 PARTS LIST CD Changer Attachment Kit (sold separately): P/N 08B26-S5T-100
Installation Instructions
 Installation Instructions www.bestop.com - We re here to help! Visit our web site and click on Ask a Question INSTALLATION TIME SKILL LEVEL Automatic Retracting Running Board Vehicle Application Chevy
Installation Manual TWM Performance Short Shifter 2008 Mitsubishi Lancer
 Page 1 Installation Manual TWM Performance Short Shifter 2008 Mitsubishi Lancer Please Note: It is preferable to park on a flat surface, as you will have to engage and disengage the hand brake and shift
Headlight Removal & Installation: VW Jetta Mk.4 / Bora
 Headlight Removal & Installation: 99-04 VW Jetta Mk.4 / Bora Disclaimer: Buyer assumes any and all risk and liability from the installation and use of this product. Seller, author, or any of their affiliates
Installation Manual TWM Performance Toyota GT86 / Scion FRS / Subaru BRZ Direct Replacement Short Shifter
 Installation Manual TWM Performance Toyota GT86 / Scion FRS / Subaru BRZ Direct Replacement Short Shifter Begin the installation by parking on a flat surface, place wooden blocks in front or behind the
CENTER BELT SYSTEM INSTALLATION INSTRUCTIONS CARCG121220
 CENTER BELT SYSTEM INSTALLATION INSTRUCTIONS 2013+ DODGE CHARGER Distributed by CARCG121220 Important Notice: Read all instructions before starting the installation of the seat. Before drilling or installing
INSTALLATION INSTRUCTIONS
 INSTALLATION INSTRUCTIONS Accessory HITCH Application 2012 CROSSTOUR Publications No. AII 46198 Issue Date JULY 2011 PARTS LIST Trailer Hitch Kit P/N 08L92-TP6-101 Upper spacer A (5 mm) (Some are not used.)
Backside License Plate Mount for Jeep JK Wrangler
 REQUIRED TOOLS 10mm SOCKET 13mm SOCKET 4mm HEX KEY WIRE CRIMPS WIRE STRIPPERS ELECTICAL TAPE SCREW DRIVER KIT CONTAINS BACKSIDE MOUNT LICENSE PLATE BRACKET WITH LEDS PLASTIC PASS-THROUGH GROMMET STAINLESS
INSTALLATION INSTRUCTIONS
 INSTALLATION INSTRUCTIONS Models: 7105 & 7105TK Dodge Ram 1500 ('02 Current) Ram 2500 & 3500 '03 - Current with stock manual mirrors. IF YOU DO NOT CURRENTLY HAVE MANUAL MIRRORS, THE WRONG SET HAS BEEN
2015+ S550 MUSTANG Battery Relocation Kit WR-BTRYRELOKIT-LH WR-BTRYRELOKIT-RH
 2015+ S550 MUSTANG Battery Relocation Kit WR-BTRYRELOKIT-LH WR-BTRYRELOKIT-RH The Watson Racing Battery Relocation Kit is NOT designed to protect you in the case of an accident, and therefore is INTENDED
PRELIMINARY INSTALLATION INSTRUCTIONS. PARTS LIST Attachment Kit(sold separately): P/N 08B23-S9V-100B. Display bracket.
: P/N 08B23-S9V-100B. Display bracket.") INSTALLATION INSTRUCTIONS Accessory Application Publications No. in- ENTERTAINMENT SYSTEM 2006 PILOT All 30502 Issue Date SEP 2005 PARTS LIST Attachment Kit(sold separately): P/N 08B23-S9V-100B Display
INSTALLATION INSTRUCTIONS Accessory Application Publications No. in- ENTERTAINMENT SYSTEM 2006 PILOT All 30502 Issue Date SEP 2005 PARTS LIST Attachment Kit(sold separately): P/N 08B23-S9V-100B Display
INSTALLATION INSTRUCTIONS
 INSTALLATION INSTRUCTIONS Accessory Application Publications No. REAR VIEW CAMERA ATTACHMENT PILOT AII 23620 Issue Date MAY 2002 PARTS LIST Attachment Kit : P/N 08B21-S9V-100 Control unit harness Rear
Hard Bar Sport, M1/M2 Hard Core Hardtop, M2 Sport, and Xtreme Installation Instructions
 HARDWARE KIT: Hard Bar Sport, M1/M2 Hard Core Shoulder Harness Guide Relocation Assemblies: 2-3/8" X 1" grade 8 bolts 4-3/8" flat washers 2-3/8" lock nuts 2 - brass bushings 2 - plastic trim caps 2-3/8"
INSTALLATION INSTRUCTIONS
 INSTALLATION INSTRUCTIONS Accessory Application Publications No. AII 26031 2004 ODYSSEY Issue Date AUG 2003 NOTE: You cannot install the subwoofer in a vehicle equipped with both an under seat Navigation
INSTALLATION INSTRUCTIONS
 INSTALLATION INSTRUCTIONS Document# 19-0038 2004+ Lotus Elise (Series 2) Rear Clamshell Removal Kit Safely support the vehicle. This is a two-person job. Allow 1 to 2 hours for initial disassembly. Have
Please read thoroughly before starting installation and check that kit contents are complete.
 Rear Vision System Mirror Display 2013-Current Ram (Kit part number 1009-9518) Please read thoroughly before starting installation and check that kit contents are complete. Items Included in the Kit: Rear
Conflicts: Vehicles without a sunroof Vehicles with a single sunroof
 Toyota Sienna (Dual Sunroof) 2011-10.2 Overhead Video Part Number: 00016-00110 00016-00110-17 Fit Kit 00016-00120 00016-00120-17 Fit Kit Accessory Code: ED5 Conflicts: Vehicles without a sunroof Vehicles
* * Inside Toyota Avalon. Tools Required IMPORTANT
 Revision 08/02/16 2013- Toyota Avalon IMPORTANT Before starting, compare items on your invoice with items received. Carefully check through packaging material. If any item is missing, please call Crutchfield
Front Bucket Seat Upholstery
 Specter Off-Road, Inc. 21600 Nordhoff St. Chatsworth, CA 91311 USA www.sor.com, (818)882-1238, Fax: (818) 882-7144 sor@sor.com Luxury Seat Upholstery Installation Instructions Front Bucket Seat Upholstery
Mustang Classic LightBar Instructions
 1994-2004 Mustang Classic LightBar Instructions Note: Read installation instructions before starting. Component List: 1 LightBar 4 Poly Plugs 4 LightBar Bolts 4 LightBar Washers 2 LightBar Rivets 2 Light
Before starting installation
 Before starting installation The load rating for these tire-can/tire carriers is a MAXIMUM of 175 lbs. Please be aware that some tire and wheel combinations along with gas cans and hi-lift jacks can exceed
Remove the 3-11mm nuts holding mirror on. Don t drop the nuts!
 2005-2012 Ford Mustang Puddle Lamp Kit Parts List: Quantity: Tool List: LED Lamps 2 Flat head screwdriver Seals 2 Ratchet & Socket set OR Nuts 2 Adjustable Wrench Wiring harness 1 Drill & 11/16 th bit
INSTALLATION INSTRUCTIONS
 INSTALLATION INSTRUCTIONS FUEL SURGE TANK INSTALLATION KIT 1999-2006 BMW E46 COUPE Document# 19-0056 Support: info@radiumauto.com Note: This kit was designed for a standard single pump Radium Engineering
SCION xa 2004 SATELLITE RADIO TUNER Section I Installation Preparation
 Section I Installation Preparation Part Number: PT546 52040 Section I Installation Preparation Kit Contents Item # Quantity Reqd. Description 1 1 Satellite Tuner 2 1 Ground Cable 3 1 Tuner Cable 4 2 Tuner
Installation Instructions
 Installation Instructions Application Fits 2012-2016 Tesla Model S X7201 & X7202 2 & 1.25 EcoHitch Stealth 200 lbs Tongue Weight/2,000 lbs Towing Weight Torklift Central 315 Central Ave N Kent, WA 98032
INSTALLATION INSTRUCTIONS
 Rear Vision System Tailgate Emblem Camera Aftermarket Display 2009-Current Ford F-150 and 2010-Current Super Duty (Kit part number 1008-6509) Kit Contents: Tailgate Emblem Mount with Camera Chassis Harness
Installation Manual TWM Performance Kia Forte Short Shifter
 Installation Manual TWM Performance Kia Forte 2009+ Short Shifter Begin the installation by parking on a flat surface, as you will have to engage and disengage the hand brake and shift from gears to neutral.
Installation instructions for IPS parking Brake Kit for 1996 to 2002 Viper
 Installation instructions for IPS parking Brake Kit for 1996 to 2002 Viper WARNING Modification of your vehicle with the parts identified above may alter its stock performance; the buyer hereby expressly
Installation Instructions
 Installation Instructions Jeep JK Unlimited (2007 Present) Mounting Bracket and Air Line System Kit for ARB On-Board Twin Air Compressor (CKMTA12) Made in the USA Kit Contents: 1 Bracket for ARB Compressor
INSTALL INSTRUCTIONS
 INSTALL INSTRUCTIONS Models: 6005 & 6005TK (For Non Electric Mirrors) GM CK Body Style If your stock mirrors are stock electric the wrong set has been ordered. Do not attempt to manually extend or retract
SCION XB SUBWOOFER ENCLOSURE Preparation
 Preparation Part Number: Kit Contents Item # Quantity Reqd. Description 1 1 Subwoofer enclosure 2 1 Wire Harness 3 1 Paper Template 4 1 Plastic Drill Template 5 1 Hardware Bag Hardware Bag Contents 1 Item
2015 Copyright Maxspeed-Motorsports.com
 1 Porsche PCM 3.1 Backup Camera Installation Instructions. Thank you for purchasing your product at www.maxspeedmotorsports.com Before you start please understand that these installation instructions are
INSTALLATION GUIDE PHANTOM TM SUBWOOFER SYSTEM. FOR BMW 3-SERIES SEDAN (F30) ver. 10/2016 DO-IT-YOURSELF 2 OUT OF HOURS F30 SEDAN
 ver. 10/2016 DO-IT-YOURSELF 2 OUT OF HOURS F30 SEDAN") INSTALLATION GUIDE PHANTOM TM SUBWOOFER SYSTEM FOR 2012+ BMW 3-SERIES SEDAN (F30) ver. 10/2016 SKILL LEVEL REQUIRED DO-IT-YOURSELF INSTALLATION DIFFICULTY 2 OUT OF 5 INSTALLATION TIME 1.5 HOURS APPLIES
INSTALLATION GUIDE PHANTOM TM SUBWOOFER SYSTEM FOR 2012+ BMW 3-SERIES SEDAN (F30) ver. 10/2016 SKILL LEVEL REQUIRED DO-IT-YOURSELF INSTALLATION DIFFICULTY 2 OUT OF 5 INSTALLATION TIME 1.5 HOURS APPLIES
INSTALLATION INSTRUCTIONS
 Rear Vision System Tailgate Emblem Camera Mirror Display 2009-Current Ford F-150 and 2010-Current Super Duty (Kit part number 1008-9527) Kit Contents: Mirror Tailgate Emblem Mount with Camera Interior
Installation Manual TWM Performance Short Shifter Subaru STi 2008+
 - 1 - Installation Manual TWM Performance Short Shifter Subaru STi 2008+ Please Note: It is preferable to park on a flat surface, as you will have to engage and disengage the hand brake and shift from
Boss Frog Installation Instructions Single Hoop Rollbar for Mazda Miata
 Boss Frog Installation Instructions Single Hoop Rollbar for Mazda Miata Introduction Congratulations! You have purchased one of the highest quality rollbars available today. Installing your new rollbar
INVISIHITCH. Hidden Hitch Receiver for. BMW X5 [F15] 2014 Current (all engines/suspension pkgs/trimlines, including M Sport line and Aero kit)
![INVISIHITCH. Hidden Hitch Receiver for. BMW X5 [F15] 2014 Current (all engines/suspension pkgs/trimlines, including M Sport line and Aero kit)](/thumbs/85/92794256.jpg "INVISIHITCH. Hidden Hitch Receiver for. BMW X5 [F15] 2014 Current (all engines/suspension pkgs/trimlines, including M Sport line and Aero kit)") INVISIHITCH Hidden Hitch Receiver for BMW X5 [F15] 2014 Current (all engines/suspension pkgs/trimlines, including M Sport line and Aero kit) Capacity: 7,700 lbs. Towed Weight / 600 lbs Tongue Weight* *
INVISIHITCH Hidden Hitch Receiver for BMW X5 [F15] 2014 Current (all engines/suspension pkgs/trimlines, including M Sport line and Aero kit) Capacity: 7,700 lbs. Towed Weight / 600 lbs Tongue Weight* *
MAZDASPEED3 Intercooler Instructions
 MAZDASPEED3 Intercooler Instructions Congratulations on your purchase of the COBB Tuning Front Mount Intercooler System for your 2007-2009 Mazdaspeed3. The following instructions should assist you through
 INSTALLATION INSTRUCTIONS Accessory Application Publications No. AII 38143-40201 S 2008 ODYSSEY Issue Date AUG 2008 PARTS LIST Backup Sensor Attachment Kit P/N 08V67-SHJ-100B Backup sensor control unit
Front seats. j a t CAUTION! Before beginning repairs on the electrical system: Obtain the anti-theft radio security code. Switch the ignition off.
 j a t Front seats 72-1 CAUTION! Before beginning repairs on the electrical system: Obtain the anti-theft radio security code. Switch the ignition off. Search Advanced Search Disconnect the battery Ground
Installation Instructions PowerBoard Automatic Retracting Running Board
 Installation Instructions PowerBoard Automatic Retracting Running Board Vehicle Application Chevy Silverado/GMC Sierra Extended Cab 2007 and newer (excluding 2011 Diesels) Part Number: 75123-15 Chevy Silverado/GMC
INSTALLATION INSTRUCTIONS
 Rear Vision System Tailgate Handle Camera Mirror Display 2004-2014 Ford F-150 and 2008-2015 Ford Super Duty (Kit part numbers 9002-9521) Kit Contents: Mirror Tailgate Handle with camera and harness Interior
(1) Remote Control with (2) AAA Batteries
 Remote Control with (2) AAA Batteries") TOOLS REQUIRED: KIT CONTENTS: E14 Torx (1) Remote Control with (2) AAA Batteries (2) Wireless Headphones with (4) AAA Batteries (2) DVD Headrest Units Owner s Manual (1) Owner s Manual (1) Power / Audio
TOOLS REQUIRED: KIT CONTENTS: E14 Torx (1) Remote Control with (2) AAA Batteries (2) Wireless Headphones with (4) AAA Batteries (2) DVD Headrest Units Owner s Manual (1) Owner s Manual (1) Power / Audio
INSTALLATION INSTRUCTIONS
 HIGH FLOW AIRFLOW METER INSTALLATION INSTRUCTIONS PART NUMBER D763-1600A APPLICATION: 2001-06 E46 M3 Parts List: Hose clamp 64Z (7) Plastic Rivets Air Filter Temp Sensor & Harness (2) Button Head Screws
INSTALLATION INSTRUCTIONS
 INSTALLATION INSTRUCTIONS Accessory Application Publications No. SYSTEM S2000 AII 26324 Issue Date OCT 2004 PARTS LIST Headrest Speaker System P/N 08A54-S2A-100 3 Small wire ties 2 Headrest speakers 9
Prius XM Radio Installation Instructions. Eddie Bell
 2004-2005 Prius XM Radio Installation Instructions By Eddie Bell www.metrotpn.com 1 Let me begin by saying this is an easy but time consuming job. Set aside a few hours of your time for the install. If
INSTALLATION INSTRUCTIONS
 INSTALLATION INSTRUCTIONS Accessory Application Publications No. in- ENTERTAINMENT SYSTEM 2004 TSX BII 24811 Issue Date APRIL 2003 PARTS LIST Attachment Kit P/N 08B23-SDA-101A Monitor bracket harness FM
INSTALLATION INSTRUCTIONS
 INSTALLATION INSTRUCTIONS Accessory S Application 2010 ODYSSEY Publications No. AII 41818 Issue Date JUNE 2009 PARTS LIST Right center sensor clip (Black) Backup Sensor Attachment Kit P/N 08V67-SHJ-101C
INSTALLATION GUIDE PREMIUM FRONT BUMPER FOR RAM AEV30304AA Last Updated: 09/18/17
 AEV30304AA Last Updated: 09/18/17 PREMIUM FRONT BUMPER FOR RAM 1500 INSTALLATION GUIDE PLEASE READ BEFORE YOU START To guarantee a quality installation, we recommend reading these instructions thoroughly
900 Installation instructions. SCdefault
 12 788 439 1 SCdefault 900 Installation instructions SITdefault Timer kit MONTERINGSANVISNING INSTALLATION INSTRUCTIONS MONTAGEANLEITUNG INSTRUCTIONS DE MONTAGE Accessories Part No. Group Date Instruction
Installation Manual Short Shift Kit 2000 and up Toyota Celica 2000 and up MR Spyder
 Page 1 Installation Manual Short Shift Kit 2000 and up Toyota Celica 2000 and up MR Spyder 1. Unscrew the shift knob and remove the boot. 2. Remove cover which houses the lighter assembly. There are four
Installation Instructions
 Installation Instructions AMP RESEARCH Power Step by Bestop Automatic Retracting Running Board Vehicle Application Nissan Titan King Cab 2004 and newer (5 ft.) Part Number: 75106-01 Nissan Titan Crew Cab
TOYOTA VENZA 2009 TRAILER WIRE HARNESS Procedure
 Part Number: PT791-0T099 Kit Contents Item # Quantity Reqd. Description 1 1 Trailer Wire Harness Module 2 1 4-Flat Harness 3 1 Battery Power Wire Harness 4 1 Mounting Bracket, 4-Flat 5 2 Screw #10-24 6
INSTALLATION INSTRUCTIONS FUEL SURGE TANK KIT
 INSTALLATION INSTRUCTIONS FUEL SURGE TANK KIT BMW E46 3-Series, Excl Convertible Document: 19-0056 Support: info@radiumauto.com Relieve fuel pressure in vehicle before beginingthe installation. Disconnect
Conf licts Note: TOYOTA Tacoma 2016 LED Illumination Package (Interior and Exterior) Part Number: Accessory Code: LL1000.
 Part Number: Accessory Code: LL1000.") TOYOTA Tacoma 2016 LED Illumination Package (Interior and Exterior) Part Number: 00016-00069 Accessory Code: LL1000 Conf licts Note: Color Applicability/Trim Level Kit Contents Item # Quantity R eqd. Description
TOYOTA Tacoma 2016 LED Illumination Package (Interior and Exterior) Part Number: 00016-00069 Accessory Code: LL1000 Conf licts Note: Color Applicability/Trim Level Kit Contents Item # Quantity R eqd. Description
INSTALLATION INSTRUCTIONS
 INSTALLATION INSTRUCTIONS Accessory Application Publications No. AII 22903-22963 ODYSSEY Issue Date MAY 2002 PARTS LIST Subwoofer Kit: P/N 08A39-EP7-100 Subwoofer 2 Cushion tapes 8 Wire ties (1 not used)
Installation Manual TWM Performance Short Shifter Nissan 350Z, 370Z Infiniti G35, G37
 Installation Manual TWM Performance Short Shifter Nissan 350Z, 370Z Infiniti G35, G37 It is preferable to park on a flat surface, as you will have to engage and disengage the hand brake and shift from
The Go Baby Go Build Manual
 The Go Baby Go Build Manual The step-by-step guide to creating your own Go Baby Go Car 4488 Shockwave Robotics and Pacific University Index 1. List of Mat erials 2. Mechanical Assembly a. Installing the
Porsche 911/996/997 Carrera Do-It-Yourself Convertible Top Hydraulic Cylinder Inspection, Removal and Shipping Instructions
 Porsche 911/996/997 Carrera Do-It-Yourself Convertible Top Hydraulic Cylinder Inspection, Removal and Shipping Instructions Disclaimer: These instructions are intended as a guide. Cabriolet Hydraulics
INSTALLATION INSTRUCTIONS
 Rear Vision System Liftgate Emblem Camera Mirror Display 2009-2012 Ford Flex (Kit part number 1008-9527) Kit Contents: Mirror Liftgate Emblem Mount with Camera Interior (shorter) Harness Chassis (longer)
Mustang CLASSIC LIGHT BAR INSTALLATION INSTRUCTIONS CDC #
 1990-1993 Mustang CLASSIC LIGHT BAR INSTALLATION INSTRUCTIONS CDC # 101000 Kit Components: 1 Light Bar 4 Bolts ( 5 / 16-18 x 2.5 ) #182010 4 Washer #182005 4 Shims #182009 2 Dark Blue Connectors #182004
FRONT FENDERS WITH FACTORY INNER FENDERS JEEP WRANGLER TJ/LJ/YJ/CJ7 INSTALLATION INSTRUCTIONS
 FRONT FENDERS WITH FACTORY INNER FENDERS JEEP WRANGLER TJ/LJ/YJ/CJ7 INSTALLATION INSTRUCTIONS TOOLS NEEDED 13mm socket 5/32 Allen head 5/16 wrench or socket 7/16 wrench or socket 7/32 Allen head 5/8 wrench
C15C C15C. Page 1 of 20
 2 x Lid Front Hinge 1135 8 x M8 Bolt 8 x M8 Washer (3mm Thick) 4 x M6 Large washers 4 x M6 Spring washers 4 x M6 x 40mm Bolts 6 x M6 20mm Bolts 6 x M6 Washers 20 x Screws 2 x Lid mount gas strut bracket
INSTALLATION INSTRUCTIONS
 INSTALLATION INSTRUCTIONS Accessory Application Publications No. AII 27336 ODYSSEY Issue Date SEP 2004 PARTS LIST 15 Black wire ties Backup Sensor Attachment Kit P/N 08V67-SHJ-100A Backup sensor control
Airbags, servicing. Airbag system, safety precautions WARNING!
 Page 1 of 75 69-40 Airbags, servicing Airbag system, safety precautions Checking, removing, installing and servicing may ONLY be performed by qualified personnel. Never perform tests using a test light
Instructions for installing Extendable Replacement Mirrors for Ford HD vehicle.
 Instructions for installing Extendable Replacement Mirrors for Ford HD vehicle. Manual CIPA # 82100 Right Hand #82110 Left Hand #82111 Electric CIPA # 72100 #72110 #72111 Heated / Electric CIPA # 72500
XK8 / XKR Navigation to Triple Gauge Cluster Conversion Harness Kit. Instructions
 XK8 / XKR Navigation to Triple Gauge Cluster Conversion Harness Kit Instructions Kit Contents: 1 - Gauge Cluster Wiring Harness 1 - Posi-Tap connector 4-4" Tie-Wraps 1- Cable pulling tool (shipped pre-applied
Installation instructions, accessories. Electric engine block heater, connector outlet, 4-cyl
 Installation instructions, accessories Instruction No 31359444 Version 1.2 5 Part. No. 31359438 Electric engine block heater, connector outlet, 4-cyl IMG-247665 Volvo Car Corporation Electric engine block
Weistec M156/M159 ENGINE
 Weistec M156/M159 ENGINE Oil / Air Separator System Installation Guide 2007-2011 S63 AMG 2007-2011 ML63 AMG 2007 R63 AMG 2007-2008 CLK63 AMG 2008 CLK63 Black Series 2007-2011 CLS63 AMG 2008-Present C63
Installation Instructions for Lingenfelter GM 2500 Suburban & Yukon XL Auxiliary Fan System (with AC clutch controlled fan output)
") Installation Instructions for Lingenfelter 2007-2013 GM 2500 Suburban & Yukon XL Auxiliary Fan System (with AC clutch controlled fan output) PN L300080607 Revision - 1.1 Lingenfelter Performance Engineering
Installation Instructions for Lingenfelter 2007-2013 GM 2500 Suburban & Yukon XL Auxiliary Fan System (with AC clutch controlled fan output) PN L300080607 Revision - 1.1 Lingenfelter Performance Engineering
Installation Instructions PowerBoard Automatic Retracting Running Board
 Installation Instructions PowerBoard Automatic Retracting Running Board Vehicle Application Chevy Silverado/GMC Sierra Extended Cab Diesel 2011 and newer Part Number: 75147-15 Chevy Silverado/GMC Sierra
INSTALLATION INSTRUCTIONS
 INSTALLATION INSTRUCTIONS FUEL SURGE TANK INSTALL KIT Honda S2000 Document# 19-0063 Support: info@radiumauto.com WARNING: DO NOT SMOKE WHILE WORKING ON FUEL SYSTEMS. KEEP SPARKS AND OPEN FLAMES AWAY FROM
INSTALLATION INSTRUCTIONS
 Rear Vision System Aftermarket and Factory 5.0, 8.4 and 6.1 MyGig Touch Screen Display (Factory Display requires Chrysler/Dodge dealer to activate) 2009 Current* Dodge Ram (Kit part number 1009-6503) *NOTE: