The world's first Bolt in Only stress bar for VW Mk 4 Chassis. Installation Manual V1.0.
|
|
|
- Lucinda Mills
- 5 years ago
- Views:
Transcription
1 The world's first Bolt in Only stress bar for VW Mk 4 Chassis Installation Manual V1.0
 6. Tin snips and a utility knife 7. Pair of pliers Supplied Parts: 1. (M6) Two (2) 10mm bolts 2. Four (4) washers 3. Two (2) 10mm nuts 4.")
2 Tools Needed: 1. 17mm, 10mm sockets and ratchet with 3inch extension 2. 10mm box end wrench 3. Phillips head screw driver 4. Regular Screw driver or Pry Tool 5. 6 pointed Torx bit or Hex Key set(alan wrench) 6. Tin snips and a utility knife 7. Pair of pliers Supplied Parts: 1. (M6) Two (2) 10mm bolts 2. Four (4) washers 3. Two (2) 10mm nuts 4. Installation Manual 5. Rear Stress Bar Procedure: 1. Remove rear package shelf and rear headrests then fold seats forward 2. Remove rubber bump (purple) stops for seat (see exhibit A2) A2.
 Phillips head screws from the lower mounting chassis which holds the Amplifier. Slide the Amp out of the lower chassis and disconnect the wire harness.")
3 3. If vehicle is not fitted with a CD changer and Amp skip to step 4. (This procedure does not include the removal of the CD Changer). Remove the (2) Phillips head screws from the lower mounting chassis which holds the Amplifier. Slide the Amp out of the lower chassis and disconnect the wire harness. Now you will see two sets of bolts and screws which hold the Mounting chassis in place. (see exhibit A3) Remove the two Hex Screws holding the Amplifier Bin in place (Purple) and then remove the bin. Remove the (4) 10mm bolts (Green) holding the remainder of the Mounting chassis. Pull up and out on the Upper chassis to remove. A3.
 Hex screw, remove (see exhibit A4). Once removed pull up on the rear of the ledge to free the 3 retaining clips underneath.")
4 4. Follow this step for both passenger and drivers side. At the rear of the plastic package shelf ledge, pull back the carpet underneath above the taillight. This will expose (1) Hex screw, remove (see exhibit A4). Once removed pull up on the rear of the ledge to free the 3 retaining clips underneath. On the opposite side of the package shelf ledge, toward the passenger compartment, there is two clips that have to be released. Press in on the leading edge against the rear passenger arm rest. This will release the clips, once this is done swing the package shelf ledge 180. Now you can see a mounting stud (Plastic) which has a compression clip. Use the tip of the Regular screw driver to compress the plastic retainers and pull up on the ledge and remove. *Note -This is plastic, try not to force the screw driver into the plastic when compressing. A4. 5. Pull back the carpet enough to access the seat belt housing. Make sure to pull the seat belt and wrap it on the seat back of the rear seat. This tension will be useful later. 6. Use the 17mm Socket to remove the Main Bolt holding the Seat Belt Housing. Once removed there is a T shaped Tab on the back side of the Housing. This will need to be removed or bent flush with the back of the Seat Belt Housing. Use the pair of pliers to bend it flush or bend the tab back and forth until it breaks free of the housing. Follow this procedure for both sides.
 A5.")
5 INSTALLATION 7. Place the Yarrowsport Upper stress bar in place. It is important to make sure the 17mm bolt is aligned properly before attaching the bar. Insert and tighten down snug, both 17mm & M6 10mm bolts for test fitment. (see exhibit A5) A5. After Test fitment, remove bolts and Reinstall Belt Reels; to do so unwind the belts from the housing first, then you will see the hole at the top of the seat belt housing. Insert the M6 10mm bolt and washer, through the top hole of the housing. Insert through the stress bar and finally through the seat belt mount on the vehicle. Now place a washer and nut on the back side then tighten the supplied M6 hardware snug using a Box end wrench and a 10mm socket. Insert the 17mm bolt in the bottom hole for the seat belt housing. Tighten using a 17mm socket. Do not torque them down yet. Follow the procedure on the opposite side, and then torque both sets tight. 8. Reinstall the Carpet; some trimming of the carpet may be needed. Use a utility knife to cut a slit in the carpet. Take the side shelf package support ledge and test fit. Trim a small portion of the plastic using the utility knife and Tin Snips so that it does not interfere with the now installed stress bar. (see exhibit A6 & Diagram A7 on next page)
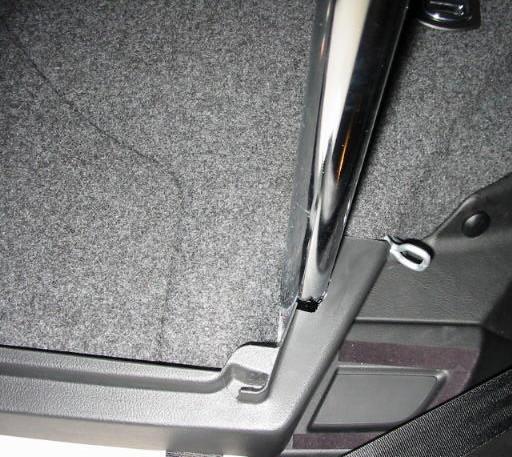
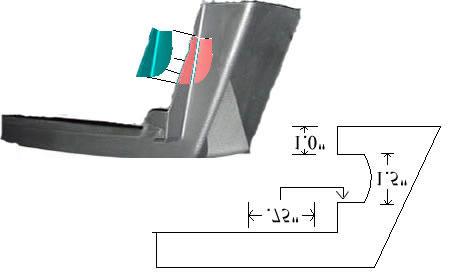
6 A6. A7.

7 9. Follow procedure in reverse to reinstall removed components. 10. Test drive and enjoy! Your finished installation should look similar to below! JS 2003
2015 Current F150/Raptor Venom Side Steps Installation Instructions
 2015 Current F150/Raptor Venom Side Steps Installation Instructions PREPARATION STEPS 1. Disconnect the negative terminal on the battery. Park the vehicle on level ground and set the emergency brake. 2.
INSTALLATION GUIDE PHANTOM TM SUBWOOFER SYSTEM. FOR BMW 3-SERIES SEDAN (F30) ver. 10/2016 DO-IT-YOURSELF 2 OUT OF HOURS F30 SEDAN
 ver. 10/2016 DO-IT-YOURSELF 2 OUT OF HOURS F30 SEDAN") INSTALLATION GUIDE PHANTOM TM SUBWOOFER SYSTEM FOR 2012+ BMW 3-SERIES SEDAN (F30) ver. 10/2016 SKILL LEVEL REQUIRED DO-IT-YOURSELF INSTALLATION DIFFICULTY 2 OUT OF 5 INSTALLATION TIME 1.5 HOURS APPLIES
INSTALLATION GUIDE PHANTOM TM SUBWOOFER SYSTEM FOR 2012+ BMW 3-SERIES SEDAN (F30) ver. 10/2016 SKILL LEVEL REQUIRED DO-IT-YOURSELF INSTALLATION DIFFICULTY 2 OUT OF 5 INSTALLATION TIME 1.5 HOURS APPLIES
2015 Mustang Lightbar (All Models) CDC#
 CDC#") 2015 Mustang Lightbar (All Models) CDC# 1511-7000-01 Components: 1 CDC Lightbar Note: READ instructions before starting installation!!! CDC Part# Driver side bracket 0511-6001-05 Passenger side bracket
2015 Mustang Lightbar (All Models) CDC# 1511-7000-01 Components: 1 CDC Lightbar Note: READ instructions before starting installation!!! CDC Part# Driver side bracket 0511-6001-05 Passenger side bracket
Installation Instructions
 Installation Instructions Jeep JK 2-Door (2011 Present) Mounting Bracket and Air Line System Kit for ARB On-Board Twin Air Compressor (CKMTA12) Made in the USA Kit Contents: 1 Flat Bracket 1 Formed Bracket
Installation Manual TWM Performance Short Shifter Cobalt SS/SC, SS/TC, HHR SS, Ion Redline and Saab 9-3
 Page 1 Installation Manual TWM Performance Short Shifter Cobalt SS/SC, SS/TC, HHR SS, Ion Redline and Saab 9-3 Please Note: It is preferable to park on a flat surface, as you will have to engage and disengage
Mobile Video Installation Guide
 000MVGUIDE Revision 04/29/04 Mobile Video Installation Guide This installation guide offers examples of mobile video system types and suggested layouts. The installation of your system will depend upon
TOYOTA VENZA 2009 TRAILER WIRE HARNESS Procedure
 Part Number: PT791-0T099 Kit Contents Item # Quantity Reqd. Description 1 1 Trailer Wire Harness Module 2 1 4-Flat Harness 3 1 Battery Power Wire Harness 4 1 Mounting Bracket, 4-Flat 5 2 Screw #10-24 6
Mobtown Offroad Toyota Tacoma Bolt On Rock Slider Installation Instructions
 Mobtown Offroad 2005+ Toyota Tacoma Bolt On Rock Slider Installation Instructions Tools Needed: 9/16 Box Wrench 9/16 Standard and Deep Well Socket, 3/8 Drive Ratchet, 3/8 Drive 3/4 Standard Socket 3/4
Lexus NX Fine Mesh and Dynamic Radar Cruise Control Fine Mesh Grilles
 IMPORTANT: PLEASE KEEP THIS INSTRUCTION MANUAL FOR FUTURE REFERENCE! 2015-16 Lexus NX Fine Mesh and Dynamic Radar Cruise Control Fine Mesh Grilles Upper Insert - factory chrome surround and emblem reused
HiBoy Maverick/Commander Doors Part # HiBoy4 Maverick/Commander Doors Black
 Racing 3191 N Washington St. Suite 2 Chandler, AZ 85225 1 (800) 708-9803 http://www.racing.com HiBoy Maverick/Commander Doors Part # 07-2001 HiBoy4 Maverick/Commander Doors Black Congratulations on your
LPE C5 Battery Relocation Kit
 LPE C5 Battery Relocation Kit The LPE C5 Corvette battery relocation kit improves vehicle weight distribution by moving weight to the rear of the vehicle. The improved weight distribution increases traction
Push Start Ignition (05-10 All) Installation
 Installation") Tools Required: Phillips head screwdriver Flat head screwdriver Ratchet 7mm Socket Torx T20 bit Wire strippers/cutters Hand file Needle nose pliers Installation Instructions: Push Start Ignition (05-10
Tools Required: Phillips head screwdriver Flat head screwdriver Ratchet 7mm Socket Torx T20 bit Wire strippers/cutters Hand file Needle nose pliers Installation Instructions: Push Start Ignition (05-10
BMW E46 Convertible Hydraulic Line #23 Replacement Guide Created by taylor192 of E46Fanatics.com
 BMW E46 Convertible Hydraulic Line #23 Replacement Guide Created by taylor192 of E46Fanatics.com BMW E46 Line #23 Replacment Guide, page 1 of 23 Background: Line #23 runs from the valve block on the driver's
INSTALLATION INSTRUCTIONS
 Rear Vision System Tailgate Emblem Camera Aftermarket Display 2009-Current Ford F-150 and 2010-Current Super Duty (Kit part number 1008-6509) Kit Contents: Tailgate Emblem Mount with Camera Chassis Harness
Deuce/Ace Installation Instructions
 HARDWARE KIT: Upper Mounting Plate: 2-7/16" (11mm) X 3.5" bolts 2-7/16" flange nuts 2-2" spacers 2-7/16" trim cap mounting washers 2 - plastic trim caps TOOLS NEEDED: safety glasses wrenches 16mm or 5/8"
Hard Bar Sport, M1/M2 Hard Core Hardtop, M2 Sport, and Xtreme Installation Instructions
 HARDWARE KIT: Hard Bar Sport, M1/M2 Hard Core Shoulder Harness Guide Relocation Assemblies: 2-3/8" X 1" grade 8 bolts 4-3/8" flat washers 2-3/8" lock nuts 2 - brass bushings 2 - plastic trim caps 2-3/8"
Z-Gate Universal Shifter
 Installation Instructions Z-Gate Universal Shifter Fits: GM, Ford, Lincoln and Chrysler Transmissions See Application Guide for Specific Applications Part #80681 Rev 06/01/2018 WORK SAFELY! For maximum
INSTALLATION INSTRUCTIONS
 INSTALLATION INSTRUCTIONS Accessory Application Publications No. CD CHANGER ATTACHMENT KIT 2004 CR-V AII 26118 Issue Date SEP 2003 PARTS LIST CD Changer Attachment Kit (sold separately): P/N 08B26-S9A-100
Fig A ADDICTIVE DESERT DESIGNS. Preparation: Removal:
 Preparation: Disconnect the negative battery terminal. Park the vehicle on level ground and set the emergency brake. We recommend reading through the installation instructions in whole before performing
INSTALLATION INSTRUCTIONS
 INSTALLATION INSTRUCTIONS Accessory Application Publications No. CD CHANGER ATTACHMENT KIT 2005 CIVIC SI AII 27936 Issue Date AUG 2004 PARTS LIST CD Changer Attachment Kit (sold separately): P/N 08B26-S5T-100
INSTALLATION INSTRUCTIONS JEEP 2011-UP JK SECURITY FULL CONSOLE #274
 INSTALLATION INSTRUCTIONS JEEP 2011-UP JK SECURITY FULL CONSOLE #274 PARTS CHECKLIST Tuffy Console #9 Left Front Mounting Bracket #10 Right Front Mounting Bracket #11 Electronics mounting bracket #12 Divider
INSTALLATION INSTRUCTIONS
 INSTALLATION INSTRUCTIONS Accessory Application Publications No. AII 27996 ATTACHMENT KIT 2005 CIVIC HYBRID Issue Date AUG 2004 PARTS LIST Changer Attachment Kit: P/N 08B26-S5B-100 4 Washer-screws, 4 x
SAFETY THIS PRODUCT IS FOR OFFROAD USE ONLY. ALL LIABILITY FOR INSTALLATION AND USE RESTS WITH THE OWNER.
 SAFETY Your safety and the safety of others is very important. In order to help you make informed decisions about safety, we have provided installation instructions and other information. These instructions
Congratulations on your purchase from Rigid Industries, here are the instructions for installation of your new Rigid Lights.
 Congratulations on your purchase from Rigid Industries, here are the instructions for installation of your new Rigid Lights. 20 E-Series LED Light Bar with Cradle for Lower Grill Mount. Dually Fog Lights
TOYOTA VENZA 2009 TRAILER WIRE HARNESS Procedure
 Part Number: PT791-0T099 Kit Contents Item # Quantity Reqd. Description 1 1 Trailer Wire Harness Module 2 1 4-Flat Harness 3 1 Battery Power Wire Harness 4 1 Mounting Bracket, 4-Flat 5 2 Screw #10-24 6
2007 Current Jeep Wrangler JK Stealth Fighter Front Bumper Installation Instructions
 2007 Current Jeep Wrangler JK Stealth Fighter Front Bumper Installation Instructions PREPARATION 1. Disconnect the negative terminal on the battery. Park the vehicle on level ground and set the emergency
R-1125 C HARNESS MOUNT BAR INSTALLATION INSTRUCTIONS Fits C7 Corvette Coupes, including Z06
 R-1125 C HARNESS MOUNT BAR INSTALLATION INSTRUCTIONS Fits C7 Corvette Coupes, including Z06 The R-1125 Harness Mount Bar has been designed and tested to provide a mounting point for the shoulder harness
Installation Instructions Z-Gate Shifter
 Installation Instructions Z-Gate Shifter Part Number 80681 1998, 2001 by B&M Racing and Performance Products The B&M Z-Gate shifter can be used in vehicles equipped with most popular three speed automatic
Installation Instructions
 Installation Instructions Jeep JK Unlimited (2007 Present) Mounting Bracket and Air Line System Kit for ARB On-Board Twin Air Compressor (CKMTA12) Made in the USA Kit Contents: 1 Bracket for ARB Compressor
Installation Instructions COMPETITION/PLUS SHIFTER Ford Mustang MT82 6-Speed Manual Transmission Catalog#
 Installation Instructions COMPETITION/PLUS SHIFTER 2015-2017 Ford Mustang MT82 6-Speed Manual Transmission Catalog# 3916037 Rev. 00 WORK SAFELY! For maximum safety, perform this installation on a clean,
FULL LENGTH HEADERS/ CATTED HEAD PIPES
 INSTALLATION INSTRUCTIONS INS232 2016-2018 CAMARO 6.2L V8 FULL LENGTH HEADERS/ CATTED HEAD PIPES Part #4044 and 40440 Special Tools required: 10mm, 12mm, 13mm, 15mm Socket and Wrenches, Pliers, Saw, Welder
PRELIMINARY INSTALLATION INSTRUCTIONS. 8 Wire ties. PARTS LIST CD Changer Attachment Kit (sold separately): P/N 08B26-S9V-100A
: P/N 08B26-S9V-100A") INSTALLATION INSTRUCTIONS Accessory Application Publications No. ATTACHMENT KIT (LX) 2006 PILOT All 30489 Issue Date SEP 2005 PARTS LIST CD Changer Attachment Kit (sold separately): P/N 08B26-S9V-100A
INSTALLATION INSTRUCTIONS Accessory Application Publications No. ATTACHMENT KIT (LX) 2006 PILOT All 30489 Issue Date SEP 2005 PARTS LIST CD Changer Attachment Kit (sold separately): P/N 08B26-S9V-100A
INSTALLATION INSTRUCTIONS
 INSTALLATION INSTRUCTIONS Accessory Application Publications No. AII 22903-22963 ODYSSEY Issue Date MAY 2002 PARTS LIST Subwoofer Kit: P/N 08A39-EP7-100 Subwoofer 2 Cushion tapes 8 Wire ties (1 not used)
INSTALLATION INSTRUCTIONS
 Rear Vision System Tailgate Emblem Camera Mirror Display 2009-Current Ford F-150 and 2010-Current Super Duty (Kit part number 1008-9527) Kit Contents: Mirror Tailgate Emblem Mount with Camera Interior
INSTALLATION INSTRUCTIONS
 INSTALLATION INSTRUCTIONS Accessory Application Publications No. ATTACHMENT (EX-L WITH NAVI) 2008 RIDGELINE AII 36587 Issue Date MAY 2007 PARTS LIST Attachment Kit P/N: 08B21-SJC-102 Template Rear camera
SAFETY SENSORS FIELD OF VIEW WILL BE ALTERED WITH USE OF THE REPLACEMENT BUMPER. Injury hazard
 SAFETY Your safety and the safety of others is very important. In order to help you make informed decisions about safety, we have provided installation instructions and other information. These instructions
Lexus ES Fine Mesh and Adaptive Cruise Control Fine Mesh Grilles Upper and Lower Replacements
 IMPORTANT: PLEASE KEEP THIS INSTRUCTION MANUAL FOR FUTURE REFERENCE! 2013-15 Lexus ES Fine Mesh and Adaptive Cruise Control Fine Mesh Grilles Upper and Lower Replacements Part #1372-0102-13 / Black Ice
LGT-306L / LB Club Car Precedent LED Light Bar Bumper Kit Installation Instructions
 LGT-306L / LB Club Car Precedent LED Light Bar Bumper Kit Installation Instructions Caution: Please read through the instructions carefully. Before starting this project, remove the system s positive and
Ford F-150 Series Rock Slider Side Steps Installation Instructions
 2004-2014 Ford F-150 Series Rock Slider Side Steps Installation Instructions PREPARATION 1. Disconnect the negative terminal on the battery. Park the vehicle on level ground and set the emergency brake.
991 ROLL BAR INSTALLATION:
 991 ROLL BAR INSTALLATION: We highly recommend CMS roll bars be fitted by shops with experience in installing roll bars. 1. Move power seats to a location where the four bolts can be removed and remove
* * Inside Toyota Avalon. Tools Required IMPORTANT
 Revision 08/02/16 2013- Toyota Avalon IMPORTANT Before starting, compare items on your invoice with items received. Carefully check through packaging material. If any item is missing, please call Crutchfield
2010+ Audi B8 S4/S5 3.0T S-FLO Intake Kit INSTALLATION GUIDE FOR RACING USE ONLY
 INSTALLATION GUIDE 2010+ Audi B8 S4/S5 3.0T S-FLO Intake Kit FOR RACING USE ONLY Congratulations on your purchase of the AWE Tuning S-FLO Intake for the 2010+ Audi B8 S4 and B8 S5 3.0T. Exquisite build
INSTALLATION INSTRUCTIONS Toyota FJ Cruiser DEMELLO-OFFROAD.
 INSTALLATION INSTRUCTIONS Item Description Vehicle 3 piece Rear Bumper 2007-2014 Toyota FJ Cruiser DEMELLO-OFFROAD www.demello-offroad.com 12785 magnolia ave Riverside ca 92503 Suite 1 phone: 1-951-735-4417
SAFETY. Read and understand all safety precautions and instructions before installing this product.
 SAFETY Your safety and the safety of others is very important. In order to help you make informed decisions about safety, we have provided installation instructions and other information. These instructions
Installation Instructions for Teraflex 2.5 Inch Lift Kit with Shocks (2010 Jeep Wrangler Unlimited)
") Installation Instructions for Teraflex 2.5 Inch Lift Kit with Shocks (2010 Jeep Wrangler Unlimited) Installation Time: 6 Hours Tools Required: Floor Jack Jack Stands Ratchet Torque Wrench 15mm Socket 15mm
Installation Instructions for Teraflex 2.5 Inch Lift Kit with Shocks (2010 Jeep Wrangler Unlimited) Installation Time: 6 Hours Tools Required: Floor Jack Jack Stands Ratchet Torque Wrench 15mm Socket 15mm
2017 Current Ford Raptor HoneyBadger Rear Bumper Installation Instructions
 2017 Current Ford Raptor HoneyBadger Rear Bumper Installation Instructions PREPARATION 1. Disconnect the negative terminal on the battery. Park the vehicle on level ground and set the emergency brake.
Remove the 3-11mm nuts holding mirror on. Don t drop the nuts!
 2005-2012 Ford Mustang Puddle Lamp Kit Parts List: Quantity: Tool List: LED Lamps 2 Flat head screwdriver Seals 2 Ratchet & Socket set OR Nuts 2 Adjustable Wrench Wiring harness 1 Drill & 11/16 th bit
TOYOTA TACOMA EC REARVIEW MIRROR Preparation
 Preparation Part Number: PT374-35052 Kit Contents Item # Quantity Reqd. Description 1 1 AD Mirror Assembly 2 1 Hardware bag Hardware Bag Contents Item # Quantity Reqd. Description 1 1 T-tap Connectors,
2017 Current Ford Raptor Bump Stop Kit Installation Instructions
 2017 Current Ford Raptor Bump Stop Kit Installation Instructions PREPARATION 1. Disconnect the negative terminal on the battery. Park the vehicle on level ground and set the emergency brake. 2. We recommend
6th generation (2015+) Mustang Harness Mount Bar Installation Instructions
 Mustang Harness Mount Bar Installation Instructions") R-1180 6th generation (2015+) Mustang Harness Mount Bar Installation Instructions A. Install harness bar 1. Remove front seats. First remove the plastic bolt covers front and rear using a small flat head
R-1180 6th generation (2015+) Mustang Harness Mount Bar Installation Instructions A. Install harness bar 1. Remove front seats. First remove the plastic bolt covers front and rear using a small flat head
I-Sheet Number Rev.B 3-1/2 OVAL BULL BAR DODGE RAM 1500
 PARTS LIST: 1 Bull Bar 2 10-1.5mm x 35mm Hex Bolts 2 Tube Brackets (Bull Bar) passenger or driver side 2 10mm Lock Washers 2 Upper Frame Brackets (models w/o tow hooks only) 4 10mm x 27mm OD x 3mm Flat
Boss Frog Installation Instructions Single Hoop Rollbar for Mazda Miata
 Boss Frog Installation Instructions Single Hoop Rollbar for Mazda Miata Introduction Congratulations! You have purchased one of the highest quality rollbars available today. Installing your new rollbar
INSTALLATION INSTRUCTIONS SPULEN BILLET SPHERICAL CATCH CAN KIT - V2 VOLKSWAGEN: MK7 GOLF, GTI & GOLF R AUDI: 8V A3
 INSTALLATION INSTRUCTIONS SPULEN BILLET SPHERICAL CATCH CAN KIT - V2 VOLKSWAGEN: MK7 GOLF, GTI & GOLF R AUDI: 8V A3 7675 & 7676 7499 & 7500 VIDEO INSTRUCTIONS ARE ALSO AVAILABLE ONLINE FOR A MORE ENHANCED
Conflicts None. TOYOTA TUNDRA 2017 Black Laser Cut Grille. Part Number: Accessory Code: BG3000. General Applicability
 TOYOTA TUNDRA 2017 Black Laser Cut Grille Part Number: 00016-34173 Accessory Code: BG3000 Conflicts None Kit Contents Item # Quantity Reqd. Description 1 1 Laser Cut Grille 2 1 Complete hardware kit General
INSTALLATION INSTRUCTIONS
 INSTALLATION INSTRUCTIONS Accessory Application Publications No. AII 26320 ATTACHMENT KIT 2004 S2000 Issue Date OCT 2003 PARTS LIST CD Changer Attachment Kit: P/N 08B26-S2A-100A Plain washer Template CD
SDHQ F-150 Winch Mount System Installation
 SDHQ 2015+ F-150 Winch Mount System Installation Recommended Tools: Door panel removal tool Needle Nose Pliers 10mm Socket or Wrench 13 mm or ½ Socket (⅜ Drive) 14 mm or 9/16 Socket (⅜ Drive) 21 mm or
PHASE 3 POWERSPORTS AUDIO KIT MAVERICK X3 CAN-AM. pg 3 Disassembly, Wire and Amplifier Plate Installation. pg 11 Dash Kit Installation
 CAN-AM MAVERICK X3 PHASE 3 POWERSPORTS AUDIO KIT pg 3 Disassembly, Wire and Amplifier Plate Installation pg 11 Dash Kit Installation pg 15 Underseat Subwoofer Installation pg 19 Dash Speaker Pods Installation
MINI COOPER HAVING INSTALLATION QUESTIONS? CALL TECHNICAL SUPPORT AT DESIGNED FOR USE WITH BALL MOUNT # D-19 / 45519
 10/8/2012 PAGE 1 of 6 ITEM 1 QTY 8 Parts List PART NUMBER DESCRIPTION 3/8" CONICAL TOOTHED WASHER TOOLS REQUIRED RATCHET TORQUE WRENCH 12" EXTENSION 12mm SOCKET 8mm SOCKET OFFSET SCREWDRIVER FLAT BLADE
INSTALLATION INSTRUCTIONS
 INSTALLATION INSTRUCTIONS Accessory Application Publications No. BII 23302 2002 MDX Issue Date PN 08U97-S3V-210 (BLACK) P/N 08U97-S3V-270 (SADDLE) NOV 2001 PARTS LIST Wood trim steering wheel 1. Make sure
Installation Instructions. QuickSilver Shifter. Fits: GM, Ford, Chrysler Transmissions See Application Guide for Specific Applications Part # 80683
 Installation Instructions QuickSilver Shifter Fits: GM, Ford, Chrysler Transmissions See Application Guide for Specific Applications Part # 80683 WORK SAFELY! For maximum safety, perform this installation
SAFETY THIS PRODUCT IS FOR OFFROAD USE ONLY. ALL LIABILITY FOR INSTALLATION AND USE RESTS WITH THE OWNER.
 SAFETY Your safety and the safety of others is very important. In order to help you make informed decisions about safety, we have provided installation instructions and other information. These instructions
INSTALLATION INSTRUCTIONS
 INSTALLATION INSTRUCTIONS Accessory Application Publications No. CD CHANGER ATTACHMENT KIT ODYSSEY AII 22030 Issue Date AUG 2000 PARTS LIST CD Changer Attachment Kit: P/N 08B12-S0X-100 Right side rail
Jeep JK Wrangler XHD Rear Tire Carrier
 Contents: 1. Frame (1) 2. Pivot Mount (1) 3. Latch Mount (1) 4. Lug Nuts (3) 5. Catch Pin (1) 6. M12 Washer (18) 7. M12 x 30 Hex Bolt (14) 8. Brake Light Mount (1) 9. Snap Ring (1) 10. Rub Strip (1) 11.
9F1760/9F1761 COBB Sport Springs Ford Focus ST
 9F1760/9F1761 COBB Sport Springs 2013+ Ford Focus ST Installation Instructions Congratulations on your purchase of the COBB Sport Springs for your 2013+ Ford Focus ST. These instructions should only be
WOC & WOC Top & Back Installation Instructions
 Shown with optional Sun Roof WOC-900500-2 & WOC-900501-2 Top & Back Installation Instructions Install Order! Heater Door System Wiper on to Windshield Windshield Rear Panel Top Panel Tools needed: 5/16
Additional Instructions for 6" Drop
 Serving the Truck & Trailer Industry Since 1944 Additional Instructions for 6" Drop Attention Dealers: Please give this manual to the customer when product is delivered. Call 800-535-9545 www.aeroindustries.com
GMC Yukon
 Torch Series LED Grille TOOLS REQUIRED: Flat Head Screwdriver Long Flat Head Screwdriver Phillips Screwdriver 7mm Socket 10mm Socket Ratchet & Extensions 3/16 Drill Bit Power Drill Cutting Wheel or Saw
INSTALLATION INSTRUCTIONS
 INSTALLATION INSTRUCTIONS Accessory HITCH Application 2012 CROSSTOUR Publications No. AII 46198 Issue Date JULY 2011 PARTS LIST Trailer Hitch Kit P/N 08L92-TP6-101 Upper spacer A (5 mm) (Some are not used.)
LOW, MID, HIGH RISE PRO-TAPER HANDLEBAR WITH HEATED GRIPS KIT
 LOW, MID, HIGH RISE PRO-TAPER HANDLEBAR WITH HEATED GRIPS KIT P/N 2881235; 2881236; 2881237 APPLICATION All AXYS and PRO RIDE chassis with stock Pro-Taper Bar BEFORE YOU BEGIN Read these instructions and
Integrated Engineering VW Jetta & GLI MK6 ( ) 2.0T/1,8T Gen 3 Cold Air Intake Install
 2.0T/1,8T Gen 3 Cold Air Intake Install") Integrated Engineering VW Jetta & GLI MK6 (2013.5+) 2.0T/1,8T Gen 3 Cold Air Intake Install Thank you for purchasing another high quality Integrated Engineering product! This instruction guide is used
Integrated Engineering VW Jetta & GLI MK6 (2013.5+) 2.0T/1,8T Gen 3 Cold Air Intake Install Thank you for purchasing another high quality Integrated Engineering product! This instruction guide is used
GENUINE PARTS INSTALLATION INSTRUCTIONS
 GENUINE PARTS INSTALLATION INSTRUCTIONS DESCRIPTION: APPLICATION: PART NUMBER: KIT-CARBON FIBER REAR SPOILER INFINITI Q50 T99J1 J5000 KIT CONTENTS: Item A B C D Qty. 1 4 1 1 Part Description Spoiler Assembly
INSTALLATION INSTRUCTIONS
 INSTALLATION INSTRUCTIONS Accessory Application Publications No. SYSTEM S2000 AII 26324 Issue Date OCT 2004 PARTS LIST Headrest Speaker System P/N 08A54-S2A-100 3 Small wire ties 2 Headrest speakers 9
INSTALL/REMOVAL INSTRUCTIONS: WINDOW LIFT MOTOR
 REMOVAL/INSTALL OF WINDOW REGULATOR (742-269) Ford Mustang 1996 2004 General Tech Tips: Use painter s tape rather than duct tape to secure window. It will not damage paint or leave sticky residue. A plastic
INSTALLATION GUIDE P1000 PRO-CELL CURRENT FORD POLICE UTILITY INTERCEPTOR. pro-gard.com STRONG RELIABLE SECURE
 INSTALLATION GUIDE P1000 PRO-CELL 2013 - CURRENT FORD POLICE UTILITY INTERCEPTOR STRONG RELIABLE SECURE THESE COMPONENTS ARE REQUIRED TO INSTALL THE PRO-GARD PARTITION SYSTEM WB4711-01D WB4711-01P 4K47UINTPRO
INSTALL INSTRUCTIONS C-VS-1500-DUR-1 15 VEHICLE SPECIFIC CONSOLE for Dodge Durango with OEM Center Shifter
 INSTALL INSTRUCTIONS C-VS-1500-DUR-1 15 VEHICLE SPECIFIC CONSOLE for 2011-2013 Dodge Durango with OEM Center Shifter TOOLS NEEDED: Phillips Screw Driver Standard Socket set Metric Socket set 90 Phillips
PARTS LIST: ELEVATION BULL NOSE FRONT BUMPER FORD SUPERDUTY F
 PARTS LIST: 1 Elevation Bumper Assembly 2 8-1.25mm x 25mm Hex Bolts 1 Winch Tray Bracket Assembly 2 8-1.25mm x 16mm Hex Bolts 2 3-hole Bracket Spacer Plates 6 8mm x 24mm x 2mm Flat Washers 2 Plastic Plugs
Quadratec Automatic Power Mirror Movers for Jeep Wrangler JK Current
 Quadratec Automatic Power Mirror Movers for Jeep Wrangler JK 2011- Current US PATENT 9573526 Installation and Instruction Manual: Item # 13125.023X 2011-2013 JK 2014-Current JK REQUIRED TOOLS: Safety Glasses
Installation Instructions
 Approx. Install Time 3Hrs 00Min Installation Instructions Vehicle Application Year: 2013-2017 Make: Ram Model: 2500/3500 Diesel Engine: 6.7L Cummins Tools Required 7mm, 8mm, 10mm,& 13mm Wrench & Socket
Subaru Front Mount Intercooler Kit STI Subaru Front Mount Intercooler Kit STI
 Subaru Front Mount Intercooler Kit STI 2008-2014 715500 Subaru Front Mount Intercooler Kit STI 2008-2014 Congratulations on your purchase of the Subaru Front Mount Intercooler Kit STI 2008-2014. The following
Curt Mfg. Trailer Hitch and Hoppy Wiring Kit Installation Instructions
 Curt Mfg. Trailer Hitch and Hoppy Wiring Kit Installation Instructions The Curt trailer hitch replaces the stock rear cross member in the Touareg. It attaches with 8 bolts just like the factory VW hitch.
SAFETY THIS PRODUCT IS FOR OFFROAD USE ONLY. ALL LIABILITY FOR INSTALLATION AND USE RESTS WITH THE OWNER.
 SAFETY Your safety and the safety of others is very important. In order to help you make informed decisions about safety, we have provided installation instructions and other information. These instructions
EVOMS Cayenne TT V-Flow Installation Instructions
 EVOMS Cayenne TT V-Flow Installation Instructions Passenger s Side OEM Air Box Removal: 1) Using a flat head screw driver, remove the plastic OEM engine covers by unscrewing the large plastic hold down
= Experienced
 I N S T A L L A T I O N G U I D E APPLICATION LENGTH MODEL YR PART # Ford F-250 / F-350 / F-450 Regular Cab * (48 ) 2002-2003, 2008-2012 75134-01A Ford F-250 / F-350 / F-450 Super Cab * (60 ) 2002-2003,
SAFETY THIS PRODUCT IS FOR OFFROAD USE ONLY. ALL LIABILITY FOR INSTALLATION AND USE RESTS WITH THE OWNER.
 SAFETY Your safety and the safety of others is very important. In order to help you make informed decisions about safety, we have provided installation instructions and other information. These instructions
INSTALLATION INSTRUCTIONS DRAWERS #240
 INSTALLATION INSTRUCTIONS DRAWERS #240 Please read and fill out the enclosed warranty registration card to activate your warranty. SHIPMENT CONTENTS #1 Lid #2 Rear #3 Left side panel #4 Right side panel
2017 Current Ford Raptor HoneyBadger Front Bumper Installation Instructions
 2017 Current Ford Raptor HoneyBadger Front Bumper Installation Instructions PREPARATION 1. Disconnect the negative terminal on the battery. Park the vehicle on level ground and set the emergency brake.
Installation instruction do88 Intercooler for Volvo S60 V70 XC70 S80 Turbo 00-09
 Installation instruction do88 Intercooler for Volvo S60 V70 XC70 S80 Turbo 00-09 1. This instruction shows how to replace the OEM intercooler with our performance intercooler. At this type of installation
3/8 Universal Joint Phillips Head Screwdriver
 Magnetic retrieval tool Pliers 1/4 Ratchet Drive T-35 Torx Socket 3/8 Ratchet Drive 5mm Allen Head Socket Torque Wrench 7-3/8 Drive Extension Flat Head Screwdriver 10mm Socket 8mm Socket 3/8 Universal
Prepare to install kit
 4. Park the vehicle on a clean, dry, flat, level surface and block the tires so the vehicle cannot roll in either direction. Prepare to install kit 2011-2012 JEEP WRANGLER (JK) SPORT CAGE INSTALLATION
INSTALLATION INSTRUCTIONS
 INSTALLATION INSTRUCTIONS APPLICATION: WINCH TRAY, SPORTSMAN GG WINCH TRAY KITS, & HDX GG WINCH TRAY KITS AUTOMOTIVE PRODUCTS, INC. 2015 & UP FORD F-150 APP PART #40-93835, 45-93830, 46-23835, 57-93830,
INSTALLATION INSTRUCTIONS
 INSTALLATION INSTRUCTIONS Accessory Application Publications No. AII 33373 ATTACHMENT KIT (TRUNK MOUNT) 2007 S2000 Issue Date AUG 2006 PARTS LIST Plain washer CD Changer Attachment Kit: P/N 08B26-S2A-100A
Installation Manual TWM Performance Short Shifter Nissan 350Z, 370Z Infiniti G35, G37
 Installation Manual TWM Performance Short Shifter Nissan 350Z, 370Z Infiniti G35, G37 It is preferable to park on a flat surface, as you will have to engage and disengage the hand brake and shift from
VW & Audi TDI CR140 ECO KIT Installation Guide
 VW & Audi TDI CR140 ECO KIT Installation Guide This guide is to help you install your new Rawtek DPF, EGR & Adblue Delete Exhaust ECO Kit on your (2009-2014) VW / Audi with 2.0l CR140 Diesel Engine. Note:
MAZDASPEED3 Intercooler Instructions
 MAZDASPEED3 Intercooler Instructions Congratulations on your purchase of the COBB Tuning Front Mount Intercooler System for your 2007-2009 Mazdaspeed3. The following instructions should assist you through
Owner smanual. Banks Ram-Air Super-Scoop Chevy/GMC Pickups. with Installation Instructions
 Owner smanual with Installation Instructions Banks Ram-Air Super-Scoop 2007-2013 Chevy/GMC Pickups THIS MANUAL IS FOR USE WITH SYSTEM 42235, 42236 & 42237 Gale Banks Engineering 546 Duggan Avenue Azusa,
*Phillips Screwdriver *10mm Nut Driver *10mm Socket *Ratchet *Three Inch Putty Knife *Panel Removal Tool *10mm Wrench CONTENTS:
 TOOLS REQUIRED: *Phillips Screwdriver *10mm Nut Driver *10mm Socket *Ratchet *Three Inch Putty Knife *Panel Removal Tool *10mm Wrench CONTENTS: 1EA. SUBWOOFER ASSEMBLY 1EA. 100 WATT AMP ASSEMBLY 1EA. WIRE
AMERICAN CAR CRAFT INSTRUCTIONS
 AMERICAN CAR CRAFT INSTRUCTIONS C7 CORVETTE STINGRAY 4pc Mud Guards CARBON FIBER WRAPPED PART #052024 PARTS INCLUDED 4- stainless mud guard s w/carbon fiber wrap protection for the inner wheel well 2-
CONTENTS TOOLS REQUIRED:
 CONTENTS 1EA. SUBWOOFER ASSEMBLY P/N 77KICK13SUBASSEMBLY 1EA. SUB BRACKET P/N 05030060AA 1EA. 200 WATT AMP P/N REBTL200 1EA. AMP BRACKET P/N RMDR 1EA. POWER HARNESS P/N RHRAMP 1EA. OVERLAY HARNESS P/N
FRONT MOUNT INTERCOOLER GOLF / JETTA IV 1.8T PART # & P INSTALATION INSTRUCTIONS
 FRONT MOUNT INTERCOOLER GOLF / JETTA IV 1.8T PART # 48.10.90 & 48.10.90P INSTALATION INSTRUCTIONS PART LIST: 1 INTERCOOLER CORE 1 U-BENT TUBE 1 L-SHAPED TUBE 1 INTERCOOLER INLET TUBE 4 M6 NYLOC NUT 3 M6
INSTALLATION MANUAL
 INSTALLATION MANUAL 2563000 Parts List 1 Carrier weldment 2 Support arm assembly 1 Third brake light assembly 1 Light extension bracket 1 Spare tire adjustment plate 1 Spare tire mount plate 1 Female spade