Congratulations on your purchase from Rigid Industries, here are the instructions for installation of your new Rigid Lights.
|
|
|
- Albert Oliver
- 5 years ago
- Views:
Transcription


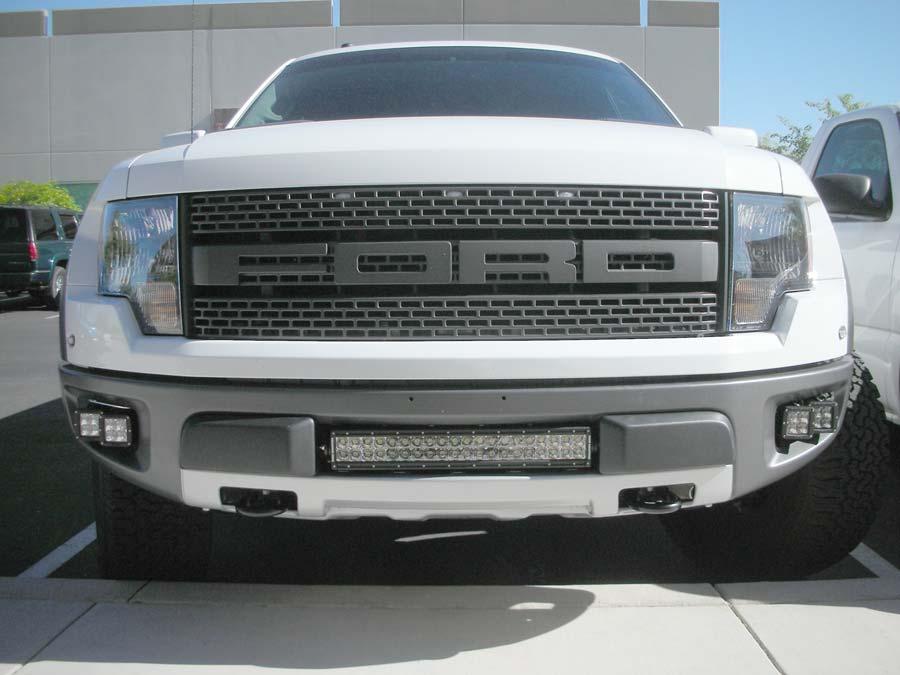
1 Congratulations on your purchase from Rigid Industries, here are the instructions for installation of your new Rigid Lights. 20 E-Series LED Light Bar with Cradle for Lower Grill Mount. Dually Fog Lights w/brackets. Wiring Instructions for Auxiliary switches **Always disconnect battery before servicing any fuses or electrical system** Your Raptor is equipped with four factory Upfitter auxiliary switches, we need to get power to them. There are two locations that need to be addressed, inside the glove box and in the engine compartment under the hood. We will start with the glove box. Open the glove box normally and empty out. On the rear right and left sides there are tabs holding the box in place. Inside of the glove box, reach into the left and right inside of the box, pull in the sides where there is a tab holding it in place, the box should swing downward and towards the floor of the truck. Glove box tab released. 1

 Aux switch 2 - pair of inner fog lights(mate green to green w/black stripe) Aux switch 3 - pair of")
2 Inside of the glove box area there is an access panel, pull towards you to remove it and expose the wiring under the dashboard. After removing the access panel you will need to locate two bundles of 4 wires each. These wires are what you will need to mate to gain switch control to your lights. Wiring bundles after access panel is removed. The switches will be wired as follows, Aux switch 1-20 Lower grill LED Light(mate red to yellow) Aux switch 2 - pair of inner fog lights(mate green to green w/black stripe) Aux switch 3 - pair of outer fog lights(mate blue to purple) If you would like switches set up differently, swap wiring where needed. Refer to your owners manual if you have any questions. Mated wiring using butt connectors to show detail Insert access panel and close glove box door.(pulling in on the tabs) 2

3 Engine Compartment wiring Open the hood of the truck and disconnect the battery, locate the Power Distribution Box(page 365 in your owners manual). Open the box and notice the fuses are numbered, and switch fuses are as follows.(page in owners manual) Switch# location Stock fuse Fuse needed for LED Light amp 10amp for 20 E-Series amp 5amp for pair of Dually s amp 5amp for pair of Dually s amp Your lights will operate normally with the stock fuse configuration, we highly recommend changing to the proper fuse noted to protect your lights against potential damage from being over fused. Locating the under-hood wiring for accessory hookup, It is on the passenger side of the truck above the wheel well. There are 4 wires, Blue, Red, Green and Purple. Refer to your owners manual if you need help locating these. Red wire is for the 20 Lower Grill LED(switch 1) Green wire is for pair of inner Dually fog lights(switch 2) Blue wire is for pair of outer Dually fog lights(switch 3) These are the hot wires that will be connecting your lights to your switches. The ground loops from your wiring harness will be secured using provided self drilling TEK screw installed next to the battery on the passenger side inner fender. There are also stock bolts on the fender well that can be used if needed. Standard grounding principles apply. Engine compartment wiring connected to light harness. 3

 We have found it easiest to remove both bumperettes(pull outward firmly) for this stage, just")

4 Installing lower grill 20 LED lights, or pairs of smaller lights. The lower grill assembly is located under the license plate holes in the front bumper, there Are 5 hex screws, use a 7/32 hex driver to remove these, pull plastic grill forward to remove and expose inner bumper frame. Lower grill removed. Trimming your bumperettes(mini bumpers on either side of the lower grill) We have found it easiest to remove both bumperettes(pull outward firmly) for this stage, just keep in mind that re-installing them can be tricky. There are four tabs on the backside of each bumperette, they are pliable, bend the lower tabs outward and slide them under the base. Using a skinny screwdriver or small pick, pry the upper tabs out and into the slot on the top of the bumperette base. Modifying the bumperettes can be done without removing them, it just makes tightening the light into the cradle a little tricky. To modify bumperettes drill ½ hole(per drawing) and cut out plastic to the edge. Hole drilled cutouts made 4


5 Installing the cradle for lower grill lights. Locate inner bumper frame, mark and drill two(1/2 )holes, one on each side per drawing. Once you have the holes drilled for the cradle, with supplied carriage bolts inserted into slots in light cradle,(making sure slots for light are facing up) loosely bolt it into place using supplied washers and nylon lock nuts. 5


6 Attaching the light to the cradle(make sure slots in bracket are facing up) Rigid Industries E-Series lights mount using a black Delrin spacer/bushing and nylon lock nut on the end mount studs. The Delrin provides needed shock resistance, while the nut holds it in place. Insert supplied Delrin bushing onto end mount stud into endcap cavity of light, then loosely spin on nylon lock nut. Set light into cradle and tighten until light is snug in cradle. Center light/cradle assembly in grill opening and tighten cradle nylon lock nuts on backside of bumper frame. Make final adjustments, tighten end stud nylon lock nuts on light. Light and Bumperettes installed 6

 should be lining your fog light opening. Mark the 4 holes and drill using a 3/16 drill bit.")
7 Installing Fog Lights/Brackets. Locate the two aluminum fog light bracket plates. Passenger Driver Picture shows non powder coated aluminum to show detail Locating and drilling holes Laying under passenger side of fog light opening, locate painted steel support beam, it should be painted the same color as your truck. Line up flat side of rear of bracket with backside of support beam and slide it inboard against the step down on the beam. The forward edge of the bracket(stepped down section with two holes) should be lining your fog light opening. Mark the 4 holes and drill using a 3/16 drill bit. Bracket in correct position(do not mount brackets yet) Repeat for driver side, remove black cap plug on beam, reinstall into larger hole in bracket after bracket is in place. Do not mount brackets yet, lights need to be installed onto them first. Mounting Dually s to bracket. Noticing how brackets are mounted(stepped down section forward lining up with the fog opening) mount Dually lights on the bottom of the plate as 7


 is soldered or if you prefer crimped with a butt connector to the red hot wire under the hood by the wheel well, the black wire is grounded with the supplied")
8 they are suspended from the bracket. Tighten cradle screws(on side of each light) then tighten main cradle stud onto the bracket with supplied hardware. You will need to adjust these to line them up, hold the bracket in place on the vehicle to get an idea of where you want them placed. Take the time here as it gets more difficult once mounted on the truck. Dually-Unmounted Drivers Side with lights mounted. Once adjusted hold bracket in place and install four supplied hex head screws per bracket with a 3/8 drive socket. Installing the wiring harnesses Lower Grill lights With the truck prewired for accessories this truck is fairly simple to wire. The 20 E-Series harness(hot wire is red) is soldered or if you prefer crimped with a butt connector to the red hot wire under the hood by the wheel well, the black wire is grounded with the supplied tek screw included(or grouped with the other grounds if installing fog light kit) Fish the plug end(male weatherpak connector) down behind the headlight bucket and over to the lower grill area, plug into the light. Fog Lights Repeat above. for inner fog lights, connect red wire to green wire on truck, for outer fog lights connect red wire to blue wire on truck. Fish the male connectors down and over to connect to female connectors on fog lights. Make sure all of your grounds are tied together and grounded. Check that all hardware is tight. Installing Upper grill 40 LED light The upper grill light mounts behind the existing main grill. Open the hood and notice the two black bumpers, one on either side of the lower grill opening. Behind those bumpers are two Torx head screws, remove the screws, and remove the nut clips that the bolts thread into. This is where you will through-bolt the new L-brackets that attach the light to the truck. The L-brackets and hardware kit are included with your 40 light. Install the L- 8


9 brackets onto the light using the supplied delrin bushing and ¼-20 nylon lock nut. Then install the through bolt into the L-bracket on either side of the opening. Tighten all hardware. Wire according to wiring instructions, a 15amp fuse is recommended for the 40 E-Series. Thank you again for your purchase from Rigid Industries
10 10
It is strongly recommended that this product be installed by a professional.
 Lower bumper Ford raptor Lower Bumper 20" E-Series or SR-Series or 4" E-Series set mounting instructions For Part # s 40133 & 40134 Thank you for purchasing Rigid Industries products for your Ford. Installation
dually & d2 Ford raptor fog light bracket dually & d2 mounting instructions
 dually & d2 Ford raptor dually & d2 fog light bracket mounting instructions Passenger Driver Thank you for purchasing Rigid Industries products for your Ford. Installation is fairly simple with the right
40" E-Series upper grille
 upper grille Ford raptor 40" E-Series upper grille mounting instructions Thank you for purchasing Rigid Industries products for your Ford. Installation is fairly simple with the right tools and good mechanical
2015 Ford F150 Rear Bumper w/ LED
 2015 Ford F150 Bumper w/ LED T527990 T527991 PARTS LIST: 1 Bumper Assembly 4 12mm Lock Washers 2 Mounting Brackets 6 12 mm Nylon Lock Nuts 4 Sensor Hole Plugs 8 4mm x 10mm Button Head Bolts 2 Plastic Plugs
Installation instruction do88 Intercooler for SAAB 9-3 1,9 TTiD
 Installation instruction do88 Intercooler for SAAB 9-3 1,9 TTiD This instruction shows how to replace the OEM intercooler with this performance intercooler. At this type of installation we always recommend
Installation instruction do88 Intercooler for SAAB 9-3SS/SC 2,8 V6 Turbo
 Installation instruction do88 Intercooler for SAAB 9-3SS/SC 2,8 V6 Turbo This instruction shows how to replace the OEM intercooler with this performance intercooler. At this type of installation we always
Installation instruction do88 Intercooler for SAAB 9-3SS/SC 4-cyl Turbo
 Installation instruction do88 Intercooler for SAAB 9-3SS/SC 4-cyl Turbo This instruction shows how to replace the OEM intercooler with this performance intercooler. 1. 4. 5. At this type of installation
INSTALLATION INSTRUCTIONS ARMOUR FRONT BUMPER W/O LED LIGHTS FOR CHEVY COLORADO PART # AFB-CO15
 INSTALLATION INSTRUCTIONS ARMOUR FRONT BUMPER W/O LED LIGHTS FOR CHEVY COLORADO 15-17 PART # AFB-CO15 ARMOUR FRONT BUMPER PARTS LIST: 1 ARMOUR Bumper Assembly 2 8mm x 25mm Hex Bolts 1 Driver/left Frame
RFB MK6 Jetta Fog Light Kit Wiles Rd.Coral Springs, FL
 What s Included: Tools Required: (2) Fog Lights (2) Front Grills Wire Harness Headlight Switch Hardware Kit T25 Torx Wire Cutters 10mm Socket and Rachet Headlight Switch Composite Wedge Tool 01 1. Remove
Passenger/Right Top Support Bracket. (2) 10mm Nut Plates
 10mm Nut Plates") PARTS LIST: 1 Extreme Grille Guard 16 12mm x 32mm OD x 3mm Flat Washers 1 Driver/Left Frame Mounting Bracket 10 12mm Lock Washers 1 Passenger/Right Frame Mounting Bracket 10 12mm Hex Nuts 1 Driver/Left
PARTS LIST: 1 Extreme Grille Guard 16 12mm x 32mm OD x 3mm Flat Washers 1 Driver/Left Frame Mounting Bracket 10 12mm Lock Washers 1 Passenger/Right Frame Mounting Bracket 10 12mm Hex Nuts 1 Driver/Left
INSTALLATION INSTRUCTIONS HEAVY DUTY FRONT BUMPER CHEVY SILVERADO 1500
 INSTALLATION INSTRUCTIONS PARTS LIST: 1 Heavy Duty Bumper Assembly 16 12mm Nylon Lock Nuts 1 Driver Mounting Bracket 8 4mm x 10mm Socket Head Screws 1 Passenger Mounting Bracket 4 Sensor Plugs 4 Support
INSTALLATION GUIDE PREMIUM FRONT BUMPER FOR RAM AEV30304AA Last Updated: 09/18/17
 AEV30304AA Last Updated: 09/18/17 PREMIUM FRONT BUMPER FOR RAM 1500 INSTALLATION GUIDE PLEASE READ BEFORE YOU START To guarantee a quality installation, we recommend reading these instructions thoroughly
Installation Instructions for Lingenfelter GM 2500 Suburban & Yukon XL Auxiliary Fan System (with AC clutch controlled fan output)
") Installation Instructions for Lingenfelter 2007-2013 GM 2500 Suburban & Yukon XL Auxiliary Fan System (with AC clutch controlled fan output) PN L300080607 Revision - 1.1 Lingenfelter Performance Engineering
Installation Instructions for Lingenfelter 2007-2013 GM 2500 Suburban & Yukon XL Auxiliary Fan System (with AC clutch controlled fan output) PN L300080607 Revision - 1.1 Lingenfelter Performance Engineering
Backside License Plate Mount for Jeep JK Wrangler
 REQUIRED TOOLS 10mm SOCKET 13mm SOCKET 4mm HEX KEY WIRE CRIMPS WIRE STRIPPERS ELECTICAL TAPE SCREW DRIVER KIT CONTAINS BACKSIDE MOUNT LICENSE PLATE BRACKET WITH LEDS PLASTIC PASS-THROUGH GROMMET STAINLESS
LD1 FRONT BUMPER GMC SIERRA 1500
 LDB-GSIE52-FB PARTS LIST: 1 LD1 Bumper Assembly 6 12mm Lock Washers 1 Driver/left Frame Mounting Bracket 6 12mm Hex Nuts 1 Passenger/right Frame Mounting Bracket 6 10-1.5mm x 35mm Hex Bolts 2 Tow Hook
80703 & Backside License Plate Mount for Jeep JK Wrangler (80707) & 10+ (80703)
 & 10+ (80703)") 80703 Backside Mount 80707 Backside Mount REQUIRED TOOLS 10mm SOCKET 13mm SOCKET 4mm HEX KEY WIRE CRIMPS WIRE STRIPPERS ELECTICAL TAPE SCREW DRIVER KIT CONTAINS BACKSIDE MOUNT LICENSE PLATE BRACKET WITH
80703 Backside Mount 80707 Backside Mount REQUIRED TOOLS 10mm SOCKET 13mm SOCKET 4mm HEX KEY WIRE CRIMPS WIRE STRIPPERS ELECTICAL TAPE SCREW DRIVER KIT CONTAINS BACKSIDE MOUNT LICENSE PLATE BRACKET WITH
INSTALLATION INSTRUCTIONS LD-1 REAR BUMPER RAM 1500 PART#R R #PW017838
 INSTALLATION INSTRUCTIONS LD-1 REAR BUMPER PART#R102617 R102620 #PW017838 PARTS LIST: 1 LD1 Bumper Assembly 4 12-1.75mm x 40mm Hex Bolts 1 Push in License Plate Light 4 12mm x 37mm x 3mm Flat Washers 2
Right Bar Light L Bracket Left Bar Light L Bracket. License Plate Bracket
 LD1 FRONT BUMPER PART#R102616 R102619 PARTS LIST: 1 LD1 Bumper Assembly 16 10mm x 27mm OD x 3mm Flat Washers 1 Driver/left Frame Mounting Bracket 8 10mm Lock Washers 1 Passenger/right Frame Mounting Bracket
(W) INSTALLATION INSTRUCTIONS GRILLE GUARD 2014 GMC SIERRA 1500 EXCLUDES DENALI PART # /
 INSTALLATION INSTRUCTIONS GRILLE GUARD 2014 GMC SIERRA 1500 EXCLUDES DENALI PART # /") (W) INSTALLATION INSTRUCTIONS GRILLE GUARD PART # 508514/ 508515 PARTS LIST: GRILLE GUARD Qty Description Qty Description 1 Grille Guard Assembly 6 12-1.75mm Hex Nuts 2 Frame Brackets 4 10-1.50mm x 30mm
(W) INSTALLATION INSTRUCTIONS GRILLE GUARD PART # 508514/ 508515 PARTS LIST: GRILLE GUARD Qty Description Qty Description 1 Grille Guard Assembly 6 12-1.75mm Hex Nuts 2 Frame Brackets 4 10-1.50mm x 30mm
ECO-SERIES FRONT BUMPER FOR GM SIERRA #GM-19337
 #GM-19337 Body Armor 4x4 272 Corporate Terrace St. Corona, CA 92879 951-808-0750 Customer Service hours: M-TH: 7:30am to 4:30 PM Pacific Time Friday: 8 AM Noon Pacific Time PARTS LIST: 1 LD1 Bumper Assembly
INSTALLATION INSTRUCTIONS GRILLE GUARD SILVERADO 1500 PART #
 INSTALLATION INSTRUCTIONS PART # 3-5863 4-0863 PARTS LIST: Qty Description Qty Description 1 Grille Guard Assembly 6 12-1.75mm Hex Nuts 2 Frame Brackets 4 10-1.50mm x 30mm Hex Bolts 1 Driver/Left Mounting
ECO-SERIES REAR BUMPER FORD F150 PART # FD-2962
 15-16 FORD F150 PART # FD-2962 Body Armor 4x4 272 Corporate Terrace St. Corona, CA 92879 951-808-0750 Customer Service hours: M-TH: 7:30am to 4:30 PM Pacific Time Friday: 8 AM Noon Pacific Time PARTS LIST:
COLD AIR INTAKE INSTALLATION INSTRUCTIONS
 COLD AIR INTAKE INSTALLATION INSTRUCTIONS # D760-0030 Fits: 2007-10 135i (E82, E88; with N54 engine) 2007-08 335i/xi (E90) 2007-10 335i (E92, E93; with N54 engine) Congratulations for being selective enough
INSTALLATION INSTRUCTIONS FORD F-150 2WD & 4WD RETAINS FACTORY TOW HOOKS PART #P3063
 INSTALLATION INSTRUCTIONS FORD F-150 2WD & 4WD RETAINS FACTORY TOW HOOKS PART #P3063 PARTS LIST: 1 Grille Guard 2 10-1.5mm Nylon Lock Nuts 1 Driver/Left Frame Mounting Bracket 4 12mm Plastic Washers 1
INSTALLATION MANUAL
 INSTALLATION MANUAL 2563000 Parts List 1 Carrier weldment 2 Support arm assembly 1 Third brake light assembly 1 Light extension bracket 1 Spare tire adjustment plate 1 Spare tire mount plate 1 Female spade
(2) 12mm x 35mm Single Bolt Plates. (2) 12mm x 30mm Double Bolt Plates
 12mm x 35mm Single Bolt Plates. (2) 12mm x 30mm Double Bolt Plates") PARTS LIST: 1 Bull Bar 6 12mm x 24mm OD x 2.5mm Flat Washers 1 Driver/Left Mounting Bracket 6 12-1.75mm Nylon Lock Nuts 1 Passenger/Right Mounting Bracket 4 10-1.50mm x 30mm Hex Bolts 2 12mm x 30mm Double
PARTS LIST: 1 Bull Bar 6 12mm x 24mm OD x 2.5mm Flat Washers 1 Driver/Left Mounting Bracket 6 12-1.75mm Nylon Lock Nuts 1 Passenger/Right Mounting Bracket 4 10-1.50mm x 30mm Hex Bolts 2 12mm x 30mm Double
INSTALLATION INSTRUCTIONS ELEVATION FRONT BUMPER DODGE RAM
 INSTALLATION INSTRUCTIONS PARTS LIST: 1 Elevation Bumper Assembly 24 12mm x 37mm OD x 3mm Flat Washers 2 Frame Mounting Brackets 12 12mm Nylon Lock Nuts 8 12-1.75mm x 50mm Hex Bolts 2 License Plate Mounting
Driver/left Corner Fill Panel. Passenger/Right Corner Fill Panel Left and Right Bar Light L Brackets. (2) Plastic Plugs. License Plate Bracket
 Plastic Plugs. License Plate Bracket") LD1 FRONT BUMPER PART#R102615 R102618 PARTS LIST: 1 LD1 Bumper Assembly 8 10mm Lock Washers 1 Driver/left Frame Mounting Bracket 8 10mm Hex Nuts 1 Passenger/right Frame Mounting Bracket 2 8-1.25mm x 25mm
LD1 FRONT BUMPER PART#R102615 R102618 PARTS LIST: 1 LD1 Bumper Assembly 8 10mm Lock Washers 1 Driver/left Frame Mounting Bracket 8 10mm Hex Nuts 1 Passenger/right Frame Mounting Bracket 2 8-1.25mm x 25mm
The world's first Bolt in Only stress bar for VW Mk 4 Chassis. Installation Manual V1.0.
 The world's first Bolt in Only stress bar for VW Mk 4 Chassis Installation Manual V1.0 www.yarrowsport.com Tools Needed: 1. 17mm, 10mm sockets and ratchet with 3inch extension 2. 10mm box end wrench 3.
INSTALLATION INSTRUCTIONS
 INSTALLATION INSTRUCTIONS HD BUMPER Kit 66240 (BLACK), 74760 (BLACK) & 74690 TUBELESS (TEXTURED BLK) For 03-Newer Chevy 3/4 Ton Trucks As you read these instructions, you will see NOTES, CAUTIONS and WARNINGS.
Passenger/Right Support Bracket Driver/Left Support Bracket
 PARTS LIST: 1 bumper 24 12mm x 37mm OD x 3mm Flat Washers 1 Driver/left Mounting Bracket 14 12mm Lock Washers 1 Passenger/right Mounting Bracket 14 12mm Hex Nuts 1 Driver/left Lower Support Bracket 2 Plastic
Installation MKIV Headlight Housings with Fog Lamps (Procedures apply to both MKIV Jetta and Golf)
") Page 1 This tutorial is provided as a courtesy by ECS Tuning. Service Procedure Installation Proper service and repair procedures are vital to the safe, reliable operation of all motor vehicles as well
Page 1 This tutorial is provided as a courtesy by ECS Tuning. Service Procedure Installation Proper service and repair procedures are vital to the safe, reliable operation of all motor vehicles as well
INSTALLATION INSTRUCTIONS GRILLE GUARD GMC SIERRA 1500 EXCLUDES DENALI PART # 4084/
 INSTALLATION INSTRUCTIONS GRILLE GUARD 14-15 GMC SIERRA 1500 PART # 4084/ 4084-2 PARTS LIST: GRILLE GUARD Qty Description Qty Description 1 Grille Guard Assembly 6 12-1.75mm Hex Nuts 2 Frame Brackets 4
Lexus NX Fine Mesh and Dynamic Radar Cruise Control Fine Mesh Grilles
 IMPORTANT: PLEASE KEEP THIS INSTRUCTION MANUAL FOR FUTURE REFERENCE! 2015-16 Lexus NX Fine Mesh and Dynamic Radar Cruise Control Fine Mesh Grilles Upper Insert - factory chrome surround and emblem reused
54531/ FORD FUSION
 54531/51531 54531/51531 13-15 FORD FUSION 13-15 FORD FUSION FORD FUSION Upper Class Grille w/ Bars TOOLS REQUIRED: Socket Set Flat/Phillips Screw Drivers Torx Bits Plastic Pry Bar 3/16 Drill Bit and Drill
Toyota Tacoma Winch Mount Bumper Installation Instructions Tools Required: Transmission cooler relocation brackets Torque Wrench
 2016-2017 Toyota Tacoma Winch Mount Bumper Installation Instructions Tools Required: Items Included: Small flat head screw driver Winch Mount Ratchet, 10mm, 12mm, 14mm, 17mm & Skid Plate 19mm sockets Transmission
SAFETY SENSORS FIELD OF VIEW WILL BE ALTERED WITH USE OF THE REPLACEMENT BUMPER. Injury hazard
 SAFETY Your safety and the safety of others is very important. In order to help you make informed decisions about safety, we have provided installation instructions and other information. These instructions
COLD AIR INTAKE INSTALLATION INSTRUCTIONS
 COLD AIR INTAKE INSTALLATION INSTRUCTIONS # D760-0029 Fits: 2009-10 335i/xi (E90; with N54 engine) Congratulations for being selective enough to use a Dinan Engineering Cold Air Intake. We have spent many
(1) License Plate Light (2) License Plate Plugs
 License Plate Light (2) License Plate Plugs") PARTS LIST: 1 HD Replacement Bumper 4 12mm x 40mm Hex Bolts 1 Driver/Left Bracket 4 12mm Nylon Lock Nuts 1 Passenger/Right Bracket 8 12mm x 37mm x 3mm Oversize Flat Washers 2 Thin Side Spacers 4 Rubber
PARTS LIST: 1 HD Replacement Bumper 4 12mm x 40mm Hex Bolts 1 Driver/Left Bracket 4 12mm Nylon Lock Nuts 1 Passenger/Right Bracket 8 12mm x 37mm x 3mm Oversize Flat Washers 2 Thin Side Spacers 4 Rubber
Installation Instructions
 Installation Instructions Jeep JK Unlimited (2007 Present) Mounting Bracket and Air Line System Kit for ARB On-Board Twin Air Compressor (CKMTA12) Made in the USA Kit Contents: 1 Bracket for ARB Compressor
INSTALLATION INSTRUCTIONS 3 BULL BAR W-BUILT IN LED LIGHT TOYOTA TACOMA
 INSTALLATION INSTRUCTIONS PARTS LIST: 1 3 Bull Bar 4 12mm Hex Nuts 1 Driver/Left Frame Mounting Bracket 2 10-1.50mm x 120mm x 30mm Hex Bolts 1 Passenger/Right Frame Mounting Bracket 2 10mm x 30mm OD x
2015 Ford F150 Front Bumper w/ LED
 PARTS LIST: 2015 Ford F150 Bumper w/ LED 1 Bumper Assembly 4 8mm Lock Washers 1 Driver/left L Bracket (center LED light) 2 8mm Hex Nuts 1 Passenger/right L Bracket (center LED light) 2 6mm x 20mm Button
Installation Guide CLAAS Lexion Combines with 9 inch Elevators
 Installation Guide CLAAS Lexion Combines with 9 inch Elevators 955614_01 4/17 1 Table of Contents System Overview 3 Quick Start Guide 4 Flow Sensor Installation 5 Hydraulic Elevator Adjustment Kit Installation
Ford Super Duty F-250, F and up
 Ford Super Duty F-250, F-350 2005 and up Installing Upfitter Switches by Richard L. Ray If you want to add a few aftermarket options to your new Ford Super Duty, Ford Motor Company makes things easy for
(2) License Plate Plugs
 License Plate Plugs") PARTS LIST: 1 HD Bull Nose Bumper Assembly 12 12-1.75mm x 50mm 1 Driver/left Frame Mounting Bracket 40 12mm x 37mm OD x 3mm Flat Washers 1 Passenger/right Frame Mounting Bracket 20 12mm Lock Washers 1
PARTS LIST: 1 HD Bull Nose Bumper Assembly 12 12-1.75mm x 50mm 1 Driver/left Frame Mounting Bracket 40 12mm x 37mm OD x 3mm Flat Washers 1 Passenger/right Frame Mounting Bracket 20 12mm Lock Washers 1
INSTALLATION INSTRUCTIONS FORD SUPER DUTY NOTE: (Vehicle Retains Tow Hook) PART # P3064
 PART # P3064") INSTALLATION INSTRUCTIONS 2011-14 FORD SUPER DUTY 250-550 NOTE: (Vehicle Retains Tow Hook) PART # P3064 PARTS LIST: Qty Description Qty Description 1 Grill Guard 2 10mm x mm Hex Bolts 1 Driver/Left Lower
INSTALLATION INSTRUCTIONS 2011-14 FORD SUPER DUTY 250-550 NOTE: (Vehicle Retains Tow Hook) PART # P3064 PARTS LIST: Qty Description Qty Description 1 Grill Guard 2 10mm x mm Hex Bolts 1 Driver/Left Lower
P3066 INSTALLATION MANUAL
 P3066 INSTALLATION MANUAL Parts List 1 Grille guard 1 Driver / left frame bracket Level of Difficulty Moderate Scan for helpful install tips 1 Passenger / right frame bracket 1 Driver / left top bracket
Left and Right Bar Light L Brackets. Driver/Left Frame Bracket
 PARTS LIST: 1 Bumper 14 12mm Nylon Lock Nuts 1 Bull Nose Hoop 2 10mm Double Bolt Plates 1 Winch Tray 4 10-1.5mm x 25mm Hex Bolts 1 Driver/left Frame Mounting Bracket 8 10mm x 30mm x 2.5mm Flat Washers
TESLA MODEL S REAR UNDER SPOILER & DIFFUSER SYSTEM
 TESLA MODEL S Thank you for purchasing your Unplugged Performance Rear Under Spoiler & Diffuser System for the Tesla Model S! Please read this manual carefully prior to installation. REAR UNDER SPOILER
INSTALLATION INSTRUCTIONS FRONT RUNNER GRILLE GUARD 2015 TRANSIT VAN (FULL SIZE)
") INSTALLATION INSTRUCTIONS FRONT RUNNER GRILLE GUARD PARTS LIST: 1 Runner Grille Guard Center 6 12mm Lock Washers 1 Driver/Left Modular Wing 6 12mm Hex Nuts 1 Passenger/Right Modular Wing 2 8-1.25mm x 40mm
INSTALLATION INSTRUCTIONS FRONT RUNNER GRILLE GUARD PARTS LIST: 1 Runner Grille Guard Center 6 12mm Lock Washers 1 Driver/Left Modular Wing 6 12mm Hex Nuts 1 Passenger/Right Modular Wing 2 8-1.25mm x 40mm
Assembly Instructions
 Assembly Instructions Part Number Description Model Approx. Assembly Time 99994-0903 Windshield Wiper Kit Mule SX 1 Hour WARNING Improper installation of this accessory could result in an accident causing
Driver/Left Mounting Bracket. Passenger/Right Mounting Bracket. Bolt Plates
 PARTS LIST: 1 Bull Bar 6 12-1.75mm Nylon Lock Nut 1 Driver/Left Mounting Bracket 4 Bolt Assembly 1 Passenger/Right Mounting Bracket 1 LED Light Bar with mounting bolts 2 12x1.75mm x 30mm Double 2 12 x
SAFETY THIS PRODUCT IS FOR OFFROAD USE ONLY. ALL LIABILITY FOR INSTALLATION AND USE RESTS WITH THE OWNER.
 SAFETY Your safety and the safety of others is very important. In order to help you make informed decisions about safety, we have provided installation instructions and other information. These instructions
INSTALLATION MANUAL P2068. Level of Difficulty. Parts List. Product Image. Notes and Maintenance. Tools Required. Easy
 INSTALLATION MANUAL P2068 Parts List 1 Grille guard 1 Driver / left frame mounting bracket 1 Passenger / right frame mounting bracket 1 Driver / left top mounting bracket 1 Passenger / right top mounting
Installation Instructions
 Installation Instructions Jeep JK 2-Door (2011 Present) Mounting Bracket and Air Line System Kit for ARB On-Board Twin Air Compressor (CKMTA12) Made in the USA Kit Contents: 1 Flat Bracket 1 Formed Bracket
Locate the 4 screws on each side of the vehicle, on the inner fender well liner. Remove them with a Torx T25 bit:
 Installation Instructions for TyrolSport UG SM IC. The first step in installing the UG SMIC is removing the front bumper. Locate the 4 screws on each side of the vehicle, on the inner fender well liner.
INSTALLATION INSTRUCTIONS ELEVATION FRONT BUMPER 2018 FORD F150
 INSTALLATION INSTRUCTIONS PARTS LIST: 1 Elevation Bumper Assembly 28 12mm x 37mm x 3mm Flat Washers 1 Driver/Left Frame Mounting Bracket 4 12mm Lock Washers 1 Passenger/Right Frame Mounting Bracket 12
Part Number: TTU-BGB14-DRL TTU-BGP14-DRL
 11/15/16 TOYOTA TUNDRA 2014-17 Billet Grille w/led DRL Part Number: TTU-BGB14-DRL TTU-BGP14-DRL Kit Contents Item # Quantity Reqd. Description 1 2 LED DRL 2 1 Driver Box 3 1 Switch 4 1 User Card 5 2 Hardware
Procharger Stage II Intercooled Supercharger System (11-14 GT)
") Procharger Stage II Intercooled Supercharger System (11-14 GT) Installation Time: Approximately one day. Installed on 2012 Mustang GT 5.0/Manual Required Tools 3/8 Socket Set (Standard and Metric) 1/2
Procharger Stage II Intercooled Supercharger System (11-14 GT) Installation Time: Approximately one day. Installed on 2012 Mustang GT 5.0/Manual Required Tools 3/8 Socket Set (Standard and Metric) 1/2
Push Start Ignition (05-10 All) Installation
 Installation") Tools Required: Phillips head screwdriver Flat head screwdriver Ratchet 7mm Socket Torx T20 bit Wire strippers/cutters Hand file Needle nose pliers Installation Instructions: Push Start Ignition (05-10
Tools Required: Phillips head screwdriver Flat head screwdriver Ratchet 7mm Socket Torx T20 bit Wire strippers/cutters Hand file Needle nose pliers Installation Instructions: Push Start Ignition (05-10
SUT-450-I ASSEMBLY REQUIREMENTS
 SUT-450-I Torque wrench, carpenters square, wire cutters, Phillips screwdriver, 7/16, 9/16, and 3/4 combination wrenches, ratchet, 9/16,3/4,13/16, and 7/8 sockets. ASSEMBLY REQUIREMENTS *Torque all T-bolt
PHASE 3 POWERSPORTS AUDIO KIT MAVERICK X3 CAN-AM. pg 3 Disassembly, Wire and Amplifier Plate Installation. pg 11 Dash Kit Installation
 CAN-AM MAVERICK X3 PHASE 3 POWERSPORTS AUDIO KIT pg 3 Disassembly, Wire and Amplifier Plate Installation pg 11 Dash Kit Installation pg 15 Underseat Subwoofer Installation pg 19 Dash Speaker Pods Installation
INSTALLATION INSTRUCTIONS
 COLD AIR INTAKE INSTALLATION INSTRUCTIONS PART NUMBER D760-0390C APPLICATION: 1999-2003 E39 M5 PARTS LIST 1 Left Aluminum Intake Tube 1 Air Pump Bracket (A) 1 Right Aluminum Intake Tube 1 Air Pump Bracket
54531/ FORD FUSION
 2014-2015 FORD Upper Class Grille w/ Bars TOOLS REQUIRED: Socket Set Flat/Phillips Screw Drivers Torx Bits Plastic Pry Bar 3/16 Drill Bit and Drill Motor PARTS LIST: (4) #8 u-nuts (2) seal brackets (driver
OIL COOLER KIT INSTALLATION INSTRUCTIONS PART NUMBER D E92 335i/xi (N55 engine) with M-Technic bumper and without stock oil cooler
 with M-Technic bumper and without stock oil cooler") OIL COOLER KIT INSTALLATION INSTRUCTIONS PART NUMBER D570-0925 APPLICATION 2011-12 E92 335i/xi (N55 engine) with M-Technic bumper and without stock oil cooler Congratulations for being selective enough
OIL COOLER KIT INSTALLATION INSTRUCTIONS PART NUMBER D570-0925 APPLICATION 2011-12 E92 335i/xi (N55 engine) with M-Technic bumper and without stock oil cooler Congratulations for being selective enough
INSTALLATION MANUAL. Level of Difficulty. Parts List. Product Image. Tools Required. Notes and Maintenance. Torque Specifications.
 INSTALLATION MANUAL Parts List 1 Bull bar 2 Upper frame mounting bracket 1 Driver / left lower frame mounting bracket 1 Passenger / right lower frame mounting bracket 2 Button head bolt, 6mm 4 Flat washer,
OIL COOLER KIT INSTALLATION INSTRUCTIONS PART NUMBER D E92 335i/xi without stock oil cooler
 OIL COOLER KIT INSTALLATION INSTRUCTIONS PART NUMBER D570-0921 APPLICATION 2007-08 E92 335i/xi without stock oil cooler Congratulations for being selective enough to use a Dinan Engineering Oil Cooler
INSTALLATION INSTRUCTIONS
 INSTALLATION INSTRUCTIONS Accessory S (L4) Application 2008 ACCORD 4-DOOR Publications No. AII 35357 Issue Date AUG 2007 PARTS LIST Left bracket C Fog Light Kit P/N 08V31-TA0-100 Left fog light Right bracket
B5 A4 1.8t Front Mount Intercooler Install Instructions
 B5 A4 1.8t Front Mount Intercooler Install Instructions Only work underneath your vehicle after properly supporting it with adequate jack stands on a flat surface. NEVER work under a vehicle only supported
GMC Yukon
 Torch Series LED Grille TOOLS REQUIRED: Flat Head Screwdriver Long Flat Head Screwdriver Phillips Screwdriver 7mm Socket 10mm Socket Ratchet & Extensions 3/16 Drill Bit Power Drill Cutting Wheel or Saw
Installation Instructions for Chevrolet Colorado, GMC Canyon, LT, Z71, With Factory Fog Lights
 Installation Instructions for 2015-2018 Chevrolet Colorado, GMC Canyon, LT, Z71, With Factory Fog Lights This kit is designed to allow use of your factory fog light operation along with an addition auxiliary
L Light Bracket Crossbar Light Mount Bracket. Driver/left Support Bracket
 PARTS LIST: Qty Description Qty Description 1 Light Bar 4 8-1.25mm x 35mm Hex Bolts 1 Crossbar Light Mount Bracket 6 8-1.25mm x 30mm Hex Bolts 2 Universal s 14 8mm x 24mm x 2mm STD Flat Washers 1 Driver/Left
MKVI Jetta Fog Light Kit
 MKVI Jetta Fog Light Kit Part Number VW Jetta Fog Light Installation This tutorial is provided as a courtesy by ECS Tuning. Proper service and repair procedures are vital to the safe, reliable operation
Lexus ES Fine Mesh and Adaptive Cruise Control Fine Mesh Grilles Upper and Lower Replacements
 IMPORTANT: PLEASE KEEP THIS INSTRUCTION MANUAL FOR FUTURE REFERENCE! 2013-15 Lexus ES Fine Mesh and Adaptive Cruise Control Fine Mesh Grilles Upper and Lower Replacements Part #1372-0102-13 / Black Ice
XX, TOYOTA, TACOMA FRONT BUMPER INSTALLATION INSTRUCTIONS THIS BUMPER SHOULD ONLY BE INSTALLED BY A PROFESSIONAL. SAFETY
 FRONT BUMPER INSTALLATION INSTRUCTIONS THIS BUMPER SHOULD ONLY BE INSTALLED BY A PROFESSIONAL. SAFETY Know safety, no injury. Know injury, no safety. ~Author Unknown If there are any questions, call 1-855-HHTOUGH
INSTALLATION INSTRUCTIONS
 INSTALLATION INSTRUCTIONS FUEL PUMP SLEEVE INSTALLATION KIT 2001-2006 BMW E46 M3 Document# 19-0058 Customer Support: info@radiumauto.com 1. There are 2 common ways to relieve fuel pressure on the BMW.
2010+ Audi B8 S4/S5 3.0T S-FLO Intake Kit INSTALLATION GUIDE FOR RACING USE ONLY
 INSTALLATION GUIDE 2010+ Audi B8 S4/S5 3.0T S-FLO Intake Kit FOR RACING USE ONLY Congratulations on your purchase of the AWE Tuning S-FLO Intake for the 2010+ Audi B8 S4 and B8 S5 3.0T. Exquisite build
8mm Bolt Plate. Passenger/right front only Upper Mounting Bracket
 4 SIDE STEPS PARTS LIST: 1 Driver/left Side Step 13 8-1.25mm x 25mm Hex Bolts 1 Passenger/right Side Step 13 8mm x 24mm x 2mm Flat Washers 1 Passenger/right Upper Bracket (all incl. DEF) 13 8mm Lock Washers
HD BULL NOSE FRONT BUMPER FORD SUPERDUTY F PARTS LIST:
 PARTS LIST: 1 HD Bull Nose Bumper Assembly 1 Bumper Cover 1 Winch Tray Bracket Assembly 5 6mm Combo Button Head Bolts (cover) 2 3-hole Bracket Spacer Plates 1 Wrench (6mm Button Head) 2 Plastic Plugs for
Installation Instructions for Lingenfelter GM 2500 Suburban & Yukon XL Auxiliary Fan System (with ECM controlled fan output)
") Installation Instructions for Lingenfelter 2007-2013 GM 2500 Suburban & Yukon XL Auxiliary Fan System (with ECM controlled fan output) PN L300090607 Revision - 1.1 Lingenfelter Performance Engineering
Installation Instructions for Lingenfelter 2007-2013 GM 2500 Suburban & Yukon XL Auxiliary Fan System (with ECM controlled fan output) PN L300090607 Revision - 1.1 Lingenfelter Performance Engineering
(2) Support Brackets (fit left or right) (2) 12mm x 40mm Bolt Plates
 Support Brackets (fit left or right) (2) 12mm x 40mm Bolt Plates") PARTS LIST: 1 bumper 6 12-1.75mm x 160mm Hex Bolts 2 Frame Mounting Brackets (fit left or right) 2 12-1.75mm x 50mm Hex Bolts 2 Support Brackets (fit left or right) 18 12mm x 37mm OD x 3mm Flat Washers
PARTS LIST: 1 bumper 6 12-1.75mm x 160mm Hex Bolts 2 Frame Mounting Brackets (fit left or right) 2 12-1.75mm x 50mm Hex Bolts 2 Support Brackets (fit left or right) 18 12mm x 37mm OD x 3mm Flat Washers
INSTALLATION INSTRUCTIONS 3 BULL BAR CHEVY SILVERADO1500/GMC SIERRA TAHOE/SUBURBAN/YUKON/YUKON XL
 INSTALLATION INSTRUCTIONS 3 BULL BAR 2007-16 CHEVY SILVERADO1500/GMC SIERRA1500 PART # 35-4016;B35-4016;B35-4016-3;P35-4016 Page 1 of 6 PARTS LIST: 1 Bull Bar 6 12mm x 24mm OD x 2.5mm Flat Washer 1 Driver/Left
INSTALLATION AND USER MANUAL
 INSTALLATION AND USER MANUAL SDKIT-730 & SDKIT-734 100% Bolt-On 150 PSI Train Horn System for 2011-2015 F-250 & F-350 Super Duty P/N SDKIT-730 P/N SDKIT-734 Thank you for purchasing a Kleinn Air Horns
Ford F-150 Billet Grilles Upper Replacement
 2015-16 Ford F-150 Billet Grilles Upper Replacement Upper Black Billet Part #1045-019U-15B Upper Polished Billet Part #1045-019U-15 TOOLS REQUIRED Automotive grade masking tape, plastic clip removal tool,
INSTALLATION INSTRUCTIONS RATTLER STEEL RUNNING BOARDS FORD TRANSIT VAN (FULL SIZE)
") INSTALLATION INSTRUCTIONS PARTS LIST: 1 32-inch Steel Running Board 1 8-1.25mm x 35mm Hex Bolt 1 96-inch Steel Running Board 13 8-1.25mm x 25mm Hex Bolt 5 Passenger Side/Driver Side Mounting Brackets 20
INSTALLATION INSTRUCTIONS PARTS LIST: 1 32-inch Steel Running Board 1 8-1.25mm x 35mm Hex Bolt 1 96-inch Steel Running Board 13 8-1.25mm x 25mm Hex Bolt 5 Passenger Side/Driver Side Mounting Brackets 20
PERFECT FIT SERIES IN-DASH HEAT/ COOL/ DEFROST MUSTANG
 specializing in AIR CONDITIONING, PARTS AND SYSTEMS for your classic vehicle PERFECT FIT SERIES IN-DASH HEAT/ COOL/ DEFROST 1969-70 MUSTANG CONTROL & OPERATING INSTRUCTIONS The controls on your new Perfect
Passenger/Right Side Frame Bracket. Driver/Left Side Frame Bracket. (4) Spacer Washers. (2) Bull Bar Mounting Brackets
 Spacer Washers. (2) Bull Bar Mounting Brackets") PARTS LIST: 1 Bull Bar 12 s 1 Driver/Left Frame Mounting Bracket 1 Passenger/Right Frame Mounting Bracket 6 10mm Lock Washers 2 Bull Bar Mounting Brackets 6 10mm Hex Nuts 4 Large Spacer Washers 4 8-1.25mm
PARTS LIST: 1 Bull Bar 12 s 1 Driver/Left Frame Mounting Bracket 1 Passenger/Right Frame Mounting Bracket 6 10mm Lock Washers 2 Bull Bar Mounting Brackets 6 10mm Hex Nuts 4 Large Spacer Washers 4 8-1.25mm
SAFETY THIS PRODUCT IS FOR OFFROAD USE ONLY. ALL LIABILITY FOR INSTALLATION AND USE RESTS WITH THE OWNER.
 SAFETY Your safety and the safety of others is very important. In order to help you make informed decisions about safety, we have provided installation instructions and other information. These instructions
SAFETY SENSORS FIELD OF VIEW WILL BE ALTERED WITH USE OF THE REPLACEMENT BUMPER. Injury hazard
 SAFETY Your safety and the safety of others is very important. In order to help you make informed decisions about safety, we have provided installation instructions and other information. These instructions
PARTS LIST: ELEVATION BULL NOSE FRONT BUMPER FORD SUPERDUTY F
 PARTS LIST: 1 Elevation Bumper Assembly 2 8-1.25mm x 25mm Hex Bolts 1 Winch Tray Bracket Assembly 2 8-1.25mm x 16mm Hex Bolts 2 3-hole Bracket Spacer Plates 6 8mm x 24mm x 2mm Flat Washers 2 Plastic Plugs
Product Packing List
 Product Packing List Product: SDHQ-55-1650-G3 Description: 2016+ Toyota Tacoma Hidden Winch Mount (1) Winch Mount SDHQ-55-1650-G3-A (2) Lower Support Brackets SDHQ-55-1650-G3-B (1) Lower Bumper Bracket
8436, 8437, 8438, 8439, 8442, 27480, 27780, 28028, & ISOLATION MODULE ELECTRICAL SYSTEM
 September 11, 2003 Lit. No. 27808 8436, 8437, 8438, 8439, 8442, 27480, 27780, 28028, & 28400 ISOLATION MODULE ELECTRICAL SYSTEM Installation Instructions Read this document before installing the snowplow.
DODGE RAM 2500
 81234007 2014-2015 DODGE RAM 2500 Congratulations - your new LevelTow Helper Springs are quality products capable of improving the handling and comfort of your vehicle. As with all products, proper installation
INSTALLATION INSTRUCTIONS SEMI-HIDDEN WINCH MOUNT Part Number:70005 Application: Ford Super Duty
 INSTALLATION INSTRUCTIONS SEMI-HIDDEN WINCH MOUNT Part Number:70005 Application: Ford Super Duty Your safety, and the safety of others, is very important. To help you make informed decisions about safety,
Depress each tab as you pull the bezel off. The bezels are tight. L.H. shown.
 2013-2014 Ford Mustang V6 & Boss 302 Lower Valance Fog Light Kit Parts List: Quantity: Tool List: Fog light & bulb with bracket 2 Flat head & Phillips screwdriver Black bezels 2 Ratchet & Socket set OR
SAFETY THIS PRODUCT IS FOR OFFROAD USE ONLY. ALL LIABILITY FOR INSTALLATION AND USE RESTS WITH THE OWNER.
 SAFETY Your safety and the safety of others is very important. In order to help you make informed decisions about safety, we have provided installation instructions and other information. These instructions
F3006 LED Driving Light Set for 2016 & Newer Can-Am Spyder F3 Limited Installation instructions
 F3006 LED Driving Light Set for 2016 & Newer Can-Am Spyder F3 Limited Installation instructions 1. Lay out and familiarize yourself with the supplied components. 2. Remove the ignition switch bezel ring
I-Sheet Number Rev.B 3-1/2 OVAL BULL BAR DODGE RAM 1500
 PARTS LIST: 1 Bull Bar 2 10-1.5mm x 35mm Hex Bolts 2 Tube Brackets (Bull Bar) passenger or driver side 2 10mm Lock Washers 2 Upper Frame Brackets (models w/o tow hooks only) 4 10mm x 27mm OD x 3mm Flat
INSTRUCTIONS. INTERCOOLER UPGRADE BMW E82 135i 2008-
 INSTRUCTIONS INTERCOOLER UPGRADE BMW E82 135i 2008- Parts Included: - Intercooler - Left and right side pipes with hoses - 3 Silicone Hoses ( 2.5 x 3 ) - 1 Silicone Hose 90degree 2.5 elbow - 8 Hoseclamps
License Plate Bracket (4) Rubber Plugs. (2) Retaining Rings (2) Foam Spacers
 Rubber Plugs. (2) Retaining Rings (2) Foam Spacers") LDB-NTIT62-FB PARTS LIST: 1 LD1 Bumper Assembly 2 8mm Hex Nuts 1 Driver/left L Bracket (center LED light) 2 6mm x 20mm Button Head Bolts 1 Passenger/right L Bracket (center LED light) 4 6mm x 18mm x 1.6mm
LDB-NTIT62-FB PARTS LIST: 1 LD1 Bumper Assembly 2 8mm Hex Nuts 1 Driver/left L Bracket (center LED light) 2 6mm x 20mm Button Head Bolts 1 Passenger/right L Bracket (center LED light) 4 6mm x 18mm x 1.6mm