Hard Bar Sport, M1/M2 Hard Core Hardtop, M2 Sport, and Xtreme Installation Instructions
|
|
|
- Ashlie Copeland
- 5 years ago
- Views:
Transcription
1 HARDWARE KIT: Hard Bar Sport, M1/M2 Hard Core Shoulder Harness Guide Relocation Assemblies: 2-3/8" X 1" grade 8 bolts 4-3/8" flat washers 2-3/8" lock nuts 2 - brass bushings 2 - plastic trim caps 2-3/8" trim cap mounting washers Upper Mounting Plate: 2-7/16"(11mm) X 2.25" bolts 2 - spacers 2 - plastic trim caps 2 - trim cap mounting washers Seat Belt Reel Plate Mounting: 2-7/16" (11mm) X 1.25" bolts Foot Plate Mounting: 2 - bent back-up plates (front) 2 - flat back-up plates (rear) 12-3/8" X 1.25" bolts 12-3/8" lock nuts 12-3/8" flat washers TOOLS NEEDED: safety glasses #2 phillips head screwdriver wrenches 16mm or 5/8" '94 & LATER - 17mm or 11/16 2-9/16" 10mm drill w/ 3/8" drill bit jack and jack stands hack saw or aviation snips for cutting package shelf and interior panels belt sander or half round file for fitting plastic interior panels T-40 torx drive for removable hard top latches - obviously not everyone will need this one 1) This step is my favorite part: PUT THE TOP DOWN! 2) REMOVE THE TRIM PANELS COVERING THE SEAT BELT TOWERS. (THESE PIECES ARE CALLED QUARTER TRIM BY MAZDA.) First remove the metal cap at the top of the panel just behind the door. This is held in place by a threaded fastener that is used to attach the top boot (10mm) and a Phillips head screw on the pre '99 cars. The M2 version is similar but an extra rubber molding has been added that is held in place by a plastic insert inside the top of the doorjamb and another under the lip of the body just behind the door. Remove the weather-stripping that runs along the front edge of the trim panel at the rear of the door opening. (you might find it necessary to loosen the 4 Phillips head screws in the scuff plate that runs along the bottom of the doorsill on some early models) Remove the plastic cover from the shoulder harness guide (it just snaps off), loosen the bolts and remove the bolt and spacers from the guide. On the '94-'97 models Remove the cockpit brace end covers (they also snap), loosen the bolts and remove the cockpit brace. There is a small plastic clip at the rear of the trim panel just behind the hole the shoulder harness guide bolt goes through. Remove the clip by pulling it toward the rear of the car. Remove the rectangular seat belt trim ring at the front of the panel and the 2 fasteners in each trim panel located on the inside just above the package tray, one is a kind of plastic
2 rivet that is loosened by lifting the center portion and pulling it free, the other is another one of those fancy boot cover snaps with the 10mm head. If you have a '99 with the wind blocker remove the screws and lift the wind blocker out. The trim panel can now be removed by pulling it toward the center of the car, there's a couple of snap type fasteners down low just behind the door that you will need to pop loose as the panel is pulled free. 3) PUT THE TOP UP - Remove the carpet from the fuel tank cover (the silver cover that makes up the front part of the package shelf) and fold it back. A claw hammer is a good tool for removing the plastic carpet fasteners. Lower the top. (Pre '99 leave the window zipped in, be careful not to crease the window) Some sort of cover for the window is not a bad idea. Remove the large silver metal fuel tank cover that makes up the front part of the package shelf by removing the several bolts w/ 10mm heads that hold it in place and releasing any wire loom fasteners. Lift the cover up and out of the car. On the '94-97 models there's a computer mounted behind the passenger seat, the outer mounting bracket will need to be modified and the upper mounting stud removed to allow clearance for the roll bar mounting plate. (FIG# 8) If you are installing an original design HARD BAR SPORT or a HARD CORE HARDTOP Only you will need to trim the package shelf area just behind the fuel tank cover opening as shown in (FIG# 5). You will also need to remove the spare tire and the metal panel at the front of the trunk on the driver's side (the one with the jack handle attached) if you are working on a pre '99. While it's not absolutely necessary to do so, I find it helpful to remove the front trunk panels in the M2, they are held in by several of those nifty little plastic rivet fasteners. If the car has antilock brakes and you are installing an original design HARD BAR SPORT or a HARD CORE HARDTOP you will need to relocate the ABS sensor wiring harnesses. Jack up the rear of the car and support with sturdy jack stands. Remove the wheels and the plastic inner splash panels. The harnesses run from the sensors, mounted next to the brake rotors, up through rubber bulkhead plugs in the areas just to either side of the fuel tank. Trace the harnesses forward to the connectors just behind the seats, on either side of the area just uncovered by removal of the fuel tank cover / package shelf. Unplug the connectors, untangle the harnesses from the wire holders and other wiring, push the bulkhead plugs through and pull the wires through into the wheel wells. After the roll bar is bolted in, drill a 3/4" hole just far enough to the front or rear of the foot plate to clear, reroute the wiring and reinstall the bulkhead plugs. 4) REMOVE THE LOWER SEAT BELT REEL BOLTS (16mm pre'94 17mm '94 and later) AND SPACERS. Also remove seat belt reel alignment screw at the top of the mounting bracket (small screw w/ 10mm head). Pull the complete assembly forward and bend the alignment tab down flat, this will allow the reel to tilt inward for better seat belt alignment and retraction after the bar is installed. GO TO SEAT BELT REEL & GUIDE INSTRUCTIONS 5) GO GET SOME HELP! 6) Y'ALL SET THE BAR IN THE CAR - BE CAREFUL The rear brace foot plates will just fit under the front edge of the package tray, work the rear braces past the several wiring
3 harnesses in this area being careful not to mess up any of the wiring. Also watch the front mounting plates, they will be very close to the seat backs at this point. The horizontal mounting plates half way up the bar should fit over the top of the seat belt tower and align with the bolt hole that held the shoulder harness guide. The lower mounting points align (hopefully) with the lower seat belt reel bolt holes. The roll bar plates fit against the seat belt reels which stay in their original location but do not use the original spacers. (FIG# 1) Once the Sport Bar and those rascally seat belt reels are in position start but do not completely tighten the seat belt reel mounting plate bolts from the hardware kit, make sure that your seat belts are on the inside of the roll bar. Using the bolts and spacers from the hardware kit, install the upper mounting bolts through the upper mounting plate with the spacer under the plate in place of the original shoulder harness guide bolt and spacers, (FIG# 2)if you have a problem with alignment partially tighten the seat belt reel bolts and pull the rear braces toward the rear by reaching through from the trunk. Be sure the trim cap mounting washers are under the bolt heads, we want this thing to look nice when you get done! The shoulder harness guide is NOT installed at this point, DO NOT install the guide under the mounting bolt. Attach the seat guide to the bar through the smaller hole in the upper mounting plate using the bolts, washers and bushings supplied in the hardware kit. (FIG# 3) Be careful, don't drop any hardware down in the seat belt reel. Tighten to 20 ft-lbs. Once you have the seat belt reel and the upper mounting plate bolts started and no wires are pinched tighten them to 50 ft-lbs 7) JACK UP THE REAR OF THE CAR AND SUPPORT WITH STURDY JACK STANDS - Remove the wheels and plastic splash panels from the front of the inner fenders. (pre 99-4 bolts w/ 10mm heads / M2-4 plastic fasteners w/ Phillips heads) 8) GET THE DRILL AND SAFETY GLASSES - Locate the position for the rear back-up plates by drilling the first hole down from the top. It's tight in this area, an angle drill is helpful but not absolutely necessary to do these holes. Once you get the first hole drilled, bolt the back-up plate in place, the others can be done from under the car using the back-up plate as a template. (FIG# 6) The nuts closest to the frame rail do not use washers because of their proximity to the rail. (FIG# 7) The front plates are easy, just drill from the front and bolt the back-up plates in place using washers under all nuts and bolts. Tighten to ft-lbs. Spraying the back-up plates with undercoating after the fasteners are tight is a good idea. Install the splash panels, rear tires, trunk panels and spare. 9) Check convertible top clearance - it may be necessary to adjust the top frame to allow clearance when the top is lowered and raised especially with the covered bars. Raise the top slowly checking clearance as the hinge points come up past the bar. If the hinge points rub loosen the (3) bolts with 12mm heads behind either doorjamb that hold the top frame. Pull the frame as far to the rear as possible, you might need to lift the top slightly to allow more movement. Tighten the bolts while holding pressure on the top and recheck clearance. See convertible top adjustment page.
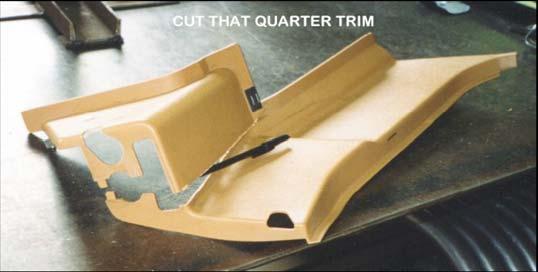
4 10) TRIM THE FUEL TANK COVER - On the pre 99's it's a small notch at the rear corners. The M2 requires a notch on either side, use the bolt holes for reference points. Bend the rear corners to clear the bar until the panel is in place then flatten into place. Install the fuel tank cover, raise the top put the carpet back in place and trim around the roll bar. 11) CUT QUARTER TRIM PANELS - This will only hurt a little. In order to reinstall the trim panels they have to be cut into two pieces, it's not really all that bad, it just takes some time to do it right. I use a small air powered reciprocating saw to do the dirty work, but a hacksaw or a pair of aviation snips (tin snips) will do just fine. It's fairly evident as to where the cut needs to be made, just cut the panel and trim to fit up to the roll bar, but maybe (FIG# 4b) will help to make things easier. A belt sander gives a nice straight finished edge but a large fairly coarse (wood type) file will suffice. Take several small cuts to get a good fit, you can always take more off but it's hard to put back. In addition to the vertical cut, a semicircular area will have to be removed along the outer top area of the panel to fit up to the bar. (FIG# 4a) The final cut is to elongate the seat belt hole, trim to the vertical edge, cut the end off of the rectangular seat belt trim rings that were snapped out of the quarter trim during the disassembly so that they will fit back into the elongated seat belt holes and butt up against the roll bar. (FIG# 4a) 12) REINSTALL THE REMAINING PARTS - You will have some leftovers: seat belt reel spacers, bolts and screws, shoulder harness guide trim, bolts and spacers. HAPPY MOTORING

5 Image #2 Image #1


6 Seat Belt Reel and Guide : This applies to all year models. Remove enough material from the web of the shoulder harness guide to allow it to rotate as far forward as possible, until the loop hits the bar. Remove metal from the side only as shown in the photo so as not to weaken the guide. '94 - '00 seat belt reels. With the seat belt reel pulled away from the car remove the 2 pop rivets that hold the upper bracket to the reel and remove the bracket. This will prevent the reel from being wedged behind the bar causing the belt to retract slower. On the early models and '00 up simply bend the small tab on the upper bracket down flat to allow the reel to lean inboard for better belt alignment.

.")
.")
7 Convertible Top Adjustment : The clearance between the rollbar the convertible top frame is very close as the top is raised or lowered. ** this clearance must be checked after installing the bar before raising the top. ** This part is easier with some help. Carefully raise the top until the frame hinge point (the one over the side window) is close to the bar. If it won't clear without rubbing adjust the top frame by loosening the three mounting bolts with 12mm hex heads (see photo 1). Insert a pry bar or large screwdriver as shown in photo 2. Slightly raise the top while pushing back on the pry bar to get the frame as far to the rear as possible (photo 3). Retighten the mounting bolts while holding pressure on the frame. Recheck clearance and readjust if needed. In a very few cases the edge of the frame may have to be filed slightly to obtain clearance. Photo 1 Photo 2 Photo 3
Deuce/Ace Installation Instructions
 HARDWARE KIT: Upper Mounting Plate: 2-7/16" (11mm) X 3.5" bolts 2-7/16" flange nuts 2-2" spacers 2-7/16" trim cap mounting washers 2 - plastic trim caps TOOLS NEEDED: safety glasses wrenches 16mm or 5/8"
Boss Frog Installation Instructions Single Hoop Rollbar for Mazda Miata
 Boss Frog Installation Instructions Single Hoop Rollbar for Mazda Miata Introduction Congratulations! You have purchased one of the highest quality rollbars available today. Installing your new rollbar
OIL COOLER KIT INSTALLATION INSTRUCTIONS PART NUMBER D
 OIL COOLER KIT INSTALLATION INSTRUCTIONS PART NUMBER D570-0907 APPLICATION: 2011-12 E90 335i/xi (N55 engine) with BMW M-Technic bumper and without stock oil cooler Congratulations for being selective enough
OIL COOLER KIT INSTALLATION INSTRUCTIONS PART NUMBER D
 OIL COOLER KIT INSTALLATION INSTRUCTIONS PART NUMBER D570-0904 APPLICATION: 2011-2012 E90 335i/xi (N55 engine) with BMW standard bumper and with stock oil cooler Congratulations for being selective enough
OIL COOLER KIT INSTALLATION INSTRUCTIONS PART NUMBER D E92 335i/xi (N55 engine) with BMW Standard bumper and with stock oil cooler
 with BMW Standard bumper and with stock oil cooler") OIL COOLER KIT INSTALLATION INSTRUCTIONS PART NUMBER D570-0924 APPLICATION: 2011-12 E92 335i/xi (N55 engine) with BMW Standard bumper and with stock oil cooler Congratulations for being selective enough
OIL COOLER KIT INSTALLATION INSTRUCTIONS PART NUMBER D570-0924 APPLICATION: 2011-12 E92 335i/xi (N55 engine) with BMW Standard bumper and with stock oil cooler Congratulations for being selective enough
INSTALLATION INSTRUCTIONS 97 FORD EXPEDITION
 INSTALLATION INSTRUCTIONS 97 FORD EXPEDITION 1. Read the instructions completely and carefully before you begin. Check the kit for proper contents (refer to the part s list and the picture diagrams). Before
PRODUCT USE INFORMATION
 9RC61000 Jeep YJ Body Lift Thank you for choosing Rough Country for all your suspension needs. This body lift fits both manual and Automatic equipped vehicles!!! Refer to last page of this Instruction
Z-Gate Universal Shifter
 Installation Instructions Z-Gate Universal Shifter Fits: GM, Ford, Lincoln and Chrysler Transmissions See Application Guide for Specific Applications Part #80681 Rev 06/01/2018 WORK SAFELY! For maximum
INSTALLATION INSTRUCTIONS
 INSTALLATION INSTRUCTIONS Document# 19-0038 2004+ Lotus Elise (Series 2) Rear Clamshell Removal Kit Safely support the vehicle. This is a two-person job. Allow 1 to 2 hours for initial disassembly. Have
Installation Instructions Z-Gate Shifter
 Installation Instructions Z-Gate Shifter Part Number 80681 1998, 2001 by B&M Racing and Performance Products The B&M Z-Gate shifter can be used in vehicles equipped with most popular three speed automatic
»Product» Safety Warning
 #C9315 Installation Instructions 2000-2005 Suburban/Tahoe/Yukon 1500 2/4wd 3" Body Lift Read and understand all instructions and warnings prior to installation of product and operation of vehicle. Zone
09-12 Dodge 4WD Leveling Kit
 9235900 09-12 Dodge 4WD 1500 2.5 Leveling Kit Thank you for choosing Rough Country for all your suspension needs. DOES NOT FIT TRX PACKAGE VEHICLES!! Rough Country recommends a certified technician install
09-12 Dodge 4WD /4 Body Lift
 92RC80000 09-12 Dodge 4WD 1500 1 1/4 Body Lift Thank you for choosing Rough Country for all your suspension needs. Rough Country recommends a certified technician install this kit. Attempts to install
PRE-INSTALLATION. INSTALLATION INSTRUCTIONS STEP 1: Park vehicle on level surface and chock rear wheels.
 2007-2013 7.5" GMC/Chevrolet 1500 4WD Suspension Lift kit PRE-INSTALLATION 15004 2 - Cross-member (Fr/Rr) 2 - Sway Bar Drop Bracket 2 - Knuckle (Dr/Pass) 1 - Driver Diff. Bracket 1 - Passenger Diff. Bracket
OIL COOLER KIT INSTALLATION INSTRUCTIONS PART NUMBER D E92 335is (N54 engine) with BMW M-Technic bumper and with stock oil cooler
 with BMW M-Technic bumper and with stock oil cooler") OIL COOLER KIT INSTALLATION INSTRUCTIONS PART NUMBER D570-0923 APPLICATION: 2011 E92 335is (N54 engine) with BMW M-Technic bumper and with stock oil cooler Congratulations for being selective enough to
OIL COOLER KIT INSTALLATION INSTRUCTIONS PART NUMBER D570-0923 APPLICATION: 2011 E92 335is (N54 engine) with BMW M-Technic bumper and with stock oil cooler Congratulations for being selective enough to
OIL COOLER KIT INSTALLATION INSTRUCTIONS PART NUMBER D E92 335i/xi (N55 engine) with M-Technic bumper and without stock oil cooler
 with M-Technic bumper and without stock oil cooler") OIL COOLER KIT INSTALLATION INSTRUCTIONS PART NUMBER D570-0925 APPLICATION 2011-12 E92 335i/xi (N55 engine) with M-Technic bumper and without stock oil cooler Congratulations for being selective enough
OIL COOLER KIT INSTALLATION INSTRUCTIONS PART NUMBER D570-0925 APPLICATION 2011-12 E92 335i/xi (N55 engine) with M-Technic bumper and without stock oil cooler Congratulations for being selective enough
Installation Instructions. QuickSilver Shifter. Fits: GM, Ford, Chrysler Transmissions See Application Guide for Specific Applications Part # 80683
 Installation Instructions QuickSilver Shifter Fits: GM, Ford, Chrysler Transmissions See Application Guide for Specific Applications Part # 80683 WORK SAFELY! For maximum safety, perform this installation
Subaru Front Mount Intercooler Kit STI Subaru Front Mount Intercooler Kit STI
 Subaru Front Mount Intercooler Kit STI 2008-2014 715500 Subaru Front Mount Intercooler Kit STI 2008-2014 Congratulations on your purchase of the Subaru Front Mount Intercooler Kit STI 2008-2014. The following
2005+ Roll Bar (Mm5RB-20.1 to -20.6) Recommended Center punch 1/8" pilot drill 1-3/4" Hole saw 2" Hole saw
 Recommended Center punch 1/8 pilot drill 1-3/4 Hole saw 2 Hole saw") 3430 Sacramento Dr., Unit D San Luis Obispo, CA 93401 Telephone: 805/544-8748 Fax: 805/544-8645 www.maximummotorsports.com 2005+ Roll Bar (Mm5RB-20.1 to -20.6) Recommended Center punch 1/8" pilot drill
3430 Sacramento Dr., Unit D San Luis Obispo, CA 93401 Telephone: 805/544-8748 Fax: 805/544-8645 www.maximummotorsports.com 2005+ Roll Bar (Mm5RB-20.1 to -20.6) Recommended Center punch 1/8" pilot drill
COLD AIR INTAKE INSTALLATION INSTRUCTIONS. # D Fits: F10 M5 # D Fits: F06/F12/F13 M6 PARTS LIST
 COLD AIR INTAKE INSTALLATION INSTRUCTIONS # D760-0035 Fits: 2013-15 F10 M5 # D760-0037 Fits: 2012-15 F06/F12/F13 M6 PARTS LIST (1) Left Carbon Airbox Lid (1) Right Carbon Airbox Lid (1) Left Carbon Snorkel
FRONT FENDERS WITH FACTORY INNER FENDERS JEEP WRANGLER TJ/LJ/YJ/CJ7 INSTALLATION INSTRUCTIONS
 FRONT FENDERS WITH FACTORY INNER FENDERS JEEP WRANGLER TJ/LJ/YJ/CJ7 INSTALLATION INSTRUCTIONS TOOLS NEEDED 13mm socket 5/32 Allen head 5/16 wrench or socket 7/16 wrench or socket 7/32 Allen head 5/8 wrench
2. With the rear door open remove pull-style clip from the passenger side just below the door latch.
 LoD Offroad FJ Cruiser Rear Bumper with Tire Carrier Installation Instructions 1. Begin with removing factory spare from the rear door. 2. With the rear door open remove pull-style clip from the passenger
OIL COOLER KIT INSTALLATION INSTRUCTIONS PART NUMBER D E92 335i/xi without stock oil cooler
 OIL COOLER KIT INSTALLATION INSTRUCTIONS PART NUMBER D570-0921 APPLICATION 2007-08 E92 335i/xi without stock oil cooler Congratulations for being selective enough to use a Dinan Engineering Oil Cooler
COLD AIR INTAKE INSTALLATION INSTRUCTIONS
 COLD AIR INTAKE INSTALLATION INSTRUCTIONS # D760-0030 Fits: 2007-10 135i (E82, E88; with N54 engine) 2007-08 335i/xi (E90) 2007-10 335i (E92, E93; with N54 engine) Congratulations for being selective enough
INSTALLATION INSTRUCTIONS ELITE SERIES REAR BUMPER AND TIRE CARRIER Part Number: 89525/89800 Application: Jeep JK
 INSTALLATION INSTRUCTIONS ELITE SERIES REAR BUMPER AND TIRE CARRIER Part Number: 89525/89800 Application: 2007+ Jeep JK GENERAL SAFETY PRECAUTIONS Your safety, and the safety of others, is very important.
Installation Instructions Sport Shifter
 The B&M Sport Shifter can be used in vehicles equipped with most popular three speed or four speed automatic transmissions. It is equipped with neutral safety and backup light switches, transmission brackets
»Product» Safety Warning
 #C1354 Installation Instructions 1999-2002 Chevy/GM 1500 4wd 3.5" Combo Lift Kit Read and understand all instructions and warnings prior to installation of product and operation of vehicle. Zone Offroad
Roll Bar (MMRB-6.1 to -6.7)
") 3430 Sacramento Dr., Unit D San Luis Obispo, CA 93401 Telephone: 805/544-8748 Fax: 805/544-8645 www.maximummotorsports.com 1994-04 Roll Bar (MMRB-6.1 to -6.7) NOTE: These instructions cover Roll Bars with
3430 Sacramento Dr., Unit D San Luis Obispo, CA 93401 Telephone: 805/544-8748 Fax: 805/544-8645 www.maximummotorsports.com 1994-04 Roll Bar (MMRB-6.1 to -6.7) NOTE: These instructions cover Roll Bars with
LPE C5 Battery Relocation Kit
 LPE C5 Battery Relocation Kit The LPE C5 Corvette battery relocation kit improves vehicle weight distribution by moving weight to the rear of the vehicle. The improved weight distribution increases traction
09-UP FORD F150 6 LIFT KIT
 92159800 09-UP FORD F150 6 LIFT KIT THANK YOU FOR CHOOSING ROUGH COUNTRY FOR YOUR SUSPENSION NEEDS. Rough Country recommends a certified technician install this system. In addition to these instructions,
I-Sheet Number Rev.B 3-1/2 OVAL BULL BAR DODGE RAM 1500
 PARTS LIST: 1 Bull Bar 2 10-1.5mm x 35mm Hex Bolts 2 Tube Brackets (Bull Bar) passenger or driver side 2 10mm Lock Washers 2 Upper Frame Brackets (models w/o tow hooks only) 4 10mm x 27mm OD x 3mm Flat
FRONT MOUNT INTERCOOLER GOLF / JETTA IV 1.8T PART # & P INSTALATION INSTRUCTIONS
 FRONT MOUNT INTERCOOLER GOLF / JETTA IV 1.8T PART # 48.10.90 & 48.10.90P INSTALATION INSTRUCTIONS PART LIST: 1 INTERCOOLER CORE 1 U-BENT TUBE 1 L-SHAPED TUBE 1 INTERCOOLER INLET TUBE 4 M6 NYLOC NUT 3 M6
READ AND UNDERSTAND ALL INSTRUCTIONS AND WARNINGS PRIOR TO INSTALLATION OF SYSTEM AND OPERATION OF VEHICLE.
 #9378 Installation Instructions 3 Body Lift Kit 1998-2000 Ranger READ AND UNDERSTAND ALL INSTRUCTIONS AND WARNINGS PRIOR TO INSTALLATION OF SYSTEM AND OPERATION OF VEHICLE. SAFETY WARNING BDS Suspension
The world's first Bolt in Only stress bar for VW Mk 4 Chassis. Installation Manual V1.0.
 The world's first Bolt in Only stress bar for VW Mk 4 Chassis Installation Manual V1.0 www.yarrowsport.com Tools Needed: 1. 17mm, 10mm sockets and ratchet with 3inch extension 2. 10mm box end wrench 3.
Drag Race Roll Bar (MMRB-6, -7)
") 3430 Sacramento Dr., Unit D San Luis Obispo, CA 93401 Telephone: 805/544-8748 Fax: 805/544-8645 www.maximummotorsports.com 1994-04 Drag Race Roll Bar (MMRB-6, -7) The Maximum Motorsports 6-point Drag Race
3430 Sacramento Dr., Unit D San Luis Obispo, CA 93401 Telephone: 805/544-8748 Fax: 805/544-8645 www.maximummotorsports.com 1994-04 Drag Race Roll Bar (MMRB-6, -7) The Maximum Motorsports 6-point Drag Race
»Product» Safety Warning
 Read and understand all instructions and warnings prior to installation of product and operation of vehicle. 1. Zone Offroad Products recommends this system be installed by a professional technician. In
RHINO SUSPENSION SYSTEM INSTALLATION INSTRUCTIONS
 PARTS INCLUDED: 2 FRONT UPPER A-ARMS 2 FRONT LOWER A-ARMS 2 UNI-BALL JOINTS 2 UNI-BALL JOINT STUDS 2 UNI-BALL JOINT CAPS 2 RETAINING RINGS 1 FRONT SHOCK ASSEM. 2 DELRON STEERING STOPS 2 SHOCK MOUNT SPACERS
INSTALLATION GUIDE PREMIUM FRONT BUMPER FOR RAM AEV30304AA Last Updated: 09/18/17
 AEV30304AA Last Updated: 09/18/17 PREMIUM FRONT BUMPER FOR RAM 1500 INSTALLATION GUIDE PLEASE READ BEFORE YOU START To guarantee a quality installation, we recommend reading these instructions thoroughly
07-UP AVALANCHE 7.5 KIT
 92120900R1 07-UP AVALANCHE 7.5 KIT Thank you for choosing Rough Country for your suspension needs. We appreciate your business!! This kit will not fit vehicles equipped with electric steering or trucks
07-11 GM 4WD 1500 P/U 1 1/4 Body Lift
 92RC70100 07-11 GM 4WD 1500 P/U 1 1/4 Body Lift Thank you for choosing Rough Country for all your suspension needs. Rough Country recommends a certified technician install this kit. Attempts to install
INSTALLATION INSTRUCTIONS JEEP 2011-UP JK SECURITY FULL CONSOLE #274
 INSTALLATION INSTRUCTIONS JEEP 2011-UP JK SECURITY FULL CONSOLE #274 PARTS CHECKLIST Tuffy Console #9 Left Front Mounting Bracket #10 Right Front Mounting Bracket #11 Electronics mounting bracket #12 Divider
Jeep JK Wrangler XHD Rear Tire Carrier
 Contents: 1. Frame (1) 2. Pivot Mount (1) 3. Latch Mount (1) 4. Lug Nuts (3) 5. Catch Pin (1) 6. M12 Washer (18) 7. M12 x 30 Hex Bolt (14) 8. Brake Light Mount (1) 9. Snap Ring (1) 10. Rub Strip (1) 11.
Mustang CDC Lightbar (94-04) - Installation Instructions
 - Installation Instructions") Mustang CDC Lightbar (94-04) - Installation Instructions The below installation instructions work for the following products: Classic Design Concepts Mustang Convertible Lightbar (94-04 Carbon Fiber) Classic
Mustang CDC Lightbar (94-04) - Installation Instructions The below installation instructions work for the following products: Classic Design Concepts Mustang Convertible Lightbar (94-04 Carbon Fiber) Classic
Mustang Shaker
 2005-2009 Mustang Shaker CDC #110050 ( 05/ 06) or 0711-7000-01 ( 07/ 09) Component Check List: Quantity/Description Part # CDC Installer 1 - Engine Cover Assembly 114050 1 - Aluminum Shaker Scoop 183020
BBK LONG TUBE HEADERS (99-04 GT, Mach 1, Bullitt)
") BBK LONG TUBE HEADERS (99-04 GT, Mach 1, Bullitt) Install Time: Approx. 8-10 hrs Parts Needed: BBK Long Tube Headers Shorty mid pipe X/H O2 wiring harness extensions Hi-temp thread locker Tools Required:
BBK LONG TUBE HEADERS (99-04 GT, Mach 1, Bullitt) Install Time: Approx. 8-10 hrs Parts Needed: BBK Long Tube Headers Shorty mid pipe X/H O2 wiring harness extensions Hi-temp thread locker Tools Required:
Read and understand all instructions and warnings prior to installation of product and operation of vehicle.
 #F9378 Installation Instructions 1998-2000 Ford Ranger 3" Body Lift Kit Read and understand all instructions and warnings prior to installation of product and operation of vehicle. Zone Offroad Products
Light Truck MegaShifter
 Installation Instructions Light Truck MegaShifter The B&M Light Truck Megashifter shifter is designed to be used in most light trucks equipped with most popular three speed or four speed automatic transmissions.
Sunroof Repair. Sunroof Repair TSB. The sunroof repair kit available for the J30 is part number Y20. See images at bottom of document.
 Sunroof Repair This document is the text/images from the TSB (technical service bulletin) issued by Infiniti concerning the repair procedure for sunroof issues. Be advised that this is a LARGE, TIME-CONSUMING
INSTALLATION INSTRUCTIONS RATTLER STEEL RUNNING BOARDS FORD TRANSIT VAN (FULL SIZE)
") INSTALLATION INSTRUCTIONS PARTS LIST: 1 32-inch Steel Running Board 1 8-1.25mm x 35mm Hex Bolt 1 96-inch Steel Running Board 13 8-1.25mm x 25mm Hex Bolt 5 Passenger Side/Driver Side Mounting Brackets 20
INSTALLATION INSTRUCTIONS PARTS LIST: 1 32-inch Steel Running Board 1 8-1.25mm x 35mm Hex Bolt 1 96-inch Steel Running Board 13 8-1.25mm x 25mm Hex Bolt 5 Passenger Side/Driver Side Mounting Brackets 20
04-08 FORD F150 4 KIT
 9257700 04-08 FORD F50 4 KIT THANK YOU FOR CHOOSING ROUGH COUNTRY FOR YOUR SUSPENSION NEEDS. Rough Country recommends a certified technician install this system. In addition to these instructions, professional
Installation Instructions QUICKSILVER CONSOLE SHIFTER Fits: Chevelle / El Camino
 WORK SAFELY! For maximum safety, perform this installation on a clean, level surface and with the engine turned off. Place blocks or wedges in front of and behind both rear wheels to prevent movement in
Installation Instructions Right Hand Drive Megashifter
 Installation Instructions Right Hand Drive Megashifter Part Number 80685 1995, 2001, 2006, 2010 by B&M Racing & Performance Products The B&M Right Hand Drive Megashifter is designed specifically for vehicles
PRO RATCHET UNIVERSAL SHIFTER
 Installation Instructions PRO RATCHET UNIVERSAL SHIFTER Fits: GM, Ford and Chryslers w/automatic Transmission See Application Guide for Specific Vehicles Catalog # 80842 WORK SAFELY! For maximum safety,
HD BULL NOSE FRONT BUMPER FORD SUPERDUTY F PARTS LIST:
 PARTS LIST: 1 HD Bull Nose Bumper Assembly 1 Bumper Cover 1 Winch Tray Bracket Assembly 5 6mm Combo Button Head Bolts (cover) 2 3-hole Bracket Spacer Plates 1 Wrench (6mm Button Head) 2 Plastic Plugs for
2014 F /6 LIFT KIT
 92157500 2014 F-150 4 /6 LIFT KIT THANK YOU FOR CHOOSING ROUGH COUNTRY FOR YOUR SUSPENSION NEEDS. Rough Country recommends a certified technician install this system. In addition to these instructions,
Hurst VMATIC3 INSTALLATION
 FORM 159 8530 07/12 Hurst VMATIC3 3-Speed & 4-Speed Automatic Shifter Catalog #3838530 2012 by Hurst Performance The Hurst Vmatic3 shifter can be used in vehicles equipped with most popular three speed
SWING DOOR SOFT ENCLOSURE (part# 16733)
") 800-643-7332 americanlandmaster.com This kit is for use with all fullsize, 2 passenger ALM utility vehicles. SWING DOOR SOFT ENCLOSURE (part# 16733) NOTE TOOLS REQUIRED Drill 1/4 Drill Bit 7/16 Wrench
800-643-7332 americanlandmaster.com This kit is for use with all fullsize, 2 passenger ALM utility vehicles. SWING DOOR SOFT ENCLOSURE (part# 16733) NOTE TOOLS REQUIRED Drill 1/4 Drill Bit 7/16 Wrench
I. Before starting installation
 5. Park the vehicle on a clean, dry, flat, level surface and block the tires so the vehicle cannot roll in either direction. A. Disconnect battery cables 1. Disconnect the negative cable first, then the
NOTICE TO DEALER AND VEHICLE OWNER
 921322300 *1322BAG1* 1322BAG1 2009-17 Dodge 2wd 1500 6 Lift Kit Thank you for choosing Rough Country for all your suspension needs. Rough Country recommends a certified technician install this system.
4 th Gen 4 Runner Front Bumper - Installation Instructions:
 www.shrockworks.com info@shrockworks.com 877-474-7625 4 th Gen 4 Runner Front Bumper - Installation Instructions: Thank you for purchasing a ShrockWorks product. We are confident you will enjoy it for
2005+ Drag Race Roll Bar (Mm5RB-20)
") 3430 Sacramento Dr., Unit D San Luis Obispo, CA 93401 Telephone: 805/544-8748 Fax: 805/544-8645 www.maximummotorsports.com 2005+ Drag Race Roll Bar (Mm5RB-20) Note that the NHRA DOES allow the door bars
3430 Sacramento Dr., Unit D San Luis Obispo, CA 93401 Telephone: 805/544-8748 Fax: 805/544-8645 www.maximummotorsports.com 2005+ Drag Race Roll Bar (Mm5RB-20) Note that the NHRA DOES allow the door bars
»Product» Safety Warning
 #C9354 Installation Instructions 2001-2002 Chevy/GM 1500 2/4wd 3" Body Lift Kit Read and understand all instructions and warnings prior to installation of product and operation of vehicle. 1. Zone Offroad
PARTS LIST: ELEVATION BULL NOSE FRONT BUMPER FORD SUPERDUTY F
 PARTS LIST: 1 Elevation Bumper Assembly 2 8-1.25mm x 25mm Hex Bolts 1 Winch Tray Bracket Assembly 2 8-1.25mm x 16mm Hex Bolts 2 3-hole Bracket Spacer Plates 6 8mm x 24mm x 2mm Flat Washers 2 Plastic Plugs
Toyota Tacoma Winch Mount Bumper Installation Instructions Tools Required: Transmission cooler relocation brackets Torque Wrench
 2016-2017 Toyota Tacoma Winch Mount Bumper Installation Instructions Tools Required: Items Included: Small flat head screw driver Winch Mount Ratchet, 10mm, 12mm, 14mm, 17mm & Skid Plate 19mm sockets Transmission
INSTALLATION INSTRUCTIONS
 HIGH FLOW AIRFLOW METER INSTALLATION INSTRUCTIONS PART NUMBER D763-1600A APPLICATION: 2001-06 E46 M3 Parts List: Hose clamp 64Z (7) Plastic Rivets Air Filter Temp Sensor & Harness (2) Button Head Screws
80-96 Ford F150 / Bronco 4WD Class II 4"- 6" Suspension Lift Installation Instructions
 www.skyjacker.com Required Tool List: 80-96 Ford F150 / Bronco 4WD Class II 4"- 6" Suspension Lift Installation Instructions Safety Glasses Metric / Standard Wrenches & Sockets Floor Jack Jack Stands Measuring
TOYOTA FJ CRUISER 6 SUSPENSION KIT
 92177000 TOYOTA FJ CRUISER 6 SUSPENSION KIT Thank you for choosing Rough Country for your suspension needs. Rough Country recommends a certified technician installs this system. In addition to these instructions,
*1264BAG3* 1264BAG WD GM KIT A
 92126400A *1264BAG3* 1264BAG3 Thank you for choosing Rough Country for your suspension needs. We appreciate your business!! This kit will not fit vehicles equipped with electric steering. 07-13 4WD GM
*1274BAG9* 1274BAG GM 4-6 SUSPENSION KIT N2.0. Thank you for choosing Rough Country for your suspension needs A
 92127400A 88-98 GM 4-6 SUSPENSION KIT N2.0 Thank you for choosing Rough Country for your suspension needs. *1274BAG9* 1274BAG9 Rough Country recommends a certified technician installs this system. In addition
Procharger Stage II Intercooled Supercharger System (11-14 GT)
") Procharger Stage II Intercooled Supercharger System (11-14 GT) Installation Time: Approximately one day. Installed on 2012 Mustang GT 5.0/Manual Required Tools 3/8 Socket Set (Standard and Metric) 1/2
Procharger Stage II Intercooled Supercharger System (11-14 GT) Installation Time: Approximately one day. Installed on 2012 Mustang GT 5.0/Manual Required Tools 3/8 Socket Set (Standard and Metric) 1/2
<THESE INSTRUCTIONS MUST BE GIVEN TO THE END USER> B&W
 B&W Trailer Hitches 1216 Hawaii Rd / PO Box 186 Humboldt, KS 66748 P:620.473.3664 F:620.869.9031 Turnoverball Gooseneck Hitch Installation Instructions
TOYOTA 4-RUNNER KIT 5 KIT
 92173600 1990-1995 TOYOTA 4-RUNNER KIT 5 KIT Thank you for choosing Rough Country for all your suspension needs. Rough Country recommends a certified technician install this system. In addition to these
INSTALLATION INSTRUCTIONS
 COLD AIR INTAKE INSTALLATION INSTRUCTIONS PART NUMBER D760-0390C APPLICATION: 1999-2003 E39 M5 PARTS LIST 1 Left Aluminum Intake Tube 1 Air Pump Bracket (A) 1 Right Aluminum Intake Tube 1 Air Pump Bracket
09-13 FORD F150 4 LIFT KIT
 92159900 09-13 FORD F150 4 LIFT KIT THANK YOU FOR CHOOSING ROUGH COUNTRY FOR YOUR SUSPENSION NEEDS. Rough Country recommends a certified technician install this system. In addition to these instructions,
Installation Instructions Megashifter
 Installation Instructions Megashifter The B&M Megashifter shifter can be used in vehicles equipped with most popular three speed or four speed automatic transmissions. Your B&M Megashifter comes equipped
Installation Manual Volvo C30 T5 Front Mount Intercooler System
 Installation Manual Volvo C30 T5 Front Mount System Volvo C30 T5 System / Installation Manual i C Contents Important Information i Parts List i Required Tools and Materials 1 1.0 - Vehicle Preparation
*1576BAG9* 1576BAG FORD F KIT C THANK YOU FOR CHOOSING ROUGH COUNTRY FOR YOUR SUSPENSION NEEDS.
 957600C THANK YOU FOR CHOOSING ROUGH COUNTRY FOR YOUR SUSPENSION NEEDS. 0-08 FORD F50-6 KIT Rough Country recommends a certified technician install this system. In addition to these instructions, professional
INSTALLATION INSTRUCTION 88148
 INSTALLATION INSTRUCTION 88148 Rev C For Rancho Suspension Systems RS6548, RS6549 & RS6550: GM 2500HD, 2500, and 1500HD Trucks READ ALL INSTRUCTIONS THOROUGHLY FROM START TO FINISH BEFORE BEGINNING INSTALLATION
»Product» Safety Warning
 #C9355 Installation Instructions 1999-2000 Chevy/GM 1500 2/4wd 3" Body Lift Kit Read and understand all instructions and warnings prior to installation of product and operation of vehicle. 1. Zone Offroad
PRODUCT USE INFORMATION
 921878200E *1878BAG11* 1878BAG11 Nissan 2017 Titan 6 Suspension Kit Thank you for choosing Rough Country for all your suspension needs. Rough Country recommends a certified technician install this system.
67-70 Cougar Rack Kit Instructions # &
 67-70 Cougar Rack Kit Instructions # 8011950-01 & 8011940-01 Unisteer offers a limited warranty against all manufacturer defects of their kits and supplied parts. Unisteer will not honor any warranty on
Desktop 5.5 Z Axis Retrofit
 Page 1 Kit parts Desktop 5.5 Z Axis Retrofit Carriage plate with stop bolt and Z proximity switch installed Zip ties Spare bolts Spindle mounting plate with stop bolt, spring mount, and rail Z proximity
Mustang Classic LightBar Instructions
 1994-2004 Mustang Classic LightBar Instructions Note: Read installation instructions before starting. Component List: 1 LightBar 4 Poly Plugs 4 LightBar Bolts 4 LightBar Washers 2 LightBar Rivets 2 Light
Installation Instructions
 Installation Instructions (2) 10-24 Black flathead Allen Screws Tailgate End Front Cover Passenger Side Rail (has inspected by sticker under rail) (4) 10-32 Screws (stainless) Front Cover Exploded View
*1609BAG8* 1609BAG8 JEEP JK 3 1/2 SUSPENSION KIT A
 JEEP JK 3 1/2 SUSPENSION KIT 92160900A *1609BAG8* 1609BAG8 Thank you for choosing Rough Country for your suspension needs. Please read instructions before beginning installation. Check the kit hardware
07-11 GM 1500 Pickup, Avalanche, Yukon, Tahoe, Suburban Front 2.5 Kit
 92130500 07-11 GM 1500 Pickup, Avalanche, Yukon, Tahoe, Suburban Front 2.5 Kit Thank you for choosing Rough Country for all your suspension needs. Rough Country recommends a certified technician install
SUT-450-I ASSEMBLY REQUIREMENTS
 SUT-450-I Torque wrench, carpenters square, wire cutters, Phillips screwdriver, 7/16, 9/16, and 3/4 combination wrenches, ratchet, 9/16,3/4,13/16, and 7/8 sockets. ASSEMBLY REQUIREMENTS *Torque all T-bolt
Ag Leader Technology. Parts List for Combine MF , 8780, White 9700
 Parts List for Combine Quantity by Model Note: Indented items indicate parts included W in an assembly listed above 8 8 8 8 H 5 5 5 7 I 6 7 9 8 T Part Name/Description Part No. 0 0 0 0 E Instruction Kit
Slave Cylinder Weep Hole Drilling Procedure
 Slave Cylinder Weep Hole Drilling Procedure Tools Required: T20 Torx Driver T25 Torx Driver T25 Torx Bit with ¼ Ratchet Wrench 4mm Hex Key (Allen wrench) 5mm Hex Key 6mm Hex Key 8mm Hex Key 12mm Hex Key
SS1066HF Jeep JK Wrangler Left Hand Drive CRDI4 2.8Litre-I4 Diesel Engine and EGHV6 3.8Litre V6 Gasoline Engine
 SS1066HF Jeep JK Wrangler Left Hand Drive CRDI4 2.8Litre-I4 Diesel Engine and EGHV6 3.8Litre V6 Gasoline Engine Installation Guide Safari SS1066HF Page - 1 of 12 6/10/2009 ITEM PART NO DESCRIPTION QTY
INSTALLATION INSTRUCTIONS GRILLE GUARD GMC SIERRA 1500 EXCLUDES DENALI PART # 4084/
 INSTALLATION INSTRUCTIONS GRILLE GUARD 14-15 GMC SIERRA 1500 PART # 4084/ 4084-2 PARTS LIST: GRILLE GUARD Qty Description Qty Description 1 Grille Guard Assembly 6 12-1.75mm Hex Nuts 2 Frame Brackets 4
COLD AIR INTAKE INSTALLATION INSTRUCTIONS
 COLD AIR INTAKE INSTALLATION INSTRUCTIONS # D760-0029 Fits: 2009-10 335i/xi (E90; with N54 engine) Congratulations for being selective enough to use a Dinan Engineering Cold Air Intake. We have spent many
Technical Support (707)
") Installation Instructions CONSOLE MEGASHIFTER Fits: 1982-1992 Camaro & Firebird w/automatic Transmission *except 1988-1992 Firebird Formula Model Catalog # 80692 WORK SAFELY! For maximum safety, perform
Installation Instructions CONSOLE MEGASHIFTER Fits: 1982-1992 Camaro & Firebird w/automatic Transmission *except 1988-1992 Firebird Formula Model Catalog # 80692 WORK SAFELY! For maximum safety, perform
INSTALLATION INSTRUCTIONS
 INSTALLATION INSTRUCTIONS Part# 22-7810 Add On Kit for Your ADS System Contents: Complete Install Kit for Your ARB CKMTA12V Compressor For the most up-to-date instructions please visit www.updownair.com
Factory Five Racing, Inc. 818 Kit Assembly manual revision 1J update
 Factory Five Racing, Inc. 818 Kit Assembly manual revision 1J update Turbo coolant overflow tank...1 Shifter handle...4 Install...4 Door skin...7 Door Liner... 10 Side mirrors... 14 Door handles and pulls...
MAZDASPEED3 Intercooler Instructions
 MAZDASPEED3 Intercooler Instructions Congratulations on your purchase of the COBB Tuning Front Mount Intercooler System for your 2007-2009 Mazdaspeed3. The following instructions should assist you through
Installation Guide for the TeraFlex Elite LCG JK 4 Long Arm Suspension System
 Tera Manufacturing, Inc. 5251 South Commerce Dr. Murray, Utah 84107 Phone/801.288.2585 Fax/801.713.2313 www.teraflex.biz INSTALLATION GUIDE Installation Guide for the TeraFlex Elite LCG JK 4 Long Arm Suspension
INSTALLATION INSTRUCTIONS GRILLE GUARD SILVERADO 1500 PART #
 INSTALLATION INSTRUCTIONS PART # 3-5863 4-0863 PARTS LIST: Qty Description Qty Description 1 Grille Guard Assembly 6 12-1.75mm Hex Nuts 2 Frame Brackets 4 10-1.50mm x 30mm Hex Bolts 1 Driver/Left Mounting
Backside License Plate Mount for Jeep JK Wrangler
 REQUIRED TOOLS 10mm SOCKET 13mm SOCKET 4mm HEX KEY WIRE CRIMPS WIRE STRIPPERS ELECTICAL TAPE SCREW DRIVER KIT CONTAINS BACKSIDE MOUNT LICENSE PLATE BRACKET WITH LEDS PLASTIC PASS-THROUGH GROMMET STAINLESS