Brabus SoundXtra for Mercedes-Benz GL350 BT X SX
|
|
|
- Karin Atkins
- 5 years ago
- Views:
Transcription


1 Brabus SoundXtra for Mercedes-Benz GL350 BT X SX The product described in the instructions was developed, produced and checked considering the necessary safety requirements. In order to ensure a proper and safe function and to rule out danger for persons and objects, this product must be installed appropriately. Only trained, qualified staff, having the necessary technical experience and tools, should make the installation. Therefore you have to read and completely understand these instructions. Before you start please check the content of the supplied parts as detailed below. Perform the disassembly/ assembly of standard components according to Mercedes-Benz workshop instructions. Youtube-Link:


2 2 Included in delivery of Brabus SoundXtra: 1x Brabus Sound module AK 1x SoundXtra control unit SG 1x Sound modul wiring harness x SoundXtra operating button TB 1x Washer for button assembly TR 1x Lock washer M6 WU3946 1x Fuse 10Amps WU TB AK SG
 To sound module Sound module connector To operating")
3 Electrical connections: Power supply connector (+12V constant) CAN-connector Fuse bracket 3 SoundXtra main plug Ground ring lug (31) To sound module Sound module connector To operating button


4 Laying of wiring harness Position of CAN distributor/ CAN-connection Position of power supply and ground connection 4 Control unit position Control button position and illumination connection Sound module position
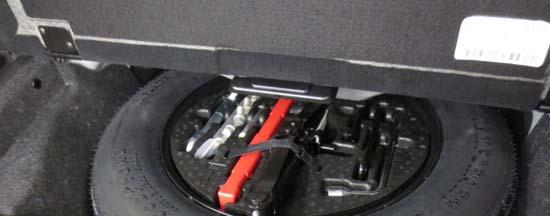
5 Preparation: - Open the floor lid within the boot compartment. - Loosen and remove the spare wheel. - Loosen and remove the trims and the insulation below the floor lid. - Loosen and remove the right side plastic entrance panels. 5 - Turn down the back seats, loosen and remove the left & right sidewall trim within the boot compartment. - Remove the right lower dashboard cover. - Remove the center console. - Remove the exhaust system and the heat shield above the rear silencer.


6 6 Remove

7 7 - Print the template on the last page (take care for correct control measures) and cut it out. Lay the template to the heat shield according to illustration and mark the outer edges to of the cutting template to it. Cut the heat shield using a suitable tool (wear protective equipment).

 using bolts supplied and")
8 8 - Bolt the sound module to the standard fixation areas below the vehicle (above bracket of pressure reservoir) using bolts supplied and the standard bolt.

9 - Remove the rubber grommet shown on the vehicle underbody. Route the wire for the sound module out of the vehicle. Cut a small hole into the rubber grommet and route the wire for the sound module through it. Attach the grommet back to the vehicle. - Route the wire to the sound module. Attach the pins to the 2-pole plug supplied and connect the plug to the sound module. Seal the rubber grommet using appropriate sealant. 9


10 - Re-attach the heat shield Re-attach the exhaust system.

11 11 - Fixate the control unit to the standard bolt within the boot compartment using lock nut supplied.


12 - Route the wiring harness to the right vehicle side, fixate it to standard wirings using cable ties. - Fold up the rear seats to get access to the fuse and relay box below the left rear seat. - Attach the power supply connector to a free port of the green fuse panel and attach the fuse supplied to the chosen terminal Bolt the ground ring lug to the ground terminal shown within the boot compartment.
. - The CAN distributor is located in the passenger footwell.")
.")
13 - Route the CAN wires (GN, WH) and the wires for the operation button (BU, BK) frontwards on the right vehicle side (below entrance and pillar-trims). - The CAN distributor is located in the passenger footwell. Attach the CAN plug of the Brabus harness to a free port of the white CAN distributor shown (wire colours GN-WH & GN). If all ports are used already, solder the wires of the Brabus harness parallel to the wires out of one standard plug. 13

 of the Brabus harness to the standard GY-WH wire.")

14 - Route the wires for the operation button (BU, BK) to the center tunnel. - Disconnect the lead of the 12V plug within the center console and remove the plug using the appropriate tool. Solder the wire BU-GY (illumination) of the Brabus harness to the standard GY-WH wire. Sufficiently isolate the soldered area. Attach the operation button to the assembly area of the 12V socket using the washer supplied. Make sure the lead for the button cannot come into contact to moveable console parts Complete the center console and attach it back to the vehicle.
15 - Attach the fuse to the fuse bracket. - Start the engine of the vehicle and perform a function-check. The system is activated by once pushing the button. Per each button push the sound can be changed. You can choose between the different modes: 15 V6 Sport V8 Decent V8 Sport V8 Race Standard (sound off)
16
1x Litz wire A
 Installation guide Retrofit electric kit for connection of standard additional daytime running lamps of carbon fibre roofspoiler G500 4x4², 463 460 TS The product described in the instructions was developed,
Fitting instructions Flap exhaust system C 63 AMG
 Fitting instructions 204-678-63 Flap exhaust system C 63 AMG The product described in the instructions was developed, produced and checked considering the necessary safety requirements. In order to ensure
Frontspoiler W463 for G63 & G65 AMG
 Frontspoiler W463 for G63 & G65 AMG 463-210-00 The product described in the instructions was developed, produced and checked considering the necessary safety requirements. In order to ensure a proper and
Rearbumper for cars after 11/ 2012
 Rearbumper 463-410-00 for cars after 11/ 2012 The product described in the instructions was developed, produced and checked considering the necessary safety requirements. In order to ensure a proper and
MAKE OF AUTOMOBILE: MODEL YEAR: 2013 SYSTEM APPROVAL NUMBER ( R115 ) R MANUAL NUMBER: 076/ DATE
 R MANUAL NUMBER: 076/ DATE") MAKE OF AUTOMOBILE: Dacia TYPE: Lodgy TANK CAPACITY: 59 Liter Stako toroidal TANK LOCATION Spare Wheel Room / Underneath MODEL YEAR: 2013 SYSTEM APPROVAL NUMBER ( R115 ) R115-000013 BOOT SET NUMBER 345/070002/A
MAKE OF AUTOMOBILE: Dacia TYPE: Lodgy TANK CAPACITY: 59 Liter Stako toroidal TANK LOCATION Spare Wheel Room / Underneath MODEL YEAR: 2013 SYSTEM APPROVAL NUMBER ( R115 ) R115-000013 BOOT SET NUMBER 345/070002/A
SCdefault. 900 Installation instructions
 SCdefault 900 Installation instructions SITdefault Installation kit, extra lights MONTERINGSANVISNING INSTALLATION INSTRUCTIONS MONTAGEANLEITUNG INSTRUCTIONS DE MONTAGE Accessories Part No. Group Date
MAKE OF AUTOMOBILE: MODEL YEAR: SYSTEM APPROVAL NUMBER ( R115 ) E4-115R /-17 / DLM-LPG 01/10 MANUAL NUMBER: 076/ DATE
 E4-115R /-17 / DLM-LPG 01/10 MANUAL NUMBER: 076/ DATE") MAKE OF AUTOMOBILE: HYUNDAI TYPE: ix35 TANK CAPACITY: 74 Liter Fuel Module Stako toroidal TANK LOCATION SPARE WHEEL ROOM MODEL YEAR: 2010 SYSTEM APPROVAL NUMBER ( R115 ) E4-115R-0000-04/-17 / DLM-LPG 01/10
MAKE OF AUTOMOBILE: HYUNDAI TYPE: ix35 TANK CAPACITY: 74 Liter Fuel Module Stako toroidal TANK LOCATION SPARE WHEEL ROOM MODEL YEAR: 2010 SYSTEM APPROVAL NUMBER ( R115 ) E4-115R-0000-04/-17 / DLM-LPG 01/10
Installation Manual W463 Trailer Hitch Receiver
 Installation Manual W463 Trailer Hitch Receiver For Mercedes-Benz USA Geländewagen W463 from 1990 to 2009 For Mercedes-Benz ROW Geländewagen W463 from 1990 up to 2013 Parts Lists W463 Trailer Hitch Receiver
Parts and Accessories Installation Instructions
 Parts and ccessories Installation Instructions Installation Kit Mini dditional Instruments MINI (R 5/R 53) The installation time is approx.. hours, but this may vary depending on the condition of the car
Parts and Accessories Installation Instructions
 Parts and Accessories Installation Instructions F 53 7 W Retrofit auxiliary heating system BMW X5 (E 53) with M57 engine (diesel) The installation time is approx..5-4.5 hours (see important information),
INSTALLATION INSTRUCTIONS. Rear Vision System Mirror Display 2010 onwards Camaro (Kit part number )
") Rear Vision System Mirror Display 2010 onwards Camaro (Kit part number 1018-9540) Kit Contents: RVS Interior (shorter) harness RVS Chassis (longer) harness Camera with mounting bracket Mirror 1 bag containing:
Rear Vision System Mirror Display 2010 onwards Camaro (Kit part number 1018-9540) Kit Contents: RVS Interior (shorter) harness RVS Chassis (longer) harness Camera with mounting bracket Mirror 1 bag containing:
MAKE OF AUTOMOBILE: MODEL YEAR: 2010 SYSTEM APPROVAL NUMBER ( R115 ) BOOT SET NUMBER 947/
 BOOT SET NUMBER 947/") MAKE OF AUTOMOBILE: FORD TYPE: MONDEO TANK CAPACITY: 61 Liter WvM toroidal TANK LOCATION SPARE WHEEL ROOM MODEL YEAR: 2010 SYSTEM APPROVAL NUMBER ( R115 ) R115-0000** BOOT SET NUMBER 947/1810501 NUMBER:
MAKE OF AUTOMOBILE: FORD TYPE: MONDEO TANK CAPACITY: 61 Liter WvM toroidal TANK LOCATION SPARE WHEEL ROOM MODEL YEAR: 2010 SYSTEM APPROVAL NUMBER ( R115 ) R115-0000** BOOT SET NUMBER 947/1810501 NUMBER:
INSTALLATION INSTRUCTIONS
 Rear Vision System Mirror Display Dodge Ram Kit Contents: Instruction Sheets Template Chassis Harness Endgate Handle with Camera Wire Ties (Qty: 17) Bottle of ZTech Plug for Non-Locking Endgates (Optional)
900 Installation instructions. SCdefault
 SCdefault 900 Installation instructions SITdefault Parking assistance (SPA) MONTERINGSANVISNING INSTALLATION INSTRUCTIONS MONTAGEANLEITUNG INSTRUCTIONS DE MONTAGE Accessories Part No. Group Date Instruction
Fitting instructions. Front spoiler MJ 2003 Part No.:
 The greatest care should be taken when carrying out work in order to avoid damage! Before commencing work check that all parts that make up the scope of delivery have been supplied. The front spoiler set
AN82.10-P-0001M Retrofitting xenon headlamps
 AN82.10-P-0001M Retroitting xenon headlamps 16.12.98 MODEL 220.### 1# 2 Headlamp cleaning system cover E1 Let headlamp unit E1m1 Let headlamp range adjustment motor E1n1 Let headlamp control module E2
Parts and Accessories Installation Instructions
 Parts and Accessories Installation Instructions Park Distance Control (PDC) Rear Retrofit BMW Z4 (E 85) The installation time is approx. 4 hours, but this may vary depending on the condition of the car
Saab 900 M94-98, Saab 9-3, Saab 9000, Saab 9-5
 SCdefault 900 Monteringsanvisning SITdefault MONTERINGSANVISNING INSTALLATION INSTRUCTIONS MONTAGEANLEITUNG INSTALLATIONS DE MONTAGE Branch cable set LHD Accessories Part No. Group Date Instruction Part
Installation instructions, accessories RTI S80
 Installation instructions, accessories Instruction No 8685714 Version 1.0 5 Part. No. RTI S80 Volvo Car Corporation RTI S80-8685714 - V1.0 Page 1 / 25 Equipment A0000161 A0000162 A0801178 D8802049 Page
ALWAYS follow all Webasto installation and repair instructions and observe all warnings.
 Water Heater Unit Feel the drive Thermo Top E Additional Heater e 00 0003 Installation Instructions Opel Meriva Diesel from Model Year 006 Left-hand drive vehicle WARNING! Hazard warning: Incorrect installation
Installation Instructions
 Installation Instructions Electric wiring kit for towbars / 13-pin / 12 Volt / ISO 11446 For use on: MERCEDES BENZ E-Class W 210 Sedan from 05/95 to 02/02 S 210 T-model (station wagon) from 05/96 C 208
Installation instructions, accessories - Volvo Navigation System, widescreen
 S60 Section Group Weight(Kg/Pounds) Year Month 3 39 2001 04 S60 2001, S60 2002 Page 1 of 21 Page 2 of 21 Required tools A0000162 A0000161 A0801178 M8802509 M3903563 Page 3 of 21 M3903565 M8503983 Page
Tools you will need: Screwdrivers, Metric Sockets, Hook and Loop Tape or Zip Ties, Shop Light, Wire cutters, Wire crimping tool
 Overview: This guide provides instruction for installing Adventure Wagon s Auxiliary Battery Tray and the charging bundle. Package Contents: Adventure Wagon Battery Tray includes the tray plus mounting
1 Cable harness for trailer hitch 3 Supporting plate, detachable ball neck 4 Bolts 12 Detachable ball neck 12a Mount X52 Trailer hitch connector
 an3110p8080aa Page 1 of 3 Retrofit trailer hitch AN31.10- P- 8080AA Retrofit trailer hitch 5.11.99 MODEL 163.113 /136 / 154 /172 #A as of 145273, 163.113 / 136 /154 / 172 #X as of 708319, 163.128 / 175
Original BMW Accessories. Installation Instructions.
 Original BMW Accessories. Installation Instructions. M Performance Alcantara Steering Wheel II with Race Display Retrofit BMW Series (F0/F) BMW Series (F/F3) BMW 3 Series (F30/F3/F34/F35) BMW 4 Series
NOTICE Maximum allowed length=7" (178mm)
") SCdefault 900 Monteringsanvisning SITdefault Tow bar MONTERINGSANVISNING INSTALLATION INSTRUCTIONS MONTAGEANLEITUNG INSTALLATIONS DE MONTAGE Accessories Part No. Group Date Instruction Part No. Replaces
SCdefault 900 Monteringsanvisning SITdefault Tow bar MONTERINGSANVISNING INSTALLATION INSTRUCTIONS MONTAGEANLEITUNG INSTALLATIONS DE MONTAGE Accessories Part No. Group Date Instruction Part No. Replaces
Installation instructions, accessories. Electric engine block heater, connector outlet, 4-cyl
 Installation instructions, accessories Instruction No 31359444 Version 1.2 5 Part. No. 31359438 Electric engine block heater, connector outlet, 4-cyl IMG-247665 Volvo Car Corporation Electric engine block
Mercedes Benz GLK 200 / 220 / 250 CDI (X204)
") Water Heater Feel the drive Thermo Top Evo 5+ Parking Heater e 00 058 Installation documentation Mercedes Benz GLK 00 / 0 / 50 CDI (X04) Diesel from model year 009 Left-hand drive vehicle Automatic air-conditioning
Water Heater Feel the drive Thermo Top Evo 5+ Parking Heater e 00 058 Installation documentation Mercedes Benz GLK 00 / 0 / 50 CDI (X04) Diesel from model year 009 Left-hand drive vehicle Automatic air-conditioning
A selection of phillips head screwdrivers 15mm socket 10mm socket Modeler s knife Solder Electrical tape A selection of flat head screwdrivers
 Read entire instructions thoroughly before starting. References to the service manual wiring diagrams and operation sections will be required for adjustments, fastener torques, and troubleshooting. TOOLS
Parts and Accessories. Installation Instructions.
 Parts and Accessories. Installation Instructions. Park Distance Control (PDC) retrofit kit BMW X5 (E 5) Retrofit kit No. 66 0 0 007 0 66 0 0 4 68 66 0 0 09 685 66 0 0 9 509 Installation time The installation
Installation Instructions Complete set active Sound incl. Soundbooster Mercedes A-Klasse W176
 Installation Instructions Complete set active Sound incl. Soundbooster Mercedes A-Klasse W176 v1. (16.06.2017) Kufatec GmbH & Co. KG - Dahlienstr. 15-2795 Bad Segeberg - e-mail: info@kufatec.de 1 Contents
Retrofit front illuminated Mercedes star wiring harness. Connection scheme
 AZ88.40-P-0010-01CW Retrofit front illuminated Mercedes star wiring harness MODEL 207.3##/4## 1# without CODE 233 (DISTRONIC PLUS) without CODE 239 (DISTRONIC PLUS and BAS PRO) MODEL 204.0## (except 204.077)
9/20/2017 Automatic Transaxle/Transmission External Controls - Selector Lever Cable - Removal and Installation 2008 Ford Edge MotoLogic
 2008 Edge SECTION 307-05: Automatic Transaxle/Transmission External Controls REMOVAL AND INSTALLATION 2008 Edge/MKX Workshop Manual Procedure revision date: 06/17/2009 Report a problem with this article
BMW Parts and Accessories Installation Instructions
 BMW Parts and Accessories Installation Instructions 46 77 B BMW subwoofer module retrofit kit BMW 3 Series compact (E 46/5) LHD Technical and electrical knowledge required Installation time approx. 1.5-2.5
AN82.10-P-0001FB Retrofit xenon headlamps MODEL 210.### 1# as of
 AN82.10-P-0001FB Retrofit xenon headlamps 3.11.99 MODEL 210.### 1# as of 1.7.99 Illustrated on model 210 sedan A51 Headlamp range adjustment rear A52 Front (headlamp range adjustment) E1 Left lamp unit
Intelligent Lift Interlock System Installation Instructions
 Intelligent Lift Interlock System Installation Instructions MB 45/55 & International 3200 w/allison 2200/2400 Transmission & Shift Lock Solenoid Allison Generation 3 Controls Part # ILIS801-D 2002-2006
INSTALLATION INSTRUCTIONS
 INSTALLATION INSTRUCTIONS Accessory Application Publications No. SYSTEM ACCORD 2-DOOR (LX/EX L4, LX V6) AII 25749 Issue Date FEB 2004 PARTS LIST Double-sided adhesive tape XM Radio Attachment Kit : P/N
4 Connecting cable 6 Central mounting screws 7 Bolts 5 Ground line
 AR68.10-P-1000GM Remove/install instrument panel 22.3.07 MODEL 463.243 /244 /245 /246 /247 /248 /249 /250 /254 /270 /271 /303 /309 /322 /323 /332 /333 /340 /341 31 Single-fuse holder for electronic ignition
Installation instructions
 Service Installation instructions Audi A4/A5 (B8 series) 2008 Engine sound system For scope of delivery 8T0.071.901* Audi Genuine Accessories Service Department. Technical Information Service Contents
Renault Laguna / - Grandtour / - GT / - Coupe
 Water Heater Thermo Top E Parking Heater Thermo Top C Parking Heater E 00 000 E 00 000 Installation Documentation Renault Laguna / - Grandtour / - GT / - Coupe Diesel from model year 008 Left-hand drive
INSTALLATION INSTRUCTIONS
 INSTALLATION INSTRUCTIONS Accessory Application Publications No. AII 25877 PILOT Issue Date AUG 2003 Optional ATF and power steering coolers are required when installing the trailer hitch. 2 Spacers PARTS
Original BMW Accessories. Installation Instructions.
 Original BMW Accessories. Installation Instructions. BMW Integrated Navigation. BMW Series (F20, F2) BMW 2 Series (F22, F23, F45, F46) BMW 3 Series (F30, F3, F34, F35) BMW 4 Series (F32, F33, F36) BMW
Accessories Part No. Group Date Instruction Part No. Replaces )HE -
HE -") SCdefault 900 Monteringsanvisning SITdefault 6DDE $GGLWLRQDOZLULQJH[WUDUDGLDWRUIDQ 07(5,*6$9,6,*Â,67$//$7,,6758&7,6 07$*($/(,78*Â,67$//$7,6'(07$*( Accessories Part No. Group Date Instruction Part No. Replaces
SCdefault 900 Monteringsanvisning SITdefault 6DDE $GGLWLRQDOZLULQJH[WUDUDGLDWRUIDQ 07(5,*6$9,6,*Â,67$//$7,,6758&7,6 07$*($/(,78*Â,67$//$7,6'(07$*( Accessories Part No. Group Date Instruction Part No. Replaces
INSTALLATION INSTRUCTIONS
 2015 - Ford Mustang Qi Wireless Charging Kit (Kit # FDMC-1222) Please read thoroughly before starting installation and check that kit contents are complete. Items Included in the Kit: Qi Wireless Charging
Parts and Accessories Installation Instructions
 Parts and Accessories Installation Instructions F 46 3 EVA Headlight Cleaning System (SRA) BMW 3 Series (E 46) The installation time is approx. 3.5 hours, but this may vary depending on the condition of
Installation Instructions Complete set active Sound incl. Soundbooster Audi A8 4H
 Installation Instructions Complete set active Sound incl. Soundbooster Audi A8 4H v.2 (04.0.207) Kufatec GmbH & Co. KG - Dahlienstr. 5-23795 Bad Segeberg - e-mail: info@kufatec.de Contents Liability Exclusion
Water heater unit. Installation instructions. Peugeot Partner. Citroen Berlingo. Supplementary heating Thermo Top C. Table of Contents.
 Water heater unit Feel the drive Supplementary heating Thermo Top C e1 00 0002 Installation instructions Peugeot Partner Citroen Berlingo 6 4 1 2 3 5 Gasoline and diesel From model year 2003 Only for left-hand
Accessory Kit Estimated Fitting Time: 120 Minutes (Prado) Estimated Fitting Time: 140 Minutes (Kluger)
 Estimated Fitting Time: 140 Minutes (Kluger)") Tow-Pro Wiring Kit - Toyota Kluger / Prado Accessory Kit Estimated Fitting Time: 0 Minutes (Prado) Estimated Fitting Time: 0 Minutes (Kluger) FI99 Page 0 of Issue: Date: 0/0/0 0 General Notes Read through
Tow-Pro Wiring Kit - Toyota Kluger / Prado Accessory Kit Estimated Fitting Time: 0 Minutes (Prado) Estimated Fitting Time: 0 Minutes (Kluger) FI99 Page 0 of Issue: Date: 0/0/0 0 General Notes Read through
Accessory Kit Estimated Fitting Time: 120 Minutes
 Landcruiser LC00 Tow-Pro Wiring Kit - Landcruiser LC00 Kit Part No: TPWKIT - 005 Accessory Kit Estimated Fitting Time: 0 Minutes FI88 Page 0 of Issue: Date: 7/09/07 07 General Notes Safety Notes Parts
Parts and Accessories Installation Instructions
 Parts and Accessories Installation Instructions 5 224 B Installation Kit Headlight Cleaning System Mini (R5/R53) LHD and RHD Installation time approx. 1.5-2 hours, which can vary according to the condition
INSTALLATION INSTRUCTIONS
 INSTALLATION INSTRUCTIONS Accessory Application Publications No. (Trunk Mount) 2009 CIVIC 4-DOOR AII 40184 Issue Date AUG 2008 PARTS LIST 8 Cushion tapes Changer Attachment (Sold Separately) P/N 08B26-SNA-101
5. Refer to GTR Workshop Manual, section: and disconnect battery ground cable.
 HYDRAULIC HOSE REPAIR REMOVAL PROCEDURE 1. Open door. 2. Turn ignition 'ON'. 3. Power the convertible top to the fully lowered position. 4. Turn ignition 'OFF'. 5. Refer to GTR Workshop Manual, section:
Original BMW Accessories. Installation Instructions.
 Questo file è stato scaricato da www.bmwretrofit.it @: info@bmwretrofit.it Postmontaggi - codifiche - ricambi - a Cesena Original BMW Accessories. Installation Instructions. TV function retrofit, only
Fitting Instructions
 Tow-Pro Wiring Kit Fitting Instructions Suitable for: Toyota Hilux / Fortuner Accessory Kit Estimated Fitting Time: 90 Minutes FI807 Page 0 of Issue: Date: /08/08 08 General Notes Safety Notes Suitable
PART No: 04997, & PRODUCT: Body Harness MAKE & MODEL: PF3, PF4 & PF5 Subaru Forester INSTALLATION INSTRUCTIONS
 1. In the engine bay, remove the engine shroud (1), by first removing the four plastic scrivets (2). Issue Date 10-09-10 Page 1 2. Remove the vehicle grommet (1) located on the LHS of the firewall. Note:
Power closing assist,
 No. 3/ Power closing assist, from June 003 Note: Information for Relay and fuse arrangements Connector arrangements Control odules and Relays Ground connections Component Locations! No. 3/ B40 B3 B40 B399
INSTALLATION INSTRUCTIONS
 INSTALLATION INSTRUCTIONS Accessory Application Publications No. AII 30518 KIT 2006 PILOT Issue Date NOV 2005 NOTE: Accessory ATF and power steering coolers are required when installing the trailer hitch.
Part Number: T4R-2IN1
 Date: 12.11.2014 TOYOTA HIGHLANDER 2015 LED Fog Light & DRL 2in1 Part Number: T4R-2IN1 Kit Contents Item # Quantity Reqd. Description 1 2 DRL + Fog Light Housing 2 1 Driver Box 3 1 Harness bag 4 1 User
Part Number: T4R-2N1. Hardware Bag Contents. General Applicability. Conflicts - Limited Models
 Date: 12.11.2014 TOYOTA HIGHLANDER 2014-2016 LED Fog Light & DRL 2 in 1 Part Number: T4R-2N1 Kit Contents Item # Quantity Reqd. Description 1 2 DRL + Fog Light Housing 2 1 Driver Box 3 1 Harness bag 4
ALWAYS follow all Webasto installation and repair instructions and observe all warnings.
 Water Heater Unit Feel the drive Thermo Top E Additional Heater Thermo Top C Additional Heater Thermo Top P Additional Heater e 00 000 e 00 000 e 00 004 Installation Instructions Toyota Hilux Diesel from
ALWAYS follow all Webasto installation and repair instructions and observe all warnings.
 Water Heater Unit Feel the drive Thermo Top E Additional Heater Thermo Top C Additional Heater e 00 000 e 00 000 Installation Instructions Alfa Romeo 47 Gasoline and Diesel from Model Year 00 Left-hand
INSTALLATION INSTRUCTIONS
 INSTALLATION INSTRUCTIONS Accessory HITCH Application 2013 MDX Publications No. BII 13442 Issue Date JULY 2012 PARTS LIST Receiver cover Trailer hitch Hitch pin Left bracket Hitch pin clip Trailer Harness
INSTALLATION INSTRUCTIONS
 INSTALLATION INSTRUCTIONS Accessory Application Publications No. CD CHANGER ATTACHMENT KIT 2005 CIVIC SI AII 27936 Issue Date AUG 2004 PARTS LIST CD Changer Attachment Kit (sold separately): P/N 08B26-S5T-100
Conflicts Note: Toyota Tacoma 2015 LED Bed Lights Preparation. Part Number: Accessory Code: BU1000
 Toyota Tacoma 2015 LED Bed Lights Preparation Part Number: 00016-34089 Accessory Code: BU1000 Conflicts Note: Kit Contents Item # Quantity Reqd. Description 1 1 Hardware Kit 2 1 Driver s Side LED assembly
Rostselmash Torum 740
 Note: Indented items indicate parts included in an assembly listed above Quantity by Model Part Name/Description Part Number 740 Combine Kit Torum 740 4100762 1 Threaded Arm Assembly 2000311-2 1 Header
SCION xb 2004 SATELLITE RADIO TUNER Section I Installation Preparation
 Section I Installation Preparation Part Number: PT546 52040 Section I Installation Preparation Kit Contents Item # Quantity Reqd. Description 1 1 Satellite Tuner 2 1 Ground Cable 3 1 Tuner Cable 4 2 Tuner
Parts and Accessories Installation Instructions
 Parts and Accessories Installation Instructions 46 96 V Universal remote control in the interior rear-view mirror retrofit kit BMW 3 Series (E 46), BMW 5 Series (E 39), BMW 7 Series (E 38) The installation
Parts and Accessories Installation Instructions
 Parts and Accessories Installation Instructions F 5 WW Wiring harness retrofit kit for removable towing hitch BMW X5 (E 5) ECE The installation time is approx. 4-5 hours, but this may vary depending on
Parts and Accessories Installation Instructions
 Parts and Accessories Installation Instructions Active cruise control retrofit (ACC) BMW 7 Series (E 65, E 66) LHD Important information The retrofit kit is for use within the BMW dealership organisation
#GL18006-L2 Honda Gold Wing 1800 & F6B models - All Years Lower Cowl LED Driving Lights INSTALLATION INSTRUCTIONS
 #GL18006-L2 Honda Gold Wing 1800 & F6B models - All Years Lower Cowl LED Driving Lights INSTALLATION INSTRUCTIONS 1. Lay out and familiarize yourself with the parts included in the set. Remove the left
900 Installation instructions. SCdefault
 12 788 439 1 SCdefault 900 Installation instructions SITdefault Timer kit MONTERINGSANVISNING INSTALLATION INSTRUCTIONS MONTAGEANLEITUNG INSTRUCTIONS DE MONTAGE Accessories Part No. Group Date Instruction
VT Commodore LPG installation utilising an LPG Memcal and Apexus Quick-kit.
 VT Commodore LPG installation utilising an LPG Memcal and Apexus Quick-kit. Description of components and operation LPG/Petrol Changeover switch The LPG change-over switch is mounted in the instrument
INSTALLATION INSTRUCTIONS
 INSTALLATION INSTRUCTIONS Accessory Application Publications No. BII 31129 REARVIEW CAMERA 2006 RL Issue Date OCT 2005 PARTS LIST Attachment Kit P/N: 08B21-SJA-B00 Template Rear camera trim 6-Pin connector
Installation Instructions for the Lingenfelter Gen 6 Camaro Boost-A-Pump (BAP) Kit
 Kit") Installation Instructions for the Lingenfelter Gen 6 Camaro Boost-A-Pump (BAP) Kit PN: L460417316 Lingenfelter Performance Engineering 1557 Winchester Road Decatur, IN 46733 (260) 724-2552 (260) 724-0422
Installation Instructions for the Lingenfelter Gen 6 Camaro Boost-A-Pump (BAP) Kit PN: L460417316 Lingenfelter Performance Engineering 1557 Winchester Road Decatur, IN 46733 (260) 724-2552 (260) 724-0422
ASX / OUTLANDER SPORT / RVR REAR VIEW CAMERA MZ380552EX INSTALLATION AND HANDLING INSTRUCTIONS
 ASX / OUTLANDER SPORT / RVR REAR VIEW CAMERA MZ380552EX INSTALLATION AND HANDLING INSTRUCTIONS Navigation (MMCS) unit Camera Thank you for purchasing the Mitsubishi Genuine Accessory. To install and use
L/6.7L DODGE CUMMINS
 10/19/2012 2005-08 5.9/6.7 Dodge Cummins FlowMAX Lift Pump Kit # 1050310B - 1-2005-09 5.9L/6.7L DODGE CUMMINS BD FLOWMax V2 LIFT PUMP KIT Installation Instructions P/N # 1050310B PLEASE READ ALL INSTRUCTIONS
TOYOTA FJ CRUISER 2007 AUXILIARY LIGHTS Preparation
 TOYOTA FJ CRUISER 2007 AUXILIARY LIGHTS Preparation Part Number: PT297-35061 Kit Contents Item # Quantity Reqd. Description 1 2 Driving Lamp Assembly 2 1 Switch Harness 3 1 Lamp Harness 4 2 Stone Shield
CIRRUS AIRPLANE MAINTENANCE MANUAL
 ELECTRICAL LOAD DISTRIBUTION. DESCRIPTION The power distribution system for this airplane consists of the main distribution bus and the essential distribution bus in the MCU along with the associated buses
ALWAYS follow all Webasto installation and repair instructions and observe all warning instructions.
 Water heater unit Feel drive Thermo Top E Auxiliary Heating Thermo Top C Auxiliary Heating Thermo Top P Auxiliary Heating e 00 000 e 00 000 e 00 004 Installation instructions Toyota RAV 4 Petrol From model
Parts and Accessories Installation Instructions
 ~/ Parts and Accessories Installation Instructions 0 0500126V White lights MINI (R50 I R53) The installation time is approx. 0.25 hours for side lights and approx. 2.50 hours for rear lights including
ALWAYS follow all Webasto installation and repair instructions and observe all warnings.
 Water Heater Feel the drive Thermo Top Evo Parking Heater e 00 058 Installation documentation Dacia Duster / Sandero / Logan Petrol from model year 0 Left-hand drive vehicle Manual air conditioning WD
INSTALLATION INSTRUCTIONS
 INSTALLATION INSTRUCTIONS Accessory Application Publications No. CHANGER ATTACHMENT (TRUNK MOUNT) 2005 CIVIC 4-DOOR AII 27890 Issue Date AUG 2004 PARTS LIST Changer Attachment (sold separately) P/N 08B26-S5D-100
SCION xa 2004 SATELLITE RADIO TUNER Section I Installation Preparation
 Section I Installation Preparation Part Number: PT546 52040 Section I Installation Preparation Kit Contents Item # Quantity Reqd. Description 1 1 Satellite Tuner 2 1 Ground Cable 3 1 Tuner Cable 4 2 Tuner
ALWAYS follow all Webasto installation and repair instructions and observe all warnings.
 Water Heater Unit Feel the drive Thermo Top C Additional Heater Thermo Top P Additional Heater e 00 000 e 00 004 Installation Instructions Dodge Nitro Diesel from Model Year 007 Left-hand drive vehicle
GN-3A Polaris General SSV Works 3 Speaker Audio Kit
 GN-3A Polaris General SSV Works 3 Speaker Audio Kit pg 2 Disassembly, Wire and Amplifier Plate Installation pg 9 Glovebox Subwoofer Installation pg 17 Kick Panel Speakers Installation pg 21 MRB3 and Dash
ML63AMG appartiens à un membre de mbworld.org merci. W210 E Class Folding Mirror Modification
 ML63AMG appartiens à un membre de mbworld.org merci W210 E Class Folding Mirror Modification Originally installed in 2002. Revised write up completed September 5, 2013. Step 1 - New Switch and Wiring Harness
INSTALLATION INSTRUCTIONS
 INSTALLATION INSTRUCTIONS Accessory Application Publications No. AUTOMATIC AII 27160 2005 CR-V Issue Date ATTACHMENT KIT SEP 2004 PARTS LIST Automatic Day/Night Mirror Attachment Kit (sold separately)
INSTALLATION INSTRUCTIONS
 INSTALLATION INSTRUCTIONS Accessory Application Publications No. AII 27996 ATTACHMENT KIT 2005 CIVIC HYBRID Issue Date AUG 2004 PARTS LIST Changer Attachment Kit: P/N 08B26-S5B-100 4 Washer-screws, 4 x
BMW Parts and Accessories Installation Instructions
 1 4 BMW Parts and Accessories Installation Instructions INFO 2 5 3 6 TONE SELET FM AM MODE MENU F 38 0393 B Retrofit Kit Onboard Monitor and Navigation System BMW 7 Series (E38) The installation instructions
Central locking system
 Page 1 of 11 57-39 Central locking system Assembly overview 1 - Vacuum line 2 - Right-front door lock actuator Removing and installing page 57-12 3 - Vacuum line connectors Disengage harness connectors
Parts Information. Commercial Microwave Oven
 Parts Information Commercial Microwave Oven Important notes: This is an uncontrolled document. There is no record of its distribution and no corrections will be provided. Models and Manufacturing numbers
TOYOTA CAMRY FOG LIGHT (Halogen and LED) Part Number: TCA-312 / TCA-812
 Part Number: TCA-312 / TCA-812") Part Number: TCA-312 / TCA-812 Kit Contents Item # Quantity Reqd. Description 1 2 Light Housings 2 2 Fog Light Bezels 3 1 Switch Assembly 4 1 Fog Light Operation Guide 5 1 Harness Bag Hardware Bag Contents
Part Number: TCA-312 / TCA-812 Kit Contents Item # Quantity Reqd. Description 1 2 Light Housings 2 2 Fog Light Bezels 3 1 Switch Assembly 4 1 Fog Light Operation Guide 5 1 Harness Bag Hardware Bag Contents
INSTALLATION INSTRUCTIONS
 INSTALLATION INSTRUCTIONS Accessory S P/N 08V67-SJC-101 Application 2012 RIDGELINE Publications No. AII 12006 Issue Date NOV 2011 PARTS LIST Back-up sensor harness 3 Wire ties with small clips (2 Not used)
FT - Function Test. Roadster Soft Top Opening Sequence Initial stage: Roadster Soft Top closed.
 1 of 10 4/26/2008 8:56 AM Home Account Contact ALLDATA Log Out Help Select Vehicle New TSBs Technician's Reference Component Search: METRO TOYOTA OK 1990 Mercedes Benz 500SL (129.067) V8-5.0L (119.960)
AIR CONTROL ACCESSORY KIT
 RAPID RESPONSE SYSTEM 2283 AIR CONTROL ACCESSORY KIT INSTALLATION INSTRUCTIONS Congratulations on your purchase of a new Air Control Accessory Kit. This kit was designed to provide inflation control of
Parts and Accessories. Installation Instructions.
 Parts and Accessories. Installation Instructions. Universal charger/hands-free kit retrofit BMW 3 Series Saloon (E 90) These installation instructions are only valid for cars with SA 606 (Business navigation
Rear Vision System Liftgate Emblem Camera for Aftermarket Display Ford Flex (Kit part number )
") Rear Vision System Liftgate Emblem Camera for Aftermarket Display 2009-2012 Ford Flex (Kit part number 1008-6509) Kit Contents: Liftgate Emblem Mount with Camera Chassis Harness with RCA (Note: In some
Rear Vision System Liftgate Emblem Camera for Aftermarket Display 2009-2012 Ford Flex (Kit part number 1008-6509) Kit Contents: Liftgate Emblem Mount with Camera Chassis Harness with RCA (Note: In some
ORIGINAL MINI ACCESSORIES. INSTALLATION INSTRUCTIONS.
 ORIGINAL MINI ACCESSORIES. INSTALLATION INSTRUCTIONS. Retrofit Kit Additional Headlight MINI 3-door (F56) MINI 5-door (F56) MINI CLUBMAN (F54) MINI CONVERTIBLE (F57) MINI COUNTRYMAN (F60) Installation
CAMRY STRIP LED DRL TOYOTA Part Number: Accessory Code: LDRS10. PIO / DIO Rev. A 02/26/13. Doc
 Doc. 02.126.00 TOYOTA CAMRY PIO / DIO Rev. A 2013-02/26/13 STRIP LED DRL Part Number: 00016-32280 Accessory Code: LDRS10 Conflicts - Only works on Camry SE Kit Contents Item # Quantity Reqd. Description
INSTALLATION INSTRUCTIONS
 INSTALLATION INSTRUCTIONS Accessory S P/N 08V67-SJC-101 Application 2010 RIDGELINE Publications No. AII 42117 Issue Date AUG 2009 PARTS LIST Back-up sensor harness 3 Wire ties with small clip (2 Not used)