#GL18006-L2 Honda Gold Wing 1800 & F6B models - All Years Lower Cowl LED Driving Lights INSTALLATION INSTRUCTIONS
|
|
|
- Augustine Patterson
- 5 years ago
- Views:
Transcription
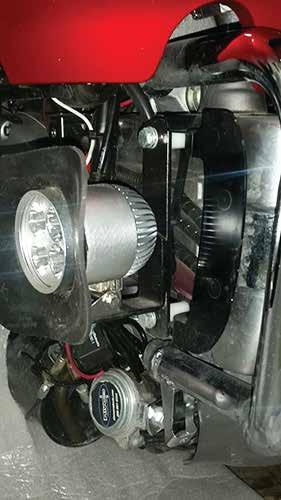
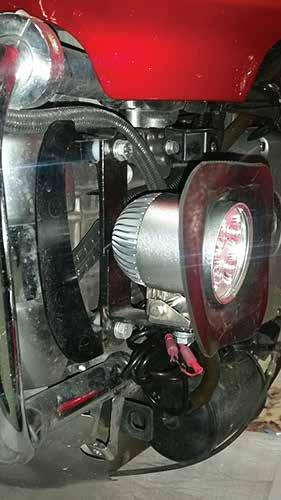
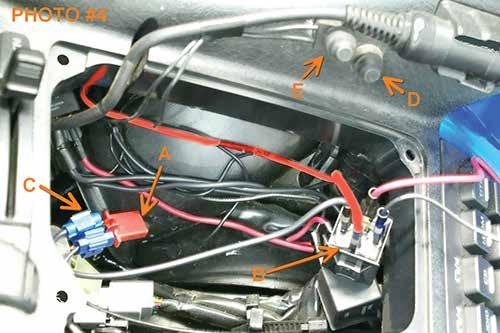
1 #GL18006-L2 Honda Gold Wing 1800 & F6B models - All Years Lower Cowl LED Driving Lights INSTALLATION INSTRUCTIONS 1. Lay out and familiarize yourself with the parts included in the set. Remove the left fairing storage compartment as follows: Open the lid, then on the left side notice there are four plastic push pin rivets in the corners of the compartment housing. Using a Phillips screwdriver, push the center pins in slightly until they click (about ¼ ), then pull the entire rivet assemblies out of the holes. Next - gently pull outward on the color matched trim strip covering the outside edge of the compartment until it pops out at the top and center, leaving the bottom still attached - then remove the compartment. Remove the Left color matching frame or side cover and the cover to the front of it. Remove the plastic shield from the battery s positive terminal. Remove the lower fairing cowl as follows: Remove the six 5mm hex screws and two plastic push in pins from the cowl - then pull the bottom of the cowl out first, and then down. Remove the left and right plastic D shaped covers (1A) held in place by two 8mm hex bolts each (1B). 2. Notice the back of the lights with brackets are marked L and R. Place the four supplied washers and lock washers onto the four supplied 10mm bolts. Referring to photo (2A) and starting with the left light and bracket assembly, place the 50mm long (longer of the two) bolts with washers through the bracket (2B), then two of the supplied plastic spacers on each bolt (1C) and finally the D shaped cover removed earlier as shown. Then tighten the bolts securely. Referring to photo (3) assemble the right side in the same manner using the 40mm long (remaining shorter bolts) with only one plastic spacer on each bolt and finally through the D shaped cover, then tighten both bolts securely. 3. Locate the supplied wire harness. Attach the black ground wire from the harness with the ring terminal to the engine using the 8mm bolt shown in photo (1C). Connect the shorter set of black and red wires to the left lights black and red wires. Route the wire loom over to the right light and connect the remaining black and red wires to it. Secure the wires and loom to the others on the motorcycle using the supplied cable ties. 4. Route the remaining red wire up and inside the left fairing compartment removed earlier as follows. Routing or fishing the wire is best done using a piece of stiff wire (a cut and straightened piece of a wire coat hanger works well) with a small loop bent at one end then pushed from desired point to point, placing the wire to be fished through the loop several inches, and bent over firmly, then pulling the stiff wire back out. 5. Working inside the left fairing compartment and referring to photo (4), connect and secure the supplied relay and switch assembly as follows: Plug the red wire from the lights onto the remaining outer terminal on the relay (4B) (not the center terminal, this will not be used). Locate the unused red two-pin wire connector on the motorcycle s wire harness
 as done with the other red wire earlier.")
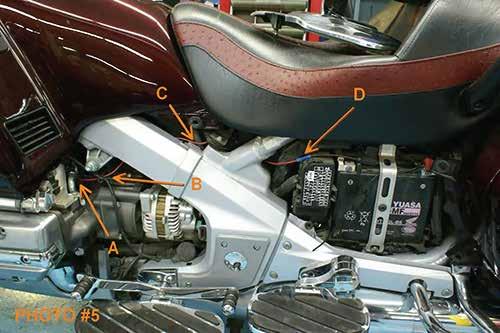
2 (photo 4A). Using the clip on wire connectors supplied, connect the wire from the switch (thinner black wire) to the light green with black striped wire (4C). Connect the thicker black wire from the relay, to the green wire. 6. Route or fish the red wire as shown in photo (5A, B and C) as done with the other red wire earlier. Connect the fuse wires forked terminal to the batteries positive (+) terminal. As shown in photo (5D) trim, strip and crimp the red wire to the fuse wire. Turn the ignition on and pushing the button on the switch, test the function of the lights. 7. Mounting the switch: The switch can be mounted as shown in photo (4) next to the headset clip either through the panel as shown in (4D) by drilling a 3/8 hole and mounting the switch from the back side of the panel, securing it with the screw on rubber push button cover. It can also be surface mounted as shown (4E) using double faced tape on the back side of the switch (not supplied) and the wires run along with the head set cord and secured with a cable tie. 8. Secure the wires and relay inside the storage compartment to the other wires using the supplied cable ties, being sure to leave room for the compartment box when replaced. Replace the storage compartment and its rivets, and then snap the trim piece back down into place. Replace the battery and side covers. 9. On the lower cowl you will need to cut out the blank centers where the lights will come through the cowl. Using a medium to fine tooth hacksaw blade, insert the blade from the backside of the cowl through the slots one at a time, and while looking at it from the outside - carefully cut the ribs or tabs. You can use a file or knife to smooth the edges. Again - work from the back and look from the front so as not to damage the paint should you slip. Before replacing the lower cowl you may want to experiment with aiming or adjusting the lights up or down in a driveway or parking lot after dark. Replace the lower cowl. RIVCO Products, Inc. 440 S. Pine Street, Burlington, WI rivcoproducts.com To register your warranty, and see many other accessories, please visit our website.

3 1 A B C 2 3 B C A
4
5 DRIVING LIGHT DRIVING LIGHT GROUND BLACK WIRE BLACK WIRE RED WIRE RELAY RED WIRE BLACK WIRE TO CONNECTOR INSIDE LEFT FAIRING COMPARTMENT (SEE INSTRUCTIONS) SWITCH RED WIRE 10A FUSE BATTERY (+) POS. GL1800 LED LOWER COWL LIGHTS GL18006-L2 WIRING DIAGRAM
LED Driving Light Set For 2014 & Newer Can-Am Spyder RT # CA006-RT
 LED Driving Light Set For 2014 & Newer Can-Am Spyder RT # CA006-RT 1. Lay-out and familiarize yourself with the components supplied with this set. 2. Remove the left mirror by pulling firmly outward on
F3006 LED Driving Light Set for 2016 & Newer Can-Am Spyder F3 Limited Installation instructions
 F3006 LED Driving Light Set for 2016 & Newer Can-Am Spyder F3 Limited Installation instructions 1. Lay out and familiarize yourself with the supplied components. 2. Remove the ignition switch bezel ring
GL1800 TRAILER HITCH - INSTALLATION INSTRUCTIONS #GL
 GL1800 TRAILER HITCH - INSTALLATION INSTRUCTIONS #GL18007-20 Read through these instructions completely before attempting installation, lay out all pieces including the numbered hardware bags to familiarize
RFB MK6 Jetta Fog Light Kit Wiles Rd.Coral Springs, FL
 What s Included: Tools Required: (2) Fog Lights (2) Front Grills Wire Harness Headlight Switch Hardware Kit T25 Torx Wire Cutters 10mm Socket and Rachet Headlight Switch Composite Wedge Tool 01 1. Remove
INSTALLATION INSTRUCTIONS
 INSTALLATION INSTRUCTIONS Accessory Application Publications No. S 1998 CIVIC 2/3/4-DOOR All 18767 Issue Date SEP 1997 PARTS LIST Fog Light Kit: P/N 08V31-S01-100 Right fog light (marked R ) Fuse label
INSTALLATION INSTRUCTIONS
 INSTALLATION INSTRUCTIONS Accessory HITCH Application 2009 CR-V Publications No. AII 40373 Issue Date AUG 2008 PARTS LIST Plain washer, 12 mm Trailer Hitch Kit P/N 08L92-SWA-100 Trailer hitch 6 Spring
Parade Flag Holder or Quick Detach Rack Mounting Kit For 2009 and Newer Harley-Davidson FLH, FLHX & FLT Models Part # HWK020
 Parade Flag Holder or Quick Detach Rack Mounting Kit For 2009 and Newer Harley-Davidson FLH, FLHX & FLT Models Part # HWK020 Note: On 2009 thru 2013 models proceed as follows. On 2014 and newer models,
INSTALLATION INSTRUCTIONS
 INSTALLATION INSTRUCTIONS Accessory Application Publications No. SYSTEM 2005 ACCORD All 27511 (DX, LX) 2-AND 4-DOOR Issue Date AUG 2004 PARTS LIST Security System Attachment (LX): P/N 08E55-SDA-100A Unit
Depress each tab as you pull the bezel off. The bezels are tight. L.H. shown.
 2013-2014 Ford Mustang V6 & Boss 302 Lower Valance Fog Light Kit Parts List: Quantity: Tool List: Fog light & bulb with bracket 2 Flat head & Phillips screwdriver Black bezels 2 Ratchet & Socket set OR
Wiring Harness Update Kit Assembly Instructions Treker 4200/4400 NT & ST Series Manual No M
 Wiring Harness Update Kit Assembly Instructions Treker 4200/4400 NT & ST Series Manual No. 700-364M Before You Start! When you see this symbol, the subsequent instructions and warnings are serious - follow
Special Note About The JDM High Performance Water Pump:
 Page 1 of 30 JDM Engineering, Inc. home Call Us! 732-780- 0770 back to Installation Instructions Electric Fan Upgrade Kit Electric Fan Wiring Diagram Thank you for your purchase of the JDM Engineering
INSTALLATION INSTRUCTIONS
 INSTALLATION INSTRUCTIONS Accessory Application Publications No. All 12035 SYSTEM 2012 RIDGELINE Issue Date NOV 2011 PARTS LIST Security System Attachment Kit: P/N 08E55-SJC-101 Flange bolt Unit bracket
INSTALLATION INSTRUCTIONS
 INSTALLATION INSTRUCTIONS Accessory BACKUP S Application 2012 ODYSSEY Publications No. AII 46724 Issue Date SEP 2011 PARTS LIST Backup Sensor Attachment Kit P/N 08V67-TK8-100A Right center sensor clip
PRELIMINARY INSTALLATION INSTRUCTIONS. PARTS LIST Security System Kit (sold separately) P/N 08E51-EP4-101
 P/N 08E51-EP4-101") INSTALLATION INSTRUCTIONS Accessory Application Publications No. All 30510 (LX) 2006 PILOT Issue Date SEP 2005 PARTS LIST Security System Kit (sold separately) P/N 08E51-EP4-101 Security system control
INSTALLATION INSTRUCTIONS Accessory Application Publications No. All 30510 (LX) 2006 PILOT Issue Date SEP 2005 PARTS LIST Security System Kit (sold separately) P/N 08E51-EP4-101 Security system control
FOG LAMPS INSTALL KIT
 FOG LAMPS INSTALL KIT PT CRUISER INSTALLATION INSTRUCTIONS Read entire instructions thoroughly before starting. For proper aiming of fog lamps, follow procedures in the service manual. NOTES: Left and
INSTALLATION INSTRUCTIONS
 INSTALLATION INSTRUCTIONS Accessory Application Publications No. AII 25877 PILOT Issue Date AUG 2003 Optional ATF and power steering coolers are required when installing the trailer hitch. 2 Spacers PARTS
INSTALLATION INSTRUCTIONS
 INSTALLATION INSTRUCTIONS Accessory Application Publications No. CASSETTE PLAYER 2000 ACCORD (EX) 2- AND 4-DOOR All 20497 Issue Date JULY 1999 PARTS LIST Cassette Player Attachment Kit Except V6: P/N 08B12-S84-100
INSTALLATION INSTRUCTIONS
 INSTALLATION INSTRUCTIONS Accessory Application Publications No. AII 24664-25319 SYSTEM 2003 CR-V Issue Date MAY 2003 PARTS LIST Security System (sold separately) P/N 08E51-EP4-100 Security System Attachment
900 Installation instructions. SCdefault
 SCdefault 900 Installation instructions SITdefault Parking assistance (SPA) MONTERINGSANVISNING INSTALLATION INSTRUCTIONS MONTAGEANLEITUNG INSTRUCTIONS DE MONTAGE Accessories Part No. Group Date Instruction
INSTALLATION INSTRUCTIONS
 INSTALLATION INSTRUCTIONS Accessory Application Publications No. AII 23086 SYSTEM CR-V Issue Date NOV 2001 PARTS LIST Security System P/N 08E51-EP4-100 Security System Attachment P/N 08E55-S9A-100 Security
w w w. h d o n l i n e s h o p. d e ROAD TECH QUEST GLOBAL POSITIONING SYSTEM (GPS) MOUNTING KIT GENERAL INSTALLATION -J03554 REV.
 MOUNTING KIT GENERAL INSTALLATION -J03554 REV.") -J03554 REV. 007-08-0 ROAD TECH QUEST GLOBAL POSITIONING SYSTEM (GPS) MOUNTING KIT GENERAL Kit Number 900-05 Models For model fitment information, please see the P&A Retail Catalog or the Parts and Accessories
-J03554 REV. 007-08-0 ROAD TECH QUEST GLOBAL POSITIONING SYSTEM (GPS) MOUNTING KIT GENERAL Kit Number 900-05 Models For model fitment information, please see the P&A Retail Catalog or the Parts and Accessories
2016 HONDA 1000 Pioneer PN 3102 Turn signal / horn kit rev nc
 2016 Honda 1000 Pioneer STOP - THIS KIT IS DESIGNED SPECIFICALLY FOR 2016 HONDA 1000 PIONEER IF YOUR MACHINE IS NOT THIS MODEL DO NOT PROCEED. THIS KIT DOES NOT WORK ON THE PIONEER 500 nor 700 S. Contact
INSTALLATION INSTRUCTIONS
 INSTALLATION INSTRUCTIONS PARTS LIST Accessory Application Publications No. MII 13038 GL1800 P/N 08E75-MCA-100K Issue Date November 2009 Honda Dealer: Please give a copy of these instructions to your customer.
INSTALLATION INSTRUCTIONS
 INSTALLATION INSTRUCTIONS Accessory Application CR-V Publications No. AII 32953-34081 Issue Date NOV 2006 PARTS LIST 2 Corner sensor clips Backup Sensor Attachment Kit P/N 08V67-SWA-100A Back-up sensor
INSTALLATION INSTRUCTIONS
 INSTALLATION INSTRUCTIONS Accessory Application Publications No. AII 44415 2011 CIVIC 4-DOOR Issue Date AUG 2010 PARTS LIST Trunk spoiler 2 Cap nuts 2 Screws Left trunk spring (marked yellow) Right trunk
INSTALLATION INSTRUCTIONS
 INSTALLATION INSTRUCTIONS Accessory Application Publications No. BII 37518 2008 RDX Issue Date JUL 2007 PARTS LIST 10 Plain washers, 12 mm Trailer Hitch Kit P/N 08L92-STK-200 Trailer hitch 6 Lock washers,
RH INSTALL INSTRUCTIONS
 Tips for Installing Rhinogear Products The recommended sequence for installing our Rhinogear line of products on your Rhino. This sequence will help with ease of installation and help save time by eliminating
INSTALLATION AND OWNER S MANUAL Side Illumination Lights Z5150 for use with K 1200 LT
 INSTALLATION AND OWNER S MANUAL Side Illumination Lights Z5150 for use with K 1200 LT Read these instructions carefully and thoroughly before beginning work. Before installing the accessory, carefully
INSTALLATION INSTRUCTIONS
 INSTALLATION INSTRUCTIONS Accessory S P/N 08E10-TK6-100 Application 2013 FIT Publications No. AII 13198 Issue Date JULY 2012 PARTS LIST Ambient light kit 2 Ambient lights 6 Wire ties Fuse label 2 Grommets
WOC & WOC Top & Back Installation Instructions
 Shown with optional Sun Roof WOC-900500-2 & WOC-900501-2 Top & Back Installation Instructions Install Order! Heater Door System Wiper on to Windshield Windshield Rear Panel Top Panel Tools needed: 5/16
INSTALLATION INSTRUCTIONS
 INSTALLATION INSTRUCTIONS Accessory Application Publications No. AII 30518 KIT 2006 PILOT Issue Date NOV 2005 NOTE: Accessory ATF and power steering coolers are required when installing the trailer hitch.
INSTALLATION INSTRUCTIONS
 INSTALLATION INSTRUCTIONS Accessory Application Publications No. ACCORD AII 24050 4-DOOR P/N 08V31-SDA-100 Issue Date AUG 2002 NOTE: The outside temperature gauge cannot be installed in a vehicle with
Mustang CDC Lightbar (94-04) - Installation Instructions
 - Installation Instructions") Mustang CDC Lightbar (94-04) - Installation Instructions The below installation instructions work for the following products: Classic Design Concepts Mustang Convertible Lightbar (94-04 Carbon Fiber) Classic
Mustang CDC Lightbar (94-04) - Installation Instructions The below installation instructions work for the following products: Classic Design Concepts Mustang Convertible Lightbar (94-04 Carbon Fiber) Classic
Audi Mk1 TT Vent Boost Gauge Kit
 2000-05 Audi Mk1 TT Vent Boost Gauge Kit Congratulations on your purchase of the A.W.E. Tuning Center Vent Boost Gauge for your Audi TT. While the install is fairly straight forward, please review these
INSTALLATION INSTRUCTIONS
 INSTALLATION INSTRUCTIONS Accessory S Application 2011 PILOT Publications No. AII 43298 Issue Date MARCH 2010 PARTS LIST Back-up Sensor Attachment Kit P/N 08V67-SZA-100A Back-up sensor harness Fuse label
LGT-306L / LB Club Car Precedent LED Light Bar Bumper Kit Installation Instructions
 LGT-306L / LB Club Car Precedent LED Light Bar Bumper Kit Installation Instructions Caution: Please read through the instructions carefully. Before starting this project, remove the system s positive and
INSTALLATION INSTRUCTIONS
 INSTALLATION INSTRUCTIONS Accessory Application Publications No. BII 25830 2004 MDX Issue Date SEP 2003 PARTS LIST 2 Clips Trailer Hitch Kit: P/N 08L92-S3V-200A Receiver cover Trailer hitch Harness Kit:
INSTALLATION INSTRUCTIONS
 INSTALLATION INSTRUCTIONS Accessory Application Publications No. AII 27336 ODYSSEY Issue Date SEP 2004 PARTS LIST 15 Black wire ties Backup Sensor Attachment Kit P/N 08V67-SHJ-100A Backup sensor control
 INSTALLATION INSTRUCTIONS Accessory Application Publications No. AII 38143-40201 S 2008 ODYSSEY Issue Date AUG 2008 PARTS LIST Backup Sensor Attachment Kit P/N 08V67-SHJ-100B Backup sensor control unit
INSTALLATION INSTRUCTIONS
 INSTALLATION INSTRUCTIONS Accessory Application Publications No. P/N 08V31-SDN-100 2004 ACCORD 2-DOOR AII 25735 Issue Date SEP 2003 NOTE: The outside temperature gauge can not be installed in a vehicle
INSTALLATION INSTRUCTIONS
 INSTALLATION INSTRUCTIONS Accessory Application Publications No. P/N 08V31-SNA-100 2008 CIVIC 4-DOOR AII 37730 Issue Date AUG 2007 PARTS LIST Fog light harness Right fog light Left fog light Sub harness
BMW-Motorrad Installing LED auxiliary headlights Preparatory work. Core activity
 77 51 001 Installing LED auxiliary headlights + 77 51 502 Equipment trim-level variant: LED auxiliary headlights Note Not all the components contained in the installation kit are necessary for installing
INSTALLATION INSTRUCTIONS
 INSTALLATION INSTRUCTIONS Accessory Application Publications No. CIVIC All 30175-31616 2 AND 4-DOOR P/N 08E10-SNA-100 Issue Date DEC 2005 NOTE: The interior illumination lights cannot be installed on 2-door
1. Front Fascia Removal 1.1 Remove the 6 plastic clips that secure the upper valance, then remove. 1.2 Remove 6 upper bolts that hold the grille and f
 STRUT 2015 GMC Denali Collection Installation Manual " 1. Front Fascia Removal 1.1 Remove the 6 plastic clips that secure the upper valance, then remove. 1.2 Remove 6 upper bolts that hold the grille and
INSTALLATION INSTRUCTIONS
 INSTALLATION INSTRUCTIONS Accessory Application Publications No. SYSTEM S2000 AII 26324 Issue Date OCT 2004 PARTS LIST Headrest Speaker System P/N 08A54-S2A-100 3 Small wire ties 2 Headrest speakers 9
Gentex by VOXX Corporation Installation Instructions
 KIT CONTENTS: Item Qty Part Number Description 1 1: ADVGEN20A 7 Pin Auto-Dimming Mirror with Compass and Temperature 2 1 Gentex by VOXX Corporation Installation Instructions Contact VOXX Customer Service
 INSTALLATION INSTRUCTIONS Accessory Application Publications No. 2010 CIVIC All 42479 2- AND 4-DOOR P/N 08E10-SNA-110 Issue Date AUG 2009 NOTE: The interior illumination lights cannot be installed on 2-door
INSTALLATION INSTRUCTIONS
 INSTALLATION INSTRUCTIONS Accessory Application 2009 PILOT Publications No. AII 39422 Issue Date MAY 2008 PARTS LIST Trailer Harness Kit P/N 08L91-SZA-100 Sold Separately Trailer socket harness Control
INSTALLATION INSTRUCTIONS
 INSTALLATION INSTRUCTIONS Accessory S Application 2010 ODYSSEY Publications No. AII 41818 Issue Date JUNE 2009 PARTS LIST Right center sensor clip (Black) Backup Sensor Attachment Kit P/N 08V67-SHJ-101C
Installation Instructions
 Instructions Created by an: DIY Underhood LED Lighting Kit (SKU# DIY-E-UHLK) Installation Instructions NOTICE: This Under Hood Light Kit was installed on a 2002 Toyota Tacoma. However, these instructions
INSTALLATION. Note: Not all of the included parts will be used during this installation. -cont.-
 Driving Lights for Road Glide 5007 Fits: 98-up Road Glide PartS Included 1 Right Light Assembly 1 Left Light Assembly 1 Right Mounting Bracket 1 Left Mounting Bracket 1 Hardware Kit Including: 2 Narrow
INSTALLATION INSTRUCTIONS
 INSTALLATION INSTRUCTIONS Accessory Application 2010 RDX Publications No. BII 41807 Issue Date JULY 2009 PARTS LIST 2 Bolts, 12 x 40 mm Trailer Hitch Kit P/N 08L92-STK-200A Trailer hitch Hitch pin Ball
Ford Super Duty F-250, F and up
 Ford Super Duty F-250, F-350 2005 and up Installing Upfitter Switches by Richard L. Ray If you want to add a few aftermarket options to your new Ford Super Duty, Ford Motor Company makes things easy for
FITTING KIT No s : BULL BAR WINCH ( P/No ) BULL BAR NON WINCH ( P/No )
 BULL BAR NON WINCH ( P/No )") ARB WINCH / NON WINCH BULL BAR TO SUIT LANDROVER DISCOVERY 2003 ONWARD. FITTING KIT No s :- 617 1793 BULL BAR WINCH ( P/No 343 2120 ) 617 1794 BULL BAR NON WINCH ( P/No 323 2120 ) WARNING FOR VEHICLES
ARB WINCH / NON WINCH BULL BAR TO SUIT LANDROVER DISCOVERY 2003 ONWARD. FITTING KIT No s :- 617 1793 BULL BAR WINCH ( P/No 343 2120 ) 617 1794 BULL BAR NON WINCH ( P/No 323 2120 ) WARNING FOR VEHICLES
ATTENTION. Custom Dynamics UTV Turn Signal Kit Installation Instructions
 Custom Dynamics UTV Kit Installation Instructions We thank you for purchasing the Custom Dynamics UTV LED Kit. Our products utilize the latest technology and high quality components to ensure you the most
INSTALLATION INSTRUCTIONS
 INSTALLATION INSTRUCTIONS Accessory Application Publications No. AII 28603 S 2006 RIDGELINE Issue Date FEB 2005 PARTS LIST Relay Fog Light Kit P/N 08V31-SJC-100 Right fog light 15 Wire ties Left fog light
INSTALLATION INSTRUCTIONS
 INSTALLATION INSTRUCTIONS Accessory Application Publications No. BII 39890 2009 MDX Issue Date JULY 2008 PARTS LIST Backup Sensor Attachment Kit P/N 08V67-STX-200A Self-tapping screw, 5 x 16 mm 12 Wire
INSTALLATION INSTRUCTIONS
 INSTALLATION INSTRUCTIONS Accessory Application Publications No. AII 24637 INSIGHT Issue Date OCT 2002 PARTS LIST Security System: P/N 08E51-S84-100 Attachment Kit: P/N 08E55-S3Y-100 Security system harness
PC45 Air PumP replacement kit- For replacing A denver-gardner PumP with A hiblow PumP.
 PC45 Air PumP replacement kit- For replacing A denver-gardner PumP with A hiblow PumP. Air pump # 3-20-02679 (Sold separately) Please read the entire instructions prior to beginning the project. kit Contents
ROAD TECH ZUMO GLOBAL POSITIONING SYSTEM (GPS) HANDLE- BAR MOUNT KIT
 HANDLE- BAR MOUNT KIT") -J046 REV. 008-08- ROAD TECH ZUMO GLOBAL POSITIONING SYSTEM (GPS) HANDLE- BAR MOUNT KIT GENERAL Kit Number 965-08 Models This kit is required when using a Road Tech Zumo GPS unit on specific model motorcycles.
-J046 REV. 008-08- ROAD TECH ZUMO GLOBAL POSITIONING SYSTEM (GPS) HANDLE- BAR MOUNT KIT GENERAL Kit Number 965-08 Models This kit is required when using a Road Tech Zumo GPS unit on specific model motorcycles.
INSTALLATION INSTRUCTIONS
 INSTALLATION INSTRUCTIONS Accessory TRAILER Application 2013 PILOT Publications No. AII 13332 Issue Date AUG 2012 PARTS LIST Trailer Harness Kit P/N 08L91-SZA-100A Relay cover Control unit harness 4 Wire
INSTALLATION INSTRUCTIONS
 INSTALLATION INSTRUCTIONS Honda Dealer: Please give a copy of these instructions to your customer. PARTS LIST (15) (8) (12) (14) (13) (10) (11) (18) (17) (1) Accessory Application Publications No. TRX500FA/FGA
2. With the rear door open remove pull-style clip from the passenger side just below the door latch.
 LoD Offroad FJ Cruiser Rear Bumper with Tire Carrier Installation Instructions 1. Begin with removing factory spare from the rear door. 2. With the rear door open remove pull-style clip from the passenger
INSTALLATION INSTRUCTIONS
 INSTALLATION INSTRUCTIONS Accessory TRAILER Application 2012 PILOT Publications No. AII 46408 Issue Date AUG 2011 PARTS LIST Trailer Harness Kit P/N 08L91-SZA-100A Relay cover Control unit harness 4 Wire
ITEM PART NO. DESCRIPTION QTY BODY - SNORKEL (SS1410HP) " AIR RAM ASSEMBLY BRACKET - UPPER MOUNTING 1
 AIR RAM ASSEMBLY BRACKET - UPPER MOUNTING 1") L; SS1410HP SAFARI ARMAX SNORKEL VOLKSWAGEN AMAROK V6 TDI550 3.0L TDI V6 Engine Parts List 10/04/2018 ITEM PART NO. DESCRIPTION QTY 1 910-133-600 BODY - SNORKEL (SS1410HP) 1 2 000-135-960 4" AIR RAM ASSEMBLY
L; SS1410HP SAFARI ARMAX SNORKEL VOLKSWAGEN AMAROK V6 TDI550 3.0L TDI V6 Engine Parts List 10/04/2018 ITEM PART NO. DESCRIPTION QTY 1 910-133-600 BODY - SNORKEL (SS1410HP) 1 2 000-135-960 4" AIR RAM ASSEMBLY
INSTALLATION INSTRUCTIONS
 INSTALLATION INSTRUCTIONS Accessory Application Publications No. AII 36765 S 2008 RIDGELINE Issue Date JUN 2007 PARTS LIST Relay Fog Light Kit P/N 08V31-SJC-100 Right fog light 15 Wire ties Left fog light
RH INSTALL INSTRUCTIONS 2008 MODEL
 RH-800-2 INSTALL INSTRUCTIONS 2008 MODEL 1 Tips for Installing Rhinogear Products The recommended sequence for installing our Rhinogear line of products on your Rhino. This sequence will help with ease
INSTALLATION INSTRUCTIONS
 INSTALLATION INSTRUCTIONS Accessory Application Publications No. BII 31129 REARVIEW CAMERA 2006 RL Issue Date OCT 2005 PARTS LIST Attachment Kit P/N: 08B21-SJA-B00 Template Rear camera trim 6-Pin connector
INSTALLATION INSTRUCTIONS
 INSTALLATION INSTRUCTIONS Accessory Application Publications No. AII 26042-26353 XM INTERFACE ODYSSEY EXCEPT EX-L WITH NAVI/RES Issue Date FEB 2004 PARTS LIST 8 Wire ties XM Radio Attachment P/N 08B15-S0X-100
Assembly Instructions
 Assembly Instructions Part Number Description Model Approx. Assembly Time 99994-0903 Windshield Wiper Kit Mule SX 1 Hour WARNING Improper installation of this accessory could result in an accident causing
SHELBY GT500
 2007-2009 SHELBY GT500 Removal of Factory Unit WARNING: 1. Radiator fluid must be handled properly. Please observe local ordinances with regards to handling and disposal. 2. Allow vehicle and components
INSTALLATION INSTRUCTIONS
 INSTALLATION INSTRUCTIONS Accessory Application Publications No. AII 40454 XM SATELLITE RADIO 2009 S2000 Issue Date AUG 2008 PARTS LIST Template XM Radio Unit Kit (sold separately): P/N 08A53-S2A-101 XM
I N S TA L L AT I O N
 I N S TA L L AT I O N 5008 fits: H-D: '80-Up Electra glide, tour glide, road king, road glide or street glide PartS Included 1 Right Fork Mount Assembly 1 Left Fork Mount Assembly 2 H3 Driving Light Assemblies
Adjustable Light Kits E-Z-Go TXT All Models Installation Instructions
 Adjustable Light Kits E-Z-Go TXT All Models 1996-2013 Installation Instructions Caution: Please read through the instructions carefully. Before starting this project, remove the system s positive and negative
INSTALLATION INSTRUCTIONS
 INSTALLATION INSTRUCTIONS Accessory Application Publications No. AII 24075 2003 ACCORD P/N 08V31-SDN-100 2-DOOR Issue Date AUG 2002 NOTE: The outside temperature gauge can not be installed in a vehicle
INSTALLATION INSTRUCTIONS
 INSTALLATION INSTRUCTIONS Accessory Application 2011 PILOT Publications No. AII 43339-47543 Issue Date JAN 2012 PARTS LIST Trailer Harness Kit P/N 08L91-SZA-100 Towing Kit P/N 08L92-SZA-100 Ball mount
Ford Mustang GT-Style Fog Light Kit Parts List: Quantity: Tool List:
 2013-2014 Ford Mustang GT-Style Fog Light Kit Parts List: Quantity: Tool List: Fog light (Left& Right) 2 Flat head & Phillips screwdriver Upper grille with surround 1 Ratchet & Socket set OR Lower grille
INSTALLATION INSTRUCTIONS
 INSTALLATION INSTRUCTIONS Accessory Application Publications No. S P/N 08V31-S0X-100 1999-2001 ODYSSEY AII 20677 Issue Date AUG 1999 PARTS LIST 2 Fog lights Switch Fuse label Right bracket Relay B, 4-pin
INSTALLATION INSTRUCTIONS
 INSTALLATION INSTRUCTIONS Accessory Application Publications No. CIVIC AII 24171 S 2- AND 4-DOOR Issue Date (DX, HX) AUG 2002 NOTE: Fog Lights cannot be installed if the vehicle is equipped with an optional
CAMRY STRIP LED DRL TOYOTA Part Number: Accessory Code: LDRS10. PIO / DIO Rev. A 02/26/13. Doc
 Doc. 02.126.00 TOYOTA CAMRY PIO / DIO Rev. A 2013-02/26/13 STRIP LED DRL Part Number: 00016-32280 Accessory Code: LDRS10 Conflicts - Only works on Camry SE Kit Contents Item # Quantity Reqd. Description
LGT-312L E-Z-Go TXT Light Bar Bumper Kit Installation Instructions
 LGT-312L E-Z-Go TXT 2014+ Light Bar Bumper Kit Installation Instructions Caution: Please read through the instructions carefully. Before starting this project, remove the system s positive and negative
INSTALLATION INSTRUCTIONS
 INSTALLATION INSTRUCTIONS Accessory Application 2011 PILOT Publications No. AII 43339 Issue Date MARCH 2010 PARTS LIST Trailer Harness Kit P/N 08L91-SZA-100 Towing Kit P/N 08L92-SZA-100 Ball mount Trailer
MKVI Jetta Fog Light Kit
 MKVI Jetta Fog Light Kit Part Number VW Jetta Fog Light Installation This tutorial is provided as a courtesy by ECS Tuning. Proper service and repair procedures are vital to the safe, reliable operation
INSTALLATION INSTRUCTIONS
 INSTALLATION INSTRUCTIONS Accessory Application Publications No. AII 24307 SYSTEM 2003 ELEMENT Issue Date DEC 2002 NOTE: An optional keyless entry system (sold seperately) must be installed before you
INSTALLATION INSTRUCTIONS
 INSTALLATION INSTRUCTIONS Accessory Application 2011 CR-V Publications No. AII 44647 Issue Date AUG 2010 PARTS LIST Trailer Hitch Kit P/N 08L92-SWA-101 Trailer Hitch Harness Kit P/N 08L91-SWA-100 Trailer
05 09 Mustang Squirter Nozzle Relocation Kit CDC #112050
 05 09 Mustang Squirter Nozzle Relocation Kit CDC #112050 Note: Read installation instructions before starting. Component Check List: Quantity/Description Part# CDC Installer 2 - Squirter Nozzles 115063
INSTALLATION INSTRUCTIONS
 INSTALLATION INSTRUCTIONS Accessory Application Publications No. S CIVIC 2 AND 4-DOOR (EX, LX) AII 24188 Issue Date AUG 2002 NOTE: Fog Lights cannot be installed if the vehicle is equipped with an optional
INSTALLATION INSTRUCTIONS
 INSTALLATION INSTRUCTIONS Accessory S Application 2013 ACCORD 4-DOOR Publications No. AII 13026 Issue Date AUG 2012 PARTS LIST Aluminum tape Backup Sensors Attachment Kit P/N 08V67-T2A-100A Control unit
MINI COOPER HAVING INSTALLATION QUESTIONS? CALL TECHNICAL SUPPORT AT DESIGNED FOR USE WITH BALL MOUNT # D-19 / 45519
 10/8/2012 PAGE 1 of 6 ITEM 1 QTY 8 Parts List PART NUMBER DESCRIPTION 3/8" CONICAL TOOTHED WASHER TOOLS REQUIRED RATCHET TORQUE WRENCH 12" EXTENSION 12mm SOCKET 8mm SOCKET OFFSET SCREWDRIVER FLAT BLADE
Part Number: TCA-712SE
 Date: 09.04.2013 TOYOTA CAMRY SE 2012-14 LED DRL Part Number: TCA-712SE Kit Contents Item # Quantity Reqd. Description 1 2 DRL s bezels w/led DRL 2 1 Driver Box 3 1 Harness bag 4 1 User s card 5 1 Cushion
INSTALLATION INSTRUCTIONS
 INSTALLATION INSTRUCTIONS Accessory S P/N 08V67-SJC-101 Application 2012 RIDGELINE Publications No. AII 12006 Issue Date NOV 2011 PARTS LIST Back-up sensor harness 3 Wire ties with small clips (2 Not used)
Curb-Alert Installation Guide: C7 Stingray
 Rev. 2014-07-28 Curb-Alert Installation Guide: C7 Stingray Page 1 of 18 To complete this procedure, you will need the following items: 13mm Socket (deep or standard will work) Flat head screw driver Coat
INSTALLATION INSTRUCTIONS
 INSTALLATION INSTRUCTIONS Models: 7105 & 7105TK Dodge Ram 1500 ('02 Current) Ram 2500 & 3500 '03 - Current with stock manual mirrors. IF YOU DO NOT CURRENTLY HAVE MANUAL MIRRORS, THE WRONG SET HAS BEEN
Mustang Classic LightBar Instructions
 1994-2004 Mustang Classic LightBar Instructions Note: Read installation instructions before starting. Component List: 1 LightBar 4 Poly Plugs 4 LightBar Bolts 4 LightBar Washers 2 LightBar Rivets 2 Light
Gentex by VOXX Corporation Installation Instructions
 Gentex by VOXX Corporation Installation Instructions Bezelled ADVGEN45A4 Bezelled w/ Homelink ADVGEN80EXP ADVGEN45A4PW4 ADVGEN40A4 Frameless ADVGEN8EXP Frameless w/ Homelink ADVGEN85EXP ADVGEN45AB5 TOOLS
INSTALLATION INSTRUCTIONS
 INSTALLATION INSTRUCTIONS Accessory Application 2011 RDX Publications No. BII 43544 Issue Date JULY 2010 PARTS LIST 2 Bolts, 12 x 40 mm Trailer Hitch Kit P/N 08L92-STK-200A Trailer hitch Hitch pin Hitch
INSTALLATION INSTRUCTIONS
 INSTALLATION INSTRUCTIONS Accessory Application Publications No. ATTACHMENT (EX-L WITH NAVI) 2008 RIDGELINE AII 36587 Issue Date MAY 2007 PARTS LIST Attachment Kit P/N: 08B21-SJC-102 Template Rear camera
INSTALLATION INSTRUCTIONS
 INSTALLATION INSTRUCTIONS Accessory S P/N 08V67-SJC-101 Application 2010 RIDGELINE Publications No. AII 42117 Issue Date AUG 2009 PARTS LIST Back-up sensor harness 3 Wire ties with small clip (2 Not used)
Ford Mustang V6 OEM-Style Fog Light Kit Parts List: Quantity: Tool List:
 2015-2017 Ford Mustang V6 OEM-Style Fog Light Kit Parts List: Quantity: Tool List: LED Foglights/ Bezels 2 Flat head & Phillips screwdriver (if you ordered part#3600) Ratchet & Socket set OR Wiring harness
INSTALLATION INSTRUCTIONS
 INSTALLATION INSTRUCTIONS Accessory Application Publications No. AII 26320 ATTACHMENT KIT 2004 S2000 Issue Date OCT 2003 PARTS LIST CD Changer Attachment Kit: P/N 08B26-S2A-100A Plain washer Template CD