ML63AMG appartiens à un membre de mbworld.org merci. W210 E Class Folding Mirror Modification
|
|
|
- Everett Hugh Chandler
- 5 years ago
- Views:
Transcription

1 ML63AMG appartiens à un membre de mbworld.org merci W210 E Class Folding Mirror Modification Originally installed in Revised write up completed September 5, Step 1 - New Switch and Wiring Harness I installed the correct wiring harness first, as this involved removing both front seats, as well as several trim panels. The part number is A (see photo). Step 2 New Wiring Harness Connections There are a number of electrical connections to be made with the harness: a. fuse block (located in engine compartment) b. motor wiring for each front door (two pins each side) c. switch on center console (connector for this is part of the harness) d. switch illumination e. ground I started from the front (the fuse box connection) and worked toward the rear from there, then across the interior of the car from left to right. The last connections made were at the base of the passenger-side door.

2 I don't have a photo of the fuse block connection in the engine compartment. It is made to the terminal marked for the folding mirrors. Remove the trim pieces in the driver's side footwell to access the wire channel leading into the engine compartment. The connection for switch illumination will be made in Step 4. The ground connection is made in Step 6. Here's a photo (below) of the motor connection for the passenger-side door which was the final connection made. The driver's side is essentially identical. The connection is made by slipping the two pins into the black connector located in the wiring channel beneath the door opening. The green and yellow wires seen looping into the back of the connector are the two leads from the new harness. These two new wires match up directly to the green and yellow wires in the mating (female) connector that are already in the car (fortunately) and that run up to the connector for each outside mirror. Step 3 Installing the Harness The new harness is routed rearwards from the driver's door motor connection, then under the driver's seat (in the black plastic channel) towards the center console. The photo below shows the center console removed, but the carpet has not been moved out of the way yet.

3 Step 4 Switch Illumination Connection Once the carpet is moved out of the way, you have full access. As the new wiring is placed in the channel, make the solder connection for switch illumination. It's a blue and gray wire, and is terminated with the other wires of the same color (all these wires provide power for illuminating various switches on the console or dash).

4 Step 5 Center Console The six-pin connector (white plastic) is routed forward toward the gear selector, and will be mated with the control switch later. I did this part last, since it involved making an additional hole in the center console wood trim. There will be three wires remaining to be connected at this point: one yellow, one green, one brown. The green and yellow wires provide the power to the passenger-side mirror, and are run under the passenger seat. The brown is the ground, and has a connector attached. Sorry for the blurry image. Rotate it 90 degrees clockwise to orient it properly. It shows the wire channel that starts at the center console and continues under the front passenger seat. The green and yellow wires are routed in the channel toward the door. You'll be making the ground connection under the passenger seat too, just in front of the channel.

5 Step 6 Ground Connection The connection to ground about to be made:

6 Step 7 New Switch The new switch: part number A

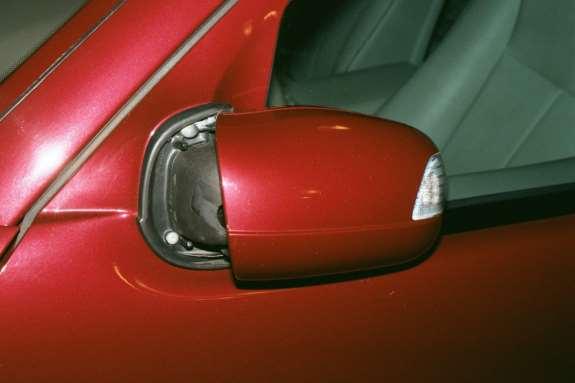
7 Step 8 Modifying the Mirror Assemblies The first part of this process is removing the mirror outer cover. It's not difficult, once you ve located the tab holding the mirror cover in place. Press the tab with a thin screwdriver to release the mechanism, and slide the cover off. Then detach the whole thing by unscrewing the three screws holding it in place. The old unit (driver s side):


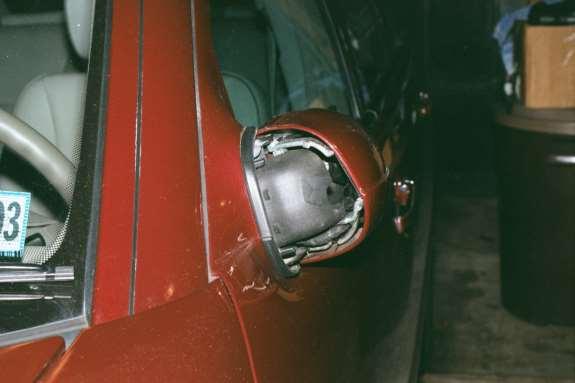
8 The driver's side folding mirror frame, as I received it from Mike:
.")
9 Same item, viewed from the front: In order to maintain all the functions of my existing mirrors (power adjustment, heating, memory, blinker), I re-used the main wiring harness from the old mirrors. You have to modify this wiring to make it longer. If you don't, the folding action will try to stretch the wiring (you don't want that!). Modifying the wiring was the longest single part of the whole job! It helps to know how to handle a soldering iron! Lengthening the wires for mirror glass heating and blinker:


10 The modified wires to the blinker connector:

11 The lengthened wiring for the mirror glass adjustment mechanism: And the connector reattached to the mirror glass adjustment motor:

12 I retained all the connector pins from my old harness. They are fairly easy to remove from the connector, and it was a lot easier to feed them through the new plastic mounting gasket that way.
 already inserted.")
13 Once they've been pulled through, seal the penetration with silicone sealant, and re-insert the connector pins into the connector. The image below shows the connector body with the two folding-motor leads (yellow and green) already inserted. Mike was kind enough to have terminated the leads for me before shipping the new assemblies.

14 The completed connector, now attached to the mirror assembly.


15 The completed passenger-side unit being installed:

16 Step 9 Adding the Switch Here are a set of photos showing how I modified the center console for the new switch. The real key to doing this is having patience...and a steady hand. The results are not perfect, but then again I saved $$$ compared with buying a factory-made unit with the appropriate cutouts. Drilling the first few holes: The opening made. Time to file...carefully!


17 The finished switch mounting (the rear window sun shade switch was also a retrofit).

18 FINISHED!! The completed project... This photo shows the new passenger-side unit, in the folded position (without the mirror cover):
19
Connecting the rear fog light on the A4 Jetta, while keeping the 5 Light Mod
 Connecting the rear fog light on the A4 Jetta, while keeping the 5 Light Mod DISCLAIMER: I'm human and make mistakes. If you spot one in this how to, tell me and I'll fix it This was done on my 99.5 Jetta.
2005+ Mustang Trunk Lid Release and Trunk Lights Installation
 There is no warranty expressed or implied by this document, you follow these instructions at your own risk. These instructions worked for me, but your experience may vary. The final product of these instructions
Smart Opener Retrofit by Richard Bevan (bimmerfest riku2)
") Smart Opener Retrofit by Richard Bevan (bimmerfest riku2) Document history V 1.0 02.04.2015 Document created. Introduction This document tells how to retrofit the smart opener to a 2011 BMW 5 series (F10).
Smart Opener Retrofit by Richard Bevan (bimmerfest riku2) Document history V 1.0 02.04.2015 Document created. Introduction This document tells how to retrofit the smart opener to a 2011 BMW 5 series (F10).
PLEASE READ THROUGH THE WHOLE WRITE UP BEFORE ACTUALLY USING IT!!!!
 JDM power folding mirror switch install into stock USDM harness. By: Greg L., Zeke21 on twinturbo.net PLEASE READ THROUGH THE WHOLE WRITE UP BEFORE ACTUALLY USING IT!!!! This is how I was able to get the
Convenience Lighting
 Convenience Lighting by Flopster843 19 Dec 2011 In order to cut costs and make a larger profit, many automobile manufacturers decided to cut several minor items from the production line. Chrysler removed
750 Paso Wiring Upgrade
 750 Paso Wiring Upgrade Supplies required: 2 Bosch 30A/12V Relays # #0 332 209 150 (with mounting tab) 1 30 Amp fuse holder 1 10 Amp fuse holder 12 inches of brown 12 gauge wire 60 inches of red 14 gauge
STEPS FOR REMOVING REAR ASHTRAY & CUP HOLDER, CENTER ARMREST, E- BRAKE CONSOLE, FRONT ASHTRAY, LOWER CENTER CONSOLE AND GLOVE BOX
 Please give credit where credit is due! This DIY was completed ENTIRELY by the hardest working VW Vortex moderator on the site!! Gary Thompson, Ph.D. - vortex ID VGRT6, email address vgrt6@yahoo.com. Please
INSTALLATION INSTRUCTIONS
 Rear Vision System Mirror Display Dodge Ram Kit Contents: Instruction Sheets Template Chassis Harness Endgate Handle with Camera Wire Ties (Qty: 17) Bottle of ZTech Plug for Non-Locking Endgates (Optional)
JOHN DEERE GATOR SWITCH PANEL INSTRUCTIONS FITS 1GTRXUV2 AND 1GTRXUV4 CABS (p/n: 1XUVSP)
") P. 1 of 5 JOHN DEERE GATOR SWITCH PANEL INSTRUCTIONS FITS 1GTRXUV2 AND 1GTRXUV4 CABS (p/n: 1XUVSP) Note: Harness Extension Kit Required for 4 Passenger (p/n: 1XUV4WHEK) This manual is the property of the
P. 1 of 5 JOHN DEERE GATOR SWITCH PANEL INSTRUCTIONS FITS 1GTRXUV2 AND 1GTRXUV4 CABS (p/n: 1XUVSP) Note: Harness Extension Kit Required for 4 Passenger (p/n: 1XUV4WHEK) This manual is the property of the
M GT 2005 up Mustang ENGINE START Push-Button INSTRUCTION SHEET
 Please contact the Ford Racing Techline for the most current instruction information @ (800) FORD-788!!! PLEASE READ THE FOLLOWING INSTRUCTIONS CAREFULLY PRIOR TO INSTALLATION!!! OVERVIEW: The following
Bucket Harness. Installation Instructions. for Electric Club Car Precedent
 Bucket Harness for Electric Club Car Precedent Installation Instructions Electric Club Car Precedents manufactured after January 1, 2008 require an additional harness to allow the installation of light
- MK7 Mirror Integration Kit - Installation Instructions
 - MK7 Mirror Integration Kit - Thank you for choosing the Double Apex Gentex Mirror Integration kit for your Volkswagen MK7. If you have any questions about the installation please email us at support@dblapex.com.
Installation MKIV Headlight Housings with Fog Lamps (Procedures apply to both MKIV Jetta and Golf)
") Page 1 This tutorial is provided as a courtesy by ECS Tuning. Service Procedure Installation Proper service and repair procedures are vital to the safe, reliable operation of all motor vehicles as well
Page 1 This tutorial is provided as a courtesy by ECS Tuning. Service Procedure Installation Proper service and repair procedures are vital to the safe, reliable operation of all motor vehicles as well
INSTALLATION INSTRUCTIONS. Rear Vision System Mirror Display 2010 onwards Camaro (Kit part number )
") Rear Vision System Mirror Display 2010 onwards Camaro (Kit part number 1018-9540) Kit Contents: RVS Interior (shorter) harness RVS Chassis (longer) harness Camera with mounting bracket Mirror 1 bag containing:
Rear Vision System Mirror Display 2010 onwards Camaro (Kit part number 1018-9540) Kit Contents: RVS Interior (shorter) harness RVS Chassis (longer) harness Camera with mounting bracket Mirror 1 bag containing:
INSTALLATION INSTRUCTIONS
 INSTALLATION INSTRUCTIONS FUEL SURGE TANK INSTALLATION KIT 1999-2006 BMW E46 COUPE Document# 19-0056 Support: info@radiumauto.com Note: This kit was designed for a standard single pump Radium Engineering
Please read thoroughly before starting installation and check that kit contents are complete.
 Rear Vision System Mirror Display 2013-Current Ram (Kit part number 1009-9518) Please read thoroughly before starting installation and check that kit contents are complete. Items Included in the Kit: Rear
Stand Alone Fog Lights Installation Instructions
 Tools Required: 1. Trim Removal tool or protected flat screwdriver 2. #2 Phillips Screwdriver 3. 10mm socket 4. 10mm wrench 5. 8mm or 5/16 socket 6. Adjustable Pliers 7. Electrical Tape WARNING!!! Disconnect
ACD-PRO Install in 2008 EvoX
 Turning in a counter clockwise direction, unscrew ift knob ACD-PRO Install in 2008 EvoX Slide back and remove the floor console panel assembly Pull up to remove the center console tray Disconnect the plug
INSTALLATION MANUAL SPECTRUM BRAKE CONTROL
 INSTALLATION MANUAL 51170 SPECTRUM BRAKE CONTROL TABLE OF CONTENTS Controls & Components Tools List Before You Begin Wiring Wiring Diagram Mounting the LED Display Rotary Knob Wiring the Plug Connector
Replacing the Vacuum Servo on 700/900 with ACC/ECC Double-Acting Servos. [Procedure from Dick Riess, to whom thanks are given; some notes from Dan]
![Replacing the Vacuum Servo on 700/900 with ACC/ECC Double-Acting Servos. [Procedure from Dick Riess, to whom thanks are given; some notes from Dan]](/thumbs/89/98811956.jpg "Replacing the Vacuum Servo on 700/900 with ACC/ECC Double-Acting Servos. [Procedure from Dick Riess, to whom thanks are given; some notes from Dan]") Replacing Vacuum Servos in ACC/ECC-Equipped 700/900 Cars FAQ Home Volvo Maintenance FAQ for 7xx/9xx/90 Cars HVAC Home OEM Manual Procedure for Replacing Vacuum Servos. See the FAQ file for a large.pdf
Replacing Vacuum Servos in ACC/ECC-Equipped 700/900 Cars FAQ Home Volvo Maintenance FAQ for 7xx/9xx/90 Cars HVAC Home OEM Manual Procedure for Replacing Vacuum Servos. See the FAQ file for a large.pdf
Special Note About The JDM High Performance Water Pump:
 Page 1 of 30 JDM Engineering, Inc. home Call Us! 732-780- 0770 back to Installation Instructions Electric Fan Upgrade Kit Electric Fan Wiring Diagram Thank you for your purchase of the JDM Engineering
Gentex Homelink Installation Instructions
 Gentex Homelink Installation Instructions Kit Contents: Item Qty Part Description 1 Number GENK-41 NVS Homelink Mirror GENK-42 NVS Homelink w/mood lights 1 of the GENK-45 NVS Homelink w/compass following
FITTING OF (WESTFALIA) REMOVABLE TOWBAR ON SKODA OCTAVIA WITHOUT TOWBAR PREPARATION (04/11/16 CJ v1.0)
 REMOVABLE TOWBAR ON SKODA OCTAVIA WITHOUT TOWBAR PREPARATION (04/11/16 CJ v1.0)") FITTING OF (WESTFALIA) REMOVABLE TOWBAR ON SKODA OCTAVIA 2013+ WITHOUT TOWBAR PREPARATION (04/11/16 CJ v1.0) A. INTRO ALL STEPS COMPLETED AT YOUR OWN RISK! I AM NOT LIABLE FOR ANY LOSS OR DAMAGE! These
FITTING OF (WESTFALIA) REMOVABLE TOWBAR ON SKODA OCTAVIA 2013+ WITHOUT TOWBAR PREPARATION (04/11/16 CJ v1.0) A. INTRO ALL STEPS COMPLETED AT YOUR OWN RISK! I AM NOT LIABLE FOR ANY LOSS OR DAMAGE! These
BMW E46 Convertible Hydraulic Line #23 Replacement Guide Created by taylor192 of E46Fanatics.com
 BMW E46 Convertible Hydraulic Line #23 Replacement Guide Created by taylor192 of E46Fanatics.com BMW E46 Line #23 Replacment Guide, page 1 of 23 Background: Line #23 runs from the valve block on the driver's
4TH GEN SEATS IN A 3RD GEN TRUCK
 4TH GEN SEATS IN A 3RD GEN TRUCK by Flopster843 02 Oct 2016 If you drive a 3rd generation Dodge Ram truck, I am sure you have discovered that the OEM seats are not the greatest (Figure 1.) They are extremely
Thank you for purchasing the Craven Speed FlexPod Complete Gauge Pod Kit For R56, R58, R59, R60 with Refresh Engines (2011+)
") Thank you for purchasing the Craven Speed FlexPod Complete Gauge Pod Kit For R56, R58, R59, R60 with Refresh Engines (2011+) Before You Start Please read instructions completely before installing. These
Thank you for purchasing the Craven Speed FlexPod Complete Gauge Pod Kit For R56, R58, R59, R60 with Refresh Engines (2011+) Before You Start Please read instructions completely before installing. These
Part Number: SFR-713. Hardware Bag Contents. General Applicability All models. Conflicts - Fog Lights. Date: SCION FRS LED DRL
 Date: 01.30.2014 SCION FRS 2013-2015 LED DRL Part Number: SFR-713 Kit Contents Item # Quantity Reqd. Description 1 2 DRL s bezels w/led DRL 2 1 Driver Box 3 1 Harness bag 4 1 User s card 5 1 Switch Hardware
U L T I M A T E R A D A R / L A S E R D E F E N S E S Y S T E M
 S m a r t e r Q u i e t e r M o r e A c c u r a t e U L T I M A T E R A D A R / L A S E R D E F E N S E S Y S T E M Installation Manual PASSPORT 9500ci Comes Complete Front Radar Receiver Miniature weatherproof
Raingear Mustang Windshield Wiper System Installation Instructions E F A
 Raingear 1965-1966 Mustang Windshield Wiper System Installation Instructions J I H J G E F A D K 2 speed switch B C L Intermittent switch Please try our way first. This system is designed to fit in your
2010 Toyota Prius Fog Light Retrofit
 2010 Toyota Prius Fog Light Retrofit A DIY prospective Last updated: Friday, December 25, 2009 *** Disclaimer Use this document and its contents at your own risk! *** Forward: This document was compiled
Maserati GranSport Drive by Wire installation
 Maserati GranSport Drive by Wire installation Phil Vincenzes MaseratiLife member Vincenzo Email: Phil.Vincenzes@hotmail.com This write-up is not intended in any way to replace the detailed instructions
Fitting Instructions
 Tow-Pro Wiring Kit Fitting Instructions Suitable for: Toyota Hilux / Fortuner Accessory Kit Estimated Fitting Time: 90 Minutes FI807 Page 0 of Issue: Date: /08/08 08 General Notes Safety Notes Suitable
Sunroof Repair. Sunroof Repair TSB. The sunroof repair kit available for the J30 is part number Y20. See images at bottom of document.
 Sunroof Repair This document is the text/images from the TSB (technical service bulletin) issued by Infiniti concerning the repair procedure for sunroof issues. Be advised that this is a LARGE, TIME-CONSUMING
Installing the Wireless Charging upgrade kit in a 2018 XT5 (Platinum version)
") Installing the Wireless Charging upgrade kit in a 2018 XT5 (Platinum version) September 2, 2018 Tools needed: Wireless charger upgrade kit Plastic trim tools 7 mm nut driver Background: I purchased the
Installing the Wireless Charging upgrade kit in a 2018 XT5 (Platinum version) September 2, 2018 Tools needed: Wireless charger upgrade kit Plastic trim tools 7 mm nut driver Background: I purchased the
VT Commodore LPG installation utilising an LPG Memcal and Apexus Quick-kit.
 VT Commodore LPG installation utilising an LPG Memcal and Apexus Quick-kit. Description of components and operation LPG/Petrol Changeover switch The LPG change-over switch is mounted in the instrument
DELCO AD Series Alternators
 DELCO AD Series Alternators The purpose of this modification is to allow the MOBI-ARC s PWM regulator to control the alternator. The Delco s regulator will be disabled while the control unit is present.
INSTALLATION INSTRUCTIONS
 Rear Vision System Tailgate Emblem Camera Mirror Display 2009-Current Ford F-150 and 2010-Current Super Duty (Kit part number 1008-9527) Kit Contents: Mirror Tailgate Emblem Mount with Camera Interior
Bachmann Digital Sound Decoder Installation Notes
 New Dimensions in Digital Sound Technology TM APPLICATION NOTE Bachmann 2-6-6-2 Digital Sound Decoder Installation Notes Overview This application note describes the installation of a DSD-090LC Digital
2007 Crown Victoria Police Interceptor (P71) Blend Door Actuator Replacement (If I did it, you can too.)
 Blend Door Actuator Replacement (If I did it, you can too.)") 2007 Crown Victoria Police Interceptor (P71) Blend Door Actuator Replacement (If I did it, you can too.) I'm not saying this is the only way, or even the right way, but it worked for me. First time I've
2007 Crown Victoria Police Interceptor (P71) Blend Door Actuator Replacement (If I did it, you can too.) I'm not saying this is the only way, or even the right way, but it worked for me. First time I've
Pantera Electronics LED Taillight Installation Manual
 Pantera Electronics LED Taillight Installation Manual (2nd Gen) This LED signal lamp conversion was designed to replace the incandescent lamp 1157 with a Light Emitting Diode Array designed specifically
Thanks to Phatty & BenTaylor200 for the S14a ECU pinouts Thanks to Bren for the S14a ABS ECU wiring. Written by john200 PDF by STiMPY
 Written by john200 PDF by STiMPY Thanks to Phatty & BenTaylor200 for the S14a ECU pinouts Thanks to Bren for the S14a ABS ECU wiring This guide is specific to the S14, the S14a has different wiring. See
Installation Instructions
 Installation Instructions These instructions cover the following kits: 64-66 Mustang Sequential Turn Signal LED kit 67-68 Mustang Sequential Turn Signal LED kit Kit Contents 2 x LED Tail Light Panels 2
Stand Alone Kit Installation Instructions
 Before installation: Stand Alone Kit Installation Instructions Read all information in this manual carefully Check the product for all components before starting the installation Remove the negative battery
INSTALLATION INSTRUCTIONS
 OEM Tailgate Camera/Bezel Assembly with Chassis Harness 2014-current Chevrolet Silverado and GMC Sierra (Kit part number 9002-1005) Kit Contents: Chassis Harness 1 bubble bag containing: Tailgate Handle
INSTALLATION INSTRUCTIONS
 Rear Vision System Mirror Display 2004 onwards Ford F-150 and 2008 onwards Ford Super Duty (Kit part numbers 1008-9520 and 1008-9525) Kit Contents: RVS Interior (shorter) Harness RVS Chassis (longer) Harness
igen2500 and ipro2500 IGNITION COIL RETROFIT GUIDE
 igen2500 and ipro2500 IGNITION COIL RETROFIT GUIDE This comprehensive retrofit guide is for replacing the ignition coil on Westinghouse s igen2500 and ipro2500 inverter generators. The purpose of this
Headlight Removal & Installation: VW Jetta Mk.4 / Bora
 Headlight Removal & Installation: 99-04 VW Jetta Mk.4 / Bora Disclaimer: Buyer assumes any and all risk and liability from the installation and use of this product. Seller, author, or any of their affiliates
LEXUS GS 350/450h ILLUMINATED DOOR SILLS Preparation
 Preparation Part Number: PT922-30120 (GS350) PT922-30130 (GS450h) NOTE: Part number of this accessory may not be the same as the part number shown. Kit Contents Item # Quantity Req'd. Description 1 1 Illuminated
TOYOTA Epic22 Perfect Pass Install
 TOYOTA Epic22 Perfect Pass Install To start, here is the paddle wheel speedometer install. This alone is almost worth the price of the kit. You ll need: 2 hole saw and drill 5200 Marine Sealant Tape Measure
INSTALLATION INSTRUCTIONS
 INSTALLATION INSTRUCTIONS FUEL SURGE TANK INSTALLATION KIT 1999-2006 BMW E46 COUPE Document# 19-0056 Support: info@radiumauto.com Note: This kit wasn t designed for a FST-R, but can be accomplished. 1.
THE SERIES-E POWR Slider
 C.R. LAURENCE CO., INC. PATENT NO. 4,920,698 THE SERIES-E POWR Slider MODEL: EPC814S 2014+ CHEVY/GMC SILVERADO/SIERRA 1500 NAGS: DY90122PK5 ELECTRIC SLIDING REAR WINDOW 2014 + CHEVY/GMC SILVERADO/SIERRA
Thank you for purchasing the Craven Speed FlexPod Complete Gauge Pod Kit
 Thank you for purchasing the Craven Speed FlexPod Complete Gauge Pod Kit Before You Start Please read instructions completely before installing. These instructions contain the information required to install
Corvette Set Separator (Glove Box) Lock Removal
 Lock Removal") 1956-62 Corvette Set Separator (Glove Box) Lock Removal The materials here were gathered from several Corvette Forum Threads as well as from the Web Pages of Rich Mozzetta (rich5962 on the CF). Our colleagues
1956-62 Corvette Set Separator (Glove Box) Lock Removal The materials here were gathered from several Corvette Forum Threads as well as from the Web Pages of Rich Mozzetta (rich5962 on the CF). Our colleagues
How to fit the remote parking heater module
 How to fit the remote parking heater module The function of this project is to convert a standard fuel burning heater on the diesel models of the Rover 75 and MG ZT to a remote controlled parking heater.
BMW 3 Series Oxygen Sensor
 1984-1991 BMW 3 Series Oxygen Sensor Replacement Replace an old oxygen sensor on your E30 for better gas mileage. Written By: Andrew Bookholt ifixit CC BY-NC-SA www.ifixit.com Page 1 of 10 INTRODUCTION
INSTALLATION INSTRUCTIONS
 OEM Recessed Lip Camera with Harness and OnStar Mirror for GM Vehicles with 10-pin Mirror Connector (Kit part number 9002-8722) Please read thoroughly before starting installation and check that kit contents
This write-up is subject to revision. PM me, eb2143 at tdiclub.com and I will update it if there are inaccuracies, typos, missing information, etc.
 1 A4 Door Switch Replacement, 1.0 Notes on this guide: The following guide is mostly a combination of two write-ups by VgRt6 on Vwvortex.com. Specific threads located here: http://forums.vwvortex.com/showthread.php?1015107
(1) Remote Control with (2) AAA Batteries
 Remote Control with (2) AAA Batteries") TOOLS REQUIRED: KIT CONTENTS: E14 Torx (1) Remote Control with (2) AAA Batteries (2) Wireless Headphones with (4) AAA Batteries (2) DVD Headrest Units Owner s Manual (1) Owner s Manual (1) Power / Audio
TOOLS REQUIRED: KIT CONTENTS: E14 Torx (1) Remote Control with (2) AAA Batteries (2) Wireless Headphones with (4) AAA Batteries (2) DVD Headrest Units Owner s Manual (1) Owner s Manual (1) Power / Audio
1967 (Late) CORVETTE STANDARD (NON-ADJUSTABLE) STEERING COLUMN DISASSEMBLY & REPAIR INSTRUCTIONS PAPER #2
 CORVETTE STANDARD (NON-ADJUSTABLE) STEERING COLUMN DISASSEMBLY & REPAIR INSTRUCTIONS PAPER #2") Last Revision: 03SE2012 1967 (Late) - 1968 CORVETTE STANDARD (NON-ADJUSTABLE) STEERING COLUMN DISASSEMBLY & REPAIR INSTRUCTIONS PAPER #2 Disassembly and Repair Instructions Addressed in this Paper Degree
Last Revision: 03SE2012 1967 (Late) - 1968 CORVETTE STANDARD (NON-ADJUSTABLE) STEERING COLUMN DISASSEMBLY & REPAIR INSTRUCTIONS PAPER #2 Disassembly and Repair Instructions Addressed in this Paper Degree
MKVI Jetta Fog Light Kit
 MKVI Jetta Fog Light Kit Part Number VW Jetta Fog Light Installation This tutorial is provided as a courtesy by ECS Tuning. Proper service and repair procedures are vital to the safe, reliable operation
AUDIO KIT P/N APPLICATION BEFORE YOU BEGIN KIT CONTENTS. Verify accessory fitment at Polaris.com.
 AUDIO KIT P/N 2882696 APPLICATION Verify accessory fitment at Polaris.com. BEFORE YOU BEGIN Read these instructions and check to be sure all parts and tools are accounted for. Please retain these installation
Lethal Performance Dual FPDM Harness Kit Installation
 Lethal Performance Dual FPDM Harness Kit Installation The Lethal Performance Dual FPDM Harness Kit is a plug-and-play modification. Depending on whether you are using the Lethal Performance wire upgrade
INSTALLATION INSTRUCTIONS
 2015 Silverado Qi Wireless Charging Kit (Kit # FDMC-1276) Please read thoroughly before starting installation and check that kit contents are complete. Items Included in the Kit: Qi Wireless Charging Module
INSTALLATION INSTRUCTIONS
 OEM Recessed Lip Camera with Harness and Slimline Mirror (Kit part number 9002-8724) Please read thoroughly before starting installation and check that kit contents are complete. Items Included in the
394: Handsfree, Bluetooth Handsfree, Bluetooth
 394: Handsfree, Bluetooth S80 (07-), 2008, B8444S, TF-80SC AWD, L.H.D, YV1AH852881073834, 073834 4/1/2013 PRINT 394: Handsfree, Bluetooth Handsfree, Bluetooth Installation instruction: 31310098 INTRODUCTION
Replace C1U-H47 Carburator on Homelite
 Replace C1U-H47 Carburator on Homelite Weed Whacker It's cheaper, quicker, and more reliable to replace your carburetor with a new one, rather than rebuilding it. Written By: Gil ifixit CC BY-NC-SA www.ifixit.com
Instructions for installing Extendable Replacement Mirrors for Ford HD vehicle.
 Instructions for installing Extendable Replacement Mirrors for Ford HD vehicle. Manual CIPA # 82100 Right Hand #82110 Left Hand #82111 Electric CIPA # 72100 #72110 #72111 Heated / Electric CIPA # 72500
Climate control components in passenger compartment, servicing
 Page 1 of 34 87-120 Climate control components in passenger compartment, servicing Component electrical testing page 01-115. A/C control head -E87-, removing and installing Notes: Always check DTC memory
OEM Cruise Control Installation in GMC/Chevy NBS trucks
 OEM Cruise Control Installation in 99-02 GMC/Chevy NBS trucks May 2008 ~ Rampage_Rick Having just installed factory cruise control in my 00 Sierra, I thought I d share the fun. I followed the steps outlined
INSTALLATION INSTRUCTIONS
 Rear Vision System Liftgate Emblem Camera Mirror Display 2009-2012 Ford Flex (Kit part number 1008-9527) Kit Contents: Mirror Liftgate Emblem Mount with Camera Interior (shorter) Harness Chassis (longer)
GVW AGM Auxiliary Battery Kit for Vanagon Westfalia Full Camper
 GVW-253-700AGM Auxiliary Battery Kit for 1983-1991 Vanagon Westfalia Full Camper The purpose of this kit is to add an Interstate SLA1161 as an auxiliary battery under the driver's seat of 1983 to 1991
Gentex Autodim Homelink Compass Temperature Mirror Installation in 2014 Tacoma Purchased from Bob s Automotive Mirrors & More LLC (Robert Prim)
") Gentex Autodim Homelink Compass Temperature Mirror Installation in 2014 Tacoma Purchased from Bob s Automotive Mirrors & More LLC (Robert Prim) This is my 50-GENK51A Gentex mirror kit and instructions.
Gentex Autodim Homelink Compass Temperature Mirror Installation in 2014 Tacoma Purchased from Bob s Automotive Mirrors & More LLC (Robert Prim) This is my 50-GENK51A Gentex mirror kit and instructions.
BMS S63TU JB4 Install Guide
 BMS S63TU JB4 Install Guide Last updated 10/22/2018 Use subject to terms and conditions posted at http://www.burgertuning.com/terms.htm THIS PART IS LEGAL FOR USE ONLY IN COMPETITION RACING VEHICLES AS
INSTALLATION INSTRUCTIONS
 OEM Lip Mount Camera with Harness and OnStar Mirror for GM Vehicles with 10-pin Mirror Connector (Kit part number 9002-8723) Items Included in the Kit: Bubble bag containing: Camera with Mount Mirror Mirror
Turn Signal / Horn Kit PN 7101 by All years Polaris RZR 1000 and RZR 900, 900-4, 900 trail, 900S and 900XC STOP - THIS KIT IS DESIGNED
 All years Polaris RZR 1000 and 1000-4 2015 RZR 900, 900-4, 900 trail, 900S and 900XC STOP - THIS KIT IS DESIGNED SPECIFICALLY FOR ALL YEAR AND MODEL POLARIS RZR 1000 AND 1000-4. ALSO THE 2015 POLARIS RZR
I want to try my hand here at doing a TacoBill write up so here it goes.
 Here is part 3 of my tutorial for the conversion of my Shaker 1000 to the Kenwood DNX7100 Navigation / Head Unit. With the 7100, my new system will include the Kenwood I-pod Adapter (P.I.E. KNW/USB-AV),
Installation Instructions - ECS Tuning Vent Pod Vacuum/Boost Gauge Kit
 Installation Instructions - ECS Tuning Vent Pod Vacuum/Boost Gauge Kit This tutorial is provided as a courtesy by ECS Tuning. Part Number for (2005-2008) Proper service and repair procedures are vital
REAR ROOF SPEAKER KIT
 REAR ROOF SPEAKER KIT P/N 2882876 APPLICATION Verify accessory fitment at Polaris.com. BEFORE YOU BEGIN Read these instructions and check to be sure all parts and tools are accounted for. Please retain
Installation Instructions - ECS Tuning Vent Pod Vacuum/Boost Gauge Kit
 Installation Instructions - ECS Tuning Vent Pod Vacuum/Boost Gauge Kit This tutorial is provided as a courtesy by ECS Tuning. Part Number for Audi B6 A4 (2002-2004) Proper service and repair procedures
INSTALLATION INSTRUCTIONS
 INSTALLATION INSTRUCTIONS Accessory Application Publications No. AII 22903-22963 ODYSSEY Issue Date MAY 2002 PARTS LIST Subwoofer Kit: P/N 08A39-EP7-100 Subwoofer 2 Cushion tapes 8 Wire ties (1 not used)
Push Start Ignition (05-10 All) Installation
 Installation") Tools Required: Phillips head screwdriver Flat head screwdriver Ratchet 7mm Socket Torx T20 bit Wire strippers/cutters Hand file Needle nose pliers Installation Instructions: Push Start Ignition (05-10
Tools Required: Phillips head screwdriver Flat head screwdriver Ratchet 7mm Socket Torx T20 bit Wire strippers/cutters Hand file Needle nose pliers Installation Instructions: Push Start Ignition (05-10
 www.odometergears.com Mercedes-Benz Mechanical Odometer Repair This how to can be used for all mechanical repairs as the only difference will be the removal of the instrument cluster. http://www.dieselgiant.com/repairyourodometer.htm
INSTALLATION INSTRUCTIONS TRAILER HITCH MAIN HARNESS KIT
 PART NUMBER: 0000-89-N30 GENUINE ACCESSORIES INSTALLATION INSTRUCTIONS TRAILER HITCH MAIN HARNESS KIT APPLICABLE MODELS: 2016 > CX-9 PACKAGE CONTENTS: INSTALLATION INSTRUCTIONS QTY 1 CABLE TIE MOUNT QTY
Pantera Electronics LED Taillight Conversion Installation Manual
 Pantera Electronics LED Taillight Conversion Installation Manual This LED signal lamp conversion was designed to replace the incandescent lamp 1157 with a Light Emitting Diode Array designed specifically
Genuine Corvette Accessories Carbon Fiber Radio Surround Installation Instructions for Corvettes.
 Genuine Corvette Accessories Carbon Fiber Radio Surround Installation Instructions for 2005-2007 Corvettes. Difficulty: 3 out of 5. Time: Plan on about 1 hour. The tools used are: A small flashlight A
SHARK UPPER WINDSHIELD FRAME & WINDSHIELD REPLACEMENT. Text and Photos by TOM BENFORD
 Text and Photos by TOM BENFORD I purchased a fathom green 69 big-block tri-power T-top coupe with only 42,000 original miles on it recently. I'm the third owner of the car, and I got it for a very good
TOYOTA SIENNA TRAILER WIRE HARNESS Preparation
 Preparation Part Number: PT791-08150 (non-se) PT791-08102 (SE only) Kit Contents Item # Quantity Reqd. Description 1 1 Trailer Module Harness 2 1 4-Flat Harness 3 1 Battery Power Wire Harness 4 1 Mounting
INSTALLATION INSTRUCTIONS
 Rear Vision System Tailgate Handle Camera Mirror Display 2004-2014 Ford F-150 and 2008-2015 Ford Super Duty (Kit part numbers 9002-9521) Kit Contents: Mirror Tailgate Handle with camera and harness Interior
GN-3A Polaris General SSV Works 3 Speaker Audio Kit
 GN-3A Polaris General SSV Works 3 Speaker Audio Kit pg 2 Disassembly, Wire and Amplifier Plate Installation pg 9 Glovebox Subwoofer Installation pg 17 Kick Panel Speakers Installation pg 21 MRB3 and Dash
The Go Baby Go Build Manual
 The Go Baby Go Build Manual The step-by-step guide to creating your own Go Baby Go Car 4488 Shockwave Robotics and Pacific University Index 1. List of Mat erials 2. Mechanical Assembly a. Installing the
INSTALLATION INSTRUCTIONS
 2015 Tahoe/Suburban/Yukon Qi Wireless Charging Kit (Kit # FDMC-1273) Please read thoroughly before starting installation and check that kit contents are complete. Items Included in the Kit: Qi Wireless
SALEEN SPEEDLAB BOOST AND WATER TEMPERATURE GAUGE POD KIT
 = SALEEN SPEEDLAB BOOST AND WATER TEMPERATURE GAUGE POD KIT INSTALLATION MANUAL: 2005-09 Mustang 4.6L 3V P/N: 10-8002-C12000B KIT P/N: 10-2903-B11511* Saleen Performance, Inc. 1225 East Maple Rd. Troy,
Jeep JK 6 Switch Panel
 921709590 2007-17 Jeep JK 6 Switch Panel Thank you for choosing Rough Country for all your lighting needs. Please read instructions before beginning installation. Check the kit hardware against the kit
OEM Lip Mount Camera with Harness and OnStar Mirror for GM Vehicles with 16-pin Mirror Connector (Kit part number )
") OEM Lip Mount Camera with Harness and OnStar Mirror for GM Vehicles with 16-pin Mirror Connector (Kit part number 9002-8722) Please read thoroughly before starting installation and check that kit contents
OEM Lip Mount Camera with Harness and OnStar Mirror for GM Vehicles with 16-pin Mirror Connector (Kit part number 9002-8722) Please read thoroughly before starting installation and check that kit contents
Accessory Kit Estimated Fitting Time: 120 Minutes
 Landcruiser LC00 Tow-Pro Wiring Kit - Landcruiser LC00 Kit Part No: TPWKIT - 005 Accessory Kit Estimated Fitting Time: 0 Minutes FI88 Page 0 of Issue: Date: 7/09/07 07 General Notes Safety Notes Parts
 Special Tools Needed: DrVanos.com Stage I Installation Instructions Camshaft locking tool TDC Crank pin Sprocket turning tool Tool rental is available with the purchase of a vanos kit *See website for
Installation Instructions - ECS Tuning Vent Pod Vacuum/Boost Gauge Kit
 Installation Instructions - ECS Tuning Vent Pod Vacuum/Boost Gauge Kit This tutorial is provided as a courtesy by ECS Tuning. Part Number (also available as steering wheel mounted kit ES2593248) for VW
Audi A4 B8 Concert Stereo Removal
 Audi A4 B8 Concert Stereo Removal I decided to put these pages together to show how to remove the Concert / Symphony stereo units from B8 model A4's as there is little information available on the internet
Ford Racing BOSS 302 Engine Oil Cooler (11-14 GT)
") Tools needed: 14mm hex socket 7mm socket/wrench 8mm socket/wrench Ford Racing BOSS 302 Engine Oil Cooler (11-14 GT) 10mm socket (for airbox removal) ¾ inch or 19mm wrench Torque wrench Appropriate ratchets
Tools needed: 14mm hex socket 7mm socket/wrench 8mm socket/wrench Ford Racing BOSS 302 Engine Oil Cooler (11-14 GT) 10mm socket (for airbox removal) ¾ inch or 19mm wrench Torque wrench Appropriate ratchets
Last Revision: 30JN THRU 1979 C3 CORVETTE STANDARD (NON-ADJUSTABLE) STEERING COLUMN DISASSEMBLY & REPAIR INSTRUCTIONS PAPER #2
 STEERING COLUMN DISASSEMBLY & REPAIR INSTRUCTIONS PAPER #2") Last Revision: 30JN2007 1969 THRU 1979 C3 CORVETTE STANDARD (NON-ADJUSTABLE) STEERING COLUMN DISASSEMBLY & REPAIR INSTRUCTIONS PAPER #2 Disassembly and Repair Instructions Addressed in this Paper Degree
Last Revision: 30JN2007 1969 THRU 1979 C3 CORVETTE STANDARD (NON-ADJUSTABLE) STEERING COLUMN DISASSEMBLY & REPAIR INSTRUCTIONS PAPER #2 Disassembly and Repair Instructions Addressed in this Paper Degree