MAX FLOW FUEL KIT KIA FORTE SX HYUNDAI VELOSTER TURBO INSTALLATION INSTRUCTIONS
|
|
|
- Dale White
- 5 years ago
- Views:
Transcription
 Various size flat head screwdrivers 5/8 wrench / 11/16 wrench SAE Quick Disconnect Fuel Line Removal Tool (not pictured) ***WARNING*** 6 th Element")
1 MAX FLOW FUEL KIT KIA FORTE SX HYUNDAI VELOSTER TURBO INSTALLATION INSTRUCTIONS Installation: Tools needed: 1/4 or 3/8 drive ratchet Different length extensions 8mm socket / 10mm socket / 12mm socket Needle nose pliers (small and large) Various size flat head screwdrivers 5/8 wrench / 11/16 wrench SAE Quick Disconnect Fuel Line Removal Tool (not pictured) ***WARNING*** 6 th Element Engineering recommends this fuel line be installed by a seasoned mechanic or professional automotive garage with relevant experience or auto dealership. Dealing with fuel can be dangerous, especially if a leak occurs when the car is driving. If you happen to smell any fuel while driving or the engine sputters and you see smoke, cut the power immediately and navigate the vehicle to a safe place. Installing the included fittings properly will result in a leak free installation, and using items like ties and clamps to keep the line in place will make it more secure.


2 1. Remove the fuel pump fuse from the fuse box. This fuse is labeled on the inside of the engine bay fuse box cover. After it is removed, start the engine and let it idle until stalling. This removes the majority of the fuel from the lines. 2. Raise the front of the car and the back of the car as high as possible by using either ramps or a jack with jack stands. Consult your vehicle instruction manual on safe jack locations. 3. Remove the positive terminal from the battery using a 10mm socket.


3 4. Remove the battery tie-down bracket using a 12mm socket. 5. Remove the battery from the car and then remove the positive terminal wires from the battery tray. 10mm socket for the bolt and use a small flathead to pop out the wire tabs.


4 6. Unplug the ECU and remove the ECU from the car. Pull up on the plastic handles to disconnect and use 10mm socket for the bolts. 7. Remove the battery tray. There are 4 bolts. Use the 12mm socket.


5 8. Remove the engine cover by pulling upward to pop it off the tabs. Then take out your current intake system. 9. Using a small flat head screwdriver, remove the plastic clip cover to the High Pressure Fuel Pump Line.


6 10. Get some rags and get them under the stock fuel line as shown below. Using a small pair of pliers or the Quick Disconnect removal tool, push the plastic retaining clip towards the driver side to disconnect the fuel line. Be aware some gas will come out of this line. Be prepared to soak it up with rags.


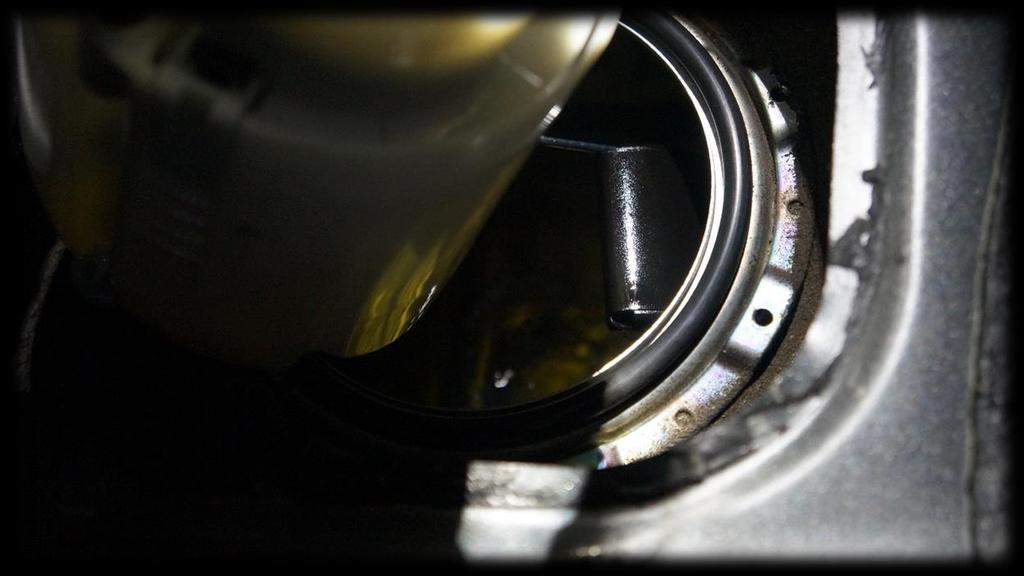
7 11. Below is the inlet of the High Pressure Fuel Pump. We are going to install one of the SAE Female Fittings from your kit. Threaded cap goes in this section, see next step. Lube end with assembly lube or fresh oil. Just a drop or two. 12. Unscrew the threaded cap from the fitting.

8 13. After removing the threaded cap, install it on the inlet of the High Pressure Fuel Pump as shown. Then slide the main fitting on to the pump and screw the two pieces together, 14. Finished install with look like this after you tighten the cap and fitting together.


9 15. Remove the Fuel line cover tray from the bottom of the body of the car. There are 6 or 7 nuts holding on to the car. Use the 10mm socket. 16. Next, remove the lower rear seat. Kia Forte is referenced. Veloster will be similar. Start by folding the rear seat forward and removing the bolt holding the lower rear seat. Use the shortest 12mm socket or wrench you have.


10 17. After the two bolts are removed, get in the back of the car and pull up on the rear seat. It should pop out.


11 18. After pulling the lower seat out, look for the Fuel Pump access plate. You ll see some wiring going through it as shown below. You ll need something sharp to break the gasket sticking it to the body. We used a thin flathead driver.


12 19. Once the sticky rubber gasket is a little loose, pry it upward. 20. You should see something like this below.

13 21. Remove the fuel line from the tank. Pry the sides of the orange clip outwards, then up to remove the orange clip. Then insert some rags under the line as shown. 22. To remove the line, slowly pull towards the passenger side. Be warned, some gas will come out. Be ready to clean with rags.


14 23. Now that the line is disconnected at both ends, remove it from its many mounting clips attaching it to the car. There are two under the body just in front of the tank. You can reach them through the hole you have been working in. Clips are under the sheet metal here. Have fun! 24. Follow the line out the driver side and down in front of the tank. The line is the innermost line towards the middle of the car.


15 25. Going along the line as you work your way to the front of the car, remove it from the clips holding to the car. You ll come to this small plastic cover that will be removed by popping it off its tabs. 26. Next, go back into the engine bay and unclip the brackets holding the stock fuel line to the engine.


16 27. There is another line that pairs with the stock fuel line. This will be removed but put back later. Using the pliers, disconnect this line as shown. 28. After the clips for the lines in the bay have been removed and lines disconnected you should have something like this.


17 29. The last thing stopping you is this bracket holding the two lines to the firewall. Use the 10mm socket to remove the single bolt. It is a real pain to get but manageable. 30. Once this bracket is gone, you can pull the lines out. Watch out for gas!


18 31. Here are the two lines removed together. Once you separate the OEM Fuel line from the other, go ahead and re-run the 2 nd line back so you don t have to mess with it later. 32. Using the same procedure on the fuel pump, install the female SAE fitting on to the tank outlet.


19 33. Starting with the 180 degree end on your new line, snake it up over the fuel tank from the bottom of the car. 34. Now it s time to remove the low pressure fuel pump assembly. Start by removing the 8 bolts holding it to the tank with the 8mm socket or Philips screwdriver


20 35. Grab the plastic and slowly pull upwards. See the next 3 pictures. Be careful of the Fuel Level buoy and lever (3 rd pic).
21


22 36. Stand the pump assembly up as shown. We have to dis-assemble it. 37. Push the top portion down. You will see a small C-Clip attached to the rod shown. Remove that C-Clip with pliers.


23 38. Before you slide the top portion away from the bottom part, unplug the pump wiring from the top piece. 39. Looking inside the bottom part, you will see a black plastic hose that needs to be undone to separate the bottom and top parts of the assembly. You ll need a long skinny screwdriver to get these tabs.


24 40. Now you can slide the top part up and off the bottom part as shown. 41. There are 3 clips that hold the pump portion in the bottom part. Pry those up to remove as shown in the next two pictures.


25 42. Turn the filter housing upside down on a flat surface as shown. Now we pop off the fuel filter sock. There are a couple tabs for this.


26 43. Now you can slide the OEM pump out of the housing. It might need some pressure from the other side. 44. Take this o-ring off the stock pump and replace it with the 2 new o-rings in your kit,


27 45. Put the new pump in just like you removed the old one. Make sure you can easily install the electrical plug! 46. Now, put everything back together. Then it s time to finish installing the Fuel Line! 47. Find that 180 degree fitting and screw it on to the SAE fitting. This is where you use the 11/16 and 5/8 wrenches. You don t have to turn too tight now, as the AN fittings will seal fairly easily.


28 48. Work your way to the front of the car, keeping the line hugged up against the body. You can even squeeze it into some of the body clips. See next 3 pictures.


29 49. Snake the 90 degree end up into the bay and attach it to the SAE fitting at the pump. There should be a little slack at this end of the line. You can arc it through the bay. Make sure to get this end tight and secure. Once you have reached this step, use the supplied zip ties to secure the line. Use more if you want to! The more the better!
30 50. Get your rags ready at the line connections. Plug your electrical connectors back up and put fuses and the battery back in. It s time to check for leaks. 51. First we must prime the fuel line. Do this by pressing the Engine Start button twice to get to the ACC display on the button. You will hear the electronics fire up and a humming sound. This is the priming of the fuel system. After you hear this noise, wait a few seconds until it stops, then press the button again to turn it all off. Repeat this process 5 times, then start the car. 52. Once the car starts, it may run fine or it may stumble and hesitate for about a minute. Check for leaks if running fine, or if it s stumbling, wait about 10 seconds and turn the engine off. Start it again and it should idle smoothly. This should only take 2 or 3 times to get a good idle. While this is going on, check for leaks. If you don t see any leaks, you can re-install all of your parts. 53. If you have an OBD-II reader, check for any pending codes that might come up. This is normal when getting fuel through an empty line. Clear those codes once you re up and running and you re good to go! Enjoy your new fuel line that won t give you any hesitation issues like stock! Legal Disclaimer: 6 th Element Engineering, LLC makes no warranties whatsoever, expressed or implied, oral or written to any purchasers, except the limited warranty described on our website. 6 th Element Engineering, LLC is hereby specifically excluded from any implied warranty of incidental, secondary, or consequential damages of any kind whatsoever. All purchasers and users of products manufactured by 6 th Element Engineering, LLC agree to hold harmless and indemnify 6 th Element Engineering, LLC from any and all claims arising from their use. Failure to receive notice of any limitations or the limitations contained in this disclaimer shall not serve to extend liability to 6 th Element Engineering, LLC for any claims arising out of use of its products.
KIA FORTE SHORT RAM 1.6T INTAKE INSTALLATION INSTRUCTIONS
 Installation: KIA FORTE SHORT RAM 1.6T INTAKE INSTALLATION INSTRUCTIONS Tools needed: 1/4 or 3/8 drive ratchet 12 extension (shorter ones work, but will be difficult to reach some bolts) 10mm socket (deep
HYUNDAI VELOSTER SHORT RAM 1.6T INTAKE INSTALLATION INSTRUCTIONS
 Installation: HYUNDAI VELOSTER SHORT RAM 1.6T INTAKE INSTALLATION INSTRUCTIONS Tools needed: 1/4 or 3/8 drive ratchet 12 extension (shorter ones work, but will be difficult to reach some bolts) 10mm socket
HYUNDAI VELOSTER COLD AIR 1.6T INTAKE
 HYUNDAI VELOSTER COLD AIR 1.6T INTAKE INSTALLATION INSTRUCTIONS Tools needed: 1/4 or 3/8 drive ratchet 12 extension (shorter ones work, but will be difficult to reach some bolts) 10mm socket (deep well)
08-18 STI Flex Fuel Bluetooth Mk2 Kit Install Instructions For Cobb Tuning Access Port
 For Cobb Tuning Access Port Delicious Tuning 1948 Don Lee Place Suite #7 Escondido, CA 92029 408-480-0995 Rough Draft BJP Rev: 2.0 Date: 2/1/17 FFBT parts: (1) Ethanol Content Analyzer Module (1) Ethanol
Installation Manual TWM Performance Kia Forte Short Shifter
 Installation Manual TWM Performance Kia Forte 2009+ Short Shifter Begin the installation by parking on a flat surface, as you will have to engage and disengage the hand brake and shift from gears to neutral.
These instructions were written for reference only and the use of a factory service manual is recommended.
 Introducing the CorkSport High Pressure Fuel Line designed for the MZR DISI. This fuel line is designed to replace the OEM fuel line which are prone to failure at the brazed connection at the rail. The
Installation Manual TWM Performance 2010 Mazda 3 short shifter 5 and 6 speed non-mazdaspeed
 Installation Manual TWM Performance 2010 Mazda 3 short shifter 5 and 6 speed non-mazdaspeed Begin the installation by parking on a flat surface, as you will have to engage and disengage the hand brake
GrimmSpeed Install Guide Series Installing the GrimmSpeed WRX Boost Control Solenoid Updated 4/14/15
 GrimmSpeed Install Guide Series Installing the GrimmSpeed 2015+ WRX Boost Control Solenoid Updated 4/14/15 Introduction: This guide will illustrate the installation of the GrimmSpeed 2015+ WRX Boost Control
IAG Street Series Air / Oil Separator (AOS) For 2017 WRX
 For 2017 WRX") P IAG Street Series Air / Oil Separator (AOS) For 2017 WRX Part# IAG-ENG-7152 Tools Required: Ratchet, torque wrench, extensions, needle nose pliers, hose cutter, snips/scissors, flathead screwdriver,
P IAG Street Series Air / Oil Separator (AOS) For 2017 WRX Part# IAG-ENG-7152 Tools Required: Ratchet, torque wrench, extensions, needle nose pliers, hose cutter, snips/scissors, flathead screwdriver,
Installation Guide for Rough Country 30 in. Chrome Series LED Light Bar w/ Hood Mounting Brackets
 Installation Guide for Rough Country 30 in. Chrome Series LED Light Bar w/ Hood Mounting Brackets Installation Time: 1 Hour Tools Required Trim removal tool (plastic or wood to prevent scratches on the
Depress each tab as you pull the bezel off. The bezels are tight. L.H. shown.
 2013-2014 Ford Mustang V6 & Boss 302 Lower Valance Fog Light Kit Parts List: Quantity: Tool List: Fog light & bulb with bracket 2 Flat head & Phillips screwdriver Black bezels 2 Ratchet & Socket set OR
Installation Manual TWM Performance Short Shifter Subaru STi 2008+
 - 1 - Installation Manual TWM Performance Short Shifter Subaru STi 2008+ Please Note: It is preferable to park on a flat surface, as you will have to engage and disengage the hand brake and shift from
List of parts needed below. Tools needed
 1 BMW 645 Coolant leak repair (Cap with Seal Repair and Expanding Coolant Pipe Installation w Pics) By Michael R. Brown (Estimated time to complete the job is 6-8 hrs) List of parts needed below. BMW PART
Thank you for purchasing the Dezod Motorsports Return Fuel System for your Scion tc.
 Thank you for purchasing the Dezod Motorsports Return Fuel System for your Scion tc. We took much pride in putting together a fuel system that would deliver a maximum amount of fuel as simply as possible
Installation Instructions for Chevrolet Colorado, GMC Canyon, LT, Z71, With Factory Fog Lights
 Installation Instructions for 2015-2018 Chevrolet Colorado, GMC Canyon, LT, Z71, With Factory Fog Lights This kit is designed to allow use of your factory fog light operation along with an addition auxiliary
Ford Mustang V6 OEM-Style Fog Light Kit Parts List: Quantity: Tool List:
 2015-2017 Ford Mustang V6 OEM-Style Fog Light Kit Parts List: Quantity: Tool List: LED Foglights/ Bezels 2 Flat head & Phillips screwdriver (if you ordered part#3600) Ratchet & Socket set OR Wiring harness
COBB Tuning MAZDASPEED6 SF Intake System. Install Instructions
 781500 COBB Tuning MAZDASPEED6 SF Intake System Install Instructions Congratulations on your purchase of the COBB Tuning SF Intake System. The following instructions will assist you through your installation
Slingshot Rotrex Supercharger Kit
 Slingshot Rotrex Supercharger Kit This supercharger kit improves on the Slingshot by forcing more dense air into the engine and creating more power. Installation time of the supercharger depends on you
Tools needed: Here is a pic of the shift kit I used. It is a Transgo brand and as you can see, it just a bag full of springs and one valve.
 Before installing a shift kit, be sure the transmission is in good operating order. If your transmission is making noises, slipping, shifting bad or the fluid looks brown or smells burnt, take the transmission
IAG Competition Series Air / Oil Separator (AOS) For WRX
 For WRX") P IAG Competition Series Air / Oil Separator (AOS) For 2015-16 WRX Part# IAG-ENG-7252 Tools Required: Ratchet, torque wrench, extensions, needle nose pliers, hose cutter, snips/scissors, flat head screw
P IAG Competition Series Air / Oil Separator (AOS) For 2015-16 WRX Part# IAG-ENG-7252 Tools Required: Ratchet, torque wrench, extensions, needle nose pliers, hose cutter, snips/scissors, flat head screw
OIL COOLER KIT CHEVY CAMARO 2.0T PARTS LIST AND INSTALLATION GUIDE INSTALL DIFFICULTY DISCLAIMER CAUTION TOOLS NEEDED NOTE INSTALL PROCEDURE
 PARTS LIST AND PARTS INCLUDED 3PC APPLICATION-SPECIFIC MOUNTING BRACKETS 1PC HORN RELOCATION MOUNTING BRACKET 1PC 25-ROW OIL COOLER (SLEEK SILVER OR STEALTH BLACK) 1PC 4'4" STAINLESS STEEL BRAIDED HOSE
CorkSport Mazdaspeed 3 ECU Relocation Box Mazdaspeed 3
 CorkSport Mazdaspeed 3 ECU Relocation Box 2007-2013 Mazdaspeed 3 Thank you for purchasing the CorkSport ECU Relocation Battery Box for the Mazdaspeed 3. With the install of this battery box, you now have
2016+ NISSAN TITAN XD
 PARTS LIST AND PARTS INCLUDED 1PC MISHIMOTO INTERCOOLER 2PC SILICONE BOOTS WITH DURACORE TECHNOLOGY 4PC CONSTANT-TENSION T-BOLT CLAMPS 2PC ALUMINUM SPACERS MOUNTING HARDWARE CAUTION Never work on the cooling
IAG Street Series Air / Oil Separator (AOS) For WRX
 For WRX") P IAG Street Series Air / Oil Separator (AOS) For 2015-16 WRX Part# IAG-ENG-7152 Tools Required: Ratchet, torque wrench, extensions, needle nose pliers, hose cutter, snips/scissors, flat head screw driver,
P IAG Street Series Air / Oil Separator (AOS) For 2015-16 WRX Part# IAG-ENG-7152 Tools Required: Ratchet, torque wrench, extensions, needle nose pliers, hose cutter, snips/scissors, flat head screw driver,
Stand Alone Fog Lights Installation Instructions
 Tools Required: 1. Trim Removal tool or protected flat screwdriver 2. #2 Phillips Screwdriver 3. 10mm socket 4. 10mm wrench 5. 8mm or 5/16 socket 6. Adjustable Pliers 7. Electrical Tape WARNING!!! Disconnect
Tooling List 10mmSocket 12mm Socket 17mm Wrench 17mm Socket 3/8 Drive Ratchet 12 Extension Needle Nose Pliers Torque Wrench
 Thank you for purchasing the CORKSPORT Mazdaspeed 3/ Mazda 3 Transmission Mount. Designed as an improved OEM replacement, the CorkSport Mazdaspeed 3 Transmission Mount maintains OEM fitment while greatly
Instant Chat off the main page of Or simply call our tech team at
 Adjustable Fuel Pressure Regulator Kit for 2008+STI 2018-10-03 PSP-FUL-301 Thank you for purchasing this PERRIN product for your car! Installation of this product should only be performed by persons experienced
Installation Manual TWM Performance Short Shifter Cobalt SS/SC, SS/TC, HHR SS, Ion Redline and Saab 9-3
 Page 1 Installation Manual TWM Performance Short Shifter Cobalt SS/SC, SS/TC, HHR SS, Ion Redline and Saab 9-3 Please Note: It is preferable to park on a flat surface, as you will have to engage and disengage
Flex Fuel Bluetooth Kit WRX install instructions
 Delicious Tuning 1948 Don Lee Place Suite #7 Escondido, CA 92029 408-480-0995 BJP Rev: 1.0 Date: 10/1/15 FFBT parts: (1) Ethanol Content Analyzer Module (1) Ethanol Content Analyzer Sensor (1) Sensor Bracket
Procharger Stage II Intercooled Supercharger System (11-14 GT)
") Procharger Stage II Intercooled Supercharger System (11-14 GT) Installation Time: Approximately one day. Installed on 2012 Mustang GT 5.0/Manual Required Tools 3/8 Socket Set (Standard and Metric) 1/2
Procharger Stage II Intercooled Supercharger System (11-14 GT) Installation Time: Approximately one day. Installed on 2012 Mustang GT 5.0/Manual Required Tools 3/8 Socket Set (Standard and Metric) 1/2
Installation Manual TWM Performance Short Shifter Nissan 350Z, 370Z Infiniti G35, G37
 Installation Manual TWM Performance Short Shifter Nissan 350Z, 370Z Infiniti G35, G37 It is preferable to park on a flat surface, as you will have to engage and disengage the hand brake and shift from
Raxiom Factory GPS Rear Back-up Camera Kit (07-17 Wrangler)
") Raxiom Factory GPS Rear Back-up Camera Kit (07-17 Wrangler) Installation Time: 2.5-3Hrs Tools Required: 7mm Socket & Driver 10mm Socket 10mm Open end wrench Knife / Razor blade Zip-ties Wire Cutters Needle
Raxiom Factory GPS Rear Back-up Camera Kit (07-17 Wrangler) Installation Time: 2.5-3Hrs Tools Required: 7mm Socket & Driver 10mm Socket 10mm Open end wrench Knife / Razor blade Zip-ties Wire Cutters Needle
Instructions for Front Midrange / Tweeter Installation in BMW 3 Series/M3 (E36)
") Disclaimer: Bavarian Soundwerks highly recommends professional installation of the products we sell. We provide these installation instructions free of charge as a guide to assist those customers who choose
Disclaimer: Bavarian Soundwerks highly recommends professional installation of the products we sell. We provide these installation instructions free of charge as a guide to assist those customers who choose
Thank you for purchasing the Craven Speed FlexPod Complete Gauge Pod Kit For R56, R58, R59, R60 with Refresh Engines (2011+)
") Thank you for purchasing the Craven Speed FlexPod Complete Gauge Pod Kit For R56, R58, R59, R60 with Refresh Engines (2011+) Before You Start Please read instructions completely before installing. These
Thank you for purchasing the Craven Speed FlexPod Complete Gauge Pod Kit For R56, R58, R59, R60 with Refresh Engines (2011+) Before You Start Please read instructions completely before installing. These
Ford Mustang GT-Style Fog Light Kit Parts List: Quantity: Tool List:
 2013-2014 Ford Mustang GT-Style Fog Light Kit Parts List: Quantity: Tool List: Fog light (Left& Right) 2 Flat head & Phillips screwdriver Upper grille with surround 1 Ratchet & Socket set OR Lower grille
2010+ VW Mk6 2.0T Vent Boost Gauge Kit INSTALLATION GUIDE
 INSTALLATION GUIDE 2010+ VW Mk6 2.0T Vent Boost Gauge Kit Congratulations on your purchase of the AWE Tuning Vent Boost Gauge Kit for the 2010+ VW Mk6 2.0T. Exquisite build quality with industry leading
Industrial Injections Compound Turbo Installation For 6.7L Scorpion
 Industrial Injections Compound Turbo Installation For 6.7L Scorpion Step 1: Whenever you are doing an installation the first thing you should do is unhook the batteries to avoid arcing. You will need an
Toggle Button Kit. Installation Instructions
 Toggle Button Kit Installation Instructions Thank you for choosing the Double Apex Toggle Button kit. If you have any questions about the installation please do not hesitate to email us at support@doubleapex.co.
2016+ Mazda Miata Front & Rear Sway Bar Installation Instructions
 Page1 James Barone Racing Aftermarket Parts and Accessories 2016+ Mazda Miata Front & Rear Sway Bar Installation Instructions Tools Required: Jack Lift or ramps Ratchet wrench Torque Wrench 6 and 12 Extension
Trail Rocker Installation Instructions
 Trail Rocker Installation Instructions Manual #90581 For Installing Painless Part Numbers: 57002 Painless Performance Products recommends you, the installer, read this installation manual from front to
INSTALLATION INSTRUCTIONS PART NUMBER: C/P
 Equipped with AEM Dryflow Filter No Oil Required! INSTALLATION INSTRUCTIONS PART NUMBER: 21-725C/P 2011-2016 SCION TC L4-2.5L LEGAL IN CALIFORNIA ONLY FOR RACING VEHICLES WHICH MAY NEVER BE USED, REGISTERED
2014 & up MAZDA 3, 6 and CX5 2.0 & 2.5L Oil Catch Can Installation Instructions
 Page1 James Barone Racing Aftermarket Parts and Accessories 2014 & up MAZDA 3, 6 and CX5 2.0 & 2.5L Oil Catch Can Installation Instructions Tooling: Jack Jack stands or ramps Ratchet wrench 3 extension
Parts List See cover Page
 Thank you for purchasing the CorkSport Front Mount Intercooler Kit for the 2010-2013 Mazdaspeed 3. Keep your BAT s under check with the CorkSport FMIC Kit with the small or large intercooler. Please let
Trail Rocker Installation Instructions
 Trail Rocker Installation Instructions Manual #90580 For Installing Painless Part Numbers: 57000 and 57001 Painless Performance Products recommends you, the installer, read this installation manual from
Installation Manual TWM Performance Short Shift Kit Stage 1 and Stage 2 MazdaSpeed 6
 Page 1 Installation Manual TWM Performance Short Shift Kit Stage 1 and Stage 2 MazdaSpeed 6 Please Note: It is preferable to park on a flat surface, as you will have to engage and disengage the hand brake
JRSC + BBK Install on SVTF. Neil A. Shah medicnas on focaljet September 2006
 JRSC + BBK Install on SVTF Neil A. Shah medicnas on focaljet September 2006 ECU up here. When removing make sure the smaller bundles of wires don t get wrapped around the bottom edge and break - this almost
IAG Competition Series Air / Oil Separator (AOS) For 2017 STI
 For 2017 STI") P IAG Competition Series Air / Oil Separator (AOS) For 2017 STI Part# IAG-ENG-7251 Tools Required: Ratchet, torque wrench, extensions, needle nose pliers, hose cutter, snips/scissors, flat head screw driver,
P IAG Competition Series Air / Oil Separator (AOS) For 2017 STI Part# IAG-ENG-7251 Tools Required: Ratchet, torque wrench, extensions, needle nose pliers, hose cutter, snips/scissors, flat head screw driver,
Performance Air Intake, 2015+
 PARTS LIST AND PARTS LIST 1PC ALUMINUM INTAKE PIPE 1PC HIGH-FLOW, OILED AIR FILTER 1PC SILICONE INDUCTION HOSE 1PC AIRBOX 1PC 1/16 RUBBER STRIPPING, 9 LENGTH 1PC 1/16 RUBBER STRIPPING, 8.5 LENGTH 1PC WORM-GEAR
Recommended tools: Estimated install time: Parts list:
 Congratulations on your purchase of the A.W.E. Tuning Center Vent Boost Gauge for your Audi A4/S4. While the install is fairly straight forward, please review these instructions carefully before attempting
BBK Electric Mustang Fuel Pump Kit - (86-97 V8) - Installation Instructions
 - Installation Instructions") BBK Electric Mustang Fuel Pump Kit - (86-97 V8) - Installation Instructions The below installation instructions work for the following products: BBK Electric Mustang Fuel Pump Kit - 190 LPH (86-97 V8)
BBK Electric Mustang Fuel Pump Kit - (86-97 V8) - Installation Instructions The below installation instructions work for the following products: BBK Electric Mustang Fuel Pump Kit - 190 LPH (86-97 V8)
Instant Chat off the main page of Or simply call our tech team at
 FRONT MOUNT INTERCOOLER 2015+ WRX 2017-07-07 Thank you for purchasing this PERRIN product for your car! Installation of this product should only be performed by persons experienced with installation of
Nissan GTR Alpha Fuel System
 Nissan GTR Alpha Fuel System Instructions V5 The goal of AMS is to provide the highest quality, best performing products available. By utilizing research and development, and rigorous testing programs
INSTALLATION INSTRUCTIONS PART NUMBER: AUDI A4 L4-2.0L C.A.R.B. E.O. # D-670-2
 Equipped with AEM Dryflow Filter No Oil Required! INSTALLATION INSTRUCTIONS PART NUMBER: 21-681 2005.5-2008 AUDI A4 L4-2.0L C.A.R.B. E.O. # D-670-2 * NOTE: Legal in California only for racing vehicles
INSTALLATION INSTRUCTIONS BILLET FUEL RAIL KIT
 INSTALLATION INSTRUCTIONS BILLET FUEL RAIL KIT MITSUBISHI LANCER EVOLUTION X Document# 19-0067 Support: info@radiumauto.com WARNING: DON'T SMOKE OR WORK WITH OPEN SPARKS WHILE WORKING ON THE FUEL SYSTEM
INSTALLATION INSTRUCTIONS
 Equipped with AEM Dryflow Filter No Oil Required! INSTALLATION INSTRUCTIONS PART NUMBER 21-818C (GUN METAL GRAY FINISH) 2017 Nissan Sentra SR Turbo 1.6T 1 ITEM NO. PART NUMBER DESCRIPTION QTY. 1 21-2157DK
7C1550 COBB Tuning R35 GT-R Silicone Hose Kit Install Instructions
 7C1550 COBB Tuning R35 GT-R Silicone Hose Kit Install Instructions Nissan GT-R (R35) Silicone Hose Kit Congratulations on your purchase of the COBB GT-R Silicone Hose Kit for your Nissan GT-R. The following
INSTALLATION INSTRUCTIONS
 INSTALLATION INSTRUCTIONS FUEL SURGE TANK INSTALLATION KIT 1999-2006 BMW E46 COUPE Document# 19-0056 Support: info@radiumauto.com Note: This kit was designed for a standard single pump Radium Engineering
8 Zip Tie Zip Tie 1 Union Fitting 1 ½ ½ Union Reducer Fitting Union 1 5/8 ½ (For Plastic Intake Manifold Vehicles)
") P IAG Street Series Air / Oil Separator (AOS) For 2017 STI Part# IAG-ENG-7151 Tools Required: Ratchet, torque wrench, extensions, needle nose pliers, hose cutter, snips/scissors, flat head screw driver,
P IAG Street Series Air / Oil Separator (AOS) For 2017 STI Part# IAG-ENG-7151 Tools Required: Ratchet, torque wrench, extensions, needle nose pliers, hose cutter, snips/scissors, flat head screw driver,
OIL COOLER KIT INSTALLATION INSTRUCTIONS PART NUMBER D E92 335is (N54 engine) with BMW M-Technic bumper and with stock oil cooler
 with BMW M-Technic bumper and with stock oil cooler") OIL COOLER KIT INSTALLATION INSTRUCTIONS PART NUMBER D570-0923 APPLICATION: 2011 E92 335is (N54 engine) with BMW M-Technic bumper and with stock oil cooler Congratulations for being selective enough to
OIL COOLER KIT INSTALLATION INSTRUCTIONS PART NUMBER D570-0923 APPLICATION: 2011 E92 335is (N54 engine) with BMW M-Technic bumper and with stock oil cooler Congratulations for being selective enough to
TJ/LJ Metal Cloak Front Fender Flare Install Instructions Rev. A Page 1 of 16
 TJ/LJ Metal Cloak Front Fender Flare Install Rev. A Page 1 of 16 READ FITTING INSTRUCTIONS IN FULL BEFORE INSTALLATION This article is sold without warranty expressed or implied. No warranty or representation
Installation Manual TWM Performance Full replacement short shifter assembly Civic all trims and models
 Installation Manual TWM Performance Full replacement short shifter assembly 2006+ Civic all trims and models Begin the installation by parking on a flat surface, as you will have to engage and disengage
GrimmSpeed Install Guide Series Installing the GrimmSpeed WRX Charge Pipe Updated 11/21/15
 GrimmSpeed Install Guide Series Installing the GrimmSpeed 2015+ WRX Charge Pipe Updated 11/21/15 Introduction: This guide will illustrate the installation of the GrimmSpeed 2015+ WRX Charge Pipe. The difficulty
Replacement Front Outer Tie Rod End (85-93 All)
") Replacement Front Outer Tie Rod End (85-93 All) Materials in the box: One outer tie rod end, castle nut, cotter pin, nut, and grease fitting. Tools Needed: Jack and Jack Stands Pry bar (you may or may
Replacement Front Outer Tie Rod End (85-93 All) Materials in the box: One outer tie rod end, castle nut, cotter pin, nut, and grease fitting. Tools Needed: Jack and Jack Stands Pry bar (you may or may
Remove black panel shown. Save 6 retaining pins for re-install later. Pry up on center part of pin first. Then pry out entire retaining pin.
 2005-2009 Ford Mustang V6 Fog Light Wiring Kit Parts List: Quantity: Tools Required: Wiring harness 1 Flat head screwdriver Supplemental wire leads 2 Ratchet & Socket set OR Wire tap red 2 Adjustable Wrench
Perfect Park 7000 Installation & Unloading Instructions Operating Manual
 Perfect Park 7000 Installation & Unloading Instructions Operating Manual 1) Always file a claim with the truck line if the lift has been damaged! (If you don t originally notice the damage, but find some
EURO HEADLIGHT ADJUSTER REMOVAL AND INSTALLATION
 EURO HEADLIGHT ADJUSTER REMOVAL AND INSTALLATION This document is a step by step explanation of how to remove and replace the headlight adjusters in the Euro headlights. Parts needed to repair both headlights:
2015+ WRX/STI RADIATOR SHROUD
 2015+ WRX/STI RADIATOR SHROUD Thank you for purchasing this PERRIN product for your car! Installation of this product should only be performed by persons experienced with installation of aftermarket performance
INSTALLATION INSTRUCTIONS
 INSTALLATION INSTRUCTIONS FUEL SURGE TANK INSTALLATION KIT 1999-2006 BMW E46 COUPE Document# 19-0056 Support: info@radiumauto.com Note: This kit wasn t designed for a FST-R, but can be accomplished. 1.
Headlight Removal & Installation: VW Jetta Mk.4 / Bora
 Headlight Removal & Installation: 99-04 VW Jetta Mk.4 / Bora Disclaimer: Buyer assumes any and all risk and liability from the installation and use of this product. Seller, author, or any of their affiliates
INSTALLATION INSTRUCTIONS
 INSTALLATION INSTRUCTIONS FUEL PUMP HANGER FORD MUSTANG: 2011+ S197 AND S550 Support: info@radiumauto.com Document# 19-0161 WARNING: DO NOT EXPOSE WORK AREA TO ANY SPARKS OR FIRE. DO NOT SMOKE WHILE WORKING
Integrated Engineering Audi RS3 8V & TTRS 8S Cold Air Intake Install Guide IEINCQ1
 Integrated Engineering Audi RS3 8V & TTRS 8S Cold Air Intake Install Guide IEINCQ1 Thank you for purchasing another high quality Integrated Engineering product! This instruction guide is used for installation
Performance Inlet Manifold
 Performance Inlet Manifold Tools needed (some tools not required on some models): 13mm Combination Wrench Flat Blade Screwdriver T30 Torx Driver T25 Torx Driver 10mm Combination Wrench and/or Socket with
OMIX-ADA EXHAUST MANIFOLD
 OMIX-ADA EXHAUST MANIFOLD Installation Time: 240 Minutes Tools Required: 3/8 ratchet 3/8 3 extension 10 mm socket 13mm socket 9/16 socket Flashlight 9/16 box end wrench Pocket screw driver Can of brake
1999 Corolla Valve Cover Gasket Replacement
 1999 Corolla Valve Cover Gasket Replacement While checking the spark plugs on my 1999 Corolla, I found the each plug sitting in a pool of oil. Oil on the spark plugs usually is indicative of major engine
FULL LENGTH HEADERS/ CATTED HEAD PIPES
 INSTALLATION INSTRUCTIONS INS232 2016-2018 CAMARO 6.2L V8 FULL LENGTH HEADERS/ CATTED HEAD PIPES Part #4044 and 40440 Special Tools required: 10mm, 12mm, 13mm, 15mm Socket and Wrenches, Pliers, Saw, Welder
COBB Fuel Pressure Regulator Kit
 315100 COBB Fuel Pressure Regulator Kit 2008+ Subaru STI Congratulations on your purchase of the COBB Tuning Fuel Pressure Regulator Kit for your 2008+ Subaru STI. The following instructions will assist
INSTALLATION INSTRUCTIONS
 INSTALLATION INSTRUCTIONS FUEL PUMP HANGER MITSUBISHI LANCER EVOLUTION X Support: info@radiumauto.com Document# 19-0116 WARNING: DO NOT EXPOSE WORK AREA TO ANY SPARKS OR FIRE. DO NOT SMOKE WHILE WORKING
Subaru WRX Performance Charge-Pipe System, 2015+
 PARTS LIST AND PARTS LIST 1PC BAR-AND-PLATE INTERCOOLER 1PC INTERCOOLER MOUNTING BRACKET 1PC CHARGE-PIPE ASSEMBLY 1PC AIR DIVERTER WITH ATTACHED RUBBER GASKETS 1PC CHARGE-PIPE-TO-INTERCOOLER HOSE INSTALLATION
WRX/STI Engine Oil Cooler
 2002-14 WRX/STI Engine Oil Cooler 2014-04-21 Thank you for purchasing this PERRIN product for your car! Installation of this product should only be performed by persons experienced with installation of
IE Audi B9 S4, S5, A4, A5, Allroad FDS Intercooler Install Guide IETPCK1
 IE Audi B9 S4, S5, A4, A5, Allroad FDS Intercooler Install Guide IETPCK1 Thank you for purchasing the best performing intercooler on the market! This instruction guide is used for installation of IE s
b o o s t r e t a i n e r v a l v e
 b o o s t r e t a i n e r v a l v e i n s t a l l a t i o n i n s t r u c t i o n s For questions or tech support, CONTACT US! Email: greg@hiperformancestore.com sales@hpsimotorsports.com Sites: www.hiperformancestore-fiat.com
Toggle Button Kit. Installation Instructions MK5 / MK6 Golf, MK5 Jetta
 Toggle Button Kit Installation Instructions MK5 / MK6 Golf, MK5 Jetta Thank you for choosing the Double Apex Toggle Button kit. If you have any questions about the installation please do not hesitate to
Terms and conditions of use:
 Terms and conditions of use: Berk Technology or any of its affiliates will not be held liable for any and all of the costs involved with use, installation, removal, inconvenience, or any other such associated
Installation Manual TWM Performance Chevrolet Camaro 5 th Gen Short Shifter
 Installation Manual TWM Performance Chevrolet Camaro 5 th Gen Short Shifter Begin the installation by parking on a flat surface, place wooden blocks in front or behind the wheels to prevent the car from
#TL T EA888 GEN 3 FUELING SYSTEM/ INSTALLATION INSTRUCTIONS
 #TL100069 2.0T EA888 GEN 3 FUELING SYSTEM/ INSTALLATION INSTRUCTIONS Notes: These instructions were written for a North American specification MkVII GTI. Other models, like the Golf R, are similar. When
Installation Manual TWM Performance Toyota GT86 / Scion FRS / Subaru BRZ Direct Replacement Short Shifter
 Installation Manual TWM Performance Toyota GT86 / Scion FRS / Subaru BRZ Direct Replacement Short Shifter Begin the installation by parking on a flat surface, place wooden blocks in front or behind the
Connecting the rear fog light on the A4 Jetta, while keeping the 5 Light Mod
 Connecting the rear fog light on the A4 Jetta, while keeping the 5 Light Mod DISCLAIMER: I'm human and make mistakes. If you spot one in this how to, tell me and I'll fix it This was done on my 99.5 Jetta.
Part# JL AIR IT UP 4 Tire On Board Air Delivery System. (Requires External Air Source)
") Part# 18-1819 JL AIR IT UP 4 Tire On Board Air Delivery System (Requires External Air Source) The most up-to-date instructions always visit www.updownair.com www.updownair.com 833-226-4863 I M P O R T
Part# 18-1819 JL AIR IT UP 4 Tire On Board Air Delivery System (Requires External Air Source) The most up-to-date instructions always visit www.updownair.com www.updownair.com 833-226-4863 I M P O R T
Soft Top Rear Locking Cylinders
 Soft Top Rear Locking Cylinders Level of difficulty: Fairly easy very rewarding! Tools needed: - M10 socket and ratchet - Flat screwdriver or needle nose pliers or small hooked tool for removal of hydraulic
VW & Audi TDI CR140 ECO KIT Installation Guide
 VW & Audi TDI CR140 ECO KIT Installation Guide This guide is to help you install your new Rawtek DPF, EGR & Adblue Delete Exhaust ECO Kit on your (2009-2014) VW / Audi with 2.0l CR140 Diesel Engine. Note:
Thank you for purchasing the Craven Speed FlexPod Complete Gauge Pod Kit
 Thank you for purchasing the Craven Speed FlexPod Complete Gauge Pod Kit Before You Start Please read instructions completely before installing. These instructions contain the information required to install
IAG Street Series Air / Oil Separator (AOS) For WRX & WRX STI
 For WRX & WRX STI") IAG Street Series Air / Oil Separator (AOS) For 2006-07 WRX & 2004-07 WRX STI Part# IAG-ENG-7150 Tools Required: Ratchet, torque wrench, extensions, needle nose pliers, hose cutter, snips/scissors, flat
IAG Street Series Air / Oil Separator (AOS) For 2006-07 WRX & 2004-07 WRX STI Part# IAG-ENG-7150 Tools Required: Ratchet, torque wrench, extensions, needle nose pliers, hose cutter, snips/scissors, flat
Mercedes E63/CLS AMG Carbon Turbo Intake System Instructions
 Mercedes E63/CLS AMG Carbon Turbo Intake System Instructions The goal of Alpha Performance is to provide the highest quality, best performing products available. By utilizing research and development,
Installation Manual TWM Performance Short throw shifter 2001 and up Hyundai Accent
 Installation Manual TWM Performance Short throw shifter 2001 and up Hyundai Accent 1. Place the vehicle on a flat surface with blocks in front and behind the wheels preventing unwanted movement. The car
Turboback Exhaust
 501301 Turboback Exhaust 2014+ Ford Fiesta ST 501200 High Flow Catted Downpipe Page 2 501100 Catback Exhaust System Page 10 501200 High Flow Catted Downpipe 2014+ Ford Fiesta ST Congratulations on your
Flex Fuel Bluetooth Kit BRZ / FRS / GT86 install instructions
 Delicious Tuning 1250 Activity Dr. Ste A Vista, CA 92081 408-480-0995 Rev: 1.0 Date: 8/20/18 FFBT parts: (1) Ethanol Content Analyzer Module (1) Ethanol Content Analyzer Sensor (1) Sensor Bracket (1) Velcro
INSTALLATION INSTRUCTIONS
 INSTALLATION INSTRUCTIONS FST KIT FOR PORT INJECTION 2013+ FORD FOCUS ECOBOOST Document: 19-0168 Support: info@radiumauto.com Working under the vehicle is required. This installation is best performed
Mustang Headlight w/ CCFL Halo (05-09) - Installation Instructions
 - Installation Instructions") Mustang Headlight w/ CCFL Halo (05-09) - Installation Instructions The below installation instructions work for the following products: Chrome Mustang Headlight w/ CCFL Halo (05-09) Smoked Mustang Headlight
Mustang Headlight w/ CCFL Halo (05-09) - Installation Instructions The below installation instructions work for the following products: Chrome Mustang Headlight w/ CCFL Halo (05-09) Smoked Mustang Headlight
INSTALLATION INSTRUCTIONS
 Equipped with AEM Dryflow Filter No Oil Required! INSTALLATION INSTRUCTIONS PART NUMBER AEM-21-805C (GUN METAL GRAY FINISH) 2016.5-19 CHEVROLET CRUZE 1.4T 1 ITEM NO. PART NUMBER DESCRIPTION QTY. 1 21-2038DK