Conversion of the 1904 Mauser Vergueiro extractor for use in the Gew. 88 Commission Rifle. Joseph L. Woods
|
|
|
- Debra Caldwell
- 5 years ago
- Views:
Transcription

1 Conversion of the 1904 Mauser Vergueiro extractor for use in the Gew. 88 Commission Rifle by Joseph L. Woods
2 PLEASE DO NOT FAIL TO WEAR EYE PROTECTION WHILE COMPLETING THIS PROJECT! You only get one set of eyes, and even when using only hand tools you may be injured by flying bits of metal. As an avid collector of the Gew. 88 Rifle, and a student of it s design, I have found the lack of affordable extractors to be a problem. In my quest to keep my rifles up and running, I devised this method of converting the readily available 1904 Mauser Vergueiro extractor to function in the Gew. 88. To complete this project you will need: 1. A Mauser Vergueiro Extractor 2. A Gew. 88 Bolt Head (for measurement and fitting) 3. A Vice 4. A Hacksaw 5. A Set of Files 6. A Hammer 7. Various Grits of Sandpaper 2
3 Before Starting it is useful to notice the similarities and differences between the two extractors. There are three primary differences between the two extractors. 1. The head of the Mauser extractor has a protrusion not present on the Gew. 88 extractor. 2. The body of the Mauser extractor is longer than the body of the Gew. 88 extractor. 3. The head of the Mauser extractor is longer than the Gew. 88 extractor head. 3


4 1904 Mauser Vergueiro Commission Rifle / Gew Mauser Vergueiro Commission Rifle / Gew. 88 4

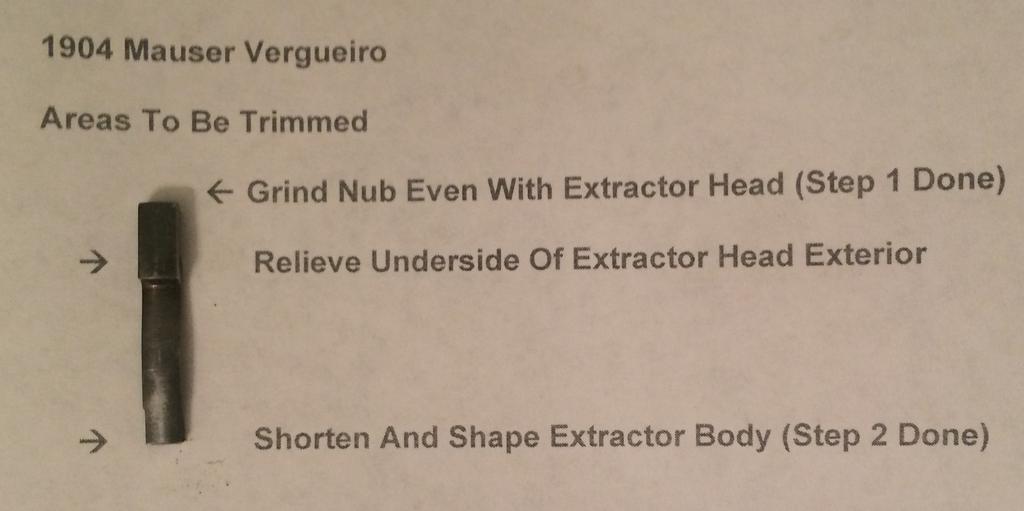
5 In order to make the Mauser extractor fit the Gew. 88 bolt head we will: Step 1. Remove the protrusion from the extractor head Step 2. Shorten the extractor body Step 3. Shorten the extractor head Step 4. Do some final finishing and trouble shoot extractor functioning. Step 1. To remove the protrusion from the Mauser extractor head you must: 1. Clamp the extractor in your vice. 2. Use your hacksaw to cut the protrusion off by guiding your hacksaw blade on the side of the extractor. 3. Dress the area where the protrusion was removed using a flat file. 5

6 Below is a picture of the Mauser Extractor being clamped in the vice, and the protrusion being removed. Once the protrusion is removed from the Mauser extractor and the extractor is dressed it looks like this. 6

7 Now we are ready to move on to Step 2. If the Mauser extractor is properly dressed it will now fit into the extractor groove of the Gew. 88 bolt head. When shortened correctly the Mauser extractor will be even at the top and bottom of the bolt head. Step 2: To shorten the extractor body on the Mauser extractor you must: 1. Fit the Mauser extractor into the extractor groove of the Gew. 88 bolt head 2. Mark the portion of the Mauser extractor body that protrudes below the bolt head for removal 3. Secure the extractor in the vice and cut halfway through the extractor body 4. (Optional) knock the unneeded portion or continue to saw the unneeded portion off of the Mauser extractor 5. Dress the cut off area with flat file 7

8 8


9 Now we are ready to move onto Step 3, shortening the Mauser extractor head. Step 3: To shorten the Mauser extractor head you must: 1. Place the Mauser extractor in the Gew. 88 extractor slot. 2. Mark the extra material protruding below the bolt head case head ring. 3. Place the Mauser extractor in a vice and using a combination or square, flat and round files shape the Mauser extractor to the contours of the Gew. 88 bolt head. *NOTE: It is very important to check the fit of the Mauser extractor against the Gew 88. Bolt head regularly and be EXTREMLEY careful not to remove too much material. Below are some comparison photos that show you the now modified Mauser extractor alongside an original Gew. 88 extractor. Converted Mauser Vergueiro Extractor & Original Gew. 88 Extractor 9

10 Converted Mauser Vergueiro Extractor & Original Gew. 88 Extractor Converted Mauser Vergueiro Extractor & Original Gew. 88 Extractor 10
11 Final Notes: The Gew. 88 extractor is a bearing surface. It makes contact with the bolt body while the bolt head rotates inside the bolt body when you cycle the weapon. For this reason you need to polish the outside of the extractor with progressively finer grades of sandpaper till you get a mirror polish. You might even polish with mothers or another abrasive paste if you want to get the finish just right. There are two other variances that your new made extractor will have over an original extractor. 1. The extractor head has a longer grasping groove that may result in the top of the extractor riding above the bolt head. I haven t experienced a problem due to this feature but if you want the replacement extractor to function as a factory original you can shim the top of the extractor groove with a piece of copper cut from a spent casing. 2. The extractor pocket may need to be slightly deepened on your newly made extractor depending on the original Mauser extractor you use. This is an easy fix with a narrow flat file. Do not deepen the extractor pocket until you have checked cycling. Deepening the extractor pocket generally isn t necessary. Please contact me at the below address if you have suggestions, find this publication useful, or just like to chat about the restoration of the Gew. 88 family of rifles. If you are looking for a Gew. 88 part send me an . I might just have what you need. I can be contacted at Joseph.Lee.Woods@outlook.com. This publication may be freely reproduced for noncommercial purposes. All other rights are reserved. 11
GruvenParts.com BRASS GM Power Folding Mirror Gear Replacement Instructions. Updated 8/25/2017 Additional Pictures / Tips Posted!
 Page 1 GruvenParts.com BRASS GM Power Folding Mirror Gear Replacement Instructions Updated 8/25/2017 Additional Pictures / Tips Posted! ** Latest Design is uses an ALL BRASS SPUR GEAR!!! ** ** If you don
Signature Series A/F/X Body GM Installation Instructions Power Disc Conversion
 Signature Series A/F/X Body GM Installation Instructions Power Disc Conversion 64-72 A Body / 67-69 F Body / 62-74 X Body Your new disc brake conversion kit can be bolted up with standard hand tools. The
Wiper Transmission Repair Charles Bernhardt
 Wiper Transmission Repair Charles Bernhardt When I purchased this '59 Corvette most of the parts were in boxes. The wiper transmissions were one of the first parts that I decided to look at to see if they
Pinewood Derby Building Basics
 Pinewood Derby Building Basics January 2016 edition (v1.1) Pack 242 - Phoenix, AZ Pinewood Derby Boys learn to take a plain block of wood, nails, and wheels... and turn it into an excellent racing machine
Full Size GM Installation Instructions
 Full Size GM Installation Instructions Rear Disc Conversion 55 64 Full Size GM (Impala, Bel Air, etc.) This kit is for axle with a 3 3/8 spread center to center on the top two bolt holes (pictured left).
PLEASE READ THESE INSTRUCTIONSFULLY BEFORE STARTING TO ASSEMBLE YOUR DIDICAR PLEASE PAY SPECIAL ATTENTION TO THE NOTES AND HINTS
 PLEASE READ THESE INSTRUCTIONSFULLY BEFORE STARTING TO ASSEMBLE YOUR DIDICAR PLEASE PAY SPECIAL ATTENTION TO THE NOTES AND HINTS ASSEMBLY INSTRUCTIONS Parts List iv) i) v) ii) iiib) iiia) vii) i) Car Body
55-64 Full Size Chevy
 55-64 Full Size Chevy Installation Instructions Power Disc Conversion 9 slimline booster pictured Your new disc brake conversion kit can be bolted up with standard hand tools. The only tools you may not
A/F/X Body GM Installation Instructions
 A/F/X Body GM Installation Instructions Rear Disc Conversion 64-72 A Body / 67-69 F Body / 62-74 X Body This kit is for axle with a 3 1/8 spread center to center on the top two bolt holes (pictured left).
1:8 scale Koban Model Documentation
 1:8 scale Koban Model Documentation Gear-foot assembly The gear foot consists of three parts, the gear-foot, prop shaft, and propeller. Clean flash from castings being careful to keep the mating surfaces
Thanks for Ordering The Vulcan 800A Front Wheel Adapter from READ THIS BEFORE UNPACKING YOUR KIT!
 Thanks for Ordering The Vulcan 800A Front Wheel Adapter from READ THIS BEFORE UNPACKING YOUR KIT! This instruction booklet contains detailed steps for installation of your Vulcan 800A Front Wheel Adapter
OVERHAULING BRAKE CALIPERS GUIDE by Mr. Stefnwolf. This guide is for a 1982 GSX750ET but I expect most of the GS series to be similar if not the same.
 OVERHAULING BRAKE CALIPERS GUIDE by Mr. Stefnwolf This guide is for a 1982 GSX750ET but I expect most of the GS series to be similar if not the same. Badly corroded calipers (caused by moisture in the
A/F/X Body GM Installation Instructions
 A/F/X Body GM Installation Instructions Power Disc Conversion 64-72 A Body / 67-69 F Body / 68-74 X Body 9 slimline booster pictured Your new disc brake conversion kit can be bolted up with standard hand
Engine Leaks and Cures
 Engine Leaks and Cures The following information, printed in blue, is taken with permission from the website of Antique Engine Rebuilding located in Skokie Illinois. I have inserted a few pictures within
Gas Piston System (GPS)
") TNW FIREARMS HTTP://WWW.TNWFIREARMS.COM/ Gas Piston System (GPS) Installation Instructions Version 1.0 AR 15 Gas piston h t t p : / / w w w. t n w f i r e a r m s. c o m / p r o d u c t s _ p i s t o n
TNW FIREARMS HTTP://WWW.TNWFIREARMS.COM/ Gas Piston System (GPS) Installation Instructions Version 1.0 AR 15 Gas piston h t t p : / / w w w. t n w f i r e a r m s. c o m / p r o d u c t s _ p i s t o n
INSTALLATION INSTRUCTIONS
 Product: Switchblade Swaybar System Part Number: JKS9100 INSTALLATION INSTRUCTIONS Applications: Wrangler TJ, 1997-06 (front) 517-278-1226 tech@jksmfg.com www.jksmfg.com 491 W. Garfield Avenue, Coldwater,
Full Size GM Installation Instructions Rear Disc Conversion
 Full Size GM Installation Instructions Rear Disc Conversion 65 68 Full Size GM (Impala, Bel Air, etc.) This kit is for axles with a 3 3/8 spread center to center on the top two bolt holes (pictured left).
Global West Suspension 655 South Lincoln Ave San Bernardino Ca Phone Fax Web address globalwest.
 Global West Suspension 655 South Lincoln Ave San Bernardino Ca. 92408 Phone 877-470-2975 Fax 909-890-0703 Web address globalwest.net Mustang coilover instruction sheets for 64-66 Kit includes the following
Converting a Chevy Non-positraction rear-end to a positraction rear using an Eaton posi unit.
 Converting a 56-62 Chevy Non-positraction rear-end to a positraction rear using an Eaton posi unit. Tom Parsons Non-posi unit Posi unit 1 Converting a 56-62 Chevy Non-positraction rear-end to a positraction
283F & 327F Engines : Distributor Cap Modification Kit Development Project
 283F & 327F Engines : Distributor Cap Modification Kit Development Project By Dick Morland Chris Craft offered the "F" series engines (283 F & 327 F) in Commanders from 23' to 35'. There are a lot of these
Installation Instructions
 Installation Instructions Product: SwitchBlade Swaybar System Part Number: PN 9100 Application: Jeep Wrangler TJ, 1997-06 (front) Welcome CONGRATULATIONS on purchasing a SwitchBlade Swaybar System from
Diamond Chain Repair Manual For. Pneumatic Concrete Chain Saws
 Diamond Manual For Pneumatic Concrete Chain Saws CS UNITEC, Inc. Terms A. Connecting link. B. Diamond segment with bumper drive link. C. Preset connecting link with rivets. Chain Breaker Description Part
Van Rack Installation Manual Ford Transit Connect
 1.888.772.8400 Big to small... We do it all Van Rack Installation Manual Ford Transit Connect Thank you for your purchase of an Unruh Fab Van rack. We have designed and built this rack so that you can
BRAKE PADS REPLACEMENT
 KLR650 Homepage Contact Me You must remove the "REMOVE-THIS" in my email address for it to work. This is a hobby website dedicated to the Kawasaki KLR650 motorcycle. I make no claim concerning the accuracy
MM IRS Coil-Over Kit - Bilstein/MM Shocks (MMCO-4)
") 3430 Sacramento Dr., Unit D San Luis Obispo, CA 93401 Telephone: 805/544-8748 Fax: 805/544-8645 www.maximummotorsports.com MM IRS Coil-Over Kit - Bilstein/MM Shocks (MMCO-4) The lower spring perch is drilled
3430 Sacramento Dr., Unit D San Luis Obispo, CA 93401 Telephone: 805/544-8748 Fax: 805/544-8645 www.maximummotorsports.com MM IRS Coil-Over Kit - Bilstein/MM Shocks (MMCO-4) The lower spring perch is drilled
Van Rack Installation Manual Dodge ProMaster
 1.888.772.8400 Big to small... We do it all Van Rack Installation Manual Dodge ProMaster Thank you for your purchase of an Unruh Fab Van rack. We have designed and built this rack so that you can easily
How To: Restore plastic headlamp lenses
 Hemmings Sports & Exotic Car How To: Restore plastic headlamp lenses Steve Berry Share Photos by the author. Daily driving a 1988 Volvo 244DL is more fun than it should be. Five speeds, air conditioning,
Mopar 8 3/4 & 9 3/4 (Dana) Installation Instructions Rear Disc Conversion
 Installation Instructions Rear Disc Conversion") Mopar 8 3/4 & 9 3/4 (Dana) Installation Instructions Rear Disc Conversion This kit is for either Mopar 8 ¾ or Mopar 9 ¾ (Dana). This kit is designed to work with axles with either GM 5 x 4.75 Bolt Pattern
Mopar 8 3/4 & 9 3/4 (Dana) Installation Instructions Rear Disc Conversion This kit is for either Mopar 8 ¾ or Mopar 9 ¾ (Dana). This kit is designed to work with axles with either GM 5 x 4.75 Bolt Pattern
1969 Camaro. Concourse Style Disc Brake Conversion Kit Instllation Instructions
 Concourse Style Disc Brake Conversion Kit Instllation Instructions 1969 Camaro (1970 Chevelle Kit Shown) This document contains our regular disc brake conversion instructions with the addition of GM assembly
Fitting Instructions For The TDV6 EGR Blanking Kit To A 2006 Model Discovery 3 TDV6 GHSE
 Part Number DA1112 Fitting Instructions For The TDV6 EGR Blanking Kit To A 2006 Model Discovery 3 TDV6 GHSE You do this modification at your own risk. Britpart won t be held responsible for what is written
A /F/X Body Instruction Packet Rear Disc Conversion
 A /F/X Body Instruction Packet Rear Disc Conversion 64-72 A Body / 67-81 F Body / 62-74 X Body This kit is for axles with a 3 1/8 spread center to center on the top two bolt holes (pictured left). If your
Installation and Service Manual
 RESIDENTIAL PLATFORM LIFTS RPL400 / RPL600 Installation and Service Manual WARNING! STRICT ADHERENCE TO THESE INSTALLATION INSTRUCTIONS IS REQUIRED to promote the safety of those installing this product,
INSTALLATION INSTRUCTIONS
 INSTALLATION INSTRUCTIONS --1075 North Ave. Sanger, CA 93657-3539 local: 559-875-0222 fax: 559-876-2259 toll free: 800-445-3767-- 2505 Lowering Spindle Assembly Installation Instructions ½ TON SILVERADO
The Ryan Overdrive by Tom Endy
 The Ryan Overdrive by Tom Endy The Ryan overdrive is a factory built overdrive designed for the Model a Ford. They were manufactured in Denver, Colorado and marketed between 1990 and 2000. They were discontinued
REPAIR MANUAL URW SERIES. URW-6, 8, 9, 10 & 12 Series Repair Manual
 REPAIR MANUAL URW SERIES URW-6, 8, 9, 10 & 12 Series Repair Manual Contents Page 1. Tools Needed for Repair 1 2. Disassembly and Reassembly of the Cam Casing 2-4 3. Disassembly and Reassembly of the Gear
Down South Vettes Leather Sun visor Installation Instructions.
 Down South Vettes Leather Sun visor Installation Instructions. Difficulty: 3 out of 5. Time: Plan on about 30 minutes. The tools used are:? A medium blade screw driver? A small flashlight may help get
Signature Series A/F/X Body GM Installation Instructions Rear Disc Conversion
 Signature Series A/F/X Body GM Installation Instructions Rear Disc Conversion 64-72 A Body / 67-81 F Body / 62-74 X Body This kit is for axles with a 3 1/8 spread center to center on the top two bolt holes
Chevrolet Generator Rebuild and Restoration
 Rich Mozzetta PDF compiled by Dave Zuberer Chevrolet Generator Rebuild and Restoration I had 2 old Chevy generators and I used parts from both to create a new one for a 1960 Corvette project. Both generators
Setup Guide and Chassis Tuning Tips (simple version) By Jim Daniels
 By Jim Daniels") This document is released into the public domain and may be reproduced and distributed in its entirety so long as all credit to Jim Daniels remains. If you find this guide helpful please consider donating
This document is released into the public domain and may be reproduced and distributed in its entirety so long as all credit to Jim Daniels remains. If you find this guide helpful please consider donating
KNS Precision Inc. Adjustable Gas Piston for AK-47 Family Firearms Installation & Operation User Manual. Patent Pending
 KNS Precision Inc. Adjustable Gas Piston for AK-47 Family Firearms Installation & Operation User Manual Patent Pending Safety Notes -Always obey the four laws of gun handling: -Treat every gun as if it
Arrow Shark 2016 M8 II Sterndrive - Collector Edition Owner Manual. M8 II weight: 925 grams Dimensions
 Arrow Shark 2016 M8 II Sterndrive - Collector Edition Owner Manual M8 II weight: 925 grams Dimensions Parts List M8V2#0001 Billet Lower Unit M8V2#0013 Steering Cable Assembly M8V2#0002 Steering Arm Housing
Mustang Radiator Conversion DIY. By GearHeadPeter. January 27, 2011
 1964-1966 Mustang Radiator Conversion DIY By GearHeadPeter January 27, 2011 We all know that the radiators in our cars are not the best, especially if you have done any customization to the engine, which
Budget Robotics Scooterbot Assembly Instructions
 Budget Robotics Scooterbot Assembly Instructions The Budget Robotics Scooterbot kit is a low-cost 7" diameter servo-driven robot base, ready for expansion. Assembly is simple, and takes less than 15 minutes.
NEW PRODUCT RELEASE. PRODUCT/KIT NAME: 12 Stabilator Tip Fairing Kit
 14401 Keil Road NE, Aurora, Oregon, USA 97002 PHONE 503-678-6545 FAX 503-678-6560 www.vansaircraft.com info@vansaircraft.com Service Letters and Bulletins: www.vansaircraft.com/public/service.htm NEW PRODUCT
HOW T O TO B UILD BUILD A F AST F PINEWOOD DERBY C AR CAR Scotten W. Jones
 HOW TO BUILD A FAST PINEWOOD DERBY CAR Scotten W. Jones I have to do what! Turn this Into this Start with the official BSA pinewood derby car kit Finish with a fast pinewood derby car Warning/disclaimer
Honda VLX 600 Front Pulley Installation Supplement from READ THIS BEFORE UNPACKING YOUR KIT!
 Honda VLX 600 Front Pulley Installation Supplement from READ THIS BEFORE UNPACKING YOUR KIT! This instruction booklet contains detailed steps for installing the front pulley associated with the belt drive
Complete Front End Suspension Rebuild, Ñ Part 1, Tear Down
 Complete Front End Suspension Rebuild, 1955-57Ñ Part 1, Tear Down by Randy Irwin There is much more to performance than pure horsepower. Great performance comes from control and Classic Chevy InternationalÕs
1/4 Die Grinder. Please read and fully understand the instructions in this manual before operation. Keep this manual safe for future reference
 Please dispose of packaging for the product in a responsible manner. It is suitable for recycling. Help to protect the environment, take the packaging to the local amenity tip and place into the appropriate
INSTALLATION MANUAL IMPORTANT CONSIDERATIONS TECHNICAL INFORMATION. Tools you may need
 Model: IS102, IS102-1-X Two Way Pressure Balance Valve 1/2 Rough and Trim Set INSTALLATION MANUAL U P C C Compliance: ASME A112.18.1 CSA B125.1 IMPORTANT CONSIDERATIONS This product and other additional
Shaver Industries. Assembly Instructions Spring-Assist Vertical Vinyl Curtain Door
 Shaver Industries 20 Steckle Place, Kitchener, ON N2E 2C3 Ph 1(888) 766 8328 www.shaverinc.com Assembly Instructions Spring-Assist Vertical Vinyl Curtain Door System Overview: Your Shaver's Spring-Assist
Marzocchi Suspension MZ III MZ III. Technical instructions
 Technical instructions Exploded view - MZ III - 100 Rif. Code Quantity Spare part list - MZ III - 100 Rif. Code Description Q.ty in the model Technical characteristics: Technical characteristics Single-crown
Maintenance Information
 16575219 Edition 4 October 2013 Air Screwdrivers QP1P, QP1S and QP1T Series Maintenance Information Save These Instructions Product Safety Information WARNING Failure to observe the following warnings,
Part# C3132/C Up Ford Mustang 8-Point Roll Bar
 Part# C3132/C3156 2005-Up Ford Mustang 8-Point Roll Bar Installation Instructions Please read the instructions completely BEFORE starting this project. Competition Engineering 8-Point Roll Bars are not
DESCRIPTION & OPERATION
 STARTER - REDUCTION GEAR 1997 STARTING & CHARGING SYSTEMS Mazda - Starters - Reduction Gear DESCRIPTION & OPERATION Reduction gear starter is a conventional 12-volt, 4-pole, brush-type starter. The integral
Turbocharger Overhaul Instruction Garrett TBP4
 Turbocharger Overhaul Instruction Garrett TBP4 Before you read this instruction, I have to say sorry my English is not that good to describe it well about how to rebuild turbocharger. If there is anything
Repairing the CIS Jetronic Alloy adjustable Bosch Fuel distributor
 CIS-Jetronic.com 07.3-0997-06-01 Repairing the CIS Jetronic Alloy adjustable Bosch Fuel distributor When do you have to repair your CIS Bosch fuel distributor? If your car has rough idle, low power, high
Maintenance Information
 16573321 Edition 3 February 2014 Air Grinder Series 61H Maintenance Information Save These Instructions Product Safety Information WARNING Failure to observe the following warnings, and to avoid these
INSTALLATION GUIDE STANDARD PRODUCT CODES:
 INSTALLATION GUIDE STANDARD PRODUCT CODES: 100, 105, 110, 111, 112, 113, 115, 120, 130, 140, 145, 146, 150, 200, 210, 240, 250, 255, 260, 300, 305, 405, 406, 407, 408, 425, 426, 435, 447, 500, 505, 510,
Workpiece support can be readjusted without tools.
 ESSENTIAL FOR EVERY WORKSHOP. Good tools are worth their weight in gold and should always be in perfect working order. Rust needs to be removed for example, or the screw driver needs to be ground. Whether
Marzocchi Suspension MZ I MZ I. Technical instructions
 Technical instructions Exploded view - MZ I - 100 Rif. Code Quantity Spare part list - MZ I - 100 Rif. Code Description Q.ty in the model Technical characteristics: Technical characteristics Single-crown
1997 Mazda MX-5 Miata. STARTER - DIRECT DRIVE 1997 STARTING & CHARGING SYSTEMS Mazda - Starters - Direct Drive
 STARTER - DIRECT DRIVE 1997 STARTING & CHARGING SYSTEMS Mazda - Starters - Direct Drive DESCRIPTION & OPERATION Direct drive starter is a conventional 12-volt, 4-pole, brush-type starter. The integral
PARTS LIST: 8581 DODGE LONG ARM BRACKETS 03-13
 SYNERGY MFG. 870 INDUSTRIAL WAY, SAN LUIS OBISPO, CA (805) 242-0397 8580 03-12 DODGE 2500/3500 4X4, 06-08 1500 MEGACAB 4X4 LONG ARM SUSPENSION KIT V3.0 GENERAL NOTES: These instructions are also available
TECHNICAL INFORMATION
 TECHNICAL INFORMATION Model No. Description DP4010, DP4011 2-Speed Drill 13mm (1/2") L PRODUCT P 1/ 8 CONCEPT AND MAIN APPLICATIONS Models DP4010 and DP4011 have been developed as 13mm (1/2") Drill for
CALIFORNIA TRIMMER MOWER MAINTENANCE MANUAL
 CALIFORNIA TRIMMER MOWER MAINTENANCE MANUAL 2 Table of Contents Section 1: General Information Page Handle Assembly Instructions 4 Maintenance All Models 6 Oil Change Procedures All Models 9 Height Adjustment
1994 Mazda MX-5 Miata. STARTER - DIRECT DRIVE 1994 ELECTRICAL Mazda Starter - Direct Drive
 DESCRIPTION STARTER - DIRECT DRIVE 1994 ELECTRICAL Mazda Starter - Direct Drive Nippondenso direct drive starter is a conventional 12-volt, 4-pole, brush-type starter. The integral solenoid is attached
»Product» Safety Warning
 J1403 Installation Instructions 1999-2004 Jeep Grand Cherokee WJ 4wd 4" Suspension Lift Read and understand all instructions and warnings prior to installation of product and operation of vehicle. Zone
Signature Series A/F/X Body GM Installation Instructions Power Disc Conversion
 Signature Series A/F/X Body GM Installation Instructions Power Disc Conversion 64-72 A Body / 67-69 F Body / 62-74 X Body Your new disc brake conversion kit can be bolted up with standard hand tools. The
A/F/X Body GM Installation Instructions Power Disc Conversion
 A/F/X Body GM Installation Instructions Power Disc Conversion 64-72 A Body / 67-69 F Body / 62-74 X Body DBMC09, PVK71 & RPB1001 pictured above (Booster, master & valve setups may vary by upgrades selected)
Premium Dry Freight (Plywood) Door Installation REFERENCE FIGURE 1
 Door Installation REFERENCE FIGURE 1") Premium Dry Freight (Plywood) Door Installation A Premium door can be identified as usually having a two-spring balancer, 2 diameter (nominal) rollers, and end hinges with removable covers. If your Whiting
Premium Dry Freight (Plywood) Door Installation A Premium door can be identified as usually having a two-spring balancer, 2 diameter (nominal) rollers, and end hinges with removable covers. If your Whiting
DAKE / JOHNSON VERTICAL BAND SAW
 DAKE / JOHNSON VERTICAL BAND SAW Model F - 6 INSTRUCTION MANUAL MODEL:F-6 SERIAL NUMBER: DATE PURCHASED: Need band saw blades? Call Dake DAKE (Division of JSJ) 724 Robbins Road Grand Haven, Michigan 4947
55-64 Full Size Chevy Installation Instructions Standard Disc Conversion
 55-64 Full Size Chevy Installation Instructions Standard Disc Conversion DBMC09, PV71 & PVB71 Pictured (Booster, master cylinder & valve setups may vary by upgrades selected) Your new disc brake conversion
WARNING NORDIC ALUMINIUM LIGHTING TRACK SYSTEMS
 WARNING NORDIC ALUMINIUM LIGHTING TRACK SYSTEMS DO NOT solder connectors as this will prohibit the adapters circuit switch to move freely from circuit to circuit. Nordic Aluminium track adapters and accessories
GM C10 Street Grip
 Part # 11365010/11365110-1973-1987 GM C10 StreetGrip Front Components 11369590 Delrin Control Arm Bushings 11369300 Drop Spindles 11362350/11362351 Front CoilSpring Kit 11369515 Front HQ Series Shocks
INSTALLATION INSTRUCTIONS South Highway 11 Westminster, SC Toll Free (888) (864) FAX (864)
 (864) FAX (864)") 1.0 Purpose: To identify requirements for the replacement of ISS seals, o-ring and installation of gland nut to rod. 2.0 Scope: This instruction applies to the ISS units manufactured at Lift Technologies
1.0 Purpose: To identify requirements for the replacement of ISS seals, o-ring and installation of gland nut to rod. 2.0 Scope: This instruction applies to the ISS units manufactured at Lift Technologies
Installing the Wireless Charging upgrade kit in a 2018 XT5 (Platinum version)
") Installing the Wireless Charging upgrade kit in a 2018 XT5 (Platinum version) September 2, 2018 Tools needed: Wireless charger upgrade kit Plastic trim tools 7 mm nut driver Background: I purchased the
Installing the Wireless Charging upgrade kit in a 2018 XT5 (Platinum version) September 2, 2018 Tools needed: Wireless charger upgrade kit Plastic trim tools 7 mm nut driver Background: I purchased the
Maintenance Information
 16573370 Edition 2 February 2014 Air Grinder 99V Series Maintenance Information Save These Instructions Product Safety Information WARNING Failure to observe the following warnings, and to avoid these
INSTALLATION INSTRUCTIONS ASSEMBLY & DISASSEMBLY
 8405/6ASERIES PTO INSTALLATION INSTRUCTIONS ASSEMBLY & DISASSEMBLY 8405/6A DISASSEMBLY-REASSEMBLY INSTRUCTIONS This document contains the information to properly disassemble/reassembleyour 8405/6A Series
COYOTE ENTERPRISES, INC. 9/10 BLAST WHEEL MAINTENANCE & ASSEMBLY MANUAL
 COYOTE ENTERPRISES, INC. 9/10 BLAST WHEEL MAINTENANCE & ASSEMBLY MANUAL Parts & Machinery for the Abrasive Blast Industry 27301 East 121st Street Coweta, Oklahoma 74429 (918) 486-8411 Fax (918) 486-8412
Maintenance Information
 51984144 Edition 6 May 2014 Air Paving Breaker MX60 & MX90 Maintenance Information Save These Instructions Product Safety Information WARNING Failure to observe the following warnings, and to avoid these
4 - Way Control 4 - Way Control 4 - Way Control with lock
 INSTALLATION / OPERATION / MAINTENANCE 1. DESCRIPTION MODEL 0-02 (Full Internal Port) Powertrol Valve This manual contains information for installation, operation and maintenance of the Cla-Val Co. 0-02
Maintenance Information
 Form 16573321 Edition 1 July 2004 Air Grinder Series 61H Maintenance Information Save These Instructions Always wear eye protection when operating or performing maintenance on this tool. Always turn off
ATASA 5 th. Wheel Alignment. Please Read The Summary. ATASA 5 TH Study Guide Chapter 47 Pages: Wheel Alignment 64 Points
 ATASA 5 TH Study Guide Chapter 47 Pages: 1403 1423 64 Points Please Read The Summary Before We Begin Keeping in mind the Career Cluster of Transportation, Distribution & Logistics Ask yourself: What careers
 This document provides instructions for removing and installing a rear shock absorber on a Ducati Superbike with a single-sided swingarm. The torque values used are for the 748/916/996 from 1994 to 2001
1994 Mazda MX-5 Miata. STARTER - REDUCTION GEAR 1994 ELECTRICAL Mazda Starter - Reduction Gear
 DESCRIPTION STARTER - REDUCTION GEAR 1994 ELECTRICAL Mazda Starter - Reduction Gear The Nippondenso reduction gear starter is a conventional 12-volt, 4-pole, brush-type starter. The integral solenoid is
Page 1. File: Motolight caliper one-piece Date: 8/14/2006
 Page 1 Caliper Mount Installation One-piece mounting brackets You should allow about two to three hours for installation. We suggest you use a well-lighted space for installation. PLEASE READ ALL THE INSTRUCTIONS.
Rebuilding of the Dana 25 (front axle) Chris Stout
 Chris Stout") The inside gears and bearings were all in excellent condition. A fluid change and some good cleaning was all the was necessary. However, the pinion shaft seal was shot as were the front wheel bearings
The inside gears and bearings were all in excellent condition. A fluid change and some good cleaning was all the was necessary. However, the pinion shaft seal was shot as were the front wheel bearings
Rollstar Shade Installation Instructions
 Rollstar Shade Installation Instructions All Lifting Systems Inside or Outside Mount Thank you for purchasing your new Rollstar shade. It has been custom-made from the highest quality materials to the
5.5 Wheel drive (wheel pilots only)
") Chapter 5: Installing the ST4000+ 61 5.5 Wheel drive (wheel pilots only) The Raymarine wheel drive will fit 3, 4, 5, 6, 7 or 8 spoke wheels. It is designed to operate with steering systems with between
Chapter 5: Installing the ST4000+ 61 5.5 Wheel drive (wheel pilots only) The Raymarine wheel drive will fit 3, 4, 5, 6, 7 or 8 spoke wheels. It is designed to operate with steering systems with between
ClearSpan Curtain Tube Support System (Manual Gearbox)
") ClearSpan Curtain Tube Support System (Manual Gearbox) ATTENTION: This guide describes the assembly and installation of roll-up curtains. The design flexibility of these curtain systems allow for a variety
ClearSpan Curtain Tube Support System (Manual Gearbox) ATTENTION: This guide describes the assembly and installation of roll-up curtains. The design flexibility of these curtain systems allow for a variety
LAND ROVER 90, 110 AND ONWARDS WARNING
 Product Description: Suited to vehicle/s: Winch Fitting Kit: Fitting Kit: 6172941 3432300 WINCH BULL BAR 3932400 WINCH BUMPER BAR LAND ROVER 90, 110 AND 130-1985 ONWARDS 3532070 (OPTIONAL EXTRA) WARNING
INSTALLATION GUIDE DODGE PRODUCT CODE:
 INSTALLATION GUIDE 2002-09 DODGE 1500-3500 PRODUCT CODE: 445 & 455 May 17, 2011 TOOLS NEEDED COMPONENTS INCLUDED 3/8" Drill P2 Tip 1/2" Drill Bit #2 Philips Screwdriver Flange(s) x 2 Hinged Lid Track(s)
GET WIRED FOR SUCCESS WITH NEW NORTON WIRE BRUSHES
 GET D FOR SUCCESS WITH NEW BRUSHES When you need the perfect low-impact solution for refining surfaces without removing any base material, try our new line of Norton wire brushes. This new, economically
If you study the Mercedes Documents (pictured below) for several minutes before you start, you will understand them as you proceed.
 for several minutes before you start, you will understand them as you proceed.") Removing the C32 center dash panel and radio These are not my instructions, they were garnered from the web, I merely pasted them onto a doc file. There is Air Bag wiring nearby. If you feel uncomfortable
Removing the C32 center dash panel and radio These are not my instructions, they were garnered from the web, I merely pasted them onto a doc file. There is Air Bag wiring nearby. If you feel uncomfortable
GM B-Body Street Grip
 Part # 11015010/11015110-1955-1957 GM B-Body StreetGrip Front Components 11019590 Delrin Control Arm Bushings 90003041 Tall Upper Balljoint 11012350/11012351 Front Dual Rate CoilSprings 22159847 Front
Part No. 8865, 8866, 8885, Rear Fender Flares Stepdown Design Jeep JK, 2/4 Dr.
 Part No. 8865, 8866, 8885, 8886 Rear Fender Flares Stepdown Design 2007-12 Jeep JK, 2/4 Dr. PLEASE READ INSTRUCTIONS THOROUGHLY BEFORE PR0CEEDING We have provided complete instructions and specific hardware,
Subaru SVX 1/43 Scale Model Assembly Instructions
 Subaru SVX 1/43 Scale Model Assembly Instructions Congratulations on your purchase of an unassembled 1/43 scale Subaru SVX! You now own a model that is even more rare than the car it represents. Currently
Cordless Rechargeable Saw Instructions for Use
 Technical data Voltage: DC 10.8V Weight: 1.25Kg Stroke rate: 0-2100/min Stroke: 15mm Cutting capacity: max diameter in wood 80mm / in soft metal 7mm Charging time: Between 5.0-5.5 Hours Battery: 1.3Ah
A* CHAIN HOOKS, 1/4" EA A* CHAIN HOOKS, 5/16" EA A* BELT, SANDER 120 GRIT EA 3" X 24" A* BELT, SANDER 120
 HAND TOOLS A*0000080001 ROPE, NYLON 1/4" FT A*0000080002 ROPE, MANILLA 1/2" FT A*0000080003 DOWELL RODS 1/4" EA A*0000080004 DOWELL RODS 3/8" EA A*0000080005 DOWELL RODS 1/2" EA A*0000080006 DOWELL RODS
Free Flow Exhaust Installation Instructions
 Free Flow Exhaust Installation Instructions PART NUMBER: APPLICATION: D660-0035 (polished tips) or D660-0035-BLK (black ceramic tips) 2010-11 X5-M & X6-M Parts List 1 D663-0159 (-BLK, for black tips) X5
Instructions for MB832 Manual Barrier Ver0614
 Instructions for MB832 Manual Barrier Ver0614 Read all the instructions before starting It is recommended that Locktite Blue brand thread sealant be used for all arm and pivot bolts as added protection
JEEVES. JEEVES Installation Manual. Installation Manual The Easiest Do-It-Yourself Dumbwaiter on the Market
 1 888-323-8755 www.nwlifts.com JEEVES Installation Manual The Easiest Do-It-Yourself Dumbwaiter on the Market This manual will cover the installation procedure step-by-step. The installation of this dumbwaiter