Chevrolet Generator Rebuild and Restoration
|
|
|
- Alice Cannon
- 6 years ago
- Views:
Transcription


1 Rich Mozzetta PDF compiled by Dave Zuberer Chevrolet Generator Rebuild and Restoration I had 2 old Chevy generators and I used parts from both to create a new one for a 1960 Corvette project. Both generators had the correct armatures with the extended shafts to drive the Tachometer Drive units. These same armatures were used to drive Power Steering pumps on Chevy and other GM passenger cars of the era. However, the Corvette applications used different end frames and front frames. Corvette end frames were approximately 1/4" shorter as measured between the center of the armature shaft and mount points. Front frames for passenger cars had reinforcing ribs along the perimeter whereas Corvette shorter frames did not. The passenger car frames will work for Corvette but will appear slightly different when installed. See the addendum at the end of this document for more information about the differences. Below is a procedure I use to restore and rebuild my generators. Below is what I started with after disassembly. To disassemble, remove the 2 long bolts (circled) holding the frames and case together. The frames should pull off the bearings. You may need to free them up with penetrant to get them to release. Both were tired from age but tested fair when "motored". To do a basic test of a generator, that is, to motor it, connect a battery Positive (+) lead to the "A"(armature) terminal, battery Negative (-) to the "F" (field) terminal, and battery Negative (-) to the generator case. This will run it as a motor and it s just a basic test to see if there's life, and to listen to the bearings and any strange sounds before rebuild. Both armatures had bad bearings and needed replacement. I could hear them singing when I motored them. The original factory generators used open ball bearings so that they could be oiled periodically through the "Gits" caps. Gits was the manufacturer of those little spring-loaded oil caps. The bearing number for both front and rear is 6203J. If sealed bearings are used in a rebuild, they cannot be oiled through the caps. I use the original open type for future oiling, NAPA part# BRG6203J. 1
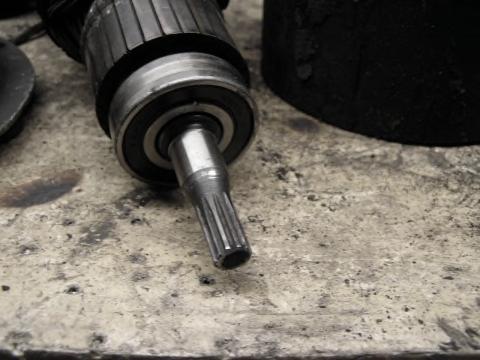
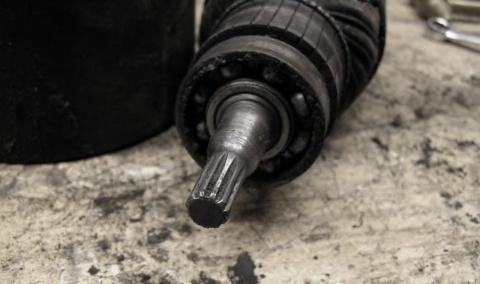
2 2


3 A puller is used to remove the commutator end bearing. I then use my lathe to shave the commutator and clean all contacts with 1000-grit sandpaper while it's rotating. I also clean the shaft bearing surface and install a new bearing. It should be a slip fit over the shaft with slight resistance. After the lathe work I clean each space between commutator contacts to remove any traces of copper shavings between them. This step is tedious but very important! 3


4 Next I use my Growler to test the armature after the commutator clean-up. This tests for opens or shorts in the windings and shorts to the armature case. The hack saw blade is part of the test. If it vibrates as the armature is manually turned on its axis it has found a fault in the windings. This one tested fine. Other tests include commutator point-to-point opens and shorts to case/ground tests. Those can be done with a test meter as well. This growler has a built it test light so I use that. Commutator to case/ground shorts test. One lead to case, then other test lead to each contact around the commutator. 4


5 Below is the commutator windings opens test. Both test leads on each adjacent contact, leapfrogging over each one to test for opens in each winding pair. Tedious but important! I remove the field coils to clean the case in solvent and to prepare it for media blasting. I use a large slotted bit and an impact gun to remove the screws. This set had a broken wire at the terminal when I removed it which I soldered later. The insulator was cracked and allowed the terminal to turn when removing it. I repaired the insulator as well. 5


6 Cracked terminal insulator 6


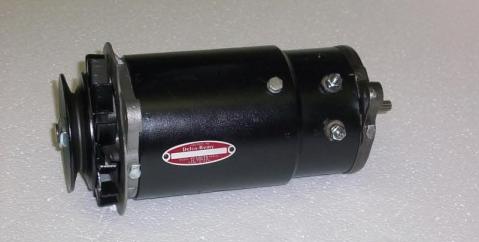
7 Finally, I clean and media blast all of the parts and repaint them. The case is semi-flat black, the cast iron end frame is Gloss black, and the front frame is unpainted casting. The pulley is semi-gloss black. Alignment slot Alignment pin 7
8 8


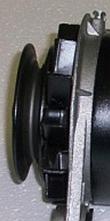
9 Note that the pulley for the Corvette is 3 5/8" diameter and is spaced above the fan 1/4". This is to line up the belt to accommodate the added thickness of the front motor mount on the early Corvettes up to ¼ Now assembly begins. The bearing in the front frame has a special felt washer and cover plate. Note the cover plate must be installed as shown. When oil is applied to the Gits cap, it flows down into the felt washer through the detent in the cover plate. The bearing is then pushed into the housing and then the gasket and keeper plate is installed Oil the felt washer 9
10 Felt washer in housing 10


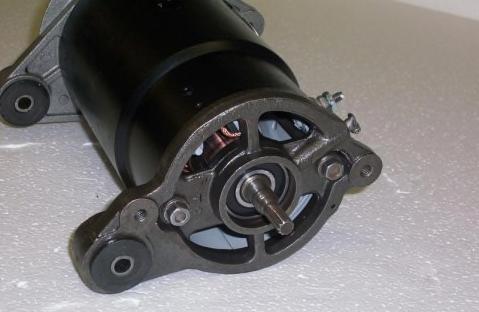
11 I reinstall the field coils into the case and use a touch of blue thread locker on the screws. Then the F & A terminal studs are installed ensuring correct alignment to the case. The F stud must be insulated, the A stud is case ground. Do not over tighten them or you can crack the insulators as was done on this F insulator in the past. My trick of using super glue and baking soda to fill the crack fixed this one. Insulator Crack repair Field stud A stud reattached 11


12 I installed new brushes (Napa ECH423) and locked them into the rear of their holders to install the armature into the case. Once the armature is in position the brushes are released to contact the commutator. I then install the end frame onto the bearing. A little oil on the frame bearing surface eases installation. Install the 2 long bolts to hold the assembly together. The frames and case have alignment pin/slots to ensure correct positioning (see earlier photos of case). Note the spacer bushing at the front shaft before the pulley is installed. This aligns the bearing to the shaft and locks it in to prevent end play. The pulley requires a key to be installed in the shaft keyway. Don't forget that. I use a band clamp to hold the pulley when I install the lock washer and shaft nut and tighten using a 1/2" drive breaker bar and a 15/16" 6-point socket. 12


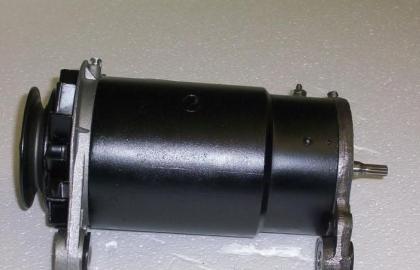
13 I then motor the generator and check its operation. This one is running much smoother and quieter than before. New bearings, commutator cleaning and general restoration has made it run and look new again. I do not own a load tester so I'll have to wait until it's installed on the car for proper operation under load but all of the rebuild work and tests have given me confidence it should work properly. I then install the Tach-Drive unit to the end frame. Note the Red lead is actually connected to the battery "-" terminal in the motor test. Here is the completed unit on the shelf ready for installation at a later time. 13

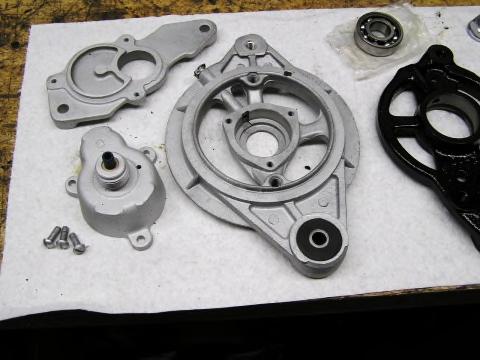
14 Addendum Below is a reprint showing the differences of Generators used on Passenger cars and Corvettes. Unfortunately it has no Author named. I would like to give credit to that person but no reference has ever been found. C1 Correct Generator: The pass car PS generators, and , use the same case and rear splined armature as the Corvette tach-drive generators but the end frames are different. The difference is in the distance between the centerline of the armature and the centerline of the rubber bushing mounting bosses. The distance is shorter on the Corvette than the PS gen. This is accomplished by using different front and rear end frames. The Corvette front end frame is aluminum and is part # The PS generator , which is the most common PS generator seen, uses the aluminum front frame # Visually, the difference is that the 109 frame doesn't have the radial reinforcing ribs and the 168 frame does. The PS rear end frame is cast and the part number is # and has a noticeable distance between the lower PS pump/tach drive mounting hole and the lower rubber bushing mounting hole than the Corvette rear end frame which is # and is also cast. The PS generator can be fitted with the tach drive and used on the corvette, but it will stand slightly taller on the mount and, of course, will not have the correct part number on the tag. There were other PS generators with solid mounting instead of rubber mounting, and they could be used but they are not correct as the Corvette generator was only rubber mounted. 14
.")

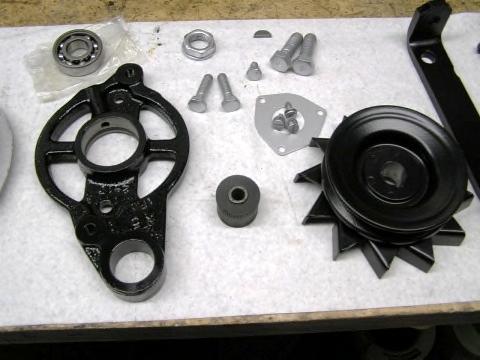
15 Here are some examples of incorrect generators. This one I call a "mongrel". It has the correct "End Frame", but the incorrect Front frame (ribbed). Notice in the 4th photo that the horizontal alignment is off. This generator will be pointing "uphill" when mounted. For 1958 to 1962 Corvettes, it has the wrong 3 5/8" pulley mounted. It should have approx. 1/4" space between the back of the pulley and the face of the fan. 15
16 16


17 This is a picture of a Passenger car generator with a Power Steering unit installed. It has the same extended shaft on the armature to drive the pump. Many Corvette Tach Drive Generators start life as one of these, but will have the incorrect frames and pulley. It will work, but it won't be the correct type. Similar type showing drive shaft extension and end frame. 17
283 CI Engine Build for Harmonic Balancer, Water Pump, Generator Pulleys & Brackets Rich Mozzetta
 283 CI Engine Build for Harmonic Balancer, Water Pump, Generator Pulleys & Brackets Rich Mozzetta Link to CF thread I built a parts buck to show a stock 1959-1961 to help clear up confusion about brackets
This LED flashtube kit covers models 400, 404, 500, 504, 600, 680 & 506.
 L.E.D. INSTRUCTIONS I D T S O T U B I R M O C R Y N A P Kit contains: This LED flashtube kit covers models 400, 404, 500, 504, 600, 680 & 506. For the power supply: 1-LED power supply circuit board, 2
Tach-Drive Distributor Reconditioning Joe Fisher PDF prepared by Dave Zuberer Link to Thread on the Corvette Forum (C1-C2)
") Tach-Drive Distributor Reconditioning Joe Fisher PDF prepared by Dave Zuberer Link to Thread on the Corvette Forum (C1-C2) I just finished two Corvette tach-drive distributors. One was a 71 small block
Tach-Drive Distributor Reconditioning Joe Fisher PDF prepared by Dave Zuberer Link to Thread on the Corvette Forum (C1-C2) I just finished two Corvette tach-drive distributors. One was a 71 small block
Converting a Chevy Non-positraction rear-end to a positraction rear using an Eaton posi unit.
 Converting a 56-62 Chevy Non-positraction rear-end to a positraction rear using an Eaton posi unit. Tom Parsons Non-posi unit Posi unit 1 Converting a 56-62 Chevy Non-positraction rear-end to a positraction
POWER RACK AND PINION STEERING INSTALLATION
 by Randy Irwin 1955-57 POWER RACK AND PINION STEERING INSTALLATION Randy Irwin - Technical Writer Randy has been involved in the Chevy parts business for over 25 years. He is a wizard at creating, making
STARTER SYSTEM TESTING 5.6
 STARTER SYSTEM TESTING 5.6 ON-MOTORCYCLE TESTS Starter Relay Test NOTE Starter relay test also applies to ignition and key switch relays.. See Figure 5-5. Locate starter relay. The relay is attached to
ALTERNATOR - BOSCH 35/75-AMP & 40/90-AMP
 ALTERNATOR - BOSCH 35/75-AMP & 40/90-AMP 1988 Chrysler LeBaron Convert/Coupe 1988 ALTERNATORS & REGULATORS Chrysler Motors - Bosch 35/75 & 40/90 Amp Alternator All Models DESCRIPTION The charging system
ON-VEHICLE INSPECTION
 CH2 P11586 CHARGING CHARGING SYSTEM ONVEHICLE INSPECTION 1. CHECK BATTERY ELECTROLYTE LEVEL Check the electrolyte quantity of each cell. MaintenanceFree Battery: CH03L01 If under the lower level, replace
T-3161-T Texas T Distributor
 T-3161-T Texas T Distributor NOTE: Please read completely through the instructions before installing your distributor. It will insure your installation goes smoothly. If you have installed a distributor
B, are made of %-in. strap iron. Armature
 # 6-32 HACK SCREWS operating on low-voltage a.c. from a bell transformer is shown in Figs. 1 and 3. The field coils A and B are two magnets from a buzzer or doorbell placed so that the windings run in
CAUTION CAUTION CAUTION
 7. Inspect the brass commutator end of the armature for any discolored spots or damage. If the commutator is slightly discolored or damaged, the armature must be replaced. This is a molded commutator and
20. Install and tighten the cap screws that hold the end frame and field frame together
 4006-30 19. Fill the oil reservoir in the bearing bore of the end frame with SAE 10 engine oil. Then put the the end frame on the armature shaft. Align the marks on the end frame and field frame and push
CONVERTING NON POSI REAR END TO POSI Chevrolet passenger car and Corvette
 By Tom Parsons CONVERTING NON POSI REAR END TO POSI 55 64 Chevrolet passenger car and 56 62 Corvette This article will be specifically directed at converting the 55-64 Chevrolet full size pass car and
Water Temperature. GM LS Engine Gauges Installation Guide
 2650-1563-00 GM LS Engine Gauges Installation Guide Water Temperature For water temperature, there is a port located on the right side (passenger side) of the engine, in the cylinder head, past the last
STARTER SYSTEM TESTING 5.6
 STARTER SYSTEM TESTING 5.6 ON-MOTORCYCLE TESTS b088x5x Starter Relay Test NOTE Starter relay test also applies to ignition and key switch relays.. See Figure 5-5. Locate starter relay. The relay is attached
Rebuilding the Alternator for a 2007 Honda Accord 4CYL. Honda CYL Alternator (Denso)
") Rebuilding the Alternator for a 2007 Honda Accord 4CYL Honda 2007 4CYL Alternator (Denso) The OEM brushes and bearings for this alternator are available for purchase online. On my vehicle with ~240k miles,
Rebuilding the Alternator for a 2007 Honda Accord 4CYL Honda 2007 4CYL Alternator (Denso) The OEM brushes and bearings for this alternator are available for purchase online. On my vehicle with ~240k miles,
 Page 1 of 6 These two pages describe the process used to convert from a Prestolite Alternator to a Toyota Alternator on a Lycoming O-360 Boss Mount wide deck. The unit described puts out an approximate
DC MOTOR MAINTENANCE ALL ELECTRIC LIFT TRUCKS PART NO SRM 294
 DC MOTOR MAINTENANCE ALL ELECTRIC LIFT TRUCKS PART NO. 897076 620 SRM 294 SAFETY PRECAUTIONS MAINTENANCE AND REPAIR When lifting parts or assemblies, make sure all slings, chains, or cables are correctly
Hard Bar Sport, M1/M2 Hard Core Hardtop, M2 Sport, and Xtreme Installation Instructions
 HARDWARE KIT: Hard Bar Sport, M1/M2 Hard Core Shoulder Harness Guide Relocation Assemblies: 2-3/8" X 1" grade 8 bolts 4-3/8" flat washers 2-3/8" lock nuts 2 - brass bushings 2 - plastic trim caps 2-3/8"
Disconnect the battery power from the car.
 Adding a safety fuse to the ignition circuit of 1956 to 1962 Corvettes Part 1 is for 1958 to 1962. Part 2 is for 1956 to 1957 Rich Mozzetta and Dave Zuberer Part 1-1958 to 1962 Here is a way to add a fuse
*Some speedometers have these additional electronic connections. If yours does, then remove the smaller slotted screws shown.
 www.odometergears.com 1981-1985 240 Cable-Driven Speedometers (NOT for 1986 and later electronic units) http://www.davebarton.com/240-odometer-repair.html For this set of instructions below, I will not
The Ford Model A Water Pump
 The Ford Model A Water Pump George Washington Chapter, Inc. 3903 Old Lee Highway Fairfax, VA 22030 1 Table of Contents Introduction/Specifications.. 3 1. Water Pump Inspection and Removal. 4 a. Removal..
Wiper Transmission Repair Charles Bernhardt
 Wiper Transmission Repair Charles Bernhardt When I purchased this '59 Corvette most of the parts were in boxes. The wiper transmissions were one of the first parts that I decided to look at to see if they
This article, written by forum member Paulages in September 2008, is from the SOHC/4 Tips and Tricks Forum.
 This article, written by forum member Paulages in September 2008, is from the SOHC/4 Tips and Tricks Forum. When Honda produced the SOHC CB650, it was immediately following the end of the CB550 production,
How to Fix the Altitude Clutch Problem in the Meade DS Mount By John Zimmerman September 2005
 How to Fix the Altitude Clutch Problem in the Meade DS Mount By John Zimmerman September 2005 Note: I claim no personal credit for the solution described here. Other DSX owners, whose real names I do not
Electric motor testing
 Electric motor testing MOTOR (MODELS EJ4-4001 AND EJ8-4001A) 23 GENERAL INFORMATION The vehicle is equipped with a 48-volt DC, shunt-wound, reversible traction motor. The shunt-wound motor is designed
The Magazine For Slot Car Enthusiasts
 The Magazine For Slot Car Enthusiasts Building the Tomy Super G+ By Milt Surratt Tomy Super G+ slot cars have been around in the current form for about 12 years. Out of the package, the Tomy HO slot car
Here's a pic of my 2500 stall converter, and if you look closely, you can see the
 On with the engine. The sick patient. Extracting the engine, with accessories and wiring removed. Note the poor condition of the heads. Working late into the night. Here's a pic of my 2500 stall converter,
The Starter motor. Student booklet
 The Starter motor Student booklet The Starter motor - INDEX - 2006-04-07-13:20 The Starter motor The starter motor is an electrical motor and the electric motor is all about magnets and magnetism: A motor
CHAPTER 22 STARTER Models J05C-TD, J08C-TP and TR
 1 INDEX STARTER 22-1 22-114E-03 CHAPTER 22 STARTER TROUBLESHOOTING...22-2 STARTER...22-4 22 22-2 STARTER 1 page 1 TROUBLESHOOTING Symptom Possible cause Remedy Engine does not crank, or cranks slowly Key
Complete Front End Suspension Rebuild, Ñ Part 1, Tear Down
 Complete Front End Suspension Rebuild, 1955-57Ñ Part 1, Tear Down by Randy Irwin There is much more to performance than pure horsepower. Great performance comes from control and Classic Chevy InternationalÕs
EnDuraLast II Charging System Installation Guidlines
 EnDuraLast II Charging System Installation Guidlines Notes & Disclaimers: The installation of this charging system assumes the installing technician has basic mechanical and electrical skills. Please understand
Installation Instructions
 Powerglide Automatic Trans Mount Installation Instructions Building American Quality With A Lifetime Warranty! TOLL FREE 1-877-469-7440 (865) 966-2269 FAX (865) 671-1999 tech@lokar.com www.lokar.com Powerglide
Magnesium Option, Late Model Front Seal, Viton, P/N 67256V Rear Seal, Viton, P/N 67257V Shifter Installed Heat Treated Yoke, P/N
 DESCRIPTION OPTION Magnesium Option, Late Model 80100L Front Seal, Viton, P/N 67256V 80109 Rear Seal, Viton, P/N 67257V 80110L Shifter Installed 80112L Heat Treated Yoke, P/N 62946-6 80119-6 Heat Treated
Looking up the front of the engine from under the radiator. (Picture taken with belt under tension.)
") 8. If you re replacing the AC compressor drive belt as well, it s time to loosen its belt tensioner. The AC compressor belt tensioner is very obvious under the front of the car. Loosen the 13mm bolt, then
8. If you re replacing the AC compressor drive belt as well, it s time to loosen its belt tensioner. The AC compressor belt tensioner is very obvious under the front of the car. Loosen the 13mm bolt, then
Part # GM A Body Complete CoilOver System
 350 S. St. Charles St. Jasper, In. 47546 Ph. 812.482.2932 Fax 812.634.6632 www.ridetech.com Part # 11230109 64-67 GM A Body Complete CoilOver System Front Components: 1 11233509 Front Non-adjustable CoilOvers
STARTING SYSTEM ST 1
 STARTING SYSTEM ST1 ST2 STARTING SYSTEM PREPARATION SST (SPECIAL SERVICE TOOLS) PREPARATION Injection Pump Spline Shaft Puller Armature bearing Alternator Rear Bearing Replacer Armature front bearing RECOMMENDED
Maintenance Information
 45530136 Edition 1 July 2008 Electric Screwdrivers EL 24V DC Series Maintenance Information Save These Instructions WARNING Always wear eye protection when operating or performing maintenance on this tool.
Engine Electrical System
 Engine Electrical System 3 Foreword This manual has been prepared by experts and specialists of,engineering Department of Saipa Yadak Company to be used as a guide by the repairers of electrical systems.we
Part # GM A Body CoilOver System
 350 S. St. Charles St. Jasper, In. 47546 Ph. 812.482.2932 Fax 812.634.6632 www.ridetech.com Part # 11240210 68-72 GM A Body CoilOver System Front Components: 1 11243510 Front Single-adjustable CoilOvers
2001 V70 T5 ETM Removal and Cleaning Directions
 2001 V70 T5 ETM Removal and Cleaning Directions Howard Cheng howardc64@gmail.com 10/24/05 Version 1.4 Read this before you start I performed this ETM cleaning because I had gotten 2 reduced performance
Corvette Set Separator (Glove Box) Lock Removal
 Lock Removal") 1956-62 Corvette Set Separator (Glove Box) Lock Removal The materials here were gathered from several Corvette Forum Threads as well as from the Web Pages of Rich Mozzetta (rich5962 on the CF). Our colleagues
1956-62 Corvette Set Separator (Glove Box) Lock Removal The materials here were gathered from several Corvette Forum Threads as well as from the Web Pages of Rich Mozzetta (rich5962 on the CF). Our colleagues
Part # GM A Body Complete SA CoilOver System
 Part # 11240210 68-72 GM A Body Complete SA CoilOver System Front Components: 1 11243510 Front Single-adjustable CoilOvers 1 11222899 Front Lower StrongArms 1 11223699 Front Upper StrongArms 1 11009300
1962 THROUGH 1972 TACH DRIVE DISTRIBUTOR RESTORATION
 Close Window 1962 THROUGH 1972 TACH DRIVE DISTRIBUTOR RESTORATION By Dave Fiedler This article covers both Transistor Ignition and points style Corvette distributors from 1962 to 1972. Fuel Injection distributors
1962 THROUGH 1972 TACH DRIVE DISTRIBUTOR
 1962 THROUGH 1972 TACH DRIVE DISTRIBUTOR RESTORATION By Dave Fiedler This article covers both Transistor Ignition and points style Corvette distributors from 1962 to 1972. Fuel Injection distributors are
Maintenance Information
 Form 16575334 Edition 1 April 2005 Electric Screwdrivers EL, EP and ET 34V DC Series Maintenance Information Save These Instructions WARNING Maintenance procedures have the potential for severe shock hazard
STARTING SYSTEM (1ZZ FE) (April, 2003)
 (April, 2003)") STARTING & CHARGING STARTING SYSTEM (1ZZ FE) (April, 2003) STARTING SYSTEM (1ZZ FE) (April, 2003) INSPECTION 19 1 190QO 02 1. INSPECT STARTER ASSY NOTICE: These tests must be performed within 3 to 5 seconds
STARTING & CHARGING STARTING SYSTEM (1ZZ FE) (April, 2003) STARTING SYSTEM (1ZZ FE) (April, 2003) INSPECTION 19 1 190QO 02 1. INSPECT STARTER ASSY NOTICE: These tests must be performed within 3 to 5 seconds
72 Mustang Mach 1 tachometer cluster and gauge conversion
 72 Mustang Mach 1 tachometer cluster and gauge conversion Dated: 02-17-2009 (drafted by a Chevy person working on his first Ford -not good-) Revised: 11-05-2010 The following information pertains to how
The NM NCRS Parts Swap is available PARTS FOR SALE: Parts Restored BB & SB TI Distributors
 The NM NCRS Parts Swap is available to all NM NCRS members including spouses and significant others who have, or have access to, automotive parts for sale or to be given away to a good home or garage.
2017+ L5P Duramax 3 ½ Down Pipe & EGR Fix Kit
 2017+ L5P Duramax 3 ½ Down Pipe & EGR Fix Kit Covers installation of PN s: WCF100630, WCF100829 Note: This Kit is for off road competition use only! Off Road Competition Use Tuning & Exhaust System is
STARTING/CHARGING SYSTEMS Brought to you by Eris Studios NOT FOR RESALE
 STARTING/CHARGING SYSTEMS General Description 1. General Description A: SPECIFICATION Vehicle model Starter Generator Item Specification Type Reduction type Model 428000-5760 Manufacturer DENSO Voltage
1991 Mazda MX-5 Miata. STARTER - DIRECT DRIVE ELECTRICAL Mazda Starters - Direct Drive ELECTRICAL Mazda Starters - Direct Drive
 DESCRIPTION STARTER - DIRECT DRIVE 1990-92 ELECTRICAL Mazda Starters - Direct Drive Nippondenso direct drive starter is a conventional 12-volt, 4-pole, brush-type starter. The integral solenoid is attached
Commander SUSPENSION SYSTEM INSTALLATION INSTRUCTIONS
 PARTS INCLUDED: 2 - FRONT UPPER A-ARMS 2 - FRONT LOWER A-ARMS 4 - COTTER PINS 2-12MM JAM NUTS 2 - TIE ROD EXTENDERS 8- FLANGED DELRON BUSHINGS 4- DELRON CASTER SPACERS 6 - GREASE FITTINGS 3 - BEARING REMOVAL
Converting an A to 12v and Adding Turn Signals Bill Lee
 Converting an A to 12v and Adding Turn Signals Bill Lee Bill@WRLee.com When I bought my 1929 Tudor, it had been restored about 20 years earlier. It had halogens and had been converted to 12v negative ground,
How I Fitted the Digital Temperature Guage... By T-Cut
 How I Fitted the Digital Temperature Guage... By T-Cut Here's one way to install the digital temperature gauge designed by Hans Schaaper. I decided to fit mine into the redundant slot above the CD-80 radio
TH350 Automatic Trans Mount Shifter Installation Instructions
 TH350 Automatic Trans Mount Installation Instructions Building American Quality With A Lifetime Warranty! TOLL FREE 1-877-469-7440 (865) 966-2269 FAX (865) 671-1999 tech@lokar.com www.lokar.com TH350 Automatic
Steeda Lower Control Arms ( )
") Steeda Lower Control Arms (2005-2012) NOTE: The following installation was performed on a 2007 Mustang GT/California Special. The control arms were previously sold in a blue color, but now they are sold
Steeda Lower Control Arms (2005-2012) NOTE: The following installation was performed on a 2007 Mustang GT/California Special. The control arms were previously sold in a blue color, but now they are sold
Rotax Sprag Replacement
 Rotax Sprag Replacement This is intended as a full walk through on a Sprag replacement on a Electric start Rotax engine These instructions were made from a sprag replacement on an MT 350 Tools List Non
BMW Throttle Body Reconditioning. Reconditioning BMW 750il throttle assemblies./
 Reconditioning BMW 750il throttle assemblies./ My 1990 BMW 750il was not idling well, and I was starting to get "EML" errors on startup. The "EML" light would stay on when I started the car, and the engine
SECTION 6Y ENGINE ELECTRICAL. CONTENTS OF THlS SECTION. Page Ignition System " 6Y-1 Specifications 6Y Passenger Shop Manual IGNITION SYSTEM
 SECTION 6Y ENGINE ELECTRICAL CONTENTS OF THlS SECTION Page Ignition System " 6Y-1 Specifications 6Y-5 Charging System 1961 Passenger Shop Manual Starting System 1961 Passenger Shop Manual IGNITION SYSTEM
STEERING COLUMN FOR CARS WITH 605, 670(500) OR DELPHI(600) POWER STEERING
 OR DELPHI(600) POWER STEERING") by Randy Irwin 1955-57 STEERING COLUMN FOR CARS WITH 605, 670(500) OR DELPHI(600) POWER STEERING Tools Needed: Philips Screwdriver 7/16 Wrench 1/2 Deep Socket And Ratchet Randy Irwin - Technical Writer
by Randy Irwin 1955-57 STEERING COLUMN FOR CARS WITH 605, 670(500) OR DELPHI(600) POWER STEERING Tools Needed: Philips Screwdriver 7/16 Wrench 1/2 Deep Socket And Ratchet Randy Irwin - Technical Writer
Building a Bulletproof NP205 Tips and tricks for the toughest transfer case available. Photography by Rick Péwé 4Wheel & Off-Road, February, 2009
 Building a Bulletproof NP205 Tips and tricks for the toughest transfer case available. Photography by Rick Péwé 4Wheel & Off-Road, February, 2009 The venerable NP205 transfer case has a reputation for
HORSTMAN GREASED LIGHTNING CLUTCH
 HORSTMAN GREASED LIGHTNING CLUTCH Horstman s Greased Lightning (GL) clutch is designed for ultra high performance, and requires expert setup and a serious commitment to maintenance. Warning!!! 1. Clutch
Installation Directions for FINGER STICK and Blocker Plate
 Installation Directions for FINGER STICK and Blocker Plate What is a Finger Stick? A Finger Stick is a simple circuit that modifies the MAF signal on LLY and LBZ engines (not LB7 engines) to expected levels
Highly Styled, Low Cost Serpentine Drive. Chrysler 383, 440 and 426 HEMI
 Highly Styled, Low Cost Serpentine Drive Installation Instructions Chrysler 8, 440 and 426 HEMI Kit #40720 (without Power Steering) Use 71.5" Serpentine Belt Kit #40725 (with Power Steering) Use 81.5"
Highly Styled, Low Cost Serpentine Drive. Chevy Small Block Alternator & Power Steering Kit #21185 and Style Track Kit #21085 and Revolver
 Highly Styled, Low Cost Serpentine Drive Installation Instructions Chevy Small Block Alternator & Power Steering Kit #21185 and 21190 Style Track Kit #21085 and 21090 Revolver Included Parts List Kit #
DESCRIPTION & OPERATION
 STARTER - REDUCTION GEAR 1997 STARTING & CHARGING SYSTEMS Mazda - Starters - Reduction Gear DESCRIPTION & OPERATION Reduction gear starter is a conventional 12-volt, 4-pole, brush-type starter. The integral
Consult electrical engineer before use. cal enterprises ltd. Instructions for use
 Washing Machine Motor Speed Controller Consult electrical engineer before use. cal enterprises ltd Instructions for use Contents Page 2 Disclaimer Page 3 Introduction Page 4-6 Bits to salvage Page 7-8
Re-Energy.ca - Solar Electricity - Build Your Own Solar Car
 Backgrounder Build Your Own Solar Car Back to Page 1 Build It! These step-by-step instructions provide you with a plan for making a basic solar car. If you can think of ways to improve the design of your
Powerglide Automatic Floor Mount Shifter Installation Instructions
 Powerglide Automatic Mount Installation Instructions Building American Quality With A Lifetime Warranty! TOLL FREE 1-877-469-7440 (865) 966-2269 FAX (865) 671-1999 tech@lokar.com www.lokar.com Powerglide
1969 Camaro. Concourse Style Disc Brake Conversion Kit Instllation Instructions
 Concourse Style Disc Brake Conversion Kit Instllation Instructions 1969 Camaro (1970 Chevelle Kit Shown) This document contains our regular disc brake conversion instructions with the addition of GM assembly
Wheel Alignment Basics Explained: Shimmed Control Arms
 Wheel Alignment Basics Explained: Shimmed Control Arms By Joe Fisher This brief article is not meant to teach someone how to align the front steering/suspension but to explain the three basic specifications
PATCO SPECIFICATION GE 1255A3 TRACTION MOTOR REPAIR PAGE 1 of 5 PAGES Rev. 1, December 24, 2012
 PAGE 1 of 5 PAGES ATTACHMENTS A. Inspection Maintenance and Basic Overhaul, Traction Motor Type GE 1255 A3 (GE Document GEK63200) B. PATCO 1255 Motor Planning Sheet (latest Revision) GENERAL Overview This
1 Green Pressure Regulator Spring Automatic transmissions operate at temperatures between 150ºF and
 Installation Instructions for 603107 Valve Body Kit C-4 1970 & Later Tools Required Speed Handle or Ratchet 3/8 Drive 1/2 Socket 3/8 Drive 7/16 Socket 3/8 Drive 5/16 Socket 3/8 Drive Small Screwdriver
POWER STEERING PUMP REBUILDING SPK101 Read instructions completely before removal & disassembly
 POWER STEERING PUMP REBUILDING SPK101 Read instructions completely before removal & disassembly DISASSEMBLY: 1. Remove pump from car and allow to drain. 2. Remove pulley from front of pump. This requires
1997 Mazda MX-5 Miata. STARTER - DIRECT DRIVE 1997 STARTING & CHARGING SYSTEMS Mazda - Starters - Direct Drive
 STARTER - DIRECT DRIVE 1997 STARTING & CHARGING SYSTEMS Mazda - Starters - Direct Drive DESCRIPTION & OPERATION Direct drive starter is a conventional 12-volt, 4-pole, brush-type starter. The integral
75 SERIES BILLET HEI DISTRIBUTORS
 INSTALLATION INSTRUCTIONS 75 SERIES BILLET HEI DISTRIBUTORS GENERAL INFORMATION Mallory 75 Series Distributors are similar to GM HEI distributors, but with many advantages over the OEM design, including:
Combine Cover Manual
 Combine Cover Manual Installation Instructions Page 26 Operating Instructions Page 7 Warranty Page 7 Trouble Shooting Page 8 10 For Big Top Extension Model s: Case I.H. 8010, 8120 Please forward onto Customer
DW017 Mitre Saw TYPE 1. January 2003 S. Hurt. Exploded Drawing. Bill Of Material. Repair Instructions. Special Instructions.
 DW017 Mitre Saw TYPE 1 Introduction Exploded Drawing Bill Of Material Repair Instructions Special Instructions E13442 E13443 DW017-----A R11368 New Parts Wiring Diagram Main Menu 22 January 2003 S. Hurt
1994 Mazda MX-5 Miata. STARTER - DIRECT DRIVE 1994 ELECTRICAL Mazda Starter - Direct Drive
 DESCRIPTION STARTER - DIRECT DRIVE 1994 ELECTRICAL Mazda Starter - Direct Drive Nippondenso direct drive starter is a conventional 12-volt, 4-pole, brush-type starter. The integral solenoid is attached
2013 IMPCO Technologies, Inc. Page 1 of 20 EPR Repair Kit Instructions (PPI-122, Rev-B)
") EPR Repair Kit Instructions PPI-122 (Rev-B) A. Introduction: This document covers the repair of the Electronic Pressure Regulator (EPR) used on Spectrum III series fuel systems. These instructions will
EPR Repair Kit Instructions PPI-122 (Rev-B) A. Introduction: This document covers the repair of the Electronic Pressure Regulator (EPR) used on Spectrum III series fuel systems. These instructions will
BMW 528i E39 Sunroof Repair
 These instructions will help guide you through the repair process for broken sunroof control rails on an E39 chassis. Before I get started, I want to give a shout-out to a couple people who also posted
Ford AOD-4R70W-AODE Cable Operated Shifter Installation Instructions
 Ford AOD-4R70W-AODE Cable Operated Shifter Installation Instructions Building American Quality With A Lifetime Warranty! TOLL FREE 1-877-469-7440 tech@lokar.com www.lokar.com Ford AOD-4R70W-AODE Cable
Ford C6 Automatic Trans Mount Shifter Installation Instructions
 Ford C6 Automatic Trans Mount Installation Instructions Building American Quality With A Lifetime Warranty! TOLL FREE 1-877-469-7440 tech@lokar.com www.lokar.com Ford C6 Automatic Trans Mount Installation
VetteNet How To: Replacing Smallblock Valve Stem Seals
 Replacing Smallblock Valve Stem Seals VetteNet How To: Replacing Smallblock Valve Stem Seals Symptoms: Recently I needed to replace the valve stem seals on my 1986 Corvette. The L98 engine had approximately
1967 (Late) CORVETTE STANDARD (NON-ADJUSTABLE) STEERING COLUMN DISASSEMBLY & REPAIR INSTRUCTIONS PAPER #2
 CORVETTE STANDARD (NON-ADJUSTABLE) STEERING COLUMN DISASSEMBLY & REPAIR INSTRUCTIONS PAPER #2") Last Revision: 03SE2012 1967 (Late) - 1968 CORVETTE STANDARD (NON-ADJUSTABLE) STEERING COLUMN DISASSEMBLY & REPAIR INSTRUCTIONS PAPER #2 Disassembly and Repair Instructions Addressed in this Paper Degree
Last Revision: 03SE2012 1967 (Late) - 1968 CORVETTE STANDARD (NON-ADJUSTABLE) STEERING COLUMN DISASSEMBLY & REPAIR INSTRUCTIONS PAPER #2 Disassembly and Repair Instructions Addressed in this Paper Degree
MGB V8 Roadster restoration project Report 128
 20th March 2017. Sorry to keep you in suspenders between report 127 and report 128, with regards to the indicator stalk switch. INDICATOR & HORN STALK SWITCH - continued After removing all the internal
A/F/X Body GM Installation Instructions
 A/F/X Body GM Installation Instructions Power Disc Conversion 64-72 A Body / 67-69 F Body / 68-74 X Body 9 slimline booster pictured Your new disc brake conversion kit can be bolted up with standard hand
LJ20 Distributor - Disassembly Inspection Repair
 LJ20 Distributor - Disassembly Inspection Repair Old Codger New To Old Suzuki Jeeps The odometer on this 1972 LJ20 indicated the distributor had less than 10,000 miles of wear but during that time it had
Chrysler 727, 904, and 518 Automatic Trans Mount Shifter Installation Instructions
 Chrysler 727, 904, and 518 Automatic Trans Mount Installation Instructions Building American Quality With A Lifetime Warranty! TOLL FREE 1-877-469-7440 tech@lokar.com www.lokar.com Chrysler 727, 904, and
DELCO 20/22/25/27MT BREAKDOWN
 DELCO 20/22/25/27MT BREAKDOWN J&N UNIT # JanNco # OE PART # LESTER # TYPE VOLT ROTATION TEETH 410-12027 25MT 12 CW 9 410-12028 410-12028R 1109264 6177 25MT 12 CW 10 410-12030R 20MT 12 CW 10 410-12031 410-12031R
Timing the 9N/2N Steering Sector Gears
 Timing the 9N/2N Steering Sector Gears by John Korschot - www.johnsoldiron.com (May 2010) The procedure for timing a set of steering gears in the 9/2n tractors is published in the I&T FO4 shop manual.
Ford AOD, 4R70W, and AODE Automatic Trans Mount Shifter Installation Instructions
 Ford AOD, 4R70W, and AODE Automatic Trans Mount Installation Instructions Building American Quality With A Lifetime Warranty! TOLL FREE 1-877-469-7440 tech@lokar.com www.lokar.com Ford AOD, 4R70W, and
700-R4, 4L60, and 4L60E Automatic Trans Mount Shifter Installation Instructions
 700-R4, 4L60, and 4L60E Automatic Trans Mount Installation Instructions Building American Quality With A Lifetime Warranty! TOLL FREE 1-877-469-7440 tech@lokar.com www.lokar.com 700-R4, 4L60, and 4L60E
INSTALLATION GUIDE CRF150R Manual Revision:
 REKLUSE MOTOR SPORTS The z-start Pro Clutch INSTALLATION GUIDE CRF150R 191-810 Manual Revision: 032508 2002 Rekluse Motor Sports Rekluse Motor Sports, Inc. 110 E. 43rd Street Boise, Idaho 83714 208-426-0659
CHAPTER 11: FLYWHEEL, CLUTCH AND ALTERNATOR BACK ON
 CHAPTER 11: FLYWHEEL, CLUTCH AND ALTERNATOR BACK ON Posted on the Wildguzzi forum by Pete Roper: January 17, 2006: Contents: Assembling the engine. Flywheel, clutch and alternator back on. Pic 11-1: To
Just what is an alternator?
 Just what is an alternator? An alternator is the device used to produce the electricity the car needs to run and to keep the battery charged. The battery is the heart of your electrical system. But you
Tools & Parts I Used. Here's everything that comes with the kit.
 Ford Super Duty Power Tailgate Lock Install 2004 F250 4x4 XLT Sport Crew Cab Back to 2004 F250 Main Page This page describes the steps to install the Pop & Lock PL8250 power tailgate lock kit. This kit
CHEVROLET 12-BOLT PASSENGER CAR
 Ring and Pinion Sets We offer complete coverage of ratios for your 12-bolt rears. The first letter of the part number indicates manufacturer. The last three numbers are the gear ratios. 8.875 Ring Gear
TH400 Automatic Trans Mount Shifter Installation Instructions
 TH400 Automatic Trans Mount Installation Instructions Building American Quality With A Lifetime Warranty! TOLL FREE 1-877-469-7440 tech@lokar.com www.lokar.com TH400 Automatic Trans Mount Installation