Turbocharger Overhaul Instruction Garrett TBP4
|
|
|
- Gregory Dorsey
- 5 years ago
- Views:
Transcription


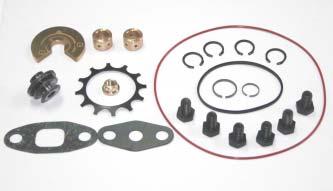
1 Turbocharger Overhaul Instruction Garrett TBP4 Before you read this instruction, I have to say sorry my English is not that good to describe it well about how to rebuild turbocharger. If there is anything wrong, any better words or suggestion for this instruction, just me to Kansai_sport@hotmail.com The T3/T4 rebuild kit you purchased from Kansai-sport is new and complete dynamic kit for T3 / T4 / T04B / T04E / TBP4 Eiji Takada in Osaka, Japan. 2007/12/22 Now let s see how to take apart of Garrett TBP4 turbo and change rebuild kit. Please remove the bolts between bearing housing and compressor housing and turbine housing.


2 Sometimes it is hard to swap bearing housing and turbine housing as there is much carbon. I will use acetylene to heart it and then we can swap it easily. If you can take apart it easily, of course, you can leave this step. Now we take apart the bearing system and turbine housing

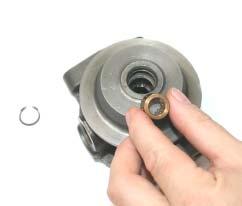
3 Let us take apart of compressor housing and cartridge. Please remove the bolt. Be care! When you remove compressor housing, don t harm the same point of edge, it may damage the compressor wheel. Please remove the housing by harming different edge of compressor housing after you remove the bolts.


4 Before you take apart of CHRA, please make sure to scribe a line across the compressor wheel, nut, and the end of the shaft at this time. If you do not bolt it back together with ALL of the lines lined up, your turbo may end up being out of balance, and it can quickly destroy itself. Place the turbine blade "nut" in a vice, and either use a T-handle socket to remove the compressor blade nut, or when using the ratchet, make sure to hold the socket so that the


5 ratchet is only twisting the nut, not placing any side load on the center shaft. Evidently it is easy to bend the center shaft if you place too much of a side load on it when removing the nut. When I removed the one in the picture, I was very careful to grab the ratchet at the rotating end and put all the twisting force directly through the socket, without putting any side load on the shaft. Be VERY careful of the wheels, the blades can really tear your hands up. It is safest to wrap them in towels, because if the nut breaks free and your hands hit either wheel, you could be seeing a lot of blood.

6 Remove the turbine wheel and then you can take off the journal bearing and heat shield Please remove piston ring (Seal Ring) on turbine shaft and clean the carbon on shaft groove and shaft. Remove the used piston ring and Polish up the shaft using 1200 grit sand paper to remove surface varnish then polish it with some kind of metal polish. For best operation the turbo shaft should shine with no scoring marks or dull spots. Rinse the shaft and exhaust wheel assembly under petroleum ether to get rid of all the polish


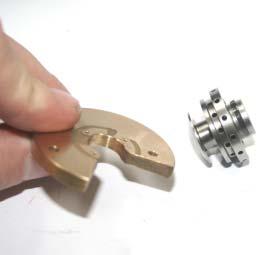
7 Remove the bolts knocks the plate and bearing housing We will see the thrust collar with piston ring (seal) and thrust bearing kit. You can use the stock collar with new thrust bearing kit as well.

 Now we will")

8 Thrust collar and thrust bearing Collar with piston ring (seal) Now we will remove the c-clip on both size to get old journal bearing.
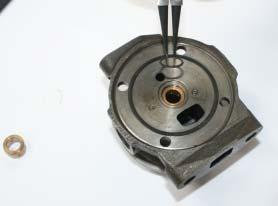
9


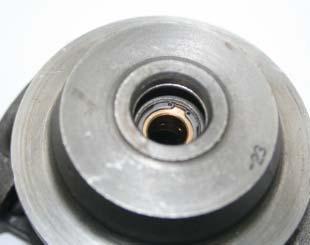
10 Here is an o-ring we have to change as well. Now we finish take apart all the bearing kit. Most of old turbos are dirty like this picture, please remove the carbon and dirty stuff as you can. If you wanna sandblast the bearing housing, please remember not to sand the central connects to journal bearing.
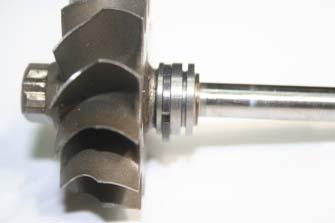
11 It is the turbine wheel / shaft with new piston ring ************************************************************************************************************* ************************************************************************************************************* Now let s install new turbo rebuild kit step by step. It is the turbo rebuild kit you got from Kansai_sport.


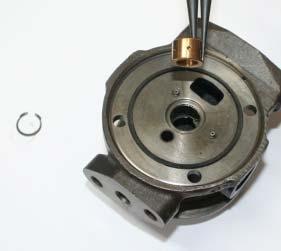
12 Install both new journal bearing into bearing housing and c-clip it.

13


14 C-clip the journal bearing. Don t forget here is an O-ring when you lock the plate and bearing housing.


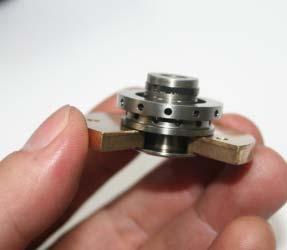
15 Set the comp. piston ring into the thrust collar. Most of the stock collar can be reused as well.
16


17 Here are two pins for two holes on thrust bearing. Remind you again here is an O-Ring Don t forget it


18 Lock the bearing housing and plate.

19 Oil feed line side When you wanna set the turbine wheel into the bearing system, make sure the gape of piston ring toward bearing housing s oil feed side. That would reduce the percentage of oil leaking. Sometimes it is hard to push turbine shaft into bearing housing, please shake and twist the wheel to make the piston ring on the central and then you can push the wheel into housing easily


20 Make sure the thrust collar will move smoothly
21 Make sure A, B, C goes back to original position as a line before you take apart this CHRA Now you finish the rebuild job Eiji Takada Dec 22, 2007 In Osaka
Toyota CT26 Type Turbos
 Type Turbos Dynamic & Carbon Seal Common Service Parts Oversize Service Parts Major Service Parts (Shaft & Wheels, Compressor Wheels) Turbine Housing Type Dynamic Seal Component Parts Common Dynamic Seal
We all put our heads together to try and determine what the facts were. They were as follows:
 VWvortex Forums > Eos > How to solve (or prevent) Eos Roof leaks As many of you know, I don t own an Eos. This makes it difficult to provide practical advice based on my own experience with the car, as
R129 Tonneau Cover Lock Cylinders
 R129 Tonneau Cover Lock Cylinders Level of difficulty: Quite easy very rewarding! Tools needed: - M10 socket and ratchet - Flat screwdriver or needle nose pliers or small hooked tool for removal of hydraulic
Soft Top Rear Locking Cylinders
 Soft Top Rear Locking Cylinders Level of difficulty: Fairly easy very rewarding! Tools needed: - M10 socket and ratchet - Flat screwdriver or needle nose pliers or small hooked tool for removal of hydraulic
Ford Racing BOSS 302 Engine Oil Cooler (11-14 GT)
") Tools needed: 14mm hex socket 7mm socket/wrench 8mm socket/wrench Ford Racing BOSS 302 Engine Oil Cooler (11-14 GT) 10mm socket (for airbox removal) ¾ inch or 19mm wrench Torque wrench Appropriate ratchets
Tools needed: 14mm hex socket 7mm socket/wrench 8mm socket/wrench Ford Racing BOSS 302 Engine Oil Cooler (11-14 GT) 10mm socket (for airbox removal) ¾ inch or 19mm wrench Torque wrench Appropriate ratchets
The Definative 'How to fit a T28' guide
 The Definative 'How to fit a T28' guide Morning all, Looking for bits of info on adapting a t28 for a Rover i found only dribs and drabs of information in a fiew scattered thread, and alot of 'i think'
Burien Toyota 5S-FE Turbocharger
 Burien Toyota 5S-FE Turbocharger Burien Toyota Seattle, WA 98148 Revised May 9, 2002 Burien Toyota 5SFE Turbo Installation Instructions Disclaimer: This project and related modifications are the responsibility
RZR 900 spring/shock installation
 RZR 900 spring/shock installation Thank you for purchasing the Shock Therapy Dual Rate Spring Kit for your RZR 900. Your item list: 2 Front upper coil springs, 2 Front lower coil springs, 2 Rear upper
Tools & Parts I Used. Here's everything that comes with the kit.
 Ford Super Duty Power Tailgate Lock Install 2004 F250 4x4 XLT Sport Crew Cab Back to 2004 F250 Main Page This page describes the steps to install the Pop & Lock PL8250 power tailgate lock kit. This kit
How to Replace the B2 Piston Bore Seal
 Page 1 Home Cars for sale Trucks for sale Where we are Links to other diesel sites About us Why diesel? Diesel Videos How they work How they sound FAQ Dodge Diesel Maintenance tips, parts and DIY DVD's
05/06 Gsxr 1000 Clutch Mod
 By: Ali (Jetspeedz) 05/06 Gsxr 1000 Clutch Mod Parts: 21472-41G10 - WASHER, CLUTCH - $10.09 From 06 Gsxr 750 Opt: 11482-40F00 - GASKET, CL COVER - $8.29 Tools: 13/64 Drill bit, 30mm, 12mm, 10mm, 8mm sockets,
Installation Instructions
 Preparing your vehicle to install your brake system upgrade 1. Rack the vehicle. 2. If you don t have a rack, then you must take extra safety precautions. 3. Choose a firmly packed and level ground to
05-08 GT. Hellion Power Systems Mustang Kit Instructions
 Hellion Power Systems 05-08 Mustang Kit Instructions 1. Disconnect Battery 2. Drain Radiator, keep fluid for re-installation. 3. Remove air box and inlethoses. 6. Next, underneath, punch oil pan for turbo
2002 Honda Passport LX
 Fig. 151: Removing Piston Pin 11. Piston (10) Page 130 2005 Mitchell Repair Information Company, LLC. 12. Connecting rod (11) INSPECTION AND REPAIR Pistons Carefully clean away all the carbon adhering
Superior Wheel Installation Guide (No Turbo removal)
") Superior Wheel Installation Guide (No Turbo removal) This is the process used to install the Turbo Wheel without having to remove the Turbo from your Engine. It should take a maximum of 5 hours. Tools:
Superior Wheel Installation Guide (No Turbo removal) This is the process used to install the Turbo Wheel without having to remove the Turbo from your Engine. It should take a maximum of 5 hours. Tools:
1986 Rear Disk Brake Upgrade. All hard lines mounted to the rear axle with mounting screws. 1/4" fittings
 1986 Rear Disk Brake Upgrade Being well prepared for a project of this size is the key to success. I thought I was well prepared by doing a lot of research and getting all of the required parts before
2001 BMW X5 4.4i. Fuel Filter Replacement
 P P 2001 BMW X5 4.4i Fuel Filter Replacement Symptoms for Replacement: OBDII code P0171, Lean Bank1, which could be a bad or dirty MAF sensor Sluggish engine performance including hesitation with Wide
We thank you for purchasing a manual petcock conversion kit from Murphs!
 We thank you for purchasing a manual petcock conversion kit from Murphs! The first step is removing the gas tank from the bike. We suggest running the tank down to reserve before removal, both for the
Volvo 850 Radiator Replacement Jason Reed 29 March 2013
 This write up covers removing and replacing the radiator on a 97 855 GLT wagon with light pressure turbo and automatic transmission. This car has 162K miles. The radiator, which was original, developed
4 pieces of silicone hose Unless you have AEM then you have 2 2.5, 1 3, and 1 3.5
 The parts in your kit: 3 pieces of Mandrel-Bent Aluminized Tubing: 1 Straight 1 45 degree bend with straight section 1 curved section 4 pieces of silicone hose 1 2.5 1 3.5 2 3 Unless you have AEM then
How to install the Barnett clutch and the stronger Oil Pump Drive Gear
 How to install the Barnett clutch and the stronger Oil Pump Drive Gear Written by WildFred I m from Germany so please excuse my English and the spelling. The following procedure is a combination of the
Front Suspension Redo
 Front Suspension Redo Message: First, thanks to all the previous posters for guidance in my doing the suspension. As thanks, here s the updated document for doing the front suspension. Procedure: While
Fuel Pump & Sending Unit Repair
 If your C4 s fuel gauge reads full regardless of how much fuel you actually have, the sending unit in the tank is most likely at fault. If you have priced a new sending unit, you realize that they run
Beechcraft BE-33/BE35 Brake Master Cylinder Overhaul. (Paramount VV )
") Beechcraft BE-33/BE35 Brake Master Cylinder Overhaul (Paramount VV-15-625) I hope the following will be helpful to those who take on the task of rebuilding the Beechcraft original equipment, Paramount
Beechcraft BE-33/BE35 Brake Master Cylinder Overhaul (Paramount VV-15-625) I hope the following will be helpful to those who take on the task of rebuilding the Beechcraft original equipment, Paramount
Rear End Installation and Bearing Kit - 8.8in (86-12 V8; V6)
") Rear End Installation and Bearing Kit - 8.8in (86-12 V8; 11-13 V6) Tools Required: Jack Stands 5 Floor Jack 2 Oil Pans 1 Wheel Blocks 2 Differential Oil 3 qts Friction Modifier 3 bottles Tube of Black
Rear End Installation and Bearing Kit - 8.8in (86-12 V8; 11-13 V6) Tools Required: Jack Stands 5 Floor Jack 2 Oil Pans 1 Wheel Blocks 2 Differential Oil 3 qts Friction Modifier 3 bottles Tube of Black
One set each of metric open and box end wrenches. Carpet square or something else suitable to lie upon
 TURBOCHARGER REMOVAL PROCEDURE Written by Chuck Roach(Speedster)/Jan. 2005 Edited and photos by Ilia Baldine(Attappman) The following removal procedure is specifically related to a 2002 Jetta, but should
INSTALLATION OF A WARN M8000 WINCH IN A HIDDEN MOUNT ON THE 2001 EXPLORER SPORT TRAC
 INSTALLATION OF A WARN M8000 WINCH IN A HIDDEN MOUNT ON THE 2001 EXPLORER SPORT TRAC By: Kyle Schwulst Email: bigmellon@yahoo.com BACKGROUND I have always wanted a winch on my vehicle. There is just something
Mikuni RS Carburetor Conversion
 Mikuni RS Carburetor Conversion After putting your carbies on the bench or the kitchen table if the wife is out, you will see that the linkages may be in different positions depending on which brand of
Some tips and tricks I learned from getting clutch out of vehicle Skoda Octavia year 2000
 Some tips and tricks I learned from getting clutch out of vehicle Skoda Octavia year 2000 Last change 2013-Oct-11 I bought Haynes manual for a starter. That s something well worth it s cost I believe.
Brake Caliper Rebuild - Part Numbers & Tips Per Jim Millet, 3/15/2005
 Per Jim Millet, 3/15/2005 Not too difficult a job. Rears are easier than fronts to access. You ll need the following gasket sets: Front caliper gasket set, P/N 34 11 1 157 037, MSRP $13.58 Rear caliper
HOW-TO: Rebuild Diesel IDI Injectors
 HOW-TO: Rebuild Diesel IDI Injectors Contributed by Administrator Wednesday, 29 October 2008 Last Updated Saturday, 13 February 2010 vincewaldon.com var gajshost = (("https:" == document.location.protocol)?
Thank you for purchasing the Dezod Motorsports Return Fuel System for your Scion tc.
 Thank you for purchasing the Dezod Motorsports Return Fuel System for your Scion tc. We took much pride in putting together a fuel system that would deliver a maximum amount of fuel as simply as possible
Rear Speaker replacement.
 Rear Speaker replacement. First off you need the right rear speakers. The easy bit is 6x9 and better than a 15W paper cone, the difficult bit is getting a mounting depth under 74mm. Or to be more precise,
Gearbox Assembly 101. Introduction. Before Beginning. By Mark Schutzer 4/13/06
 Gearbox Assembly 101 By Mark Schutzer 4/13/06 Introduction If you are planning to re-motor an old brass locomotive you may want to upgrade to a new gearbox at the same time. The early 60 s and 70 s gearboxes
HOW TO MODIFY A STOCK DODGE KEGGER INTAKE MANIFOLD
 HOW TO MODIFY A STOCK DODGE KEGGER INTAKE MANIFOLD Even though this 3.9L V6 intake manifold is smaller than the 5.2L and 5.9L V8 intake manifolds, the same instructions apply to all 3 engines. If you are
There is also a 115 BHP version which uses a Siemens SID807 ECU, Siemens injectors and a Garrett GTD1244VZ VNT turbo charger.
 The 1.6 8V HDI engine is fitted to vehicles after 2010 and comes with three different power options. There are 75 BHP and 92 BHP models which both use the same injectors, turbo and ECU. These come fitted
List of parts needed below. Tools needed
 1 BMW 645 Coolant leak repair (Cap with Seal Repair and Expanding Coolant Pipe Installation w Pics) By Michael R. Brown (Estimated time to complete the job is 6-8 hrs) List of parts needed below. BMW PART
List of tools: Jack Two Jack Stands Conventional Socket Set Liquid Collection pan Rear axle lubricant and friction modifier Rags for wiping up spills
 List of tools: Jack Two Jack Stands Conventional Socket Set Liquid Collection pan Rear axle lubricant and friction modifier Rags for wiping up spills 1. Jack car up Loosen wheel lugs first. Don t take
DIY: Repairing/Replacing the Timing Chain Tensioner
 DIY: Repairing/Replacing the Timing Chain Tensioner By Saki GT - February 8, 2012 [youtube=http://www.youtube.com/watch?v=24cil5_9yvq] The above video is an example of how a bad Timing Chain Tensioner
Pontoon Assembly Instructions and manual. Read before using hoist.
 Page 1 Pontoon Assembly Instructions and manual. Read before using hoist. For Models 32BL18, 32BL22, 32BL25 and 42BL28 R Model 32BL22 Shown Proudly Made in Michigan By NuCraft Metal Products 402 Southline
How to replace your Turbo Actuator Step by Step
 How to replace your Turbo Actuator Step by Step Special thanks to other forum members who have previously dealt with this problem! Old By Chirpz New Your Turbo is a lot tougher than the electric actuator
O ring installation guide
 AtomicRice.com O ring installation guide Tools and materials needed: 1) Phillips Screwdriver ( one medium and one large head) 2) Small or Medium sized flathead screwdriver or thin rigid shim 3) Vaseline
1.6 HDI or TDCI (up to 2010) Turbo and injector upgrade
 Turbo and injector upgrade") 1.6 HDI or TDCI (up to 2010) Turbo and injector upgrade The 1.6 90 and 110 16v engines are the same apart from the turbo charger and the injectors. The injectors both use the same body however the 110
1.6 HDI or TDCI (up to 2010) Turbo and injector upgrade The 1.6 90 and 110 16v engines are the same apart from the turbo charger and the injectors. The injectors both use the same body however the 110
Connecting the rear fog light on the A4 Jetta, while keeping the 5 Light Mod
 Connecting the rear fog light on the A4 Jetta, while keeping the 5 Light Mod DISCLAIMER: I'm human and make mistakes. If you spot one in this how to, tell me and I'll fix it This was done on my 99.5 Jetta.
Door panel removal F07 5 GT
 Things needed Decent plastic trim removal tools Torx 30 Spare door clips 07147145753 I got away with a set of 5 but if I did it again I d be cautious and get 10. From prior experience if they are damaged
Tools needed: Here is a pic of the shift kit I used. It is a Transgo brand and as you can see, it just a bag full of springs and one valve.
 Before installing a shift kit, be sure the transmission is in good operating order. If your transmission is making noises, slipping, shifting bad or the fluid looks brown or smells burnt, take the transmission
BMW 2002 M42 Swap Notes-THIS IS NOT FINISHED
 BMW 2002 M42 Swap Notes-THIS IS NOT FINISHED This document is to help those that want to install an m42 into a BMW 2002. It is based around an e30 engine, trans, and wiring. You can use the e36 block/head/wiring
APIKOL AAN INTAKE MANIFOLD INSTALLATION INSTRUCTIONS
 APIKOL AAN INTAKE MANIFOLD INSTALLATION INSTRUCTIONS Estimated Installation Time: Approximately 2 hours Parts that will need to be modified/removed (Details provided later in the instructions): Intercooler
Door Panel Removal & Window Stop Adjustment
 Door Panel Removal & Window Stop Adjustment By: Jeff Wolford Disclaimer: This is simply an article of how I fixed my car. I m not responsible if you break, scratch, or mess up anything following my example.
How I installed new brake pads on my i with Sport Package (should be fine for other E39 s) By Robert B.
 By Robert B.") How I installed new brake pads on my 1999 528i with Sport Package (should be fine for other E39 s) How I installed new brake pads on my 1999 528i with Sport Package (should be fine for other E39 s) By
How I installed new brake pads on my 1999 528i with Sport Package (should be fine for other E39 s) How I installed new brake pads on my 1999 528i with Sport Package (should be fine for other E39 s) By
W123 Transmission Vacuum Modulator Adjustment DIY - measure it the 'right' way
 W123 Transmission Vacuum Modulator Adjustment DIY - measure it the 'right' way Why do you need to do this?: You need to do this to properly check the internal hydraulic pressure of the transmission, either
Днепр) Russian Motorcycle Carburetors Part 2B: PZ-24 and PZ-28 Carburetor Assembly and Jet Drilling
 Russian Motorcycle Carburetors Part 2B: PZ-24 and PZ-28 Carburetor Assembly and Jet Drilling") Ural (Урал( Урал) - Dnepr (Днепр( Днепр) Russian Motorcycle Carburetors Part 2B: PZ-24 and PZ-28 Carburetor Assembly and Jet Drilling (applies also to K-37 K and K-38 K carbs) Ernie Franke eafranke@tampabay.rr.com
Ural (Урал( Урал) - Dnepr (Днепр( Днепр) Russian Motorcycle Carburetors Part 2B: PZ-24 and PZ-28 Carburetor Assembly and Jet Drilling (applies also to K-37 K and K-38 K carbs) Ernie Franke eafranke@tampabay.rr.com
Troubleshooting of the LubeTech Grease System
 Troubleshooting of the LubeTech Grease System February 2009 The LubeTech grease system is designed to be a preventative maintenance system that will extend the life of your bearings that are connected
Tempted by the Fruit of Another (A Little Red Diversion)
") Part 4 Tempted by the Fruit of Another (A Little Red Diversion) Last month saw the Green n Mean s back end problems remedied; it also saw the purchase of another V12 XJS by the lost soul writing this article.
Part 4 Tempted by the Fruit of Another (A Little Red Diversion) Last month saw the Green n Mean s back end problems remedied; it also saw the purchase of another V12 XJS by the lost soul writing this article.
Table of Contents. 4. Before a New Turbocharger is Installed
 Table of Contents 1. Turbocharger Overview ------------------------------------------------------------------ 1.1. Definition -----------------------------------------------------------------------------
NEW BRAKE INSTALLATION. Let us show you how a
 Tech Article From Newsletter 17.2-2nd Quarter of 2011 NEW BRAKE INSTALLATION Let us show you how a Big Brake Install is easier than you think!! So, you have a 572 (or a hot 383) in your shoebox... you
2017+ L5P Duramax 3 ½ Down Pipe & EGR Fix Kit
 2017+ L5P Duramax 3 ½ Down Pipe & EGR Fix Kit Covers installation of PN s: WCF100630, WCF100829 Note: This Kit is for off road competition use only! Off Road Competition Use Tuning & Exhaust System is
BBK Ceramic Long Tube Headers (99-04 Cobra and Mach 1) - Installation Instructions
 - Installation Instructions") BBK Ceramic Long Tube Headers (99-04 Cobra and 03-04 Mach 1) - Installation Instructions The below installation instructions work for the following products: BBK Ceramic Long Tube Headers (99-04 Cobra
BBK Ceramic Long Tube Headers (99-04 Cobra and 03-04 Mach 1) - Installation Instructions The below installation instructions work for the following products: BBK Ceramic Long Tube Headers (99-04 Cobra
Preparation. With the car on the ground you will want to:
 Doing a stage 3 swap was a LOT of work Audi S4 Stage 3 (K04) Install Doing a stage 3 swap was a LOT of work. Just a lot of small and simple tasks really. Just make sure you keep track of what you re doing.
N55 Turbo upgrade install guide
 N55 Turbo upgrade install guide Thank you for your purchase of the VTT BMW N55 Stage 2 turbo charger upgrade! First thing to do when you open your box is to make sure all parts are in their respective
Figure 1 - Kit Contents
 11/11/2009 204-900-4248 - INST Installation Manual v1.2: 204-900-4248: Pulse Flow Exhaust Manifolds 2001-2004 LB7 Duramax 6.6L Note: OFF-ROAD USE ONLY if used on California emissions LB7 or EGR Equipped
DCX2496 Linear Power Supply mod by
 DCX2496 Linear Power Supply mod by Construction Guide Linear Power Supply for the DCX2496 Introduction. One of my more rewarding modifications to the DCX2496 was the replacement of the stock I/O board
Mexican Beetle 1600i. Fuel Injection System. Ignition Timing
 Mexican Beetle 1600i Fuel Injection System Ignition Timing Version 1.00 Phil Ade 2005 1 Table of Contents 1.0 Introduction 3 1.1 Tools Required 3 1.2 Prerequisites 3 2.0 Setting the Timing on a 1600i Engine
REMANUFACTURED PRODUCTS. Cat Reman Products for Engines
 REMANUFACTURED PRODUCTS Cat Reman Products for Engines As good as new as strong as ever 2 Maximum Productivity and Lower Costs Caterpillar Engines work on the toughest jobs and in the most extreme conditions.
Before replacing, you have to take apart. Let's review quickly some of the steps involved in taking apart the front brakes.:
 Folks, This is a short write-up about how to replace front rotors and pads on the Carrera 997.1 S or 4S. There are already a couple of very good videos done by Van on how to replace the pads and rotors
Speakers and Motors. Three feet of magnet wire to make a coil (you can reuse any of the coils you made in the last lesson if you wish)
") Speakers and Motors We ve come a long way with this magnetism thing and hopefully you re feeling pretty good about how magnetism works and what it does. This lesson, we re going to use what we ve learned
Speakers and Motors We ve come a long way with this magnetism thing and hopefully you re feeling pretty good about how magnetism works and what it does. This lesson, we re going to use what we ve learned
REMAN MBE 4000 Turbo Brake Assembly
 TO: Service Locations No.: 06 TS - 22 August 17, 2006 FROM: SUBJECT: Technical Support REMAN MBE 4000 Turbo Brake Assembly ISSUE A new service assembly (P/N: R4571401206) is now available to install a
As stated, these are solely based off of how I like to do the Pre-Trip. I give my personal opinions as well as some helpful tips.
 Here are our sections: Engine Compartment Drivers Door Fuel Area Coupling System Trailer (Please note in the type of suspension your trailer has) Light Check In-Cab Inspection and Brake Tests You will
ACURA NSX ABS/ALB Modulator Rebuild Procedure
 Version 03 ACURA NSX ABS/ALB Modulator Rebuild Procedure I rebuilt my 1991 ABS/ALB modulator using this procedure. Please note that this will not guarantee that your ABS/ALB system issues will be resolved
Installation Directions for FINGER STICK and Blocker Plate
 Installation Directions for FINGER STICK and Blocker Plate What is a Finger Stick? A Finger Stick is a simple circuit that modifies the MAF signal on LLY and LBZ engines (not LB7 engines) to expected levels
Traditional method Oil Change Instructions For VW 1.9 TDI
 Traditional method Oil Change Instructions For VW 1.9 TDI Created by DeafBug This document provides instructions on changing the oil and filter on a VW 1.9 TDI engines. All the pictures here are taken
PLEASE READ THESE INSTRUCTIONSFULLY BEFORE STARTING TO ASSEMBLE YOUR DIDICAR PLEASE PAY SPECIAL ATTENTION TO THE NOTES AND HINTS
 PLEASE READ THESE INSTRUCTIONSFULLY BEFORE STARTING TO ASSEMBLE YOUR DIDICAR PLEASE PAY SPECIAL ATTENTION TO THE NOTES AND HINTS ASSEMBLY INSTRUCTIONS Parts List iv) i) v) ii) iiib) iiia) vii) i) Car Body
Troubleshooting Guide for Okin Systems
 Troubleshooting Guide for Okin Systems More lift chair manufacturers use the Okin electronics system than any other system today, mainly because they re quiet running and usually very dependable. There
Fitting Instructions For The TDV6 EGR Blanking Kit To A 2006 Model Discovery 3 TDV6 GHSE
 Part Number DA1112 Fitting Instructions For The TDV6 EGR Blanking Kit To A 2006 Model Discovery 3 TDV6 GHSE You do this modification at your own risk. Britpart won t be held responsible for what is written
 This document provides instructions for removing and installing a rear shock absorber on a Ducati Superbike with a single-sided swingarm. The torque values used are for the 748/916/996 from 1994 to 2001
Mustang Radiator Conversion DIY. By GearHeadPeter. January 27, 2011
 1964-1966 Mustang Radiator Conversion DIY By GearHeadPeter January 27, 2011 We all know that the radiators in our cars are not the best, especially if you have done any customization to the engine, which
Troubleshooting Guide for Limoss Systems
 Troubleshooting Guide for Limoss Systems NOTE: Limoss is a manufacturer and importer of linear actuators (motors) hand controls, power supplies, and cables for motion furniture. They are quickly becoming
Installation Manual v1.2: Ford Sub Zero Intercooler L Ford Trucks. Please read all instructions before installation.
 9/14/2009 203-900-3224 - INST Installation Manual v1.2: Ford Sub Zero Intercooler 99-03 7.3L Ford Trucks Please read all instructions before installation. Note: Some aftermarket air intakes can interfere
Volvo 1800 Dash Pad Replacement
 Volvo 1800 Dash Pad Replacement (courtesy of John Garden State Chapter Volvo Club America) Reupholstering the dash Well it has been some time since I have been online in the forum. Winter is a quite time
Oil change: Mark s 2015 Jetta. Changed oil and 10k service on 11 October 2015.
 Oil change: Mark s 2015 Jetta. Changed oil and 10k service on 11 October 2015. Mark had the car on the lift when I got there. The dog was friendly, but not much help. Oil level before the change at 9,997
Brake System Rebuilding the brake calipers
 Page 1 of 39 Brake System Rebuilding the brake calipers Written by the backyard hack mechanic Sean750 Document history: # 14 Jan 2004 added pictures of rear caliper rebuild kit # 13 Nov 2004 added more
2007 Crown Victoria Police Interceptor (P71) Blend Door Actuator Replacement (If I did it, you can too.)
 Blend Door Actuator Replacement (If I did it, you can too.)") 2007 Crown Victoria Police Interceptor (P71) Blend Door Actuator Replacement (If I did it, you can too.) I'm not saying this is the only way, or even the right way, but it worked for me. First time I've
2007 Crown Victoria Police Interceptor (P71) Blend Door Actuator Replacement (If I did it, you can too.) I'm not saying this is the only way, or even the right way, but it worked for me. First time I've
Description Of the. Disassembly, Overhaul and Assembly Of a. Distributor Nr Of a. Porsche 993 Carrera
 Description Of the Disassembly, Overhaul and Assembly Of a Distributor Nr. 930.602.015.01 Of a Porsche 993 Carrera 4 1996 1 1. Introduction This article is a description of the dual distributor overhaul
Honda Super Cub Etc. Frame & Forks
 Honda Super Cub Etc. Frame & Forks Introduction This section is all about how to strip, servioce and rebuild the frame and forks of the Honda Super Cub and other bikes using the same frames, plus all the
Installation Manual v1.0: Aurora Plus Turbo Kit ( ) 5.9L Dodge. Please read all instructions before installation.
 5.9L Dodge. Please read all instructions before installation.") Installation Manual v1.0: Aurora Plus - 4000 Turbo Kit (2003-2007) 5.9L Dodge Please read all instructions before installation. Figure 1: Aurora Plus - 4000 Kit Contents 1 Figure 2: Aurora Plus Hardware
Installation Manual v1.0: Aurora Plus - 4000 Turbo Kit (2003-2007) 5.9L Dodge Please read all instructions before installation. Figure 1: Aurora Plus - 4000 Kit Contents 1 Figure 2: Aurora Plus Hardware
Fitting the Bell Auto Services (B-A-S) TDV6 EGR Blanking Kit to a 2006 model Discovery 3 TDV6 HSE
 TDV6 EGR Blanking Kit to a 2006 model Discovery 3 TDV6 HSE") Fitting the Bell Auto Services (B-A-S) TDV6 EGR Blanking Kit to a 2006 model Discovery 3 TDV6 HSE Before I describe how I did this, I must first thank other members of the Disco3.co.uk forum (namely J,moore
Fitting the Bell Auto Services (B-A-S) TDV6 EGR Blanking Kit to a 2006 model Discovery 3 TDV6 HSE Before I describe how I did this, I must first thank other members of the Disco3.co.uk forum (namely J,moore
How to stick a 3.4L engine into your Boxster.
 How to stick a 3.4L engine into your Boxster. When I purchased my 99 Boxster in January, it was already equipped with a TPC supercharger setup. While fun and a great improvement over the rather anemic
Tonneau Cover Lift Cylinders
 Tonneau Cover Lift Cylinders Level of difficulty: Fairly easy very rewarding! Tools needed: - Flat screwdriver - Rags or paper towels - (recommended: magnetic parts tray to hold clips) For inspection only:
2010 Prius Maintenance
 2010 Prius Maintenance Changing Oil Disclaimer: All the information stated in this document was provided by Prius owners. None were affiliated with Toyota Motor Corporation, except as customers. This document
Single Barrel Shotgun HPFP Install Guide
 Single Barrel Shotgun HPFP Install Guide Thank you for purchasing the VTT Single Barrel Shotgun HPFP upgrade kit! PLEASE READ THE ENTIRE GUIDE BEFORE BEGINNING INSTALLATION! The first thing you should
HOW TO: Rebuild the Bendex-Treadlevac Master Brake Cylinder By Ross Miller
 HOW TO: Rebuild the Bendex-Treadlevac Master Brake Cylinder By Ross Miller Whenever Packard had a design or manufacturing lapse, the correction showed up in the Service Bulletins and Letters, even if it
Actual CFM = VE Theoretical CFM
 Here is a brief discussion of turbo sizing for a 2.0 liter engine, for example, the 3-SGTE found in the 91-95 Toyota MR2 Turbo. This discussion will compare some compressor maps from the two main suppliers
PLEASE READ THROUGH THE WHOLE WRITE UP BEFORE ACTUALLY USING IT!!!!
 JDM power folding mirror switch install into stock USDM harness. By: Greg L., Zeke21 on twinturbo.net PLEASE READ THROUGH THE WHOLE WRITE UP BEFORE ACTUALLY USING IT!!!! This is how I was able to get the
This is what we are trying to create in the steps below
 You will need: (1) Some 3/4 aluminium or steel flat bar (+/- 1 foot) (2) About 12 of 3 Aluminium or steel tubing. (2) Piece of 3X3 silicone hose and 2 hose clamps (3) 1 K&N (or similar) high flow filter
YOU MAY WANT TO FIRST TRY TO LOOSEN THE FILTER HOUSING
 2005 XC90 Tune-up (5-cyl) Including: Oil Change - Spark Plugs - Fuel Filter - Cabin Filter First off - let me say that I am an amateur (at best) mechanic, and I claim no responsibility for whatever you
Cleaning the EGR valve (Electronic)
") Tools Required: Cleaning the EGR valve (Electronic) A 4mm Allen Key A 6mm Allen Key A 10mm Socket A 13mm Socket A Ratchet Rubber Gloves Old Tooth Brush Oven Cleaner (Caustic) Step 1: Remove the plastic
Tools Required: Cleaning the EGR valve (Electronic) A 4mm Allen Key A 6mm Allen Key A 10mm Socket A 13mm Socket A Ratchet Rubber Gloves Old Tooth Brush Oven Cleaner (Caustic) Step 1: Remove the plastic
3 October 2016 PN# V Dodge Twin Turbo Kit (I-00274) ½ D o d g e 2 4 v I S B
 ½ D o d g e 2 4 v I S B") 3 October 2016 PN#1045320 24V Dodge Twin Turbo Kit (I-00274) 1 DOWNLOAD ENHANCED INSTALL MANUALS AT dieselperformance.com BD Twin Turbo Kit 1998½- 2 0 0 2 D o d g e 2 4 v I S B Part# 1045320 PLEASE READ
3 October 2016 PN#1045320 24V Dodge Twin Turbo Kit (I-00274) 1 DOWNLOAD ENHANCED INSTALL MANUALS AT dieselperformance.com BD Twin Turbo Kit 1998½- 2 0 0 2 D o d g e 2 4 v I S B Part# 1045320 PLEASE READ
This TSI Service Bulletin replaces TSI , Cylinder Liner, D12, D12A, D12B, D12C ( ), publication no. PV776 TSP
, publication no. PV776 TSP") Volvo Trucks North America, Inc. Greensboro, NC USA This TSI Service Bulletin replaces TSI 213 002, Cylinder Liner, D12, D12A, D12B, D12C (11.2001), publication no. PV776 TSP160571. Cylinder Liner TSI
Volvo Trucks North America, Inc. Greensboro, NC USA This TSI Service Bulletin replaces TSI 213 002, Cylinder Liner, D12, D12A, D12B, D12C (11.2001), publication no. PV776 TSP160571. Cylinder Liner TSI
CRANKSHAFT REAR RADIAL SEAL
 1B-38 CRANKSHAFT REAR RADIAL SEAL Preceding Work: Removal of flywheel or drive plate 1. Special tool 2. Special tool 3. Crankshaft rear seal Tools Required W9911 0020B (601 589 03 43 00) Crankshaft Rear
Detroit Tuned R56 Oil Service How-To
 Detroit Tuned R56 Oil Service How-To Welcome to Detroit Tuned s how-to guide for an oil service for an R56 MINI Cooper. It s always best to do an oil change on a hot engine as the hot oil will drain better