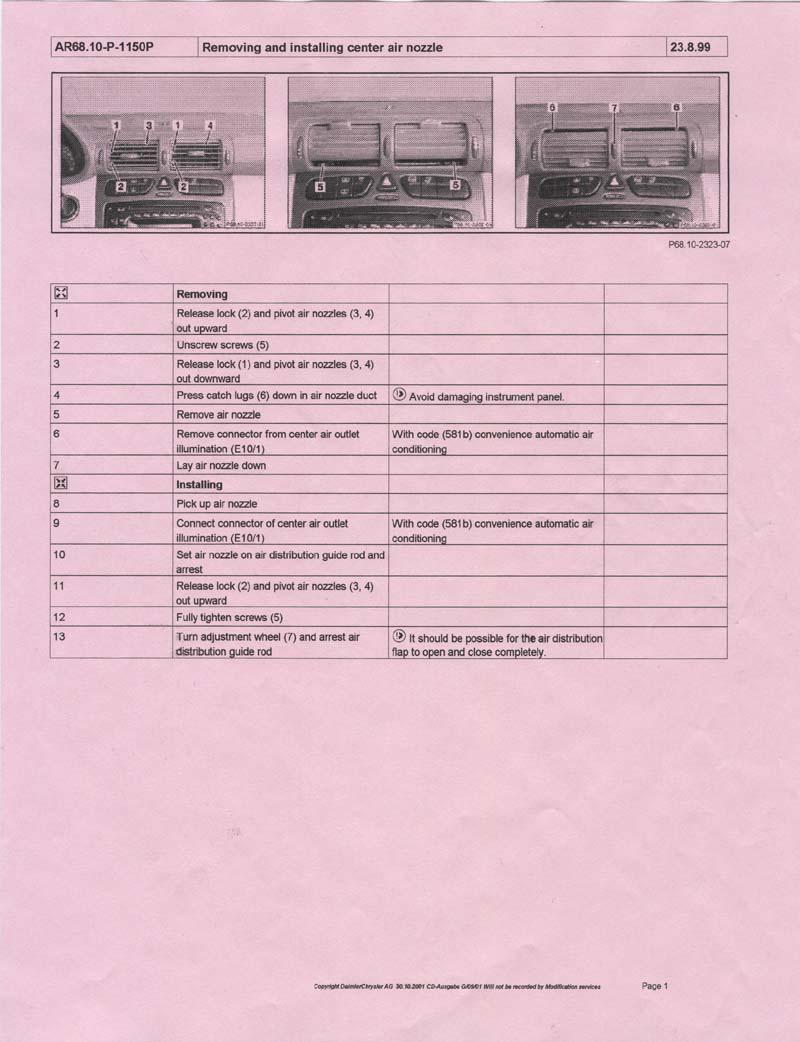
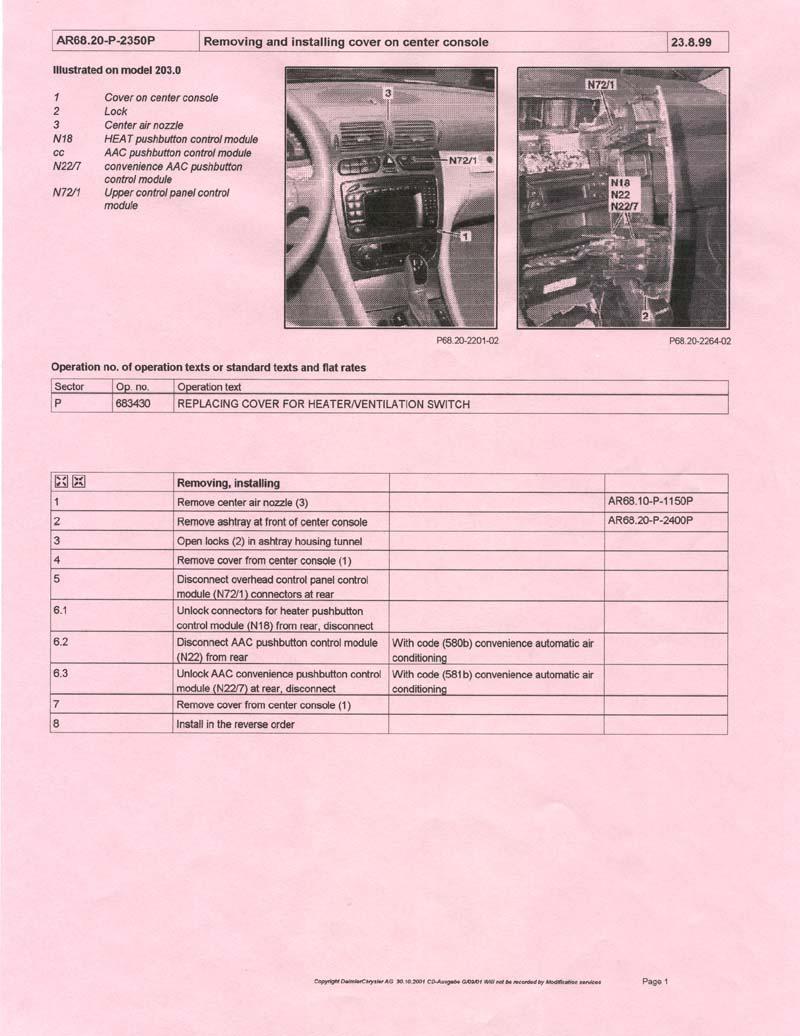
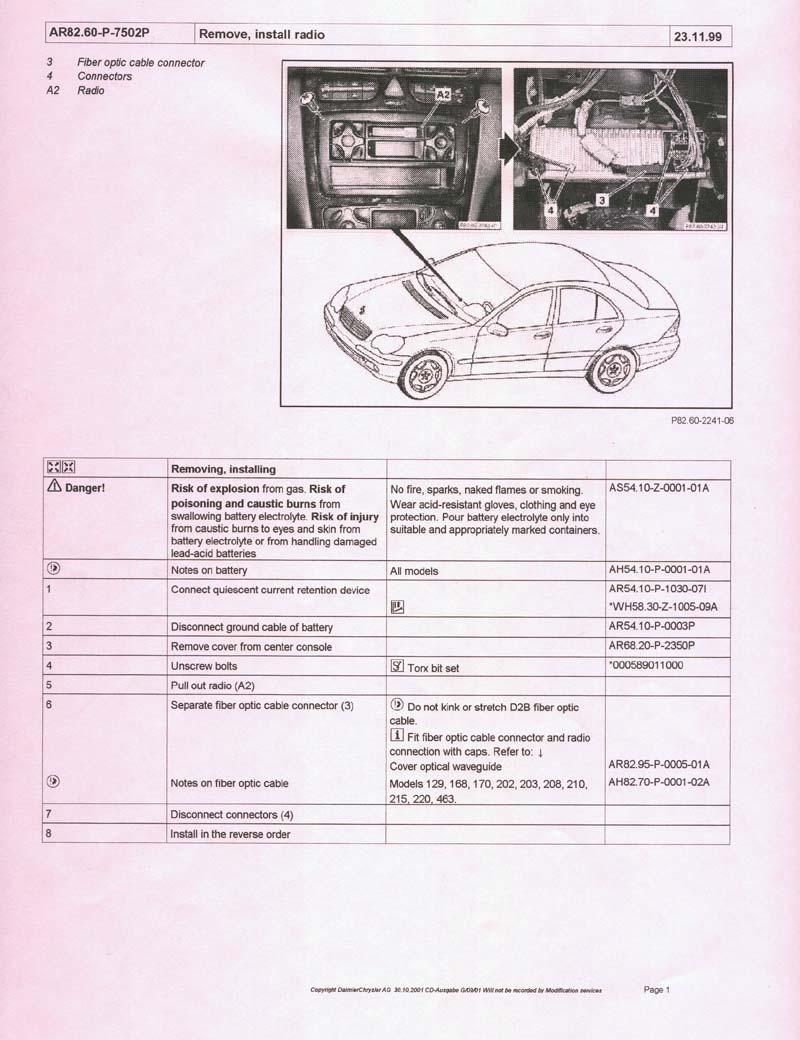
If you study the Mercedes Documents (pictured below) for several minutes before you start, you will understand them as you proceed.
|
|
|
- Rosalind Sutton
- 6 years ago
- Views:
Transcription
1 Removing the C32 center dash panel and radio These are not my instructions, they were garnered from the web, I merely pasted them onto a doc file. There is Air Bag wiring nearby. If you feel uncomfortable with that fact I suggest you don t proceed. Take your time: be careful not to break the plastic locks and scratch your dash panels. The first time you do this it will take about 30 minutes, the next time may well be half that time because you will have the correct tools and will understand exactly what you need to do. There probably is airbag wiring nearby, you should not tamper with that, so be very sure you know what you are doing with the wiring. If you study the Mercedes Documents (pictured below) for several minutes before you start, you will understand them as you proceed. Tools needed: Torx driver small-med #15 or #20?, a thin steel tool such as a 1/2 inch wide steel ruler, small flat-blade screwdriver (tweaker driver style) regular, long flat blade screwdriver small, bright flashlight Removing the center dash panel to get to the radio (These are installation notes, I suggest you follow the actual MBZ docs 1 page below). Remove Vent Assembly: The hardest part is the first, the upper center vent assy. It has to come out. Look inside the vent itself: Find the locks on the top/sides, they allow the vents to rotate fully, farther up and down than normal. Phase 1: Release locks, rotate the vents fully up, remove the torx screws on the bottom. Phase 2: Unlock again, rotate fully down, and hold the top teeth assy s, pull firmly to remove the whole vent assembly. You will soon appreciate the tight fit and the German Engineering. It is a little tricky to get the center vent assembly out. You need to keep the top latches pressed down as you pull out the assembly. They have several "teeth" that grip the lip molded into the dash piece above, so you need to keep some pressure on the unlock tabs as you slide it out. It's a tight fit, but if you pull straight out and gently rock it, it will come out. Disconnect the electrical connector that supplies power for the backlit controls. Removing the aluminum trim piece: Stop the car with the gear selector in N Remove ashtray. There are two spring Metal Clip locks (which are deep and thus hard to see) on either side inside the ashtray receiver area/in the gap above the Ashtray door. Use a flashlight to locate them. Careful not to scratch your ashtray door. Lever them DOWN to UNCLIP these spring clips. Panel should now be loose. Remove the panel. Watch where you disconnect cables, pay attention else they can be reassembled incorrectly. The radio itself is held in place by two torx screws (one on each side). For this dash/radio removal work the torx screws are different, keep each torx type separated from the others. Once you remove those screws, the radio slides right out. After you slide out the radio, the pocket below it also slides out (no screws holding it in). Be careful that your fiber optic lines don't kink while you're sliding out the radio. It's a little tight in there. Be especially careful not to kink a line during re-insertion of the radio.
2 Actual Mercedes instructions follow below: Removing the radio is done in three major steps: 1) Center Air Nozzle (Vent) Removal, (this is the black, plastic 2-channel vent directly above the radio). This step is a little difficult. 2) Center Console Cover Removal, (this is the metal panel surrounding the radio itself). This step is a bit easier. 3) Radio Removal. Mechanically this step is very easy
3
4
5
6
7 Installing the CD changer UNTESTED steps: 1. Remove the radio. 2. Remove the three CD changer transport keys. 3. Verify that the suspension spring setting is "H" (horizontal). Affix the three adhesive dust covers from the kit over the transport holes 4. on the bottom of the CD changer. Mount the CD changer to the mounting bracket with four M4 X 6 5. machine screws. Use a knife to cut out the perforated knock-out from inside the CD 6. changer compartment left side. Feed the CD changer power cable through the newly created opening 7. and into the CD changer compartment. Feed the fiber optic cable through the same opening into the CD changer 8. compartment. 9. Connect the power and fiber optic cables to the back of the CD changer. 10. Carefully secure both cables in the CD changer bracket clip. Slide the CD changer assembly completely to the left of the 11. compartment until the bracket tab inserts into the compartment slot. 12. Secure the CD changer assembly at the right mounting tab with a screw. 13. Reinstall the radio in reverse order of removal.
Genuine Corvette Accessories Carbon Fiber Radio Surround Installation Instructions for Corvettes.
 Genuine Corvette Accessories Carbon Fiber Radio Surround Installation Instructions for 2005-2007 Corvettes. Difficulty: 3 out of 5. Time: Plan on about 1 hour. The tools used are: A small flashlight A
t o A T tio llo firs ... tic tib try rfa fib (in r): lis BAU ... ALM ith ilitie tio lis ts c a x d n itin
: lis BAU ... ALM ith ilitie tio lis ts c a x d n itin") www.soundgate.com Be Sure To Ask Your Autosound Specialist About These Other Exciting SoundGate Products... Competition-Grade Interfaces for adding amplifiers Remote audio control interfaces that let you
www.soundgate.com Be Sure To Ask Your Autosound Specialist About These Other Exciting SoundGate Products... Competition-Grade Interfaces for adding amplifiers Remote audio control interfaces that let you
OIL COOLER KIT INSTALLATION INSTRUCTIONS PART NUMBER D
 OIL COOLER KIT INSTALLATION INSTRUCTIONS PART NUMBER D570-0904 APPLICATION: 2011-2012 E90 335i/xi (N55 engine) with BMW standard bumper and with stock oil cooler Congratulations for being selective enough
Installation Instructions
 Installation Instructions Page 1 of 8 August 2008 Sound System, CD Changer Version 2.0 Accessory Development These installation instructions supercede all previous versions. SUBJECT CD Changer Retrofit
INSTALLATION INSTRUCTIONS JEEP 2011-UP JK SECURITY FULL CONSOLE #274
 INSTALLATION INSTRUCTIONS JEEP 2011-UP JK SECURITY FULL CONSOLE #274 PARTS CHECKLIST Tuffy Console #9 Left Front Mounting Bracket #10 Right Front Mounting Bracket #11 Electronics mounting bracket #12 Divider
OEM Cruise Control Installation in GMC/Chevy NBS trucks
 OEM Cruise Control Installation in 99-02 GMC/Chevy NBS trucks May 2008 ~ Rampage_Rick Having just installed factory cruise control in my 00 Sierra, I thought I d share the fun. I followed the steps outlined
8mm Bolt Plate. Passenger/right front only Upper Mounting Bracket
 4 SIDE STEPS PARTS LIST: 1 Driver/left Side Step 13 8-1.25mm x 25mm Hex Bolts 1 Passenger/right Side Step 13 8mm x 24mm x 2mm Flat Washers 1 Passenger/right Upper Bracket (all incl. DEF) 13 8mm Lock Washers
Irunning Board Installation Instruction
 PARTS LIST: Item QTY Description Item QTY Description #1 2 Running Board(use for left or right) #8 13 8-1.25mm x 25mm Hex Bolt #2 1 Passenger/right Upper Bracket #9 13 8mm x 24mm x 2mm Flat Washer #3 1
OIL COOLER KIT INSTALLATION INSTRUCTIONS PART NUMBER D E92 335is (N54 engine) with BMW M-Technic bumper and with stock oil cooler
 with BMW M-Technic bumper and with stock oil cooler") OIL COOLER KIT INSTALLATION INSTRUCTIONS PART NUMBER D570-0923 APPLICATION: 2011 E92 335is (N54 engine) with BMW M-Technic bumper and with stock oil cooler Congratulations for being selective enough to
OIL COOLER KIT INSTALLATION INSTRUCTIONS PART NUMBER D570-0923 APPLICATION: 2011 E92 335is (N54 engine) with BMW M-Technic bumper and with stock oil cooler Congratulations for being selective enough to
INSTALLATION INSTRUCTIONS
 INSTALLATION INSTRUCTIONS Accessory Application Publications No. AII 27871 CIVIC IN-DASH CD CHANGER 2- AND 4-DOOR Issue Date AUG 2004 PARTS LIST In-Dash CD Changer Attachment: P/N 08B06-S5D-110 CD Changer
Installing the Wireless Charging upgrade kit in a 2018 XT5 (Platinum version)
") Installing the Wireless Charging upgrade kit in a 2018 XT5 (Platinum version) September 2, 2018 Tools needed: Wireless charger upgrade kit Plastic trim tools 7 mm nut driver Background: I purchased the
Installing the Wireless Charging upgrade kit in a 2018 XT5 (Platinum version) September 2, 2018 Tools needed: Wireless charger upgrade kit Plastic trim tools 7 mm nut driver Background: I purchased the
INSTALLATION INSTRUCTIONS GRILLE GUARD SILVERADO 1500 PART #
 INSTALLATION INSTRUCTIONS PART # 3-5863 4-0863 PARTS LIST: Qty Description Qty Description 1 Grille Guard Assembly 6 12-1.75mm Hex Nuts 2 Frame Brackets 4 10-1.50mm x 30mm Hex Bolts 1 Driver/Left Mounting
INSTALLATION INSTRUCTIONS
 HIGH FLOW AIRFLOW METER INSTALLATION INSTRUCTIONS PART NUMBER D763-1600A APPLICATION: 2001-06 E46 M3 Parts List: Hose clamp 64Z (7) Plastic Rivets Air Filter Temp Sensor & Harness (2) Button Head Screws
Remove 4 circled pins. Route wiring along dashed line. Remove the 2 9mm nuts and black retaining plate that secure extractor.
 2015 Ford Mustang Turn Signal Hood Kit Parts List: Quantity: Tool List: Bracket & pre-installed lamp 2 Flat head screwdriver Wiring harness 1 Phillips screwdriver PB-3660 Parts Bag 1 Ratchet & Socket set
Remove the 3-11mm nuts holding mirror on. Don t drop the nuts!
 2005-2012 Ford Mustang Puddle Lamp Kit Parts List: Quantity: Tool List: LED Lamps 2 Flat head screwdriver Seals 2 Ratchet & Socket set OR Nuts 2 Adjustable Wrench Wiring harness 1 Drill & 11/16 th bit
Required Parts and Tools
 Welcome to the installation guide for the 2004 to 2009 CLK Class Mercedes Benz. Please thoroughly review this manual before installation as there are details that are essential to operation of the vehicle.
Replacing the Vacuum Servo on 700/900 with ACC/ECC Double-Acting Servos. [Procedure from Dick Riess, to whom thanks are given; some notes from Dan]
![Replacing the Vacuum Servo on 700/900 with ACC/ECC Double-Acting Servos. [Procedure from Dick Riess, to whom thanks are given; some notes from Dan]](/thumbs/89/98811956.jpg "Replacing the Vacuum Servo on 700/900 with ACC/ECC Double-Acting Servos. [Procedure from Dick Riess, to whom thanks are given; some notes from Dan]") Replacing Vacuum Servos in ACC/ECC-Equipped 700/900 Cars FAQ Home Volvo Maintenance FAQ for 7xx/9xx/90 Cars HVAC Home OEM Manual Procedure for Replacing Vacuum Servos. See the FAQ file for a large.pdf
Replacing Vacuum Servos in ACC/ECC-Equipped 700/900 Cars FAQ Home Volvo Maintenance FAQ for 7xx/9xx/90 Cars HVAC Home OEM Manual Procedure for Replacing Vacuum Servos. See the FAQ file for a large.pdf
OIL COOLER KIT INSTALLATION INSTRUCTIONS PART NUMBER D E92 335i/xi (N55 engine) with BMW Standard bumper and with stock oil cooler
 with BMW Standard bumper and with stock oil cooler") OIL COOLER KIT INSTALLATION INSTRUCTIONS PART NUMBER D570-0924 APPLICATION: 2011-12 E92 335i/xi (N55 engine) with BMW Standard bumper and with stock oil cooler Congratulations for being selective enough
OIL COOLER KIT INSTALLATION INSTRUCTIONS PART NUMBER D570-0924 APPLICATION: 2011-12 E92 335i/xi (N55 engine) with BMW Standard bumper and with stock oil cooler Congratulations for being selective enough
GENUINE PARTS INSTALLATION INSTRUCTIONS
 GENUINE PARTS INSTALLATION INSTRUCTIONS 1. 2. 3. 4. DESCRIPTION: Accent light Kit APPLICATION: Versa (2012) PART NUMBER: 999F3 AW008 - Universal Accent Lighting Kit. KIT CONTENTS: Item QTY Description
I - Sheet Number I-PW Rev. A
 I - Sheet Number I-PW013988 Rev. A Installation Instructions Part # 23948007/24048007 PARTS LIST: 1 Driver/left Sidebar 17 8-1.25mm x 25mm Hex Bolts 1 Passenger/right Sidebar 17 8mm x 24mm x 2mm Flat Washers
INSTALLATION INSTRUCTIONS
 INSTALLATION INSTRUCTIONS Accessory XM RADIO SYSTEM Application 2009 CIVIC 2-AND 4-DOOR (Si) Publications No. AII 40186 Issue Date AUG 2008 PARTS LIST XM Radio Attachment (sold separately): P/N 08B15-SNA-100B
INSTALLATION INSTRUCTIONS GRILLE GUARD GMC SIERRA 1500 EXCLUDES DENALI PART # 4084/
 INSTALLATION INSTRUCTIONS GRILLE GUARD 14-15 GMC SIERRA 1500 PART # 4084/ 4084-2 PARTS LIST: GRILLE GUARD Qty Description Qty Description 1 Grille Guard Assembly 6 12-1.75mm Hex Nuts 2 Frame Brackets 4
INSTALLATION INSTRUCTIONS 5" BENT END SIDEBARS ROCKER PANEL MOUNT SILVERADO/SIERRA CREW CAB INCLUDES DIESEL W/DEF PART NUMBER
 INSTALLATION INSTRUCTIONS 5" BENT END SIDEBARS ROCKER PANEL MOUNT PART NUMBER WB51010S WB51010B WB51019S WB51019B PARTS LIST: 1 Driver/left Sidebar 25 8-1.25mm x 25mm Hex Bolt 1 Passenger/right Sidebar
Mercedes Benz SLK Class
 INSTALLATION INSTRUCTIONS FOR PART 99-8713 KIT FEATURES DIN radio provision with pocket ISO radio provision with pocket Double DIN radio provision APPLICATIONS See application list inside Mercedes Benz
Down South Vettes Leather Sun visor Installation Instructions.
 Down South Vettes Leather Sun visor Installation Instructions. Difficulty: 3 out of 5. Time: Plan on about 30 minutes. The tools used are:? A medium blade screw driver? A small flashlight may help get
OIL COOLER KIT INSTALLATION INSTRUCTIONS PART NUMBER D
 OIL COOLER KIT INSTALLATION INSTRUCTIONS PART NUMBER D570-0907 APPLICATION: 2011-12 E90 335i/xi (N55 engine) with BMW M-Technic bumper and without stock oil cooler Congratulations for being selective enough
GM TRUCK Double Din Head Unit Install Kit
 www.thedetailss.com 95-99 GM TRUCK Double Din Head Unit Install Kit Please read all instructions including the *install tips* first! 1. Disconnect the vehicle s battery. 2. Remove the dash panel; Lower
Installation Manual TWM Performance Short Shifter Nissan 350Z, 370Z Infiniti G35, G37
 Installation Manual TWM Performance Short Shifter Nissan 350Z, 370Z Infiniti G35, G37 It is preferable to park on a flat surface, as you will have to engage and disengage the hand brake and shift from
Wheel Bearing Replacement Passat TDI
 Rear Bearing/hub assembly replacement This is a fairly straight forward process. Pictures are not necessary for most of this procedure for a person with skills to do this repair. Anyone who thinks they
GENUINE PARTS INSTALLATION INSTRUCTIONS
 GENUINE PARTS INSTALLATION INSTRUCTIONS 1. DESCRIPTION: 2. APPLICATION: 3. PART NUMBER(S) REQUIRED FOR INSTALLATION: 4. KIT CONTENTS: Item Qty. Fog Lamp Kit Titan MY16 999F1 W4000 Fog Lamp Kit Part Description
Passenger/Right. Driver/Left. Driver/Left Side Frame. Mounting Bracket. (2) 12mm Double Nut Plates (models without tow hooks)
 12mm Double Nut Plates (models without tow hooks)") PARTS LIST: Qty Description Qty Description 1 Grille Guard 4 10-1.5mm x 30mm Hex Bolt 1 Driver/left Frame Bracket 8 10mm x 24mm OD x 2.2mm Flat Washer 1 Passenger/right Frame Bracket 4 10-1.5mm Nylon Lock
PARTS LIST: Qty Description Qty Description 1 Grille Guard 4 10-1.5mm x 30mm Hex Bolt 1 Driver/left Frame Bracket 8 10mm x 24mm OD x 2.2mm Flat Washer 1 Passenger/right Frame Bracket 4 10-1.5mm Nylon Lock
Mo- Doors Garage Door Opener Installation Victory Vision
 Mo- Doors Garage Door Opener Installation Victory Vision Your Mo- Door opener is the best garage door opener system out there for your Victory Vision. We hope you enjoy your opener as much as we do designing
COLD AIR INTAKE INSTALLATION INSTRUCTIONS. # D Fits: F10 M5 # D Fits: F06/F12/F13 M6 PARTS LIST
 COLD AIR INTAKE INSTALLATION INSTRUCTIONS # D760-0035 Fits: 2013-15 F10 M5 # D760-0037 Fits: 2012-15 F06/F12/F13 M6 PARTS LIST (1) Left Carbon Airbox Lid (1) Right Carbon Airbox Lid (1) Left Carbon Snorkel
Please read thoroughly before starting installation and check that kit contents are complete.
 Rear Vision System Mirror Display 2013-Current Ram (Kit part number 1009-9518) Please read thoroughly before starting installation and check that kit contents are complete. Items Included in the Kit: Rear
Driver/Left Rear Inner Support Bracket. (2) Front Bracket Arms
 Front Bracket Arms") PARTS LIST: VIEWPOINT RUNNING BOARDS 1 Driver/Left Running Board 2 10mm Lock Washers 1 Passenger/Right Running Board 20 8mm x 25mm Hex Bolts 2 Mounting Bracket Arms 28 8mm x 22mm OD x 2mm Flat Washers
PARTS LIST: VIEWPOINT RUNNING BOARDS 1 Driver/Left Running Board 2 10mm Lock Washers 1 Passenger/Right Running Board 20 8mm x 25mm Hex Bolts 2 Mounting Bracket Arms 28 8mm x 22mm OD x 2mm Flat Washers
RAINGEAR 1955/ 1956 Chevrolet
 RAINGEAR 1955/ 1956 Chevrolet GETTING STARTED: SOME RECOMMENDATIONS PLEASE TRY OUR WAY FIRST! Note: This system is designed with built in adjustments to fit in your car. If, as you are installing it, you
Mustang Short Throw Sport Shifter (All 83 - Early 01 & V6 T-5/T-45 Transmission) - Installation Instructions
 - Installation Instructions") Mustang Short Throw Sport Shifter (All 83 - Early 01 & 01-04 V6 T-5/T-45 Transmission) - Installation Instructions The below installation instructions work for the following products: Mustang Short Throw
Mustang Short Throw Sport Shifter (All 83 - Early 01 & 01-04 V6 T-5/T-45 Transmission) - Installation Instructions The below installation instructions work for the following products: Mustang Short Throw
One Piece Products. Series XI Ford F SERIES TRUCKS One Piece Door Glass Conversion Manual.
 *Registered Trademark One Piece Products *Patent Pending Series XI 1980-1996 Ford F SERIES TRUCKS One Piece Door Glass Conversion Manual www.onepieceproducts.com (888)One Products (888)663-7763 1 Installation
List of parts needed below. Tools needed
 1 BMW 645 Coolant leak repair (Cap with Seal Repair and Expanding Coolant Pipe Installation w Pics) By Michael R. Brown (Estimated time to complete the job is 6-8 hrs) List of parts needed below. BMW PART
2015 Copyright Maxspeed-Motorsports.com
 1 Porsche PCM 3.1 Backup Camera Installation Instructions. Thank you for purchasing your product at www.maxspeedmotorsports.com Before you start please understand that these installation instructions are
INSTALLATION INSTRUCTIONS
 INSTALLATION INSTRUCTIONS Accessory Application Publications No. AII 37978 XM RADIO SYSTEM 2008 CIVIC HYBRID Issue Date SEP 2007 PARTS LIST XM Radio Attachment (sold separately): P/N 08B15-SNA-100B 7 Wire
INSTALLATION INSTRUCTIONS RATTLER STEEL RUNNING BOARDS FORD TRANSIT VAN (FULL SIZE)
") INSTALLATION INSTRUCTIONS PARTS LIST: 1 32-inch Steel Running Board 1 8-1.25mm x 35mm Hex Bolt 1 96-inch Steel Running Board 13 8-1.25mm x 25mm Hex Bolt 5 Passenger Side/Driver Side Mounting Brackets 20
INSTALLATION INSTRUCTIONS PARTS LIST: 1 32-inch Steel Running Board 1 8-1.25mm x 35mm Hex Bolt 1 96-inch Steel Running Board 13 8-1.25mm x 25mm Hex Bolt 5 Passenger Side/Driver Side Mounting Brackets 20
STEPS FOR REMOVING REAR ASHTRAY & CUP HOLDER, CENTER ARMREST, E- BRAKE CONSOLE, FRONT ASHTRAY, LOWER CENTER CONSOLE AND GLOVE BOX
 Please give credit where credit is due! This DIY was completed ENTIRELY by the hardest working VW Vortex moderator on the site!! Gary Thompson, Ph.D. - vortex ID VGRT6, email address vgrt6@yahoo.com. Please
INSTALLATION INSTRUCTIONS FORD F-150 2WD & 4WD RETAINS FACTORY TOW HOOKS PART #P3063
 INSTALLATION INSTRUCTIONS FORD F-150 2WD & 4WD RETAINS FACTORY TOW HOOKS PART #P3063 PARTS LIST: 1 Grille Guard 2 10-1.5mm Nylon Lock Nuts 1 Driver/Left Frame Mounting Bracket 4 12mm Plastic Washers 1
INSTALLATION INSTRUCTIONS
 9002-6513 Rear Vision System W/ Zoom Aftermarket and Factory 8.4 Touch Screen Display (Factory Display requires Chrysler/Dodge dealer to activate) 2009 2012 RAM (Part B) 2013 Current RAM (Part A) NOTE:
12 6mm x 22mm OD x 2mm Flat Washers mm x 40mm Button Head Bolt Plates 12 6mm Hex Nuts 6 12mm Plastic Retainers
 Parts List: VIEWPOINT ALUMINUM RUNNING BOARD 1 Driver/Left Side Running Board 6 12mm Lock Washers 1 Passenger/Right Side Running Board 6 12mm x 32mm OD x 3mm Flat Washers 1 Driver/Left Mounting Bracket
8mm Bolt Plate. (15) 8mm U-Clip Nuts. Passenger/right front Upper Bracket
 8mm U-Clip Nuts. Passenger/right front Upper Bracket") PARTS LIST: 2 T-6 Side Bars 8 8mm Double Bolt Plates 1 Passenger/right Upper Bracket (all incl. DEF) 17 8-1.25mm x 25mm Hex Bolts 1 Passenger/right Lower Bracket (all incl. DEF) 33 8mm x 24mm x 2mm Flat
PARTS LIST: 2 T-6 Side Bars 8 8mm Double Bolt Plates 1 Passenger/right Upper Bracket (all incl. DEF) 17 8-1.25mm x 25mm Hex Bolts 1 Passenger/right Lower Bracket (all incl. DEF) 33 8mm x 24mm x 2mm Flat
Installation Instructions
 Installation Instructions Jeep JK 2-Door (2011 Present) Mounting Bracket and Air Line System Kit for ARB On-Board Twin Air Compressor (CKMTA12) Made in the USA Kit Contents: 1 Flat Bracket 1 Formed Bracket
Prerequisites: Shop Manual (recommended) pages 3-9 through 3-13.
 pages 3-9 through 3-13.") Prerequisites: Order your gaskets average about $25.00 bucks X 2 so $50.00 4NK-11193-00-00 Obtain a shim kit (Should have several 265 and 270s) (Some dealers will exchange) Obtain a Valve Bucket Tool YM-33961
Prerequisites: Order your gaskets average about $25.00 bucks X 2 so $50.00 4NK-11193-00-00 Obtain a shim kit (Should have several 265 and 270s) (Some dealers will exchange) Obtain a Valve Bucket Tool YM-33961
2014 Subaru of America, Inc. All rights reserved. SERVICE BULLETIN. Service Procedure to Address a Wind Rushing Sound from the Front Door Sash Area
 ATTENTION: GENERAL MANAGER q PARTS MANAGER q CLAIMS PERSONNEL q SERVICE MANAGER q IMPORTANT - All Service Personnel Should Read and Initial in the boxes provided, right. 2014 Subaru of America, Inc. All
Stand Alone Fog Lights Installation Instructions
 Tools Required: 1. Trim Removal tool or protected flat screwdriver 2. #2 Phillips Screwdriver 3. 10mm socket 4. 10mm wrench 5. 8mm or 5/16 socket 6. Adjustable Pliers 7. Electrical Tape WARNING!!! Disconnect
VW Shift Paddle Kit Installation Instructions
 VW Shift Paddle Kit Installation Instructions Parts Included: (1) Left and right shift paddle (1) Small pick tool (1) Hex key (1) T20 Torx key (1) Loctite capsule Tools Needed: Medium flat-heat screwdriver
(2) 12mm x 40mm Short Low Profile Bolt Plates. (2) Spacer Washers. (4) 12mm Plastic Retainers. Passenger/Right Front.
 12mm x 40mm Short Low Profile Bolt Plates. (2) Spacer Washers. (4) 12mm Plastic Retainers. Passenger/Right Front.") PARTS LIST: 1 Driver/Left Running Board with 1 Rubber Backing (use on SX & Limited models) 4 12mm Plastic Retainer 1 Passenger/Right Running Board with 1 Rubber 4 12mm Lock Washer Backing (use on SX &
PARTS LIST: 1 Driver/Left Running Board with 1 Rubber Backing (use on SX & Limited models) 4 12mm Plastic Retainer 1 Passenger/Right Running Board with 1 Rubber 4 12mm Lock Washer Backing (use on SX &
SECTION 1A3 - INSTRUMENT PANEL AND CONSOLE
 SECTION 1A3 - INSTRUMENT PANEL AND CONSOLE Click on the button for more information. CAUTION: This vehicle will be equipped with a Supplemental Restraint System (SRS). A SRS will consist of either seat
INSTALLATION INSTRUCTIONS
 INSTALLATION INSTRUCTIONS Accessory XM RADIO SYSTEM Application 2011 CIVIC 2-AND 4-DOOR (EX, EX-L) Publications No. AII 44350 Issue Date AUG 2010 PARTS LIST XM Radio Attachment (sold separately): P/N 08B15-SNA-100A
Spark Plug replacement on VW 2.0L engine with AEG code
 Spark Plug replacement on VW 2.0L engine with AEG code This is document is an attempt to describe and illustrate to some extent the process of replacing the spark plugs on a Volkswagen 2.0L engine with
Installation Manual Volvo C30 T5 Front Mount Intercooler System
 Installation Manual Volvo C30 T5 Front Mount System Volvo C30 T5 System / Installation Manual i C Contents Important Information i Parts List i Required Tools and Materials 1 1.0 - Vehicle Preparation
Aux Port. Installation Instructions For Radio Harness
 Aux Port Installation Instructions For Radio Harness Thank you for choosing the Double Apex Aux Port! If you have any questions about the installation please do not hesitate to email us at support@doubleapex.co
ECS Tuning 3095 Cleveland-Massillon Rd. Norton, Ohio Phone Fax Web
 B7 A4 Gauge Pod Installation Instructions Safety first:. When working with your vehicles electrical system; always disconnect the battery! Avoid shorting any circuits, or probing around wires. Failure
Date: Order No.: Supersedes: Group:
 Installation Instructions Date: April 2007 Order No.: Supersedes: P-I-82.60/394A Group: 82 Revision: MOST ring configuration correction Section F, Figure 17 SUBJECT: MODEL 220.170/174/175/176/183/184 MODEL
xpressstart Mercedes Solution Mercedes Benz S and CL Class
 DIGITAL REMOTE START SYSTEM WWW.XPRESSKIT.COM MADE IN THE USA xpressstart Mercedes Solution 2007-2012 Mercedes Benz S and CL Class Tools you will need -T-25 Torx Driver -Panel Removal tool -3/4 Drill bit
GENUINE PARTS INSTALLATION INSTRUCTIONS
 GENUINE PARTS INSTALLATION INSTRUCTIONS 1. 2. 3. 4. DESCRIPTION: APPLICATION: PART NUMBER: KIT CONTENTS: Accent light Kit Versa Note 999F3 4Z000 - Accent Lighting Kit. 999Q9 AY000 - Accessory Service Connector
DrVanos.com Stage II Installation Instructions. Tool rental is available with the purchase of a vanos kit *See website for more info*
 DrVanos.com Stage II Installation Instructions Special Tools Needed: Camshaft locking tool TDC Crank pin Sprocket turning tool Tool rental is available with the purchase of a vanos kit *See website for
The drawings are all available from the author or from the host websight. You will find these pictures and descriptions to be most helpful.
 Last Revision: 10JA2010 1969 THRU 1976 GM A & F-CAR STANDARD (NON-ADJUSTABLE) STEERING COLUMN DISASSEMBLY & REPAIR INSTRUCTIONS PAPER #1 Disassembly and Repair Instructions Addressed in this Paper Degree
BMW E61 Hydraulic Pump replacement instructions
 BMW E61 Hydraulic Pump replacement instructions This DIY will guide you through the tasks needed to successfully replace your defective tailgate hydraulic pump Difficulty 3 of 10. The most difficult part
M GT 2005 up Mustang ENGINE START Push-Button INSTRUCTION SHEET
 Please contact the Ford Racing Techline for the most current instruction information @ (800) FORD-788!!! PLEASE READ THE FOLLOWING INSTRUCTIONS CAREFULLY PRIOR TO INSTALLATION!!! OVERVIEW: The following
GENUINE PARTS INSTALLATION INSTRUCTIONS
 GENUINE PARTS INSTALLATION INSTRUCTIONS 1. 2. 3. DESCRIPTION: APPLICATION: PART NUMBER: Accent light Kit Cube (MY2013+) 999F3 AW000 - Universal Accent Lighting Kit. 4. KIT CONTENTS: Item QTY Description
Cost - 41 ($68 approx) Time 2.5 hours approx
 Time 2.5 hours approx") Cost - 41 ($68 approx) Time 2.5 hours approx The early X3 (E83) from the first build to September 2004 was fitted with nasty black plastic door opener handles which were quickly superseded by a matt chrome
Cost - 41 ($68 approx) Time 2.5 hours approx The early X3 (E83) from the first build to September 2004 was fitted with nasty black plastic door opener handles which were quickly superseded by a matt chrome
Audi A8 ( ) MMI swivelling unit repair manual
 MMI swivelling unit repair manual") Audi A8 (2003-2007) MMI swivelling unit repair manual Tools which you will need: two pcs screwdriver (any kind, for vent removing ) (you can cover the metal part with any tape to prevent making scratches
Audi A8 (2003-2007) MMI swivelling unit repair manual Tools which you will need: two pcs screwdriver (any kind, for vent removing ) (you can cover the metal part with any tape to prevent making scratches
Van Rack Installation Manual Ford Transit Connect
 1.888.772.8400 Big to small... We do it all Van Rack Installation Manual Ford Transit Connect Thank you for your purchase of an Unruh Fab Van rack. We have designed and built this rack so that you can
(W) INSTALLATION INSTRUCTIONS GRILLE GUARD 2014 GMC SIERRA 1500 EXCLUDES DENALI PART # /
 INSTALLATION INSTRUCTIONS GRILLE GUARD 2014 GMC SIERRA 1500 EXCLUDES DENALI PART # /") (W) INSTALLATION INSTRUCTIONS GRILLE GUARD PART # 508514/ 508515 PARTS LIST: GRILLE GUARD Qty Description Qty Description 1 Grille Guard Assembly 6 12-1.75mm Hex Nuts 2 Frame Brackets 4 10-1.50mm x 30mm
(W) INSTALLATION INSTRUCTIONS GRILLE GUARD PART # 508514/ 508515 PARTS LIST: GRILLE GUARD Qty Description Qty Description 1 Grille Guard Assembly 6 12-1.75mm Hex Nuts 2 Frame Brackets 4 10-1.50mm x 30mm
c. The new configuration was to connect i. Sound-Out to UHI-In ii. UHI-Out to SDARS-In
 (Borrowed a couple of pictures from Cellguy s 20-page brief, but mostly mine. ) To be shared freely in the MBenz community; no rights reserved. This is just my experience and not an endorsement or recommendation
Tonneau Cover Lift Cylinders
 Tonneau Cover Lift Cylinders Level of difficulty: Fairly easy very rewarding! Tools needed: - Flat screwdriver - Rags or paper towels - (recommended: magnetic parts tray to hold clips) For inspection only:
Installation Manual TWM Performance Short Shifter Cobalt SS/SC, SS/TC, HHR SS, Ion Redline and Saab 9-3
 Page 1 Installation Manual TWM Performance Short Shifter Cobalt SS/SC, SS/TC, HHR SS, Ion Redline and Saab 9-3 Please Note: It is preferable to park on a flat surface, as you will have to engage and disengage
Jazzy Engineering Aux-in Accessory for 2005/06 Subaru WRX, Outback Sport & Impreza Radios Installation Instructions
 Jazzy Engineering Aux-in Accessory for 2005/06 Subaru WRX, Outback Sport & Impreza Radios Installation Instructions First check that your package includes everything listed below for proper installation.
TOYOTA YARIS XM SATELLITE RADIO Preparation (Sedan & Hatchback)
") Preparation (Sedan & Hatchback) Part Number: Mounting Kit PT546-52096 Tuner Assy 86180-0W031 Tuner Assy Kit Contents (86180-0W031) Item # Quantity Reqd. Description 1 1 Tuner Assy, Stereo Component Mounting
Preparation (Sedan & Hatchback) Part Number: Mounting Kit PT546-52096 Tuner Assy 86180-0W031 Tuner Assy Kit Contents (86180-0W031) Item # Quantity Reqd. Description 1 1 Tuner Assy, Stereo Component Mounting
spec.dock BMW 5-Series e60 v.2 Installation Instructions
 Thank you for your purchase of a spec.dock ipod solution for your vehicle. Audio connections may vary according to your particular setup. 2point5 recommends having your spec.dock integrated by a certified
Raxiom Factory GPS Rear Back-up Camera Kit (07-17 Wrangler)
") Raxiom Factory GPS Rear Back-up Camera Kit (07-17 Wrangler) Installation Time: 2.5-3Hrs Tools Required: 7mm Socket & Driver 10mm Socket 10mm Open end wrench Knife / Razor blade Zip-ties Wire Cutters Needle
Raxiom Factory GPS Rear Back-up Camera Kit (07-17 Wrangler) Installation Time: 2.5-3Hrs Tools Required: 7mm Socket & Driver 10mm Socket 10mm Open end wrench Knife / Razor blade Zip-ties Wire Cutters Needle
COLD AIR INTAKE INSTALLATION INSTRUCTIONS
 COLD AIR INTAKE INSTALLATION INSTRUCTIONS # D760-0029 Fits: 2009-10 335i/xi (E90; with N54 engine) Congratulations for being selective enough to use a Dinan Engineering Cold Air Intake. We have spent many
BODY-24, Late Model 944 ( and Newer) Dash Replacement
 Dash Replacement") BODY-24, Late Model 944 (1985.5 and Newer) Dash Replacement Introduction Replacing the dash in a late model 944 is not overly difficult. However, it is very tedious and a lot of patience is required. It's
BODY-24, Late Model 944 (1985.5 and Newer) Dash Replacement Introduction Replacing the dash in a late model 944 is not overly difficult. However, it is very tedious and a lot of patience is required. It's
Soft Top Rear Locking Cylinders
 Soft Top Rear Locking Cylinders Level of difficulty: Fairly easy very rewarding! Tools needed: - M10 socket and ratchet - Flat screwdriver or needle nose pliers or small hooked tool for removal of hydraulic
GOMINIGO Third Brake Light Pulsar Kit. Installation Instructions
 Page 1 of 8 Mini Cooper Installation Instructions This kit allows the owner of any MINI Cooper or Cooper S to create a blinking effect from the third brake light assembly. The MINI Cooper being hit from
DASH AUDIO KIT P/N APPLICATION BEFORE YOU BEGIN KIT CONTENTS. Instr Rev 01 04/16 Page 1 of 6. Verify accessory fitment at Polaris.com.
 DASH AUDIO KIT P/N 2882030 APPLICATION Verify accessory fitment at Polaris.com. BEFORE YOU BEGIN Read these instructions and check to be sure all parts and tools are accounted for. Please retain these
Fitting new lock and replacing a door latch assembly
 Fitting new lock and replacing a door latch assembly It has long been a problem with older MGBs and Midgets that once the door lock becomes worn the whole barrel assembly twists with the key as you try
Removing and installing the dash panel
 Стр. 1 из 6 Removing and installing the dash panel Removing: WARNING Disconnect battery earth strap Electrical System Rep. Gr.27. Removing the centre console Chapter. Remove the steering wheel Chapter.
Connecting the rear fog light on the A4 Jetta, while keeping the 5 Light Mod
 Connecting the rear fog light on the A4 Jetta, while keeping the 5 Light Mod DISCLAIMER: I'm human and make mistakes. If you spot one in this how to, tell me and I'll fix it This was done on my 99.5 Jetta.
INSTALLATION INSTRUCTIONS 3 BULL BAR CHEVY SILVERADO1500/GMC SIERRA TAHOE/SUBURBAN/YUKON/YUKON XL
 INSTALLATION INSTRUCTIONS 3 BULL BAR 2007-16 CHEVY SILVERADO1500/GMC SIERRA1500 PART # 35-4016;B35-4016;B35-4016-3;P35-4016 Page 1 of 6 PARTS LIST: 1 Bull Bar 6 12mm x 24mm OD x 2.5mm Flat Washer 1 Driver/Left
Push Start Ignition (05-10 All) Installation
 Installation") Tools Required: Phillips head screwdriver Flat head screwdriver Ratchet 7mm Socket Torx T20 bit Wire strippers/cutters Hand file Needle nose pliers Installation Instructions: Push Start Ignition (05-10
Tools Required: Phillips head screwdriver Flat head screwdriver Ratchet 7mm Socket Torx T20 bit Wire strippers/cutters Hand file Needle nose pliers Installation Instructions: Push Start Ignition (05-10
How to Install a 997, Boxster, & Cayman Radio
 How to Install a 997, Boxster, & Cayman Radio Step-by-step instructions for a 997.1, Boxster, & Cayman Radio Installation. *Credit to CAI- Store.com for this Guide* Written By: Danielle 2017 guides.drivediy.com
C4 Sound Deadening & Insulation Kit Interior Removal & Installation Instructions
 C4 Sound Deadening & Insulation Kit Interior Removal & Installation Instructions Ok, let's start with taking the radio bezel dash area off first. Here is what the OEM radio looks like, and the points you
AEM Intake Tube & Dryflow Air Filter Kit GT
 AEM Intake Tube & Dryflow Air Filter Kit 2011-2014 GT Time Required: Approximately 1 hour Tools Required: Pair of Diagonal Cutters or Tin Snip Pliers (something to cut thick wire) Medium Size Flat Head
Guide to fitting a MK2.5 (Facelift) Centre Console into a MK2 Focus. The Parts
 Centre Console into a MK2 Focus. The Parts") Guide to fitting a MK2.5 (Facelift) Centre Console into a MK2 Focus For the latest project on my MK2 Focus I decided that a Facelift centre console would tie my previous interior uplift together. As I
Guide to fitting a MK2.5 (Facelift) Centre Console into a MK2 Focus For the latest project on my MK2 Focus I decided that a Facelift centre console would tie my previous interior uplift together. As I
B. Land Rover Range Rover
 99-9402B INSTALLATION INSTRUCTIONS KIT FEATURES ISO DIN radio provision with pocket ISO DDIN radio provision Painted black KIT COMPONENTS A) Radio trim panel B) Radio brackets C) Radio bracket adapters
by B6 Boost Volkswagen -> (46) Golf & Jetta V (13) Passat B6 (11) Passat B5.5 (4) Phaeton (8) Eurovan (7) Touareg (3) Audi
 Golf & Jetta V (13) Passat B6 (11) Passat B5.5 (4) Phaeton (8) Eurovan (7) Touareg (3) Audi") 1 of 10 Top» Volkswagen» Passat B6» European Cup Holder DIY Installations European Cup Holder by B6 Boost Volkswagen -> (46) Golf & Jetta V (13) Passat B6 (11) Passat B5.5 (4) Phaeton (8) Eurovan (7) Touareg
1 of 10 Top» Volkswagen» Passat B6» European Cup Holder DIY Installations European Cup Holder by B6 Boost Volkswagen -> (46) Golf & Jetta V (13) Passat B6 (11) Passat B5.5 (4) Phaeton (8) Eurovan (7) Touareg
335i Upgrade Intercooler Installation Instructions
 335i Upgrade Intercooler Installation Instructions Part Number: D330-0015 Applications: 2011-12 E90/E92/E93 335i (N55) 2011-12 E92/E93 335is (N54) 2011-12 E90 335i (N55) with M-Technic bumpers (Except
Gentex Homelink Installation Instructions
 Gentex Homelink Installation Instructions Kit Contents: Item Qty Part Description 1 Number GENK-41 NVS Homelink Mirror GENK-42 NVS Homelink w/mood lights 1 of the GENK-45 NVS Homelink w/compass following
 Special Tools Needed: DrVanos.com Stage I Installation Instructions Camshaft locking tool TDC Crank pin Sprocket turning tool Tool rental is available with the purchase of a vanos kit *See website for
INSTALLATION INSTRUCTIONS GRILLE GUARD F-150 P/N 3066;3066-2
 INSTALLATION INSTRUCTIONS P/N 3066;3066-2 PARTS LIST: 1 Grille Guard 4 12mm Lock Washer 1 Driver/left Frame Bracket 4 10-1.5mm x 30mm Hex Bolt 1 Passenger/right Frame Bracket 8 10mm x 24mm OD x 2.2mm Flat
Chrysler Multi-kit TABLE OF CONTENTS Dash Disassembly...2 Kit Assembly
 99-650345 INSTALLATION INSTRUCTIONS Chrysler Multi-kit 1998-2010 INTRODUCTION This instruction booklet will cover (3) different kits, yet carry the same applications and dash disassembly. After dash disassembly
OIL COOLER KIT INSTALLATION INSTRUCTIONS PART NUMBER D E92 335i/xi (N55 engine) with M-Technic bumper and without stock oil cooler
 with M-Technic bumper and without stock oil cooler") OIL COOLER KIT INSTALLATION INSTRUCTIONS PART NUMBER D570-0925 APPLICATION 2011-12 E92 335i/xi (N55 engine) with M-Technic bumper and without stock oil cooler Congratulations for being selective enough
OIL COOLER KIT INSTALLATION INSTRUCTIONS PART NUMBER D570-0925 APPLICATION 2011-12 E92 335i/xi (N55 engine) with M-Technic bumper and without stock oil cooler Congratulations for being selective enough