Before replacing, you have to take apart. Let's review quickly some of the steps involved in taking apart the front brakes.:
|
|
|
- Rosanna Garrett
- 5 years ago
- Views:
Transcription

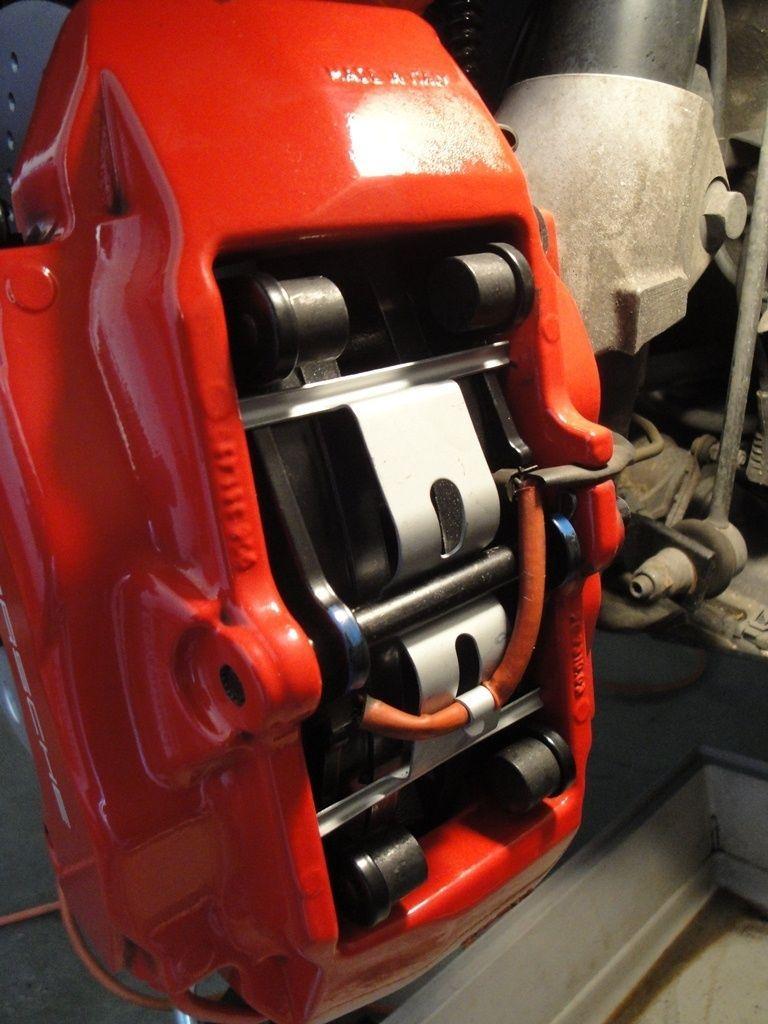
1 Folks, This is a short write-up about how to replace front rotors and pads on the Carrera S or 4S. There are already a couple of very good videos done by Van on how to replace the pads and rotors on a 996. However, I never found a comprehensive and complete write-up on how to replace the brakes on a S. When the need to change brake pads arise, the owner must decide if it worth changing the rotors or not. Measurements should be done to determine if the rotors need to be replaced or not. In my case, the existence of a little lip all around the rotors justified their replacement. When it comes to replacing the brake parts, there is a plethora of parts available and it can quickly become overwhelming and confusing. Prices vary considerably from one place to the next. Of course Porsche genuine parts remain by far the most expensive and they have to, if Porsche wants to maintain the significant profit margin it does on each car ($18K in average) and on their spare parts. After looking carefully at the brakes, it appears that the brake system is designed and manufactured by Brembo (Italy). Originally, the calipers are by Brembo, the rotor surprisingly are not marked at all (no number, no brand), pads are from Jurid (Spain) and all remaining parts are from Brembo. It seemed logical to me to select Brembo rotors sold by Pelican for $150 piece (a third of the Porsche price). The rotors are extremely well finished, plated on the outside and on the hub to prevent corrosion and very similar to the original Porsche rotors as it can be seen on the following pictures.

2 I did not weight the two rotors to see if there was any differences. I suspect that both rotor types are very identical, with perhaps a slight advantage to the Brembo rotors which seemed better built. For the pads, I decided to stick with the Porsche genuine pads for the very good feeling they give you in street and daily driving. I do not race my car and thus did not even look into the vast choice of racing and competition pads. I have used Ceramic pads on all my BMWs and found them sometimes dry to the touch, slow to respond under the rain, sometimes noisy, despite their fantastic advantage of not generating that black and nasty dust like regular pads. I also found that if you do not use them hard on a regular basis, they tend to glaze and loose a lot of their efficiency. With the above in mind, I decided to go with the Porsche genuine pads that can be obtained for $210 from Suncoast Porsche (a really good price - These guys limit their margin and make it up with the large volume of parts sold to enthusiasts all over North America. I also ordered from Suncoast the bolts, springs, clips and got the damping plates from my local dealer. In hindsight, I should have bought all the miscellaneous parts from my local dealer who always give me a very good discount.

3 There have been discussions about whether or not replace the bolts, springs clips and plates. My car is close to 70K miles, almost ten years old, and I thought it deserved to have a complete and new braking system. In addition the moral comfort to know that all the parts that could be replaced have been replaced, helps a lot when you take some risks. Besides, all miscellaneous parts add about $120 to the overall bill. Before replacing, you have to take apart. Let's review quickly some of the steps involved in taking apart the front brakes.: 1) After jacking up safely the car and removing the front wheels, you need to start taking apart the old brakes. 2) Using pliers, remove the small clip holding the pin. The clip is placed along the back of the caliper, on the inside.
4 3) Using an old Torx screwdriver or a long rod, push the pin located above the pads, towards the inside of the car. 4) Remove very carefully the wear sensors on each pad. A small screwdriver is the best tool I have found to dislodge these sensors without damaging them. Both sensors are plunging into a hole located in the pads, so be careful when pulling them out. They have to be extracted perpendicularly to the pads. 5) Once everything is cleared, use an adjustable pliers to squeeze the pads to the side of the caliper. Make sure you place a piece of rags between the outside of the caliper and the teeth of the pliers, so as to not damage the paint. You must squeeze each pad towards the outside as much as possible. You may want to open the brake fluid reservoir and make sure that none of the fluid is spilling while you try to spread away both pads. Once the pads are next to the caliper walls, they will remain there and you can move to the next phase. 6) Using a thin blade (I found a cheese knife to be the perfect tool), insert it between the pad and the damping plate. The damping plate is glued to the pads, but the heat and pressure usually cook the glue, and cutting through that glue is not that difficult. Take your time and make sure that the pads are free from their damping plate from the top all the way to the bottom. 7) At this point, just pick up the pad and pull it out. It should slide out very easily. 8) Using your cheese knife, gently insert it between the damping plate and the caliper and remove the damping plate. The damping plate has two cylinders attached to it (see picture). They are of different sizes. If you have pushed the pad completely against the wall of the caliper, you will have just enough space to remove the damping plate. If the damping plate are not coming out, re-insert the pad, and squeeze with your adjustable pliers (and rag) until the two pistons are completely compressed inside the caliper. 9) Do the same for the other pad and damping plate. 10) Using an hex-pan of 10 mm, insert it into one of the two bolts holding the caliper to the hub. Use a breaking bar if you have access to a 10 mm Hex Pan mounted on a 1/2 socket. I could only find a 10 mm Hex pan mounted on 3/8 socket and noticed that the 10 mm bit was starting to rotate into its socket...not good. Instead, I inserted a regular 10 mm Hex wrench (the L shaped stuff, hard and solid) and using a hammer, tapped it a few times to break it. After that, it was easy to remove both bolts. 11) Before taking away completely the second bolt, you will secure the caliper to the suspension spring using some twig, wool or soft material to not damage the paint. The fluid line going to the caliper is solid and gives you just enough play to remove the caliper out of the rotor. 12) Spray a drop of PB Blaster on both Phillips screws holding the rotor, wait a few seconds and remove these two screws. Here, I have read a lot of horror stories, where people had to use impact screwdrivers or even worse, having to drill out the screws. On my car, they came out very easily. I suppose that on cars submitted to extreme thermal cycling (such as racing) or if the previous mechanic did not use anti-seizing agent on these screws, they may be more challenging to remove. 13) Finally, wiggle the rotor and remove it from the hub. Alternatively, you can use a rubber hammer to dislodge it with some friendly taps. Alright, the hub appears in all its glory and we are ready to start rebuilding.

5 Wanting to do things as cleanly as possible, I brushed the hub with a metallic brush and removed all traces of corrosion and dust. As customary when replacing the pads, a can of brake cleaner comes handy to give a final blow of cleanliness. I also, took apart the brake shield plate, sanded it and repainted it with a high temperature spray paint. It may last whatever it will, but it looks much better than the corroded and dusty shield I removed earlier:
 or should I leave it the way it is? To clean or not to clean?")
6 When re-attaching the shield, do not forget the anti seize paste on all three bolts. Then comes the philosophical question: Should I clean the caliper (think Concours d'elegance) or should I leave it the way it is? To clean or not to clean? I will leave that question to each and everyone. What I did was rather simple and would not allow me to score any points at a Concours d'elegance. I sprayed the caliper with simple green, left it soaking and used a tooth brush to remove most of the grime on the inside and mostly around the pistons. I also verified that each piston could be squeezed and would travel freely within the caliper. The small pistons can be easily verified and actuated, whereas the larger one will require more powerful fingers.

7 I know, it is not perfect but who has time for perfection anyway? Once happy with the clean (or dirty) appearance of the caliper, the new rotor (or the old one) can be installed. When I ordered the brake parts from Suncoast, I also decided to get a set of 7mm spacers for the front wheels and 15 mm spacers for the rear wheels. These spacers comes as a complete kit with beautiful chrome plated lugs and longer screws for fixing the spacer and the rotor to the hub:

8 It makes for a very nice assembly. Again, do not forget the Permatex anti-seizing grease on the tip of the two screws holding the spacer and rotor. This is your insurance against future headaches. We are moving along with the re-assembly with the installation of the caliper on the new rotor.: 1) Take your time and wiggle the caliper until it slide on the rotor without scratching it or damaging it. It is tight but it will pass. 2) Insert the two new black bolts into the caliper and torque them at 63 foot-pounds with your torque wrench. 3) with all pistons squeezed as much as possible, insert one damping plate in the pistons. Push it all the way inside. Damping plates are apparently mounted dry with no type of anti-squealing grease or anything. Peel carefully the sticker to reveal the glue. 4) Insert a new pad all the way in and push it against the damping plate. Adhesion will start but you have plenty of time to move the pad or even remove it and re-insert it. 5) Do the same for the other damping plate and pad. 6) Place the spring on top and insert the pin from the inside of the car out. You may have to tap gently the pin to make it go all the way on the front wall of the caliper. 7) Do not forget to insert the clip in the pin. Verify twice that everything is perfect. 8) Spin the rotor and make sure all is fine. Clean the rotor if some greasy or dirty fingers have contaminated it (use Brake cleaner fluid). 9) Carefully re-insert both wear sensors into the pads. I found it easier to first insert the inside sensor, place the wire under the spring, and finish with the outside sensor.
9 10) Carefully re-attach the electrical wire of the sensors to the brake line with the two plastic clips. On the C4S, make sure the wire is not located near the universal joint of the front wheel. 11) Now is a good time to flush that specific caliper. I know there are people (and even dealers) who looks at the fluid in the reservoir, finds it clear and beautifully transparent and concludes that it never needs to be changed. The point is: the fluid in the reservoir and the fluid in the calipers are two different animals, separated by meters of brake lines. When you do a job such as this one, do not take a short cut and do not skip the flushing phase. Instead, I run about half a liter of fluid through each caliper and alternate between blue and yellow fluid. Here I was going from Blue back to Yellow, which takes a lot of fluid to get rid of any shades of blue and green. Start flushing the outside caliper/pistons first, and then flush the inside/caliper pistons. Of course, use the one-man pressure system hooked to your brake fluid reservoir. Here is a picture of the finished brake assembly:
10


11 As indicated before, I am also installing some 7 mm spacers. The new bolts provided in the kit are quite beautiful and 7 mm longer than the original bolts. I am also getting rid of the anti theft lug which is always a problem, when doing some maintenance. The spacer kit also comes with a couple of Porsche mounting pins to help you position the wheel and avoid paint damage to your beautiful calipers:
 which is built with a plastic cover to preserve your rims, a brass insert to not mar your lugs and a 1/2 inch socket to match your torque wrench. A beautiful and very inexpensive tool.")
12 Because of the near absence of shoulders on the 7 mm spacer, the wheel must be installed as carefully as possible and torqued very progressively. I use a soft wrench of 19 mm (Autozone $9.99) which is built with a plastic cover to preserve your rims, a brass insert to not mar your lugs and a 1/2 inch socket to match your torque wrench. A beautiful and very inexpensive tool. I also washed carefully the wheels before re-assembling them. Wheel lugs must be torqued at 96 foot-pound. The finished result is a lot nicer than it was with the old lugs and will provide me with some good braking capabilities for years to come. Now, it is time to move to the other front wheel...and to play it again.

13 I hope you enjoyed that write-up and will find it useful when replacing your brakes. I have learnt so much from that 997 community that I really enjoy giving back and contributing when I see certain topics not covered or missing. Yves
How I installed new brake pads on my i with Sport Package (should be fine for other E39 s) By Robert B.
 By Robert B.") How I installed new brake pads on my 1999 528i with Sport Package (should be fine for other E39 s) How I installed new brake pads on my 1999 528i with Sport Package (should be fine for other E39 s) By
How I installed new brake pads on my 1999 528i with Sport Package (should be fine for other E39 s) How I installed new brake pads on my 1999 528i with Sport Package (should be fine for other E39 s) By
2008 Toyota Tundra 4WD Brake Job: A Quick Job and Even Quicker Write-Up.
 FRONT BRAKES: 2008 Toyota Tundra 4WD Brake Job: A Quick Job and Even Quicker Write-Up. 1. Remove this bolt holding brake line bracket to the suspension. 2. I had to replace all 4 rotors at 60K miles, so
Changing the Struts on a WK Jeep CRD
 Changing the Struts on a WK Jeep CRD Step by Step By Chirpz Disclaimer: I do not claim that this procedure is the right way or even the best way to change your struts. This is what I did after reading
Installing Rear Brake Pads on a WK Jeep
 Installing Rear Brake Pads on a WK Jeep Step by Step By Chirpz Disclaimer: I do not claim that this procedure is the right way or even the best way to change your rear brake pads. This is what I did after
How to replace Air Filter and Serpentine Belt in less than one hour on a Porsche S
 How to replace Air Filter and Serpentine Belt in less than one hour on a Porsche 997.1 3.8S How to replace your Air Filter cartridge and serpentine belt on a 997.1 3.8S engine in less than one hour. Disclaimer:
Rear drum to disk conversion for a 00 Toyota Camry LE 4 cylinder
 Rear drum to disk conversion for a 00 Toyota Camry LE 4 cylinder *** Read and use at your own discretion I assume no liability for what you or anyone else does with this information. By reading this, you
Fitting the Bell Auto Services (B-A-S) TDV6 EGR Blanking Kit to a 2006 model Discovery 3 TDV6 HSE
 TDV6 EGR Blanking Kit to a 2006 model Discovery 3 TDV6 HSE") Fitting the Bell Auto Services (B-A-S) TDV6 EGR Blanking Kit to a 2006 model Discovery 3 TDV6 HSE Before I describe how I did this, I must first thank other members of the Disco3.co.uk forum (namely J,moore
Fitting the Bell Auto Services (B-A-S) TDV6 EGR Blanking Kit to a 2006 model Discovery 3 TDV6 HSE Before I describe how I did this, I must first thank other members of the Disco3.co.uk forum (namely J,moore
Door Panel Removal & Window Stop Adjustment
 Door Panel Removal & Window Stop Adjustment By: Jeff Wolford Disclaimer: This is simply an article of how I fixed my car. I m not responsible if you break, scratch, or mess up anything following my example.
Brake Caliper Rebuild - Part Numbers & Tips Per Jim Millet, 3/15/2005
 Per Jim Millet, 3/15/2005 Not too difficult a job. Rears are easier than fronts to access. You ll need the following gasket sets: Front caliper gasket set, P/N 34 11 1 157 037, MSRP $13.58 Rear caliper
How to Change Front Brake Pads on a Toyota Corolla
 How to Change Front Brake Pads on a Toyota Corolla Link to this article on (All other links in this document are disabled) Follow this picture guide to change the front brake pads on a 2003-2008 Toyota
Converting a Series Land Rover to front wheel disc brakes using the kit made by Torrel Industries Ltd,
 Converting a Series Land Rover to front wheel disc brakes using the kit made by Torrel Industries Ltd, Torrel Industries ltd Series Land Rover front brake conversion kit: Difficulty - Low Except for one
Fitting Instructions For The TDV6 EGR Blanking Kit To A 2006 Model Discovery 3 TDV6 GHSE
 Part Number DA1112 Fitting Instructions For The TDV6 EGR Blanking Kit To A 2006 Model Discovery 3 TDV6 GHSE You do this modification at your own risk. Britpart won t be held responsible for what is written
Disco 3 Clock Spring / Rotary Coupler replacement
 Disco 3 Clock Spring / Rotary Coupler replacement I recently had to change my Clock spring and thought some folks may find it helpful to see what it entailed. I did lots of reading around but couldn t
Re-building a Caliper
 Re-building a Caliper by Leslie Henson The pistons in the calipers on the 90 are in very poor condition, and although the brakes work ok, it plays on our mind that the pistons are badly corroded, and it
My Hawk build Part 8 by Stuart Clarke
 My Hawk build Part 8 by Stuart Clarke Front hubs, brakes and brake lines. There was still no news on my rear springs so I thought I d find something else to get on with. I had the front hubs, brake calipers
Front Axle Pinion Seal Replacement
 Front Axle Pinion Seal Replacement by Flopster843 10 Apr 2016 The AAM 925 axle used on the front of Dodge Ram trucks is a decent unit, but it does have its flaws. This axle lacks lockout hubs on the front
ACURA NSX ABS/ALB Modulator Rebuild Procedure
 Version 03 ACURA NSX ABS/ALB Modulator Rebuild Procedure I rebuilt my 1991 ABS/ALB modulator using this procedure. Please note that this will not guarantee that your ABS/ALB system issues will be resolved
Rebuilding the Alternator for a 2007 Honda Accord 4CYL. Honda CYL Alternator (Denso)
") Rebuilding the Alternator for a 2007 Honda Accord 4CYL Honda 2007 4CYL Alternator (Denso) The OEM brushes and bearings for this alternator are available for purchase online. On my vehicle with ~240k miles,
Rebuilding the Alternator for a 2007 Honda Accord 4CYL Honda 2007 4CYL Alternator (Denso) The OEM brushes and bearings for this alternator are available for purchase online. On my vehicle with ~240k miles,
SUSP-09, Rear Wheel Bearing Replacement - Steel Trailing Arm. Acrobat Printable Version
 SUSP-09, Rear Wheel Bearing Replacement - Steel Trailing Arm Introduction Acrobat Printable Version I'd like to thank Ben Davis for providing the pictures for this procedure. Ben took the time to take
OVERHAULING BRAKE CALIPERS GUIDE by Mr. Stefnwolf. This guide is for a 1982 GSX750ET but I expect most of the GS series to be similar if not the same.
 OVERHAULING BRAKE CALIPERS GUIDE by Mr. Stefnwolf This guide is for a 1982 GSX750ET but I expect most of the GS series to be similar if not the same. Badly corroded calipers (caused by moisture in the
Mark had the car on the lift when I got there. The dog was friendly, but not much help.
 Mark s 2015 Jetta. Changed oil and 10k service on 11 October 2015. Updated with 20k service on 28 February 2016. Mark had the car on the lift when I got there. The dog was friendly, but not much help.
NEW BRAKE INSTALLATION. Let us show you how a
 Tech Article From Newsletter 17.2-2nd Quarter of 2011 NEW BRAKE INSTALLATION Let us show you how a Big Brake Install is easier than you think!! So, you have a 572 (or a hot 383) in your shoebox... you
BMW 745Li E65/E66 Rear Brake Pad Replacement By Jerry Incollingo (Jerry 745Li)
") Page 1 of 11 BMW 745Li E65/E66 Rear Brake Pad Replacement By Jerry Incollingo (Jerry 745Li) This guide will detail how to change the rear brakes on late model BMW E65 / E66 s. It was performed on a 2003
Page 1 of 11 BMW 745Li E65/E66 Rear Brake Pad Replacement By Jerry Incollingo (Jerry 745Li) This guide will detail how to change the rear brakes on late model BMW E65 / E66 s. It was performed on a 2003
Mercedes Diesel Valve Adjustment Procedure
 1 of 30 5/30/2008 12:58 PM Home Cars for sale Trucks for sale Where we are Links to other diesel sites About us Why diesel? Diesel Videos How they work How they sound FAQ Dodge Diesel Maintenance tips,
List of parts needed below. Tools needed
 1 BMW 645 Coolant leak repair (Cap with Seal Repair and Expanding Coolant Pipe Installation w Pics) By Michael R. Brown (Estimated time to complete the job is 6-8 hrs) List of parts needed below. BMW PART
Brake System Rebuilding the brake calipers
 Page 1 of 39 Brake System Rebuilding the brake calipers Written by the backyard hack mechanic Sean750 Document history: # 14 Jan 2004 added pictures of rear caliper rebuild kit # 13 Nov 2004 added more
Some tips and tricks I learned from getting clutch out of vehicle Skoda Octavia year 2000
 Some tips and tricks I learned from getting clutch out of vehicle Skoda Octavia year 2000 Last change 2013-Oct-11 I bought Haynes manual for a starter. That s something well worth it s cost I believe.
Ford Racing Front Rotor Upgrade Kit (05-10 V6) Installation Instructions
 Installation Instructions") Ford Racing Front Rotor Upgrade Kit (05-10 V6) Installation Instructions Time Necessary: Approximately 1.5 hours Tools Required: 15 MM Socket Ratchet PryBar Floor Lift or: o Floor Jack o (2) Jack Stands
Ford Racing Front Rotor Upgrade Kit (05-10 V6) Installation Instructions Time Necessary: Approximately 1.5 hours Tools Required: 15 MM Socket Ratchet PryBar Floor Lift or: o Floor Jack o (2) Jack Stands
Kodak 750H Carousel Projector Repair
 Kodak 750H Carousel Projector Repair An AT YOUR OWN RISK PROJECT by Klaus Wolter, Rev B, 3-26-2016 Here I documen the repair of my 750H carousel. A common problem with this projector, and all of the projectors
Replace brake pads and discs - rear * (Volkswagen Golf )
") Replace brake pads and discs - rear * (Volkswagen Golf 1997-2004) *Caution! This instructions are created by random users and must be used as a reference only! Please, take all safety precautions, and
Replace brake pads and discs - rear * (Volkswagen Golf 1997-2004) *Caution! This instructions are created by random users and must be used as a reference only! Please, take all safety precautions, and
Brake lever removed. Not too much corrosion on this one. The circlip retaining the plunger can be seen more clearly after cleaning with WD40
 Genuine Suzuki Kits to re-furbish your Master Cylinder are available from your regular Kettle parts supplier Part No. 59600-45811 and should cost about 20. The Kits contain all of the parts that you need
Two bolts at. Two each side where studs pass through. rear. Two bolts at. front. Front-most bolt for diagonal brace. Rear jacking point
 The following describes the process of changing the transmission s gear oil in my own 2008 CS 6sp. I have no relationship with any of the products mentioned, other than being a satisfied consumer. Exercise
Mirrored from:
 Mirrored from: http://www.wranglerforum.com/f274/install-synergy-suspension-ball-joints-write-up-147062.html 03-18-2012, 02:43 AM #1 SilverSport Supporting Member WF Supporting Member Install Synergy Suspension
 This document provides instructions for removing and installing a Front Wheel / Rotor on a Ducati Superbike. The torque values used are for the 748/916/996 from 1994 to 2001 and may be applicable for later
Ford Racing BOSS 302 Engine Oil Cooler (11-14 GT)
") Tools needed: 14mm hex socket 7mm socket/wrench 8mm socket/wrench Ford Racing BOSS 302 Engine Oil Cooler (11-14 GT) 10mm socket (for airbox removal) ¾ inch or 19mm wrench Torque wrench Appropriate ratchets
Tools needed: 14mm hex socket 7mm socket/wrench 8mm socket/wrench Ford Racing BOSS 302 Engine Oil Cooler (11-14 GT) 10mm socket (for airbox removal) ¾ inch or 19mm wrench Torque wrench Appropriate ratchets
Gearbox Assembly 101. Introduction. Before Beginning. By Mark Schutzer 4/13/06
 Gearbox Assembly 101 By Mark Schutzer 4/13/06 Introduction If you are planning to re-motor an old brass locomotive you may want to upgrade to a new gearbox at the same time. The early 60 s and 70 s gearboxes
1464. Interior Installation. Cover Rear Seat Support Cut the vinyl to approximately the size of the rear seat support.
 Chapter 37 (Video Clip 37) - Interior Installation 1464. Interior Installation Cover Rear Seat Support 1465. Cut the vinyl to approximately the size of the rear seat support. 1466. Make a dry fit of the
E31 Repair Procedure Replace Front Wheel Hub/Bearing Assembly
 E31 Repair Procedure 31-21 Replace Front Wheel Hub/Bearing Assembly Disclaimer This repair procedure is provided as is and is not authoritative with respect to any BMW repair operation. Mark F. Fling is
Replacing MK4 Golf/Jetta radiator mounts in-car
 Replacing MK4 Golf/Jetta radiator mounts in-car This is a guide to replacing the radiator mounts in a MK4 Golf/Jetta. This involves moving the core support to the service position which allows you to do
Superior Wheel Installation Guide (No Turbo removal)
") Superior Wheel Installation Guide (No Turbo removal) This is the process used to install the Turbo Wheel without having to remove the Turbo from your Engine. It should take a maximum of 5 hours. Tools:
Superior Wheel Installation Guide (No Turbo removal) This is the process used to install the Turbo Wheel without having to remove the Turbo from your Engine. It should take a maximum of 5 hours. Tools:
what you need to do is hit the taper housing as hard as you can with your hammers AT THE SAME TIME and at a slight angle, what will happen is you
 first things first, get the car on axle stands and the wheels off. Open the bonnet to let more light through to the area in which you'll be working. The following guide shows the passenger side being done
Sport Model with an easy-lube spindle
 1. List of tools: Back To Top 1. Safety glasses 2. Hammer 3. Brass or aluminum punch 4. channel locks 5. Block of wood or plastic 6. grease gun 7. razor knife 8. 6" long, 2" diameter or 1 ½" diameter pipe
Rear End Installation and Bearing Kit - 8.8in (86-12 V8; V6)
") Rear End Installation and Bearing Kit - 8.8in (86-12 V8; 11-13 V6) Tools Required: Jack Stands 5 Floor Jack 2 Oil Pans 1 Wheel Blocks 2 Differential Oil 3 qts Friction Modifier 3 bottles Tube of Black
Rear End Installation and Bearing Kit - 8.8in (86-12 V8; 11-13 V6) Tools Required: Jack Stands 5 Floor Jack 2 Oil Pans 1 Wheel Blocks 2 Differential Oil 3 qts Friction Modifier 3 bottles Tube of Black
Timing belt change. Timing belt change
 Timing belt change Put 2 new Gates T275 timing belts on today. Tensioner drilled smooth and tight with less than 16,000 miles on her decided not to change the tensioners just the belts. You'll need some
2001 V70 T5 ETM Removal and Cleaning Directions
 2001 V70 T5 ETM Removal and Cleaning Directions Howard Cheng howardc64@gmail.com 10/24/05 Version 1.4 Read this before you start I performed this ETM cleaning because I had gotten 2 reduced performance
BMW Throttle Body Reconditioning. Reconditioning BMW 750il throttle assemblies./
 Reconditioning BMW 750il throttle assemblies./ My 1990 BMW 750il was not idling well, and I was starting to get "EML" errors on startup. The "EML" light would stay on when I started the car, and the engine
Subaru SVX 1/43 Scale Model Assembly Instructions
 Subaru SVX 1/43 Scale Model Assembly Instructions Congratulations on your purchase of an unassembled 1/43 scale Subaru SVX! You now own a model that is even more rare than the car it represents. Currently
Hawk Brake Pads ( Mustang GT/V6 Rear Pair)
") Hawk Brake Pads (1994-2004 Mustang GT/V6 Rear Pair) The below installation instructions work for the following products: Hawk HPS Brake Pads (1994-2004 Mustang GT/V6 Rear Pair) Hawk Performance Ceramic
Hawk Brake Pads (1994-2004 Mustang GT/V6 Rear Pair) The below installation instructions work for the following products: Hawk HPS Brake Pads (1994-2004 Mustang GT/V6 Rear Pair) Hawk Performance Ceramic
Wheel Bearing Replacement Passat TDI
 Rear Bearing/hub assembly replacement This is a fairly straight forward process. Pictures are not necessary for most of this procedure for a person with skills to do this repair. Anyone who thinks they
Replace front brake pads and discs * (Ford Galaxy )
") Replace front brake pads and discs * (Ford Galaxy 2006-2015) *Caution! This instructions are created by random users and must be used as a reference only! Please, take all safety precautions, and if you're
Replace front brake pads and discs * (Ford Galaxy 2006-2015) *Caution! This instructions are created by random users and must be used as a reference only! Please, take all safety precautions, and if you're
Installing LED lights in a Hypercharger By Keith Edwards Joker s Wild! (Wildjokr)
") Installing LED lights in a Hypercharger By Keith Edwards Joker s Wild! (Wildjokr) THINGS YOU WILL NEED: A Hypercharger (duh!) LEDs (The ones I got were from Benny Bryant at Fantasies on Wheels in Sylacauga,
Installing LED lights in a Hypercharger By Keith Edwards Joker s Wild! (Wildjokr) THINGS YOU WILL NEED: A Hypercharger (duh!) LEDs (The ones I got were from Benny Bryant at Fantasies on Wheels in Sylacauga,
INSTALLATION INSTRUCTIONS
 INSTALLATION INSTRUCTIONS BIG ROTOR / CALIPER RELOCATION REAR KIT SUM-BK1423 1999-2009 GM 1/2 Ton Trucks & SUVs Thank you for choosing SUMMIT RACING for your braking needs. Pleases take the time to read
Toyota Truck Park Brake Bellcrank Repair
 Toyota Truck Park Brake Bellcrank Repair Toyota trucks including Tacoma, T100 and Tundra with rear drum brakes use a bellcrank apparatus through the brake backing plate as part of the parking brake system.
INSTALLATION INSTRUCTIONS
 INSTALLATION INSTRUCTIONS BIG ROTOR / CALIPER RELOCATION FRONT KITS SUM-BK1422, BK1423, BK1424 1999-2006 GM 1/2 Ton Trucks & SUVs Thank you for choosing SUMMIT RACING for your braking needs. Pleases take
Troubleshooting of the LubeTech Grease System
 Troubleshooting of the LubeTech Grease System February 2009 The LubeTech grease system is designed to be a preventative maintenance system that will extend the life of your bearings that are connected
1986 Rear Disk Brake Upgrade. All hard lines mounted to the rear axle with mounting screws. 1/4" fittings
 1986 Rear Disk Brake Upgrade Being well prepared for a project of this size is the key to success. I thought I was well prepared by doing a lot of research and getting all of the required parts before
The following information shows the steps to change the rear brake pads and rotors on an E36 chassis.
 1 of 20 1/18/2010 9:15 PM See More DIY Articles Bookmark Site! The following information shows the steps to change the rear brake pads and rotors on an E36 chassis. Disclaimer: The following information
Front Suspension Redo
 Front Suspension Redo Message: First, thanks to all the previous posters for guidance in my doing the suspension. As thanks, here s the updated document for doing the front suspension. Procedure: While
or the Shaft? The Joint Certain jobs you do one way when the shop is
 The Joint or the Shaft? Certain jobs you do one way when the shop is busy and another when time runs a bit slack, shifting the percents between parts and labor to keep everyone working while still providing
Cost - 41 ($68 approx) Time 2.5 hours approx
 Time 2.5 hours approx") Cost - 41 ($68 approx) Time 2.5 hours approx The early X3 (E83) from the first build to September 2004 was fitted with nasty black plastic door opener handles which were quickly superseded by a matt chrome
Cost - 41 ($68 approx) Time 2.5 hours approx The early X3 (E83) from the first build to September 2004 was fitted with nasty black plastic door opener handles which were quickly superseded by a matt chrome
How to Replace the B2 Piston Bore Seal
 Page 1 Home Cars for sale Trucks for sale Where we are Links to other diesel sites About us Why diesel? Diesel Videos How they work How they sound FAQ Dodge Diesel Maintenance tips, parts and DIY DVD's
Sherco Setup and Lubrication Guide
 Sherco Setup and This guide is designed to provide the Sherco owner with instructions on how to: Set up a new bike Clean and re-oil the air filter Change the transmission oil Change the fork oil Repack
Volvo 1800 Dash Pad Replacement
 Volvo 1800 Dash Pad Replacement (courtesy of John Garden State Chapter Volvo Club America) Reupholstering the dash Well it has been some time since I have been online in the forum. Winter is a quite time
There is hence three things you can do - add oil, adjust the temp that the clutch begins to engage, or do both.
 As most of you may be aware, I have been doing a lot of research lately on our cooling system in the 80's including the fact that we have a dead spot on the OEM temp gauge which prompted me to not rely
Replacement Front Outer Tie Rod End (85-93 All)
") Replacement Front Outer Tie Rod End (85-93 All) Materials in the box: One outer tie rod end, castle nut, cotter pin, nut, and grease fitting. Tools Needed: Jack and Jack Stands Pry bar (you may or may
Replacement Front Outer Tie Rod End (85-93 All) Materials in the box: One outer tie rod end, castle nut, cotter pin, nut, and grease fitting. Tools Needed: Jack and Jack Stands Pry bar (you may or may
Slave Cylinder Weep Hole Drilling Procedure
 Slave Cylinder Weep Hole Drilling Procedure Tools Required: T20 Torx Driver T25 Torx Driver T25 Torx Bit with ¼ Ratchet Wrench 4mm Hex Key (Allen wrench) 5mm Hex Key 6mm Hex Key 8mm Hex Key 12mm Hex Key
Tools needed: Here is a pic of the shift kit I used. It is a Transgo brand and as you can see, it just a bag full of springs and one valve.
 Before installing a shift kit, be sure the transmission is in good operating order. If your transmission is making noises, slipping, shifting bad or the fluid looks brown or smells burnt, take the transmission
Learning to Set-Up Your Warrior Drive Belt Arizona Warrior (Rev4) BEFORE GETTING STARTED
 BEFORE GETTING STARTED") BEFORE GETTING STARTED 1. A noise one guy calls 'howling' is the same noise another guy calls 'squealing' so unless you are both hearing the noise with your own ears its better to not assume a drive belt
BEFORE GETTING STARTED 1. A noise one guy calls 'howling' is the same noise another guy calls 'squealing' so unless you are both hearing the noise with your own ears its better to not assume a drive belt
Self Adjusting Disc Brakes
 Disc Brakes Four advantages of Disc Brakes to Drum Brakes 1) Resistance to heat fade 2) Resistance to water fade 3) Less of a tendency to pull 4) Automatically adjust to lining wear Self Adjusting Disc
INSTALLATION INSTRUCTIONS
 INSTALLATION INSTRUCTIONS DISC BRAKE CONVERSION KITS A120-4 & A120-5 1964-1/2-66 Ford & Mercury Thank you for choosing STAINLESS STEEL BRAKES CORPORATION for your braking needs. Pleases take the time to
HOW TO REPLACE THE SPOILER ON YOUR GEN 3 PRIUS
 HOW TO REPLACE THE SPOILER ON YOUR GEN 3 PRIUS Yup, it happened. The spoiler on your beloved Prius has departed this earth and now is in the great junkyard in the sky. This is how you make it all better
WARNING: Only perform this installation if you are experienced, fully equipped mechanic.
 DYNATRAC V3.2 2005-Present Ford Super Duty 250/350-4x4, Front Axle, Free Spin Conversion Kit Some of the less common tools, which will be required: 6 point Spanner socket (OTC #7090-A or equivalent). These
Installation Instructions
 Installation Instructions Rear Disc Brake Conversion Kit Item # RC1001, RC1001X Applications: 64-72 A-body, 67 F-Body, 63-67 X-body with Non Staggered Shocks Thank you for choosing GPS Auto for your automotive
Hood stripes Tools needed from AutoZone or any auto parts store: bottle spray, squeegee, a towel that you re using to clean you car up after washing,
 WARNING These following pages are instruction for C5 CE stripes; however, it is the same method applying vinyl. Please spend time to read thru these pages. At the end, it is your C5 GS1 stripes instruction.
Performance Brake Caliper Guide Bushing Set Installation Guide
 Performance Brake Caliper Guide Bushing Set Installation Guide Proper service and repair procedures are vital to the safe, reliable operation of all motor vehicles as well as the personal safety of those
4TH GEN SEATS IN A 3RD GEN TRUCK
 4TH GEN SEATS IN A 3RD GEN TRUCK by Flopster843 02 Oct 2016 If you drive a 3rd generation Dodge Ram truck, I am sure you have discovered that the OEM seats are not the greatest (Figure 1.) They are extremely
Rear Wheel Removal (by BassCliff)
") Rear Wheel Removal (by BassCliff) Hello to my GS riding friends! After picking up a nail in my rear tire (while on the freeway at 75mph!) I thought I would take a few pictures to help illustrate the rear
Rear Wheel Removal (by BassCliff) Hello to my GS riding friends! After picking up a nail in my rear tire (while on the freeway at 75mph!) I thought I would take a few pictures to help illustrate the rear
INSTALLATION INSTRUCTIONS
 INSTALLATION INSTRUCTIONS PERFORMANCE AT THE WHEELS KITS W156-6 & W156-7 1965-74 MOPAR B & E BODY Thank you for choosing STAINLESS STEEL BRAKES CORPORATION for your braking needs. Pleases take the time
Installation Directions for FINGER STICK and Blocker Plate
 Installation Directions for FINGER STICK and Blocker Plate What is a Finger Stick? A Finger Stick is a simple circuit that modifies the MAF signal on LLY and LBZ engines (not LB7 engines) to expected levels
INSTALLATION INSTRUCTIONS
 INSTALLATION INSTRUCTIONS REAR DISC BRAKE CONVERSION KIT A126-1 1973-87 CHEVROLET 1/2 TON 2WD Thank you for choosing STAINLESS STEEL BRAKES CORPORATION for your braking needs. Pleases take the time to
Fanatec GT3RS V1 to GT3RS V2 Tutorial
 Fanatec GT3RS V1 to GT3RS V2 Tutorial by Roy Visser 1 How to update your Fanatec GT3RS V1 wheel to a GT3RS V2 wheel Welcome to this guided and detailed tutorial for upgrading your Fanatec GT3RS V1 wheel
Brake master cylinder replacement
 Brake master cylinder replacement 8-25-2010 I had replaced the front brake master cylinder a few years ago when it developed a bad leak, at that time, I ordered a new master cylinder from Spartan, very
INSTALLATION INSTRUCTIONS
 INSTALLATION INSTRUCTIONS REAR DISC BRAKE CONVERSION KIT A157 1991-2004 Dodge Dakota 2WD 1991-2002 Dodge Dakota 4WD 1998-2002 Dodge Durango Thank you for choosing STAINLESS STEEL BRAKES CORPORATION for
2001 BMW X5 4.4i. Fuel Filter Replacement
 P P 2001 BMW X5 4.4i Fuel Filter Replacement Symptoms for Replacement: OBDII code P0171, Lean Bank1, which could be a bad or dirty MAF sensor Sluggish engine performance including hesitation with Wide
The Magazine For Slot Car Enthusiasts
 The Magazine For Slot Car Enthusiasts Building the Tomy Super G+ By Milt Surratt Tomy Super G+ slot cars have been around in the current form for about 12 years. Out of the package, the Tomy HO slot car
WARNING These following pages are instruction for C5 CE stripes; however, it is the same method applying vinyl. Please spend time to read thru these
 WARNING These following pages are instruction for C5 CE stripes; however, it is the same method applying vinyl. Please spend time to read thru these pages. At the end, it is your C5/C6 ME stripes' instruction.
BEW engine timing belt replacement procedure from MOGolf (as demonstrated on a 2004 Jetta).
.") BEW engine timing belt replacement procedure from MOGolf (as demonstrated on a 2004 Jetta). Based on the procedure published by Volkswagen, but modified for the "average" shadetree mechanic. Some special
BEW engine timing belt replacement procedure from MOGolf (as demonstrated on a 2004 Jetta). Based on the procedure published by Volkswagen, but modified for the "average" shadetree mechanic. Some special
Installation Instructions
 Preparing your vehicle to install your brake system upgrade 1. Rack the vehicle. 2. If you don t have a rack, then you must take extra safety precautions. 3. Choose a firmly packed and level ground to
 www.odometergears.com Mercedes-Benz Mechanical Odometer Repair This how to can be used for all mechanical repairs as the only difference will be the removal of the instrument cluster. http://www.dieselgiant.com/repairyourodometer.htm
SunFlower Helicopter Rocket LUNAR Build Session: 9/25/08 By Tom Desmarais
 SunFlower Helicopter Rocket LUNAR Build Session: 9/25/08 By Tom Desmarais Contents of Kit: A. 3 1/16 x1 x11 basswood rotors B. 3 1/16 x2 x2 basswood fins C. 3 1/16 x5/16 x1/2 basswood hold spacer D. 3
MGB V8 Roadster restoration project - 145
 11th June 2017. The MGB V8 rebuild is getting near to being finished. The exhaust manifold this side was a lot easier to fit than the left hand side. I could get my 3/8 drive Allen key socket onto the
Go-ped ESR750 / ESR750EX Rear Brake Installation Instructions
 Go-ped ESR750 / ESR750EX Rear Brake Installation Instructions This kit provides all the parts you need to install a rear brake on your ESR750 or ESR750EX. It will not work on an ESR Sport, or other Go-ped
INSTALLATION INSTRUCTIONS
 INSTALLATION INSTRUCTIONS INSTALLATION INSTRUCTIONS FOR A136 REAR DRUM TO DISC BRAKE CONVERSION KIT for 1970-75 Jeep, CJ SERIES with Dana 44 flanged axle Thank you for choosing STAINLESS STEEL BRAKES CORPORATION
Signature Series A/F/X Body GM Installation Instructions Power Disc Conversion
 Signature Series A/F/X Body GM Installation Instructions Power Disc Conversion 64-72 A Body / 67-69 F Body / 62-74 X Body Your new disc brake conversion kit can be bolted up with standard hand tools. The
INSTALLATION INSTRUCTIONS
 INSTALLATION INSTRUCTIONS REAR DISC CONVERSION KIT A126-2 1988-98 C1500 2WD 10" REAR DRUM Thank you for choosing STAINLESS STEEL BRAKES CORPORATION for your braking needs. Pleases take the time to read
LJ20 Distributor - Disassembly Inspection Repair
 LJ20 Distributor - Disassembly Inspection Repair Old Codger New To Old Suzuki Jeeps The odometer on this 1972 LJ20 indicated the distributor had less than 10,000 miles of wear but during that time it had
Aamir_bt The legend..
 Aamir_bt The legend.. How to do timing on a 4XE1-W (DOHC) engine. well i decided to to a write up for DOHC timing since there was only the SOHC written up, and i had to do a timing belt on my stylus anyways,
Replacing a Brake Line by UCLA-Vstar, April 2007
 Replacing a Brake Line by UCLA-Vstar, April 2007 Replacing a brake line may seem intimidating if you ve never bled brakes before, and especially if you cannot find a stepby-step how-to. Here s a crude
Slinky Long Travel Suspension. Toyota Land Cruiser. 80 Series Installation Instructions
 Slinky Long Travel Suspension Toyota Land Cruiser 80 Series Installation Instructions 1991-1997 www.facebook.com/redlinelandcruisers www.twitter.com/redlinecruisers www.instagram.com/redlinelandcruisers
Kysor On/Off Rear Air Fan Drive
 . Proper precautions must be taken to prevent personal injury from contact with moving parts, unintended engine start or other hazards present when working with powered equipment. Refer to the vehicle