Installation Instructions
|
|
|
- Andra Pope
- 5 years ago
- Views:
Transcription

1 Installation Instructions Rear Disc Brake Conversion Kit Item # RC1001, RC1001X Applications: A-body, 67 F-Body, X-body with Non Staggered Shocks Thank you for choosing GPS Auto for your automotive product needs. Before you begin your installation please inspect all parts and review the installation instructions. If you have any missing or damaged parts or if you have any questions regarding the fitment of this kit on your specific vehicle please contact our customer service team at (716) before beginning your installation.
2 Tools required for a safe and smooth installation: Proper Jack & Jack Stands, Tube Wrenches, Standard Socket Set, Standard Wrench Set, Torque Wrench, Lug Wrench, Pliers, Mallet, Brake Fluid, Brake Cleaner, Differential Gasket and Proper Gear Oil. Wheel Size This kit is designed for 15 or larger wheels. We do not recommend attempting to install this kit with 14 wheels and we do not authorize the modification of any of the components of the kit. Drum Brake Removal: 1. Safely raise the vehicle off the ground until the wheels are clear and spin freely. Support the vehicle using the appropriate Jack Stands and remove the rear wheels. 2. Begin by removing the brake drums from the ends of the axles. If the drums are stuck they can often be freed by tapping the drum face between the studs with a hammer. If the inside of the drums are badly grooved it may also be necessary to back of the self-adjuster to allow the drums to slide of over the brake shoes. C-Clip Axles 1. Moving to the differential remove the cover bolts and drain the gear oil from the differential. Rotate the differential until the center shaft retaining bolt is visible. Carefully loosen and remove the retaining bolt. 2. Push the center shaft towards the rear of the car and slide it out of the differential. You can now push the axle shafts inward towards the differential and remove the C-clips. With the clips removed the axles can be slid out of the axle housing. Be sure to save the C-clips, center pin, center shaft, retaining bolt and differential cover bolts for reinstallation. 3. Disconnect the parking brake cable from the brake lever and the backing plate. Using a set of hose pinch off pliers or something similar pinch of the center rear flex hose. Using a flare wrench disconnect the brake line from the back of the wheel cylinder. Remove the 4 nuts and bolts from the end of the axle housing and remove the drum brake backing plate. 4. Inspect the condition of your axle bearings and seals and clean the front and back side of the axle housing flanges for installation of the new brackets
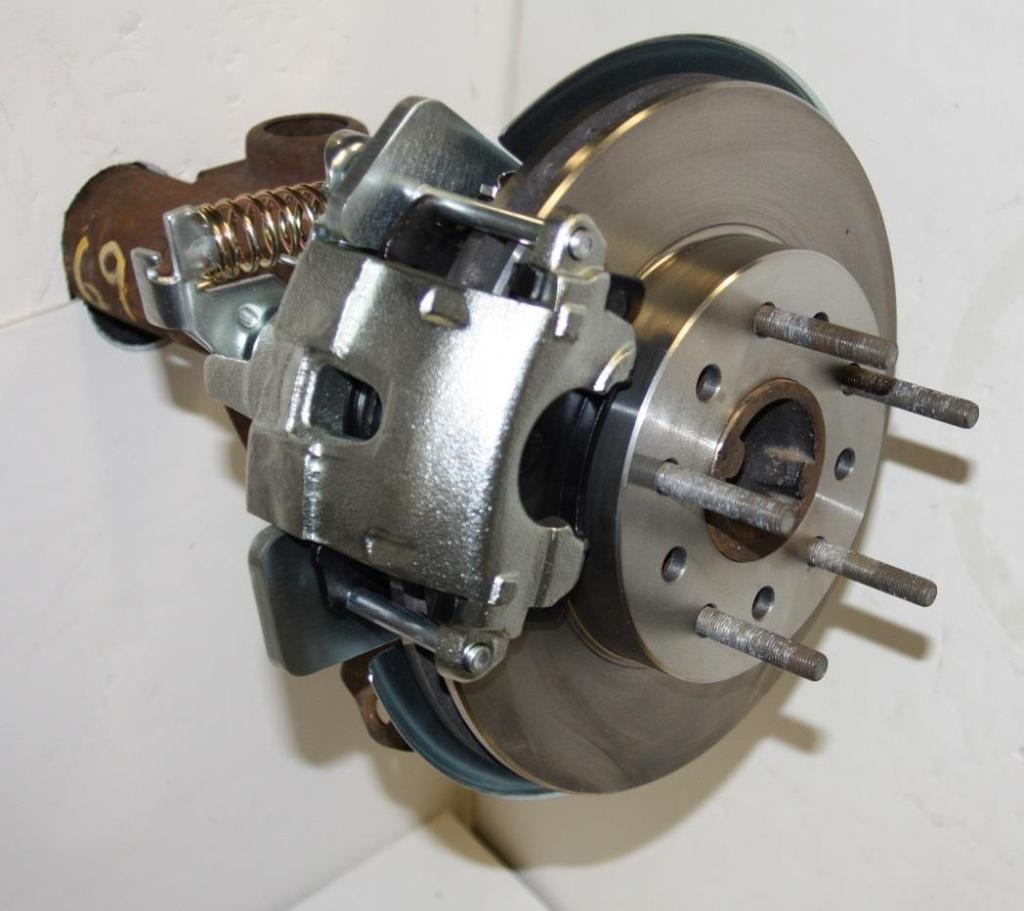
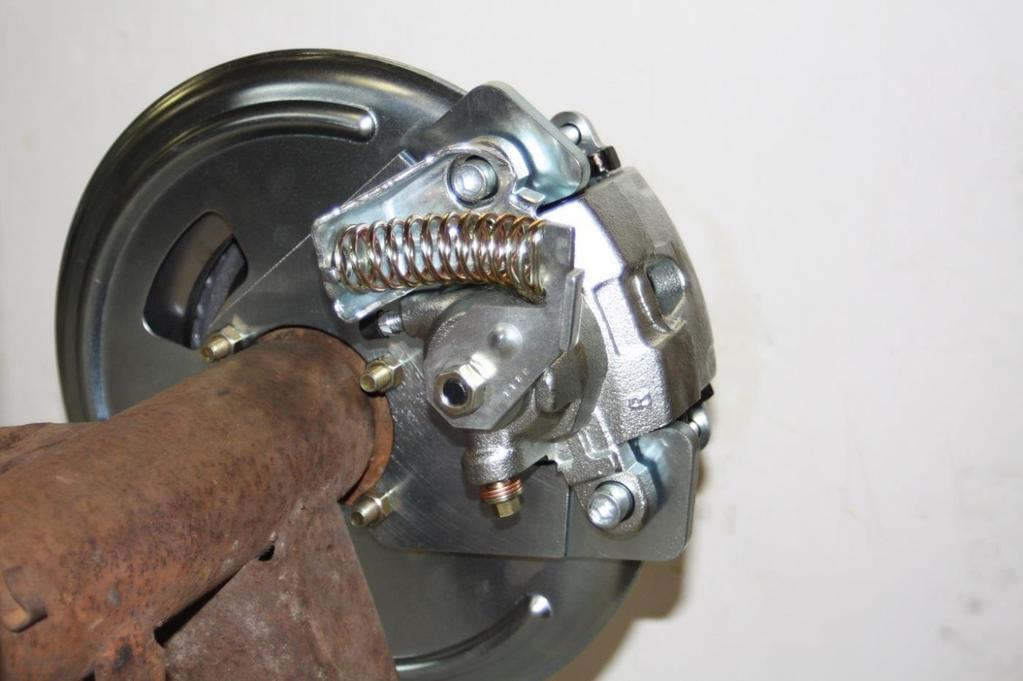
3 Bolt In Axles 1. If your vehicle is equipped with bolt in axles instead of C-clips the axle will have a retainer plate separate from the drum brake backing plate to retain the axle bearing in the housing. 2. Remove the 4 nuts and bolts from the end of the axle housing and slide out the axle shafts. 3. Disconnect the parking brake cable from the brake lever and the backing plate. Using a set of hose pinch off pliers or something similar pinch of the center rear flex hose. Using a flare wrench disconnect the brake line from the back of the wheel cylinder. Remove the drum brake backing plate. 4. Inspect the condition of your axle bearings and seals and clean the front and back side of the axle housing flanges for installation of the new brackets. Bracket Installation: 1. The new caliper mounting brackets will be installed on the inboard side of the axle housing flange. Be sure the surface is clean and free from any burrs or rust to insure the brackets will sit flat. 2. This kit is designed for non-staggered shock cars. The brackets need to be installed so that the calipers are on rear side of the axle tube. C-Clip Axles 1. Your kit includes brackets and splash shields. The kit will function the same with or without the splash shields. If you wish to install them they must be bolted to the outboard face of the axle housing flange and the mounting bracket must be mounted to the inboard side of the flange. The lip of the splash shield should point out towards the rotor. Photo 1 2. The bracket and shield will be installed with (3) 3/8 x 2.0 bolts and flange nuts provided. If you are installing the splash shields use the 3/8 x 1.5 bolt in the 4th hole that does not pass through the bracket. The heads of the bolts should be on the outboard side. Place the bracket on the inboard side of the flange with the pocket in the bracket against the axle housing flange. Snug the bolts, but do not torque them at this time. Photo 3 & 4 3. Reinstall the axle shafts, C-clips, center shaft and retaining bolt. Be sure the axle shafts are in the correct sides and tighten the retaining bolt. Make sure everything spins freely and reinstall the differential cover with a new gasket. Be sure to refill the differential with the correct grade of gear oil. Photo 5
4 Bolt In Axles 1. Your kit includes brackets and splash shield. The kit will function the same with or without the splash shield, but if you opt not to install the splash shield you must install the 4 bolt spacer plate in its place on the outboard side of the axle housing flange. If you wish to install the shields they must be bolted to the outboard face of the axle housing flange and the mounting bracket must be mounted to the inboard side of the flange. The lip of the splash shield should point out towards the rotor. Photo 1 & 2 2. The bracket and shield will be installed with (3) 3/8 x 2.0 bolts and flange nuts provided. Use the 3/8 x 1.5 bolt in the 4th hole that does not pass through the bracket. The heads of the bolts should be on the outboard side. Slide the axle shaft into the housing sandwiching the splash shield or the 4 bolt spacer plate between the bearing retainer and the axle housing flange. Photo 3 & 4 3. Place the bracket on the inboard side of the flange with the pocket in the bracket against the axle housing flange. Snug the bolts, but do not torque them at this time. Photo 5 Rotor And Caliper Installation 1. Inspect the axle shaft flanges to insure they are free from rust and burrs. For proper function it s important that the rotors sit flat on the axle flanges. Slide the rotors into place on the ends of the axle shafts and secure with 2 lug nuts. Photo 6 2. Since this kit is for non-staggered shock applications the calipers are different for the left and right sides. The calipers will be installed so that the parking brake levers are above the axle tube. 3. Slide the caliper into position over the rotor and align the caliper with the mounting holes in the bracket. Install the caliper slider bolts and check relationship of the caliper to the rotor. If the caliper is centered over the rotors no shimming is required. If the caliper is not centered or would not slip easily into place you will need to add one of the supplied shims between the bracket and the axle housing flange. Repeat the process as necessary until the caliper is centered and the rotor can be turned freely by hand. Photo 7 & 8 4. When the shimming is complete the 3/8 nuts and flange washers can be torqued to Ft/Lbs. The rotor and caliper can then be reinstalled and the slider bolts can be lubricated with silicone grease and torqued to Ft/Lbs. 5. Attach the flexible brake lines to the caliper using the banjo bolt and copper washers provided in the kit. Place one copper washer on the banjo bolt and then slide the banjo bolt into the flex hose. Install a second copper washer onto the end of the bolt and then install the bolt into the caliper. Tighten the banjo bolts to 25 Ft/Lbs. Additional torque may be required if any leaks are noted after bleeding the brakes. Photo 9 6. Carefully bend the original hard lines so they can be connected to the flexible lines. Make sure both the hard lines and flex lines make smooth bends and do not contact any moving parts. If the hard lines cannot be secured to the axle housing using the original mounting tabs then the brackets supplied can be welded to the axle housing to support the lines. Now remove the pinch off pliers from the center rear flex line.
5 Parking Brake Cables and Adjustment 1. This kit has been designed to work with your stock parking brake cables. The cables will now run above the axle and connect to the levers on the calipers. In certain cases such as with some aftermarket suspension kits the stock cables may not work. In those situations the best solution is a universal cable kit such as those supplied by Lokar. 2. If your stock cables are not long enough to connect to parking brake lever on the new calipers you will need to use the extension kit supplied to lengthen your front cable. Connect the coupling nut to the original cable and then install the threaded rod supplied into the coupler and secure with the jamb nut. If the extension is slightly too long the threaded rod can be cut shorter. 3. Work the parking brake levers on each caliper by hand until the rotor cannot be spun by hand with the lever engaged. This step must be completed to achieve a firm brake pedal. It will take many applications of the lever to completely adjust the calipers. The pistons can also be adjusted by turning them out a ¼ turn at a time. You must use a proper caliper adjusting tool to avoid damaging the piston. These are inexpensive tools available at most parts stores. This tool will also be needed to turn the pistons back in when you replace worn out brake pads in the future. In order for your new calipers to stay in adjustment and provide a solid pedal feel the parking brake must be used on a regular basis. 4. Connect the cables to the calipers and make final adjustments as necessary to insure the parking brake applies and releases completely. If the car is supported under the frame rails and the rear suspension is fully extended it may be necessary to make your final adjustments when the car is back on the ground and the suspension is compressed. Bleeding and Final Adjustments We recommend that the brake system is bled using a gravity bleed method. While there are many ways to bleed a system this way is less likely to introduce air in the system causing a spongy pedal. Whenever bleeding your system you must keep an eye on your fluid level. If your master runs dry you will have to bench bleed the master again. 1. Remove the cap from the master cylinder. 2. Starting at the right rear wheel caliper attach a clear hose to the bleeder with the other end in a clear container. 3. Open the bleeder and observe the fluid flow. It may take a couple of minutes for the fluid to flow with a new system. Once the fluid begins to flow let it drip until you do not see any air bubbles. 4. Move to the left rear wheel, repeat step Repeat steps 2 thru 4 once more. 6. Install the lid on the master cylinder. 7. Pump the brake pedal until you achieve a firm pedal. 8. Remove lid on master cylinder & check fluid level 9. Repeat steps 2 thru 6 to insure all air has been removed.
6 Once you feel you have successfully removed all air from your brake system check all fittings and lines for leaks and verify all fasteners are tight. Install your wheels, and spin them to insure they still spin freely making sure the caliper doesn t interfere with the wheel and your brakes are not dragging or locked up. You may now take your vehicle for a test drive in a safe area. We recommend that you drive the vehicle with light to medium application of the brakes for the first miles. This will allow your brake pads to properly seat to your rotors to insure optimal braking performance. If you have any questions please call our tech line at (716) Thank you for purchasing from GPS Automotive we hope you have had an enjoyable experience.
7 Installation Photos Rear Disc Brake Conversion Kit Applications: A-Body, 67 F-Body, X-body Photo 1

8 Photo 2 Photo 3

9 Photo 4 Photo 5

10 Photo 6 Photo 7

11 Photo 8 Photo 9
Installation Instructions
 Installation Instructions Rear Disc Brake Conversion Kit Item # RC4001, RC4001X Applications: Mopar 7.25, 8.25, 9.25 Axles Thank you for choosing Leed Brakes for your automotive product needs. Before you
Installation Instructions
 Installation Instructions Rear Disc Brake Conversion Kit Item # RC2001, RC2001X Applications: Mopar 8-3/4 & 9-3/4 Rear Axles Thank you for choosing Leed Brakes for your automotive product needs. Before
INSTALLATION INSTRUCTIONS
 INSTALLATION INSTRUCTIONS FORCE 10 SPORT R1 REAR DISC CONVERSION KIT A126-50 2005-10 Chevrolet Silverado and GMC Sierra Thank you for choosing STAINLESS STEEL BRAKES CORPORATION for your braking needs.
INSTALLATION INSTRUCTIONS
 INSTALLATION INSTRUCTIONS REAR DISC CONVERSION KIT A128 1990-1995 JEEP WRANGLER (YJ) WITH DANA 35 AXLES (non-abs) Thank you for choosing STAINLESS STEEL BRAKES CORPORATION for your braking needs. Pleases
INSTALLATION INSTRUCTIONS
 INSTALLATION INSTRUCTIONS R1 REAR DRUM TO DISC BRAKE CONVERSION KIT A130-3 JEEP CJ SERIES W/AMC-20 REAR AXLES AND 5 x 5-1/2" BOLT CIRCLE Thank you for choosing STAINLESS STEEL BRAKES CORPORATION for your
INSTALLATION INSTRUCTIONS PERFORMANCE AT THE WHEELS KIT W125
 INSTALLATION INSTRUCTIONS PERFORMANCE AT THE WHEELS KIT W125 1968-81 CAMARO & FIREBIRD 10 & 12 BOLT W/"C" CLIPS Thank you for choosing STAINLESS STEEL BRAKES CORPORATION for your braking needs. Pleases
INSTALLATION INSTRUCTIONS
 INSTALLATION INSTRUCTIONS REAR DISC BRAKE CONVERSION KIT A125-3 1965-72 GM A-BODY 10 & 12 BOLT AXLES Thank you for choosing STAINLESS STEEL BRAKES CORPORATION for your braking needs. Pleases take the time
INSTALLATION INSTRUCTIONS
 INSTALLATION INSTRUCTIONS FX4 ELITE REAR DISC CONVERSION KITS WITH INTERNAL PARKING BRAKE A110-14, A111-25, A111-29 for FORD 8" & 9" REAR ENDS Thank you for choosing STAINLESS STEEL BRAKES CORPORATION
INSTALLATION INSTRUCTIONS
 INSTALLATION INSTRUCTIONS REAR DISC BRAKE CONVERSION KIT A158 1994-97 Dodge Ram 1500 (2WD & 4WD) and REAR DISC BRAKE CONVERSION KIT A158-1 1998-01 Dodge Ram 1500 (2WD & 4WD) Thank you for choosing STAINLESS
INSTALLATION INSTRUCTIONS
 INSTALLATION INSTRUCTIONS REAR DISC BRAKE CONVERSION KIT A125-2 1955-70 FULL SIZE CHEVROLET Thank you for choosing STAINLESS STEEL BRAKES CORPORATION for your braking needs. Pleases take the time to read
INSTALLATION INSTRUCTIONS
 INSTALLATION INSTRUCTIONS REAR DISC BRAKE CONVERSION KIT A126-1 1973-87 CHEVROLET 1/2 TON 2WD Thank you for choosing STAINLESS STEEL BRAKES CORPORATION for your braking needs. Pleases take the time to
INSTALLATION INSTRUCTIONS
 INSTALLATION INSTRUCTIONS REAR DISC BRAKE CONVERSION KIT A126-3 1988-98 CHEVY K1500 4WD 10" DRUMS Thank you for choosing STAINLESS STEEL BRAKES CORPORATION for your braking needs. Pleases take the time
INSTALLATION INSTRUCTIONS
 INSTALLATION INSTRUCTIONS REAR DISC BRAKE CONVERSION KITS A112, A112-1 & A112-93 1979-93 FORD MUSTANG with 7.5" & 8.8" AXLES Thank you for choosing STAINLESS STEEL BRAKES CORPORATION for your braking needs.
INSTALLATION INSTRUCTIONS
 INSTALLATION INSTRUCTIONS REAR DISC BRAKE CONVERSION KIT A157 1991-2004 Dodge Dakota 2WD 1991-2002 Dodge Dakota 4WD 1998-2002 Dodge Durango Thank you for choosing STAINLESS STEEL BRAKES CORPORATION for
INSTALLATION INSTRUCTIONS
 INSTALLATION INSTRUCTIONS COMP. R AND COMP. S QUICK CHANGE KITS A200, A200-1 Thank you for choosing STAINLESS STEEL BRAKES CORPORATION for your braking needs. Pleases take the time to read and carefully
INSTALLATION INSTRUCTIONS
 INSTALLATION INSTRUCTIONS PERFORMANCE AT THE WHEELS KIT W125-42 GM 10 & 12 Bolt Rear Axles with Staggered or non-staggered Shocks with C-Clips Thank you for choosing STAINLESS STEEL BRAKES CORPORATION
INSTALLATION INSTRUCTIONS R1 REAR CONVERSION KIT
 INSTALLATION INSTRUCTIONS R1 REAR CONVERSION KIT INSTRUCTION FOR ASSEMBLY OF JEEP CJ SERIES W/AMC 20 REAR AXLES, 5 x 5-1/2" BOLT CIRCLE WITH A130-4 FULL FLOATING AXLE OR A130-5 (1 PIECE AXLE) Thank you
INSTALLATION INSTRUCTIONS
 INSTALLATION INSTRUCTIONS REAR DISC CONVERSION KIT A126-2 1988-98 C1500 2WD 10" REAR DRUM Thank you for choosing STAINLESS STEEL BRAKES CORPORATION for your braking needs. Pleases take the time to read
EGR Performance Brakes Assembly Instructions DODGE DANA 70 '87 - '93 (Will not fit stock sized dual rear wheels)
") EGR Performance Brakes Assembly Instructions DODGE DANA 70 '87 - '93 (Will not fit stock sized dual rear wheels) Got Brakes? Parts List (2) Vented Rotors (2) Multi hole Cable Mount & L Brkt (2) Axle Tube
EGR Performance Brakes Assembly Instructions DODGE DANA 70 '87 - '93 (Will not fit stock sized dual rear wheels) Got Brakes? Parts List (2) Vented Rotors (2) Multi hole Cable Mount & L Brkt (2) Axle Tube
INSTALLATION INSTRUCTIONS
 INSTALLATION INSTRUCTIONS COMP CALIPER QUICK CHANGE KIT A213 1968-73 MUSTANG Thank you for choosing STAINLESS STEEL BRAKES CORPORATION for your braking needs. Pleases take the time to read and carefully
INSTALLATION INSTRUCTIONS
 INSTALLATION INSTRUCTIONS REAR DISC CONVERSION KIT A136-1 1976-86 AMC 20 AXLES WITH WARN FULL FLOATING AXLE CONVERSION Thank you for choosing STAINLESS STEEL BRAKES CORPORATION for your braking needs.
INSTALLATION INSTRUCTIONS
 INSTALLATION INSTRUCTIONS PERFORMANCE AT THE WHEELS KIT W155-5 CHRYSLER 8 3 /4" & 9 3 /4" REAR AXLES Thank you for choosing STAINLESS STEEL BRAKES CORPORATION for your braking needs. Please take the time
INSTALLATION INSTRUCTIONS
 INSTALLATION INSTRUCTIONS INSTALLATION INSTRUCTIONS FOR A136 REAR DRUM TO DISC BRAKE CONVERSION KIT for 1970-75 Jeep, CJ SERIES with Dana 44 flanged axle Thank you for choosing STAINLESS STEEL BRAKES CORPORATION
INSTALLATION INSTRUCTIONS
 INSTALLATION INSTRUCTIONS POWER FRONT DISC CONVERSION KIT A126-7 1963-66 CHEVY C10 PICKUP NON-POWER FRONT DISC CONVERSION KIT A126-8 1963-72 CHEVY C10 PICKUP Thank you for choosing STAINLESS STEEL BRAKES
INSTALLATION INSTRUCTIONS
 INSTALLATION INSTRUCTIONS FRONT DISC BRAKE CONVERSION KITS A148-9 & A148-15 1949-54 Chevy Trucks Thank you for choosing STAINLESS STEEL BRAKES CORPORATION for your braking needs. Please take the time to
INSTALLATION INSTRUCTIONS
 INSTALLATION INSTRUCTIONS REAR CONVERSION KIT A111-2 (FORD 8" & 9" SMALL BEARING) & REAR CONVERSION KIT A111-3 (FORD 9 TORINO) Thank you for choosing STAINLESS STEEL BRAKES CORPORATION for your braking
INSTALLATION INSTRUCTIONS
 INSTALLATION INSTRUCTIONS FRONT BIG BRAKE CONVERSION KIT A112-5 1987-93 FORD MUSTANG Thank you for choosing STAINLESS STEEL BRAKES CORPORATION for your braking needs. Pleases take the time to read and
INSTALLATION INSTRUCTIONS
 INSTALLATION INSTRUCTIONS FRONT DISC BRAKE CONVERSION KIT A129-2 1959-64 Full Size Chevrolet Car and FRONT DISC BRAKE CONVERSION KITS A129-3 & A129-4 1965-68 Full Size Chevrolet Car Thank you for choosing
INSTALLATION INSTRUCTIONS
 INSTALLATION INSTRUCTIONS REAR DISC CONVERSION KIT A128-4 1997-2004 JEEP WRANGLER (TJ) WITH DANA 44 AXLES (non-abs) Thank you for choosing STAINLESS STEEL BRAKES for your braking needs. Pleases take the
INSTALLATION INSTRUCTIONS
 INSTALLATION INSTRUCTIONS PERFORMANCE AT THE WHEELS KIT W120-22, W120-23 1964 1/2-69 MUSTANG Thank you for choosing STAINLESS STEEL BRAKES CORPORATION for your braking needs. Pleases take the time to read
INSTALLATION INSTRUCTIONS
 INSTALLATION INSTRUCTIONS DISC BRAKE CONVERSION KITS A121-1, A121-2, A121-3, A121-4 1967-69 Ford & Mercury Thank you for choosing STAINLESS STEEL BRAKES CORPORATION for your braking needs. Pleases take
INSTALLATION INSTRUCTIONS
 INSTALLATION INSTRUCTIONS BIG ROTOR / CALIPER RELOCATION FRONT KITS SUM-BK1422, BK1423, BK1424 1999-2006 GM 1/2 Ton Trucks & SUVs Thank you for choosing SUMMIT RACING for your braking needs. Pleases take
INSTALLATION INSTRUCTIONS
 INSTALLATION INSTRUCTIONS BIG ROTOR / CALIPER RELOCATION REAR KIT SUM-BK1423 1999-2009 GM 1/2 Ton Trucks & SUVs Thank you for choosing SUMMIT RACING for your braking needs. Pleases take the time to read
INSTALLATION INSTRUCTIONS
 INSTALLATION INSTRUCTIONS REAR DRUM TO DISC BRAKE CONVERSION KIT A118 pre-1985 Ford F150 (except 1983-1984 w/super H/D axle) Thank you for choosing STAINLESS STEEL BRAKES CORPORATION for your braking needs.
INSTALLATION INSTRUCTIONS
 INSTALLATION INSTRUCTIONS BIG ROTOR / CALIPER RELOCATION KITS A126-67 2002-11 GM 2500/3500 Thank you for choosing STAINLESS STEEL BRAKES CORPORATION for your braking needs. Pleases take the time to read
INSTALLATION INSTRUCTIONS
 INSTALLATION INSTRUCTIONS REAR DRUM TO DISC BRAKE CONVERSION KIT A130 JEEP CJ SERIES W/AMC-20 REAR AXLES AND 5 x 5-1/2" BOLT CIRCLE Thank you for choosing STAINLESS STEEL BRAKES CORPORATION for your braking
INSTALLATION INSTRUCTIONS
 INSTALLATION INSTRUCTIONS REAR DISC BRAKE CONVERSION KIT A117-1, A117-2 1991-97 S10 PICKUP & BLAZER 1985-02 ASTRO AND SAFARI VAN Thank you for choosing STAINLESS STEEL BRAKES CORPORATION for your braking
Mopar 8 3/4 & 9 3/4 (Dana) Installation Instructions Rear Disc Conversion
 Installation Instructions Rear Disc Conversion") Mopar 8 3/4 & 9 3/4 (Dana) Installation Instructions Rear Disc Conversion This kit is for either Mopar 8 ¾ or Mopar 9 ¾ (Dana). This kit is designed to work with axles with either GM 5 x 4.75 Bolt Pattern
Mopar 8 3/4 & 9 3/4 (Dana) Installation Instructions Rear Disc Conversion This kit is for either Mopar 8 ¾ or Mopar 9 ¾ (Dana). This kit is designed to work with axles with either GM 5 x 4.75 Bolt Pattern
INSTALLATION INSTRUCTIONS
 INSTALLATION INSTRUCTIONS DISC BRAKE CONVERSION KIT A120-20, A120-21 1964 1 /2-66 Ford & Mercury Thank you for choosing STAINLESS STEEL BRAKES CORPORATION for your braking needs. Pleases take the time
A /F/X Body Instruction Packet Rear Disc Conversion
 A /F/X Body Instruction Packet Rear Disc Conversion 64-72 A Body / 67-81 F Body / 62-74 X Body This kit is for axles with a 3 1/8 spread center to center on the top two bolt holes (pictured left). Rotor
DISC BRAKE/DUAL MASTER CYLINDER CONVERSION. Tools, Equipment and Supplies Needed:
 Please take the time to read the enclosed instructions carefully. If you have any questions, call our Product Assistance personnel for clarification. It is important to note that these instructions contain
INSTALLATION INSTRUCTIONS
 INSTALLATION INSTRUCTIONS FRONT DISC BRAKE CONVERSION KITS: A132-1, A133, A133-1 A134, A134-1 1968-73 MUSTANG/FORD Thank you for choosing STAINLESS STEEL BRAKES CORPORATION for your braking needs. Please
INSTALLATION INSTRUCTIONS
 INSTALLATION INSTRUCTIONS INSTRUCTION FOR ASSEMBLY OF JEEP CJ SERIES W/AMC 20 REAR AXLES, 5 x 5-1/2" BOLT CIRCLE WITH A130-1 FULL FLOATING AXLE OR A130-2 (1 PIECE AXLE) Thank you for choosing STAINLESS
INSTALLATION INSTRUCTIONS
 INSTALLATION INSTRUCTIONS DISC BRAKE CONVERSION KITS A120-4 & A120-5 1964-1/2-66 Ford & Mercury Thank you for choosing STAINLESS STEEL BRAKES CORPORATION for your braking needs. Pleases take the time to
NEW BRAKE INSTALLATION. Let us show you how a
 Tech Article From Newsletter 17.2-2nd Quarter of 2011 NEW BRAKE INSTALLATION Let us show you how a Big Brake Install is easier than you think!! So, you have a 572 (or a hot 383) in your shoebox... you
55-64 Full Size GM (Impala, Bel Air, etc.) This kit is for axles with a 3 3/8 spread center to center on the top two bolt holes (pictured left).
 This kit is for axles with a 3 3/8 spread center to center on the top two bolt holes (pictured left).") SUM-BK1624A Full Size GM Installation Instructions Rear Disc Conversion 55-64 Full Size GM (Impala, Bel Air, etc.) This kit is for axles with a 3 3/8 spread center to center on the top two bolt holes (pictured
SUM-BK1624A Full Size GM Installation Instructions Rear Disc Conversion 55-64 Full Size GM (Impala, Bel Air, etc.) This kit is for axles with a 3 3/8 spread center to center on the top two bolt holes (pictured
Installation Instructions
 Preparing your vehicle to install your brake system upgrade 1. Rack the vehicle. 2. If you don t have a rack, then you must take extra safety precautions. 3. Choose a firmly packed and level ground to
GM FULL SIZE REAR DISC BRAKE KIT
 GM FULL SIZE REAR DISC BRAKE KIT This kit is for axles with a 3 3/8 spread center to center on the top two bolt holes (pictured left). If your axle flange measures 3 1/8 from center to center, you need
Full Size GM Installation Instructions
 Full Size GM Installation Instructions Rear Disc Conversion 55 64 Full Size GM (Impala, Bel Air, etc.) This kit is for axle with a 3 3/8 spread center to center on the top two bolt holes (pictured left).
INSTALLATION INSTRUCTIONS
 INSTALLATION INSTRUCTIONS PERFORMANCE AT THE WHEELS KITS W156-6 & W156-7 1965-74 MOPAR B & E BODY Thank you for choosing STAINLESS STEEL BRAKES CORPORATION for your braking needs. Pleases take the time
INSTALLATION INSTRUCTIONS
 INSTALLATION INSTRUCTIONS REAR DISC BRAKE CONVERSION KITS SUM-BK1329-X, SUM-BK1329-99904, SUM-BK1330-X, SUM-BK1330-99904 CHRYSLER 8 3 /4", 9 3 /4" and 2-PIECE REAR AXLES Thank you for choosing SUMMIT RACING
INSTALLATION INSTRUCTIONS
 INSTALLATION INSTRUCTIONS REAR CONVERSION KITS SUM-BK1326-X, SUM-BK1326-99904, SUM-BK1327-X, SUM-BK1327-99904, SUM-BK1328-X, SUM-BK1328-99904 FORD 8 and 9 AXLES WITH GM & FORD BOLT PATTERN Thank you for
INSTALLATION INSTRUCTIONS
 INSTALLATION INSTRUCTIONS Disc Brake Spindle Kit SUM-BKA2447 1964-72 A-BODY 1967-69 F-BODY 1968-74 X-BODY Thank you for choosing SUMMIT RACING for your braking needs. Please take the time to read and carefully
INSTALLATION INSTRUCTIONS
 INSTALLATION INSTRUCTIONS REAR DISC CONVERSION KIT SUM-BK1414-X 1997-2004 JEEP WRANGLER (TJ) WITH DANA 44 AXLES (non-abs) Thank you for choosing SUMMIT RACING for your braking needs. Pleases take the time
Tools, Equipment and Supplies Needed:
 153-162 DISC BRAKE/DUAL MASTER CYLINDER CONVERSION Please take the time to read the enclosed instructions carefully. If you have any questions, call our Product Assistance personnel for clarifi cation.
Ford 8, 9 Small Bearing Installation Instructions Rear Disc Conversion
 Ford 8, 9 Small Bearing Installation Instructions Rear Disc Conversion This kit is for Ford 9 rear axles with the small (2.835 ) style bearing and Ford 8 rear ends. This kit is designed to work with axles
DBK FULL-SIZE CHEVY DISC BRAKE conversion KIT
 DBK5964 1959-1964 FULL-SIZE CHEVY DISC BRAKE conversion KIT impala, bel air, biscayne Installation Instructions does not fit 14" rims must ust 15" or larger for this kit to be installed correctly on your
A /F/X Body Instruction Packet Rear Disc Conversion
 A /F/X Body Instruction Packet Rear Disc Conversion 64-72 A Body / 67-81 F Body / 62-74 X Body This kit is for axles with a 3 1/8 spread center to center on the top two bolt holes (pictured left). If your
Triumph Brake Kit TR4A/TR250/TR6 PART # Rutherford St. P.O. Box 847 Goleta, CA FAX
 1. Lift the front of the car with a jack and place it on jackstands. Take off the front wheels. 2. Use two 9/16 combination wrenches to disconnect the soft brake line from the body and hard line connection
Mopar 8 3/4 & 9 3/4 (Dana) Installation Instructions Rear Disc Conversion
 Installation Instructions Rear Disc Conversion") Mopar 8 3/4 & 9 3/4 (Dana) Installation Instructions Rear Disc Conversion This kit is for either Mopar 8 ¾ or Mopar 9 ¾ (Dana). This kit is designed to work with axles with either GM 5 x 4.75 Bolt Pattern
Mopar 8 3/4 & 9 3/4 (Dana) Installation Instructions Rear Disc Conversion This kit is for either Mopar 8 ¾ or Mopar 9 ¾ (Dana). This kit is designed to work with axles with either GM 5 x 4.75 Bolt Pattern
60 76 A Body Mopar Power Disc Conversion Installation Instructions
 62-72 B & E BodyMopar 60 76 A Body Mopar Power Disc Conversion Installation Instructions Special A-Body only parts shown below (In addition to parts above for A-Body cars, part # MDC66DC & MDC46DC) Your
Signature Series A/F/X Body GM Installation Instructions Rear Disc Conversion
 Signature Series A/F/X Body GM Installation Instructions Rear Disc Conversion 64-72 A Body / 67-81 F Body / 62-74 X Body This kit is for axles with a 3 1/8 spread center to center on the top two bolt holes
BAER Your Complete Performance Brake Supplier!
 Installation Instructions Product: SS4 12 Rear Instruction Part Number: 6000386 Vehicle Revision Date: 03 September 2013 Make: Ford and GM Model: 7.5/8.8 Ford and 10/12 Bolt GM Axle with Bearings in Housing
SLOWINGDOWN. For those looking for the ultimate heartpounding STAINLESS STEEL BRAKES DELIVERS WITH AN AWESOME MID-YEAR NOVA BRAKE KIT
 SLOWINGDOWN STAINLESS STEEL BRAKES DELIVERS WITH AN AWESOME MID-YEAR NOVA BRAKE KIT By Tony Gutierrez Photography by the author For those looking for the ultimate heartpounding enjoyment, strap yourself
A /F/X Body Instruction Packet Rear Disc Conversion
 A /F/X Body Instruction Packet Rear Disc Conversion 64-72 A Body / 67-81 F Body / 62-74 X Body This kit is for axles with a 3 1/8 spread center to center on the top two bolt holes (pictured left). If your
& GM A,F,& X Body Rear disc brake conversion kit
 630614 & 630615 GM A,F,& X Body Rear disc brake conversion kit FOR STAGGERED SHOCK APPLICATIONS HIGH PERFORMANCE KIT shown. regular kit includes plain rotors and rubber brake hoses. Note: Always refer
Full Size GM Installation Instructions Rear Disc Conversion
 Full Size GM Installation Instructions Rear Disc Conversion 65 68 Full Size GM (Impala, Bel Air, etc.) This kit is for axles with a 3 3/8 spread center to center on the top two bolt holes (pictured left).
INSTALLATION INSTRUCTIONS
 INSTALLATION INSTRUCTIONS FRONT DISC BRAKE CONVERSION KITS SUM-BK1200, SUM-BK1201, SUM-BK1202, SUM-BK1203 1964-72 A-BODY 1967-69 F-BODY 1962-74 X-BODY (NOTE: 62-64 X-BODY REQUIRES 5-LUG STEERING ARMS)
A/F/X Body GM Installation Instructions
 A/F/X Body GM Installation Instructions Rear Disc Conversion 64-72 A Body / 67-69 F Body / 62-74 X Body This kit is for axle with a 3 1/8 spread center to center on the top two bolt holes (pictured left).
Detroit Speed, Inc. Detroit Speed C7 Rear Full Floater Kit P/N: , , , , &
 Detroit Speed, Inc. Detroit Speed C7 Rear Full Floater Kit P/N: 070512, 070607, 070616, 070626, 070636 & 070649 Thank you for purchasing the Detroit Speed Inc., C7 Rear Full Floater Kit. The Detroit Speed
M-2300-M Mustang GT Rear Disc Brake Bracket Kit INSTALLATION INSTRUCTIONS
 Please contact the Tech Line for the most current instruction information (800) 367-3788!!! PLEASE READ THE FOLLOWING INSTRUCTIONS CAREFULLY PRIOR TO INSTALLATION!!! INTRODUCTION: This kit allows for the
A/F/X Body GM Installation Instructions Manual Disc Conversion
 A/F/X Body GM Installation Instructions Manual Disc Conversion 64-72 A Body / 67-69 F Body / 62-74 X Body DBMC09 & PVK71 pictured above (Booster, master & valve setups may vary by upgrades selected) Your
55-64 Full Size Chevy
 55-64 Full Size Chevy Installation Instructions Power Disc Conversion 9 slimline booster pictured Your new disc brake conversion kit can be bolted up with standard hand tools. The only tools you may not
55-64 Full Size Chevy Installation Instructions Standard Disc Conversion
 55-64 Full Size Chevy Installation Instructions Standard Disc Conversion DBMC09, PV71 & PVB71 Pictured (Booster, master cylinder & valve setups may vary by upgrades selected) Your new disc brake conversion
1969 Camaro. Concourse Style Disc Brake Conversion Kit Instllation Instructions
 Concourse Style Disc Brake Conversion Kit Instllation Instructions 1969 Camaro (1970 Chevelle Kit Shown) This document contains our regular disc brake conversion instructions with the addition of GM assembly
A/F/X Body GM Installation Instructions Manual Disc Conversion
 A/F/X Body GM Installation Instructions Manual Disc Conversion 64-72 A Body / 67-69 F Body / 62-74 X Body DBMC09 & PVK71 pictured above (Booster, master & valve setups may vary by upgrades selected) Your
InstalL Instructions. rear disc brake kit Kit ( toyota pickup/4runner) 2 ct. Brake rotors. 2 ct. 2 ct. Adapter Rings. 2 ct.
 2 ct. Brake rotors. 2 ct. 2 ct. Adapter Rings. 2 ct.") InstalL Instructions rear disc brake kit 140250-1-Kit (1979-1995 toyota pickup/4runner) kit contents Brake rotors Brake calipers Adapter Rings (1) Long brake line (1) Short brake line Brackets 8 ct. (6)
InstalL Instructions rear disc brake kit 140250-1-Kit (1979-1995 toyota pickup/4runner) kit contents Brake rotors Brake calipers Adapter Rings (1) Long brake line (1) Short brake line Brackets 8 ct. (6)
2 ct. Brake rotors. 2 ct. 8 ct. (6) M10x1.5x40 Bolts (2) M10x1.5x35 Bolts M10x1.5 Toplock Nuts. 2 ct. 2 ct. Brackets ( K) Brake calipers
 M10x1.5x40 Bolts (2) M10x1.5x35 Bolts M10x1.5 Toplock Nuts. 2 ct. 2 ct. Brackets ( K) Brake calipers") InstalL Instructions rear disc brake kit (140250-1-K) kit contents Brake rotors Brake calipers (1) Long brake line (1) Short brake line Brackets 8 ct. (6) M10x1.5x40 Bolts (2) M10x1.5x35 Bolts M10x1.5
InstalL Instructions rear disc brake kit (140250-1-K) kit contents Brake rotors Brake calipers (1) Long brake line (1) Short brake line Brackets 8 ct. (6) M10x1.5x40 Bolts (2) M10x1.5x35 Bolts M10x1.5
SCION tc BIG BRAKE KIT Section I - Installation Preparation
 SCION tc 2005- BIG BRAKE KIT Section I - Installation Preparation Part Number: PTR09-21080 Kit Contents Item # Quantity Reqd. Description 1 1 Brake Rotor, LH Front 2 1 Brake Rotor, RH Front 3 1 Brake Caliper
J&M Stainless Steel Teflon Brake Lines - Front (94-98 Cobra)
") J&M Stainless Steel Teflon Brake Lines - Front (94-98 Cobra) Time Required: 30min-1 hour. Tools and Supplies Required: Jack Jack Stands Lug Wrench or 13/16 Socket 10mm Socket Socket Wrench Torque Wrench
J&M Stainless Steel Teflon Brake Lines - Front (94-98 Cobra) Time Required: 30min-1 hour. Tools and Supplies Required: Jack Jack Stands Lug Wrench or 13/16 Socket 10mm Socket Socket Wrench Torque Wrench
INSTALLATION INSTRUCTIONS
 INSTALLATION INSTRUCTIONS BILLET ALUMINUM ALL-IN-ONE MASTER CYLINDERS A0472, -1, -2, -3, -4, -5 A0473, -1, -2, -3, -4, -5 A0474, -1, -2, -3, -4, -5 Thank you for choosing STAINLESS STEEL BRAKES CORPORATION
REMOVAL & INSTALLATION
 REMOVAL & INSTALLATION FRONT DISC BRAKE PADS 1. Raise and support front of vehicle. Remove wheels. Remove caliper bolt and brakeline bracket bolts. Pivot caliper aside. Remove pads and pad shim. Remove
BAER Your Complete Performance Brake Supplier!
 Installation Instructions Product: Ext+ / Pro+/ S4 Rear w/ park brake Instruction Part Number: 6000392 Vehicle Revision Date: 07 August 2013 Make: General Fit Dana / 8.75 Rear Axle Model: All Year(s):
Signature Series A/F/X Body GM Installation Instructions Power Disc Conversion
 Signature Series A/F/X Body GM Installation Instructions Power Disc Conversion 64-72 A Body / 67-69 F Body / 62-74 X Body Your new disc brake conversion kit can be bolted up with standard hand tools. The
2 ct. Brake rotors. 2 ct. Freeze plugs. 2 ct. 2 ct. 8 ct. (6) M10x1.5x40 Bolts (2) M10x1.5x35 Bolts M10x1.5 Toplock Nuts. 2 ct. Brackets ( K)
 M10x1.5x40 Bolts (2) M10x1.5x35 Bolts M10x1.5 Toplock Nuts. 2 ct. Brackets ( K)") InstalL Instructions tacoma rear disc brake kit (144039-1-K) kit contents Brake rotors Brake calipers Freeze plugs (1) Long brake line (1) Short brake line Brackets 8 ct. (6) M10x1.5x40 Bolts (2) M10x1.5x35
InstalL Instructions tacoma rear disc brake kit (144039-1-K) kit contents Brake rotors Brake calipers Freeze plugs (1) Long brake line (1) Short brake line Brackets 8 ct. (6) M10x1.5x40 Bolts (2) M10x1.5x35
07-13 TOYOTA TUNDRA 2WD 6" LIFT SPINDLES
 MAXTRAC SUSPENSION 4030 E LEAVERTON CT ANAHEIM, CA 92807 714-630-0363 WWW.MAXTRACSUSPENSION.COM SALES@MAXTRACSUSPENSION.COM PRODUCT: K886764 07-13 TOYOTA TUNDRA 2WD 6" LIFT SPINDLES PARTS LIST QTY LIFT
ASSEMBLY INSTRUCTIONS
 ASSEMBLY INSTRUCTIONS FOR DYNALITE PRO SERIES REAR PARKING BRAKE KIT WITH.9 DIAMETER VENTED ROTOR (. OFFSET) 005 - PRESENT MUSTANG 8.8 (5 LUG) PART NUMBER GROUP 0-98 INSTALLATION OF THIS KIT SHOULD ONLY
TOYOTA TUNDRA BIG BRAKE KIT Section I - Installation Preparation
 TOYOTA TUNDRA 2007- BIG BRAKE KIT Section I - Installation Preparation Part Number: PTR09-34070 Kit Contents Item # Quantity Reqd. Description 1 1 Brake Rotor, LH Front 2 1 Brake Rotor, RH Front 3 1 Brake
BRAKE SYSTEM Nissan 240SX DESCRIPTION BRAKE BLEEDING * PLEASE READ FIRST * BLEEDING PROCEDURES ADJUSTMENTS BRAKE PEDAL HEIGHT SPECS TABLE
 BRAKE SYSTEM 1990 Nissan 240SX 1990 BRAKE SYSTEMS Nissan Disc & Drum Axxess, Maxima, Pathfinder, Pickup, Pulsar NX, Sentra, Stanza, 240SX, 300ZX DESCRIPTION All brake systems are hydraulically operated
BAER Your Complete Performance Brake Supplier!
 Installation Instructions Instruction Part Number: 6000511 Product: Extreme+ / Pro+ Rear Rev Date: 28 January 2015 Vehicle Make: Ford Model: Mustang Year(s): 2015> ATTENTION: Read this before going any
IRS Racing Brake Kit (MMBAK-15, -16)
") 3430 Sacramento Dr., Unit D San Luis Obispo, CA 93401 Telephone: 805/544-8748 Fax: 805/544-8645 www.maximummotorsports.com IRS Racing Brake Kit (MMBAK-15, -16) Floating rotors (MMBAK-16 ONLY) can move
3430 Sacramento Dr., Unit D San Luis Obispo, CA 93401 Telephone: 805/544-8748 Fax: 805/544-8645 www.maximummotorsports.com IRS Racing Brake Kit (MMBAK-15, -16) Floating rotors (MMBAK-16 ONLY) can move
PART NUMBER GROUP
 www.wilwood.com ASSEMBLY INSTRUCTIONS FOR DYNAPRO LOW-PROFILE PRO SERIES REAR PARKING BRAKE KIT WITH FRONT MOUNTED CALIPERS AND 11.00 DIAMETER VENTED ROTOR (.50 OFFSET) BIG BEARING FORD, NEW STYLE PART
DBK9. Ford 9 rear end Disc Brake conversion kit. Installation Instructions
 DBK9 Ford 9 rear end Disc Brake conversion kit Fits the three most popular rear ends (3-3/8 x 2, 3-1/2 x 2-3/8, 3-9/16 x 2 ). Note: Also Available in High performance kit with stainless steel braided hoses
BAER Your Complete Performance Brake Supplier!
 Installation Instructions Product: SS4 / SS4+ / Pro+ / Ext+ Rear w/ park brake Instruction Part Number: 6000264 Revision Date: 27 August 27, 2014 Vehicle Make: Model Year(s): General Fit 8 & 9 Ford Rear
INSTALLATION INSTRUCTIONS
 INSTALLATION INSTRUCTIONS FX1 REAR DISC CONVERSION KITS A110-11, A111-20, A111-21 for FORD 8" & 9" REAR ENDS Thank you for choosing STAINLESS STEEL BRAKES CORPORATION for your braking needs. Pleases take
Brake Pad: Service and Repair Front PADS - BRAKE FRONT
 2005 Dodge Truck RAM 3500 4WD Pickup L6-5.9L DSL Turbo VIN C Page 1 Brake Pad: Service and Repair Front PADS - BRAKE FRONT REMOVAL 1. Raise and support vehicle. 2. Remove the wheel and tire assemblies.
1984 Dodge W250 PICKUP
 1984 Dodge W250 PICKUP Submodel: Engine Type: V8 Liters: 5.2 Fuel Delivery: CARB Fuel: GAS Dana 44 MODELS THROUGH 1984 2. Raise and safely support the vehicle, then remove the wheel hub and bearings as
Signature Series A/F/X Body GM Installation Instructions Power Disc Conversion
 Signature Series A/F/X Body GM Installation Instructions Power Disc Conversion 64-72 A Body / 67-69 F Body / 62-74 X Body Your new disc brake conversion kit can be bolted up with standard hand tools. The
jegs.com
 Installation Instructions for 630040 & 630050 A-Body 2 Drop Spindle Disc Brake Kit Instructions * High performance kit shown. Regular kit has plain rotors & hoses. WARNING Proper operation of your brakes
TOYOTA FJ CRUISER 6 SUSPENSION KIT
 92177000 TOYOTA FJ CRUISER 6 SUSPENSION KIT Thank you for choosing Rough Country for your suspension needs. Rough Country recommends a certified technician installs this system. In addition to these instructions,