Ford Racing Front Rotor Upgrade Kit (05-10 V6) Installation Instructions
|
|
|
- Aubrey Bradford
- 5 years ago
- Views:
Transcription
1 Ford Racing Front Rotor Upgrade Kit (05-10 V6) Installation Instructions Time Necessary: Approximately 1.5 hours Tools Required: 15 MM Socket Ratchet PryBar Floor Lift or: o Floor Jack o (2) Jack Stands o 4 bricks or wheel chocks Parts Required: (2) 12.4" Rotors (2) Caliper Brackets Brake Pad Set (4 pads) Brake Pad Grease (usually comes with pads) Procedure: Accessing Front Brakes: 1. Remove Front Wheels a. Place Car in park (or in 1 st for Manual Tranny) b. Lift Car either with Floor Lift (helps if you have a mechanic or car dealer buddy) or a jack and Jack Stands (Chock rear wheels if using jack stands). c. Remove the 5 lug nuts from each wheel and set aside. d. Remove Wheel


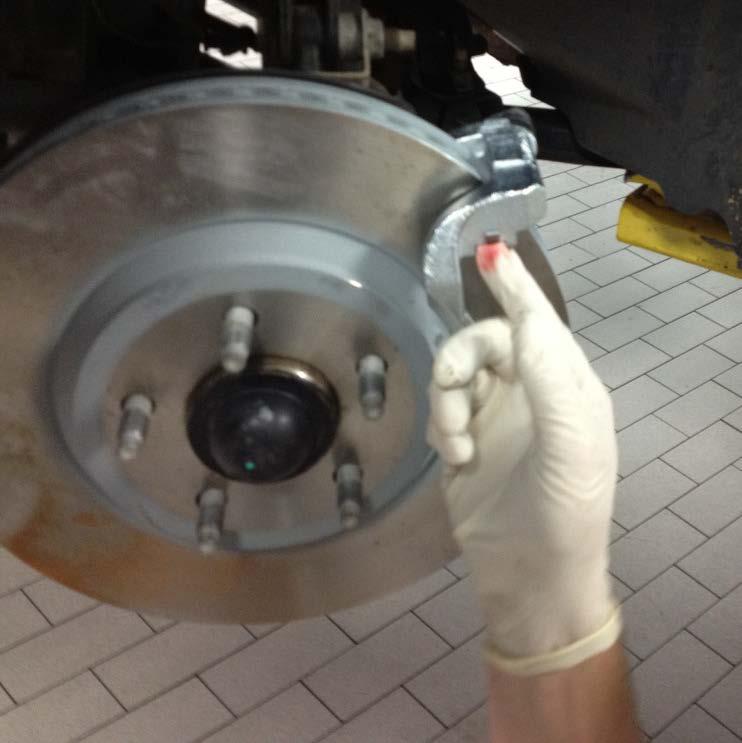
2 Remove brackets and rotors 2. Place keys in ignition and turn to accessory spot. This will allow you to turn your front wheels to gain easier access to the brakes. Best not to start the car here!!! 3. Turn steering wheel or manipulate old rotor to get caliper sticking out. Caution! Your old brake hardware will likely be hot.
3 Removing Brake Hardware: 4. Now you can use a small pry bar to reseat your brake caliper piston. It is much easier to do at this stage and requires no special tools. Insert the pry bar between the caliper and rotor and slowly work the caliper jaws apart as seen in the pictures below


4 5. Now you can unbolt your calipers. There are 2 fine threaded bolts holding these on. Remove each one and set aside. The caliber should easily slide off at this point. Support it, or carefully


5 let it hang, taking care not to dammage your brake lines. 6. Your old brake pads should pop out now. One from each side of the rotor.

6 7. Next, you must take off the old Caliper bracket. This is very similar to taking off the caliper. Just 2 bolts in back of the piece and it s out. 8. Now, remove the old rotor. If this is your original factory rotor, there will be a small retainer clip on one lug bolt that will need to be removed. It is un-necessary and just server to keep the

7 rotors on the factory line when it was being built.


8 Installing New Hardware 9. Next, place your new rotor in place of the old one. 10. Attach your new Caliper bracket with the same bolts and holes you removed the old one with. 11. Now you want to apply the brake pad lube to the caliper brackets. Just add some where the moving parts touch. Too much isn t helpful. Don t forget to do both sides!

9


10 12. Install new Brake Pads in the caliper brackets. Once again both sides. Make sure the friction side is towards the rotor. 13. Apply Grease on the caliper where it comes in contact with the brake pads. If you apply it to the pads themselves, you will see the grease on the back of the pads whenever you look at your brakes.


11 14. Reinstall the caliper over the new brake pads. These should slide in place with perhaps a little persuasion. They will bolt into the caliper bracket using the bolts you set aside earlier. 15. At this point, you have finished one side. Now repeat the exact process on the other. 16. Reinstall your tires. 17. Pump the brakes a few times to insure you did not get any air bubbles in your brake lines.

12 18. Place car back on the ground and take the car for a test drive! You should Work in the new brakes by slowing from 35 MPH to 5 MPH, 5 times with steady even braking pressure. Now Enjoy!
Installing Rear Brake Pads on a WK Jeep
 Installing Rear Brake Pads on a WK Jeep Step by Step By Chirpz Disclaimer: I do not claim that this procedure is the right way or even the best way to change your rear brake pads. This is what I did after
Hawk Brake Pads ( Mustang GT/V6 Rear Pair)
") Hawk Brake Pads (1994-2004 Mustang GT/V6 Rear Pair) The below installation instructions work for the following products: Hawk HPS Brake Pads (1994-2004 Mustang GT/V6 Rear Pair) Hawk Performance Ceramic
Hawk Brake Pads (1994-2004 Mustang GT/V6 Rear Pair) The below installation instructions work for the following products: Hawk HPS Brake Pads (1994-2004 Mustang GT/V6 Rear Pair) Hawk Performance Ceramic
FORD RACING DIFFERENTIAL INSTALLATION (99-04 GT, Mach 1)
") FORD RACING DIFFERENTIAL INSTALLATION (99-04 GT, Mach 1) Time Necessary: Approximately 4 hours Tools Required: Wrenches: 8mm, 13mm, 15mm, 5.5 mm allen, 6mm allen Sockets: 5/8, 3/4 Ratchet Floor Jack Jack
FORD RACING DIFFERENTIAL INSTALLATION (99-04 GT, Mach 1) Time Necessary: Approximately 4 hours Tools Required: Wrenches: 8mm, 13mm, 15mm, 5.5 mm allen, 6mm allen Sockets: 5/8, 3/4 Ratchet Floor Jack Jack
How to install Front Brake Pads on your GT, V6
 Time Necessary: Approximately 1.5 hours Tools Required: How to install Front Brake Pads on your 99-04 GT, V6 Jack Jack stands Torque wrench Ratchet Lug wrench 15mm socket 12mm socket Large C-clamp Syringe
INSTALLATION INSTRUCTIONS: LONG TRAVEL KIT 07+ FJ CRUISER and 05+ TACOMA
 INSTALLATION INSTRUCTIONS: LONG TRAVEL KIT 07+ FJ CRUISER and 05+ TACOMA ISNTALLATION DIFFICULTY: Advanced APPROX TIME: 6-8 Hours REQUIRED TOOLS: 14mm-35mm sockets, wrenches, and ratchet 9/16 and 5/8 12
INSTALLATION INSTRUCTIONS
 INSTALLATION INSTRUCTIONS BIG ROTOR / CALIPER RELOCATION FRONT KITS SUM-BK1422, BK1423, BK1424 1999-2006 GM 1/2 Ton Trucks & SUVs Thank you for choosing SUMMIT RACING for your braking needs. Pleases take
Mustang 7.5 Limited Slip Differential (28 Spline) V8; V6:
 V8; V6:") Mustang 7.5 Limited Slip Differential (28 Spline) 79-85 V8; 86-10 V6: Required Tools: Ratchet Wrench Torque Wrench 1/2", 5/16, 3/4", 12mm and 15mm Sockets Lug nut Wrench Dial Indicator Digital Measuring
Mustang 7.5 Limited Slip Differential (28 Spline) 79-85 V8; 86-10 V6: Required Tools: Ratchet Wrench Torque Wrench 1/2", 5/16, 3/4", 12mm and 15mm Sockets Lug nut Wrench Dial Indicator Digital Measuring
Installation Instructions for BMR Lowering Springs Performance ( Mustang GT)
") Installation Instructions for BMR Lowering Springs Performance (2015-2017 Mustang GT) Time Required: 3+ hours Notes: This install was done with the performance springs from BMR, but install should be the
Installation Instructions for BMR Lowering Springs Performance (2015-2017 Mustang GT) Time Required: 3+ hours Notes: This install was done with the performance springs from BMR, but install should be the
Installation Instructions
 Preparing your vehicle to install your brake system upgrade 1. Rack the vehicle. 2. If you don t have a rack, then you must take extra safety precautions. 3. Choose a firmly packed and level ground to
INSTALLATION INSTRUCTIONS
 INSTALLATION INSTRUCTIONS BIG ROTOR / CALIPER RELOCATION REAR KIT SUM-BK1423 1999-2009 GM 1/2 Ton Trucks & SUVs Thank you for choosing SUMMIT RACING for your braking needs. Pleases take the time to read
ALLOY USA AXLE INSTALLATION (99-04 GT, Mach 1)
") ALLOY USA AXLE INSTALLATION (99-04 GT, Mach 1) Time Necessary: Approximately 4 hours Tools Required: Wrenches: 8mm, 13mm, 15mm, 5.5 mm allen, 6mm allen Sockets: 5/8, 3/4 Ratchet Floor Jack Jack Stands
ALLOY USA AXLE INSTALLATION (99-04 GT, Mach 1) Time Necessary: Approximately 4 hours Tools Required: Wrenches: 8mm, 13mm, 15mm, 5.5 mm allen, 6mm allen Sockets: 5/8, 3/4 Ratchet Floor Jack Jack Stands
1969 Camaro. Concourse Style Disc Brake Conversion Kit Instllation Instructions
 Concourse Style Disc Brake Conversion Kit Instllation Instructions 1969 Camaro (1970 Chevelle Kit Shown) This document contains our regular disc brake conversion instructions with the addition of GM assembly
Mopar 8 3/4 & 9 3/4 (Dana) Installation Instructions Rear Disc Conversion
 Installation Instructions Rear Disc Conversion") Mopar 8 3/4 & 9 3/4 (Dana) Installation Instructions Rear Disc Conversion This kit is for either Mopar 8 ¾ or Mopar 9 ¾ (Dana). This kit is designed to work with axles with either GM 5 x 4.75 Bolt Pattern
Mopar 8 3/4 & 9 3/4 (Dana) Installation Instructions Rear Disc Conversion This kit is for either Mopar 8 ¾ or Mopar 9 ¾ (Dana). This kit is designed to work with axles with either GM 5 x 4.75 Bolt Pattern
LMB-C6 CF Senior Member
 LMB-C6 CF Senior Member Rotor install DIY... ****** FRONT: ****** Remove the wheel. To remove the rotor you need to remove the caliper and the bracket. There are 2 bolts for the caliper (top smaller bolt
A/F/X Body GM Installation Instructions
 A/F/X Body GM Installation Instructions Power Disc Conversion 64-72 A Body / 67-69 F Body / 68-74 X Body 9 slimline booster pictured Your new disc brake conversion kit can be bolted up with standard hand
Lowering Spring Installation on a Mustang GT
 Lowering Spring Installation on a 99-04 Mustang GT This installation is very the same installation that many of the 79-04 Mustangs excluding Cobra require. Time to install: 2-3 hours to do alone with a
How I installed new brake pads on my i with Sport Package (should be fine for other E39 s) By Robert B.
 By Robert B.") How I installed new brake pads on my 1999 528i with Sport Package (should be fine for other E39 s) How I installed new brake pads on my 1999 528i with Sport Package (should be fine for other E39 s) By
How I installed new brake pads on my 1999 528i with Sport Package (should be fine for other E39 s) How I installed new brake pads on my 1999 528i with Sport Package (should be fine for other E39 s) By
How to Change Front Brake Pads on a Toyota Corolla
 How to Change Front Brake Pads on a Toyota Corolla Link to this article on (All other links in this document are disabled) Follow this picture guide to change the front brake pads on a 2003-2008 Toyota
FORD COBRA JET SPRING INSTALLATION
 FORD COBRA JET SPRING INSTALLATION Tools Needed: 1. Floor jack with rubber padding on lift point or vehicle lift 2. Jack stands (2) 3. Socket sizes 13/16, 3/4, 15mm, 8mm 4. Pliers 5. Breaker bar, ratchet
Steeda Bumpsteer Kit (94-04) - Installation Instructions
 - Installation Instructions") Steeda Bumpsteer Kit (94-04) - Installation Instructions The below installation instructions work for the following products: Steeda Bumpsteer Kit (94-04) Please read through the instructions carefully
Steeda Bumpsteer Kit (94-04) - Installation Instructions The below installation instructions work for the following products: Steeda Bumpsteer Kit (94-04) Please read through the instructions carefully
07-13 TOYOTA TUNDRA 2WD 6" LIFT SPINDLES
 MAXTRAC SUSPENSION 4030 E LEAVERTON CT ANAHEIM, CA 92807 714-630-0363 WWW.MAXTRACSUSPENSION.COM SALES@MAXTRACSUSPENSION.COM PRODUCT: K886764 07-13 TOYOTA TUNDRA 2WD 6" LIFT SPINDLES PARTS LIST QTY LIFT
Rear End Installation and Bearing Kit - 8.8in (86-12 V8; V6)
") Rear End Installation and Bearing Kit - 8.8in (86-12 V8; 11-13 V6) Tools Required: Jack Stands 5 Floor Jack 2 Oil Pans 1 Wheel Blocks 2 Differential Oil 3 qts Friction Modifier 3 bottles Tube of Black
Rear End Installation and Bearing Kit - 8.8in (86-12 V8; 11-13 V6) Tools Required: Jack Stands 5 Floor Jack 2 Oil Pans 1 Wheel Blocks 2 Differential Oil 3 qts Friction Modifier 3 bottles Tube of Black
55-64 Full Size GM (Impala, Bel Air, etc.) This kit is for axles with a 3 3/8 spread center to center on the top two bolt holes (pictured left).
 This kit is for axles with a 3 3/8 spread center to center on the top two bolt holes (pictured left).") SUM-BK1624A Full Size GM Installation Instructions Rear Disc Conversion 55-64 Full Size GM (Impala, Bel Air, etc.) This kit is for axles with a 3 3/8 spread center to center on the top two bolt holes (pictured
SUM-BK1624A Full Size GM Installation Instructions Rear Disc Conversion 55-64 Full Size GM (Impala, Bel Air, etc.) This kit is for axles with a 3 3/8 spread center to center on the top two bolt holes (pictured
A /F/X Body Instruction Packet Rear Disc Conversion
 A /F/X Body Instruction Packet Rear Disc Conversion 64-72 A Body / 67-81 F Body / 62-74 X Body This kit is for axles with a 3 1/8 spread center to center on the top two bolt holes (pictured left). Rotor
Maximum Motorsports Camber Caster Plates (05-10):
:") Maximum Motorsports Camber Caster Plates (05-10): Tools Required: Lug Wrench 21mm Deep Socket 18mm Deep Socket 15mm Deep Socket 17mm Socket 13mm Socket 10mm Socket Torque Wrench (requires 166lb-ft capacity
Maximum Motorsports Camber Caster Plates (05-10): Tools Required: Lug Wrench 21mm Deep Socket 18mm Deep Socket 15mm Deep Socket 17mm Socket 13mm Socket 10mm Socket Torque Wrench (requires 166lb-ft capacity
Installation Time One / Two Hours
 Front Caliper (With Bracket) Install Guide 1999-2002 Mustang GT or V6 NOTE: These instructions are for the front driver side caliper, but can also be applied to the passenger side front caliper as well.
Installation Guide: Front Brake Pad
 Installation Guide: Front Brake Pad Ninety percent of the brake pad changes you make during the life of your vehicle will be to the front brakes because they do 60% to 70% of the braking. On most cars,
Ford 8, 9 Small Bearing Installation Instructions Rear Disc Conversion
 Ford 8, 9 Small Bearing Installation Instructions Rear Disc Conversion This kit is for Ford 9 rear axles with the small (2.835 ) style bearing and Ford 8 rear ends. This kit is designed to work with axles
A/F/X Body GM Installation Instructions Manual Disc Conversion
 A/F/X Body GM Installation Instructions Manual Disc Conversion 64-72 A Body / 67-69 F Body / 62-74 X Body DBMC09 & PVK71 pictured above (Booster, master & valve setups may vary by upgrades selected) Your
Replace front brake pads and discs * (Ford Galaxy )
") Replace front brake pads and discs * (Ford Galaxy 2006-2015) *Caution! This instructions are created by random users and must be used as a reference only! Please, take all safety precautions, and if you're
Replace front brake pads and discs * (Ford Galaxy 2006-2015) *Caution! This instructions are created by random users and must be used as a reference only! Please, take all safety precautions, and if you're
Rear Parking Brake Cable (93 Cobra)
") Rear Parking Brake Cable (93 Cobra) Materials in the box: Brake Cable Tools Needed: One jack and four jack stands. One socket wrench with a 12mm, 13mm ( ½ inch, 12 point DEEP WALL DO NOT FORGET THIS) and
Rear Parking Brake Cable (93 Cobra) Materials in the box: Brake Cable Tools Needed: One jack and four jack stands. One socket wrench with a 12mm, 13mm ( ½ inch, 12 point DEEP WALL DO NOT FORGET THIS) and
Anti-Sway Bars Installation Instructions For Mazda MX-5 PART #
 Anti-Sway Bars Installation Instructions For 2006+ Mazda MX-5 PART # 920-330 Tools required: A jack and jack stands, 5mm Allen wrench, ratchet, 10mm, 12mm and 14mm, combination wrenches and sockets, 21mm
NEW BRAKE INSTALLATION. Let us show you how a
 Tech Article From Newsletter 17.2-2nd Quarter of 2011 NEW BRAKE INSTALLATION Let us show you how a Big Brake Install is easier than you think!! So, you have a 572 (or a hot 383) in your shoebox... you
INSTALLATION INSTRUCTIONS
 INSTALLATION INSTRUCTIONS Disc Brake Spindle Kit SUM-BKA2447 1964-72 A-BODY 1967-69 F-BODY 1968-74 X-BODY Thank you for choosing SUMMIT RACING for your braking needs. Please take the time to read and carefully
Powerslot Mustang Rotors (Rear Pair GT/V6) - Installation Instructions
 - Installation Instructions") Powerslot Mustang Rotors (Rear Pair 94-04 GT/V6) - Installation Instructions The below installation instructions work for the following products: Powerslot Mustang Rotors (Rear Pair 94-04 GT/V6) Please
Powerslot Mustang Rotors (Rear Pair 94-04 GT/V6) - Installation Instructions The below installation instructions work for the following products: Powerslot Mustang Rotors (Rear Pair 94-04 GT/V6) Please
Steeda Lower Control Arms ( )
") Steeda Lower Control Arms (2005-2012) NOTE: The following installation was performed on a 2007 Mustang GT/California Special. The control arms were previously sold in a blue color, but now they are sold
Steeda Lower Control Arms (2005-2012) NOTE: The following installation was performed on a 2007 Mustang GT/California Special. The control arms were previously sold in a blue color, but now they are sold
BBK Ceramic Long Tube Headers (99-04 Cobra and Mach 1) - Installation Instructions
 - Installation Instructions") BBK Ceramic Long Tube Headers (99-04 Cobra and 03-04 Mach 1) - Installation Instructions The below installation instructions work for the following products: BBK Ceramic Long Tube Headers (99-04 Cobra
BBK Ceramic Long Tube Headers (99-04 Cobra and 03-04 Mach 1) - Installation Instructions The below installation instructions work for the following products: BBK Ceramic Long Tube Headers (99-04 Cobra
FRONT DROP SPINDLES
 92725000 88-98 2 FRONT DROP SPINDLES Thank you for choosing Rough Country for all your suspension needs. Rough Country recommends a certified technician install this system. In addition to these instructions,
Dodge Ram Kit
 92138000 Thank you for choosing Rough Country for your suspension needs. 2002-05 Dodge Ram 1500 4-5.5 Kit Rough Country recommends a certified technician install this system. In addition to these instructions,
Pypes 409 Stainless Steel Violator Catback with Polished 304 Tips (86-93 LX & GT) - Installation Instructions
 - Installation Instructions") Pypes 409 Stainless Steel Violator Catback with Polished 304 Tips (86-93 LX & 94-97 GT) - Installation Instructions The below installation instructions work for the following products: Pypes 409 Stainless
Pypes 409 Stainless Steel Violator Catback with Polished 304 Tips (86-93 LX & 94-97 GT) - Installation Instructions The below installation instructions work for the following products: Pypes 409 Stainless
INSTALLATION INSTRUCTIONS
 INSTALLATION INSTRUCTIONS REAR DISC BRAKE CONVERSION KIT A157 1991-2004 Dodge Dakota 2WD 1991-2002 Dodge Dakota 4WD 1998-2002 Dodge Durango Thank you for choosing STAINLESS STEEL BRAKES CORPORATION for
BBK LONG TUBE HEADERS (99-04 GT, Mach 1, Bullitt)
") BBK LONG TUBE HEADERS (99-04 GT, Mach 1, Bullitt) Install Time: Approx. 8-10 hrs Parts Needed: BBK Long Tube Headers Shorty mid pipe X/H O2 wiring harness extensions Hi-temp thread locker Tools Required:
BBK LONG TUBE HEADERS (99-04 GT, Mach 1, Bullitt) Install Time: Approx. 8-10 hrs Parts Needed: BBK Long Tube Headers Shorty mid pipe X/H O2 wiring harness extensions Hi-temp thread locker Tools Required:
KG09100BK / KG09101BK GM WD.
 KG09100BK / KG09101BK GM. 1988-2006 2 WD. KG09101BK KG09100BK Instruction Sheet: P10476-05 2013 Daystar Products International Inc. Tools Needed Quantity Description 1 Floor Jack 2 Jack Stands 2 Wheel
Z1 Motorsports 300zx Akebono Brake Kit Installation Manual (Front)
") Z1 Motorsports 1200 Carrollton Villa Rica Hwy Carrollton GA 30116 770.838.7777 Z1 Motorsports 300zx Akebono Brake Kit Installation Manual (Front) Parts Included: 2 Akebono Front Brake Calipers (Pair; Nissan
Z1 Motorsports 1200 Carrollton Villa Rica Hwy Carrollton GA 30116 770.838.7777 Z1 Motorsports 300zx Akebono Brake Kit Installation Manual (Front) Parts Included: 2 Akebono Front Brake Calipers (Pair; Nissan
1204AA Ford Mustang Double Adjustable Trailing Arms
 1204AA 79-04 Ford Mustang Double Adjustable Trailing Arms Special Tools Required for this Installation - 4 post lift or alignment rack preferable - Air Chisel, Angle Finder (Digital Preferred), Dead blow
nissan patrol birfield kit
 nissan patrol birfield kit 300795-kit 1987-1997 nissan patrol gr(y60) 1988-1994 ford maverick 1987-1997 nissan patrol gq 1987-1997 nissan patrol safari 1987-1997 nissan safari kit contents 5356 PINE AVE
A/F/X Body GM Installation Instructions Manual Disc Conversion
 A/F/X Body GM Installation Instructions Manual Disc Conversion 64-72 A Body / 67-69 F Body / 62-74 X Body DBMC09 & PVK71 pictured above (Booster, master & valve setups may vary by upgrades selected) Your
Hawk HP Performance Brake Pads (94-98 GT/V6 Front Pair) - Installation Instructions
 - Installation Instructions") Hawk HP Performance Brake Pads (94-98 GT/V6 Front Pair) - Installation Instructions The below installation instructions work for the following products: Hawk HP Plus Performance Brake Pads (94-98 GT/V6
Hawk HP Performance Brake Pads (94-98 GT/V6 Front Pair) - Installation Instructions The below installation instructions work for the following products: Hawk HP Plus Performance Brake Pads (94-98 GT/V6
Ford Racing GT500 Style Strut Mount Upgrade (05-12 All):
:") Ford Racing GT500 Style Strut Mount Upgrade (05-12 All): Required tools: (2) Jack stands Floor jack (1 is required but 2 is preferred) Torque wrench Spring compressor tool (can be rented at your local
Ford Racing GT500 Style Strut Mount Upgrade (05-12 All): Required tools: (2) Jack stands Floor jack (1 is required but 2 is preferred) Torque wrench Spring compressor tool (can be rented at your local
Installation Notes: #86000-R Race Series +3.5 L/T Kit
 159 North Maple St. Unit J, CORONA CA 92880 P. 951-737-9682 F. 951-737-9006 WWW.CHAOSFAB.COM Installation Notes: #86000-R Race Series +3.5 L/T Kit Factory manual is recommended for removal and re-installation
Installation Instructions INDY SHIFTER Fits: Mustang Fastback & Convertible with MT-82 Transmission Catalog #
 Installation Instructions INDY SHIFTER Fits: 2015-2018 Mustang Fastback & Convertible with MT-82 Transmission Catalog # 3916036 Watch our installation video on YouTube WORK SAFELY! For maximum safety,
55-64 Full Size Chevy
 55-64 Full Size Chevy Installation Instructions Power Disc Conversion 9 slimline booster pictured Your new disc brake conversion kit can be bolted up with standard hand tools. The only tools you may not
INSTALLATION INSTRUCTIONS
 INSTALLATION INSTRUCTIONS BIG ROTOR / CALIPER RELOCATION KITS A126-67 2002-11 GM 2500/3500 Thank you for choosing STAINLESS STEEL BRAKES CORPORATION for your braking needs. Pleases take the time to read
M-Force E36 Camber Plate Installation
 Thank you for purchasing the Adjustable Camber Plate kit from Vorshlag Motorsports. In order to ensure proper installation and longevity of your kit, Vorshlag Motorsports recommends that you have your
Team Z Motorsports. K-Member installation instructions
 Team Z Motorsports K-Member installation instructions Parts Included: 1-Tubular K-Member Needed Items-Solid Steering Shaft Offset Steering Rack Bushings Optional-Heavy Duty Bolt Kit Tubular Front Lower
INSTALLATION INSTRUCTIONS
 INSTALLATION INSTRUCTIONS 1075 North Ave. Sanger, CA 93657-3539 local: 559-875-0222 fax: 559-876-2259 toll free: 800-445-3767 3100-3200 3 DROPPED FRONT SPINDLE 73-87 1/2 TON C-10 PICK-UP / 1/2 TON BLAZER
List of tools: Jack Two Jack Stands Conventional Socket Set Liquid Collection pan Rear axle lubricant and friction modifier Rags for wiping up spills
 List of tools: Jack Two Jack Stands Conventional Socket Set Liquid Collection pan Rear axle lubricant and friction modifier Rags for wiping up spills 1. Jack car up Loosen wheel lugs first. Don t take
INSTALLATION INSTRUCTIONS
 INSTALLATION INSTRUCTIONS COMP. R AND COMP. S QUICK CHANGE KITS A200, A200-1 Thank you for choosing STAINLESS STEEL BRAKES CORPORATION for your braking needs. Pleases take the time to read and carefully
GM FULL SIZE REAR DISC BRAKE KIT
 GM FULL SIZE REAR DISC BRAKE KIT This kit is for axles with a 3 3/8 spread center to center on the top two bolt holes (pictured left). If your axle flange measures 3 1/8 from center to center, you need
J&M Stainless Steel Teflon Brake Lines - Front (94-98 Cobra)
") J&M Stainless Steel Teflon Brake Lines - Front (94-98 Cobra) Time Required: 30min-1 hour. Tools and Supplies Required: Jack Jack Stands Lug Wrench or 13/16 Socket 10mm Socket Socket Wrench Torque Wrench
J&M Stainless Steel Teflon Brake Lines - Front (94-98 Cobra) Time Required: 30min-1 hour. Tools and Supplies Required: Jack Jack Stands Lug Wrench or 13/16 Socket 10mm Socket Socket Wrench Torque Wrench
Weistec CLK Black Series SUSPENSION
 Weistec CLK Black Series SUSPENSION Rear Suspension Bushing Upgrade Installation Guide 1 Thank you for your purchase of the Weistec CLK Black Series Rear Suspension Bushing Upgrade for the 2008 Mercedes
Installation Instructions COMPETITION/PLUS SHIFTER Ford Mustang MT82 6-Speed Manual Transmission Catalog#
 Installation Instructions COMPETITION/PLUS SHIFTER 2015-2017 Ford Mustang MT82 6-Speed Manual Transmission Catalog# 3916037 Rev. 00 WORK SAFELY! For maximum safety, perform this installation on a clean,
INSTALLATION INSTRUCTIONS
 INSTALLATION INSTRUCTIONS COMP CALIPER QUICK CHANGE KIT A213 1968-73 MUSTANG Thank you for choosing STAINLESS STEEL BRAKES CORPORATION for your braking needs. Pleases take the time to read and carefully
60 76 A Body Mopar Power Disc Conversion Installation Instructions
 62-72 B & E BodyMopar 60 76 A Body Mopar Power Disc Conversion Installation Instructions Special A-Body only parts shown below (In addition to parts above for A-Body cars, part # MDC66DC & MDC46DC) Your
2003 Infiniti G35. CAUTION: When brake caliper is removed, DO NOT depress brake pedal, or piston will pop out.
 FRONT & REAR DISC PADS CAUTION: When brake caliper is removed, DO NOT depress brake pedal, or piston will pop out. To determine which brake system vehicle is equipped with, see MODEL IDENTIFICATION. Removal
Wheel Bearing Replacement Passat TDI
 Rear Bearing/hub assembly replacement This is a fairly straight forward process. Pictures are not necessary for most of this procedure for a person with skills to do this repair. Anyone who thinks they
Rear Wheel Removal (by BassCliff)
") Rear Wheel Removal (by BassCliff) Hello to my GS riding friends! After picking up a nail in my rear tire (while on the freeway at 75mph!) I thought I would take a few pictures to help illustrate the rear
Rear Wheel Removal (by BassCliff) Hello to my GS riding friends! After picking up a nail in my rear tire (while on the freeway at 75mph!) I thought I would take a few pictures to help illustrate the rear
CHEVY C WHEEL DRIVE STANDARD CAB ONLY (EXCEPT 454SS) FTS1588-7BC 4" LIFT SPINDLES
 FTS1588-7BC 4 LIFT SPINDLES") 1988-1991 CHEVY C1500 2 WHEEL DRIVE STANDARD CAB ONLY (EXCEPT 454SS) FTS1588-7BC 4" LIFT SPINDLES PARTS LIST: 1 EA. LIFT SPINDLE PASS. SIDE FT1588-7BCP 1 EA. LIFT SPINDLE DRIVER'S SIDE FT1588-7BCD 6 EA.
1988-1991 CHEVY C1500 2 WHEEL DRIVE STANDARD CAB ONLY (EXCEPT 454SS) FTS1588-7BC 4" LIFT SPINDLES PARTS LIST: 1 EA. LIFT SPINDLE PASS. SIDE FT1588-7BCP 1 EA. LIFT SPINDLE DRIVER'S SIDE FT1588-7BCD 6 EA.
2008 Toyota Tundra 4WD Brake Job: A Quick Job and Even Quicker Write-Up.
 FRONT BRAKES: 2008 Toyota Tundra 4WD Brake Job: A Quick Job and Even Quicker Write-Up. 1. Remove this bolt holding brake line bracket to the suspension. 2. I had to replace all 4 rotors at 60K miles, so
Installation Instructions
 99-04 Suzuki Sidekick 2 Inch Budget Lift Kit Also fits 99-04 Tracker, Vitara, Grand Vitara or XL-7 Instructions Include:! SKU# KSP-BLKV Basic Kit!!!! SKU# KSP-C2BLKV-RS Basic Kit W/Rear Shocks!!!! SKU#
1 of 9 7/19/2016 5:35 PM
 1 of 9 7/19/2016 5:35 PM PADS - FRONT/REAR BRAKE - SRT8 STANDARD PROCEDURE BRAKE PAD BURNISHING CAUTION: After installing NEW brake pads, keep in mind that braking effectiveness might be somewhat reduced
EGR Performance Brakes Assembly Instructions DODGE DANA 70 '87 - '93 (Will not fit stock sized dual rear wheels)
") EGR Performance Brakes Assembly Instructions DODGE DANA 70 '87 - '93 (Will not fit stock sized dual rear wheels) Got Brakes? Parts List (2) Vented Rotors (2) Multi hole Cable Mount & L Brkt (2) Axle Tube
EGR Performance Brakes Assembly Instructions DODGE DANA 70 '87 - '93 (Will not fit stock sized dual rear wheels) Got Brakes? Parts List (2) Vented Rotors (2) Multi hole Cable Mount & L Brkt (2) Axle Tube
2007 Pontiac G BRAKES Disc Brakes - G6
 REAR DISC BRAKE PADS REPLACEMENT Removal Procedure CAUTION: Refer to Brake Dust Caution. 1. Inspect the fluid level in the brake master cylinder reservoir. 2. If the brake fluid level is midway between
J&M Mustang Rear Adjustable Lower Control Arms Installation Guide (99-04)
") J&M Mustang Rear Adjustable Lower Control Arms Installation Guide (99-04) 1. Required Tools: 1.1. 3/8 ratchet 1.2. 1/2 ratchet 1.3. 18mm deep socket 1.4. 18mm standard socket (optional) 1.5. 19mm open
J&M Mustang Rear Adjustable Lower Control Arms Installation Guide (99-04) 1. Required Tools: 1.1. 3/8 ratchet 1.2. 1/2 ratchet 1.3. 18mm deep socket 1.4. 18mm standard socket (optional) 1.5. 19mm open
WARNING: Only perform this installation if you are experienced, fully equipped mechanic.
 DYNATRAC V3.2 2005-Present Ford Super Duty 250/350-4x4, Front Axle, Free Spin Conversion Kit Some of the less common tools, which will be required: 6 point Spanner socket (OTC #7090-A or equivalent). These
Installation Manual TWM Performance Short throw shifter 2001 and up Hyundai Accent
 Installation Manual TWM Performance Short throw shifter 2001 and up Hyundai Accent 1. Place the vehicle on a flat surface with blocks in front and behind the wheels preventing unwanted movement. The car
DINAN by Brembo BRAKE KIT INSTALLATION NOTES
 DINAN by Brembo BRAKE KIT INSTALLATION NOTES a) Dinan by Brembo brake conversion kits contain components which are considerably larger than the stock parts currently on the vehicle. Dinan Engineering highly
kit contents trail-safe samurai inner axle seal suzuki samurai (all engines) InstalLation Instructions
 InstalLation Instructions") InstalLation Instructions trail-safe samurai inner axle seal 300748-3-kit 1986-1995 suzuki samurai (all engines) kit contents 5356 PINE AVE FRESNO, CA 93727 USA TOLL FREE: 877.4X4.TOYS WORLDWIDE: 559.252.4950
InstalLation Instructions trail-safe samurai inner axle seal 300748-3-kit 1986-1995 suzuki samurai (all engines) kit contents 5356 PINE AVE FRESNO, CA 93727 USA TOLL FREE: 877.4X4.TOYS WORLDWIDE: 559.252.4950
M-3000-ZX3 SVT Focus Suspension Kit INSTALLATION INSTRUCTIONS
 Please contact the Tech Hot Line for the most current instruction information (586) 468-1356!!! PLEASE READ THE FOLLOWING INSTRUCTIONS CAREFULLY PRIOR TO INSTALLATION!!! INTRODUCTION: The components in
Full Size GM Installation Instructions
 Full Size GM Installation Instructions Rear Disc Conversion 55 64 Full Size GM (Impala, Bel Air, etc.) This kit is for axle with a 3 3/8 spread center to center on the top two bolt holes (pictured left).
BK061 INSTALLATION INSTRUCTIONS
 NOTE: While this installation can be done with a hydraulic jack and jack stands, it is most easily performed with a 2-post service lift, transmission jack, and a few extra people. At the very minimum,
A/F/X Body GM Installation Instructions
 A/F/X Body GM Installation Instructions Rear Disc Conversion 64-72 A Body / 67-69 F Body / 62-74 X Body This kit is for axle with a 3 1/8 spread center to center on the top two bolt holes (pictured left).
Ford Focus Front Brake Pad Replacement
 2005-2007 Ford Focus Front Brake Pad Replacement Replacing the brake pads on all 2005-2007 Focus models with rear drum brakes. Written By: David Hodson ifixit CC BY-NC-SA www.ifixit.com Page 1 of 16 INTRODUCTION
INSTALLATION INSTRUCTIONS
 INSTALLATION INSTRUCTIONS FRONT BIG BRAKE CONVERSION KIT A112-5 1987-93 FORD MUSTANG Thank you for choosing STAINLESS STEEL BRAKES CORPORATION for your braking needs. Pleases take the time to read and
Replace brake pads and discs - rear * (Volkswagen Golf )
") Replace brake pads and discs - rear * (Volkswagen Golf 1997-2004) *Caution! This instructions are created by random users and must be used as a reference only! Please, take all safety precautions, and
Replace brake pads and discs - rear * (Volkswagen Golf 1997-2004) *Caution! This instructions are created by random users and must be used as a reference only! Please, take all safety precautions, and
KIT # CSS-C SUSPENSION LIFT KIT
 14385 Veterans Way Moreno Valley, CA 92553 Phone: (951) 571-0212 Fax: (951) 571-0215 2001-2010 CHEVROLET SILVERADO 1500 AND 2500 HD 4WD AND 2WD PICK-UP 1999-2010 CHEVY 2500 4WD PICK-UPS 2001-2010 2500
Eibach Pro-Damper Shocks & Struts (05-09 All):
:") Eibach Pro-Damper Shocks & Struts (05-09 All): Required tools: 3/8 and 1/2 drive ratchets 7, 8, 10, 15, 16, 17, 18, 21 & 22 mm open ended wrenches 8 & 10 mm box end wrenches 10mm socket 13, 15 & 18 mm
Eibach Pro-Damper Shocks & Struts (05-09 All): Required tools: 3/8 and 1/2 drive ratchets 7, 8, 10, 15, 16, 17, 18, 21 & 22 mm open ended wrenches 8 & 10 mm box end wrenches 10mm socket 13, 15 & 18 mm
Fox 2.0 Adjustable Coilovers (Par# ) Installation on a 2013 F-150 (2WD)
 Installation on a 2013 F-150 (2WD)") Fox 2.0 Adjustable Coilovers (Par# 983-02-052-2) Installation on a 2013 F-150 (2WD) This guide is for the install of the Fox 2.0 adjustable leveling struts on a 2013 F-150 2WD, these are being installed
Fox 2.0 Adjustable Coilovers (Par# 983-02-052-2) Installation on a 2013 F-150 (2WD) This guide is for the install of the Fox 2.0 adjustable leveling struts on a 2013 F-150 2WD, these are being installed
Steeda Sport Mustang Lowering Springs (2005+) - Installation Instructions
 - Installation Instructions") Steeda Sport Mustang Lowering Springs (2005+) - Installation Instructions The below installation instructions work for the following products: Steeda Sport Mustang Lowering Springs (2005+) Please read
Steeda Sport Mustang Lowering Springs (2005+) - Installation Instructions The below installation instructions work for the following products: Steeda Sport Mustang Lowering Springs (2005+) Please read
1986 Rear Disk Brake Upgrade. All hard lines mounted to the rear axle with mounting screws. 1/4" fittings
 1986 Rear Disk Brake Upgrade Being well prepared for a project of this size is the key to success. I thought I was well prepared by doing a lot of research and getting all of the required parts before
INSTALLATION INSTRUCTIONS
 INSTALLATION INSTRUCTIONS REAR DISC BRAKE CONVERSION KIT A126-1 1973-87 CHEVROLET 1/2 TON 2WD Thank you for choosing STAINLESS STEEL BRAKES CORPORATION for your braking needs. Pleases take the time to
Installation Instructions for Teraflex 2.5 Inch Lift Kit with Shocks (2010 Jeep Wrangler Unlimited)
") Installation Instructions for Teraflex 2.5 Inch Lift Kit with Shocks (2010 Jeep Wrangler Unlimited) Installation Time: 6 Hours Tools Required: Floor Jack Jack Stands Ratchet Torque Wrench 15mm Socket 15mm
Installation Instructions for Teraflex 2.5 Inch Lift Kit with Shocks (2010 Jeep Wrangler Unlimited) Installation Time: 6 Hours Tools Required: Floor Jack Jack Stands Ratchet Torque Wrench 15mm Socket 15mm
Ford Racing BOSS 302 Engine Oil Cooler (11-14 GT)
") Tools needed: 14mm hex socket 7mm socket/wrench 8mm socket/wrench Ford Racing BOSS 302 Engine Oil Cooler (11-14 GT) 10mm socket (for airbox removal) ¾ inch or 19mm wrench Torque wrench Appropriate ratchets
Tools needed: 14mm hex socket 7mm socket/wrench 8mm socket/wrench Ford Racing BOSS 302 Engine Oil Cooler (11-14 GT) 10mm socket (for airbox removal) ¾ inch or 19mm wrench Torque wrench Appropriate ratchets
55-64 Full Size Chevy Installation Instructions Standard Disc Conversion
 55-64 Full Size Chevy Installation Instructions Standard Disc Conversion DBMC09, PV71 & PVB71 Pictured (Booster, master cylinder & valve setups may vary by upgrades selected) Your new disc brake conversion
INSTALLATION INSTRUCTIONS
 INSTALLATION INSTRUCTIONS --1075 North Ave. Sanger, CA 93657-3539 local: 559-875-0222 fax: 559-876-2259 toll free: 800-445-3767-- 2000 1984 1991 Toyota 2 Wheel Drive Pick-Ups 2 Front Dropped Spindles Congratulations!
Signature Series A/F/X Body GM Installation Instructions Power Disc Conversion
 Signature Series A/F/X Body GM Installation Instructions Power Disc Conversion 64-72 A Body / 67-69 F Body / 62-74 X Body Your new disc brake conversion kit can be bolted up with standard hand tools. The
Toyota Celica Short Throw Shift Kit Installation Manual (Metal Assembly)
") 1992-1993 Toyota Celica Short Throw Shift Kit Installation Manual (Metal Assembly) Page 1 1. Remove shift knob and plastic cover from shift assembly. 2. Remove the three nuts holding the top part of the
1992-1993 Toyota Celica Short Throw Shift Kit Installation Manual (Metal Assembly) Page 1 1. Remove shift knob and plastic cover from shift assembly. 2. Remove the three nuts holding the top part of the
RC4WD Diablo Instruction Manual
 Version 1.1 RC4WD Diablo Instruction Manual Thank you for your purchase. Welcome to the RC4WD family. This kit is a combination of many specially engineered and manufactured parts. Enjoy your build. This
Slave Cylinder Weep Hole Drilling Procedure
 Slave Cylinder Weep Hole Drilling Procedure Tools Required: T20 Torx Driver T25 Torx Driver T25 Torx Bit with ¼ Ratchet Wrench 4mm Hex Key (Allen wrench) 5mm Hex Key 6mm Hex Key 8mm Hex Key 12mm Hex Key
Front Axle Pinion Seal Replacement
 Front Axle Pinion Seal Replacement by Flopster843 10 Apr 2016 The AAM 925 axle used on the front of Dodge Ram trucks is a decent unit, but it does have its flaws. This axle lacks lockout hubs on the front