For your safety: Always read this instruction manual before use. Operator Instruction manual for. Bomford Turner. Raven. Vegetation control Arm mower
|
|
|
- Vernon Moore
- 5 years ago
- Views:
Transcription

1 For your safety: Always read this instruction manual before use. Operator Instruction manual for Bomford Turner Raven Vegetation control Arm mower (Book number IM RAVEN-562 v1) Page 1 of 50 Original instructions
2 IMPORTANT Note here the serial number of your machine and always quote it in any communication with us or your dealer. This is particularly important when ordering spares. Remember to include all numbers and letters. Machine serial numbers The information given throughout this manual is correct at the time of publication. However, in the course of constant development of Bomford Turner machines, changes in specification are inevitable. Should you find the information given in this book to be at variance with the machine in your possession, you are advised to contact the Bomford Turner Service department where up-to-date information will be provided. The manual can contain standard and optional features and is not to be used as a machine specification. The machine has been tested and is considered safe if carefully used. Ensure your operator is properly trained in its use and maintenance. IMPORTANT Notez ici les numeros de serie de votre machine et mentionnez les dans toute communication avec nos services ou votre revendeur. Ceci est important pour la commande de pieces detachees. Pensez a noter tous les numeros et toutes les letters. Numeros de serie de la machine. Les informations donnees dans ce manuel sont correctes cependant, du fait de developpement constant des machines Bomford Turner. Changements dans les caracteristiques sont inevitables. Si vous trouvez que les informations donnees ne correspondent pas a votre machine veuillez contacter le service des reparations ou des informations plus recentes vous seront donnees. Ce manuel peut montrer des caracteristiques optionnelles et ne peut pas etre considere comme specification de la machine. Cette machine a ete testee, et elle est consideree comme fiable a condition d une bonne utilisation. Assurez-vous que votre operateur est qualifie en ce qui concerne l utilisation de la machine ainsi que son entretien. WICHTIG Tragen sie hier die seriennummern ihrer maschine ein und geben sie diese immer an, wenn sie sich an uns oder ihren händler wenden. Das ist besonders bei ersatzteilbestellungen wichtig. Vergessen sie nicht, alle zahlen und buchstaben zu notieren. Seriennummern der maschine Die angaben indiesem handbuch sind bei veröffentliching korrekt. Aufgrund der konstanten weiterentwicklung von Bomford Turner maschinen sind jedochänderugden in der spezifikation unvermeidlich. Wenn die information in diesem handbuch nicht mit ihrer maschine übereinstimmen, nehmen sie bitte kontakt mit der Bomford Turner kundendienstabteilung auf, die ihnen gerne die aktuellen information zukommen lässt. Das handbuch kann sowohl beschreibungen für die standard ausführung als auch für zubehör enthalten und ist nicht als maschinenspezifikation zu verwended. Die maschine ist getestet und bei sachgemässem betrieb als sicher befunden worden. Sorgen sie dafür, dass ihr bedienpersonal in anwendung und wartung richtig geschult wird. Page 2 of 50 Original instructions
3 Page 3 of 50 Original instructions
4 Raven This manual covers the Raven series of Flail Mowing machines, which are two-arm linkage mounted machines. These light weight economy machines have integral mainframe and oil tank and fixed lateral arms. The raven has fully independent hydraulics powered by a PTO drive from the rear of a suitable tractor. The Raven is designed for vegetation control, to cut and thin all types of hedges and verges within the scope of its reach and performance, provided the correct guards are fitted. It is essential that the guards are fitted at all times during operation and that the machine is operated in line with the procedures and practices detailed in this manual Section Contents Page No. EC declaration of conformity 3 Contents Machine description Intended usage General arrangement Machine rotation convention Machine general specification Safety Safety warnings Noise Emergency stop Guards Guarding related to shaft rotation Tractor stability Safety decals Electromagnetic compatibility Machine preparation Tractor requirements Lifting the machine Tractor preparation for chain supports Tractor preparation for tubular 3pt linkage Fitting the PTO Mounting the cutting unit to the arm Connecting the cutting unit motor Hydraulic oils Filter replacement Filling the tank Filling the gearbox Greasing pivot point Controls Overview Definitions Cable controls (if fitted) Fitting the control lever unit Stopping quickly Movement of cable control levers Head float Manual arm float (if fitted) LPH controls (if fitted) Connecting the LPH control unit Emergency cut-off Joystick movement Joystick button functions Arm rest mounting 33 Page 4 of 50 Original instructions
5 Section Contents Page No. 9.0 EPP III controls (not available on Raven) ICS controls (not available on Raven) Installation checks Checking head float Checking arm float (if fitted) Breakout Hydraulic Hoses General operation Operator training Initial checks Machine pre-start check Starting up procedure Transportation to work site Cutting control Stopping the cutting unit Arm float (if fitted) Operating hints Grass cutting Hedge cutting Stalling the rotor Removal, Storage and Disposal Preparation for storage Parking and removal Disposal Maintenance Power Take-Off shaft (PTO) Hoses Pins Rams Gearbox Greasing Filter Rotor shaft Tensioning drive belts Changing the drive pulleys Cable lever adjustment 50 IMPORTANT This machine is designed for vegetation control and must not be used for any other purpose. It is potentially hazardous to fit or use any parts other than genuine Bomford Turner parts. The company disclaims all liability for the consequences of such use which, in addition, voids the machine warranty. Page 5 of 50 Original instructions

6 1.0 Machine Description 1.1 Intended usage. The Raven was developed to meet the demands of small scale agricultural markets having horticultural, landscape and amenity management needs. Equipped with lighter duty flail heads and a maximum reach up to 4.7m it can be mounted on large compact or small agricultural tractors in the 50 to 70 hp range. The machine can be used for hedge or grass cutting. The Raven is designed to be rear mounted and for use on level, undulating or inclined ground. It can be articulated to access up-bank or down-bank vegetation and will cut up to 40mm thickness (depending on flail type fitted). Bomford Turner Raven Page 6 of 50 Original instructions

7 1.2 General arrangement The layout and naming convention used throughout this manual are shown in Figures 1.2 below Integral oil tank and mainframe Oil Filter / Filler cap 1st ram PTO drive input Cowl ram Cowl linkage Rotor shaft bearing, drive belts and motor opposite end. Integral Stands stands First arm 2 nd ram Second arm Roller Figure Machine rotation convention Bomford Turner uses a convention to determine the correct rotation of the flail head cutting rotor with respect to specific types of cutting work. The convention relates the cutting rotor direction and the direction of rotation of the tractor wheels. Definition: Reverse rotation, the cutting rotor direction is the reverse of the tractor drive wheel rotation Forward rotation, the cutting rotor direction is the same as the tractor drive wheel rotation The standard Bomford Turner cutting head construction for both hedge and grass cutting is Reverse rotation with a front steel guard and a flexible flap together with a rear flexible guard In all cases for Reverse rotation, Forward rotation and both hedge and grass cutting conditions the roller is an integral and essential part of the safety guarding If the machine is to be used for cutting in Forward rotation then a rear metal guard must also be fitted See section 2.6 and 2.7 for detailed guarding instructions. Page 7 of 50 Original instructions
8 1.4 Machine general specification. RAVEN: Technical specification (1) Type Live PTO Speed 540rpm Size 1.3/8 (34.9mm), 6 spline Minimum Tractor weight (With ballast) 50hp (@1800kg) Arm Mower weight Base unit with no oil 407kg Base unit with oil 510kg Max lateral on-ground grass cut 4700mm (See item 1 in figure 1.4) Max lateral off-ground grass cut 4705mm (See item 2 in figure 1.4) Max lateral off-ground side cut 4219mm (See item 3 in figure 1.4) Max down-bank grass cut 3169mm (See item 4 in figure 1.4) Reach arm dimensions Max up-bank grass cut 4240mm (See item 5 in figure 1.4) (2) (3) (4) (9) Max vertical flat cut 3375mm (See item 6 in figure 1.4) Max vertical side cut (5) 4810mm (See item 7 in figure 1.4) Max transport width to centreline (6) 1230mm (See item 8 in figure 1.4) Max transport overhang to axle (7) 1503mm (See item 9 in figure 1.4) Oil tank capacity 130 litres RAVEN: Flail head data (1) Cutting unit 950LW 1100LW 1257LW 1007MW 1100MW Weight (Kg) Drive Direct Direct Direct V Belt V Belt Nominal shaft speed (rpm) (8) / /3237 Twin flail (Quantity) Forward facing flail (Quantity) HS40 flail (Quantity) MP44 Flail (Quantity) Bushmaster flail (Quantity) 16 N/A N/A Notes: (1) All specification information is correct for this version of the instruction manual. Bomford Turner constantly review and improve product designs and reserve the right to change this information. As a consequence actual machines may vary from specification. Contact your Bomford Turner Sales representative if you have any queries. (2) All dimensions are taken with a 950LW flail head fitted. (3) All heights assume a notional arm mower mounting height of 550mm. This is measured from the ground to the centre of the main first arm to mainframe pivot. This will vary from tractor to tractor. (4) All lateral reach dimensions are taken from the centreline of a notional tractor with a 2030mm overall width. Consequently down bank dimensions are measured assuming this notional tractor has the outside of its rear wheel on the edge of an embankment. (5) This specified geometric maximum is stated for information purposes only. It does not imply that it is safe or appropriate to cut material in this position. The actual safe maximum side cut height will depend on the width of the tractor that the arm mower is mounted to. (6) The transport width quoted is a half width and is measured to the PTO centre which is notionally assumed to be on the tractor centreline. As a consequence the full on road width is the quoted transport width plus half the tractor width plus (or minus) any mounting offset from the tractor centreline. (7) The transport depth is indicative and will vary with the specified tractor. This figure assumes a direct mount to the tractor. There is an optional spacer frame which can be fitted for some tractor configurations to allow the head to tuck in behind the wheel where this presents a problem for some direct mount configurations. (8) The two figures quoted for shaft rpm are dependant on the pulley configuration. (9) All dimensions are determined from computer models. As a result actual measurements may vary as a result of deflections due to weight. Tractor tyres will naturally compress on the working side of the tractor as the arm is deployed and the centre of gravity shifts. The amount is affected by tyre construction, age, inflation pressures and the use of local ballast weight. For example a 20mm compression of the cutting side rear tyre will be magnified by the arm reach which will have an affect on the actual cut height. Page 8 of 50 Original instructions


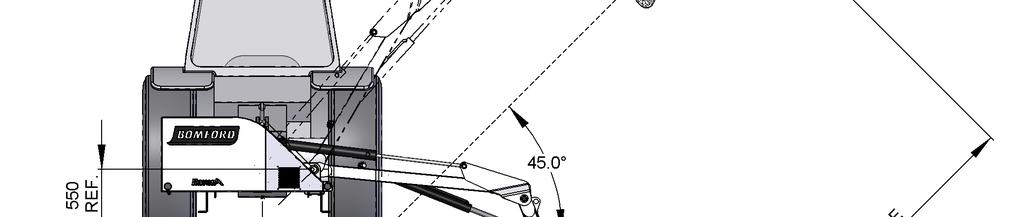


9 Figure 1.4 Page 9 of 50 Original instructions
10 2.0 Safety: 2.1 Safety warnings; The operator must read, understand and follow all of the Safety instructions. Serious injury or death may occur unless care is taken to follow the warnings and instructions provided. The level of safety is indicated in three levels and the following notation is used throughout this operator instruction book; DANGER! WARNING! CAUTION! Level 1; alerts for imminent death or critical injury. Level 2; warns of serious injury or possible death. Level 3; indicates possible injury. Never operate the tractor or machinery until you have read and completely understand this manual and the tractor operators manual and each of the safety messages found in the manuals and those displayed on the tractor and implement. DANGER! DO NOT attempt any maintenance of or adjustment to the machine while it is running. Before carrying out any work on the machine follow the three safety instructions below: Lower the cutting head on to the ground Put the PTO out of gear Stop the tractor engine DANGER! DANGER! DANGER! DANGER! DANGER! DANGER! DANGER! DANGER! At all times ensure that the PTO shaft guard is in position, securely fitted and in good condition and that the tractor PTO shaft shield is fitted. Keep a careful watch for passers by who may inadvertently get in the way of cut material being thrown from the cutting unit. Flail mowers are capable under adverse conditions of throwing objects great distances at high velocity. Stop the rotor shaft until all people are well clear. AVOID WIRE. It can be extremely dangerous if wire catches in the rotor, and every care must be taken to ensure this will not happen. Inspect the working area before commencing. Remove all loose wire and obstructions and clearly mark those that are fixed so that you can avoid them. Any unusual noise from the cutting unit area indicates that the rotor shaft may have been fouled by an obstruction. A visual indication that wire is in contact with the flails may be a sudden movement of the vegetation ahead of the cutting unit. In any such event STOP the tractor engine INSTANTLY. On no account move the cutting unit until the rotor has completely stopped. NEVER UNDER ANY CIRCUMSTANCES run the rotor in reverse to 'clear itself'. When the rotor has stopped, inspect it and remove any obstruction that may be present. If working under a raised machine ensure that it is safely supported. Before working on the rotor always stop the tractor engine and remove the ignition key. Flail mowers are capable under adverse conditions of throwing objects great distances at high velocity. CHECK the flails for wear and the attachment bolts for tightness every day during work.a few moments whenever the machine is stopped, e.g. whenever removing obstructions, will help reduce flail wear or loss. Keep your forward speed to a level appropriate to the operating conditions. High-speed manoeuvres with the arms stretched out are very dangerous, particularly on uneven ground where there is risk of overturning. Do not operate or transport with the arms extended rearwards as instability will result with the possibility of overturning A wire mesh cab guard must be fitted on the outside of the cab window, between the operator and the cutting head, in such a position as to give the operator maximum protection. Where a hedge trimmer is used in conjunction with tractors not fitted with a glazed safety cab, a clear polycarbonate safety screen together with a mesh guard must be fitted to the tractor between the operator and the cutting head. A polycarbonate safety screen must be used on cabs where Page 10 of 50 Original instructions
11 windows are likely to be left open for ventilation purposes. It is essential that cab windows on the operating side; through which the cutting head is observed; are be intact, clean and closed, or a clear polycarbonate safety screen must be fitted where hedge cutting and grass trimming operations are carried out. When hedge cutting a mesh guard must also be fitted. WARNING! Do not operate machinery with guards missing. Ensure that the correct guards are properly fitted to the machine and tractor at all times and that they are in good condition. Refer to section on Guards and Rotation in this manual to ensure you have the correct guards fitted for the type of operation being performed. WARNING! While the tractor is running all personnel should keep well clear of the area around the machine as there are numerous crushing, shearing, impact dangers caused by the machine operation. WARNING! Direct the cut material away from the tractor. It is important that while operating the cut material is not directed towards the operator. Avoid positioning the cutting head so that the underside is angled towards the cab. WARNING! Extreme care should be taken when operating near loose objects such as gravel, rocks, wire, and other debris. Inspect the area before mowing. Foreign objects should be removed from the site to prevent machine damage and/or bodily injury or even death. Any objects that cannot be removed must be clearly marked and carefully avoided by the operator. Stop mowing immediately if flails strike a foreign object. Repair all damage and make certain the rotor shaft is still balanced before resuming cutting operations. WARNING! Transport the machine only at safe speeds. Serious accidents and injuries can result from operating this equipment at unsafe speeds. WARNING! Do not operate or transport with the arms extended rearwards as instability will result. CAUTION! Replace the PTO shaft guard if any of the following are evident; guard cracked or damaged, any part of the PTO shaft exposed. Ensure the PTO shaft guard is free to rotate and the anti-rotation chains are securely fitted and effective. CAUTION! Keep the roller in position at all times. It is an essential part of the machines guarding. The machine must not be operated with the roller missing. 2.2 Noise THINK SAFETY - WORK SAFELY The equivalent daily personal noise exposure from this machine, measured at the operator's ear, is within the range of 80-85dB when used in conditions where the load fluctuates between zero and maximum. This applies when the machine is attached to a tractor fitted with a quiet cab and used in accordance with the operating instructions in a generally open environment. At equivalent daily noise exposure levels of between 85 and 90dB, suitable ear protectors are recommended. 2.3 Emergency Stop In an emergency bringing the cutting head to a stop requires familiarity with the controls fitted to the machine. The Raven is equipped with two types of control; Cable and Low Pressure Hydraulic (LPH). For Cable controls see section 7.2 to stop quickly. For LPH controls see section 8.2 for emergency stop. 2.4 Guards DANGER: For safe operation it is essential that that all guards and the roller must be kept in position on the machine whenever the machine is running. Bomford Turner Ltd disclaim all responsibility for any damage or injury arising as a result of guards or roller being removed, or of guards other than of Bomford Turner manufacture having been fitted, or of operation of the machine other than in accordance with these instructions. Page 11 of 50 Original instructions
12 DANGER: When hedge cutting or trimming or any operation where the cutting head is not in contact with the ground, the welded mesh guard; supplied with the machine; must be fitted to the side window of the tractor cab. Cabs without laminated or toughened glass must also be fitted with a laminated glass or polycarbonate shield in addition to the welded mesh guard. WARNING: Inspect guards twice daily or immediately damage is suspected. Always replace guards that have damage or wear which could impair their performance. Typical damage to inspect for is; Adjustable front metal guard Rear metal guard (when fitted) Flexible front or rear guards - distorted or with sharp outer edges. - bent, missing or blunt cutting edge. - missing portions, damaged, or worn sufficiently to permit stones or similar objects to be ejected beneath it in normal conditions. 2.5 Guarding related to shaft rotation It is very important to fit the correct combination of guarding for the method of cutting being employed. This is also dependant on the drive option selected for the flail head. Flail heads fall into two broad types, single and dual rotation Single rotation Flail heads The direction of the shaft rotation may be changed by reversing the hose connection on the motor. Ensure the correct guards are fitted for the direction of rotation being used, see figure 2.1a and 2.1b. Mesh cab guard Adjustable front metal guard Mesh cab guard Travel Travel Front flexible guard Rear flexible guard Rear metal (wire trap) guard Figure 2.1a Hedge cutting REVERSE rotation Figure 2.1b Hedge cutting FORWARD rotation Page 12 of 50 Original instructions

13 2.5.2 Dual rotation Flail heads: On machines fitted with a Cable Dual Sense Rotation (CDSR) or Electric Dual Sense Rotation (EDSR) rotor control valves, the shaft rotation can be reversed by the operation of a lever or a switch. Ensure the correct guards are fitted for the direction of rotation being used at any time, see figure 2.2a and 2.2b. Mesh cab guard Adjustable front metal guard Adjustable front metal guard Travel Travel Front flexible guard Rear metal (wire trap) guard Front flexible guard Rear flexible guard Figure 2.2a Hedge cutting in DUAL rotation Figure 2.2b Grass cutting in DUAL rotation 2.6 Tractor stability Due to the design of mowers and the work they undertake, it is essential to ensure that the tractor is stable during work and transport in order to eliminate any risk of loss of directional control, imbalance or overturning. Before work, extend the arms to full reach slowly and ensure that at full reach the rear wheel on the opposite side to the extended arms is still on the ground. It is advisable to have a helper to check this. Check that the tyre shows evidence of bearing some load. If the tyre lifts then add ballast in the form of wheel weights to the rear wheel of the tractor opposite to the extended arms until the tyre shows evidence of bearing some load. Before driving in transport, place the arm mower in the transport position and again check that the front wheels of the tractor are both on the ground. Again, it is advisable to have a helper to check this. Check that the tyre shows evidence of bearing load. This is especially important to ensure forward directional control at speed on an undulating terrain. If the front tyres lift add ballast weights to the front of the tractor. WARNING: Failure to have sufficient load over the front axle or to drive at inappropriate speeds on undulating terrain may result in a loss of directional control. If ballast weights have been added to the tractor, check that the plated tractor axle loads have not been exceeded. IMPORTANT: When transporting on the highway, it is the responsibility of the operator to obey all relevant local highway laws. Page 13 of 50 Original instructions


14 2.7 Safety Decals Safety decals are located on various points of the machine see figure 2.3a for the mower and figure 2.3b for the cutting unit. They can be identified by the yellow upper panel depicting the hazard, and the lower white panel indicating means of avoidance or precautions to be taken. These decals have no text. It is essential that all operators and personnel associated with the machine fully understand their meanings, which are shown in figure 2.4. Any safety decals which are found missing should be replaced. Safety Decals on cutting head Safety Decals on machine Figure 2.3a Figure 2.3b Figure Electromagnetic Compatibility (EMC) - Radio Telephones Machines fitted with electric controls are subject to EU directives. The use of radiotelephone equipment should not affect their performance. Ensure that any telephones are installed correctly. Check that no unexpected movements of the machine occur when a telephone is in use. Page 14 of 50 Original instructions
15 This page intentionally left blank Page 15 of 50 Original instructions


16 3.0 Machine preparation 3.1 Tractor requirements; Before fitting the machine to the tractor ensure that specification of the tractor meets the requirements listed below A six spline 1 3/8 inch diameter PTO output shaft, is available A PTO output speed of 540rev/min is available A tractor top link is available if required To ensure fore aft stability ballast should be added to the tractor front weight tray. The amount will vary depending on type of tractor used and prevailing conditions To ensure lateral stability ballast should be added to the rear wheel opposite to the arms. The amount will vary depending on type of tractor used and prevailing conditions. NOTE: Some Bomford Turner machines are capable of being deployed on both sides of the tractor, in such a case lateral ballast may be required on both rear wheels Once the machine is mounted to the tractor and the tractor is correctly ballasted ensure that the maximum axle loads for the tractor have not been exceeded. Failure to meet this requirement may render the operator liable for infringement of public highway regulations Ensure that the tyres fitted to the tractor are correctly rated for the total working weight. NOTE: When the cutting head is deployed in work at the furthest reach the load on the rear tyre on the cutting side increases significantly Bomford Turner does not endorse the use of water ballast within tyres as this can have adverse effects on fore aft stability at speed. 3.2 Lifting the machine The machine will normally be delivered with the arms fully assembled to the mainframe, but with the cutting unit detached. If this is not the case then specific re-assembly instructions will be provided with the machine. WARNING! Only personnel experienced in lift and hoist operation should be involved in lifting machines. The lifting points (indicated with arrows) are for machines without the cutting unit attached. Due to the fact that machine may be supplied with or without a tank full of oil there are several lifting points. Ensure the correct points are used to suit the machine's condition, as the centre of gravity changes with or without oil - Exercise caution! Figure 3.2 illustrates the lifting points and a typical transport stay. Liftin g Figure Kg (No oil) 510Kg (With Page 16 of 50 Original instructions

17 3.3 Tractor preparation for chain supports: The machine is supported on the three point linkage of the tractor and its height is set by chain tension. IMPORTANT: When fitting to some models of tractor a top link support kit is required. Please consult your local dealer for details. IMPORTANT: Due to variations in the strength of different tractor manufacturer s drop links, it is recommended that support tubes are fitted around the exposed section of drop links that are less than 30mm in diameter. To fit the machine to the tractor, follow the instructions below and refer to figure 3.3; Position the machine on a flat, hard surface Remove the pins (A) from the support lugs or clevis s or in the Mainframe Carefully reverse the tractor so that the ball joint on the linkage (B) lines up with the clevis (C) in the mainframe. Note: the Raven has a breakout link fitted to the mainframe clevis nearest to the arms. This breakout link also has a clevis and it is this which must receive the tractor linkage ball joint on this side Adjust the height hydraulically until the link arm can be positioned in the clevis (C). When correctly aligned and before fitting the retention pin ensure that one of the bent keyhole plates (D) are introduced into the clevis on the inboard side of the lift arm. The plain hole should be used leaving keyhole bent towards the PTO. Secure the assembly with the retention pin (A) Similarly, adjust the remaining lift arm levelling screw until this arm can also be secured to the clevis together with the remaining bent keyhole plate (D). Again secure with the retention pin (A) Attach the top link bracket (E) between the machine and tractor top link clevis Two pairs of top link chain bracket are supplied. One pair with category 1 holes and the other pair with category 2 holes. Only one pair is required to fit either side of the tractor top link on the same pin (G). Fit whichever type is most suitable and thread the chain through the keyhole shaped hole(s), so that two equal lengths of chain are suspended from the bracket(s) Lift the machine until the tractor and machine PTO are in line Adjust the right arm and the top link until the machine is square with the tractor Thread each end of the chain through the bent keyholes (H) in the lower link stabilizer bracket Lock the chain in the slot of the stabilizer bracket, taking up the slack in the chain between the top link and the bracket, and ensuring the lengths of the chain on each side are the same Lower the machine carefully, ensuring that the tension on each chain is taken up evenly. The chain attachment brackets are designed to flex and to take up minor irregularities Clip the 'loose' ends of the chain to the taut chain as far as possible, to lock it positively in the bracket keyholes Fit the tractor external check chains to the lift arms and adjust them until there is no sideways movement. C B E D G A H F Figure 3.3 Page 17 of 50 Original instructions

18 3.4 Tractor preparation for tubular three point linkage: The machine is attached to the tractor by the tractor lift arms, top link and telescopic tubular linkages. IMPORTANT: When fitting to some models of tractor a top link support kit is required. Please consult your local dealer for details. IMPORTANT: Due to variations in the strength of different tractor manufacturer s drop links, it is recommended that support tubes are fitted around the exposed section of drop links that are less than 30mm in diameter Position the machine on a flat, hard surface Prepare the mower by using the top link to join the mower' mainframe s upper hitch point to the clevis on the linkage delta bracket (See Figure 3.4). Select an appropriate top link mounting plate to fit the tractor. In the top link kit, Category 2 fittings are standard (Two optional plates are supplied for cat 3 and 28mm diameter pins and a category 1 bush is also included) Using the lower pins, fix the linkage delta bracket ball ends into the inner clevis of each mower mainframe lower hitch point Carefully reverse the tractor so the ball joints on the tractor linkage line up with the clevis on the mower mainframe. Connect the mower by pushing the hitch pins through the lift arm ball ends in the outer clevises and fit the lynch pins. WARNING: Do not allow personnel between tractor and mower Connect the upper hitch point of the A frame to the tractor upper hitch point, adjusting the top link as necessary. It is recommended a second top link pin is fitted to act as a stop against top link mounting plate Lift machine to its working height ensuring that the machine is level by adjusting the tractor linkage to suit Adjust the outer part of each A frame arm by turning it until one of the 12mm holes in the outer tube lines up with one of the holes in the inner rod, then insert pin and R clip The A frame is now a rigid unit and the tractor lift arms can be lowered, removing the weight from the tractor hydraulics. Top link mounting plate Delta bracket Top link Mower mainframe Tractor Link pin 2 nd Tractor Link pin Linkage ball end Figure 3.4 Page 18 of 50 Original instructions

 IMPORTANT: The recommended minimum engagement of the PTO is 150mm in the working position. This measurement must be taken into account when shortening the PTO shaft.")


 (b) Figure 3.5.2 (c) Page 19 of 50 Original instructions")
19 3.5 Fitting the PTO Due to many different makes and sizes of tractor to which mowers may be fitted, a nominal length PTO shaft is supplied with the machine. In some cases the nominal PTO shaft supplied will be too long and will have to be shortened, see below. IMPORTANT: The PTO shaft, which drives the hydraulic system, must not be operated until the tank is filled with the correct brand/grade of oil. (See section 5.0) IMPORTANT: The recommended minimum engagement of the PTO is 150mm in the working position. This measurement must be taken into account when shortening the PTO shaft. (See Figure 3.5.1) Figure Both machinery and tractor must be parallel to one another Pre-assemble the PTO shaft and check that the drive tube overlap is not less than 150mm, see figure 3.5.1, and 3.5.2a Check that the minimum overlap of the shaft guards is not less than 50mm, see figure If the overall PTO length is likely to reduce during operation then ensure that at its minimum there is at least 40mm movement left between the guards, see dimension A in figure If the PTO needs to be shortened, cut both tubes as both halves must be shortened equally, see figure 3.5.2b Remove burrs with a file and clean any residual cutting debris from the tubes Before fitting the PTO shaft to the tractor, grease the sliding drive shafts and bearing units Fit the PTO to the tractor ensuring that the locking peg and collar on the spline-coupling is fully engaged Attach the PTO guard check chains to the tractor and to the machine to prevent guard rotation. (a) (b) Figure (c) Page 19 of 50 Original instructions

 from the end of the arm. 4.0.")
. Figure 4.1 A Bomford Turner flail heads can be centre mounted or end mounted according to user preference.")
20 4.0 Mounting the cutting unit to the arm; With the machine assembled, the cutting unit can now be fitted to the end of the arms, see figure 4.1. To do this; Start tractor engine and raise the arms so that the cutting unit clamp on the end of the arm is approximately 500mm clear of the ground Place the cutting unit directly in front of the clamp, ensuring that the roller is behind the cutting rotor for the intended direction of travel. (Level up cutting unit with wood packing if necessary.) Remove clamp bracket (A) from the end of the arm Adjust the position of the arms until the cutting unit clamp is lined up with the clamping bar on top of the cutting unit in the desired position along the bar Replace and re-tighten clamp bracket (A). Figure 4.1 A Bomford Turner flail heads can be centre mounted or end mounted according to user preference. IMPORTANT: Head float is most effective when the flail head is centre mounted. The hydraulic hose length for the motor hoses supplied makes allowance for different user mounting preferences. The hoses must run down the back of the second arm from the bulkhead connection plate to the head motor in a smooth unrestricted loop, see typical right hand configuration in figure 4.2. (Typically, on left hand configurations the loop is not necessary.) Hose clamps on the arm and the flail head cowl are provided to guide the hose routing. The bend radius of this loop must not be less than ten times the diameter of the hose. If possible ensure the hoses are clamped to the cowl to allow for full articulation of the cowl ram without snagging the hoses. Figure 4.2 (Note: Typical RH set up illustrated) Page 20 of 50 Original instructions
.")

21 4.1 Connecting the cutting unit motor Connection of the drive hoses to the flail head motor will determine the direction of rotation of the cutting rotor shaft. For safe cutting of both grass and hedge the Bomford Turner standard factory build supports Reverse rotation (for definition see section 1.3). There are two types of flail head configuration available. These are; Direct drive and Belt drive. Direct drive allows for one rotor speed dictated by the PTO input. Belt drive allows for two operating speeds depending on the pulley configuration used. On a left hand arm mower the drive motor will be on the end of the flail head furthest from the tractor. On a right hand arm mower the drive motor will be on the end of the flail head nearest the tractor. This convention ensures that shaft rotation is common between left hand and right hand machines and that the pressure hose is always connected to the motor port closest to the arm mounting point to achieve reverse rotation (RR). To connect a direct drive flail head in reverse rotation (RR) see figure 4.3. To connect a belt drive flail head in reverse rotation (RR) see figure 4.4. For reverse rotation RR, on Left hand direct drive flail heads, the pressure port is nearest to the arm Figure 4.3 For reverse rotation RR, on Left hand belt driven flail heads, the pressure port is nearest to the arm Figure 4.4 Having connected the hoses to the motor supplied, then; Start the tractor and engage the PTO with engine on low revs Switch on the rotor control in reserve rotation as shown on the decal Check the direction of rotation of the rotor Stop the rotor and the tractor If the rotor has run in the wrong direction, reverse the large hoses on the motor. Page 21 of 50 Original instructions
22 5.0 Hydraulic oils: The list of oils in figure 5.2 has been approved for use with hydraulically driven flail mowers. IMPORTANT: The warranty on hydraulic equipment is invalidated if oils other than those recommended here are used. 5.1 Filter replacement; The filter element in the filter unit situated on the top of the tank must be replaced after the first 50 hours of work and thereafter after every 500 hours of work or after two seasons work whichever is the sooner. See figure Filling the tank; Figure 5.1 IMPORTANT: Before filling the tank with oil connect the drive hoses together using one of the adapters from the motor fitted to the cutting head. Unless the tank is already full, the correct procedure for filling the oil tank is as follows: Remove breather cap and strainer assembly and place at side of tank Check unions on suction hose from tank to pumps for tightness and freedom from kinks and restrictions Fill tank to half way up the sight glass with the correct grade of oil from the recommended list, see figure 5.2. WARNING! Only use oil on the approved list, see figure Replace breather cap and strainer assembly Avoid contamination at all times particularly when the breather cap and strainer assembly is removed. Figure 5.2: Approved oils 5.3 Filling the Gearbox The gearbox capacity is 0.5 litres. Always check the oil level before use and top up if necessary. Recommended gearbox oils are listed in Figure Greasing pivot points Any lithium-based grease can be used for lubricated pivot points. Figure 5.3 Mobil Exelube Recommended Gearbox oils Mobiland Universal multi-purpose tractor Super universal tractor oil Page 22 of 50 Original instructions
23 This page intentionally left blank Page 23 of 50 Original instructions
24 6.0 Controls overview: Your Bomford Turner machine will be fitted with one of four available control systems detailed in the following standard sections; 7.0 Cable control: which is a mechanical system where the control valve is operated by cables and is actuated by mechanical levers. 8.0 LPH control: which is a hydraulic system where two hydraulic services on the control valve are operated by low pressure hydraulic flow; actuated by a single joystick; and other services are operated by electronic switches. There are two joystick configurations depending on machine type. 9.0 EPP III control: which is an electrical system where the control valve is operated by electronic signals and is actuated by joystick or electronic switches mounted in a control box. Two services; first and second rams; are proportionally controlled ICS control: which is an electrical system where the control valve is operated by electronic signals and is actuated by joystick or electronic switches mounted in a control box. Three hydraulic services are proportionally controlled, with all remaining services having ramped control. This control also benefits from a setup and diagnostics screen and a three user settings memory. Up to three operators can store preferred personal speed settings for each direction of every ram service. Raven machines can be fitted with either Cable or LPH controls, thus sections 9.0 and 10.0 are deliberately left blank in this instruction manual. 6.1 Definitions: The text in this instruction by necessity needs to refer to relative rotational directions. The terms clockwise and anti-clockwise are themselves relative definitions and depend on the operator s viewpoint. To eliminate confusion the following definition will be used throughout this text; Under normal cutting conditions flail rotation in the flail head should be the reverse of the tractor drive wheel rotation, this will be defined as Reverse rotation (RR). When the direction of flail rotation in the flail head is the same as the tractor drive wheel rotation, this will be defined as Forward rotation (FR). Additionally, other references to clockwise and anti-clockwise actions by the operator conform to international right hand thread conventions for screw down and un-screw respectively. Page 24 of 50 Original instructions

25 7.0 Cable controls The Bomford cable control system is fitted and comprises a curved metal armrest surmounted by an operation decal. Up to five hydraulic service control levers can be added to the armrest. The hydraulic service control levers are normally identified with black knobs. Additionally there is an On/Off lever identified by a red knob. This basic cable ON/Off control can be optionally replaced with a cable rotor reverse control lever also identified with a red knob. To avoid confusion there will only be one red knob lever fitted on a set of controls. The entire assembly is connected to the machine control valve by cables. There is one cable per lever. The entire assembly can be mounted within the tractor cab using a universal cab mounting kit. Black Ram control levers Red On/Off or Red Forward and Reverse lever (if fitted) Operation decal Lever mounting plate armrest Figure 7.1 Control cables 7.1 Fitting the control lever unit The position of the lever unit inside the tractor cab depends largely upon the route of the cables between unit and control valve. The cable normally can be routed through the rear cab window and should be as free of bends as possible. IMPORTANT: Do not pinch any cables in a closed window. If the tractor cab has special apertures for cables, then the lever unit should be fed through them before they are attached to the tractor cab. IMPORTANT: The remote control cables must not have a bend of less than 150mm (6in) radius. Follow instructions below for fitting lever unit: Pass lever unit and cable through the window or suitable aperture in rear of tractor cab. Figure 7.2 IMPORTANT: See separate cab fitting kit instruction sheet supplied with the machine. It is essential not to drill mounting holes through any structural member of the safety cab Mount the unit securely on to the mounting bracket with bolts provided Check motor control lever for smooth operation in both directions. If any stiffness is detected check the cable for sharp bends. Page 25 of 50 Original instructions
26 7.1.4 Adjust arm support to suit operator handling preferences. The lever body can be raised or lowered relative to the armrest, see figure 7.2. IMPORTANT: Whenever the machine is removed and the tractor is operated without the control valve unit in place, fit rubber beading (contained in cab fitting kit) to the edge of the console mounting bracket to prevent risk of injury. 7.2 Stopping quickly In an emergency bringing the cutting head to a stop requires familiarity with the lever controls fitted to the machine. If the machine is fitted with a red On/Off lever pull the lever to stop, disengage the PTO drive and switch off the engine. Wait until the rotor has audibly stopped turning before approaching the flail head. When leaving the cab always pocket the ignition keys. If the machine is fitted with a red cable rotor reverse control (CDSR) move the lever to the stop position, disengage the PTO drive and switch off the engine. Wait until the rotor has audibly stopped turning before approaching the flail head. When leaving the cab always pocket the ignition keys. IMPORTANT: The tractor PTO control should not be used to engage or disengage the drive to the rotor. 7.3 Movement of cable control levers An instruction decal for control valve operation is provided just behind the levers on the lever mounting plate arm rest. The decal is illustrated in Figure 7.3. IMPORTANT: If this decal is damaged in any way it must be replaced. Black Lever 1 controls the first arm ram. Push forwards to lower the arm and pull back to raise the arm. Black Lever 2 controls the second arm ram. Push forwards to lower the arm and pull back to raise the arm. Black Lever 3 controls a telescopic ram (If fitted). Push forwards to extend the ram and pull back to retract the ram. Black Lever 4 controls the cowl angling ram. Push forwards to lower the angle of the head and pull back to lift the angle of the head. This lever also has a detent position on push forward. Overcoming the detent position and pushing the lever fully forward to position Y, engages head float, see section 7.4. Black Lever 5 controls the slew ram (If fitted). Push forwards to slew the arm into work and pull back slew the arm into transport position. CAUTION: Do not slew to the rear of the machine with the arms extended more than 2m beyond the kingpost pivot or a tipping instability may result. The Red Lever controls rotor on off (If fitted). OR The Red Lever controls rotor reverse (If fitted). Push forwards to start the rotor and pull back to stop the rotor The resulting rotation direction is determined by the hose connections used when mounting the flail head to the base unit, see section 4.0. Push forwards to start the rotor in Forward rotation (FR).. Pull back to the mid lever position to stop forward rotation. There is a pawl which prevents instant shifts between rotation directions. Lift the pawl to allow the lever to move beyond the mid position from any direction. WARNING: Always wait for the rotor to stop rotating completely before raising the pawl. Pull the lever fully back to start in Reverse rotation (RR). NOTE: The rotation direction is determined by the hose connections used when mounting the flail head to the base unit, see section 4.0 Page 26 of 50 Original instructions
27 A typical decal (for a five service machine with on off controls) is illustrated in Figure 7.3. The operator must be familiar with the operation of these levers before commencing work. Figure Head float All Bomford turner machines have head float fitted as standard. When the machine is to be used for cutting verges, the head float may be turned on. Head float has the benefit of letting the flail head pitch side to side around the cowl movement axis, smoothing out lumps and bumps in the ground being worked upon. This will create a more level cut, reduce scalping of the ground, and will prolong the life of the arm mower by reducing shock loads in the arms. This works most efficiently when the arm is centrally mounted on the cowl rail. To engage the head float push fully forward the cowl angling lever, overcoming the intermediate spring detent until it engages in the valve detent position Y. 7.5 Manual arm float (If fitted) There are no lever controls for this. Instead there is a manual hydraulic tap fitted on the first arm. If the machine is to be used on rough or undulating ground, then the manual arm float must be engaged. In order to do this the hydraulic tap on the first arm ram need to be opened. As a result, when the spool valve is closed and the arm is pushed up by the undulating ground the displaced oil is diverted into an accumulator bottle. When the machine is to be moved into transport position, the valve will need to be closed again before manoeuvring the arms. Page 27 of 50 Original instructions

28 8.0 LPH controls The Bomford LPH (Low Pressure Hydraulic) control system is fitted and comprises a joystick and armrest for mounting in the tractor cab connected to the machine via low pressure hydraulic control hoses and an electrical loom connected to a control box positioned either on the top or the side of the oil tank. If your machine is fitted with a cover or cooler lid it is likely to be fitted under it. Under normal circumstances the system will already be connected to the machine it is controlling and only requires electrical connection to the tractor (see section 8.1.1) and also fitting into the tractor cab, see section 8.5. Optionally, rotor on and off and reverse controls can be fitted to the armrest. There is a choice of both, cable or electric diverter; to simply start or stop the rotor; and cable and electric rotor reverse controls. In figure 8.0 a cable rotor control lever (CDSR - Cable Dual Sense Reverse) is illustrated. The electric controls are operated by push button switches and additional rocker switches which are either set into the armrest or added to the side. The joystick provides proportional control to the first ram and second ram, with non-proportional control through push button switches to slew ram, cowl ram, (and if fitted) the telescopic ram and forward arm ram. On machines which support a turntable option, the turntable ram is accommodated through the use of an additional rocker switch on the electric rotor control box. Push buttons are also provided for head float, arm float. A typical LPH control setup is illustrated in figure 8.0 below; Operation decal Joystick Armrest Rotor control lever Electrical connection Motor control cable Rotor control mounting Hydraulic control hoses Figure Connecting the LPH control unit Under normal circumstances the LPH control system will already be connected to the machine it is controlling and only requires to be connected electrically and fitted into the tractor cab. The position of the unit inside the cab depends largely upon the preference of the operator. An armrest mounting kit is provided which attaches the unit to the cab, see section 8.5. The LPH control hoses are 3.5 meters long and may be fed through an open cab window or suitable aperture in the rear of the cab. Take care to avoid sharp edges which may damage the hoses. Do not trap the hoses when closing cab windows Electrical Connections Power is supplied through a pre-wired loom with a 7 pin trailer socket and is powered from the tractor side light circuit. Connect the power lead with the 7 pin connector into the tractor 7 pin socket and switch on the tractor sidelights. Page 28 of 50 Original instructions
29 The power lead from the control box to the LPH joystick is 4.8 metres long may be fed through an open cab window or suitable aperture in the rear of the cab. Take care to avoid sharp edges which may damage the cable. Do not trap the cable when closing cab windows. It is recommended that the power to the LPH control box is disconnected at the end of each working day. WARNING: Once the machine is fitted to the tractor and the power connected, it may be possible to slew the arms to hit the cab. Serious injury or damage could occur. The slewing operation must be practised with care to ensure safe operation. 8.2 Emergency cut-off In an emergency bringing the cutting head to a stop requires familiarity with the lever controls fitted to the machine For machines fitted with Cable controls then; If the machine is fitted with a red On/Off lever (COFF) pull the lever to stop, disengage the PTO drive and switch off the engine. Wait until the rotor has audibly stopped turning before approaching the flail head. Stop the engine when leaving the cab and always pocket the ignition keys. If the machine is fitted with a red cable rotor reverse control (CDSR) move the lever to the stop position, disengage the PTO drive and switch off the engine. DO NOT lift the pawl. Wait until the rotor has audibly stopped turning before approaching the flail head. Stop the engine when leaving the cab and always pocket the ignition keys. IMPORTANT: The tractor PTO control should not be used to engage or disengage the drive to the rotor For LPH machines fitted with Electric controls then; In both Electric on/off (EOFF) and electric rotor reverse (EDSR) the red mushroom button disables power to the rotor control rocker switch. Push down to latch in OFF position. This stops the cutter rotation only. It is reactivated by twisting the button clockwise and allowing it to release upwards. When reactivated any previously active rotor functions are de-activated. WARNING: The rotor has considerable inertia and will not stop instantly on pressing the stop button. 8.3 Joystick Movement (See figure 8.3 below) When operating any of the joystick controls take care. The cutting head must at all times be lowered gently into the cutting position. Never drop a flail head into a hedge at speed. Similarly, when cutting at ground level (grass etc.) the head must be lowered gently to give a slight contact pressure of the roller to the ground. DANGER! Before attempting to remove any items that foul the flail head ALWAYS stop the machine, disengage the PTO, switch off the engine and pocket the key. WARNING! Ensure the flail head does not come into contact with obstacles such as rocks, stones, stumps etc. Keep the rotor away and free from wire, because wire entangled in a rotor is both dangerous and costly. Should large obstacles be encountered or wire becomes entangled in the rotor STOP IMMEDIATELY and reset or clear obstacles before continuing. Normal obstacles and level variations should be overcome by the operator slowing forward motion and raising/lowering the arms of the machine to suit Movement of the joystick in a Forward and Backward direction operates the first arm: Forwards (away from the operator) lowers the first arm Backwards (towards the operator) raises the first arm Movement of the joystick in a Sideways direction operates the second arm: Left Moves second arm away from the operator (for left hand machine) Right Moves second arm towards the operator (for left hand machine) These are REVERSED if a right handed machine is being operated. Page 29 of 50 Original instructions

30 8.4 The Joystick button functions Figure 8.3 Arm rest decal The control decal in figure 8.3 above is illustrated as viewed from the driving position. NOTE: the arm float button is only operative if the machine is fitted with the electrical arm float option. The remaining cowl ram is controlled by the thumb rocker switch at the top of the joystick, see figure 8.3 and as follows for left hand machine. These are REVERSED if a right handed machine is being operated Head ACW rocker switch when the rocker switch is thumbed to the left the flail head is rotated in an anti-clockwise direction when viewed from behind the tractor Head CW rocker switch when the rocker switch is thumbed to the right the flail head is rotated in an clockwise direction when viewed from behind the tractor. Float function controls are located on the upper face of the armrest behind the joystick, see figure 8.3 and as follows; Head float button Engages the electric head float. Press once to engage press again to disengage. When the machine is to be used for cutting verges, the head float may be turned on. Head float has the benefit of letting the flail head pitch side to side around the cowl movement axis, smoothing out lumps and bumps in the ground being worked upon. This will create a more level cut, reduce scalping of the ground, and will prolong the life of the arm mower by reducing shock loads in the arms, cowl, roller bearings etc. This works most efficiently when the arm is centrally mounted on the cowl rail Arm float button Engages electric arm float. Press once to engage press again to disengage. NOTE: the arm float button is only operative if the machine is fitted with the electrical arm float option. If fitted, turning on the arm float will allow the arm mower to ride undulating ground without Page 30 of 50 Original instructions
31 transferring these displacements to the tractor, and will also prolong the life of the arm mower and flail head. When the machine is to be moved into transport position, or the arms are to be moved from their work position, then the arm float will need to be disabled by pressing the same button on the joystick again Manual arm float operation There are no joystick controls for this. Instead there is a manual hydraulic tap fitted on the first arm. If the machine is to be used on rough or undulating ground, then the manual arm float must be engaged. In order to do this the hydraulic tap on the first arm ram need to be opened. As a result, when the spool valve is closed and the arm is pushed up by the undulating ground the displaced oil is diverted into an accumulator bottle. When the machine is to be moved into transport position, the valve will need to be closed again before manoeuvring the arms Cable operated rotor on/off (COFF if fitted) The cable rotor on/off lever is easily identified by a red coloured knob. It is attached to the side of the armrest as illustrated in figure To operate, push forwards to start the rotor and pull back to stop the rotor The rotation direction is determined by the hose connections used when mounting the flail head to the base unit, see section Cable operated rotor reverse (CDSR if fitted) The Cable Operated Dual Sense (CDSR) rotor reverse control is mounted in the same way as for the Cable on off control Figure To operate, push forwards to start the rotor in Forward rotation (FR) and pull back to the mid lever position to stop forward rotation There is a pawl which prevents instant shifts between rotation directions, see Figure Lift the pawl to allow the lever to move beyond the mid position from any direction. WARNING: Always wait for the rotor to stop rotating completely before raising the pawl Pull the lever fully back to start in Reverse rotation (RR) NOTE: The rotation direction is determined by the hose connections used when mounting the flail head to the base unit, see section Electric rotor on/off (EOFF) The electric rotor on/off control consists of a switch box containing a red mushroom stop button and a rocker switch. (An optional and additional service switch can also be mounted within the same box.) The box is attached to the side of the LPH armrest in the same way as the illustration in Figure To operate, press the rocker switch once and to stop press the opposite end of the rocker switch again. The switch contains an indicator lamp which illuminates when the switch is on. Figure WARNING: The rotor has considerable inertia and will not stop instantly on pressing the stop button The rotation direction is determined by the hose connections used when mounting the flail head to the base unit, see section 4.0. The red mushroom button disables power to the rotor control rocker switch. Push down to latch in OFF position. This stops the cutter rotation only. Electric Rotor control box Page 31 of 50 Original instructions

 The Electric Operated Dual Sense (EDSR) rotor reverse control consists of a switch box containing a red mushroom stop button and at least one two way rocker")

. The rotor will start in reverse rotation. 8.4.9.")

32 WARNING: The rotor has considerable inertia and will not stop instantly on pressing the stop button It is reactivated by twisting the button clockwise and allowing it to release upwards. When reactivated any previously active rotor functions are de-activated. The Tractor PTO emergency stop control must be used to disable the rotor control during road transit and whenever the operator stops the tractor or leaves the cab Electric operated rotor reverse (EDSR) The Electric Operated Dual Sense (EDSR) rotor reverse control consists of a switch box containing a red mushroom stop button and at least one two way rocker switch. (An optional and additional service switch can also be mounted within the same box). The box is attached to the side of the LPH armrest in the same way as the illustration in Figure IMPORTANT: The correct rotation direction is determined by the hose connections used when mounting the flail head to the base unit, see section 4.0. To operate the EDSR rocker switch see figure The rocker switch is a two way latching rocker switch with indicator lamps (8.4.4a) For reverse rotation press the end of the rocker switch identified with a solid arrow. The switch will latch on and illuminate to show that reverse rotation is engaged but the switch itself will return to the neutral position (8.4.4b). The rotor will start in reverse rotation To stop normally, press the end with the solid arrow again, at which point the illumination lamps will flash for a short time Whilst the lights are flashing the switch is inoperative to allow the rotor to come to a stop. This prevents instantaneous selection of opposite rotation. WARNING: The rotor has considerable inertia and will not stop instantly on pressing the stop button When the lights have stopped flashing reverse or forward rotation may be selected For forward rotation, press the end of the rocker switch with the outline arrow symbol. The switch will again latch on and illuminate to show that forward rotation is engaged but the switch itself will return to the neutral position (8.4.4c). The rotor will start in forward rotation The red mushroom button disables power to the rotor control rocker switch, see (8.4.4d). Push down to latch in OFF position. This stops the rotor only. WARNING: The rotor has considerable inertia and will not stop instantly on pressing the stop button It is reactivated by twisting the button clockwise and allowing it to release upwards When reactivated any previously active rotor functions are de-activated (8.4.4a) The Tractor PTO emergency stop control must be used to disable the rotor control during road transit and whenever the operator stops the tractor or leaves the cab. Figure (a) (b) (c) (d) Page 32 of 50 Original instructions
33 8.5 Armrest mounting Cable and low pressure hydraulic control armrests can be fitted into the cab using a remote cab control kit, see figure 8.5. A universal cab mounting bracket is supplied, see figure 8.5a. Depending on the cab construction this bracket can be mounted on the steel body of the cab as follows; IMPORTANT: Do not drill through any structural cab supports Two 50mm long by 8mm setscrews, two M8 wing nuts, 4off rubber washers, 2off flat washers and 2off spring washers are supplied for the purpose of fastening the cab mounting bracket to the cab, see figure 8.5a Use the cab mounting bracket for marking out, and then drill 2off 9mm diameter holes in the preferred location. Use the fasteners to mount the bracket. If the armrest is subsequently removed and the bracket is left in place then for safety a small piece of protective edging strip is provided to cover the upper edge of the bracket and this should be either fitted or retained The cable or LPH armrest control can be fitted directly to this bracket if space and ergonomics permit. Otherwise there is a mounting extension bar which can be fitted to the cab mounting bracket, see figure 8.5b Assemble the mounting plate, clamps and extension beam with the fasteners as illustrated in figure 8.5b. Remove the protective edging strip from the cab mounting bracket and retain it for future use. Bolt the extension beam mounting plate to the cab mounting bracket. If necessary slacken the clamps on the extension tube and turn the offset extension bar to present the most favourable ergonomics for a seated operator Finally, assemble the armrest mounting clamps onto the armrest but do not tighten, see figure 8.5c. Leave sufficient play to allow the armrest and clamp assembly to be slid easily onto the end of the now rigid extension beam. Once the armrest is positioned and rotated favourably tighten the bolts fully When temporarily removing the arm mower controls from the cab the armrest and extension beam should be removed as one piece. This preserves the setup for when the arm mower controls are refitted. IMPORTANT: Always refit the protective edging strip to the cab mounting bracket when the controls are removed. (b) (c) (a) Figure 8.5 Page 33 of 50 Original instructions
34 9.0 EPP III controls This function is not available in the RAVEN arm mower range. (This section is intentionally blank) Page 34 of 50 Original instructions
35 10.0 ICS controls This function is not available in the RAVEN arm mower range. (This section is intentionally blank) Page 35 of 50 Original instructions
36 11.0 Installation checks: With the machine fully assembled, familiarize yourself with all the controls, start the tractor and check for leaks Checking Head float All Bomford Turner machines have head float fitted as standard. Head float allows the flail head to pitch side to side around the cowl movement axis, smoothing out lumps and bumps in the ground being worked upon. It works most effectively when the flail head is mid-mounted. To check the head float operation; Start the tractor engine and move the arms into a normal work position with the flail head raised about 1m (39 ) off the ground Switch the head float on. The flail head should slowly rotate as the heavier drive end sinks under gravity. In specific circumstances the head may also be in complete balance, in which case apply pressure by hand to lift or lower one end of the flail head If the system is operating there should be some movement in one or other direction. No movement can indicate a fault with the accumulator isolation valve or a defective accumulator To determine which, replace the cutting head back on ground. Stop the tractor engine and operate the cowl ram control to remove pressure from the hydraulic system Remove the isolator valve. Reconnect the hose and repeat the test from item If there is again no movement in the flail head this indicates an accumulator defect. However, if there is movement in the flail head then this indicates a faulty isolator valve Repeat instruction , replace the defective part and repeat the test procedure to confirm the correct operation Checking Arm float (If fitted) Arm float is an optional feature. It allows the first arm to rise of fall under the action of ground pressure or gravity in order to follow undulating ground. The range of movement is controlled by an accumulator on the lift end of the first ram. Under correct operating conditions the accumulator will be partially charged for level cutting. The accumulator will fill further when the flail head encounters a depression in the ground, and, it will empty when the ground rises. When the mower is first installed on the tractor, or, when transferring from hedge cutting to verge cutting it is advisable to check that the arm float is operational. The following test procedure should be used; Start the tractor engine and move the arms into a normal work position, with the flail head roller resting on the ground Open the accumulator isolator valve, i.e. switch arm float on Operate the first ram and lift the rotor unit about 1 metre (39 ) off the ground. CAUTION: The rotor should be switched off for this test Test the accumulator by pushing the rotor unit downwards by hand. This should compress the first ram slightly If there is no movement in the first ram then a fault is indicated. This could result from a faulty isolation valve or a defective accumulator To determine which, replace cutting head back on ground. Stop the tractor engine and operate the first ram control to remove pressure from the hydraulic system Remove the isolator valve. Reconnect the hose and repeat the test from item If there is again no movement in the first ram this indicates an accumulator defect. However, if there is movement in the first ram then this indicates a faulty isolator valve Repeat instruction , replace the defective part and repeat test procedure to confirm correct operation. Page 36 of 50 Original instructions
37 11.3 Breakout All breakout systems are designed for the purpose of providing initial protection to the mower and its cutting attachment. This protection is to be afforded in the relatively rare circumstance that an obstruction; unseen by the operator; is encountered during work. Breakout systems are not designed as a complete protection system to remove operator responsibility. The operator must always be in control. By breaking back the arm signals to the operator that an obstruction has been encountered and it is then the responsibility of the operator to take appropriate action to prevent any further damage to the arm mower. Damage resulting from continuing to work with the arm broken back will invalidate warranty claims. In most cases the speed of response required by the operator is proportional to the cutting speed. Operators must therefore work responsibly within their own individual capability. To monitor ongoing capability Bomford Turner endorses the maintenance of operator training records. There are several types of breakout employed on Bomford Turner machines depending on the duty cycle envisaged for the machine. These are; Gravity breakout Spring breakout Hydraulic breakout Gravity breakout: On the Raven, a gravity breakout vertical-link is fitted between the mainframe and the tractor lift arm attachment point on the cutting side. See the gravity breakout linkage in figure It will reduce the risk of damage if an obstruction is encountered during work. Gravity breakout linkage Arm in breakaway mode Arm in grass cutting mode FIGURE When an obstruction is encountered the arm is pushed back by the obstacle and as it is pushed back the gravity breakout linkage ensures that the cutting head is also raised slightly. The force to breakout of the work position is the force to overcome the weight of the arm mower. This force increases linearly as the arm is pushed back and the breakout linkage rotates. When the linkage is horizontal the arm cannot breakout any more. At this point, if the obstacle has not been overcome or if forward progress is not stopped by the operator; the arms are no longer protected and will begin to bend. Beyond this point and depending on the power of the tractor the arms may become permanently damaged. Mounting the Raven on a tractor larger than 70hp allows the operator to drive faster and also de-sensitises the operator to feedback from the gravity breakout system. This allows less time to respond and will not only stress the arm mower structure but also the drive system. Always use on an appropriately sized tractor and drive within the operator capability. Page 37 of 50 Original instructions

38 11.4 Hydraulic Hoses It is important that hoses are fitted correctly. Always check all hoses to ensure that there are no kinks or sharp bends, and that the hoses do not chafe against sharp edges. The following guidelines should be used when checking the hosing of the machine prior to work; Twists; Hoses should never be twisted or kinked. On most hoses there is a line which runs the full length of the hose acting as a useful guide. If a visual check reveals that no guideline is present along a hose, refer to figure and conduct the following check; Loosen any clamps Attach one end of the hose to its coupling, but do not tighten Place the hose in its required position Connect the other end loosely to its union Tighten the and with any angled fittings first ensuring it is in the right position for its intended run Now tighten the straight end. It is possible that as the nut is tightened the hose may twist slightly If this happens, slacken off the nut and turn the hose in the opposite direction to that caused by tightening. Then, re-tighten the nut bringing the hose back to the central position Otherwise tighten the fitting fully. Torque settings for BSP hose fittings are shown in table 11.4 below Tighten any clamps Finally re-bleed the rams and operate the arms in all positions whilst carefully checking for any twists and obstructions Sharp bends Figure Hoses should always be fitted to allow enough hose radius for free movement, see figure It is also important to avoid sharp bends in hoses. As a general guideline hoses should not be bent round a radius smaller than ten times the hose diameter. This will vary with hose construction and any queries about specific hoses should be addressed to the Bomford Turner service department. Figure Page 38 of 50 Original instructions
 Diameter (inch) nominal Min - max nominal Min - max 1/4 20 15-25 14.75 11.06-18.44 3/8 34 27 41 25.07 19.91-30.24 1/2 60 42 76 44.25 30.97-56.05 5/8 69 44 94 50.88 32.45-69.32 3/4 115 95 135 84.")
39 Chafing hoses It is important that hoses are fitted and clamped so that hose chafing is avoided. Always give plenty of clearance around sharp edges see figure Figure BSP SWIVEL FEMALE TORQUE VALUES THread Metric (Nm) Imperial (lbf.ft) Diameter (inch) nominal Min - max nominal Min - max 1/ / / / / / / Table 11.4 Page 39 of 50 Original instructions
40 12.0 General operation 12.1 Operator training These notes are produced for guidance and are intended to help the operator obtain the best results from the machine, with the minimum of trouble and downtime. The operator should read the following pages carefully and be familiar with the contents before commencing work. A familiar knowledge of the operator instruction manual forms an essential part of the training record for a competent user. Make a note of the serial numbers inside the front cover of this manual. The serial number is stamped on the mainframe of the arm mower and on the cowl of the cutting unit. Always quote these numbers in any correspondence with a dealer. The parts manual supplied with the machine is specific to the construction of the machine. It will already contain the machine serial number on each page. Upon delivery always confirm that the parts book serial number matches the machine serial number Initial checks Check that the tractor is equipped to deliver 540 rpm at the PTO shaft. The machine is designed to run at this speed. Check also that the machine is firmly and safely mounted. WARNING: Under no circumstances must the PTO exceed 600 rpm Machine pre-start check At every opportunity and before getting into the cab and starting the engine perform the following inspections; Check that the rotor is free from obstructions especially pieces of wire Check that all flails are in good condition and securely attached to the rotor Check that all guards are in their correct place (see Section 2.6 and 2.7) and in good condition Check the oil level in the tank. The level is correct when up to the indicator mark in the sight glass or visible in the bottom of the filler assembly strainer. IMPORTANT: DO NOT OVERFILL. Most oils increase in volume as they warm up and aerate and can then spill out through the breather. (Refer to Approved Oils Section.) 12.4 Starting up procedure Cold start up When starting the machine for the first time; when the hydraulic oil is cold; and prior to commencing work, it is essential that the pumps must not be run at working speeds initially. To avoid cavitation the pumps should be allowed to warm up gradually. Therefore, the tractor PTO speed should not exceed 360rpm, and this initial speed should only be achieved gradually. IMPORTANT: The cold start up instructions given below should be strictly adhered to Ensure that the tractor PTO drive is in neutral For twin pump independent machines, ensure that the rotor control lever is in the rotorstopped position. (This is the lever with the red knob which operates the diverter valve [CDIV] or the rotor reverse valve [CDSR]. It will be located adjacent to the ram operation levers Start the tractor engine, run it at idle speed and engage the PTO drive Slowly move the rotor control lever to start the rotor Gradually increase the engine speed Continue to increase the engine speed until the rotor is running smoothly and the PTO speed is approximately 360rpm Run the rotor at this speed for a minimum of 5 minutes to allow the oil in the system to warm up On completion the machine is ready for work. Page 40 of 50 Original instructions


41 Normal start up CAUTION: Never attempt to start the rotor while it is under load. Always free the rotor from any obstructions first. IMPORTANT: Never increase or decrease PTO speed rapidly as this can lead to pump and motor damage Transportation to work site Normally the machine will need to be driven to the work site before commencing work. To keep the tractor and machine width to a minimum it is necessary to fold the arms to the transport position see figure On models with a slew breakout ram the arms may also be slewed back at an angle to provide a narrower transport position. Before driving on the public highway check the following; All hoses are sufficiently clear of the tyres to prevent contact during bounce and sway on braking, turning and undulating ground It is an essential requirement that when the machine is in the transport position all the isolator valves are closed When transporting with the arms slewed back, keep the first arm vertical as the arms can bounce forward and damage the tractor cab Ensure sufficient ballast is added to the front of the tractor to maintain steerage under bounce conditions Ensure that the rear axle load does not exceed the plated axle limit for the tractor Ensure the rear tyres are correctly inflated and rated for the axle load Ensure all stop, tail and indicator lights (if fitted) are in working order Ensure all stop, tail and indicator lights are visible to road users at the rear and fit a trailer bar if appropriate. IMPORTANT: When transporting on the highway, it is the responsibility of the operator to obey all relevant local highway laws. IMPORTANT: Pay due care and attention to the driving conditions and drive accordingly. DO NOT travel too quickly over undulating ground. In transport the arms and head represent heavy masses on long lever arms thus braking, turning, sway and bounce can magnify forces and induce significant and damaging loads into the arm mower which is rigidly attached to the tractor. Bomford Turner will not warrant damage bought about by abuse of the machines proper purpose or neglectful handling. On non-slew machines there is an optional spacer bracket which displaces the whole machine 460mm rearward. For some tractor mounting configurations this may be required to allow the flail head to be tucked in behind the rear wheels. For further details contact a Bomford Turner sales representative. Figure Raven in transport position Optional spacer bracket Page 41 of 50 Original instructions
42 12.6 Cutting control CAUTION: Do not swing the cutting unit inboard beyond the vertical cut when arms are raised above tractor cab height. In this position a loss of control can occur. The roller on the cutting unit is set in its middle position before the machine leaves the factory. It should be reset to suit the operating conditions and cut length required. This is best achieved by rotating the cowl bracket until the roller is standing upright. WARNING: Ensure the tractor is switched off and the keys are removed before making adjustments. Undo the roller height location bolts on the roller brackets at each end and push or pull the roller to the required position. Always check to ensure the same hole is used on either side of the roller. Re-tighten the location bolts, ensuring that the spring washers are in place For Grass Cutting; adjust the height of the roller to give the required cut length. The higher the roller is raised the shorter the grass. Note: The higher the roller is set the greater the flail wear. For Hedge Trimming; raise the roller to its maximum height to give the lowest cut possible. IMPORTANT: The roller must be kept in position at all times as it is an essential part of the cutting unit guarding Stopping the cutting unit The rotor must only be engaged or disengaged by means of the rotor on/off control lever (with red knob) or switch depending on the method of control (e.g. cable or electric), see section 7.0 and 8.0. Stopping the rotor by use of the tractor engine stop or PTO control risks damage to the cutting unit's hydraulic system, and should only be used in an emergency. WARNING: If the rotor is stopped by use of the tractor engine stop or the PTO control, care must be taken to ensure the rotor control lever is returned to the OFF position before restarting the tractor Arm float (if fitted) The machine may fitted with an accumulator to allow the arms to float for grass cutting application. The purpose of the arm float is to permit the cutting unit to follow uneven ground without operator intervention as far as possible and to allow most of the weight of the cutting unit to be carried by the tractor, thus minimising the tendency to slew. This also reduces wear on the rotor and in the bearings of the roller. The arm float is not used when hedge trimming, as the cutting unit would be very difficult to control and uneven (castellated) results would be obtained. To shut off the arm float close the isolator valve. When opening the isolator valve ensure all head weight is on the ground, otherwise the first arm may move unexpectedly. WARNING: This valve must be closed when the machine is being transported whether the arm mower is in the transport position or not Operating hints Keep the tractor PTO speed at rpm to maintain the correct rotor speed for the job. Depending on the build of the fitted cutting unit this may be either 2948 to 3237 rpm advised for hedge cutting, or 2480 rpm advised for grass cutting see sections & Slower speeds may reduce the quality of cut obtained by the rotor, but satisfactory performance can be maintained down to a rotor speed of 2100 rpm. This can be an advantage with tractors with a high bottom gear Examine the piece of work to be cut. It is very important that the work site is inspected before cutting and all hidden obstructions removed or their position clearly marked so that they may be avoided Check hedges for wire and fencing stakes, and ditches for tree stumps, drain pipes, large stones, etc Stalling the rotor in heavy growth is likely to cause damage to the rotor. Page 42 of 50 Original instructions
43 Do not operate the machine with the cutting head slewed more than 40 backwards and ensure sufficient stability ballast is used when cutting in a slewed position. WARNING: Do not allow personnel near the machine while it is operating DO NOT angle the cutting unit in such a way as to throw cut material towards the tractor Avoid rushing into the work. Remember that the unit has to chop up material as well as cut it to the required height When hedge cutting, close the isolator valve on the arm float accumulator, (if fitted) Always give the rotor shaft enough material to 'bite' into, particularly when a hedge has a lot of leaf and very flexible thin stems Grass cutting (Rotor Shaft Speed rpm.) Run the rotor at normal speed, i.e. 540rpm PTO speed Avoid taking in too much grass by regulating the forward speed of the tractor If the rotor shaft slows down or begins to choke up in grass, raise the cutting unit a little and allow grass to fall clear Before continuing with the cut let the rotor speed recover again Advantage may be gained in exceptional conditions by taking a narrow cut with part of the cutting unit clear of the work When working alongside or clearing ditches, take a first cut along the edge of the ditch so that the ditch limits can be seen When working over a hedge or into a ditch, keep the highest point of the mower arms directly over the obstacle Do not run the machine for prolonged periods when the head is not at 90 to the direction of travel Hedge cutting (Rotor Shaft Speed rpm). Consider how the job should be done before commencing work, as every hedge has a different height, width, thickness and density of growth. Hedges that have previously been cut by machine tend to have denser growth, and although they can be cut to any desired shape, it is advisable to trim to the same shape and height as before. The flails cause the new growth to 'tiller' (spread out) and thicken up the hedge. Therefore it is advisable to cut the hedge side at a slight angle rather than straight, otherwise the hedge may eventually die at the bottom due to lack of light. The following information gives a few hints on how to tackle a hedge First trim the top down to the height of the previous year's trim in one cut, but do not cut into it as the old growth will be very thick and strong and can cause premature wear to the flail cutting edges Next trim the sides to the previous trim but not into it. WARNING: Do not angle the cutting unit so that debris is thrown through the hedge when trimming the far side of the hedge. Always ensure that cut material is directed away from you or on to the ground Finally, lower the roller and trim along the bottom of the hedge to clear debris and undergrowth Stalling the rotor If the rotor does become choked the tractor will stall, the belts may slip and/or the relief valve will operate. If this occurs follow the instructions below: Stop forwards motion and disengage drive to cutting unit immediately by placing the lever controlling the rotor in the stop position Ensure that the rotor has stopped and lift the cutting unit Stop tractor engine Remove any obstruction that may be present on the rotor. If working under the raised machine ensure that it is safely supported. WARNING: NEVER IN ANY CIRCUMSTANCES run or reverse the rotor to "clear itself". Page 43 of 50 Original instructions


44 13.0 Removal, Storage and Disposal 13.1 Preparation for storage Before removing the machine from the tractor a thorough check of the machine should be made as follows; Thoroughly clean all moving parts, particularly the cutting unit Check that all flails are in place and that they are in good condition Check all hoses for damage such as cracks, evidence of chafing and leaks Smear all unpainted metal parts with grease and lubricate all grease nipples Make a note of any item that needs replacing so that parts can be ordered in good time Parking and removal In the parked position the machine is supported by three stands on the mainframe and also the cutting head, see figure Figure 13.1 To put the machine into this position the following procedure is necessary; DANGER: Do not allow personnel between tractor and machine when manoeuvring Find a flat, hard area on which to park Place the cutting unit on the ground about 1 metre from the tractor rear wheel Lift the mainframe on the tractor lift arms Stop the tractor engine and (if fitted) lower the stands on the arm mower from their stored position Restart the tractor and lower the 3-point linkage so that the weight of the machine is on the stands and cowl. In doing this, the tension will be removed from the chain linkage For mowers fitted with a chain stabilised three point linkage Raise the machine slightly on the lift arms to loosen the tension chains Stop the tractor engine, unclip the chain and remove it from the keyholes in the lower link stabilizer brackets Open the accumulator isolation valve (if fitted) and operate control levers to release pressure (If fitted) Ensure that the isolator valves on first ram and accumulator are closed Remove the control unit from inside the tractor and tie the unit on to the mainframe. Do not at any time during removal or storage bend any connection cables in a tight radius. Ensure that the control unit is protected from weather Remove lower and top link pins. Store the chain and brackets in a safe place Release the tractor end of the PTO shaft and pull back along the spline until the PTO shaft is free from the tractor. Place a cap over the tractor PTO Start the tractor engine and drive carefully forward disengaging the machine from the tractor Replace lower link pins and place cap over tractor PTO. Page 44 of 50 Original instructions
SR15-6 FLAT DECK MODELS
 SR15-6 FLAT DECK MODELS FLEX WING MOWER Parts Manual (Revised: 01.07.15) IMPORTANT NOTE HERE THE SERIAL NUMBER OF YOUR MACHINE AND ALWAYS QUOTE IT IN ANY COMMUNICATION WITH US OR YOUR DEALER. THIS IS PARTICULARLY
IM1933 TWIN - BLADE SEMI - OFFSET TOPPER INSTRUCTION BOOK AND REPLACEMENT PARTS INFORMATION ISSUE 1
 IM1933 TWIN - BLADE 1800 SEMI - OFFSET TOPPER INSTRUCTION BOOK AND REPLACEMENT PARTS INFORMATION ISSUE 1 IMPORTANT NOTE HERE THE SERIAL NUMBER OF YOUR MACHINE AND ALWAYS QUOTE IT IN ANY COMMUNICATION WITH
IM1932 TWIN - BLADE IN-LINE TOPPER INSTRUCTION BOOK AND REPLACEMENT PARTS INFORMATION ISSUE 1
 IM1932 TWIN - BLADE 2400 2700 IN-LINE TOPPER INSTRUCTION BOOK AND REPLACEMENT PARTS INFORMATION ISSUE 1 Bomford Turner Limited Salford Priors, Evesham, Worcestershire, England, WR11 8SW Telephone: 00 44
ROTARY SLASHERS INSTRUCTION MANUAL
 IM 1719 RS RANGE ROTARY SLASHERS INSTRUCTION MANUAL ISSUE 2 Section 1 Page 1 of 8 IMPORTANT NOTE HERE THE SERIAL NUMBER OF YOUR MACHINE AND ALWAYS QUOTE IT IN ANY COMMUNICATION WITH US OR YOUR DEALER.
IM6004 KESTREL S ARM MOWER INSTRUCTION BOOK ORIGINAL INSTRUCTIONS ISSUE 1
 IM6004 KESTREL S ARM MOWER INSTRUCTION BOOK ORIGINAL INSTRUCTIONS ISSUE 1 IMPORTANT NOTE HERE THE SERIAL NUMBER OF YOUR MACHINE AND ALWAYS QUOTE IT IN ANY COMMUNICATION WITH US OR YOUR DEALER. THIS IS
DITCH CLEANER MK II INSTRUCTION & PARTS BOOK
 IM & PM 313 DITCH CLEANER MK II INSTRUCTION & PARTS BOOK ISSUE 1 IMPORTANT NOTE HERE THE SERIAL NUMBER OF YOUR MACHINE AND ALWAYS QUOTE IT IN ANY COMMUNICATION WITH US OR YOUR DEALER. THIS IS PARTICULARLY
Finishing Mower Estate 72
 Finishing Mower Estate 72 Owners/Operators Manual & Spare Parts List Issue Date: October 2011 1 Introduction Your FIELDMASTER Estate 72 Finishing Mower has been designed to do a range of work to your satisfaction.
Spearhead Excel 565, 605 & 645T
 1 Spearhead Twiga 5000, 6000, 6000LR & 6000 T Parts Book 11 th Edition February 2010 Green-Tec A/S Merkurvej 25 DK 6000 Kolding Tel: +45 7555 3644 Fax: +45 7555 4243 www.greentec.eu info@greentec.eu Spearhead
Spearhead TWIGA. TWIGA Reach Mower 545 / 595 / 640T. Edition 1.1 April 2014 Part No
 TWIGA Reach Mower 545 / 595 / 640T Edition 1.1 April 2014 Part No. 8999016 0 Contents Ordering Your Parts 3 A Frame 4 Tank 6 Tank Lid 8 Rear Panel 10 Slew Post 12 Lift Frame 14 Main Arm 16 Dipper Arm 18
Spearhead TWIGA. TWIGA Reach Mower 555/600/655T/700T 555FR/600FR. Edition 2.5 June 2014 Part No
 TWIGA Reach Mower 555/600/655T/700T 555FR/600FR Edition 2.5 June 2014 Part No. 8999057 0 Contents Ordering Your Parts 3 A Frame 4 Tank 6 Slew Post 8 Lift Frame 10 Tank Lid 12 Rear Panel 13 Stabiliser Brackets
IM 6010 HERON ARM MOWER INSTRUCTION BOOK ISSUE 4
 IM 6010 HERON ARM MOWER INSTRUCTION BOOK ISSUE 4 IMPORTANT NOTE HERE THE SERIAL NUMBER OF YOUR MACHINE AND ALWAYS QUOTE IT IN ANY COMMUNICATION WITH US OR YOUR DEALER. THIS IS PARTICULARLY IMPORTANT WHEN
Spearhead TWIGA. TWIGA Reach Mower 555/600/655T 555FR/600FR. Edition 2.0 March 2011 Part No
 TWIGA Reach Mower 555/600/655T 555FR/600FR Edition 2.0 March 2011 Part No. 8999057 0 Contents Ordering Your Parts 3 A Frame 4 Tank 6 Slew Post 8 Lift Frame 10 Tank Lid 12 Rear Panel 13 Stabiliser Brackets
Wheel Horse. 44 Snowthrower. for 5xi Lawn and Garden Tractors. Model No & Up. Operator s Manual
 FORM NO. 8 Rev A Wheel Horse Snowthrower for 5xi Lawn and Garden Tractors Model No. 7966 890050 & Up Operator s Manual IMPORTANT: Read this manual, and your tractor manual, carefully. They contain information
Kubota Rear Discharge Mowers 1.3m
 Operating instructions and parts manual for Kubota Rear Discharge Mowers 1.3m (For G2160 Tractors) autoguide equipment Heddington, Nr Calne, Wiltshire, SN11 0PS Telephone: +44 (0) 1380 850885 Fax: +44
TABLE OF CONTENTS DESCRIPTION. Safety Instructions & Safety Sign Locations Operating Instructions Assembly Instructions...
 TABLE OF CONTENTS DESCRIPTION PAGE Warranty... 1 Safety Instructions & Safety Sign Locations... 2 Operating Instructions... 3 Assembly Instructions... 5 500 & 600 Snowblower Drawings... 8 500 & 600 Snowblower
GROUNDSMASTER. 52 Recycler. for 120 Traction Unit. Model No & UP. Operator s Manual
 FORM NO. 8-980 Rev A GROUNDSMASTER 5 Recycler for 0 Traction Unit Model No. 077 79000 & UP Operator s Manual IMPORTANT: Read this manual carefully. It contains information about your safety and the safety
OPERATOR'S MANUAL. Shredders TL JN001AGB K JN001AGB K
 OPERATOR'S MANUAL JN001AGB K JN001AGB K - English - 11-2009 $Dear Owner In buying a Kuhn machine you have chosen wisely. Into it have gone years of thought, research and improvement. You will find, as
Walker Loader Bucket OPERATOR S AND PARTS MANUAL
 Walker Loader Bucket OPERATOR S AND PARTS MANUAL Please Read and Save These Instructions For Safety, Read all Safety and Operation Instructions Prior To Operating Machine P/N 6690 TABLE OF CONTENTS Introduction
WARRANTY REGISTRATION AND POLICY
 WARRANTY REGISTRATION AND POLICY Buhler Manufacturing products are warranted for a period of twelve (12) months from original date of purchase, by original purchaser, to be free from defects in material
ProLine. 44 Mower. for 120 Traction Unit. Model No & Up. Operator s Manual
 FORM NO. 9 ProLine Mower for 0 Traction Unit Model No. 05 99000 & Up Operator s Manual IMPORTANT: Read this manual carefully. It contains information about your safety and the safety of others. Also become
RHD OFFSET SERIES 160/190/225 Flail Mowers
 RHD OFFSET SERIES 160/190/225 Flail Mowers Edition 1.3 - August 2016 Part No. 8999071 1 2 3 4 CE Declaration of Conformity, Conforming to EU Machinery Directive 2006/42/EC We, Spearhead Machinery Ltd,
OPERATIONS MANUAL LEVER CHAIN HOIST
 OPERATIONS MANUAL LEVER CHAIN HOIST IMPORTANT SAFETY INFORMATION Please read, understand and follow all safety information contained in these instructions prior to the use of this hoist. Retain these instructions
Spearhead TWIGA 320/420. TWIGA Reach Mower 320/420. Edition 1.5 February 2015 Part No
 Spearhead TWIGA 320/420 TWIGA Reach Mower 320/420 Edition 1.5 February 2015 Part No. 8999060 0 Contents Ordering Your Parts 3 A Frame 4 Tank 6 540/1000 RPM Hydraulic Drive 8 Electric Rotor Valve Assembly
Wheel Horse. 42 Mower. for Lawn and Garden Tractors. Model No & Up. Operator s Manual
 FORM NO. 9 559 Rev A Wheel Horse 4 Mower for Lawn and Garden Tractors Model No. 78 890000 & Up Operator s Manual IMPORTANT: Read this manual carefully. It contains information about your safety and the
DIAMONDBACK/EDGE GRASS COLLECTION SYSTEM PARTS & OPERATORS MANUAL
 DIAMONDBACK/EDGE GRASS COLLECTION SYSTEM PARTS & OPERATORS MANUAL GRASS CATCHER W/WEIGHT: TUBE KIT: BLOWER KIT: 48 5101305 632093 632078 52 5101305 542119 632074 60 632086 542120 632081 3 WORLDLAWN POWER
Table of Contents General Information Safety Message Classifi cation...2 Safety Notes...3 Terminology...4 Coupler Lifting Lug...
 Table of Contents General Information Safety Message Classifi cation...2 Safety Notes...3 Terminology...4 Coupler Lifting Lug...6 Assembly and Installation General Information...7 How it works...7 Component
ROTARY TILLER. Operation, Service & Parts Manual For "AS" Series. FORM: ASTillerBook.QXD
 ROTARY TILLER Operation, Service & Parts Manual For "AS" Series FORM: ASTillerBook.QXD April 2002 TABLE OF CONTENTS Preparation......................................1 Assembly Instructions.............................2
Trench Filler for Compact Utility Loaders
 Form No. 3353-608 Rev A Trench Filler for Compact Utility Loaders Model No. 22472 260000001 and Up Operator s Manual Register your product at www.toro.com Original Instructions (EN) Contents Page Introduction................................
W & A 12 ROW TOP LEVELING STACKER LEVEL BANDER
 W & A 12 ROW TOP LEVELING STACKER LEVEL BANDER NO. 3640 OPERATOR S MANUAL TO THE OWNER: Congratulations on your purchase of a new W & A Top Leveling Stacker Level Bander. Your selection is an indication
Quiet Collector. Model No & Up
 FORM NO. -8GB Rev A Quiet Collector Model No. 795-890000 & Up Operator s Manual IMPORTANT: Read this manual, and your tractor manual, carefully. They contain information about your safety and the safety
3.25 Ton Heavy Duty Floor Jack
 Please dispose of packaging for the product in a responsible manner. It is suitable for recycling. Help to protect the environment, take the packaging to the local amenity tip and place into the appropriate
MK AUGERS POWER SWING KIT ASSEMBLY & OPERATION MANUAL
 MK AUGERS POWER SWING KIT ASSEMBLY & OPERATION MANUAL Read this manual before using product. Failure to follow instructions and safety precautions can result in serious injury, death, or property damage.
610 BUSHEL MANURE SPREADER
 610 BUSHEL MANURE SPREADER RODA MANUFACTURING 1008 LOCUST ST. HULL, IA. 51239 Art s-way Manufacturing 712-439-2366 Co., Inc. Hwy 9 West - PO Box 288 WWW.RODAMFG.COM Armstrong, IA. 50514 U.S.A 2 INTRODUCTION
HAMMER KNIFE FLAIL MOWER SHREDDER
 HAMMER KNIFE FLAIL MOWER SHREDDER Operation, Service, & Parts Manual For Models: GOL79 & GOL89 October 2010 FORM: GOLShredder.QXD TABLE OF CONTENTS Installation....................................................1
DM-135 DRUM MOWER USER S MANUAL
 DM-135 DRUM MOWER USER S MANUAL 1 DM135 DRUM MOWER INSTRUCTIONS CHAPTER 1 SAFE OPERATION Do not attempt to operate the mower until you have read the operator s manual and all the safety signs on the mower.
GRASS CATCHER PART S & OPERATORS MANUAL
 GRASS CATCHER PART S & OPERATORS MANUAL WORLDLAWN POWER EQUIPMENT, INC. WORLDLAWN.COM 2415 ASHLAND AVE BEATRICE, NE 68310 800-267-4255 FAX 402-223-4103 2 3 4 OPERATORS MANUAL This catcher manual is for
PM 1744 B49/B54/58T FM PARTS MANUAL
 PM 1744 B49/B54/58T FM PARTS MANUAL 1744 INDEX 1297 B49/54/58T FRONT MOUNT HEDGE/VERGE MOWER PAGE AND ILLUSTRATION NUMBERS SHOWN ARE USED ONLY FOR REFERENCE PURPOSES AND SHOULD NOT BE USED FOR ORDERING
KING COBRA/CALIBER GRASS COLLECTION SYSTEM PARTS & OPERATORS MANUAL
 KING COBRA/CALIBER GRASS COLLECTION SYSTEM PARTS & OPERATORS MANUAL GRASS CATCHER W/WEIGHTS: TUBE KITS: BLOWER KITS: 52 542128 52 542119 5101002 60 542129 60 542120 5101003 2 WORLDLAWN POWER EQUIPMENT
HYDRAULIC PALLET TRUCK MODEL NO: PT540M/BM/CM & PT685BM/CM PART NO: , , , ,
 HYDRAULIC PALLET TRUCK MODEL NO: PT540M/BM/CM & PT685BM/CM PART NO: 7631700, 7631705, 7631710, 7631715, 7631720 OPERATION & MAINTENANCE INSTRUCTIONS LS0316 INTRODUCTION Thank you for purchasing this CLARKE
TO THE OWNER ASSEMBLY
 TO THE OWNER This is an operational and general maintenance manual only and does not cover repair. All repair work must be performed by an authorized BOLENS DEALER or the factory warranty is void. Bolens
FIELD KIT FITTING INSTRUCTIONS FOR TR3
 24795G-GB (rev.1) FIELD KIT FOR TR3 Rear Roller Brush Kit LMAC185-TR3-F for "Fairway" style Cutting Units Series: AAG, AAH, AAJ, AAK IMPORTANT NOTE - TR3 ONLY Grassboxes cannot be used with these Cutting
HYDRAULIC PALLET TRUCK
 HYDRAULIC PALLET TRUCK Models; PT550C & PT685C Part Nos 7630172 & 7630177 OPERATING & MAINTENANCE INSTRUCTIONS GC05/12 INTRODUCTION Thank you for purchasing this CLARKE Pallet Truck. Before attempting
INSTALLATION INSTRUCTIONS
 INSTALLATION INSTRUCTIONS WARNING: NEVER EXCEED YOUR VEHICLE MANUFACTURER'S RECOMMENDED TOWING CAPACITY PIN-STYLE TRUNNION BAR WEIGHT DISTRIBUTION KIT MAINTENANCE Keep the socket-mounted ends of the spring
EverythingAttachments.com
 EverythingAttachments.com 60 Xtreme Duty Brush Cutter Owner s Manual SAFETY GENERAL SAFETY INSTRUCTIONS AND PRACTICES A careful operator is the best operator. Safety is of primary importance to the manufacturer
44 and 52 Twin Bagger 100 Series Z Master
 Form No. 7 87 and 5 Twin Bagger 00 Series Z Master Model No. 7855 Serial No. 000000 and Up Operator s Manual English (CE) Contents Page Introduction................................ Safety.....................................
HAMMER KNIFE FLAIL MOWER SHREDDER
 HAMMER KNIFE FLAIL MOWER SHREDDER Operation, Service, & Parts Manual For Models: GOF69, 79, 89, 98, & 108 February 2006 Rev. 2009 FORM: GOFMower.QXD TABLE OF CONTENTS Installation....................................................1
FLAIL MOWER SHREDDER
 FLAIL MOWER SHREDDER Operation, Service, & Parts Manual For Models: GML41, 49, 61, 69, & 79 February 2006 FORM: GMLMower.QXD TABLE OF CONTENTS Installation....................................................1
Post Hole Digger. Operation Manual MODEL
 Post Hole Digger MODEL 107798 Operation Manual This safety alert symbol identifies important safety messages in this manual. Failure to follow this important safety information may result in serious injury
Installation Instructions
 Equipment Required: Wrenches: 9/16, 3/4, 1-1/8 Drill Bits: 11/32 Torque Wrench capable of reading 260 ft-lbs. Installation Instructions IN DEALERS: Please give these instructions to your customer. Do Not
Post Hole Diggers Compact Standard Heavy Duty
 Post Hole Diggers Compact Standard Heavy Duty MODEL 90 / MODEL 100 / MODEL 110 # 100623 # 100498 # 100624 Operation Manual This safety alert symbol identifies important safety messages in this manual.
OPERATORS MANUAL FOR KAFURTER ROTARY TOPPERS MODELS: TP110, TP140, TP160, TP170
 OPERATORS MANUAL FOR KAFURTER ROTARY TOPPERS MODELS: TP110, TP140, TP160, TP170 SAFETY WARNING: Do not use or operate this this manual and assembly instructions (where applicable) has been read and understood.
Wheel Horse. 36 Tiller. Model No & Up. Operator s Manual
 FORM NO. 8 9 Rev. A Wheel Horse 6 Tiller for Classic Garden Tractors Model No. 7970 690000 & Up Operator s Manual IMPORTANT: Read this manual carefully. It contains information about your safety and the
2 Ton - 50 Ton Bottle Jack
 Please dispose of packaging for the product in a responsible manner. It is suitable for recycling. Help to protect the environment, take the packaging to the local amenity tip and place into the appropriate
Quiet Collector. Model No & Up
 FORM NO. -0 Quiet Collector Model No. 79-990000 & Up Operator s Manual IMPORTANT: Read this manual, and your tractor manual, carefully. They contain information about your safety and the safety of others.
LOG SPLITTER. Heavy Duty PTO Driven. Owners Illustrated Instruction Book & Parts List
 LOG SPLITTER Heavy Duty PTO Driven Owners Illustrated Instruction Book & Parts List Grovebury Road, Leighton Buzzard, Bedfordshire. LU7 4UX. UK. Tel:01525 375157. Fax:01525 385222. Email: enquires@brownsagricultural.co.uk
36 Rear Discharge Mower
 FORM NO. 8 95 Rev. A Wheel Horse 6 Rear Discharge Mower for Classic Garden Tractor Model No. 7805 790000 & Up Operator s Manual IMPORTANT: Read this manual carefully. It contains information about your
Operator's Manual. VC-60 & VC-60 Plus Harper Industries, Inc. 7/03 Part No
 Operator's Manual VC-60 & VC-60 Plus 2003 Harper Industries, Inc. 7/03 Part No. 970066 Thank you for purchasing a Harper/Goossen Verti-Cutter. As with all Harper/Goossen products, the Harper/Goossen Verti-Cutter
4815RR1,4810RR RR1,14810RR1
 4815RR1,4810RR1 14815RR1,14810RR1 This Manual applies to Models: 4815RR1, 4810RR1, 14815RR1, 14810RR1 FLEX-WING ROTARY CUTTERS / SHREDDERS Published 07/16 Part No. 50076491 To the Owner/Operator/Dealer
3 Ton Trolley Jack. Please read and fully understand the instructions in this manual before operation. Keep this manual safe for future reference.
 Please dispose of packaging for the product in a responsible manner. It is suitable for recycling. Help to protect the environment, take the packaging to the local amenity tip and place into the appropriate
Wheel Horse. 48 Mower. for Lawn and Garden Tractors. Model No & Up. Operator s Manual
 FORM NO. 5 Wheel Horse 48 Mower for Lawn and Garden Tractors Model No. 786 990000 & Up Operator s Manual IMPORTANT: Read this manual carefully. It contains information about your safety and the safety
FERTILIZER SPREADERS MODEL PL180, PL400 & PL500
 FERTILIZER SPREADERS MODEL PL180, PL400 & PL500 SAFETY INSTRUCTIONS; OPERATING INSTRUCTIONS; PARTS BREAKDOWNS; ASSEMBLY; MAINTENANCE TABLE OF CONTENTS PAGE Introduction...1 Safety Decals...2 Checklists...3
Operator s ManualMOWERS
 Operator s ManualMOWERS ATTENTION Carefully read this manual before using the machine M48-S M48-A M60-S M60-A M72-S M72-A M84-S M84-A March 2009 page 1 page 2 Belco Resources Equipment PO Box 8164 Rocky
57 ROUGH CUT OWNER S MANUAL. With Assembly Instructions For Model: MR55H KUNZ ENGINEERING, INC. / MENDOTA, IL / PH (815) /07
 /07") 57 ROUGH CUT OWNER S MANUAL With Assembly Instructions For Model: MR55H KUNZ ENGINEERING, INC. / MENDOTA, IL 61342 / PH (815) 539-6954 1/07 ASSEMBLY INSTRUCTIONS Read the complete assembly instructions
57 ROUGH CUT OWNER S MANUAL With Assembly Instructions For Model: MR55H KUNZ ENGINEERING, INC. / MENDOTA, IL 61342 / PH (815) 539-6954 1/07 ASSEMBLY INSTRUCTIONS Read the complete assembly instructions
ROTARY MOWER OPERATION, SERVICE & PARTS MANUAL FOR
 ROTARY MOWER OPERATION, SERVICE & PARTS MANUAL FOR L-G-40-40-P, L-G-48-40-P, L-G-60-40-P & L-G-72-40-P Slip Clutch Models: L-G-60-40-SC-P & L-G-72-40-SC-P February 2003 FORM: RotMwrBook.QXD TABLE OF CONTENTS
p.t.o. Slip clutch Read this material before using this product. Failure to do so can result in serious injury. Save this manual.
 p.t.o. Slip clutch 65517 Installation Instructions Distributed exclusively by Harbor Freight Tools. 3491 Mission Oaks Blvd., Camarillo, CA 93011 Visit our website at: http://www.harborfreight.com Read
ABSOLUTE EQUIPMENT PTY LTD
 Manual Hydraulic Toe Jack Model DTJ Series ABSOLUTE EQUIPMENT PTY LTD 2/186 Granite Street, GEEBUNG QLD 4034 Australia sales@absoluteequipment.com.au Phone: +61 7 3865 4006 Fax: +61 7 3102 6288 This is
LOG CHOP. Hydraulic Wood Guillotine. Owners Illustrated Instruction Book & Parts List
 LOG CHOP Hydraulic Wood Guillotine Owners Illustrated Instruction Book & Parts List Grovebury Road, Leighton Buzzard, Bedfordshire. LU7 4UX. UK. Tel:01525 375157. Fax:01525 385222. Email: enquires@brownsagricultural.co.uk
OPERATOR S MANUAL. 20-bu 3-Point Hitch Material Collection System. LP65048 Supplier ST /07/2017 English. North American Edition Printed in USA
 OPERATOR S MANUAL 20-bu 3-Point Hitch Material Collection System LP65048 Supplier ST48289 11/07/2017 English North American Edition Printed in USA Introduction Using Your Operator s Manual Read this entire
Lift Arm Pivot Boss Kits
 24800G-GB (rev.0) LMC244 - Kit - Lift rm Pivot Boss x 2 LMC247 - Kit -Lift rm Pivot Boss x 3 LMC247 - For Serial No. FG000301 to FG000332 EJ000301 to EJ000455 EK000301 to EK000450 Lift rm Pivot Boss Kits
INSTALLATION INSTRUCTIONS DODGE DAKOTA 2 KIT # 682 (2WD), 692 (4WD) 3 KIT # 683 (2WD), 693 (4WD)
, 692 (4WD) 3 KIT # 683 (2WD), 693 (4WD)") INSTALLATION INSTRUCTIONS 1997-1999 DODGE DAKOTA 2 KIT # 682 (2WD), 692 (4WD) 3 KIT # 683 (2WD), 693 (4WD) Installation of a Performance Accessories body lift kit will change the vehicle s center of gravity
INSTALLATION INSTRUCTIONS 1997-1999 DODGE DAKOTA 2 KIT # 682 (2WD), 692 (4WD) 3 KIT # 683 (2WD), 693 (4WD) Installation of a Performance Accessories body lift kit will change the vehicle s center of gravity
MAINTENANCE WEIGHT RATINGS WARNINGS. warning: never exceed your vehicle manufacturer's recommended towing capacity
 Installation instructions warning: never exceed your vehicle manufacturer's recommended towing capacity Round Bar WEIGHT DISTRIBUTION kit MAINTENANCE Keep the socket-mounted ends of the spring bars and
PA47 Mk3 HEDGECUTTER / MOWER. Parts Manual. Publication 555 October 2008 Part No Revision:
 Publication 555 October 2008 Part No. 41571.55 Revision: 17.03.09 PA47 Mk3 HEDGECUTTER / MOWER Parts Manual For best performance USE ONLY GENUINE SERVICE PARTS To be assured of the latest design improvements
Model 858-RH. Operating and Assembly Manual. Palmor Products Inc Serum Plant Road Thorntown, IN 46071
 Model 5-RH Operating and Assembly Manual Palmor Products Inc. 55 Serum Plant Road Thorntown, IN 6071 3/31/015 SAFETY RULES Remember, any power equipment can cause injury if operated improperly or if the
Berta Flail Mower Attachment. BCS Power Units
 Manufactured by Berta s.r.l. to fit BCS Power Units Operating Instructions Before commissioning the machine, read operating instructions and observe warning and safety instructions. PLEASE ALSO READ ORIGINAL
Z Master. 62 Mower. for Z Master Z 255 Traction Unit. Model No & UP. Operator s Manual
 FORM NO. 9 88 Z Master 6 Mower for Z Master Z 55 Traction Unit Model No. 7408 89000 & UP Operator s Manual IMPORTANT: Read this manual carefully. It contains information about your safety and the safety
tRIPr Chief Grain Cart. Operator s Manual. Operator s Manual
 125-000-01 125-000-01 1tRIPr 1tRIPr Operator s Manual 1210 Chief Grain Cart Operator s Manual Operator s Manual TO THE DEALER Predelivery/Delivery Checklist 1210 Grain Cart PREDELIVERY/DELIVERY CHECKLIST
RONDINI SQTF. The spreader cannot be used for other purposes than those ones for which had been designed.
 RONDINI SQTF 1 - How to use the machine The spreader cannot be used for other purposes than those ones for which had been designed. The liability is null and void in case of damages occurred when the machine
INSTRUCTIONS AND SPARE PARTS READ CAREFULLY BEFORE OPERATING MACHINE
 SP Series OPERATING INSTRUCTIONS AND SPARE PARTS READ CAREFULLY BEFORE OPERATING MACHINE July 2006 Technical Data SERIES "SP Model SP 150 SP 250 SP 300 SP 400 SP 500 Capacity 149 li 198 li 250 li 302 li
Spearhead Offset Flail Mowers. Spearhead 0S/Q160-OS. OFFSET Flail Mower. Handbook
 Spearhead Q120-0S/Q160 0S/Q160-OS Q200-OS OFFSET Flail Mower Handbook 1 st Edition January 2011 Please ensure that this manual is handed to the operator before using the machine for the first time. The
Operator s Manual. GreenTek Ltd Rudgate Walton Leeds LS23 7AU UK
 Multi-Brush Operator s Manual GreenTek Ltd Rudgate Walton Leeds LS23 7AU UK Certificate of CE Conformity Date: 10 February 2003 Machine Model: Description: Multi-Brush Tractor Mounted Brush Serial Number:
TL SERIES ADJUSTABLE OFFSET TILLER
 R L S E S 995 OPERATION & PARTS MANUAL Please read these instructions carefully before using! Always grease all fittings and be sure to always check and fill with oil before operating! Retain this manual
42in GT Classic Single Stage Snowthrower Conversion Kit XT Series Garden Tractor
 Form No. 5 70 in GT Classic Single Stage Snowthrower Conversion Kit XT Series Garden Tractor Part No. 06 858 Installation Instructions Original Instructions (EN) This kit is for installing an existing
OPE R AT O R S MANU A L QUICK-HITCH ADAPTER. 5BP (Field conversion kit)
") OPE R AT O R S MANU A L 5BP006750 (Field conversion kit) Manual 5BP97378B Date 06/8/05 SAFETY Take note! This safety alert symbol found throughout this manual is used to call your attention to instructions
OPE R AT O R S MANU A L 5BP006750 (Field conversion kit) Manual 5BP97378B Date 06/8/05 SAFETY Take note! This safety alert symbol found throughout this manual is used to call your attention to instructions
Two-Stage Snow Blower For 4WD Pick Up Trucks. Operator s Manual
 Two-Stage Snow Blower For 4WD Pick Up Trucks Operator s Manual Distrubuted by: Metal Fabricating LLC P.O. Box 831 Brodheadsville, PA 18322 Phone: 570-992-9989 SnowVac.com WARRANTY POLICY Metal Fabricating
Thank you for purchasing a Nelson RainTrain2.
 Thank you for purchasing a Nelson RainTrain2. Read this manual carefully to learn how to operate and service your machine properly. Failure to do so can result in personal injury and/or property damage.
57 ROUGH CUT OWNER S MANUAL. With Assembly Instructions. For Models: MR55T, MR55B-17.5HP, MR55B-22HP & MR55K
 57 ROUGH CUT MR55K MR55B OWNER S MANUAL With Assembly Instructions For Models: MR55T, MR55B-17.5HP, MR55B-22HP & MR55K KUNZ ENGINEERING, INC. / MENDOTA, IL 61342 / PH (815) 539-6954 1/07 ASSEMBLY INSTRUCTIONS
42in GT Classic Single Stage Snowthrower Conversion Kit XT Series Garden Tractor
 Form No. 9 66 in GT Classic Single Stage Snowthrower Conversion Kit XT Series Garden Tractor Part No. 06 88 Installation Instructions English (EN) This kit is for installing an existing 00 Series Classic
PA 52 HY REACH. Mk2 Models. Parts Manual. Publication 490 October 2005 Part No Revision:
 Publication 490 October 2005 Part No. 41570.90 Revision: 07.11.08 PA 52 HY REACH Mk2 Models Parts Manual For best performance USE ONLY McCONNEL SERVICE PARTS To be assured of the latest design improvements
HYDRAULIC QUICK HITCH
 HYDRAULIC QUICK HITCH Installation & Operation Manual Important: This manual must be kept with the excavator at all times and referred to as required Harford Attachments Ltd Table of Contents Introduction
ALAMO INDUSTRIAL WARRANTY REGISTRATION INFORMATION
 TEAR TEAR TEAR TEAR TEAR TEAR TEAR TEAR TEAR TEAR TEAR TEAR TEAR TEAR TEAR TEAR TEAR TEAR TEAR TEAR TEAR TEAR TEAR TEAR TEAR 1. PRINT FIRMLY. 2. REMOVE WHITE COPY FOR CUSTOMER RECORDS. 3. REMOVE YELLOW
THE GIANT-VAC PTO BLOWER MODELS 2000*/3200**/4000***
 THE GIANT-VAC PTO BLOWER MODELS 2000*/3200**/4000*** Congratulations! ASSEMBLY INSTRUCTIONS AND OPERATOR S MANUAL You have just purchased one of the finest pieces of outdoor power equipment on the market
48 Side Discharge Mower
 FORM NO. 9 7GB Wheel Horse 48 Side Discharge Mower for Lawn & Garden Tractors Model No. 7868 790000 & Up Operator s Manual IMPORTANT: Read this manual carefully. It contains information about your safety
ABSOLUTE EQUIPMENT PTY LTD
 Manual Hydraulic Toe Jack Model DTJ Series ABSOLUTE EQUIPMENT PTY LTD 2/186 Granite Street, GEEBUNG QLD 4034 Australia sales@absoluteequipment.com.au Phone: +61 7 3865 4006 Fax: +61 7 3102 6288 This is
2. PREPARATION 1. SAFETY 3. FRAME 4. TRANSMISSION 5. DRIVE 6. ROW UNIT 7. OPTIONAL EQUIPMENT Monosem Inc.
 TABLE OF CONTENTS 1. SAFETY 2. PREPARATION 3. FRAME 4. TRANSMISSION 5. DRIVE 6. ROW UNIT 7. OPTIONAL EQUIPMENT For the initial preparation of the planter, lubricate the planter and row units. Make sure
Part Number Published 08/ Series Blade. 181 Series Blade
 141 SERIES 181 SERIES Published 08/15 Part Number 50076192 141 Series Blade 181 Series Blade To the Owner/Operator/Dealer All implements with moving parts are potentially hazardous. There is no substitute
48 Side Discharge Mower
 FORM NO. 9 650 Rev A Wheel Horse 8 Side Discharge Mower for Classic Garden Tractor Model No. 786 890000 & Up Operator s Manual IMPORTANT: Read this manual carefully. It contains information about your
70HP HYDRAULIC SYSTEM
 HD700 SERIES THE SHELBOURNE HD700 SERIES RANGE OF HEDGE AND VERGE TRIMMERS HAS BEEN DEVELOPED HAND IN HAND WITH OWNER DRIVER CONTRACTORS OVER THE LAST 10 YEARS AND IS AVAILABLE IN 5.5m FIXED BOOM, 6m TELESCOPIC
OPERATOR and PARTS MANUAL GRAIN GRINDER MODEL GG 10
 1 Serial # GG10-AUG10-6-0701 to GG10-AUG10-276-0314 ROTO GRIND OPERATOR and PARTS MANUAL GRAIN GRINDER MODEL GG 10 ROTO GRIND BURROWS ENTERPRISES, INC. 2024 East 8 th Street Greeley, Colorado 80631 970-353-3769
AG PRODUCTS, LTD. YOU RE ALWAYS AHEAD... WITH A MODERN BEHIND.
 SUMMER 2016 BADGER DISC HARROW Operator s Manual 011-1156 011-1166 001-1501 001-1501-1 011-1167 001-1501-2 001-1501-3 011-1176 001-1501-4 011-1177 MODERN AG PRODUCTS, LTD. YOU RE ALWAYS AHEAD... WITH A
John Berends Implements Pty Ltd OPERATOR S MANUAL PARTS LIST
 John Berends Implements Pty Ltd AGRICULTURAL ENGINEERS OPERATOR S MANUAL PARTS LIST PRODUCT NO. Lifting Jibs 0140 Lifting Jib 0142 Lifting Jib - Heavy Duty 130 FRANKSTON RD, DANDENONG, VIC. 3175 AUSTRALIA