Installation Instructions
|
|
|
- Ralph Reeves
- 5 years ago
- Views:
Transcription
: X6 (E71): Vehicle Production SOP-on* Vehicle Production SOP-on* * For")
1 Installation Instructions Accessories, Electric Trailer Brake Controller Ver 1.0 Page 1 of 9 August 2009 Accessory Development SUBJECT ELECTRIC TRAILER BRAKE CONTROLLER - P/N MODEL X5 (E70): X6 (E71): Vehicle Production SOP-on* Vehicle Production SOP-on* * For use only with BMW NA approved trailer hitch kits. SUGGESTED INSTALLATION TIME: 1.25 HOURS Total installation time may vary depending on vehicle options and equipment. The instructions below are developed for BMW vehicles and are not to be compared to any other existing instructions for vehicles other than BMW. No methods other than those specified in this document are to be used for installation in BMW vehicles. Left and right are determined from the driver s seat. Carefully read all instructions and supplements before proceeding with the installation. Reference should be made to TIS for instructions dealing with a stock part of the vehicle but not stated in detail in these instructions. The instructions were complete and up to date at time of publication; however, changes to the vehicle or installation may have occurred. Please report any problems or changes noted with the installation to BMW Technical Hotline, along with VIN, date of manufacture and as much detail as possible. WARNING: Electric trailer brake functionality cannot be checked until a trailer with electric brakes is connected to the vehicle. Settings and adjustments to the electric trailer brake controller must also be performed with a trailer connected to the vehicle. DO IT RIGHT THE FIRST TIME, ON TIME, EVERY TIME 2009 BMW of North America, LLC
2 PARTS INFORMATION 2 Contents of Kit - P/N Description Qty BMW Part Number Electric Trailer Brake Control 1 N/A Wiring Harness 1 N/A Mounting Bracket Mounting Screws 2 N/A Owner s Manual
3 Vehicle Preparation 3 1. Disconnect vehicle battery. 2. Remove the following components using procedures available through TIS: Storage pocket (1) Fuse panel cover (2) Cargo area trim (3) 3. Remove the following rear seating area trim panels: Wheel arch trim (1) Door sill/b pillar trim (2) B pillar trim (3) Air conditioning vent (4) 4. Remove the following right front seating area trim panels: Door sill trim (1) Kick panel (2) Under dash trim (3) Carpeted console trim (4) 5. Remove rubber base from cup holder (1).
4 4 6. Remove transmission lock access cover (1). Optional procedure 7. Cut away left side portion of base, and reinstall right side into cup holder. Vehicle preparation complete
5 Install Procedure 5 1. Locate black 4 pin connector (1) from previously installed accessory trailer hitch wiring harness. 2. Connect electric trailer brake wiring harness (2) to 4 pin connector (1). Route along other wire harness as shown. 3. Route harness (1) along right side of vehicle and secure to existing vehicle wiring harness. 4. Continue harness routing across right side foot well, behind floor ducting. 5. Route remainder of harness (1) along right side of center console, into footwell area.
6 6 Note: Removal of left side carpeted center console trim may aid in wire routing for the next step. 6. With a wire routing tool, or the help of an assistant, route remaining harness length (1) under center console, up through shift lock access hole in left side cup holder. 7. Insert harness connector (1) through the hole in bottom of controller mount bracket (2), up through rectangular hole in front of bracket. 8. Insert harness connector (1) into brake control unit (2). 9. Position control unit into bracket, align mounting holes, install supplied screws (1). Caution: Do not over tighten screws
7 7 10. While feeding excess harness length back through access hole, guide control unit/bracket assembly downward into cup holder until the bracket snaps into position, being held by the 4 spring loaded fingers. 11. Secure remaining harness length along center console ducting and existing vehicle wiring along firewall in passenger foot well. Installation Complete
8 RETROFIT CODING 8 There is no retrofit coding required for this installation. QUICK OPERATION (POWER UP) CHECK Set vehicle ignition to accessory mode or engine ON mode Display on controller should flash n.c. for 15 seconds After 15 seconds the display should change to.. If no display is present or if other characters are displayed please check electrical connections WARNING: Complete electric trailer brake functionality cannot be checked until a trailer with electric brakes is connected to the vehicle. Settings and adjustments to the electric trailer brake controller must also be performed with a trailer connected to the vehicle.
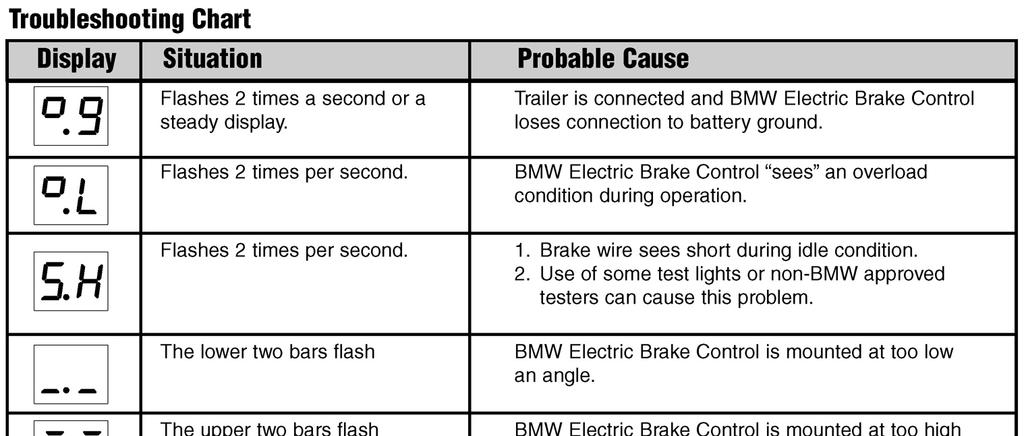
9 TROUBLESHOOTING 9
Installation Instructions
 Installation Instructions Page 1 of 13 October 2006 Equipment Parts, Trailer Hitch Ver 4.0 Accessory Development These Installation Instructions supersede all previous versions. SUBJECT MODEL TRAILER HITCH
Installation Instructions
 Installation Instructions Page 1 of 15 November 2007 Equipment Parts, Trailer Hitch Version 3.0 Accessory Development These Installation Instructions supersede all previous versions. SUBJECT MODEL TRAILER
Installation Instructions
 Installation Instructions Page 1 of 8 August 2008 Sound System, CD Changer Version 2.0 Accessory Development These installation instructions supercede all previous versions. SUBJECT CD Changer Retrofit
Installation Instructions
 Installation Instructions Page 1 of 15 December 2006 Equipment Parts, Trailer Hitch Ver 1.0 Accessory Development SUBJECT MODEL TRAILER HITCH KIT (US Only) - P/N 71 60 0 413 359 X5 (E70): Select Vehicle
PRAMCQ13. Designed for Dodge Ram vehicles with base audio Not Compatible with 2018 and newer Dodge Ram vehicles
 PRAMCQ13 Designed for 2013 2017 Dodge Ram vehicles with base audio Not Compatible with 2018 and newer Dodge Ram vehicles Subwoofer Alternate Amplifier Bracket Amplifier Subwoofer Harness Subwoofer Amplifier
GENUINE PARTS INSTALLATION INSTRUCTIONS
 GENUINE PARTS INSTALLATION INSTRUCTIONS 1. 2. 3. 4. DESCRIPTION: Security Light Kit APPLICATION: Altima Sedan (2013+) PART NUMBER: 999F4 AX010 - Universal Security Lighting Kit. KIT CONTENTS: Item QTY
GENUINE PARTS INSTALLATION INSTRUCTIONS
 GENUINE PARTS INSTALLATION INSTRUCTIONS 1. 2. 3. 4. DESCRIPTION: APPLICATION: PART NUMBER: KIT CONTENTS: Accent light Kit Pathfinder 999F3 XZ000 - Accent Lighting Kit. Item QTY Description Service Part
 INSTALLATION INSTRUCTIONS Accessory Application Publications No. All 38163 XM SATELLITE RADIO SYSTEM 2008 ODYSSEY Issue Date OCT 2007 PARTS LIST XM Radio Attachment (sold separately): P/N 08B15-SHJ-100A
GENUINE PARTS INSTALLATION INSTRUCTIONS
 GENUINE PARTS INSTALLATION INSTRUCTIONS 1. 2. 3. 4. DESCRIPTION: Accent light Kit APPLICATION: Versa (2012) PART NUMBER: 999F3 AW008 - Universal Accent Lighting Kit. KIT CONTENTS: Item QTY Description
INSTALLATION INSTRUCTIONS. Rear Vision System Aftermarket Display 2009-Current Dodge Ram (Kit part number )
") Rear Vision System Aftermarket Display 2009-Current Dodge Ram (Kit part number 1009-6503) Kit Contents: Chassis Harness with RCA (Note: In some cases a RCA extension may be required to connect to your
Rear Vision System Aftermarket Display 2009-Current Dodge Ram (Kit part number 1009-6503) Kit Contents: Chassis Harness with RCA (Note: In some cases a RCA extension may be required to connect to your
GENUINE PARTS INSTALLATION INSTRUCTIONS
 GENUINE PARTS INSTALLATION INSTRUCTIONS 1. 2. 3. DESCRIPTION: APPLICATION: PART NUMBER: Accent light Kit Cube (MY2013+) 999F3 AW000 - Universal Accent Lighting Kit. 4. KIT CONTENTS: Item QTY Description
Installation Instructions
 Installation Instructions Accessories, Armrest Page 1 of 8 December 2003 Product Development SUBJECT Armrest Retrofit Kit P/N 82 12 0 304 181 MODEL Cooper & Cooper S (R50/R53): All Vehicle Production SUGGESTED
GENUINE PARTS INSTALLATION INSTRUCTIONS
 GENUINE PARTS INSTALLATION INSTRUCTIONS 1. 2. 3. 4. DESCRIPTION: Security Light Kit APPLICATION: Altima Coupe and Sedan (2011+) PART NUMBER: 999F4 AX008 - Universal Security Lighting Kit. KIT CONTENTS:
DVD REAR SEAT VIDEO SYSTEM
 Read entire instructions thoroughly before starting. TOOLS REQUIRED: DVD REAR SEAT VIDEO SYSTEM MINIVANS WITH ROOF RAILS INSTALLATION INSTRUCTIONS Non-metal trim stick Phillips screwdriver T15, T20, T25
GENUINE PARTS INSTALLATION INSTRUCTIONS
 GENUINE PARTS INSTALLATION INSTRUCTIONS 1. DESCRIPTION: Trailer Hitch Harness Kit 2. APPLICATION: Pathfinder and QX60 3. PART NUMBER: 999T8 XZ000 - Trailer Hitch Harness Kit 4. KIT CONTENTS: Item QTY Description
Side Door Sill Trim Plate Package Installation
 Page 1 of 5 2014 Chevrolet Equinox Equinox, Terrain VIN L Accessory Installation Manual Accessories Interior Accessories Accessories Document ID: 3619390 Side Door Sill Trim Plate Package Installation
INSTALLATION INSTRUCTIONS. Rear Vision System Aftermarket Display 2009-Current Dodge Ram (Kit part number )
") Rear Vision System Aftermarket Display 2009-Current Dodge Ram (Kit part number 1009-6503) Kit Contents: Chassis Harness with RCA Endgate Handle with Camera 1 bag containing: Wire Ties (Qty: 17) Bottle
Rear Vision System Aftermarket Display 2009-Current Dodge Ram (Kit part number 1009-6503) Kit Contents: Chassis Harness with RCA Endgate Handle with Camera 1 bag containing: Wire Ties (Qty: 17) Bottle
GENUINE PARTS INSTALLATION INSTRUCTIONS
 GENUINE PARTS INSTALLATION INSTRUCTIONS 1. 2. 3. 4. DESCRIPTION: APPLICATION: PART NUMBER: KIT CONTENTS: Trailer Hitch Harness Kit Infiniti JX 999T8 YZ000- Trailer Hitch Harness Kit Item QTY Description
Installation instructions, accessories RTI S80
 Installation instructions, accessories Instruction No 8685714 Version 1.0 5 Part. No. RTI S80 Volvo Car Corporation RTI S80-8685714 - V1.0 Page 1 / 25 Equipment A0000161 A0000162 A0801178 D8802049 Page
GENUINE PARTS INSTALLATION INSTRUCTIONS
 GENUINE PARTS INSTALLATION INSTRUCTIONS 1. 2. 3. 4. DESCRIPTION: APPLICATION: PART NUMBER: KIT CONTENTS: Security light Kit Maxima 999F4 AX009 - Universal Security Lighting Kit. Item QTY Description Service
SRAMCQ09. Designed for Dodge Ram vehicles Stillwater Designs SRAMCQ Subwoofer. Subwoofer Harness.
 SRAMCQ09 Designed for 2009-2018 Dodge Ram vehicles Subwoofer Alternate Amp Bracket Subwoofer Harness Subwoofer Amplifier Wire Ties x 6 Adapter Harness Subwoofer Power Harness Bolt (only for solid rear
INSTALLATION INSTRUCTIONS TRAILER HITCH MAIN HARNESS KIT
 PART NUMBER: 0000-89-N30 GENUINE ACCESSORIES INSTALLATION INSTRUCTIONS TRAILER HITCH MAIN HARNESS KIT APPLICABLE MODELS: 2016 > CX-9 PACKAGE CONTENTS: INSTALLATION INSTRUCTIONS QTY 1 CABLE TIE MOUNT QTY
MY 2003 BMW X5 (E53) (6 and 8 cyl. models) With Option SA639
 (6 and 8 cyl. models) With Option SA639") 1of 8 MY 2003 BMW X5 (E53) (6 and 8 cyl. models) With Option SA639 BMW CPT 9000 DIGITAL PORTABLE TELEPHONE INSTALLATION INSTRUCTIONS 2of 8 This manual has been prepared by to provide service technicians
1of 8 MY 2003 BMW X5 (E53) (6 and 8 cyl. models) With Option SA639 BMW CPT 9000 DIGITAL PORTABLE TELEPHONE INSTALLATION INSTRUCTIONS 2of 8 This manual has been prepared by to provide service technicians
PWRA215. Designed for 2015 and newer Jeep Wrangler two door with base audio. T-TAP x2 10MM BOLT FUSE WIRE TIES x6 SUBWOOFER ASSEMBLY
 PWRA215 Designed for 2015 and newer Jeep Wrangler two door with base audio T-TAP x2 10MM BOLT FUSE WIRE TIES x6 SUBWOOFER ASSEMBLY 200 WATT AMP BRACKET ASSEMBLY POWER HARNESS 2015 Stillwater Designs PWRA215
TOOLS REQUIRED: Panel Removal Tool Phillips Screwdriver 10mm Nut Driver Ratchet 10mm Socket 7mm Wrench 7mm Nut Driver Straight Screwdriver
 CONTENTS: 1EA. FIVE CHANNEL AMPLIFIER/BRACKET ASSEMBLY P/N MPDSP039AA 1EA. OVERLAY HARNESS P/N RH41LX10 3EA. 7MM SCREWS P/N RF7MM 6EA. WIRE TIE P/N RFZIP6 1EA. 30 AMP FUSE P/N RFUSE30 1EA. INSTRUCTIONS
GMC Duramax (LBZ) High Idle Kit Note: Only for automatic transmissions with cruise control
 High Idle Kit Note: Only for automatic transmissions with cruise control") U 17 December 2014 (1036606) 2006-07 GMC Duramax (LBZ) High Idle Kit (I-00318) 1 GMC Duramax (LBZ) High Idle Kit Note: Only for automatic transmissions with cruise control 1036606 2006-2007 GMC Duramax
U 17 December 2014 (1036606) 2006-07 GMC Duramax (LBZ) High Idle Kit (I-00318) 1 GMC Duramax (LBZ) High Idle Kit Note: Only for automatic transmissions with cruise control 1036606 2006-2007 GMC Duramax
CONTENTS: TOOLS REQUIRED:
 CONTENTS: 1EA. FIVE CHANNEL AMPLIFIER/BRACKET ASSEMBLY P/N RBI77KICK37 1EA. POWER HARNESS P/N RH41PMP 1EA. OVERLAY HARNESS P/N RH41PM 3EA. NUT P/N RFM6NUT 6EA. WIRE TIE P/N RFZIP6 1EA. FUSE 30 AMP P/N
INSTALLATION INSTRUCTIONS
 INSTALLATION INSTRUCTIONS Accessory Application Publications No. XM RADIO SYSTEM (EXCEPT LX) 2006 ODYSSEY All 30392 Issue Date AUG 2005 PARTS LIST XM Radio Attachment (sold separately): P/N 08B15-SHJ-100
PART NUMBER: H630SSJ000. Kit Contents: A. Amplifier with Bracket (1) D. Badge (2) with push nuts (4)
 D. Badge (2) with push nuts (4)") Kit Contents: A. Amplifier with Bracket (1) D. Badge (2) with push nuts (4) E. Clip B. Harness (1) C. Cable tie (8) F. Mounting Hardware (2) G. Replacement Speaker (2) H. HVAC Duct extension (2) IMPORTANT:
Kit Contents: A. Amplifier with Bracket (1) D. Badge (2) with push nuts (4) E. Clip B. Harness (1) C. Cable tie (8) F. Mounting Hardware (2) G. Replacement Speaker (2) H. HVAC Duct extension (2) IMPORTANT:
LEXUS CT 200h ILLUMINATED DOOR SILLS Preparation
 Preparation Part Number: PT922-89100 Kit Contents Item # Quantity Req'd. Description 1 1 Door Sill, Front Right Hand 2 1 Door Sill, Front Left Hand 3 1 Door Sill, Rear Right Hand 4 1 Door Sill, Rear Left
INSTALLATION INSTRUCTIONS
 9002-6513 Rear Vision System W/ Zoom Aftermarket and Factory 8.4 Touch Screen Display (Factory Display requires Chrysler/Dodge dealer to activate) 2009 2012 RAM (Part B) 2013 Current RAM (Part A) NOTE:
GENUINE PARTS INSTALLATION INSTRUCTIONS
 GENUINE PARTS INSTALLATION INSTRUCTIONS 1. 2. 3. 4. DESCRIPTION: Illuminated Kick Plate Kit APPLICATION: Murano PART NUMBER: 999G6 C2000, 999G6 C2100, 999G6 C2200 999Q9 AY001 - Accessory Service Connector
ACD-PRO Install in 2008 EvoX
 Turning in a counter clockwise direction, unscrew ift knob ACD-PRO Install in 2008 EvoX Slide back and remove the floor console panel assembly Pull up to remove the center console tray Disconnect the plug
TOYOTA CAMRY LE / SE / XLE DUAL SEAT HEATER KIT Section I Pre-Installation Check
 Section I Pre-Installation Check Kit Part Number: 250-1897 3 General Applicability Camry LE / SE / XLE 5 4 1 Recommended Sequence of Application Item # Accessory 1 Wiring 2 Elements 3 2 Kit Contents Item
INSTALLATION INSTRUCTIONS
 Rear Vision System Mirror Display Dodge Ram Kit Contents: Instruction Sheets Template Chassis Harness Endgate Handle with Camera Wire Ties (Qty: 17) Bottle of ZTech Plug for Non-Locking Endgates (Optional)
GENUINE PARTS INSTALLATION INSTRUCTIONS
 GENUINE PARTS INSTALLATION INSTRUCTIONS 1. 2. 3. 4. DESCRIPTION: APPLICATION: PART NUMBER: KIT CONTENTS: Accent light Kit Versa Note 999F3 4Z000 - Accent Lighting Kit. 999Q9 AY000 - Accessory Service Connector
TOYOTA HIGHLANDER 2016 ON BOARD VACUUM CLEANER
 2016 Part Numbers: 00016-48017- (01, 02, 04) Accessory Code: SV1000 NOTE: Will not work in Highlander HV Kit Contents Item # Quantity Reqd. Description 1 1 Vacuum Assembly 2 1 Hose Assembly 3 1 Tool Kit
Designed for 2015 Ford F150 Super-Cab and Super-Crew vehicles (Compatible in vehicles with or without Sony System. M6 Bolt X 2
 SF150SC15 Designed for 2015 Ford F150 Super-Cab and Super-Crew vehicles (Compatible in vehicles with or without Sony System Subwoofer Assembly Amplifier Relocation Bracket (not used on non Sony trucks)
PCAMA13MY. Designed for Chevrolet Camaro vehicles with MyLink. Subwoofer Assembly. Subwoofer Bracket Wire Ties x6 Rubber Bumper
 PCAMA13MY Designed for 2013-2015 Chevrolet Camaro vehicles with MyLink Subwoofer Assembly Subwoofer Harness Adapter Harness Subwoofer Bracket Wire Ties x6 Rubber Bumper 2012 Stillwater Designs PCAMA13MY-A3-20151028
INSTALLATION INSTRUCTIONS
 INSTALLATION INSTRUCTIONS [1] Description: Tow Hitch Wire Harness Kit [2] Application: Nissan Rogue Note: Tow Harness application is limited to specific vehicle option packages that include tow harness
GENUINE PARTS INSTALLATION INSTRUCTIONS
 GENUINE PARTS INSTALLATION INSTRUCTIONS 1. 2. 3. 4. DESCRIPTION: Accent light Kit APPLICATION: Infiniti JX (2013) PART NUMBER: 999F3 YY000 - Universal Accent Lighting Kit. KIT CONTENTS: Item QTY Description
INSTALLATION INSTRUCTIONS
 INSTALLATION INSTRUCTIONS Accessory Application Publications No. AII 27363 ODYSSEY Issue Date SEP 2004 PARTS LIST Compact Subwoofer Kit: P/N 08A39-5E1-010 4 Flange bolt, 6 x 12 mm Subwoofer 3 Cushion tapes
INSTALLATION INSTRUCTIONS
 Rear Vision System Aftermarket and Factory 5.0, 8.4 and 6.1 MyGig Touch Screen Display (Factory Display requires Chrysler/Dodge dealer to activate) 2009 Current* Dodge Ram (Kit part number 1009-6503) *NOTE:
Conflicts: Vehicles without a sunroof Vehicles with a single sunroof
 Toyota Sienna (Dual Sunroof) 2011-10.2 Overhead Video Part Number: 00016-00110 00016-00110-17 Fit Kit 00016-00120 00016-00120-17 Fit Kit Accessory Code: ED5 Conflicts: Vehicles without a sunroof Vehicles
GENUINE PARTS INSTALLATION INSTRUCTIONS
 GENUINE PARTS INSTALLATION INSTRUCTIONS DESCRIPTION: APPLICATION: PART NUMBER(S) REQUIRED FOR INSTALLATION: Dual Rear Seat USB Charge Port Kit Titan T99Q7 6LB0A (Excluding Single Ca T98Q7 5ZW2A (Metal
INTERIOR > CONSOLE, FLOOR > REMOVAL > REMOVAL > BASE FLOOR CONSOLE
 Page 1 of 18 2016 Dodge Grand Caravan 3.6L Eng VIN G SE Service Manual: BODY - INTERIOR & EXTERIOR Print Date: INTERIOR > CONSOLE, FLOOR > REMOVAL > REMOVAL > BASE FLOOR CONSOLE Fig 1: Base Floor Console
2015 Copyright Maxspeed-Motorsports.com
 1 Porsche PCM 3.1 Backup Camera Installation Instructions. Thank you for purchasing your product at www.maxspeedmotorsports.com Before you start please understand that these installation instructions are
SCAMA10. Designed for Chevrolet Camaro vehicles. Subwoofer Assembly. Subwoofer Bracket Wire Ties x6 Wire Taps x2 Rubber Bumper
 SCAMA10 Designed for 2010-2015 Chevrolet Camaro vehicles Subwoofer Assembly Subwoofer Harness Subwoofer Bracket Wire Ties x6 Wire Taps x2 Rubber Bumper 2012 Stillwater Designs SCAMA10-A3-20151028 M6 Nut
TOYOTA HIGHLANDER TRAILER WIRE HARNESS Preparation
 Preparation Part Number: PT219-48111 Kit Contents Item # Quantity Reqd. Description 1 1 Converter 2 1 Flat 4-pin wire harness 3 5 Plastic tie 4 1 Special plastic tie for stud mount 5 1 Packing 6 2 Bolt
Installation Manual W463 Trailer Hitch Receiver
 Installation Manual W463 Trailer Hitch Receiver For Mercedes-Benz USA Geländewagen W463 from 1990 to 2009 For Mercedes-Benz ROW Geländewagen W463 from 1990 up to 2013 Parts Lists W463 Trailer Hitch Receiver
INSTALLATION INSTRUCTIONS
 INSTALLATION INSTRUCTIONS Accessory Application Publications No. AII 26042-26353 XM INTERFACE ODYSSEY EXCEPT EX-L WITH NAVI/RES Issue Date FEB 2004 PARTS LIST 8 Wire ties XM Radio Attachment P/N 08B15-S0X-100
PF150SC15. Designed for 2015 and newer Ford F150 Super-Cab and Super-Crew vehicles without Sony System Stillwater Designs PF150SC15-A
 PF150SC15 Designed for 2015 and newer Ford F150 Super-Cab and Super-Crew vehicles without Sony System Subwoofer Assembly Amplifier Assembly Amplifier Harness 2015 Stillwater Designs PF150SC15-A2-20160502
INSTALLATION OVERVIEW: Connector, 7-pin. Clips w/plastic Ties. Plastic Ties. Connector, 52-pin. Step 22 a) Step 21 a) Step 23. Step 24.
 Step 21 a) Step 23. Step 24.") GENUINE PARTS INSTALLATION INSTRUCTIONS DESCRIPTION: APPLICATION: PART NUMBER: KIT CONTENTS: Tow Hitch Wire Harness Kit NV Cargo & Passenger 999T8 HW000 Installation of this accessory requires installation
GENUINE PARTS INSTALLATION INSTRUCTIONS DESCRIPTION: APPLICATION: PART NUMBER: KIT CONTENTS: Tow Hitch Wire Harness Kit NV Cargo & Passenger 999T8 HW000 Installation of this accessory requires installation
CONTENTS TOOLS REQUIRED:
 CONTENTS 1EA. FIVE CHANNEL AMPLIFIER P/N MPDSP033AA 1EA. AMPLIFIER BRACKET P/N RM11JK41 1EA. POWER HARNESS P/N RH41JKP 1EA. OVERLAY HARNESS P/N RH41JK 1EA. FUSE 30 AMP P/N RFUSE30 6EA. WIRE TIE P/N RFZIP6
LEXUS GS 350/450h ILLUMINATED DOOR SILLS Preparation
 Preparation Part Number: PT922-30120 (GS350) PT922-30130 (GS450h) NOTE: Part number of this accessory may not be the same as the part number shown. Kit Contents Item # Quantity Req'd. Description 1 1 Illuminated
AEV30229AD Last Updated: 06/17/14 REAR VISION SYSTEM INSTALLATION GUIDE
 AEV30229AD Last Updated: 06/17/14 REAR VISION SYSTEM INSTALLATION GUIDE PLEASE READ BEFORE YOU START TO GUARANTEE A QUALITY INSTALLATION, WE RECOMMEND READING THESE INSTRUCTIONS THOROUGHLY BEFORE BEGINNING
Part Number: SFR-713. Hardware Bag Contents. General Applicability All models. Conflicts - Fog Lights. Date: SCION FRS LED DRL
 Date: 01.30.2014 SCION FRS 2013-2015 LED DRL Part Number: SFR-713 Kit Contents Item # Quantity Reqd. Description 1 2 DRL s bezels w/led DRL 2 1 Driver Box 3 1 Harness bag 4 1 User s card 5 1 Switch Hardware
GENUINE PARTS INSTALLATION INSTRUCTIONS
 GENUINE PARTS INSTALLATION INSTRUCTIONS 1. 2. 3. 4. DESCRIPTION: Accent light Kit APPLICATION: R42H (2011) PART NUMBER: 999F3 AW000 - Universal Accent Lighting Kit. KIT CONTENTS: Item QTY Description Service
RAINGEAR 1955/ 1956 Chevrolet
 RAINGEAR 1955/ 1956 Chevrolet GETTING STARTED: SOME RECOMMENDATIONS PLEASE TRY OUR WAY FIRST! Note: This system is designed with built in adjustments to fit in your car. If, as you are installing it, you
Installation instructions, accessories - Volvo Navigation System, widescreen
 S60 Section Group Weight(Kg/Pounds) Year Month 3 39 2001 04 S60 2001, S60 2002 Page 1 of 21 Page 2 of 21 Required tools A0000162 A0000161 A0801178 M8802509 M3903563 Page 3 of 21 M3903565 M8503983 Page
CONTENTS TOOLS REQUIRED: *Ratchet*13mm Socket*10mm Socket*Phillips Screwdriver*Pliers*Panel Removal Tool. Subwoofer Installation
 CONTENTS 1EA. SUBWOOFER ASSEMBLY P/N 77KICK24SUBASSEMBLY 1EA. 200 WATT AMP P/N RE08BTL200R 1EA. POWER HARNESS P/N RHWRANGLERPWR 1EA. OVERLAY HARNESS P/N RHWRANGLER 2EA. T-TAP P/N RFTTAPB 1EA. FUSE 30 AMP
PRODUCT INSTRUCTIONS
 PRODUCT INSTRUCTIONS Thank you for purchasing genuine Design Engineering, Inc. products. Be sure to always wear the proper safety equipment when installing any DEI product. Design Engineering Inc. WILL
CONTENTS TOOLS REQUIRED: *Ratchet*13mm Socket*10mm Socket*Phillips Screwdriver*Pliers*Panel Removal Tool. Subwoofer Installation
 CONTENTS 1EA. SUBWOOFER ASSEMBLY P/N 77KICK40SUBASSEMBLY 1EA. 200 WATT AMP P/N RE08BTL2000R 1EA. POWER HARNESS P/N RHWRANGLERPWR 1EA. OVERLAY HARNESS P/N RHWRANGLER 2EA. T-TAP P/N RFTTAPB 1EA. FUSE 30
CANOPY WIRING PATCH KIT INSTALLATION INSTRUCTIONS Holden Colorado RG
 CANOPY WIRING PATCH KIT INSTALLATION INSTRUCTIONS Holden Colorado RG IMPORTANT! Read instructions carefully before installation. It is strongly recommended that installation is conducted by an authorized
LED Fog Light. Conflicts Note: 1832, 1852, 1856, 1872, General Applicability Fits Models
 LED Fog Light Year & Model Part Number 2017 Corolla TCO-817 Conflicts Note: 1832, 1852, 1856, 1872, 1874 General Applicability Fits Models 1863 1866 1864 1865 Additional Items Required For Installation
Conflicts: Vehicles with a sunroof
 Toyota 4Runner Non/MR 2010-10.2 Overhead Video Part Number: 00016-00110; Fit Kit -00110-15, Beige 00016-00120; Fit Kit -00120-15, Gray Accessory Code: ED6 Conflicts: Vehicles with a sunroof Kit Contents:
SWRA211. T-TAP x2 10MM BOLT FUSE WIRE TIES x6 SUBWOOFER ASSEMBLY 200 WATT AMP BRACKET ASSEMBLY POWER HARNESS OVERLAY HARNESS.
 SWRA211 Designed for 2011-2014 Jeep Wrangler two door with base audio or premium audio T-TAP x2 10MM BOLT FUSE WIRE TIES x6 SUBWOOFER ASSEMBLY 200 WATT AMP BRACKET ASSEMBLY POWER HARNESS 2012 Stillwater
INSTALLATION INSTRUCTIONS
 Jeep Wrangler Rear Vision Camera, 2007 Current (Kit # 9002-8838) Items Included in the Kit Camera Chassis Harness Zip lock bag with 15 Wire Ties & 3 Push Nuts These Instructions Required Tools & Supplies
If technical support is required, please contact Advent Technical Support at
 Document 128-9015A Created 12/12/11 Kit Contents: Item # Qty. Component Description 1 2 Headrest Assembly 2 2 Cables # 3 3 1 Power Cord # 9 4 1 FM Antenna 5 1 Control Box 6 2 IR Headphones 7 2 Remote Control
CONTENTS: 1EA. SUBWOOFER HARNESS 2PIECE TOOLS REQUIRED:
 CONTENTS: 1EA. SUBWOOFER ENCLOSURE 1EA. SUBWOOFER HARNESS 2PIECE 2EA. T-TAP 1EA. FUSE 30 AMP 6EA. WIRE TIES 1EA. INSTRUCTIONS P/N 77KICK14SUBASSEMBLY P/N RHPM1 P/N RFTTAPB P/N RFUSE30 P/N RFZIP6 P/N RBI77KICK14
INSTALLATION INSTRUCTIONS
 Rear Vision System Tailgate Emblem Camera Mirror Display 2009-Current Ford F-150 and 2010-Current Super Duty (Kit part number 1008-9527) Kit Contents: Mirror Tailgate Emblem Mount with Camera Interior
Installation instructions, accessories - Fuel driven heater 912-D
 XC90 Section Group Weight(Kg/Pounds) Year Month 8 87 2002 10 XC90 2003 D5244T, XC90 2004 D5244T, XC90 2005 D5244T AW50/51 AWD, XC90 2006 D5244T, XC90 2006 D5244T AW50/51 AWD D5244T R8703687 Page 1 of 20
GENUINE PARTS INSTALLATION INSTRUCTIONS
 GENUINE PARTS INSTALLATION INSTRUCTIONS 1. 2. 3. 4. DESCRIPTION: APPLICATION: PART NUMBER: KIT CONTENTS: LED Daytime Driving Lights CUBE B66M0-1FC00 Item A B C D E F G H I K L QTY 2 2 1 1 1 2 18 6 4 J
ROUSH Active IO Exhaust. Installation Instructions P/N: (R LITE) Fastback GT Convertible GT V8
 Fastback GT Convertible GT V8") Installation Instructions P/N: 422128 (R1318-5231LITE) Fastback GT Convertible GT V8 39555 Schoolcraft Rd, Plymouth MI, 48170 800.59.ROUSH ROUSH Active IO Exhaust Installation Instructions P/N: 422128
Installation Instructions P/N: 422128 (R1318-5231LITE) Fastback GT Convertible GT V8 39555 Schoolcraft Rd, Plymouth MI, 48170 800.59.ROUSH ROUSH Active IO Exhaust Installation Instructions P/N: 422128
Toyota 4RUNNER With/MR Overhead Video
 Toyota 4RUNNER With/MR 2010-10.2 Overhead Video Part Number: 00016-00110; Fit Kit-00110-14, Beige 00016-00120; Fit Kit-00120-14, Gray Accessory Code: ED7 Conflicts: Vehicles without a sunroof Kit Contents:
GENUINE PARTS INSTALLATION INSTRUCTIONS
 GENUINE PARTS INSTALLATION INSTRUCTIONS DESCRIPTION: APPLICATION: PART NUMBER: KIT CONTENTS: Illuminated Kick Plate Maxima (Applicable ONLY to U.S. Market Vehicles with Build Date June 2012 or later) 999G6
INSTALLATION INSTRUCTIONS
 INSTALLATION INSTRUCTIONS Accessory ACCESSORY HANDSFREELINK Application 2010 ACCORD 2 AND 4-DOOR Publications No. AII 42231 Issue Date AUG 2009 PARTS LIST HFL retainer HFL Attachment Kit P/N 08E02-TA0-100
Installation Instructions
 Installation Instructions Jeep JK 2-Door (2011 Present) Mounting Bracket and Air Line System Kit for ARB On-Board Twin Air Compressor (CKMTA12) Made in the USA Kit Contents: 1 Flat Bracket 1 Formed Bracket
Reverse Camera Installation Instructions
 Reverse Camera Installation Instructions XUV500 Issue: 1-01/03/2013 Page 1 of 12 Fitting Time: 45 Minutes Parts Supplied: Reverse Camera Wiring Harness Tools and Materials Flat Blade Screw driver Phillips
INSTALLATION INSTRUCTIONS INFINITI CELLPORT UNIVERSAL HANDS FREE SYSTEM
 INSTALLATION INSTRUCTIONS 1. DESCRIPTION: INFINITI CELLPORT UNIVERSAL HANDS FREE SYSTEM 2. APPLICATION: 2002 Q45 3. PART NUMBER: 948T3CELLR95 (VPC) or 999Q2TN000 (PDC) 4. TOOLS REQUIRED: a. Loctite 242
Document: PIO / DIO Rev.A 08/04/08 Toyota Solara Rear Sight RECOMMENDED SEQUENCE OF APPLICATION
 Document: 13.15.00 PIO / DIO Rev.A 08/04/08 Toyota 2008 - Rear Sight Part Number: 00016-00040 Code: MC1 Item # Quantity Reqd. Description 1 1 MIRROR/MONITOR 2 1 REVERSE MINI-CAMERA 3 1 EXTENSION HARNESS
INSTALLATION INSTRUCTIONS
 GENUINE PARTS INSTALLATION INSTRUCTIONS 1 DESCRIPTION: Trailer Tow Harness 2 APPLICATION: Nissan Rogue 3 PART NUMBER: 999T8 G2000 4 KIT CONTENTS: 999T8 G2000 Item Qty. Part Description Service Part Number
INSTALLATION INSTRUCTIONS
 INSTALLATION INSTRUCTIONS Accessory S P/N 08E12-T2A-100B Application 2014 ACCORD 4-DOOR Publications No. AII 49980 Issue Date AUG 2013 PARTS LIST Right front illuminated door sill trim Fuse label 2 Alcohol
2015+ F-150 Active Exhaust Kit Installation Instructions P/N: (1117-5E292LITE)
") 2015+ F-150 Active Exhaust Kit Installation Instructions P/N: 422104 (1117-5E292LITE) 39555 Schoolcraft Rd, Plymouth MI, 48170 800.59.ROUSH 2015+ Ford F-150 Active Exhaust Kit Installation Instructions
2015+ F-150 Active Exhaust Kit Installation Instructions P/N: 422104 (1117-5E292LITE) 39555 Schoolcraft Rd, Plymouth MI, 48170 800.59.ROUSH 2015+ Ford F-150 Active Exhaust Kit Installation Instructions
SCION xd INTERIOR LIGHTING UPGRADE Preparation
 Preparation Part Number: PTS21-52085 Light Guide Kit Contents Item # Quantity Reqd. Description 1 1 Controller Board, 4 color programmed w/ Bracket 2 1 RGB, LED Engine wire harness 3 2 14mm Light Rod,
Fitting Instructions
 Tow-Pro Wiring Kit Fitting Instructions Suitable for: Toyota Hilux / Fortuner Accessory Kit Estimated Fitting Time: 90 Minutes FI807 Page 0 of Issue: Date: /08/08 08 General Notes Safety Notes Suitable
Important! The subwoofer system is designed to be used only with the rear seat in the up position only.
 Important! The subwoofer system is designed to be used only with the rear seat in the up position only. CONTENTS 1EA. SUBWOOFER ASSEMBLY 2EA. BRACKET LOWER 2EA. BRACKET UPPER 1EA. OVERLAY HARNESS 2EA.
SCION FRS FOG LIGHTS. Part Number: SFR-313
 Part Number: SFR-313 Kit Contents Item # Quantity Reqd. Description 1 2 Light Housings 2 2 Fog Light bezels 3 1 Harness bag 4 1 User s card 5 1 Switch 6 1 Fuse jumper Hardware Bag Contents Item # Quantity
INSTALLATION INSTRUCTIONS
 INSTALLATION INSTRUCTIONS Accessory Application Publications No. AII 23642 P/N 08L91-S9V-100 2003 PILOT Issue Date MAY 2002 PARTS LIST Trailer hitch harness 2 Short wire ties 2 Long wire ties Clip Bolt
Original BMW Accessories. Installation Instructions.
 Original BMW ccessories. Installation Instructions. Trailer tow hitch retrofit (removable version) BMW X5 (E70) BMW X6 (E7) Retrofit kit No. 7 60 2 55 44 Electrical components retrofit kit (for E70 only)
Installation instructions, accessories. Parking assistance, rear
 Installation instructions, accessories Instruction No 31330676 Version 1.4 Part. No. 30758088, 9487266, 30786087, 31359215 Parking assistance, rear Volvo Car Corporation Parking assistance, rear- 31330676
PSIEXT16I. Designed for 2016 and newer 1500 Series and Heavy Duty GM Silverado/Sierra Double Cab vehicles with 7 inch touchscreen radio
 PSIEXT16I Designed for 2016 and newer 1500 Series and Heavy Duty GM Silverado/Sierra Double Cab vehicles with 7 inch touchscreen radio Not compatible with Bose Audio Not compatible with 4.2 inch radio
INSTALLATION INSTRUCTIONS
 Rear Vision System Tailgate Handle Camera Mirror Display 2004-2014 Ford F-150 and 2008-2015 Ford Super Duty (Kit part numbers 9002-9521) Kit Contents: Mirror Tailgate Handle with camera and harness Interior
TOYOTA SOLARA CONVERTIBLE XM SATELLITE RADIO Preparation. Part Number: Mounting Kit PT
 Preparation Part Number: Mounting Kit PT546-06061 Tuner Assy 86180-0W030 Tuner Assy Kit Contents (86180-0W030) 1 1 Tuner Assy, Stereo Component Mounting Kit Contents (PT546-06061) 1 Ground Cable 1 1 Wire,
Conflicts. TOYOTA 4Runner REARSIGHT. Part Number: Code: MC90 KIT CONTENTS ADDITIONAL ITEMS REQUIRED FOR INSTALL RECOMMENDED TOOLS
 TOYOTA 4Runner 2010 - REARSIGHT Part Number: 00016-00085 Code: MC90 Conflicts KIT CONTENTS ITEM QTY DESCRIPTION 1 1 MIRROR/MONITOR 2 1 REAR CAMERA ASSEMBLY 3 1 CAMERA EXTENSION HARNESS 4 1 SACK PARTS 5
Part Number: TTU-BGB14-DRL TTU-BGP14-DRL
 11/15/16 TOYOTA TUNDRA 2014-17 Billet Grille w/led DRL Part Number: TTU-BGB14-DRL TTU-BGP14-DRL Kit Contents Item # Quantity Reqd. Description 1 2 LED DRL 2 1 Driver Box 3 1 Switch 4 1 User Card 5 2 Hardware
INSTALLATION INSTRUCTIONS
 INSTALLATION INSTRUCTIONS Accessory Application Publications No. AII 22903-22963 ODYSSEY Issue Date MAY 2002 PARTS LIST Subwoofer Kit: P/N 08A39-EP7-100 Subwoofer 2 Cushion tapes 8 Wire ties (1 not used)
11 Important: Use only the BMW X5 (E70) ball mount kit, available from BMW centers, with the following specifications:
 ball mount kit, available from BMW centers, with the following specifications:") 11 Important: Use only the BMW X5 (E70) ball mount kit, available from BMW centers, with the following specifications: A (Drop) = 2! (57mm) B (Rise) = 1 (25mm) C (Length) = 8 (203mm) 5. Install trailer
11 Important: Use only the BMW X5 (E70) ball mount kit, available from BMW centers, with the following specifications: A (Drop) = 2! (57mm) B (Rise) = 1 (25mm) C (Length) = 8 (203mm) 5. Install trailer
GENUINE PARTS INSTALLATION INSTRUCTIONS
 GENUINE PARTS INSTALLATION INSTRUCTIONS DESCRIPTION: APPLICATION: PART NUMBER: Electronic Tailgate Lock Kit Nissan Titan 999M2-W3005 KIT CONTENTS: Item Qty. Part Description Service Part Number A 1 Electronic
GENUINE PARTS INSTALLATION INSTRUCTIONS
 GENUINE PARTS DESCRIPTION: APPLICATION: PART NUMBER: REQUIRED FOR INSTALLATION: INSTALLATION INSTRUCTIONS Interior Accent Lighting Kit. Murano 999F3 C5000 999Q9 AY001 (Accessory Service Connector) -Not